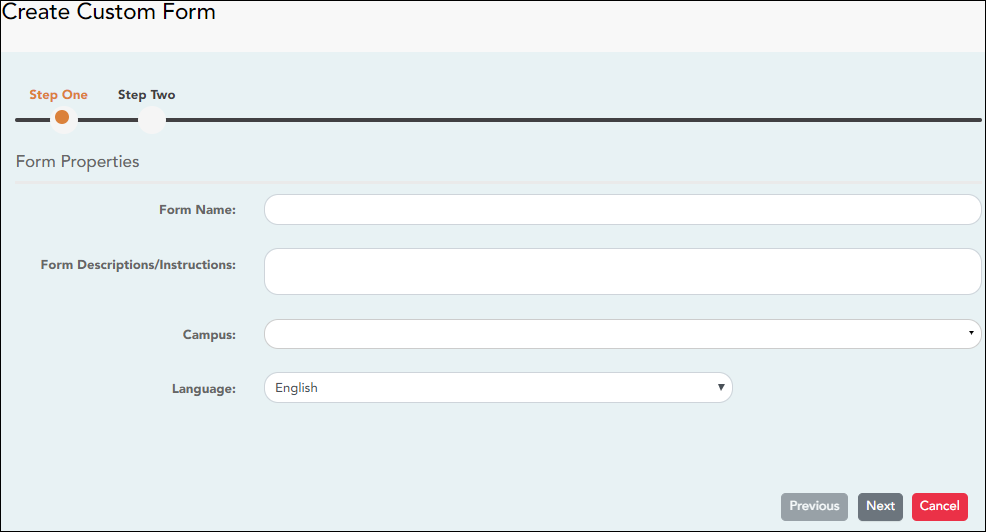
Step 1
If selecting English and Spanish for Language, the English version will be created first. To translate into a Spanish version, use Custom Forms > Edit Custom Forms.
Form Properties:
| Form Name | Type a name for the form, using up to 50 characters. For a Spanish form, provide the name in Spanish. |
|---|---|
| Form Descriptions/Instructions | Type any specific district-level instructions for the form, using up to 500 characters. For a Spanish form, provide the instructions in Spanish. |
| Campus | (Required) Select a campus in order to assign the form to a specific campus. Or, select All Campuses if the form is used for all campuses in the district. If you select All Campuses, each campus is listed, and you can remove individual campuses if needed.  NOTE: If you select All Campus by mistake, click Cancel All to clear all campuses at once. |
| Language | Select the language of the form. If you need the form in both English and Spanish (now or in the future), select English and Spanish. This creates a duplicate of the English form that can later be translated into Spanish on Custom Forms > Edit Custom Forms. WARNING: Once the language option is selected, it cannot be changed. |
❏ Click Next.
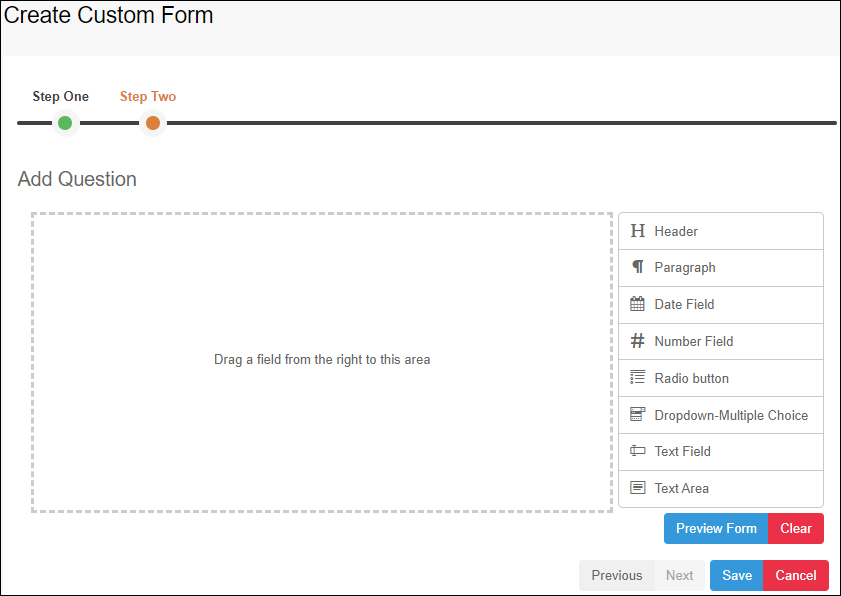
Step 2
Question Format Types:

❏ You can add a variety of elements to your form.
- Drag the element from the right to the blank area in the middle.
- You can drag and drop the elements to re-position them within the form.
- Click Preview Form any time to see how the form will look to parents.
The following two options allow you to provide headings and instructions on the form.
| Header | Select to add a heading, up to 50 characters. Example:  |
|---|---|
| Paragraph | Select to provide one or more sentences in the form, such as instructions, up to 1000 characters. Example:  |
The following question format types refer to the answer you are soliciting from the parent.
All question format types allow the following properties to be set:
NOTE: For Spanish forms, provide this information in Spanish.
TIP: Be sure to add questions to the custom form that help identify the student that the information is being gathered for (e.g., What is your student’s first name? What is your student’s last name? Grade Level? What school does your child attend? (multiple choice)). The form results do not automatically provide default information such as first name, last name, grade level, campus.
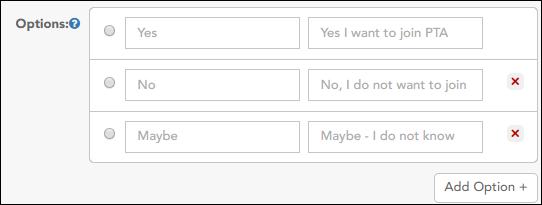
The following properties depend on the type of question format type selected:
NOTE: For Spanish forms, provide this information in Spanish.
❏ You can further adjust the form. Hover over each question in the form:
 - Click to remove the question from the form.
 - Click to view/modify the properties of the question.
Click Close to collapse (i.e., hide) the properties for a particular question.
❏ Click Clear if you need to remove all questions from the form and start over.
❏ Click Save.
❏ Click Previous if you need to return to Step 1 to modify form properties.
NOTE: A custom form must be added to either the Returning Student Registration or Student Data Maintenance group (under Form Group Management) to be visible to parents. Custom forms are not available for use in New Student Enrollment.


