ASCENDER - Set up and run the Bank Reconciliation Process
The purpose of this document is to guide you through the necessary steps to assist you in running the bank reconciliation process in the Bank Reconciliation application. The Bank Reconciliation application is used to retrieve transactions from Payroll and Finance to reconcile cash on the books to the bank balance.
This document allows you to complete the following Bank Reconciliation tasks:
- Set up bank reconciliation options.
- Set up bank tables.
- Review and update bank reconciliation layouts.
- Create transactions.
- Create a bank reconciliation.
- Reconcile items and finalize bank reconciliation.
- Print reports as needed.
This document assumes you are familiar with the basic features of the ASCENDER Business system and have reviewed the ASCENDER Business Overview guide.
Some of the images and/or examples provided in this document are for informational purposes only and may not completely represent your LEA’s process.
Set up Bank Reconciliation Options and Tables
- Select bank reconciliation options.
This page is used to set a bank reconciliation option, which is used on the Bank Reconciliation page.
Set option:
❏ Under Options:
Field Description All Computer Checks to Finance Clearing Fund Select to include computer checks in the bank account group that list the Finance Clearing Fund/Fiscal Year from the Finance > Tables > District Finance Options > Clearing Fund Maintenance tab.
Leave this field blank to filter computer checks by the bank account group. Cash receipts and district checks posted to funds other than the clearing fund are not affected by this option and are always filtered by the bank account group.❏ Click Save.
- Set up the bank account group table.
Set up the bank account group table
Bank Reconciliation > Tables > Bank Account Fund Groups > Bank Account Group
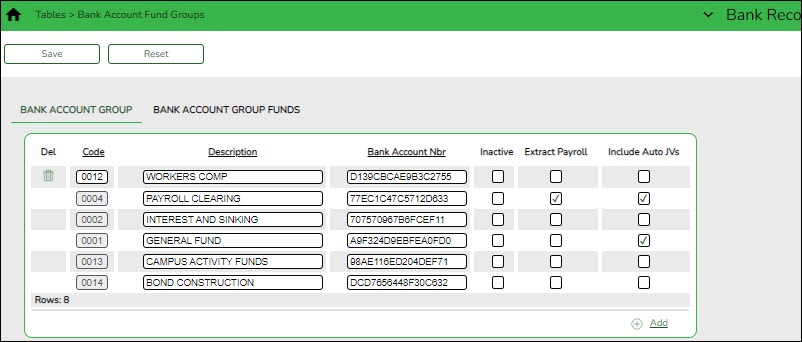
This tab is used to manage bank account group codes that are used for bank reconciliation, positive pay, and auto bank reconciliation. Each bank account group has fund codes and fund years associated with that group.
Use the Bank Reconciliation > Tables > Bank Account Fund Groups > Bank Account Group Funds tab to add the applicable funds to the fund groups.
Add a bank account group code:
❏ Click a column heading to sort the data in ascending or descending order.
❏ Click +Add to add a row.
Field Description Code Type the four-character code for the bank account group. Special characters are allowed. Description Type the bank account group description. The field can be a maximum of 30 characters. Special characters are allowed. Bank Account Nbr Type the account number for the bank account group. The field can be a maximum of 17 digits. The last four digits of the account number are displayed on the Positive Pay Check Export List report in Finance. Inactive Select to exclude the bank account group code from being displayed and used throughout the system. Extract Payroll Select to include payroll checks and deduction/transfer checks if paid from the payroll check stock in the bank account fund group. This field can only be selected for one bank account group. Include Auto JVs Select to include the automatically created journal vouchers from the payroll and vendor check processing. ❏ Click Save. The code is saved to the grid and is displayed in the Group Code drop-down field on the Bank Account Group Funds tab.
Other functions and features:
- Add the bank account group funds.
Add the bank account group funds
Bank Reconciliation > Tables > Bank Account Fund Groups > Bank Account Group Funds
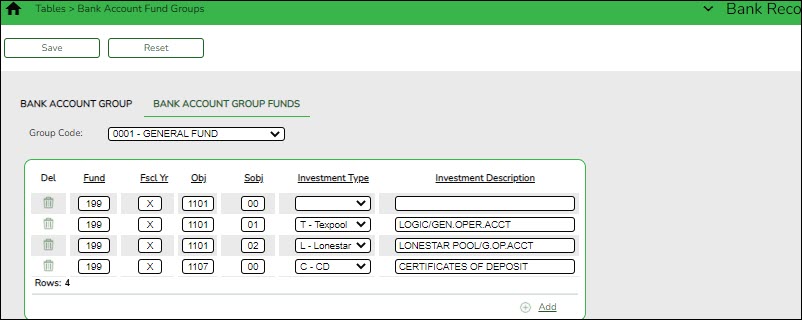
This tab is used to create multiple group funds for each bank account:
- For each of the individual funds created, you can have multiple investment and cash object/subobject combinations.
- You can change between bank groups and edit records. Funds cannot be duplicated.
- You cannot add the same fund, year, obj, and sobj in an active group if the same fund, year, obj, sobj exists in an inactive group. The fund, year, obj, and sobj combination must be unique for the selected bank account group.
Add a bank account group fund:
Field Description Group Code ❏ Click +Add to add a fund to the selected group code.
Fund Type the three-digit fund code. Fscl Yr Type the one-digit fiscal year. It is recommended to type X to mask the fiscal year. Obj Type the four-digit object code. Object codes in the 1100-1199 and 1800-1999 ranges are allowed. Sobj Type the two-digit subobject code. Investment Type Click  to select the investment type. This field is optional and affects the Finance Cash Position by Bank reports.
Note: Investment accounts are not extracted on the Bank Reconciliation > Maintenance > Bank Transactions > Create Transactions tab.
Investment Description Type the investment description. The field can be a maximum of 30 characters. ❏ Click Save.
Other functions and features:
Customize Your Bank Reconciliation Layout
- Define categories.
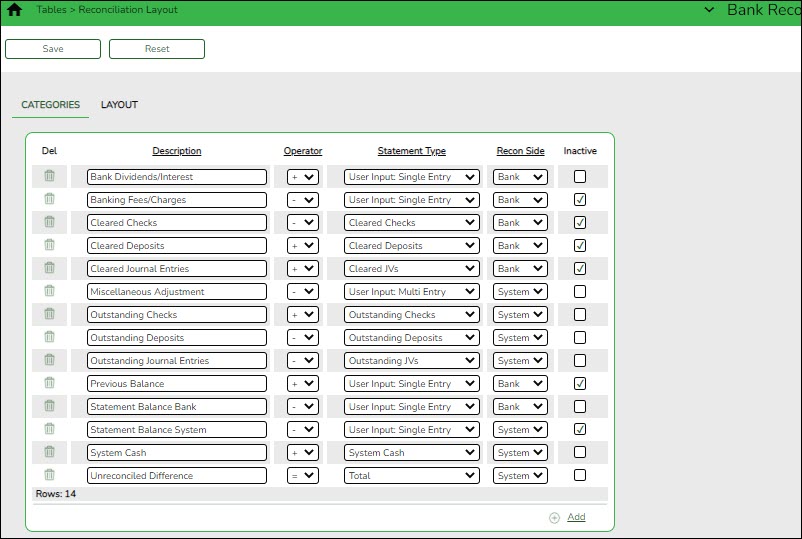
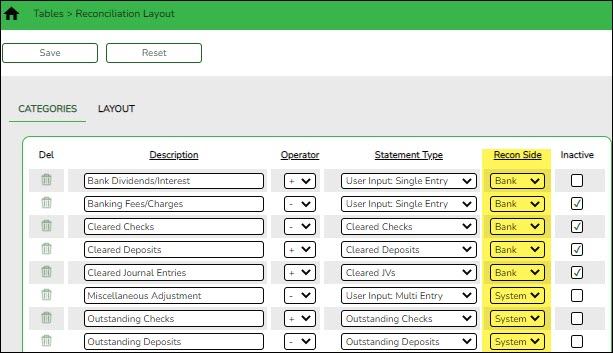
This tab is used to define the categories (fields) displayed on the Bank Reconciliation page. These categories are used in the reconciliation layout template, which is managed on the Layout tab.
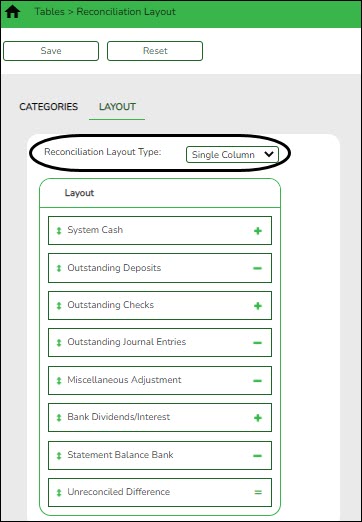
There are two layout type options:
- The Single Column layout consists of a single column of fields and operations.
- The Double Column layout consists of two columns of fields and operations; System and Bank.
- The Double Column layout is the default.
Add a category:
❏ Click +Add to add a row.
Field Description Description Type the 30-character category description to be displayed in the bank reconciliation layout. Operator Click
 to select the operation to be used for the category description. If the Statement Type field is set to Total, the Operator field must be set to = Equals.
You can select to use a single or double column layout on the Layout tab.If Double Column is selected, only one bank side category and one system side category can be set to = Equals.
If Single Column is selected, only one category (field) can be set to = Equals.Statement Type Default categories (statement types)
Description Statement Type Bank Dividends/Interest User Input Single Entry Banking Fees/Charges User Input Single Entry Cleared Checks Cleared Checks Cleared Deposits Cleared Deposits Cleared JVs Cleared JVs Miscellaneous Adjustment User Input Single Entry (It is recommended that this field is set up as a Multiple Entry field with a (+) operator.) Outstanding Checks Outstanding Checks Outstanding Deposits Outstanding Deposits Outstanding Journal Entries Outstanding JVs Previous Balance User Input Single Entry Statement Balance Bank User Input Single Entry Statement Balance System User Input Single Entry System Cash System Cash Unreconciled Difference Total The following statement types are calculated amounts:
Cleared Deposits - A total of cash receipts with the Recon checkbox selected is displayed.
Outstanding Deposits - A total of cash receipts without the Recon checkbox selected is displayed.
Cleared Checks - A total of checks with the Recon checkbox selected is displayed.
Outstanding Deposits - A total of checks without the Recon checkbox selected is displayed.
Cleared JVs - A total of JVs with the Recon checkbox selected is displayed.
Outstanding JVs - A total of JVs without the Recon checkbox selected is displayed.
System Cash - The general ledger balance of all cash object/subobject codes associated with the bank account group as of the selected accounting period is displayed.
Total - A total of all fields in the column is calculated and displayed at the end of the column.
User Input Single Entry - An enabled field is provided allowing you to type a single dollar amount.
User Input Multi Entry - If you click in the enabled field, a pop-up window is displayed allowing you to add multiple rows of descriptions and associated amounts, as needed. Positive and negative amounts are allowed.Recon Side Select the category reconciliation side (Bank or System). This field is only displayed if Double Column is selected and saved on the Layout tab. Inactive Select to exclude the category from the reconciliation layout. If selected, the category is not displayed on the Layout tab. ❏ Click Save.
Note: You can edit field names as needed. For example, the Bank Statement System field can be renamed to Bank Statement Balance.
Other functions and features:
- Organize the layout template.
Organize the layout template
Bank Reconciliation > Tables > Reconciliation Layout > Layout
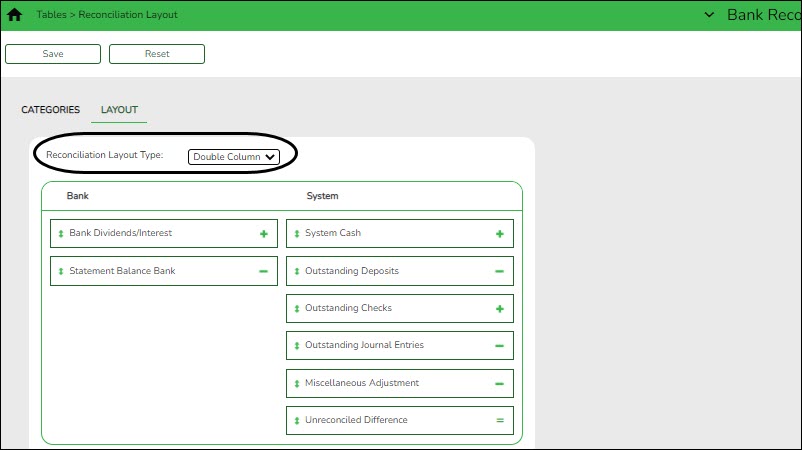
This tab is used to design the bank reconciliation layout template that displays the reconciliation summary information.
A list of the category descriptions with the operator type from the Categories tab is displayed. If Inactive is selected for any category on the Categories tab, the category description is not displayed on this tab.
Set the reconciliation layout:
Field Description Reconciliation Type
If Double Column is selected, the Bank and System columns are displayed.The category reconciliation side can be selected in the Recon Side field on the Categories tab, which is only displayed if Double Column is selected and saved on this tab.
If Single Column is selected, all active categories are displayed in a single column.
The drag and drop feature is available on this tab, which allows you to change the category order in a column. Hover over a category until the category box color turns a darker shade and the mouse pointer changes to four arrows, then hold down the left mouse button and drag and drop the category to the desired location within the same column (i.e., Bank or System).
❏ Click Save.
Other functions and features:
Reset Click to retrieve data from the last save. If you click Reset, any unsaved changes are lost.
Manage Transactions
TIP: You can use the Auto Bank Reconciliation page to import a bank file with bank transactions. The imported bank transactions are saved as pending on the Transaction Maintenance page.
- Create transactions.
Create transactions
Bank Reconciliation > Maintenance > Bank Transactions > Create Transactions
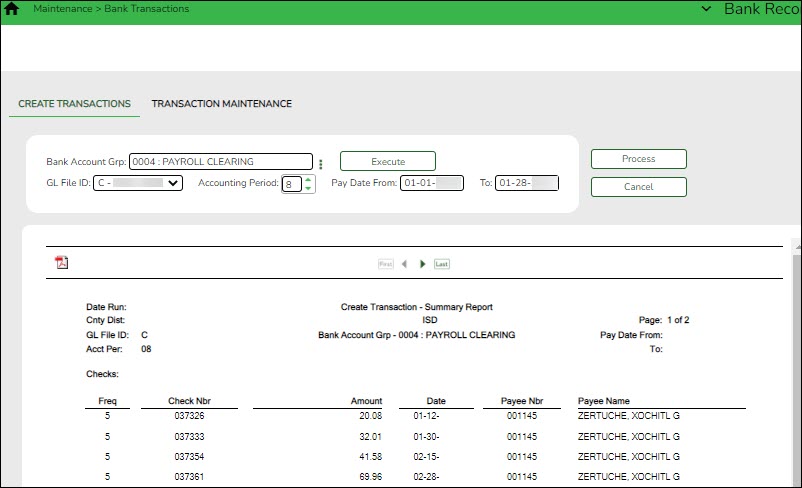
This tab is used to extract transactions from the Finance and Payroll tables for bank reconciliation.
Transactions are grouped and summarized as follows:
- Cash Receipts - Cash receipt number, date, and description
- Checks - Vendor number, check number, check date, check void flag (voids are extracted)
- Payroll Checks - Employee number, pay frequency, pay date, adjustment number (voids are extracted)
Note: The original and voided check transactions are extracted even if the two transactions have the same date.
- Journal Vouchers - JV number, JV description (the earliest date is extracted)
EFT payments are extracted as a JV with the following JV number (description for all is EFT Total):
- Vendor EFT: EFT-mmddyy where mmddyy is the month/day/year of the check date.
- Payroll EFT: PAY EFT-mmddyy where mmddyy is the month/day/year of the pay date.
Payroll transfer transactions are extracted as a JV. An additional extract for the same Bank Account Group, Accounting Period and/or Pay Date range does not create duplicate entries.
Note: Accounts with an Investment Type selected on the Bank Reconciliation > Tables > Bank Account Fund Groups > Bank Account Group Funds tab are not extracted.
Create transactions:
Field Description Bank Account Grp Type the bank account group code to be used. This field is required.
If the bank account group code is not known, click . The Bank Account Grp lookup is displayed.
To narrow the search for a bank account group code, type data in the Search field. A list of codes matching the search criteria is displayed.
Select a bank account group code from the list. Otherwise, click Cancel.GL File ID Click  to select a general ledger file ID. This field is required.
 Accounting Period Type the accounting period to be used. The leading zero is not required. Or, click  to select an accounting period. Only one accounting can be used at a time. If this field is not populated, Finance data is not retrieved.
Pay Date From and To Type or select from the calendar the from and to pay dates to be used to retrieve payroll data. If you do not need payroll data, leave these fields blank. You can enter the same to and from date to retrieve data for a single date. ❏ Click Execute to retrieve the applicable transactions based on the entered search criteria. All reports are displayed by the transaction category (Checks, Cash Receipts, and Journal Vouchers).
If there are errors, an error report is displayed. If no errors are encountered, the Error Report and Summary Report buttons are not displayed.You can toggle between the summary and the error report.
- Click the Summary Report button to view the Summary Report.
- Click the Error Report button to view the Error report.
❏ Click Process to import the transactions listed on the Summary Report to the Maintenance > Transaction Maintenance page. The Process button is disabled until valid transactions are retrieved.
❏ Click Cancel to cancel the process and clear the data on the tab.
- Perform transaction maintenance.
Perform transaction maintenance
Bank Reconciliation > Maintenance > Bank Transactions > Transaction Maintenance
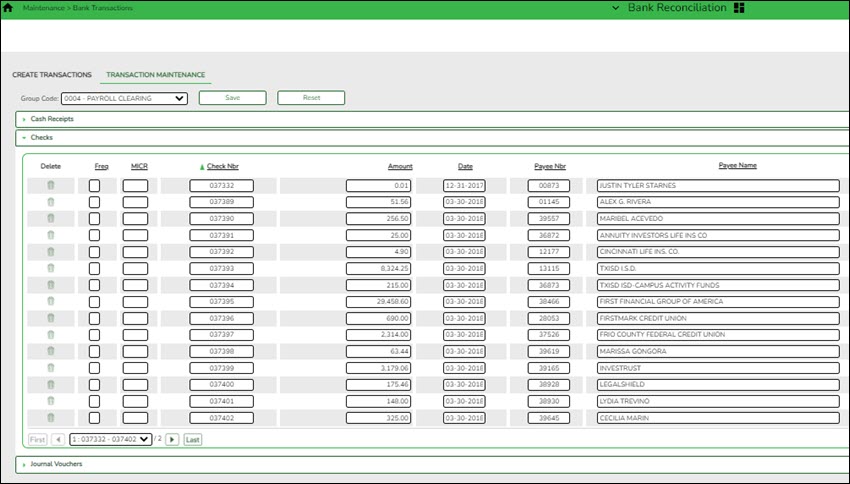
This tab is used to create, edit, and delete unreconciled data from the bank reconciliation transactions table.
Retrieve data:
Cash Receipts
The Cash Receipts section is expanded by default if cash receipts exist for the selected group code.
❏ Click Cash Receipts to collapse the section. The following cash receipt information is displayed and can be modified:
Receipt Nbr - cash receipt number
Amount - total cash receipt amount
Date - cash receipt date
Description - cash receipt description
By default, the results are sorted in ascending order by cash receipt number. Click a column heading to sort the data in ascending or descending order. - indicates that the column is sorted in ascending order
 - indicates that the column is sorted in descending order
Checks
❏ Click Checks to expand the section and view the checks associated with the selected group code. Click Checks again to collapse the section.The following check information is displayed and can be modified:
Freq - payroll frequency (if applicable)
Micr - check number correction
Check Nbr - check number from Finance or Payroll
Amount - total check amount
Date - check date
Payee Nbr - vendor number or employee number
Payee Name - vendor name or employee name
By default, the results are sorted in ascending order by check number. Click a column heading to sort the data in ascending or descending order.
 - indicates that the column is sorted in ascending order
 - indicates that the column is sorted in descending order
Journal Vouchers
❏ Click Journal Vouchers to expand the section and view the journal vouchers associated with the selected group code. Click Journal Vouchers again to collapse the section. The following journal voucher information is displayed and can be modified:
Freq - payroll frequency (if applicable)
JV Nbr - journal voucher number
Amount - total JV amount
Date - JV date (earliest date if multiple dates exist)
Description - JV number description
By default, the results are sorted in ascending order by the journal voucher number. Click a column heading to sort the data in ascending or descending order.
 - indicates that the column is sorted in ascending order
 - indicates that the column is sorted in descending order
❏ Click Save. After the transaction maintenance is completed, the transactions can be reconciled.
Reconcile Transactions
- Reconcile bank transactions.
Reconcile bank transactions
Bank Reconciliation > Maintenance > Bank Reconciliation
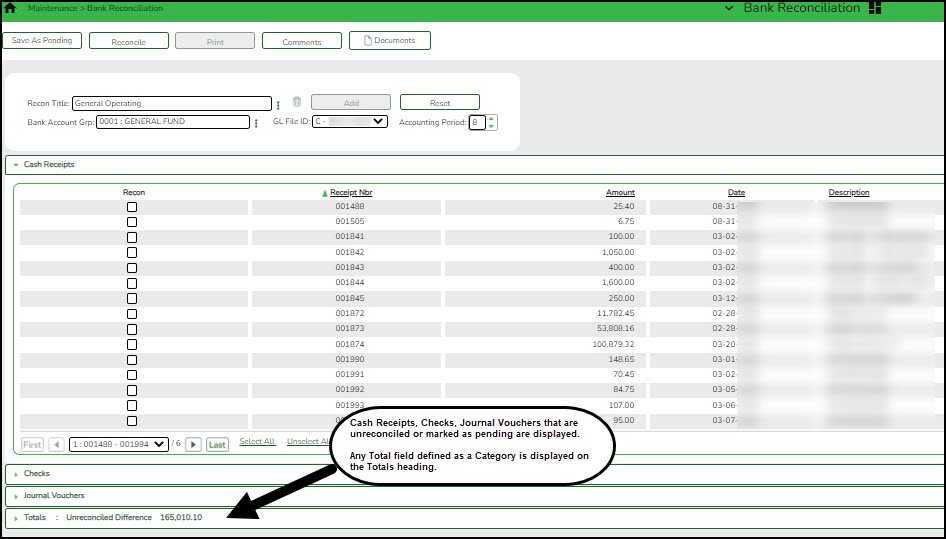
This page is used to reconcile unreconciled bank transactions from the bank reconciliation transaction table. Review the Categories tab for more information on the Totals section layout.
Retrieve a reconciliation record:
Recon Title Type a bank reconciliation title or press the SPACEBAR to select from a list of unreconciled records.
Reconciled records are not displayed in the drop down, and can only be selected from the reconciliation directory.
Click to select an existing reconciliation record from the Reconciliation Search.
This field is required.The transactions associated with the selected bank account group are displayed under the respective drop-down sections (Cash Receipts, Checks, Journal Vouchers).
- If the reconciliation record is in a pending status, the layout in the Totals section remains as it was saved even if the layout changed on the Tables > Reconciliation Layout page. The corresponding unreconciled transactions are retrieved, recalculated, and saved.
- If the reconciliation record is reconciled:
- The layout for the Totals section is retrieved and the totals are not recalculated.
- The Recon Title, Bank Account Grp, GL File ID, and Accounting Period fields are disabled.
- The Add, Save As Pending, and Reconcile buttons are disabled.
- You can print the Reconciled Report.
- You can view and add comments.
Add a bank reconciliation record:
Field Description Recon Title Type a bank reconciliation title. This field is required. Bank Account Grp Type a bank account group for which you want to reconcile transactions. This field is required.
If the bank account group code is not known, click . The Bank Account Grp lookup is displayed. To narrow the search for a bank account group code, type data in the Search field. A list of codes matching the search criteria is displayed.
Select a bank account group code from the list. Otherwise, click Cancel.
Note: Only one pending reconciliation is allowed per bank account at a time.
GL File ID Click  to select a general ledger file ID. This field is optional when adding a reconciliation record; however, it is required when processing a reconciliation record.
 Accounting Period Type the accounting period to be used. The leading zero is not required. Or, click  to select an accounting period.
Only one accounting period can be reconciled at a time.
If this field is not populated, Finance data is not retrieved.
This field is optional when adding a reconciliation record; however, it is required when processing a reconciliation record.❏ Click Add. An add successful message is displayed.
- The reconciliation record is available in the Reconciliation Search directory.
- The Add button is disabled.
- The order, layout, and statement types are retrieved from the Tables > Reconciliation Layout.
- A list of unreconciled (i.e. status is not R) transactions that correspond to the selected Bank Account Grp is displayed.
- Totals are calculated and saved with the reconciliation Totals.
The transactions associated with the selected bank account group are displayed under the respective drop-down sections (Cash Receipts, Checks, Journal Vouchers).
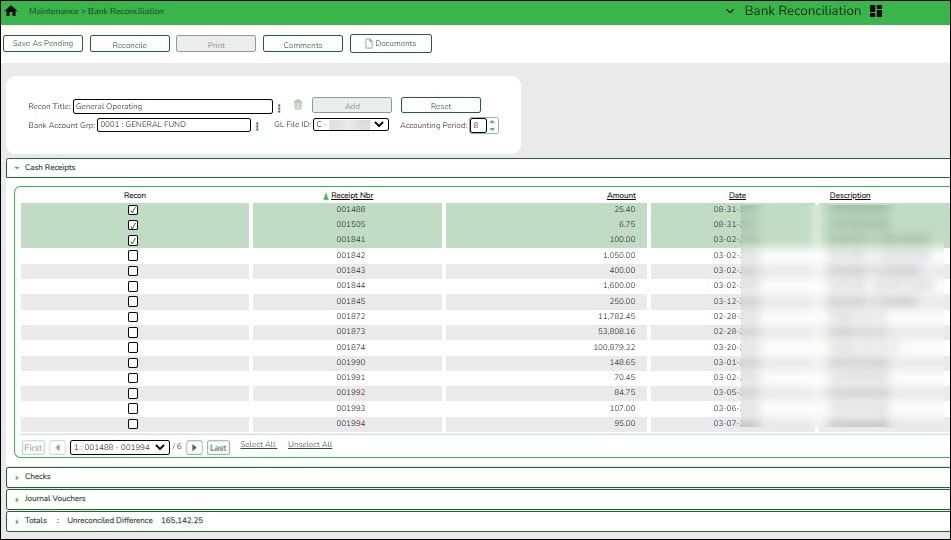
❏ Select the Recon check box for the transactions that you want to reconcile.Cash Receipts
The Cash Receipts section is expanded by default. Click Cash Receipts to collapse the section.
❏ Select the Recon check box for the transactions that you want to reconcile.❏ Click Select All to select all of the transactions in the section or click Unselect all to clear all of the selected transactions.
The following cash receipt information is displayed:Receipt Nbr
Amount
Date
Description
By default, the results are sorted in ascending order by cash receipt number. Click a column heading to sort the data in ascending or descending order.
 - indicates that the column is sorted in ascending order
 - indicates that the column is sorted in descending order
Checks
❏ Click Checks to expand the section and view the checks associated with the selected group code. Click Checks to collapse the section.
❏ Select the Recon check box for the transactions that you want to reconcile.❏ Click Select All to select all of the transactions in the section or click Unselect all to clear all of the selected transactions.
The following check information is displayed:Freq
Micr
Check Nbr
Amount
Date
Payee Nbr
Payee Name
By default, the results are sorted in ascending order by check number. Click a column heading to sort the data in ascending or descending order.
 - indicates that the column is sorted in ascending order
 - indicates that the column is sorted in descending order
Journal Vouchers
❏ Click Journal Vouchers to expand the section and view the journal voucher associated with the selected group code. Click Journal Vouchers to collapse the section.
❏ Select the Recon check box for the transactions that you want to reconcile.❏ Click Select All to select all of the transactions in the section or click Unselect all to clear all of the selected transactions.
The following journal voucher information is displayed:Freq
JV Nbr
Amount
Date
Description
By default, the results are sorted in ascending order by check number. Click a column heading to sort the data in ascending or descending order.
 - indicates that the column is sorted in ascending order
 - indicates that the column is sorted in descending order
Totals
❏ Click Totals to display the bank reconciliation total fields as defined on the Categories tab. Based on the Categories tab, some of the fields are automatically calculated and cannot be edited.
The totals are updated as transactions are selected or cleared. The Unreconciled Difference amount is displayed on the Totals header only if the Totals section is collapsed. This allows you to view the updated unreconciled difference amount as transactions are selected and cleared.
If the Totals section is expanded, the unreconciled difference amount is not displayed on the header.
If the Statement Type for a category is set to User Input: Multi Entry on the Tables > Reconciliation Layout > Categories tab, click in the category field to open a multi-entry pop-up window allowing you to add user-defined rows of descriptions and amounts to be included in the total calculations.- In the Description field, type a user-defined description for the entry.
- In the Amount field, type a dollar amount for the entry.
- Click +Add to add a row. Or, a new row is added when you type a description in an existing row and press TAB.
❏ Click OK. The multi-entry pop-up window closes, and the entered amounts are totaled and displayed in the corresponding category field.
❏ Click Cancel to close the pop-up window without adding additional entries.
❏ Click to delete a row.
❏ Click Save As Pending. The Totals are recalculated to include the multi-entry amounts.
❏ If the Statement Type for a category is set to User Input: Single Entry on the Tables > Reconciliation Layout > Categories tab, type the amount in the field.
Total calculations:
Cleared Deposits - Total of cash receipts with the Recon checkbox selected.
Cleared Checks - Total of cash receipts with the Recon checkbox selected.
Cleared JVs - Total of JVs with the Recon checkbox selected.
Banking Fees/Charges - Type the fees/charges from the bank statement.
Previous Balance - Type the beginning/previous balance from the bank statement.
Statement Balance - Type the ending balance from the bank statement.
Bank Dividends/Interest - Type the dividend/interest from the bank statement.
System Cash - The general ledger balance of all cash object/subobject codes associated with the bank account group is displayed.
Outstanding Deposits - Total of cash receipts without the Recon checkbox selected.
Outstanding Checks - Total of checks without the Recon checkbox selected.
Outstanding JVs - Total of JVs without the Recon checkbox selected.
Statement Balance - The ending balance from the bank statement that you entered under the Bank Statement column is displayed.
Miscellaneous Adjustment - Type the additional entries that have not been posted yet.
Unreconciled Difference - The calculated value based on the following formula is displayed: Unreconciled Difference = System Cash + Outstanding Deposits + Outstanding Checks - Statement Balance - Miscellaneous Adjustment
❏ Click System Cash to refresh the system cash totals.Note: You have the option to save your work as pending or finalize the reconciliation process.
After the applicable transactions are selected and the totals are reviewed:
❏ Click Save as Pending to save all of the selected transactions and totals as pending. You can retrieve the reconciliation record at a later time to resume the reconciliation process.OR
❏ Click Reconcile to begin finalizing the reconciliation process for the selected transactions. The totals and transactions are saved as pending, and a preview report is displayed.
Review the report.
❏ Click Process to continue the reconciliation process. The Reconciliation Report is displayed with a list of the transaction statuses and totals.
Review the report.
❏ Click Cancel to return to the Bank Reconciliation page.
Other functions and features:
Reset Click to clear the data on the page. Comments Print Click to print data.
If the reconciliation record is in a pending status, the Pending Reconciliation Report is displayed.
If the reconciliation record is in a reconciled status, the Reconciliation Report is displayed.
Review the report.
Click to delete the selected reconciliation. A message is displayed prompting you to delete the reconciliation record.
Click OK to delete the record. A message is displayed indicating that the record was deleted successfully.
Click Cancel to return to the Bank Reconciliation page without deleting the record.
After a bank reconciliation is saved, the delete option is no longer available. If a bank reconciliation is saved but needs to be deleted, you must mass delete the transactions prior to deleting the reconciliation.Errors Documents View or attach supporting documentation.
Other Bank Reconciliation Tasks
- Process an auto bank reconciliation.
This tab is used to import a bank file with bank transactions. Once the bank transactions are imported, they are saved as pending.
Import bank transactions for auto bank reconciliation:
Field Description Bank Account Grp Type the bank account group code(s) to be used. If the bank account group code is not known, click  . The Bank Account Grp lookup is displayed. This field is required.
 Import Path Click Browse. The File name pop-up window opens.
Select a file and click Open. The pop-up window closes and the file name is displayed in the Import Path field.
Click Cancel to close the pop-up window without selecting a file.❏ Click Execute to execute the process. If errors are encountered, an error report is displayed.
You can toggle between the summary and the error report.
- Click the Summary Report button to view the Summary Report.
- Click the Error Report button to view the Error report.
If no errors are encountered, the Error Report and Summary Report buttons are not displayed.
❏ Click Process to import the transactions listed on the Summary Report to the Maintenance > Bank Reconciliation page. The Process button is only displayed if there are valid transactions to be imported.
- The bank account numbers in the file are verified with the account numbers for the selected bank account groups.
- The check numbers are first verified with MICR numbers, and then with the check numbers for the selected bank account group and account number. In addition, the check amounts in the file are verified with the check amounts in the system.
❏ Click Cancel to cancel the process and return to the Auto Bank Reconciliation page. - Perform an inquiry.
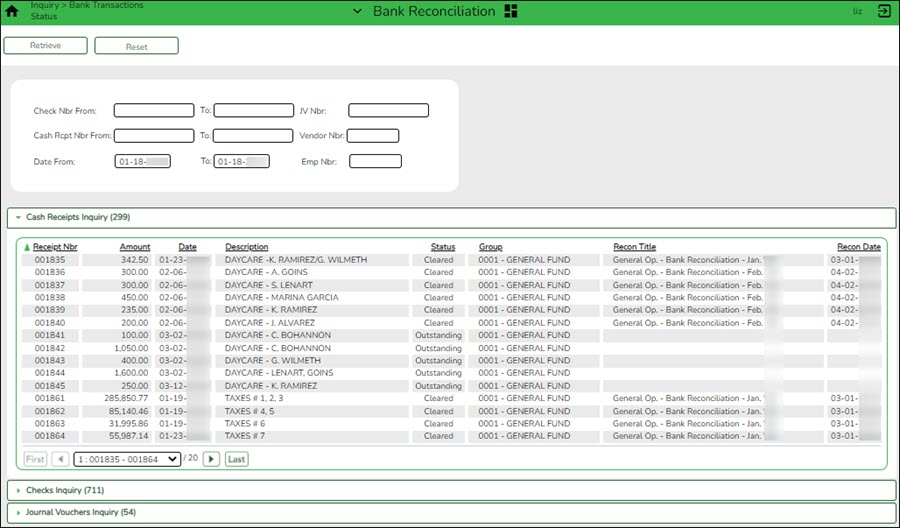
This page is used to perform a status inquiry on cash receipts, checks, and journal vouchers.
Perform an inquiry:
❏ Retrieve bank transactions using one or more of the following search parameters:
Notes:
- At least one search parameter must be entered.
- If a to number is not entered, transactions beginning with the from number through the last available number are retrieved.
- If a to date is not entered, transactions beginning with the from date through the current date are retrieved.
Field Description Check Nbr From and To Type a beginning and ending check number range Cash Rcpt Nbr From and To Type a beginning and ending cash receipt number range. Date From and To Type a beginning and ending date range for which to retrieve cash receipts, checks, and journal vouchers. Or, select a date from the calendar. JV Nbr Type a journal voucher number. Vendor Nbr Type a vendor number for which to retrieve check transactions. Employee Nbr Type an employee number. ❏ Click Retrieve. The applicable bank transactions are displayed under the respective section.
The number of transactions listed in each section is displayed next to the section heading (e.g., Cash Receipts Inquiry (50)).
The section is expanded based on the entered search parameter(s). For example, if only the Check Nbr search parameter is used, then the Checks Inquiry section is automatically expanded with a list of the applicable check transactions.
Cash Receipts Inquiry
❏ The Cash Receipts Inquiry section is expanded by default if cash receipts are retrieved. Click Cash Receipts Inquiry to collapse the section. The following cash receipt information is displayed:
Receipt Nbr
Amount
Date
Description
Vendor name
Status
Group
Recon Title
Recon Date
By default, the results are sorted in ascending order by cash receipt number. Click a column heading to sort the data in ascending or descending order.
 - indicates that the column is sorted in ascending order
 - indicates that the column is sorted in descending order
Checks Inquiry
❏ Click Checks Inquiry to expand the section and view the check transaction details. Click Checks Inquiry to collapse the section. The following check information is displayed:
Freq
MICR - only displays when the check has been reconciled.
Check Nbr
Amount
Date
Payee Nbr
Payee Name
Status
Group
Recon Title
Recon Date
By default, the results are sorted in ascending order by check number. Click a column heading to sort the data in ascending or descending order.
 - indicates that the column is sorted in ascending order
 - indicates that the column is sorted in descending order
Journal Vouchers Inquiry
❏ Click Journal Vouchers to expand the section and view the journal voucher details. Click Journal Vouchers to collapse the section. The following journal voucher information is displayed:
Freq
JV Nbr
Amount
Date
Description
Status
Group
Recon Title
Recon Date
By default, the results are sorted in ascending order by check number. Click a column heading to sort the data in ascending or descending order.
 - indicates that the column is sorted in ascending order
 - indicates that the column is sorted in descending order
Other functions and features:
Retrieve Click to retrieve data.
Reset Click to clear the data on the page. Errors - Mass delete transactions.
This page is used to mass delete cleared and outstanding transactions.
Perform a mass delete:
Field Description Bank Account Grp Type the bank account group code to be used. If the bank account group code is not known, click  . The Bank Account Grp lookup is displayed. This field is required.
 Date From Type the beginning date from which you want to delete transactions. Date To Type the ending date to which you want to delete transactions. Cleared Only Select to only delete cleared (reconciled) transactions during the indicated date range. Outstanding Only Selected by default. If selected, this field deletes outstanding (unreconciled/pending) transactions during the indicated date range. Both Select to delete both cleared (reconciled) and outstanding (unreconciled/pending) transactions during the indicated date range. ❏ Click Execute. The Delete Transactions - Summary Report is displayed.
❏ Click Process to continue the mass delete process.
❏ Click Cancel to cancel the process and return to the Mass Delete Transactions page.
Bank Reconciliation Reports
- BBR0100 - Bank Account Fund Groups
Bank Reconciliation > Reports > Bank Account Fund Groups
This report provides a list of group codes, bank account numbers, and associated funds based on the selected parameter.
Parameter Description Bank Account Group(G), Funds(F), or blank for ALL G - Include bank account group data from the Tables > Bank Account Fund Groups > Bank Account Group tab.
F - Include bank account group fund data from the Tables > Bank Account Fund Groups > Bank Account Group Funds tab. Only group codes from the Group Code drop down with associated funds are displayed.
Blank - Include both bank account group and fund data.❏ Click Export PDF to export the report in PDF format.
❏ Click Export CSV to export the report in CSV format.
❏ Click Clear Options to clear the report parameter data.
- BBR0200 - Bank Transactions
Bank Reconciliation > Reports > Bank Transactions
This report is used to review all of the items that were reconciled within a particular bank account. It provides a list of bank account group codes and associated bank transactions (cash receipts, checks, and journal vouchers). If you need a detailed report for a particular fund and month, refer to the actual Bank Reconciliation and locate the reconciled account to see if the account was Reconciled or Unreconciled.
Parameter Description Bank Account Group Type the bank account group code to be used. If the bank account group code is not known, click  . The Bank Account Grp lookup is displayed.
❏ Click Export PDF to export the report in PDF format.
❏ Click Export CSV to export the report in CSV format.
❏ Click Clear Options to clear the report parameter data.




Click to add comments to the reconciliation record. A comments pop-up window opens.
Type your comments and click Save. Otherwise, click Cancel to return to the Bank Reconciliation page.
A paperclip icon is displayed on the Comments button if comments exist.