Admin - Form Field Management
ASCENDER ParentPortal Admin > Form Management > Form Field Management
This page is only available to users who log on to ASCENDER ParentPortal with a district- or campus-level security administrator user name.
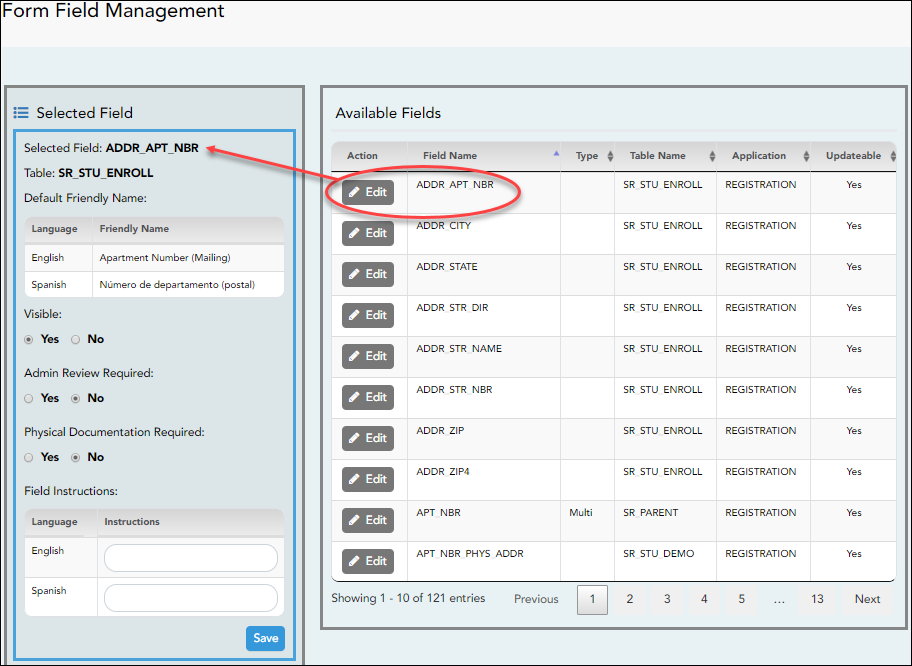
This page allows you to set options for the fields that will be used for New Student Enrollment, Returning Student Registration, and Student Data Maintenance forms. Examples of fields are first name, last name, middle name, and birth date.
The list of Available Fields is added automatically. For each field, you indicate if the field is visible and add any instructions. By default, all fields are visible and no action is required; however you can hide a field globally and/or add default instructions as needed.
Some districts allow you to select document storage (DOCSTOR_) fields which allow parents to upload supporting registration forms (immunization record, birth certificate, etc.).
NOTE: On this page you will set options for the fields. You will add the fields to a form in a subsequent step.
❏ Under Available Fields (right):
A list of all available fields is displayed.
The list includes the database field name, database table name, and the application with which the field is associated (such as Registration).
| Type | This field indicates if the field is from a vertical table. • blank = a single record for the student, such as a birth date (i.e., not a vertical table). • Multi = multiple records for the student, such as multiple contact records. For example, the demo contact table has a sequence identifier for each person entered. • sequence number = a hard-coded sequence resulting in a static number of multiple-records. If there are two contacts entered, they would have sequence numbers of 01 and 02. |
|---|---|
| Updateable | This field indicates if the data in the field can be updated by a parent. This is set automatically and cannot be changed. |
❏ Click Edit to edit settings for a particular field.
The Selected Field section is displayed on the left side of the page.
❏ Under Selected Field (left), modify information for the selected field as needed.
| Selected Field | The database name for the selected field is displayed. For a field in a vertical table, an asterisk or a sequence number is displayed in parentheses next to the field name. |
|---|---|
| Table | The database name for the table in which the selected field exists is displayed. |
| Default Friendly Name | A friendly name for the selected field is displayed as it will appear on the form in both English and Spanish. For example, if the database field name is DOB, the friendly name might be Date of Birth (English) and Fecha de nacimiento (Spanish). The friendly name is set automatically and cannot be changed from this page; however, you can modify the friendly name when you add it to a form in a subsequent step. Language Friendly Name: Friendly field names are automatically provided for both languages. |
| Visible | Yes - Allow the field to be displayed for the parent on a form in ParentPortal. No - The field will not be displayed on any forms for parents to see. If No, this setting overrides all other visibility settings. |
| Admin Review Required | This field is not in use at this time. Whether you select Yes or No, all changes submitted by a parent must be reviewed by an administrator before they can be reviewed. |
| Physical Documentation Required | This field is not in use at this time. |
| Field Instructions | Type any special instructions for the parent that are specific to the field, up to 255 characters. Language: Instructions: Any instructions should be provided in both English and Spanish. NOTE: If Spanish instructions are not provided, English instructions will be displayed even if the parent is viewing ParentPortal in Spanish. |
❏ Click Save.
❏ Repeat for each field that will be used in a form.
