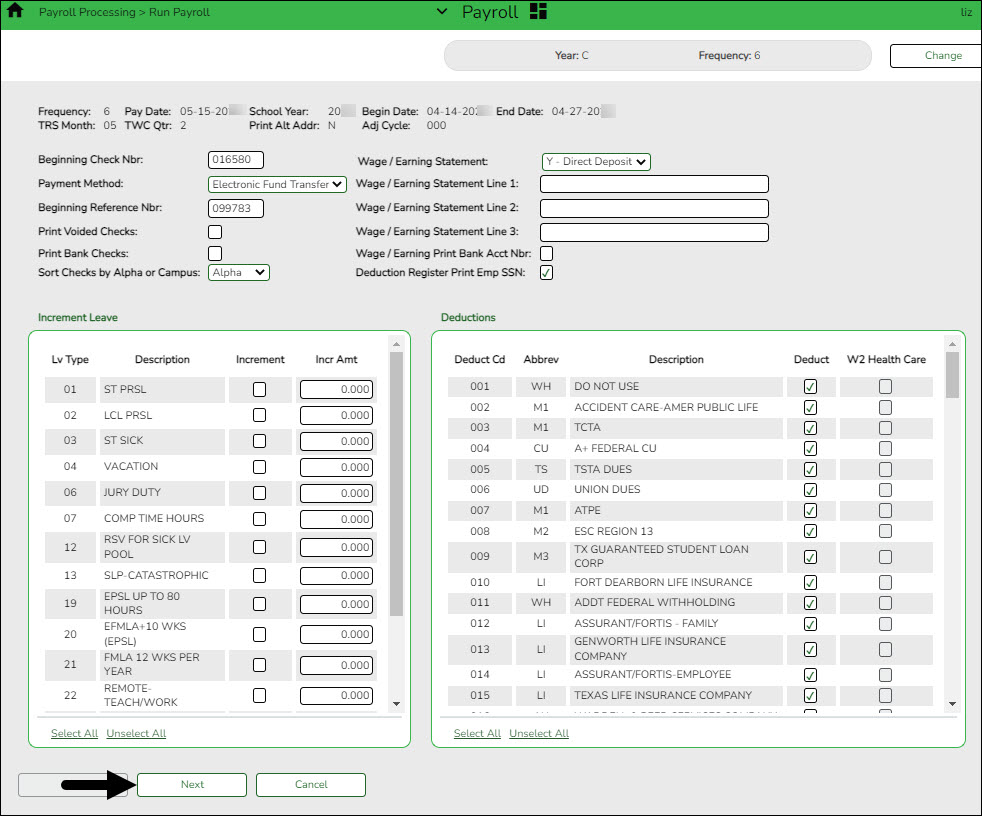
The payroll information is populated.
❏ Complete the following fields:
❏ Under Increment Leave, a list of all available leave types for the pay period is displayed.
Note: Inactive leave types are excluded from the Increment Leave section. Payroll calculations are processed and leave transmittals are posted even if a leave type or absence reason is inactive.
| Increment | Select to increment a leave type. If not selected, the leave is not incremented. Click Select All to increment all of the leave types. |
|---|---|
| Incr Amt | Type the amount to increment for each leave type. |
❏ Under Deductions:
- Select the deductions to include in the payroll process by selecting the Deduct field for the corresponding deduction code.
- Click Select All to include all of the deductions in the payroll process.
Notes:
- If a new deduction code is added to the deduction code table, Deduct is selected automatically. If you do not want the new deduction included in the payroll process, you must manually clear the Deduct field for the new deduction code.
- If Deduct is not selected and deduction transmittals exist on the Payroll > Maintenance > Hours/Pay Transmittals page, then deductions are not processed.
❏ Click Next to continue to the Staff Selection page. Otherwise, click Cancel to exit the run payroll process.
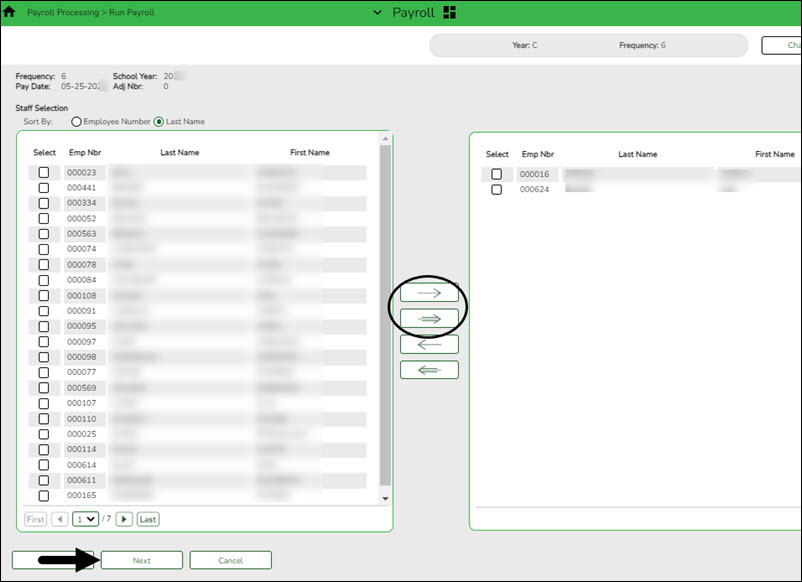
❏ Under Sort by, select one of the following:
- Select the Employee Number field to sort by employee number.
- Select the Last Name field to sort by the last name. The system default is to sort by the last name.
All employees are displayed on the left side of the page.
❏ Select the employees to include in the payroll.
- Select an individual employee number to select only one employee.
- To select multiple rows when the employee numbers are consecutive (e.g., 000001-000025), select an employee number to start at and then press and hold SHIFT while selecting an employee number to end the selection process. All employee numbers (between the first and last items) in the sequence are now selected.
- To select multiple rows when the employee numbers are not consecutive (e.g., 000025, 000185, 000221), select an employee number, and then select other individual employee numbers from different parts of the listing.
- The system displays all available employees to include in payroll on the left side of the page. Use the following buttons to select which employees to move to the right side of the page:
❏ Click Next to continue the Calculations page. The calculation process computes net pay amounts for all employees using salaries, taxes, deductions, supplemental pay, and transmittals. Otherwise, click Back to go back to the previous page or click Cancel to exit the run payroll process.
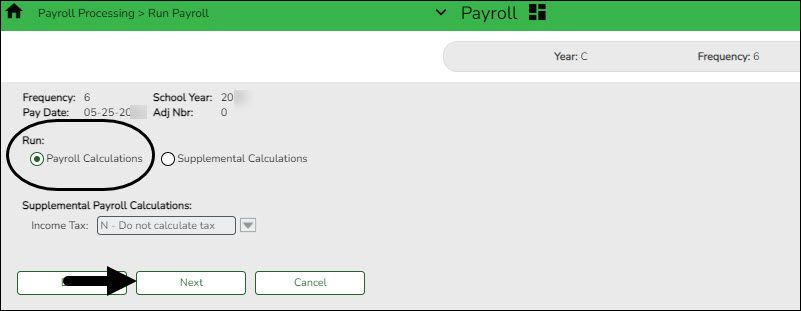
❏ Under Run, select one of the following:
- Select Payroll Calculations to run the payroll calculation for this payroll.
- Select Supplemental Calculations to calculate only the supplemental transmittals that have been created on the Extra Duty, Deduction Refunds, and Non-TRS tabs in Hours/Pay Transmittals under the Maintenance menu. Only transmittals that exist in the Extra Duty, Deduction Refunds, and Non-TRS tabs are processed with this selection.
When Supplemental Calculations is selected, the fields under Supplemental Payroll Calculations are enabled allowing you to select the supplemental payroll parameters to include in the payroll.
❏ Click Next to continue to the Payroll Processing page. Otherwise, click Back to go back to the previous page or click Cancel to exit the run payroll process.
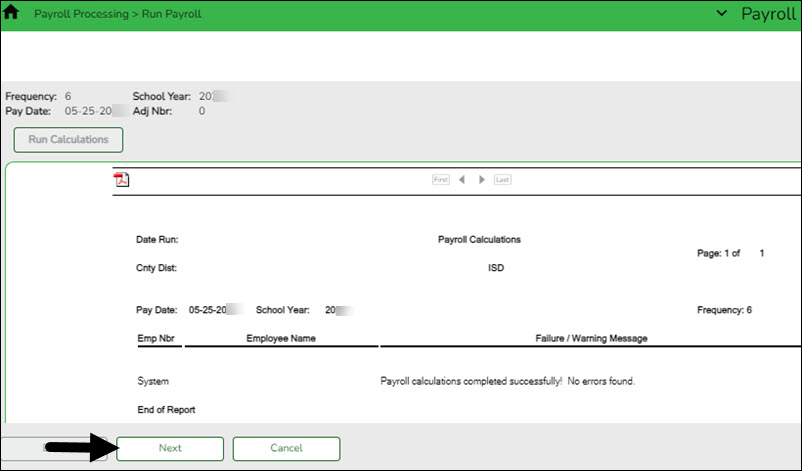
❏ Click Run Calculations. A message is displayed asking you to confirm that you want to continue and payroll details are provided.
- Click Yes to continue. The temporary tables will be cleared of the previous records for the pay date, and the payroll will be calculated based on the current user's selections. Otherwise, click No to cancel the process. No temporary tables will be deleted, and the current user can cancel out of the payroll calculations process. An error message will display on the Payroll Calculations Error report.
Notes:
- Failure and warning messages are displayed by employee number.
- If a failure message is received, the employee does not have a paycheck calculated.
- If a warning message is received, the amount calculated for the employee may or may not be correct based on the type of warning received.
❏ Be sure to print the failure and warning messages before clicking Next as these messages are no longer available after you click Next. If there are no errors that affect payroll processing, click Next. Otherwise, click Back to go back to the previous page, or in the event of a substantial error, click Cancel to exit the run payroll process and correct the problem.
The Payroll Calculations report is displayed. Review the report.
After running the payroll calculations, verify the results on the Calculation Reports page before continuing with the payroll process. Errors must be corrected before continuing. Once corrections are made, run payroll calculations again to ensure that corrections were completed. If errors are found and corrections made, click Cancel to exit the run payroll process and start the run payroll process again.
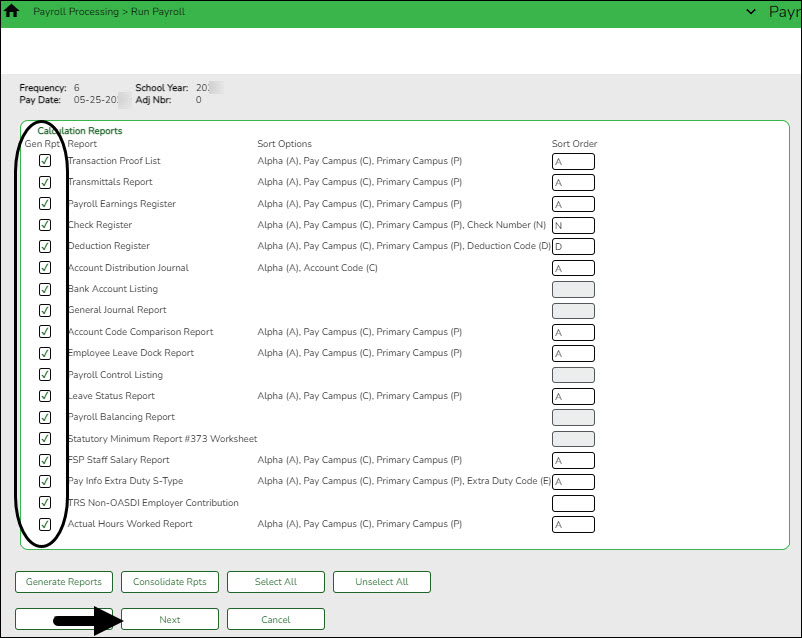
❏ Under Calculation Reports:
- Select and generate all pre-post reports and review as needed.
- Compare current payroll data to prior month's payroll data to identify discrepancies. Reference the Helpful Templates & Worksheets section of the Process Payroll guide for additional resources.
❏ Select the Gen Rpt checkbox next to each report you want to generate or click Select ALL to select all reports. Review and print the reports as needed.
❏ For each report, under Sort Order, type the one-character letter that represents the sort option to be applied. Available sort options are listed under Sort Options. If the field is blank, no sort options are available.
❏ Click Generate Reports. The system displays the first report selected. Click Cancel to display the next selected report. Verify the totals of each report. When you are done viewing all of the selected reports, you are returned to the Calculation Reports page.
❏ Click Consolidate Rpts to generate all selected reports as one PDF file.

