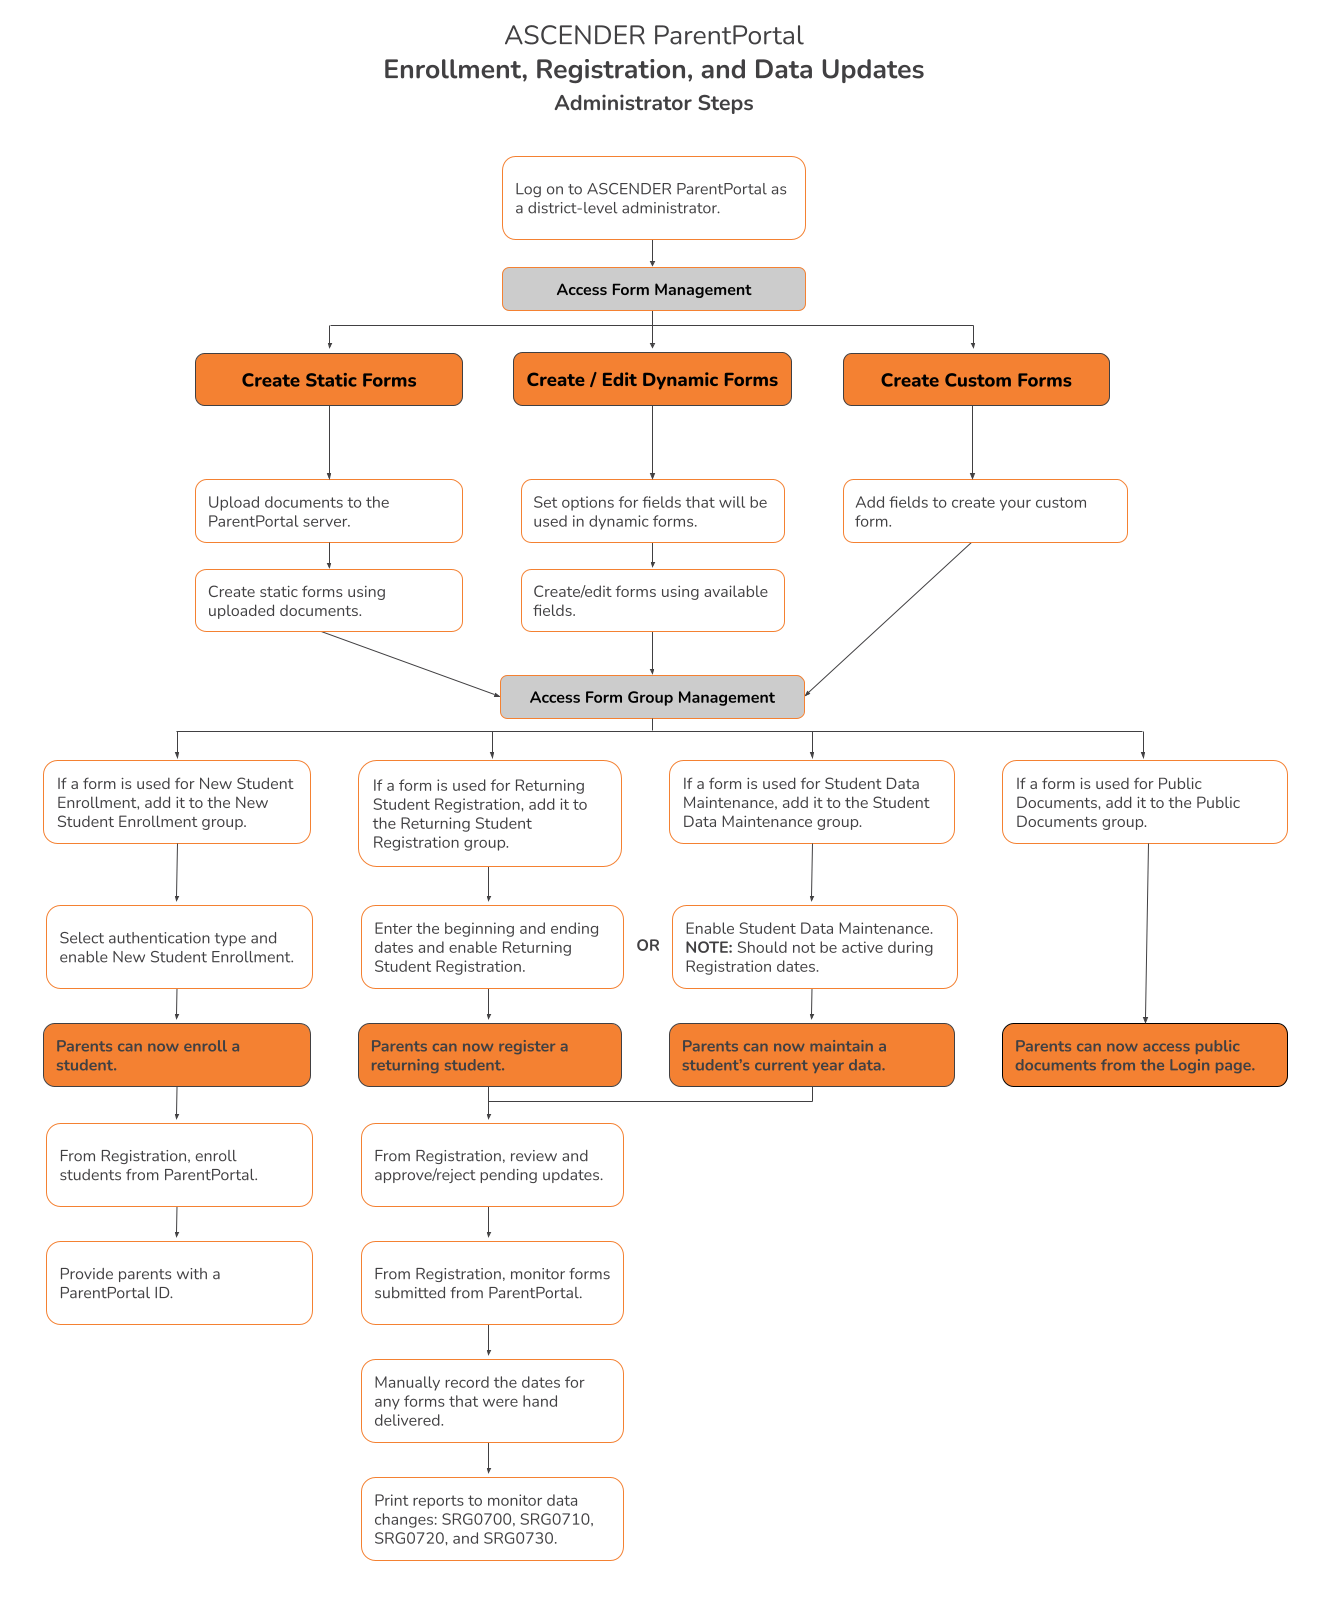
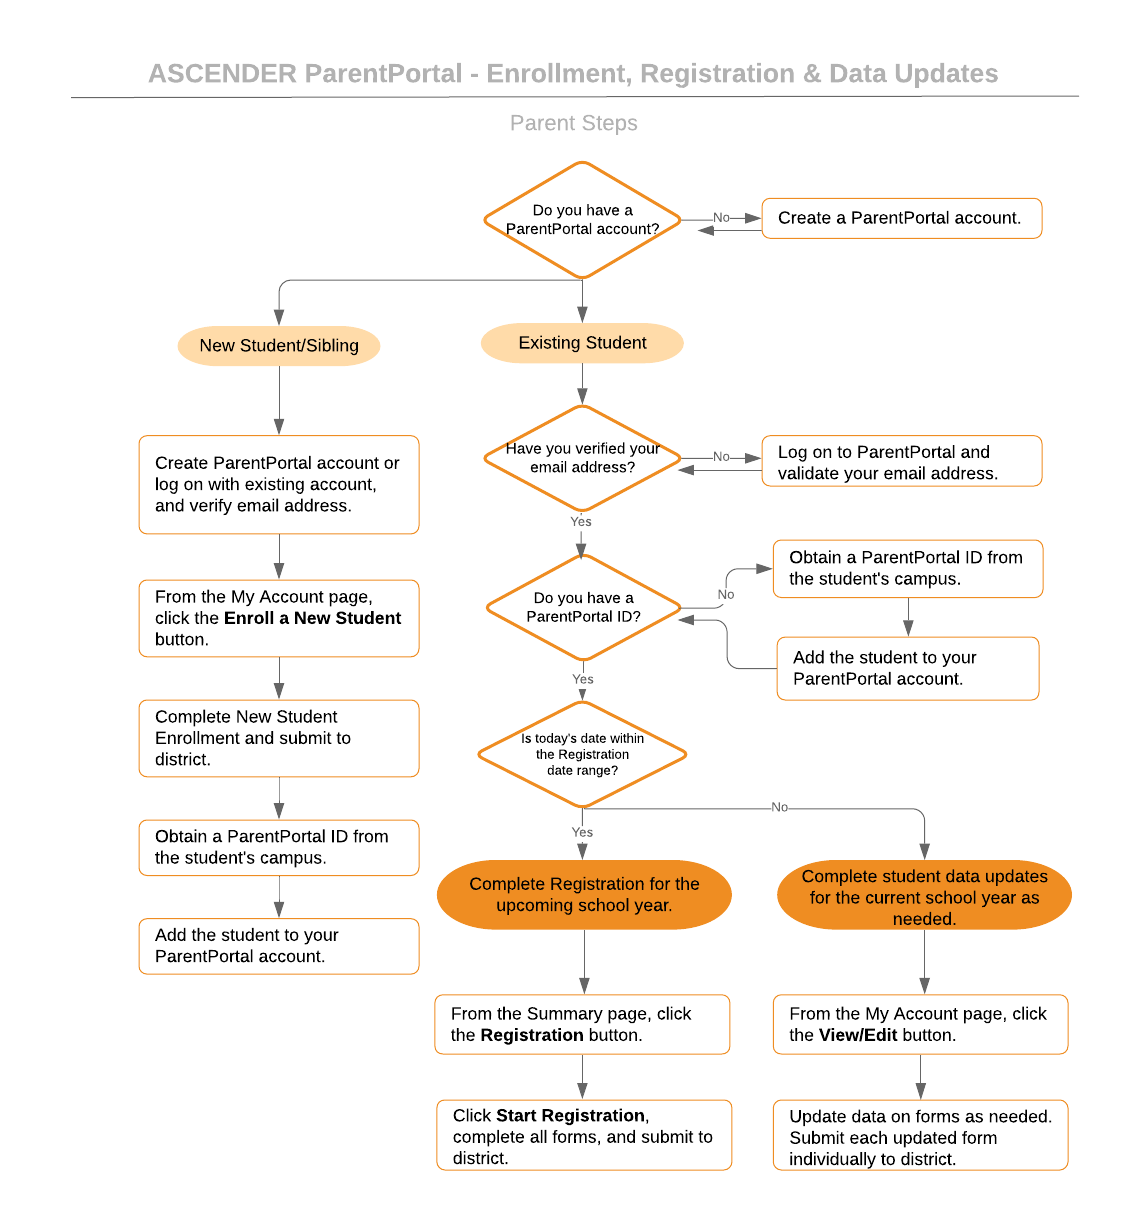
ParentPortal Admin: Enrollment, Registration, and Data Updates
Overview
Terminology
Be sure you are familiar with the following terminology:
- New Student Enrollment - The process of enrolling a student in the district for the first time in the current year.
- Returning Student Registration - The annual registration of returning students, including review and updates to student records such as demographic data updates and standard forms.
- Student Data Maintenance - The ongoing maintenance of records for existing students, such as changes to contact information.
- Uploaded documents cannot be updated online by parents; they can by viewed, printed, completed by hand, and returned to the campus. Uploaded documents forms will vary by campus and district, and can be delivered in various formats, such as Microsoft Word, PDF, spreadsheet, etc. Calendars are an example of static documents. Any documents you upload should be ADA compliant.
- Dynamic forms are presented online and can be completed and submitted online. These forms may include student online registration and demographic updates, as well as document attachment fields and uploads. Dynamic forms are built from a list of available fields. The list of available fields can be found later in the document.
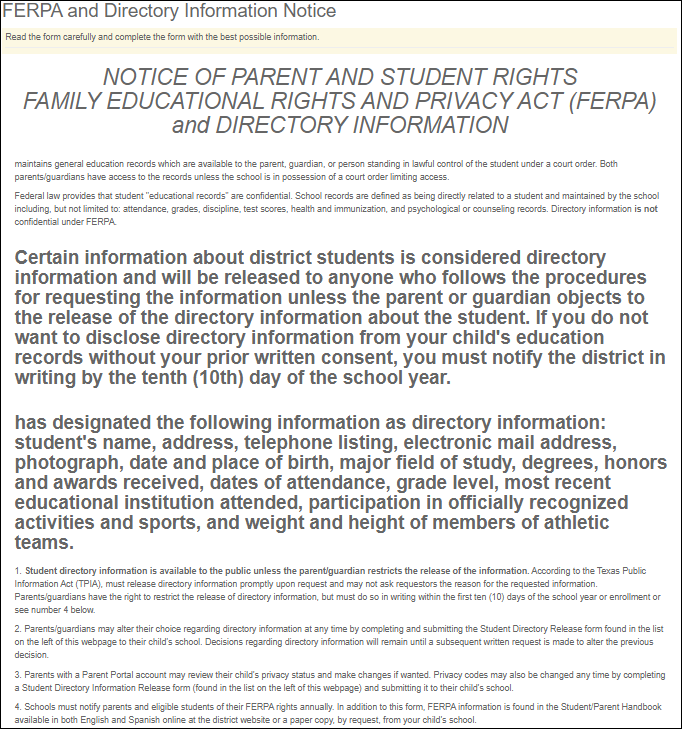
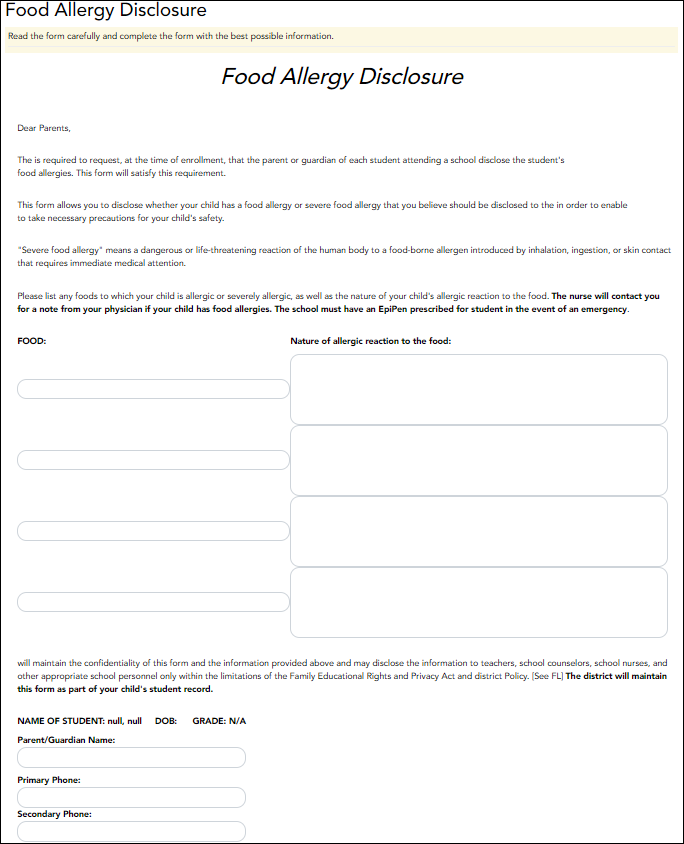
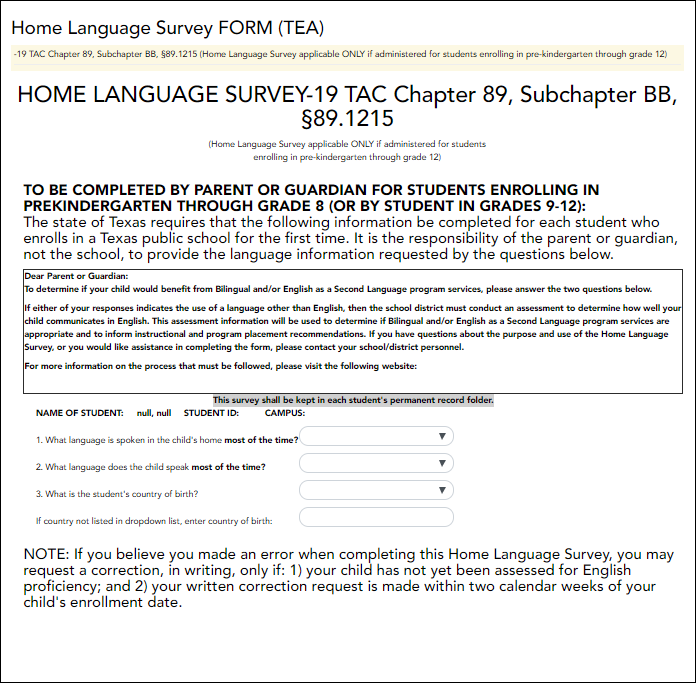
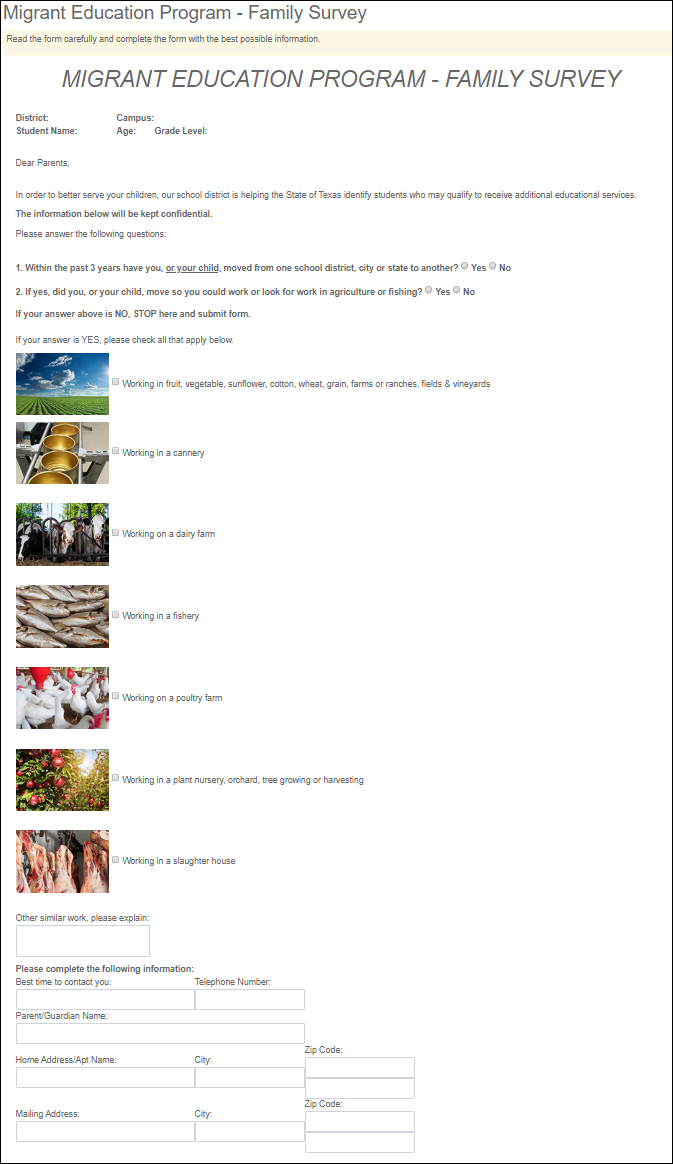
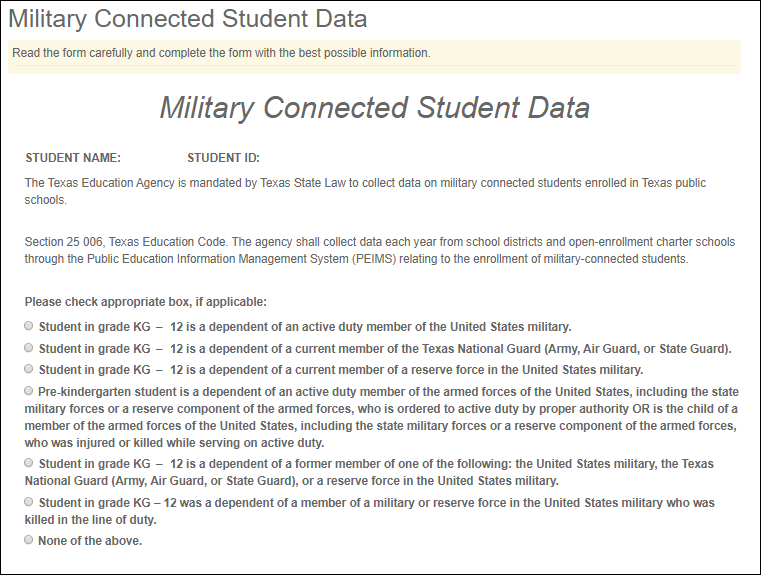
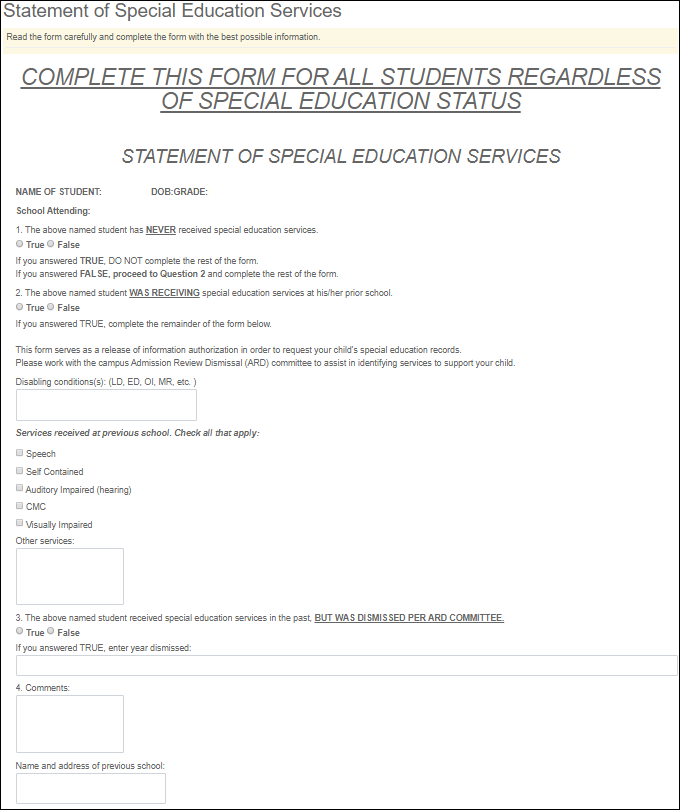
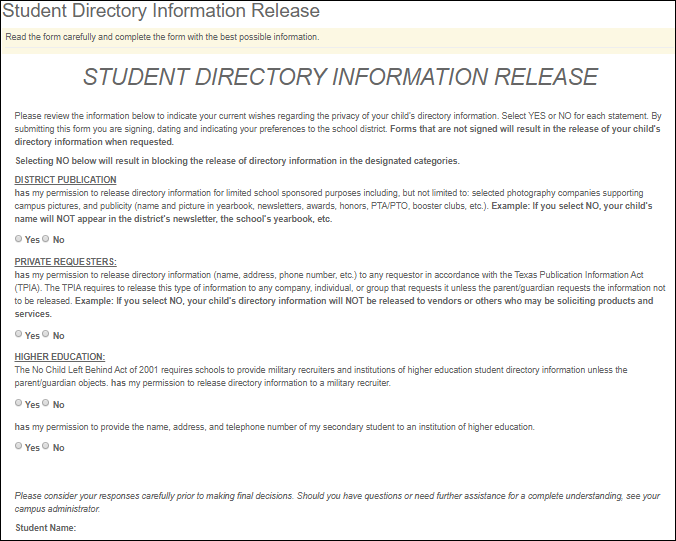
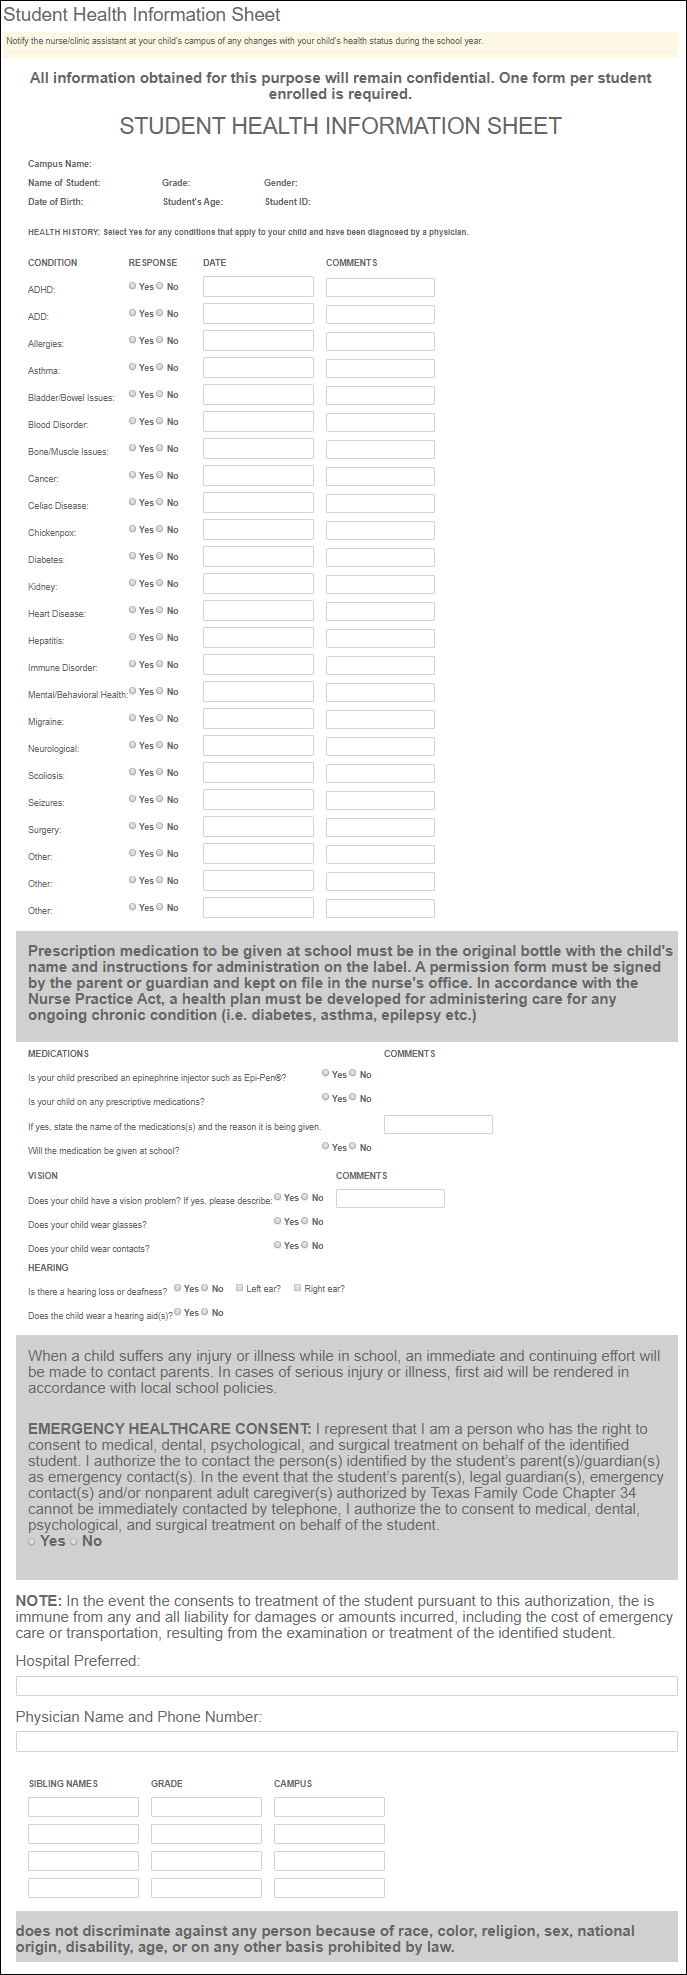
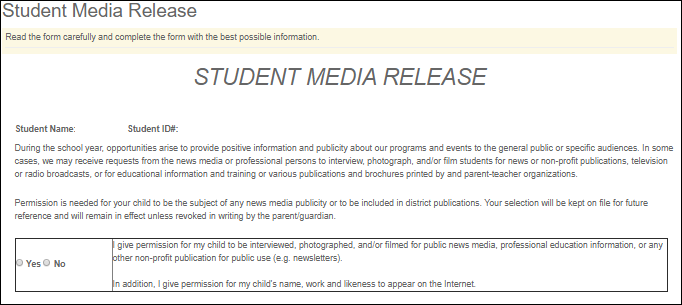
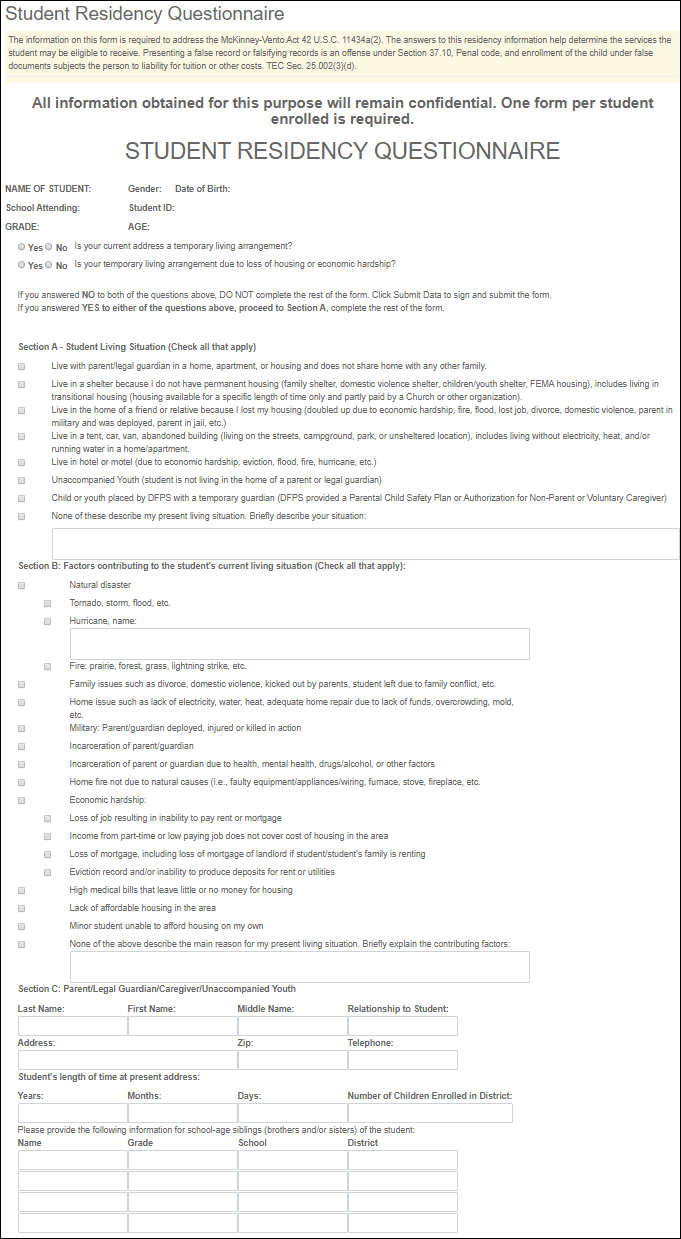
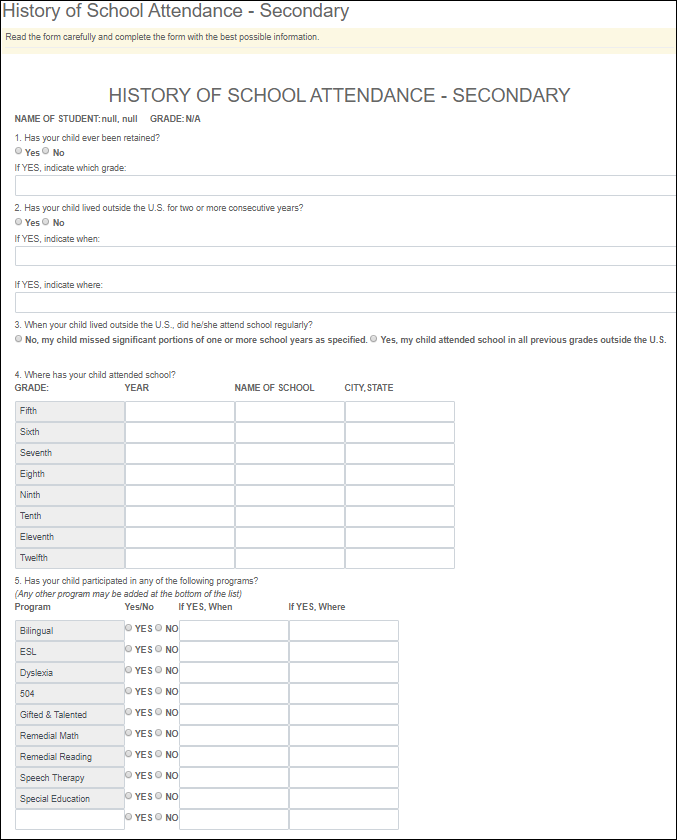
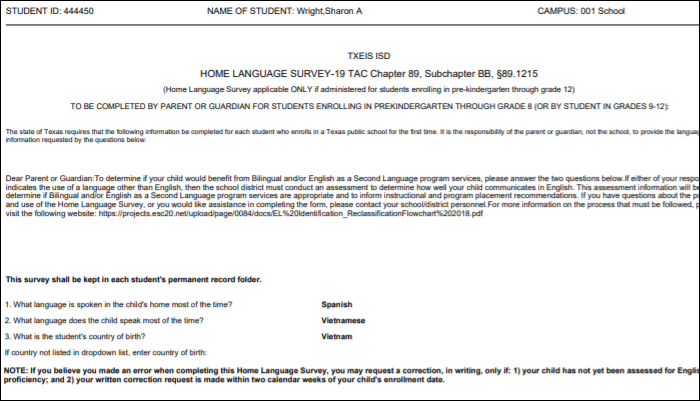
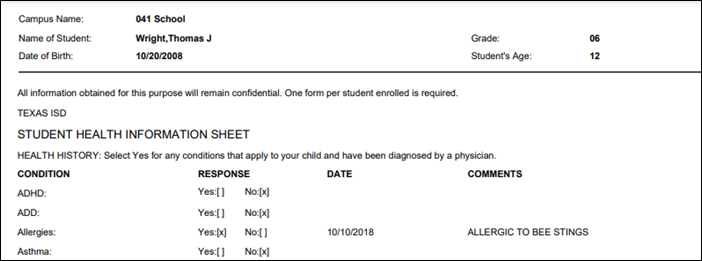
- Standard forms are predefined district-level forms that are common throughout Texas. The forms cannot be edited, but you can determine whether or not they are available to parents by including (or excluding) them from groups. Most forms are submitted annually; the Home Language Survey only needs to be submitted once during the student's lifetime enrollment in the district.
- Forms list:
* Only needs to be submitted once during the student's lifetime enrollment in the district.
- Custom forms are forms that parents can complete and submit online. These forms include district-created questions which are not covered by dynamic and standard forms, such as polls, surveys, and event registration.
Before you Begin
The following information will assist you in implementing ASCENDER ParentPortal New Student Enrollment, Returning Student Registration, and Student Data Maintenance in your district.
Accessing the Tools & Assigning Staff
Determine who will be responsible for managing the tasks:
❏ The Form Management setup steps must be completed by a user with a district admin login for ASCENDER ParentPortal. These setup steps cover New Student Enrollment, Returning Student Registration, and Student Data Maintenance.
❏ Campus tasks such as enrolling students and accepting data changes must be completed by a user with access to the applicable pages in ASCENDER Registration. This user must have a role ID with appropriate access to necessary campuses and the following ASCENDER Registration pages:
New Student Enrollment:
- Registration > Maintenance > Online Registration > New Student Enrollment
- Registration > Maintenance > Parent Portal > Letters > Print > Letter Criteria
- Registration > Maintenance > Parent Portal > Letters > Print > Print Letters
- Registration > Maintenance > Student Enrollment > Forms (Be sure this tab is enabled in Security Admin.)
Returning Student Registration and Student Data Maintenance:
- Registration > Maintenance > Student Enrollment > Forms (Be sure this tab is enabled in Security Admin.)
- Registration > Maintenance > Online Registration > Register Student
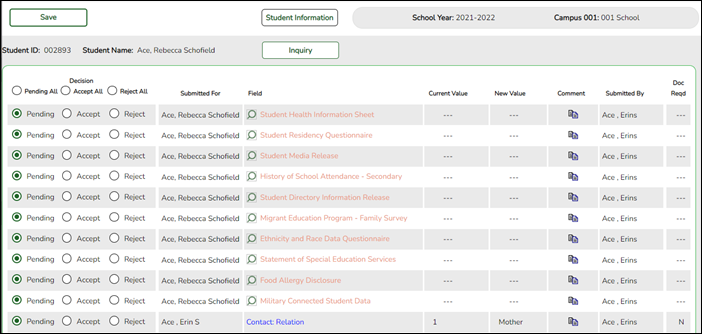
- Registration > Maintenance > Online Registration > Pending Updates
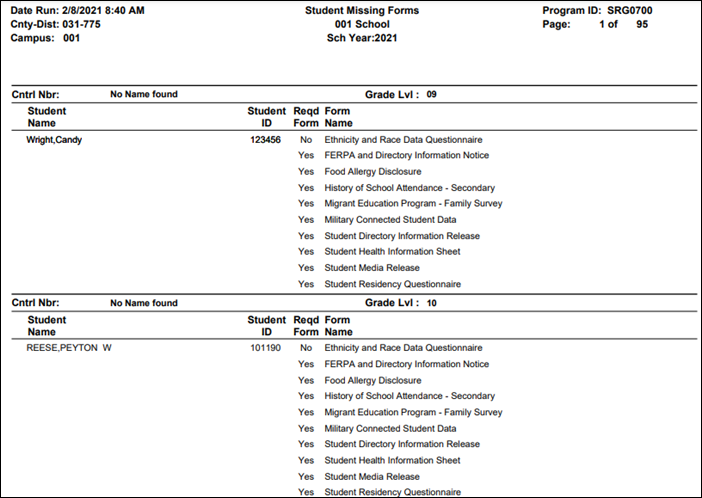
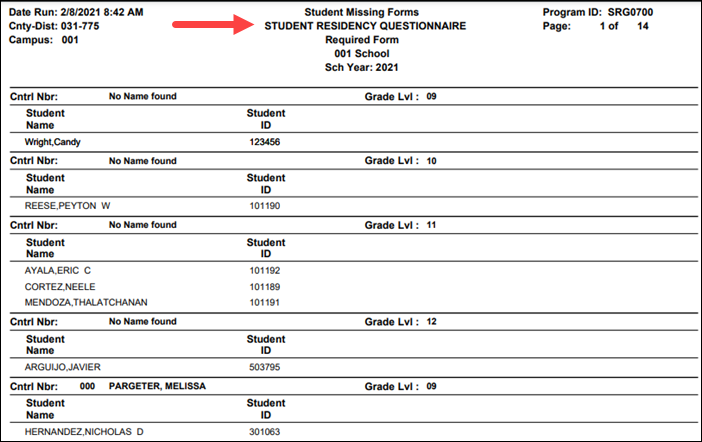
- Registration > Reports > Registration Reports > Student > SRG0700 - Student Missing Forms
- Registration > Reports > Registration Reports > Student > SRG0710 - Standard Forms (Home Language Survey)
- Registration > Reports > Registration Reports > Student > SRG0720 - Online Registration Forms Related Reports
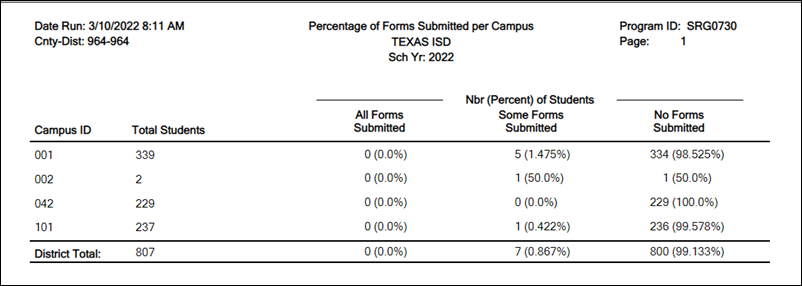
- Registration > Reports > Registration Reports > Student > SRG0730 - Percentage of Forms Submitted per Campus
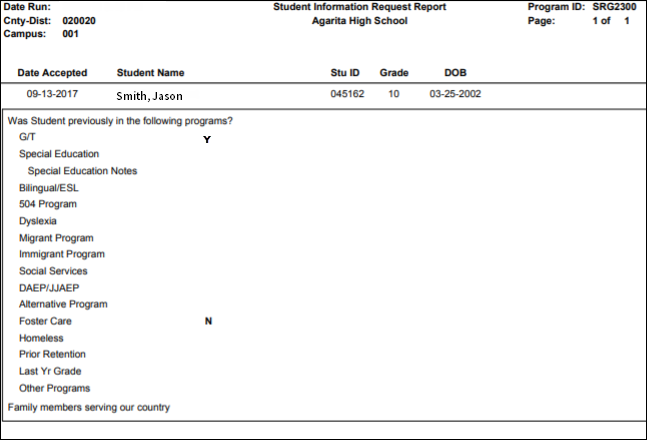
- Registration > Reports > Registration Reports > Withdrawal > SRG2300 - Student Information Request
Planning Ahead
❏ During the planning phase, contact your regional service center for assistance in developing your forms.
❏ Discuss how your campus and district will implement New Student Enrollment (method and location).
- What method will you be using (CAPTCHA or email verification)?
- Where will you be hosting the enrollment event (campus, home, during a Kinder Roundup event or open house, etc.)
❏ Determine who will be responsible for completing the form management setup and ongoing maintenance. It is recommended that 1 or 2 staff persons set up and maintain online forms.
❏ Review all of the district's current registration documents, and compare them to the available forms.
- Determine whether static forms are needed, and which built-in dynamic and standard forms will be used.
- Make changes to built-in forms as needed.
- Determine if custom forms are needed using district-created questions.
- Contact your service center consultant for assistance with individual situations.
❏ Develop a plan to explain how the returning student registration process will work.
❏ It is recommended that you communicate in advance to parents that they need to verify that their ASCENDER ParentPortal account and email address are current. Recommendations:
- Send a letter to parents (or use messaging system) to notify them that Returning Student Registration will be available on xx/xx/xxx (or during a particular event). Example: The letter can be created from ASCENDER Registration > Reports > Create Registration Report. Select the student contact fields, create the report, and then filter the report by email and populate a mail merge with an electronic form template.
- Enable online student data updates before the Returning Student Registration event. This will give parents an opportunity and a reason to log on to ASCENDER ParentPortal, which may assist districts in reconciling ParentPortal account issues.
- NOTE: Registration > Maintenance > Student Enrollment > Contact: The Email field for contacts marked as Parent/Guardian must match for ALL students associated with the ParentPortal account in order for Registration features to be activated for the parent. This email address must also be the address entered on the parent’s ParentPortal account and it must be validated.
❏ Because custom instructions cannot be added to standard forms, consider creating a static form that is listed at the beginning of the standard forms which provides any instructions or additional information you would like to communicate to the parent before beginning the registration process.
❏ Consider whether you need to have translators available for any enrollment events.
Troubleshooting Tools
❏ The Guardian Verified field on Registration > Maintenance > Student Enrollment > Contacts can be used to allow verification of ParentPortal accounts for parents who do not have access to a valid email address.
If Guardian Verified is selected, the contact's email address can immediately be matched to the email address entered by the parent when registering for an ASCENDER ParentPortal account. If the two addresses match, the contact can complete online registration and update the student's data. This allows you to bypass the normal email verification process for short-term situations where the normal email address verification process cannot be completed.
District and Campus: Set Up ParentPortal
Districts and campuses should follow these steps to set up and maintain ParentPortal settings.
- You must have district-level administrative access the District Settings page.
- You must have district- or campus-level administrative access the Campus Settings page.
- Log on to ParentPortal as an administrator.
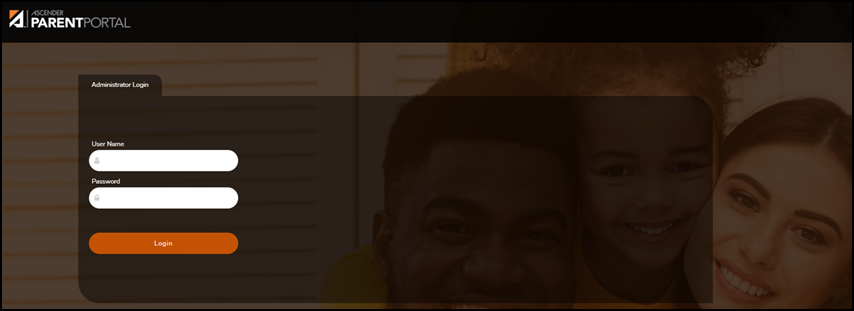
Administrator access to ParentPortal is accomplished by a separate Administrator Login page containing adminLogin?distid=xxxxxx in the application URL, where xxxxxx is the county-district ID.
From the Administrator Login page, type your administrative user name and password and click Login.
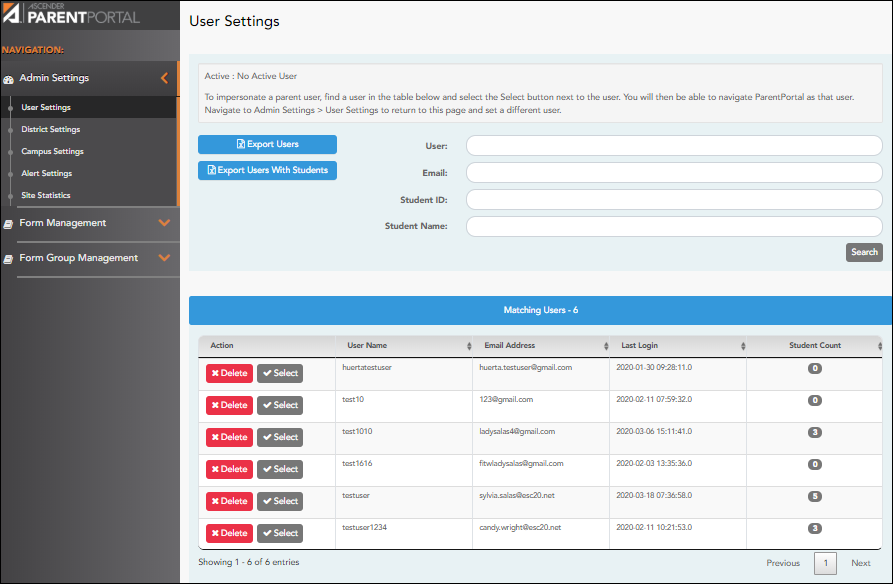
The Administrator website opens with User Settings as the default page.
- Update district settings for ParentPortal.
ASCENDER ParentPortal Admin > Admin Menu > District SettingsThis page allows administrative users to manage the district-wide ASCENDER ParentPortal settings, such as site theme and security questions.
NOTE: Selections are automatically saved for most fields. Clicking Save is only required where indicated.
Access Control
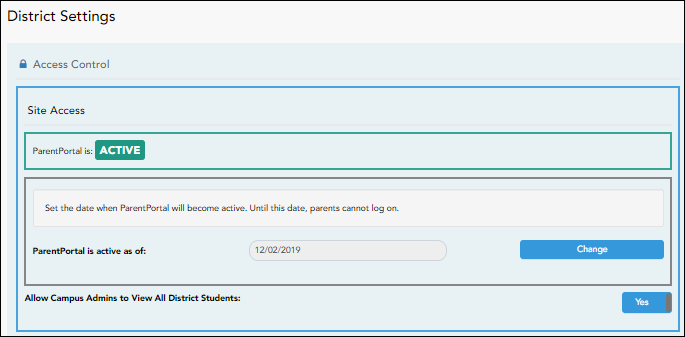
Site Access:
❏ Enable or disable access to ASCENDER ParentPortal.
ParentPortal is Active is displayed if the application is currently available to parents.
Inactive is displayed if the application is not currently available to parents.
NOTE: Parents will receive a message that the portal is Inactive when it has been disabled by the district.ParentPortal is active as of The date for the active/inactive setting is displayed.
If Active, the date indicates when ParentPortal became active.
If Inactive, the date indicates when ParentPortal will become active.
To change the date, click Change.
In the ASCENDER ParentPortal will be active as of field, type the new date. Click Save.
The new date is displayed, and the system is automatically activated or inactivated accordingly on that date.Allow Campus Admins to View All District Students Indicate if campus-level administrative users can see all students in the district.
No - Campus-level administrators are blocked from accessing students who are not at a campus they have access to, and from impersonating a user to access those students. For example, if a parent has two students - one that the campus administrator should be able to see, and one that he should not be able to see, the campus administrator can impersonate that parent, but only students at his campus are displayed.
Yes - Campus-level administrators can access students who are not at a campus they have access to, and can impersonate a user to access those students.
Display Access:
❏ Determine what data is displayed to ParentPortal users.
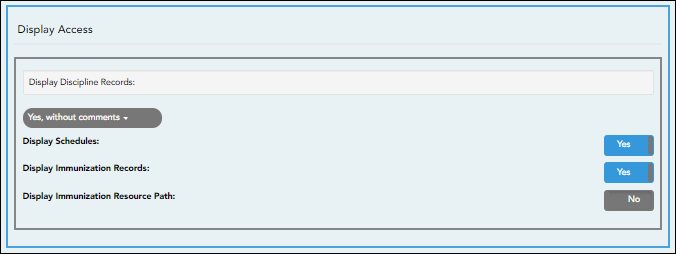
Display Discipline Records Indicate if you want discipline information (with or without comments) displayed in ParentPortal.
No - The Discipline page is not available for parents in ParentPortal.
Yes, without comments - The Discipline page is available for parents in ParentPortal, but any comments associated with an incident are not displayed.
Yes, with comments - The Discipline page is available for parents in ParentPortal, and any comments associated with an incident are displayed below the discipline record.
Discipline Flow ChartDisplay Schedules Indicate if you want to display student schedule information in ParentPortal.
No - Parents will be able to access ParentPortal and use some parts (such as online registration), but will not be able to view data that would require a student's schedule to be displayed (Summary, Attendance, Grades, and Assignments). When set to No, the message “Student schedule is not available at this time” is displayed at the top of the Summary, Attendance, Grades, Assignments, and My Account pages.
Yes - Student schedule data is displayed throughout ParentPortal.Display Immunization Records Indicate if you want to display immunization data for parents in ParentPortal. Display Immunization Resource Path If Yes:
Path: Type the address for the website providing information about immunization requirements, such as the Texas Department of State Health Services website.
Click Save.
NOTE: The Texas Education Code requires that a link to the Texas Department of State Health Services website be provided to parents as part of the Immunization Awareness program. This field provides a way to adhere to this requirement; however, you are not required to use this field.
Site Resources
Security Questions:
❏ Enter security questions that parent users can use to recover a user name or reset a password.
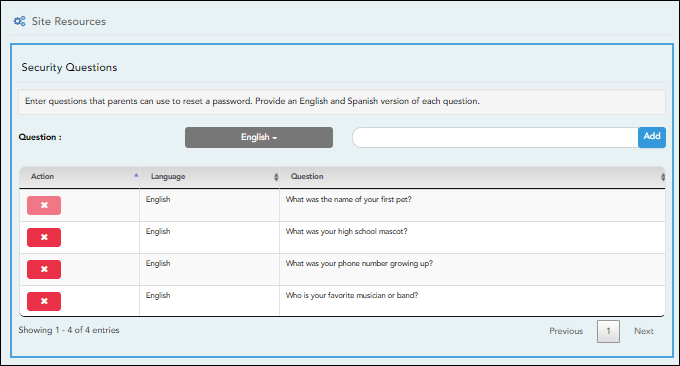
Question Select the language of the question.
Type a question in the corresponding language that the user will answer.
❏ Click Add.- New questions are displayed in the grid at the top of the list.
- Once the page is refreshed, all questions are listed in alphabetical order.
 - Click to remove a question from the list.
NOTE: You cannot remove a question if it has a parent's answer associated with it.
District Links:
❏ Provide links to helpful websites. These links will be displayed on the Links page.
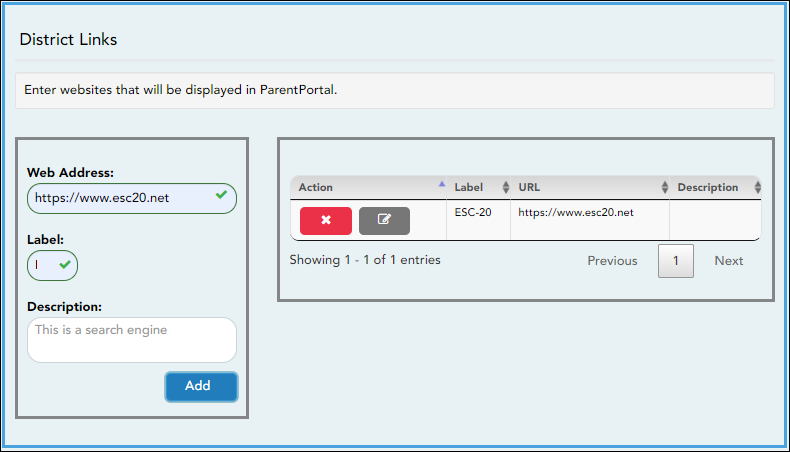
Web Address Type the URL for the website. Label Type the text as you want the link to appear. The text can be the URL or specific words such as the website name. Description (Optional) Type an additional description of the website, such as why it is being provided, or what information it provides.
❏ Click Add.
❏ On the right: - Click to stop displaying the link in ParentPortal.
You are prompted to confirm that you want to delete the link. Click Yes.
The link is removed from the list.
 - Click to modify the properties of the link.
A pop-up window opens allowing you to modify the properties. Click Save Changes.
Color Customization:
❏ Change the ASCENDER ParentPortal district-wide color scheme.
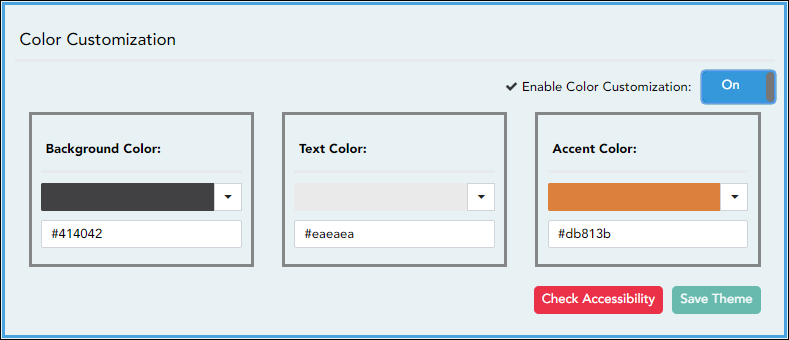
Enable Color Customization Select On to enable modifying the ParentPortal color scheme. Additional fields are displayed allowing you to select web accessible colors.
❏ For each color choice:❏ Click the drop-down arrow to open the color palette.
❏ Click a color in the palette to select it, or enter the Hex code or RGB code.
❏ Click Apply.
Background Color Changes the background of the left-side navigation bar. Text Color Changes the color of the text in the left-side navigation bar. Accent Color Changes the color of the main menu headings, drop-down arrows, vertical bars, and a few other navigation elements.
❏ When all colors have been selected, click Check Accessibility to confirm that your color selections meet ADA requirements. If not, make different selections.
❏ Click Save Theme.You cannot save a theme until you have checked its accessibility.
NOTE: To reset to the original colors, set Enable Color Customization to No. - Update campus-level settings for ParentPortal.
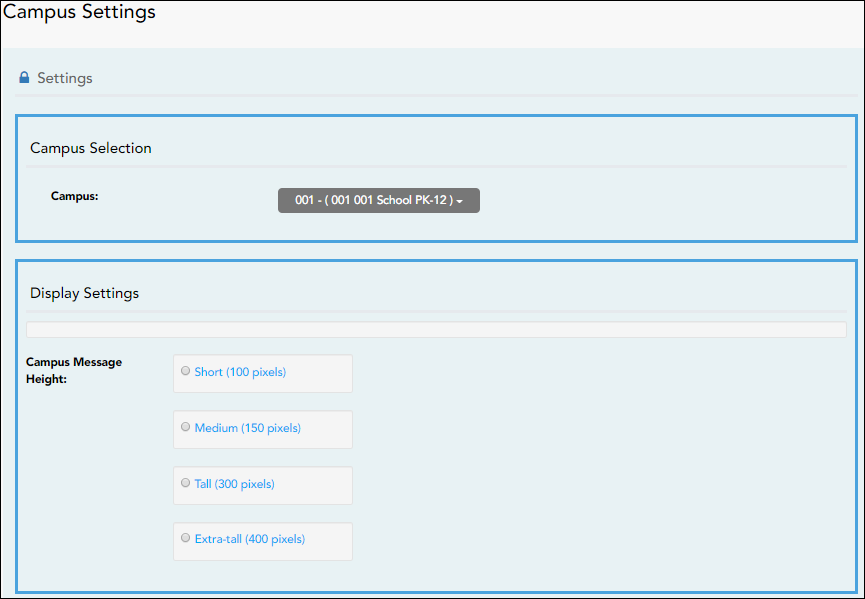
ASCENDER ParentPortal Admin > Admin Settings > Campus SettingsThis page allows you to maintain campus-level settings for ParentPortal.
NOTES:
• Selections are automatically saved. There is no Save button.
• If you are logged in as a multi-campus user, most of the following fields are not available.
Settings
Campus Selection:
Campus Select the campus you want to update settings for.
Display Settings:
❏ Indicate how the Campus Notes should be displayed on the Summary Page in ParentPortal.
The text for the campus notes are entered on Registration > Maintenance > Parent Portal > Campus.
Any notes entered are displayed on the Summary page, which is the first page displayed when a user logs on to ParentPortal.
Campus Message Height Short - Height is 100 pixels.
Medium - Height is 150 pixels.
Tall - Height is 300 pixels.
Extra-tall - Height is 400 pixels.
For all options, the width will adjust according to the user's screen size. - Update alert and other settings for ParentPortal.
ASCENDER ParentPortal Admin > Admin Settings > Alert SettingsThis page allows you to set a district-level schedule for the parent alert messages, as well as several district-level security settings.
Alerts refers to the update that occurs in the system.
NOTE: Please contact your System Administrator if your district wants Alerts turned off.
Notification refers to the text or email message that is set to the parent as notification that there is an alert. Notifications do not have to go out at the same time the alert occurs.
Set Alerts
Start/End Time Select the start and end times to specify the time of day when alerts are generated. Interval Type the number of minutes that will elapse between each alert during the specified time. ❏ Click Save.
Set Notifications
Start/End Time Select the start and end times to specify the time of day when notifications are sent to parents. Interval Type the number of minutes that will elapse between each notification during the specified time. ❏ Click Save.
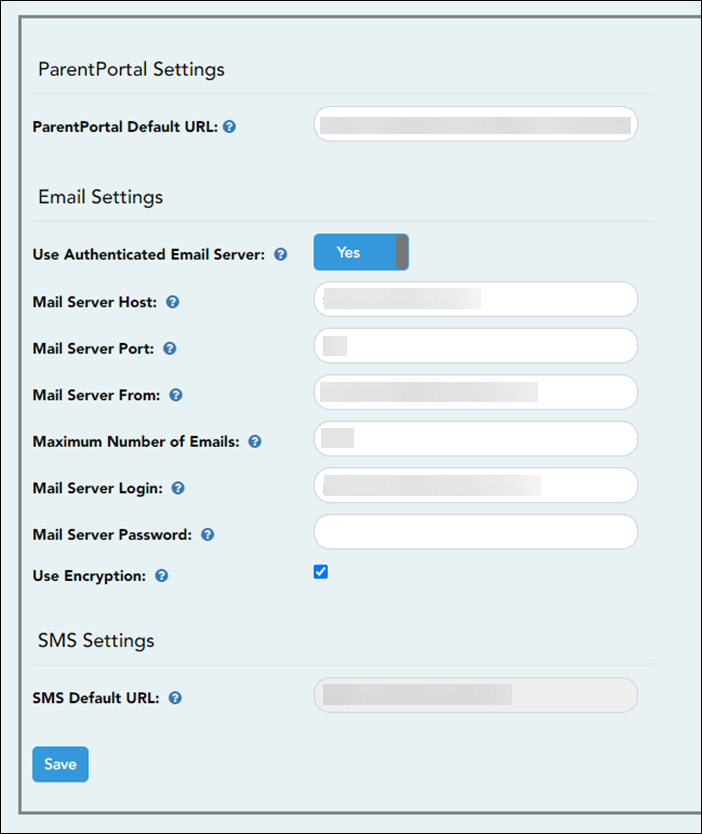
ParentPortal Settings
ParentPortal Default URL Type the full URL that parents in the district will use to access ASCENDER ParentPortal. This URL will be used during the email verification process.
❏ Under Email Settings:
User Authenticated Email Server Indicate if the client's email notification email server requires a login and password. If Yes, enter the user name and password in the Mail Server Login and Mail Server Password fields. Mail Server Host Indicate the address of the outgoing mail server. Mail Server Port Set the port that the alert service will be running on. Mail Server From Type the email address that will be displayed in the From field when a message is sent by the ParentPortal mail server. Maximum Number of Emails Type the maximum number of email messages that go out in a notification run. Mail Server Login If using an authenticated email server, type the user name. Mail Server Password If using an authenticated email server, type the password. Use Encryption Select to use encryption.
❏ Under SMS Settings:SMS Default URL Type the path used for text messages.
❏ Click Save.
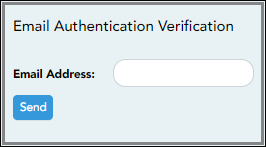
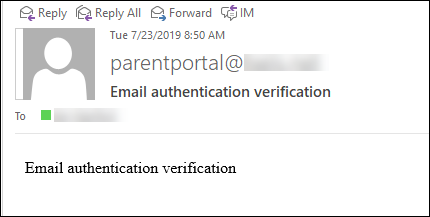
Email Authentication Verification
Email Address Type any email address you wish to test. This allows you to confirm that SMTP and other settings are set up correctly. ❏ Click Send.
- View ParentPortal usage data.
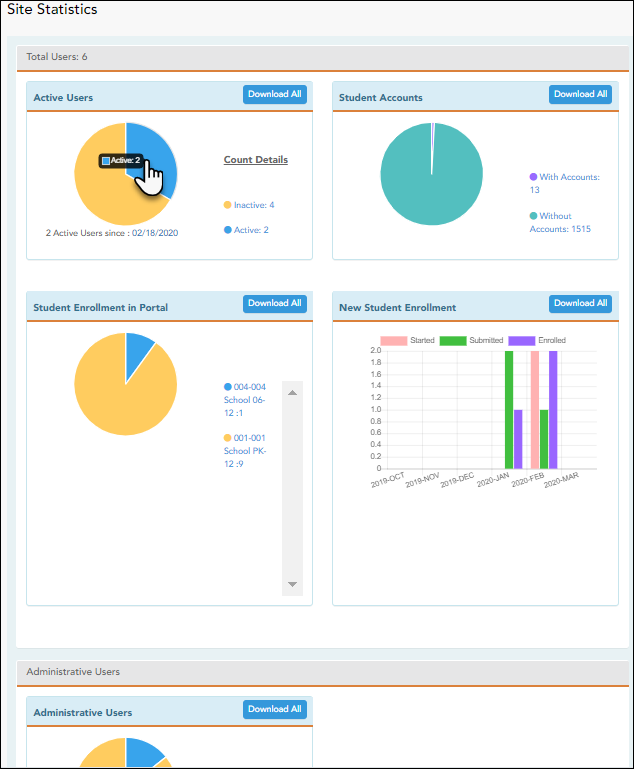
ASCENDER ParentPortal Admin > Admin Menu > Site Statistics
This page provides information about form usage across the district or campus, or for a specific parent/guardian, is displayed. Archived forms are not included in these counts.
- Click each graph to view additional details.
- Click on sections of a graph or the adjacent legend to download a csv file containing details for a particular section.
The following information is displayed:
Total Users Provides a count of all ParentPortal users in the district. Active Users Provides data about the number of users who have logged on since a particular date. Student Accounts Provides data about students associated with a ParentPortal account (includes student accounts). Student Enrollment in Portal Provides data about returning students who have registered online using ParentPortal (whether they have started and/or completed the process). New Student Enrollment Provides data about students who have enrolled online using ParentPortal (whether they have started and/or completed the process). NOTE: In the Status column on the downloaded spreadsheet:
Code 1 = Started (pink)
Code 2 = Submitted (green)
Code 3 = Enrolled (purple)Administrative Users
Administrative Users Provides counts of district-wide and campus-wide administrative users. - Set an optional alert message.
An optional alert message can be displayed on the Login page. This message is displayed in a pop-up window, and the user must click OK to close the window.

The message file (alert.txt) is located on the application server. Contact your technical administrator to enable, disable, or update the message.
District: Set Up & Enable Forms
Districts should follow these steps to manage forms for New Student Enrollment, Returning Student Registration, and Student Data Maintenance, including static printable forms, customized dynamic forms, and standard forms.
- You must have district-level administrative access to ASCENDER ParentPortal.
- Any static forms must be ready for upload and saved in a valid format (English and Spanish versions). All forms should be ADA compliant.
- Upload static documents.
ASCENDER ParentPortal Admin > Form Management > Document Upload
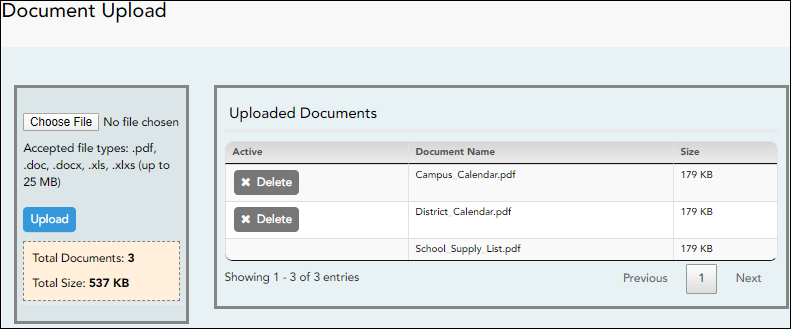
This page allows you to maintain a pool of read-only static documents that once created into a static form and then added to a form group, parents can view and print as needed. These documents cannot be updated by parents online; they can be viewed, printed, completed by hand (if necessary), and returned to the campus, such as campus and district calendars, school supply lists, acknowledgement forms, or surveys. The documents may vary by district and campus.
From this page, you can upload static documents from your PC to the ParentPortal server. Once created into a static form and then added to a form group, parents will be able to access these forms from ParentPortal for online enrollment, annual online registration, and for ongoing student data maintenance.
Your documents should be ADA compliant.
You can upload documents in the following formats:
- .doc or .docx (Microsoft Word)
- .pdf (Adobe Acrobat)
- .xls or .xlsx (Microsoft Excel)
- On this page, you will only upload the documents. You will create a form for each document in a subsequent step using the Form Creator page.
- If you will be creating English and Spanish versions of static forms, you must upload an English and Spanish version of each document.
Upload a document:
❏ Click Choose File.
Locate and select the form you want to upload. The file name is displayed.
❏ Click Upload to upload the selected file to the ParentPortal server.
Uploaded Documents (right) Once uploaded, the file name and file size are displayed.
❏ Upload additional files as needed.They are listed alphabetically.
Below the Upload button, statistical information is displayed indicating the total number of documents uploaded and the total file size for all uploaded documents.
Delete a document:
❏ Under Uploaded Documents, click Delete for the document you want to delete.
NOTE: You cannot delete a document if it is in use (i.e., added to a form).
- Edit student data fields.
ASCENDER ParentPortal Admin > Form Management > Form Field Management
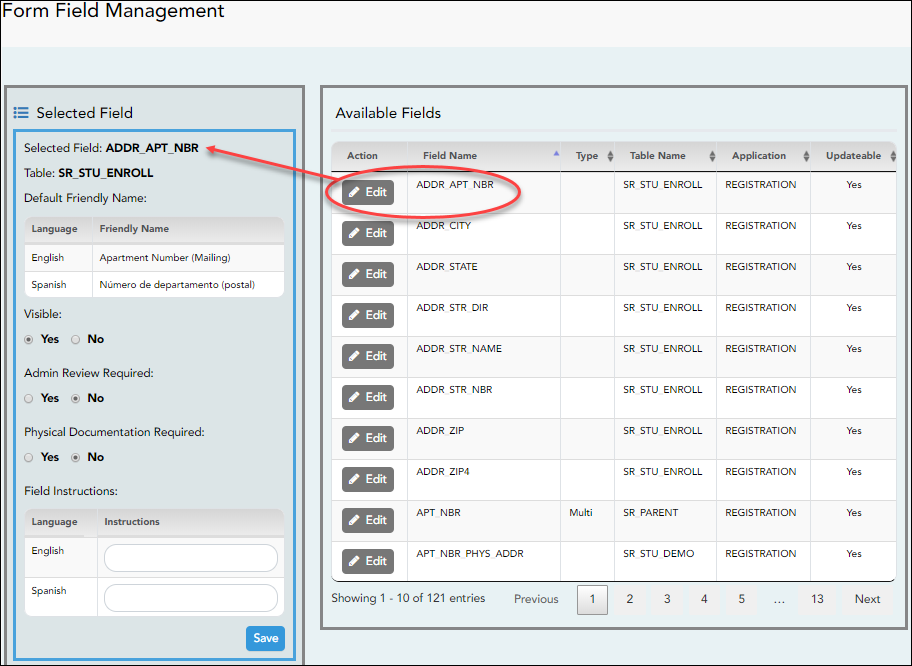
This page allows you to set options for the fields that will be used for New Student Enrollment, Returning Student Registration, and Student Data Maintenance forms. Examples of fields are first name, last name, middle name, and birth date.
The list of Available Fields is added automatically. For each field, you indicate if the field is visible and add any instructions. By default, all fields are visible and no action is required; however you can hide a field globally and/or add default instructions as needed.
Some districts allow you to select document storage (DOCSTOR_) fields which allow parents to upload supporting registration forms (immunization record, birth certificate, etc.).
NOTE: On this page you will set options for the fields. You will add the fields to a form in a subsequent step.
NOTES:
- Default friendly names are initially provided in the program, but they can be changed by administrators as needed. This list reflects the names initially provided.
- The following fields are required: Contact: Last Name, Contact: First Name, and Contact: Relation.
- Field names that begin with DOCSTOR_ can be added to a form to allow parents to upload these documents. If the ParentPortal-provided standard forms are used in your district, it may not be necessary to use DOCSTOR_ fields for these particular forms.
- Field names that begin with MOCK_ are reserved for New Student Enrollment forms (special programs) and cannot be selected for any other dynamic forms.
Field Name Default Friendly Name - English Default Friendly Name - Spanish ADDR_APT_NBR Apartment Number (Mailing) Número de departamento (postal) ADDR_CITY City (Mailing) Ciudad (postal) ADDR_STATE State (Mailing) Estado (postal) ADDR_STR_DIR Street Direction (Mailing) Calle y número (postal) ADDR_STR_NAME Street Name (Mailing) Nombre de la calle (postal) ADDR_STR_NBR Street Number (Mailing) Número(postal) ADDR_ZIP Zip (Mailing) Código postal (postal) ADDR_ZIP4 Zip4 (Mailing) Código postal4 (postal) APT_NBR Contact: Apartment Number Contacto: Número de departamento APT_NBR_PHYS_ADDR Apartment Number (Physical) Número de departamento (físico) CAMPUS_CD_PRV Previous Campus Campus anterior CELL_PHONE Contact: Cell Phone Contacto: Teléfono celular CITY Contact: City Contacto: Ciudad CITY_NAME_PHYS_ADDR City (Physical) Ciudad (física) DL_NBR Contact: Driver License Number Contacto: Número de licencia de conducir DL_ST Contact: Driver License State Contacto: Estado de licencia de conducir DOB (SR_PARENT) Contact: Date of Birth Contacto: Fecha de nacimiento DOB (SR_STU_DEMO) Date of Birth Fecha de nacimiento DOCSTOR_ACCEPTABLEUSEPOLICY Student Acceptable Use Policy Política de uso aceptable para estudiantes DOCSTOR_BC Birth Certificate Document Documento de certificado de nacimiento DOCSTOR_CAPP Chemical Abuse Participation Form Formulario de participación en abuso de sustancias DOCSTOR_DIRECTORY Directory Form Formulario del directorio DOCSTOR_DISTRICTHANDBOOK District Handbook Manual del distrito DOCSTOR_DL Driver License Document Documento de licencia de conducir DOCSTOR_EMP_SURVEY Employee Survey Form Formulario de encuesta para empleados DOCSTOR_ETHRACEQUESTIONNAIRE Ethnicity and Race Data Questionnaire Cuestionario de datos de origen étnico y raza DOCSTOR_FAMILYSURVEY Family Survey Encuesta familiar DOCSTOR_FOODALERGY* Food and Allergy Form Formulario de alimentos y alergias DOCSTOR_FREELUNCH Free Lunch (NSLP) Almuerzo gratis (NSLP) DOCSTOR_HISTSCHOOLATTENDANCE History of School Attendance Historial de asistencia escolar DOCSTOR_HOMELANGSURVEY Home Language Survey Encuesta sobre idioma del hogar DOCSTOR_IDENTITYVERIF Identity Verification Verificación de identidad DOCSTOR_IMM* Immunizations Document Documento de inmunizaciones DOCSTOR_MCVINTO McKinney-Vento Form Formulario McKinney-Vento DOCSTOR_MILCONNECTEDSTUDATA Military Connected Student Data Datos de alumnos con conexiones militares DOCSTOR_POR Proof of Residency Document Documento de comprobante de residencia DOCSTOR_REGISTRATIONPACKET Registration Packet Paquete de registro DOCSTOR_RELEASEOFINFO Release of Information Divulgación de información DOCSTOR_SSC Social Security Card Tarjeta de seguro Social DOCSTOR_STATEMENTSPECED Statement of Special Education Services Declaración de servicios de educación especial DOCSTOR_STUDENTMEDIARELEASE Student Media Release Divulgación de información del alumno a medios de comunicación EMAIL (SR_PARENT) Contact: Email Contacto: Correo electrónico EMAIL (SR_STU_DEMO) Student Email Address Dirección de correo electrónico del estudiante EMERGENCY_FLAG Contact: Emergency Contact Contacto: Contacto de emergencia ETHN_HISPANIC Hispanic/Latino FOOD_ALLERGY Food Allergy Food Allergy GEN Contact: Generation Contacto: Generación HOME_LANG_CD Pri Language Spoken at Home LANG_CD Contact: Language Contacto: Idioma LANG_PRI Pri Language Spoken by Student MIGRANT_FLAG Contact: Migrant Contacto: Migrante MIL_BRANCH Contact: Branch of Service Contacto: Rama del servicio MIL_IND Military Connection MIL_RANK Contact: Rank Contacto: Rango MOCK_FOSTER_CARE Foster care Cuidado tutelar MOCK_HOMELESS Is student homeless? ¿Es un estudiante sin hogar? MOCK_LAST_YEAR_GRADE Last year's grade Grado del año pasado MOCK_PREV_IN_504 504 Program Programa 504 MOCK_PREV_IN_ALT_PROG Alternative Program Programa alternativo MOCK_PREV_IN_ARMED_FORCES Family members serving our country Miembros de la familia que sirven a nuestro país MOCK_PREV_IN_BIL_ESL Bilingual/ESL Bilingüe/ESL MOCK_PREV_IN_DAEP_JJAEP DAEP/JJAEP DAEP/JJAEP MOCK_PREV_IN_DYSLEXIA Dyslexia Dislexia MOCK_PREV_IN_GT Was student previously in GT? ¿El estudiante estuvo antes en GT? MOCK_PREV_IN_IMMIGRANT Immigrant Program Programa para inmigrantes MOCK_PREV_IN_MIGRANT Migrant Program Programa para migrantes MOCK_PREV_IN_OTHER_PROG Other Programs Otros programas MOCK_PREV_IN_SOCIAL_SERVICES Social Services Servicios sociales MOCK_PREV_IN_SPECIAL_ED Special Education Educación especial MOCK_PREV_IN_SPECIAL_ED_TYPE If yes, which one? En caso afirmativo MOCK_PRIOR_RETENTION Prior student retention? NAME_F (SR_STU_ENROLL) First Name Nombre NAME_F (SR_PARENT) Contact: First Name Contacto: Nombre NAME_GEN_CD Generation Generacion NAME_L (SR_STU_ENROLL) Last Name Apellido NAME_L (SR_PARENT) Contact: Last Name Contacto: Apellido NAME_M (SR_STU_ENROLL) Middle Name Segundo nombre NAME_M ( SR_PARENT) Contact: Middle Name Contacto: Segundo nombre NAME_STU_GOES_BY Nickname Apodo OCCUPATION Contact: Occupation Contacto: Ocupación OTHER_PHONE_AC Contact: Other Phone Area Code Contacto: Código de área de otro teléfono OTHER_PHONE_EXT Contact: Other Phone Extension Contacto: Extensión de otro teléfono OTHER_PHONE_NBR Contact: Other Phone Contacto: Otro teléfono PAR_NAME Parent Name Nombre del padre/madre PHONE_AREA_CD Contact: Area Code Contacto: Código de área PHONE_AREA_CD_BUS Contact: Business Area Code Contacto: Código de área del negocio PHONE_EXT_BUS Contact: Business Phone Extension Contacto: Extensión del teléfono del negocio PHONE_NBR (SR_STU_DEMO) Student Phone Teléfono del estudiante PHONE_NBR (SR_PARENT) Contact: Phone Contacto: Teléfono PHONE_NBR_BUS Contact: Business Phone Contacto: Teléfono del negocio PHONE_PREF Contact: Phone Preference Contacto: Preferencia telefónica PHYS_ADDR_STATE State (Physical) Estado (físico) PREV_DIST Previous District Distrito anterior PRI_PHONE Primary Phone Teléfono principal PRIMARY_FLAG Contact: Guardian Contacto: Tutor PRIORITY Contact: Priority Contacto: Prioridad RACE_AMER_INDIAN American Indian/Alaskan Native Indio americano/Nativo de Alaska RACE_ASIAN Asian Asiático RACE_BLACK Black/African American Negro/Afroamericano RACE_PACIFIC_ISL Hawaiian/Pacific Islander Hawaiiano/Islas del Pacífico RACE_WHITE White Blanco RCV_MAILOUTS Contact: Receive Mailouts Contacto: Recibir comunicaciones por correo RELAT Contact: Relation Contacto: Relación SCH_YR Contact: School Year Contacto: Año escolar SCND_PHONE Secondary Phone SEQ_NO Contact: Sequence Number Contacto: Número consecutivo SEX Sex Sexo SSN Contact: SSN Contacto: NSS STATE_CD Contact: State Contacto: Estado STATE_STU_ID STR_DRCTN_PHYS Street Direction (Physical) Calle y número (física) STR_NAME Contact: Street Name Contacto: Calle STR_NAME_PHYS Street Name (Physical) Nombre de la calle (física) STR_NBR Contact: Street Number Contacto: Número STR_NBR_PHYS Street Number (Physical) Número (físico) STU_CELL_PH Student Cell Phone Teléfono celular del estudiante STU_ID Student ID Identificación del estudiante STU_PHONE_AC Student Area Code Código de área del estudiante TRANSPORT_IND Contact: Right to Transport Contacto: Derecho a transportar VEH_COLOR Contact: Vehicle Color Contacto: Color del vehículo VEH_LIC Contact: Vehicle License Plate Number Contacto: Número de placas del vehículo VEH_LIC_ST Contact: Vehicle License State Contacto: Estado de registro del vehículo VEH_MDL Contact: Vehicle Model Contacto: Modelo de vehículo VEH_MK Contact: Vehicle Make Contacto: Marca del vehículo ZIP Contact: Zip Contacto: Código postal ZIP_CODE_PHYS_ADDR Zip (Physical) Código postal (físico) ZIP4 Contact: Zip4 Contacto: Código postal4 ZIP4_PHYS_ADDR Zip4 (Physical) Código Postal4 (físico)
❏ Under Available Fields (right):
A list of all available fields is displayed.
The list includes the database field name, database table name, and the application with which the field is associated (such as Registration).
Type This field indicates if the field is from a vertical table.
• blank = a single record for the student, such as a birth date (i.e., not a vertical table).
• Multi = multiple records for the student, such as multiple contact records. For example, the demo contact table has a sequence identifier for each person entered.
• sequence number = a hard-coded sequence resulting in a static number of multiple-records. If there are two contacts entered, they would have sequence numbers of 01 and 02.Updateable This field indicates if the data in the field can be updated by a parent. This is set automatically and cannot be changed.
❏ Click Edit to edit settings for a particular field.
The Selected Field section is displayed on the left side of the page.
❏ Under Selected Field (left), modify information for the selected field as needed.
Selected Field The database name for the selected field is displayed. For a field in a vertical table, an asterisk or a sequence number is displayed in parentheses next to the field name. Table The database name for the table in which the selected field exists is displayed. Default Friendly Name A friendly name for the selected field is displayed as it will appear on the form in both English and Spanish. For example, if the database field name is DOB, the friendly name might be Date of Birth (English) and Fecha de nacimiento (Spanish). The friendly name is set automatically and cannot be changed from this page; however, you can modify the friendly name when you add it to a form in a subsequent step.
Language Friendly Name: Friendly field names are automatically provided for both languages.Visible Yes - Allow the field to be displayed for the parent on a form in ParentPortal.
No - The field will not be displayed on any forms for parents to see. If No, this setting overrides all other visibility settings.Admin Review Required This field is not in use at this time. Whether you select Yes or No, all changes submitted by a parent must be reviewed by an administrator before they can be reviewed. Physical Documentation Required This field is not in use at this time. Field Instructions Type any special instructions for the parent that are specific to the field, up to 255 characters.
Language:
Instructions: Any instructions should be provided in both English and Spanish.NOTE: If Spanish instructions are not provided, English instructions will be displayed even if the parent is viewing ParentPortal in Spanish.
❏ Click Save.
❏ Repeat for each field that will be used in a form.Create a form.
ASCENDER ParentPortal Admin > Form Management > Form Creator
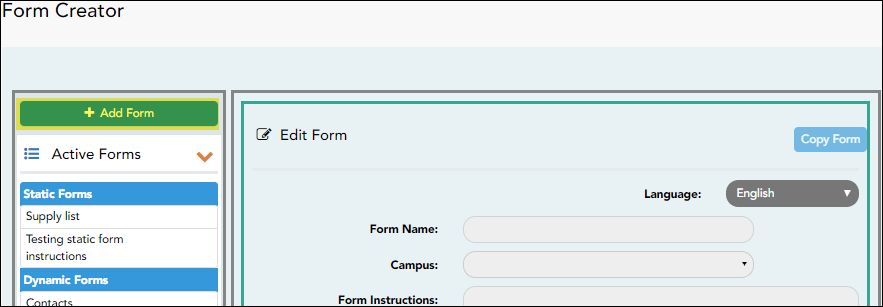
The Form Creator allows you to create new forms, as well as delete and edit existing forms.
Two types of forms can be created:
- Static forms can be created using the static documents you have already uploaded.
- Dynamic forms can be created using the fields you selected in previous steps.
NOTE: A form must be added to a group in order to be accessible to parents. You will add the form to a group in a subsequent step.
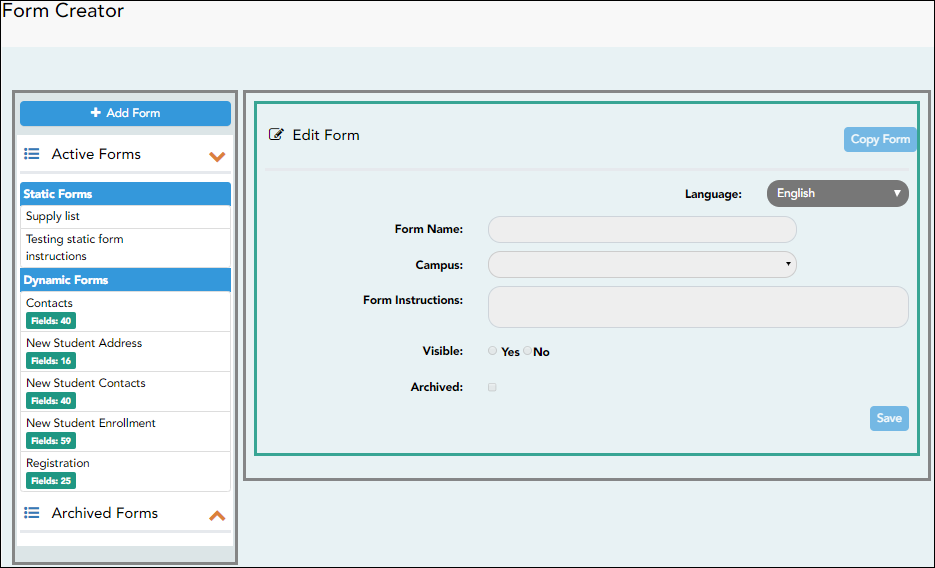
On the left side of the page, any existing forms are listed.- Active Forms are listed first, and Archived Forms are listed below active forms.
- Forms are automatically grouped by form type (Static first, then Dynamic).
Forms that have an uploaded document attached are listed under Static.
Forms that do not have an uploaded document attached are listed under Dynamic. - Under Active Forms - Dynamic, three 'New Student' forms are included by default:
• New Student Enrollment
• New Student Contacts
• New Student Address
The following forms are also included by default:
• Contacts
• Registration - Fields: # indicates the number of fields that have been added to a dynamic form. Static forms do not have fields.
 - Hover over the form and click the preview icon to preview the form.
The form opens in a pop-up window or different tab allowing you to view the form as it will be displayed to parents in ParentPortal. In the preview window, data cannot be edited or saved.
Create a new form:
- Create a static form using an uploaded document.
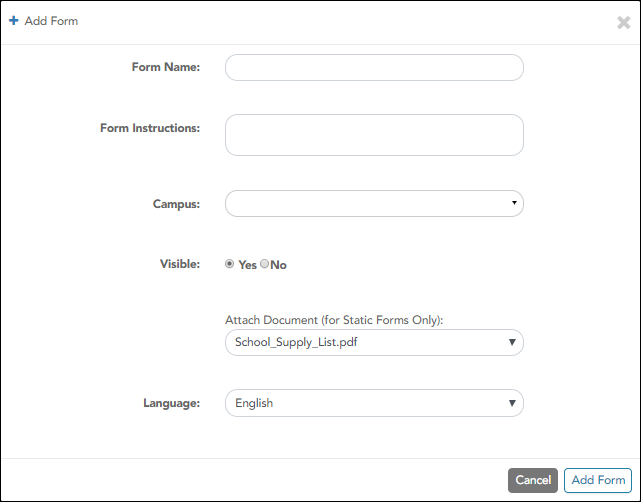
If you uploaded any documents on Document Upload, you must create a form with each document in order to make it accessible to parents. If you have English and Spanish versions of documents, you must upload each document individually.
❏ Click Add Form.The form is added to the Active Forms list on the left side of the page, under Static Forms.
❏ Repeat for all remaining static documents, including Spanish documents. - Create/edit a dynamic form using data fields.
Dynamic forms are built using the fields from Forms Field Management.
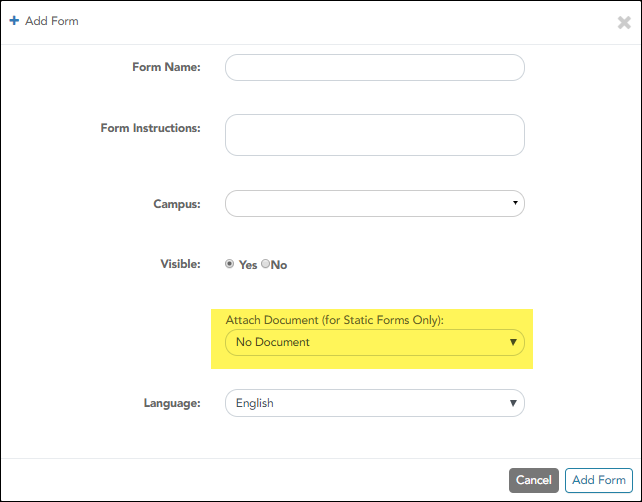
❏ Click Add Form.
IMPORTANT: For a dynamic form, leave the drop-down field set to No Document.
❏ Click Add Form.The form is added to the Active Forms list on the left side of the page, under Dynamic Forms.
❏ Under Active Forms: - Hover over the new or existing dynamic form and click the edit icon.
The form details open in the Edit Form section (right side) where you can add or edit details:
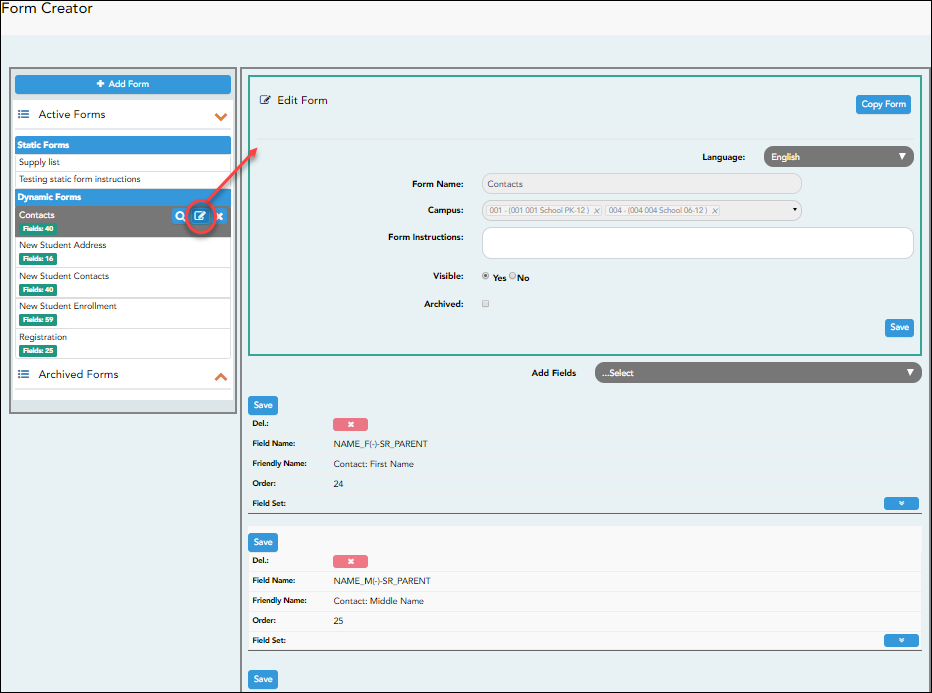
❏ Click Save.
❏ Select the fields to include on the form from the drop-down list:
NOTE: You must save changes for each field individually.
Field name The selected FIELD-NAME(-)-TABLE-NAME is displayed. Friendly Name The English default friendly name is displayed. Modify the name as needed. Order A default order number is assigned. (Optional) Indicate the order in which you want the fields to be displayed on the form. For example, type 1 if you want to field to be displayed at the top of the form. Field Set Use this column to group related fields together in the form. For example, you could type 'Mailing Address' for all fields that are related to the student's mailing address.
The fields that you want to physically group together should also be together as indicated by the Order field. The fields with the same Field Set are grouped together in a box, but only if they are adjacent in the order. The box is drawn around one or more sequential fields that have a Field Set specified.
Field Set does not apply to New Student Enrollment Forms.
 - Click to view additional fields.
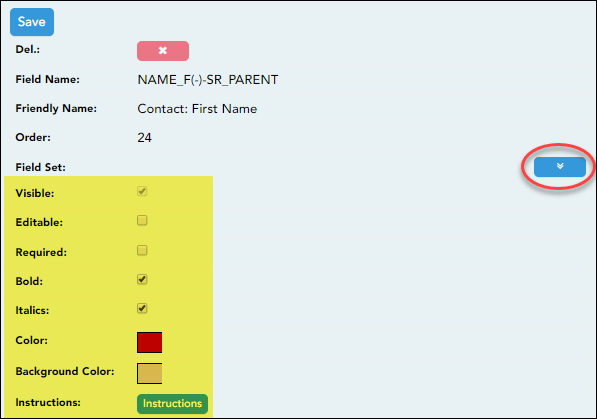
Visible Select if you want the field to be visible to parents on the form. Clear the check box if you do not want the field visible to parents. For example, you can hide the four-digit zip code extension. The setting of this field overrides all other visibility settings. Editable Select to allow parents to update data in this field from the form.
• If selected, the form field will be editable, but only if the field is also set to Updateable=true on Form Field Management.
• If not selected, this will override the other setting, and the form field will not be editable.This setting does not apply to New Student forms.
Required Select if the field is required of the parents. If this field is selected, be sure Edit is also selected. Bold Select if you want the field to be displayed in a bold font. Italics Select if you want the field to be displayed in an italic font. Color Click the box to select a color for the field text, if you prefer a color other than black. A pop-up window opens that provides seven color choices, as well as the option for no color (i.e., black).

Click a color to select it, and the window closes.Background Color Click the box to select a background color for the field. A pop-up window opens that provides seven background color choices, as well as the option for no color.

Click a color to select it, and the window closes.
The form is automatically shaded with an alternating (light/dark) gray background when displayed for parents in ParentPortal. If you do not select a color, or if you select No Color, the background will be gray.Instructions Click the button to view any existing default instructions and add additional instructions for the field. A pop-up window opens.
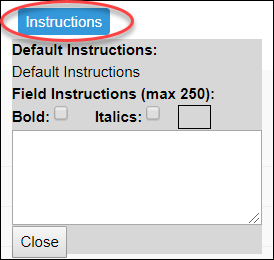
Default Instructions Any instructions entered above are displayed. They cannot be changed here. Field Instructions Add or update any additional instructions for the field. These instructions will be appended to the Default Instructions when the parent accesses the form in ParentPortal. Bold Select if you want the instructions to be displayed in a bold font. This selection will apply to all text typed in the Field Instructions area. Italics Select if you want the instructions to be displayed in an italic font. This selection will apply to all text typed in the Field Instructions area. Color Click the box if you want the instructions to be displayed in a color. A pop-up window opens that provides seven color choices, as well as the option for no color (i.e., black).

Click a color to select it, or click No Color, and the window closes.
This selection will apply to all text typed in the Field Instructions area.
❏ Click Close.
 - Click the corresponding delete icon to remove a column from the form.
It is removed from the list, but it is not actually deleted until you click Save.
❏ Click Save.
NOTE: If you created a form with fields from a vertical table, some required additional fields may be added automatically. If so, a message is displayed prompting you to review the fields before saving.
Note the added fields. These fields cannot be removed; the delete icon is not displayed.
❏ Click Save.Edit settings for a 'New Student' form.
New Student forms are dynamic forms used specifically for the new student enrollment process. Several New Student forms are included automatically and already have columns (i.e., fields) added.
- New Student Address
- New Student Contacts
- New Student Enrollment
These forms cannot be deleted or renamed; however, you can modify some of the default settings for each form column. See the Create/edit a dynamic form using data fields section for more details.
Under Active Forms:
 - Hover over a 'New Student' form and click the edit icon.
The form details open in the Edit Form section (right side) where you can add or edit details as described previously.
 - To remove a column from the form, click the corresponding delete icon.
It is removed from the list, but it is not actually deleted until you click Save.
❏ Click Save.Create a new form by copying an existing form.
An existing static or dynamic forms can be duplicated and renamed.
Only saved changes are copied to the new form; unsaved changes are not copied.
❏ Click Copy Form to create a new form that is an exact duplicate of the form you are copying.

A text box is displayed allowing you to type a name for the new form.
The new form name cannot already be in use by another form, and it must be three or more characters.

❏ Type the new form name and click Save.The new form is now displayed on the Active Forms list and can be modified as needed.
New forms are initially displayed at the top of the list. Once the page is refreshed, the form is sorted alphabetically with the section.Create a custom form.
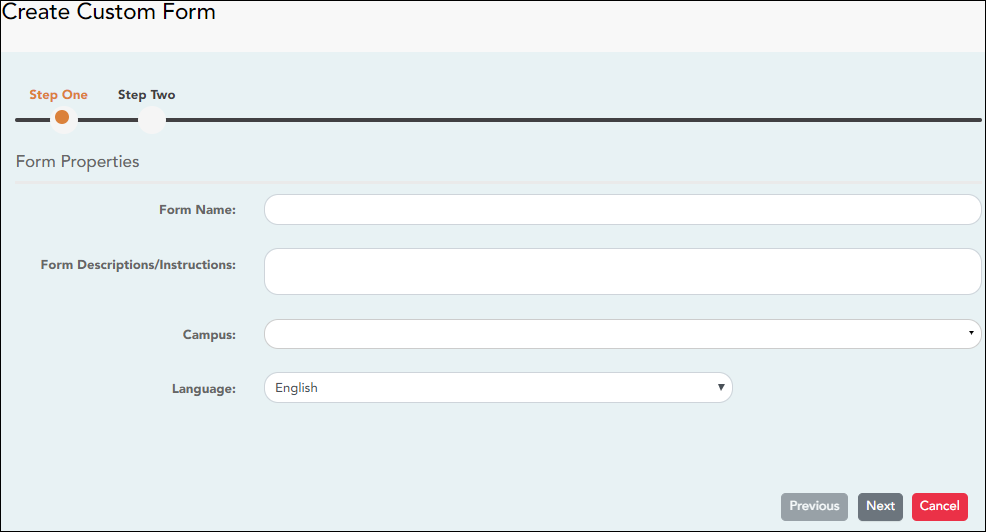
ASCENDER Parent Portal Admin > Form Management > Custom Forms > Create Custom FormStep 1
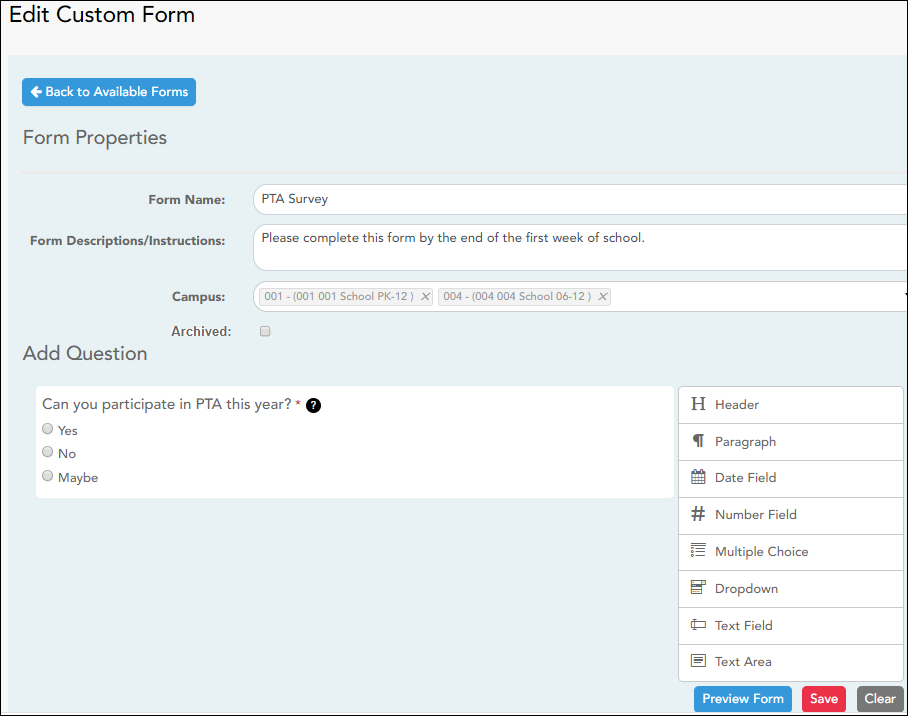
If selecting English and Spanish for Language, the English version will be created first. To translate into a Spanish version, use Custom Forms > Edit Custom Forms.
Form Properties:
Form Name Type a name for the form, using up to 50 characters. For a Spanish form, provide the name in Spanish. Form Descriptions/Instructions Type any specific district-level instructions for the form, using up to 500 characters. For a Spanish form, provide the instructions in Spanish. Campus (Required) Select a campus in order to assign the form to a specific campus. Or, select All Campuses if the form is used for all campuses in the district.
If you select All Campuses, each campus is listed, and you can remove individual campuses if needed.

NOTE: If you select All Campus by mistake, click Cancel All to clear all campuses at once.
Language Select the language of the form.
If you need the form in both English and Spanish (now or in the future), select English and Spanish. This creates a duplicate of the English form that can later be translated into Spanish on Custom Forms > Edit Custom Forms.
WARNING: Once the language option is selected, it cannot be changed.
❏ Click Next.
Step 2
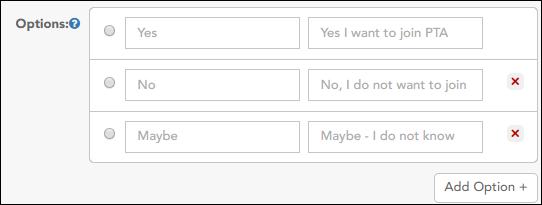
Question Format Types:
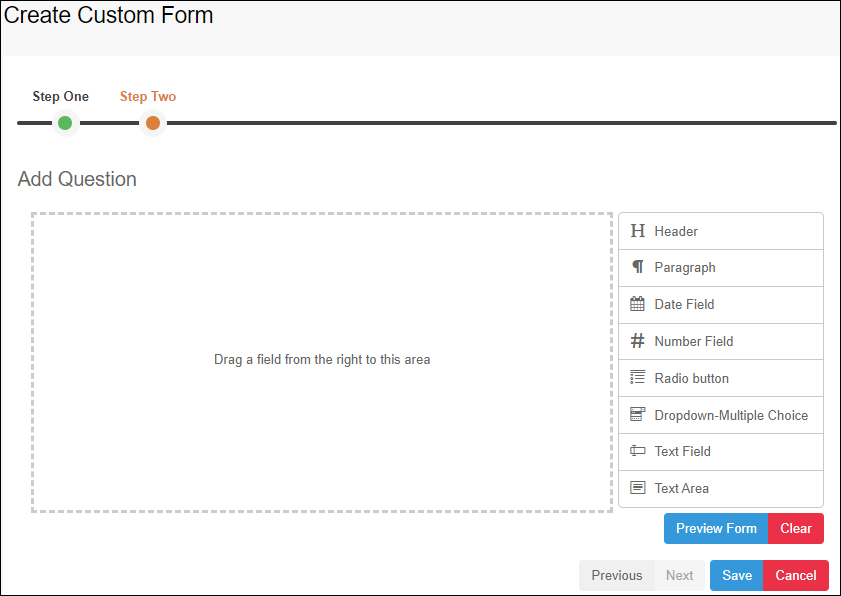
❏ You can add a variety of elements to your form.
- Drag the element from the right to the blank area in the middle.
- You can drag and drop the elements to re-position them within the form.
- Click Preview Form any time to see how the form will look to parents.
The following two options allow you to provide headings and instructions on the form.
Header Select to add a heading, up to 50 characters.
Example:

Paragraph Select to provide one or more sentences in the form, such as instructions, up to 1000 characters.
Example:

The following question format types refer to the answer you are soliciting from the parent.
All question format types allow the following properties to be set:
NOTE: For Spanish forms, provide this information in Spanish.
TIP: Be sure to add questions to the custom form that help identify the student that the information is being gathered for (e.g., What is your student’s first name? What is your student’s last name? Grade Level? What school does your child attend? (multiple choice)). The form results do not automatically provide default information such as first name, last name, grade level, campus.
The following properties depend on the type of question format type selected:
NOTE: For Spanish forms, provide this information in Spanish.
❏ You can further adjust the form. Hover over each question in the form: - Click to remove the question from the form.
 - Click to view/modify the properties of the question.
Click Close to collapse (i.e., hide) the properties for a particular question.
❏ Click Clear if you need to remove all questions from the form and start over.
❏ Click Save.
❏ Click Previous if you need to return to Step 1 to modify form properties.
NOTE: A custom form must be added to either the Returning Student Registration or Student Data Maintenance group (under Form Group Management) to be visible to parents. Custom forms are not available for use in New Student Enrollment.
ASCENDER Parent Portal Admin > Form Management > Custom Forms > Edit Custom Form
This page allows you to view or modify existing custom forms that you have created. Copy allows you to copy a form and add or remove fields.
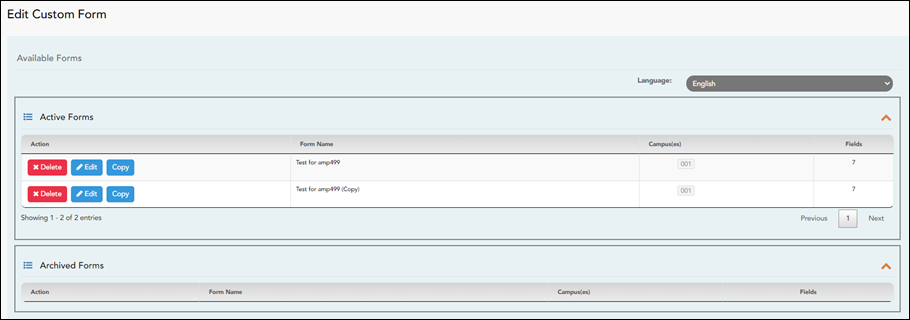
Your existing custom forms are listed. Active Forms are listed first, and Archived Forms are listed below active forms.
To translate an English and Spanish form into Spanish, select Spanish from the Language drop-down menu and select Edit.
WARNING: When translating into Spanish, only translate the text, do not change the order of the Questions or add any Questions. Doing so will cause data in the Spanish version to become out of sync with the English version.❏ Click Edit to view/modify a form.
The form opens in editing mode. You can make changes as described on Custom Forms > Create Custom Form.
NOTE: Custom Forms with data attached have limited edit capabilities. The campus cannot be edited and fields cannot be rearranged, deleted or duplicated. If major changes are required, it is recommended to use the Copy Form feature to create a new form.
❏ Or, click Copy to copy a form.
The form opens in editing mode. You can make a copy of a form and add or remove fields as described on Custom Forms > Create Custom Form. The Form Name field is limited to 50 characters.
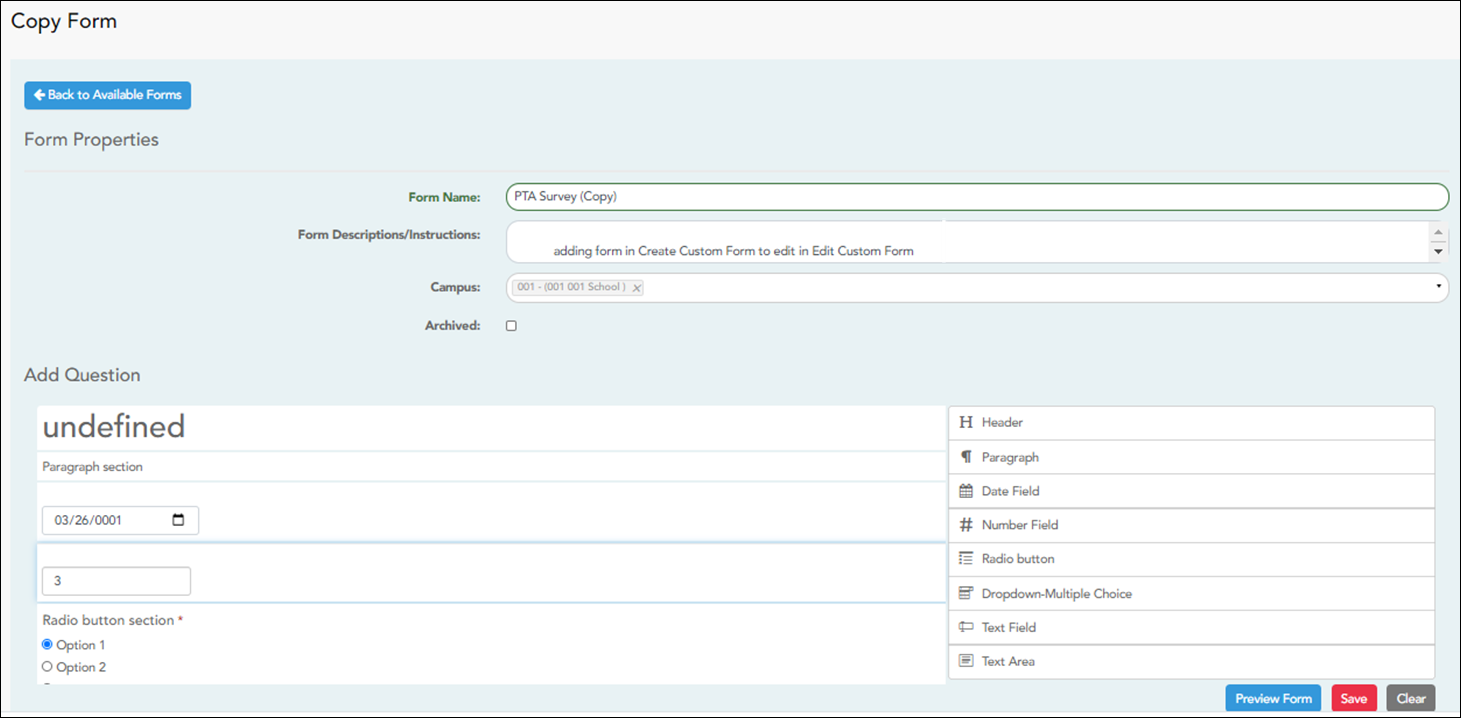
❏ Select Archive to archive the form.
Archiving allows you to retain forms that may still be needed for reporting purposes but are no longer used for data collection. An archived form is still accessible to administrators, but is grouped with other archived forms for organizational purposes.
❏ Click Back to Available Forms to return to the list of existing custom forms.
❏ Click Delete to delete a custom form.
NOTE: A custom form cannot be deleted if there is data associated with it.
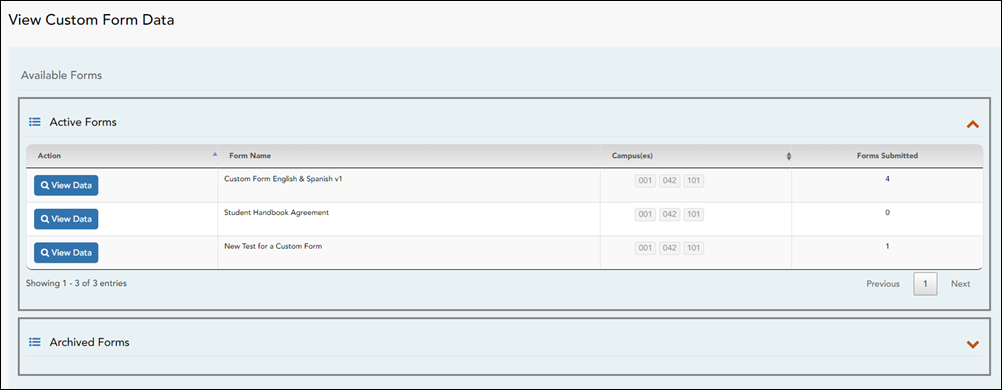
ASCENDER Parent Portal Admin > Form Management > Custom Forms > View Custom Form Data
This page allows you to view data submitted by parents in custom forms.
Your existing custom forms are listed. Active Forms are listed first, and Archived Forms are listed below active forms.NOTE: Archived forms are forms that may still be needed for reporting purposes but are no longer used for data collection. An archived form is still accessible to administrators, but is grouped with other archived forms for organizational purposes.
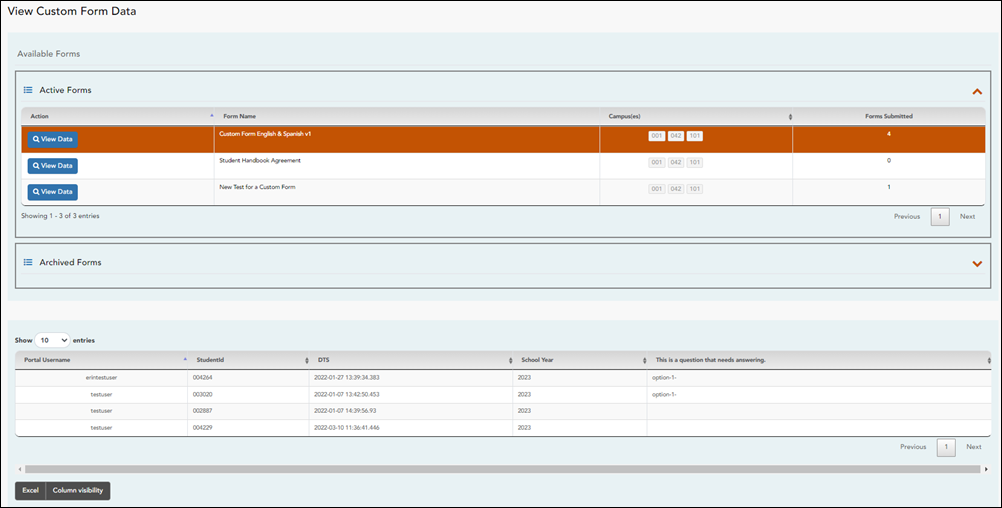
Form Name The name of the custom form is displayed, as entered in Step 1 on the Create Custom Form page. Campus The campuses using the custom form are listed. Forms Submitted The number of form responses submitted by parents is displayed.
❏ Click View Data to view the answers submitted by parents. <div indent>The answer data is displayed in a grid below the forms list.
TIP: You can click the column headings to sort data by a particular question.
Excel Click to export the report as a spreadsheet. Column visibility Click to select which columns to include in the export.
NOTE: It is recommended that you save a backup copy of the form once all data is gathered.
Edit, delete, or archive existing forms.
ASCENDER ParentPortal Admin > Form Management > Form Creator
Once a form is created, it can be edited, archived, and deleted.
Edit a form:
❏ Under Active Forms:
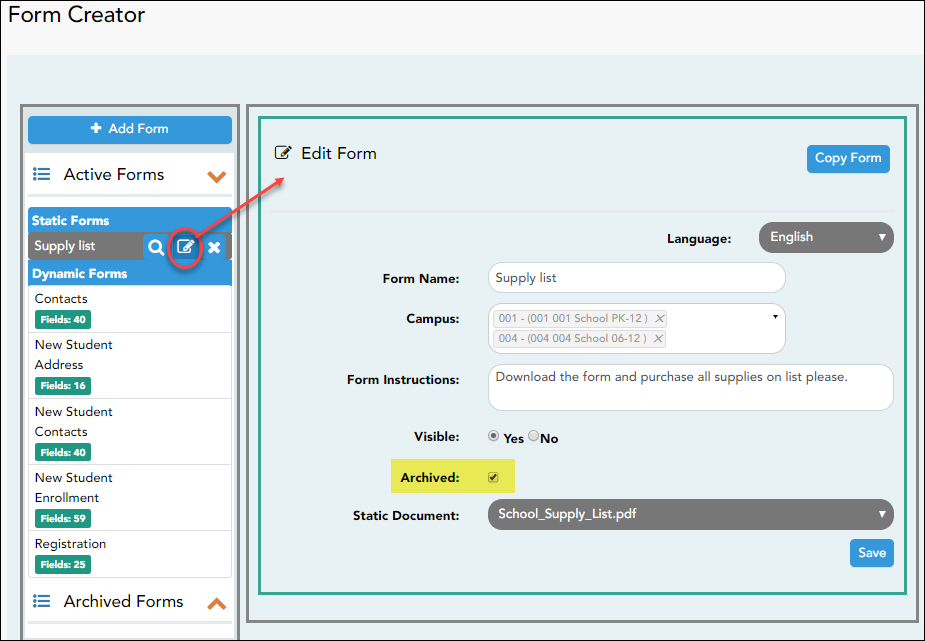
Archive a form:
Archiving allows you to retain a form that may still be needed for reporting purposes but is no longer used for data collection. An archived form is no longer available to parents, but it is still accessible to administrators and grouped with other archived forms. A form can be un-archived at any time.
 - Hover over the new or existing form and click the edit icon.
The form details open in the Edit Form (right) section. Select Archived and click Save.
The form moves from the Active Forms list to the Archived Forms list.
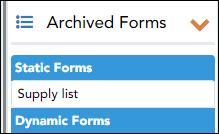
Clear the Archived field if you want to make the form active again. The form will move back to the Active Forms list.
Delete a form:
❏ Under Active Forms (left):
Create groups and add forms to groups:- Create the New Student Enrollment forms group.
ASCENDER ParentPortal Admin > Form Group Management > New Student EnrollmentThis page allows district-level users to add or modify the list of forms associated with enrollment of new students.
The list of available forms is pre-set and cannot be modified.
NOTE:
Only static and standard forms can be added for New Student Enrollment Forms Group. Custom forms are not available for New Student Enrollment. The dynamic forms for New Student Enrollment are added by default and aren’t viewable here.
Any selected static forms will be available to parents on Step 5 of the New Student Enrollment process; the parent can view, print, complete, and hand deliver these forms to the campus.
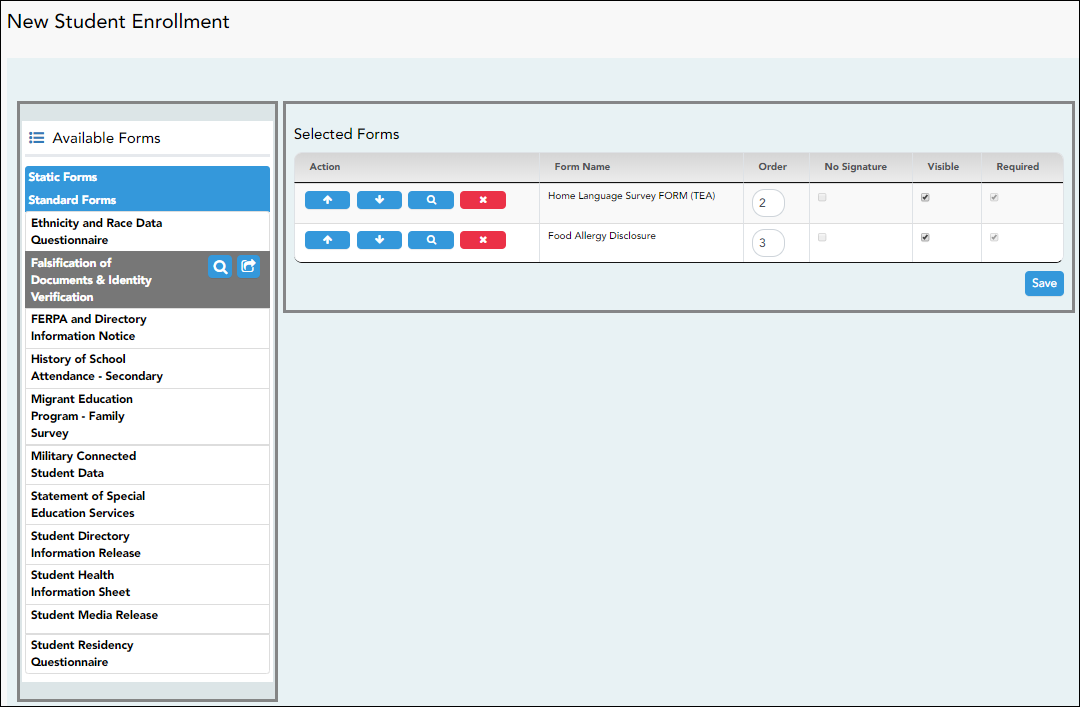
❏ In the Available Forms (left) list:
 - Hover over the form and click to preview the form. The form opens in a separate browser window.
 - Hover over the form and click to add the form to the New Student Enrollment group.
❏ The form is added to the Selected Forms (right) list where you can modify certain properties:
Order Type the number indicating the order in which you want the forms to be listed within the group. For example, type 1 if you want the form to be listed first in the group. No Signature Select if the form has no data input fields or the parent is not required to acknowledge or submit the form. This only applies to forms that are for information purposes only, such as a school supply list or calendar.
When selected, the form will not have any buttons displayed in ParentPortal allowing the parent to submit or acknowledge the form. The form will be displayed as a read-only form.
NOTE: For standard forms, the field is disabled; it is cleared by default and cannot be selected.
Visible Select to make the form visible to parents. If not selected, the form will not be displayed in ParentPortal, even if it is associated with a group. This field can be used if you need to temporarily or quickly block access to the form. Required Select to indicate to the parent that the form is required.
NOTE:
For standard forms, the field is selected by default and cannot be cleared.
For static forms, the field is cleared by default and cannot be selected.
❏ You can modify the order in which the forms are displayed in ParentPortal:
❏ Click Save.
❏ Under Selected Forms:
 - Click to preview the form. The form opens in a separate browser window.
 - Click to delete the form from the group.
You are prompted to confirm that you want to delete the form. Click OK.
The form is removed from the list on the right and moved back to the Associated Forms list on the left. - Create the Returning Student Registration forms group.
ASCENDER ParentPortal Admin > Form Group Management > Returning Student Registration
This page allows district-level users to create a set of forms for annual registration of returning students.
NOTE: Returning Student Registration refers to forms required annually for returning students, which is not the same as New Student Enrollment.
When Returning Student Registration is enabled at the district, these forms will be displayed to parents when they are logged on to ParentPortal, and parents will have notifications indicating their progress in the registration process.
Download Standard Forms:
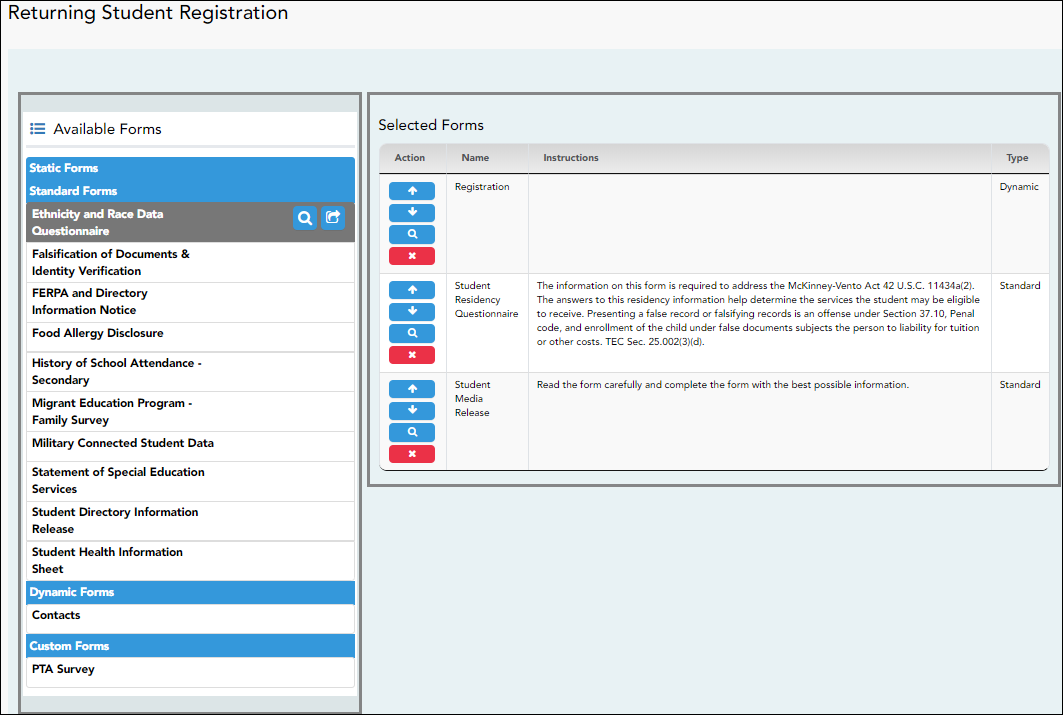
❏ In the Available Forms (left) list:
 - Hover over the form and click to preview the form. The form opens in a separate browser window.
 - Hover over the form and click to add the form to the Online Registration group.
❏ The form is added to the Selected Forms (right) list:
IMPORTANT: Once a form is added to the group, it is live. There is no Save button.
Instructions The instructions are displayed, as entered in Form Instructions on Form Management > Form Creator. Type The form type is displayed.
❏ You can modify the order in which the forms are displayed in ParentPortal:
❏ Under Selected Forms:
 - Click to preview the form. The form opens in a separate browser window.
 - Click to delete the form from the group.
You are prompted to confirm that you want to delete the form. Click OK.
The form is removed from the list on the right and moved back to the Available Forms list on the left. - Create the Student Data Maintenance forms group.
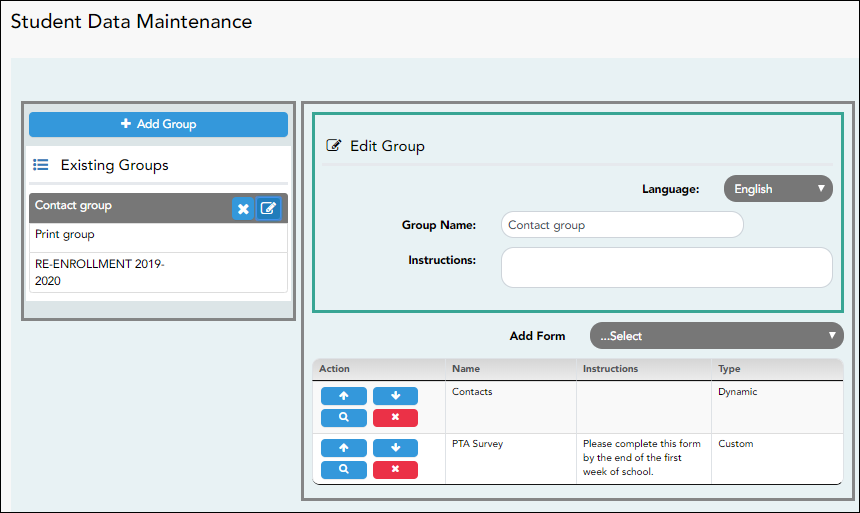
ASCENDER ParentPortal Admin > Form Group Management > Student Data MaintenanceThis page allows district-level users to create a group of forms that parents can use for student data maintenance, such as changes to demographic data throughout the year (e.g., address or phone number changes).
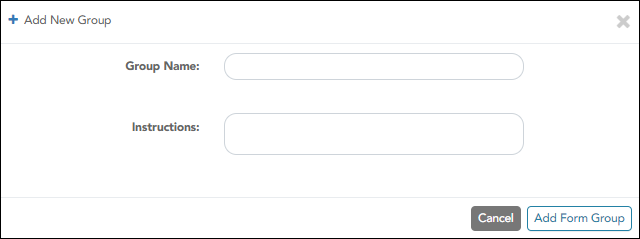
Add a group:
❏ Click + Add Group.
Group Name Type a name for the group. Instructions Add or update any instructions for the form group, such as clarification about which forms are included in the group.
NOTE: If you are creating a group for Spanish forms, the instructions should be typed in Spanish. If you do not type Spanish instructions under Instructions, English instructions will be displayed even if the parent is viewing ParentPortal in Spanish.
❏ Click Add Form Group.The group is added to the Existing Groups (left) list.
Edit a new or existing group:
❏ In the Existing Groups (left) list:
 - Hover over the new or existing group and click the edit icon.
The group details open in the Edit Group section (right) where you can add or edit group details:
Language Select the language of the forms in the group.
NOTE: If you select Spanish, but you did not type Spanish instructions under Instructions, English instructions will be displayed even if the parent is viewing ParentPortal in Spanish.
Group Name The current group name is displayed and can be edited. Instructions The current instructions for the form group are displayed and can be edited.
NOTE: If you are creating a group for Spanish forms, the instructions should be typed in Spanish. If you do not type Spanish instructions under Instructions, English instructions will be displayed even if the parent is viewing ParentPortal in Spanish.
Add Form Select each form you want to add to the group. Be sure to select forms that correspond to the selected Language.
As forms are added, they are listed below the Edit Group section in the order they were added.
❏ You can modify the order in which the forms are displayed in ParentPortal:
❏ Under Edit Group (right):
 - Click to preview the form. The form opens in a separate browser window.
 - Click to delete the form from the group.
You are prompted to confirm that you want to delete the form. Click OK.
The form is removed from the group but not deleted from the ParentPortal server.
❏ Under Existing Groups (left): - Create the Public Documents group.
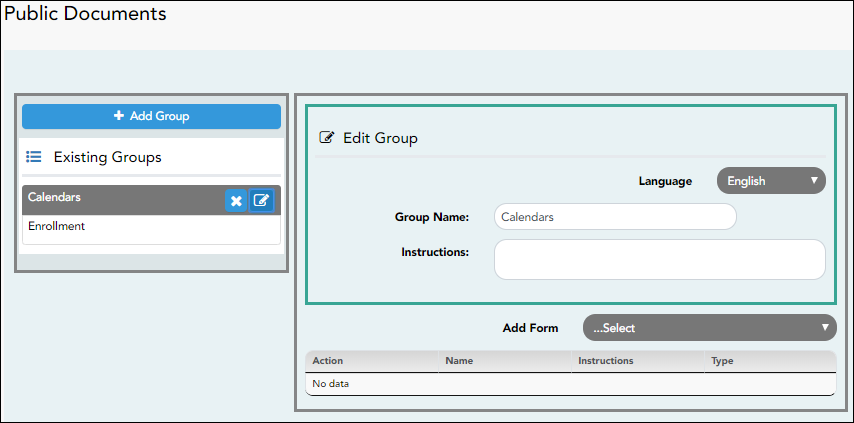
ASCENDER ParentPortal Admin > Form Group Management > Public DocumentsThis page allows district-level users to create a group of forms that a parent can access without having a ParentPortal account, such as calendars, school supply lists, etc. The parent will be able to access these documents without logging on.
Only static forms can be added to these groups. If at least one static form has been added to this group, the parent can click the District Name Documents link on the ParentPortal login page to access the documents.
NOTE: A static form must already be created for each uploaded document before it can be added to a group.
Add a group:
❏ Click + Add Group.
Group Name Type a name for the group. Instructions Add or update any instructions for the form group, such as clarification about which forms are included in the group.
NOTE: If you are creating a group for Spanish forms, the instructions should be typed in Spanish. If you do not type Spanish instructions under Instructions, English instructions will be displayed even if the parent is viewing ParentPortal in Spanish.
❏ Click Add Form Group.The group is added to the Existing Groups (left) list.
Edit a new or existing group:
❏ In the Existing Groups (left) list:
 - Hover over the new or existing group and click the edit icon.
The group details open in the Edit Group section (right) where you can add or edit group details:
Language Select the language of the forms in the group.
If you are creating a group for Spanish forms, select Spanish.Group Name The current group name is displayed and can be edited. Instructions The current instructions for the form group are displayed and can be edited.
NOTE: If you are creating a group for Spanish forms, the instructions should be typed in Spanish. If you do not type Spanish instructions under Instructions, English instructions will be displayed even if the parent is viewing ParentPortal in Spanish.
Add Form Only static forms are listed.
Select each form you want to add to the group. Be sure to select forms that correspond to the selected Language.As forms are added, they are listed below the Edit Group section in the order they were added.
❏ You can modify the order in which the forms are displayed in ParentPortal:
❏ Under Edit Group:
 - Click to preview the form. The form opens in a separate browser window.
 - Click to delete the form from the group.
You are prompted to confirm that you want to delete the form. Click OK.
The form is removed from the group but not deleted from the ParentPortal server.
❏ Under Existing Groups list (left side):
Enable forms for parents.
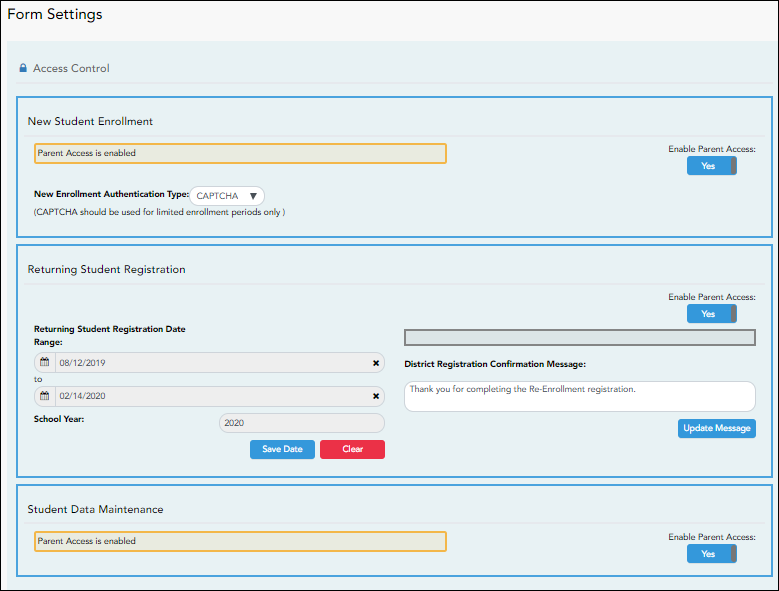
ASCENDER ParentPortal Admin > Admin Menu > Form Settings
Once forms are set up, you can enable New Student Enrollment, Returning Student Registration, and Student Data Maintenance in ParentPortal throughout the district, and manage other form settings.
NOTE: Public Documents (i.e. calendars, school supply lists, downloadable registration forms) will be available on the ASCENDER ParentPortal Login page once the static forms have been created (Form Management > Document Upload and Form Management > Document Upload > Form Creator) and added to the Pubic Documents group (Form Group Management > Public Documents).
Access Control:
New Student Enrollment
❏ Enable or disable new student enrollment in ParentPortal.
Enable Parent Access This field enables and disables New Student Enrollment in ParentPortal. This field is set to No by default. Leave set to No until setup is complete and you are ready to enable Student Enrollment.
When set to Yes. the Enroll a New Student button will become active on the ParentPortal allowing the parent to enroll a new student in the district.New Enrollment Authentication Type Select the user validation method for Student Enrollment:
Email - Validate a user by email. With this validation process, an email message is sent to the user’s email address containing the registration code. The user must type the code, exactly as it appears in the message, in order to continue with the enrollment process.
CAPTCHA - Validate a user by CAPTCHA, which is a tool that protects websites against bots by generating codes that humans can pass but computer programs cannot pass. When this option is enabled, the registration key is automatically generated once you correctly enter the CAPTCHA code. An email message is sent to the parent containing the registration key.
IMPORTANT: The CAPTCHA option should only be used during short-term enrollment events such as Kinder Roundup.
Returning Student Registration
❏ Enable or disable annual registration of returning students.
Enable Parent Access This field enables and disables Returning Student Registration.
Select Yes if you will be using Returning Student Registration.
Use Online Registration Date Range to control when Returning Student Registration is available to parents.Online Registration Date Range To specify the beginning and ending dates for registration:
❏ Click in the field, and a calendar opens.
❏ First click the start date, then click the end date.The calendar closes once you click the end date.
When the current date falls on or within these dates, parents will be able to use Returning Student Registration for students who are enrolled in the district.
If no dates are entered, or if the current date is outside the date range, Returning Student Registration is not available in ParentPortal.School Year The displayed school year is determined by looking at the From/Beginning date-year to determine the school year/ending year that Returning Student Registration is for. District Registration Confirmation Message ❏ Type a message that will be displayed to parents upon successfully completing Registration in ParentPortal.
❏ Click Update Message.Notes:
- Annual Student Data Rollover (ASDR) does not need to be run prior to enabling parent access to Returning Student Registration.
- Districts can accept or reject pending changes for returning students before or after Annual Student Data Rollover (ASDR) has been run.
Student Data Maintenance
❏ Enable or disable ongoing student data maintenance.
Enable Parent Access This field enables and disables Student Data Maintenance in ParentPortal.
Review enrollment requests:
As students are enrolled online in ParentPortal, an administrator must review each enrollment request, create a record for each registered student, and assign a ParentPortal ID to each student.
See the following guides:
Review student demographic change requests and form submission:
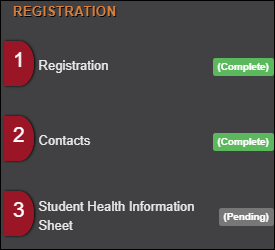
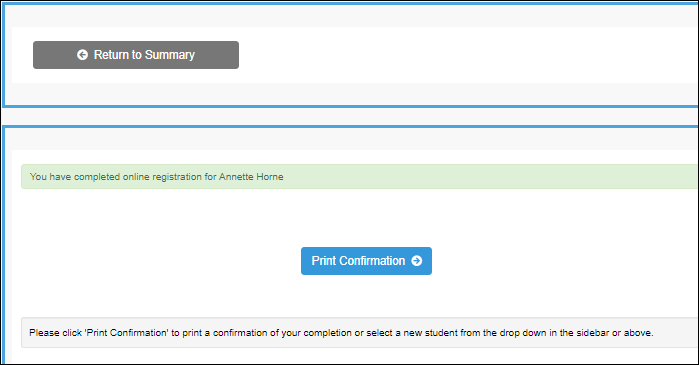
As parents update data for their students and/or complete Returning Student Registration, campus staff must review and approve each data change. As parents submit data and forms from ParentPortal, the campus staff can monitor the status and identify students who are missing required forms.
See the following guides:
View form usage:- Form Management > Form Usage > Usage Statistics - Displays information about form usage across the district or campus, or for a specific parent. Archived forms are not included in these counts.
- Form Management > Form Usage > Individual Form Information - Displays data that is collected when a parent makes changes online to a student's registration information or accepts the data that is currently stored in the registration tables. You can retrieve and delete data for a specific form for the entire campus or district, as well as by parent.
Parent: Enroll a New Student in the District
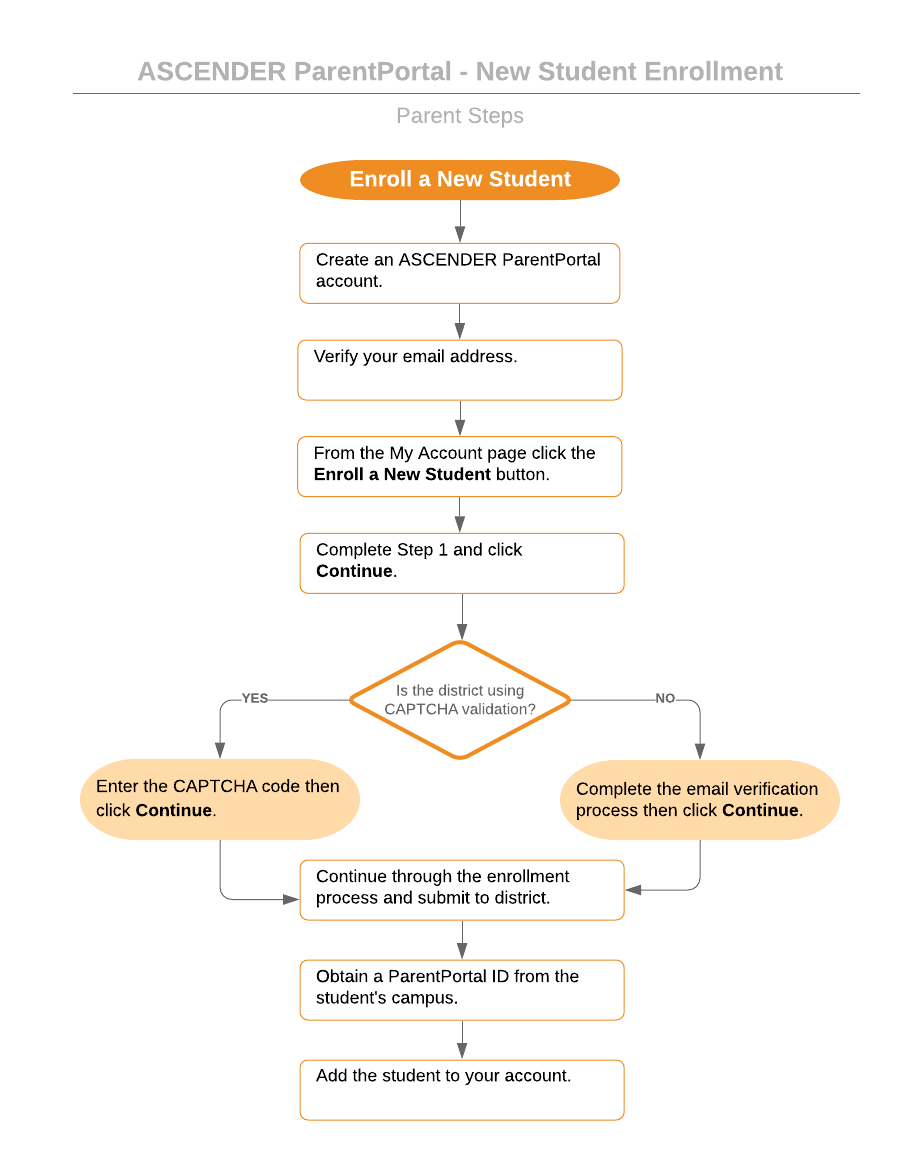
Parents should follow these steps to enroll a student in the district using the New Student Enrollment wizard.
This guide assumes that several required steps have already been completed by the district to enable online enrollment.
- The Enable New Student Enrollment field must be set to Yes.
- Create an ASCENDER ParentPortal account and log on.
ASCENDER ParentPortal > Login
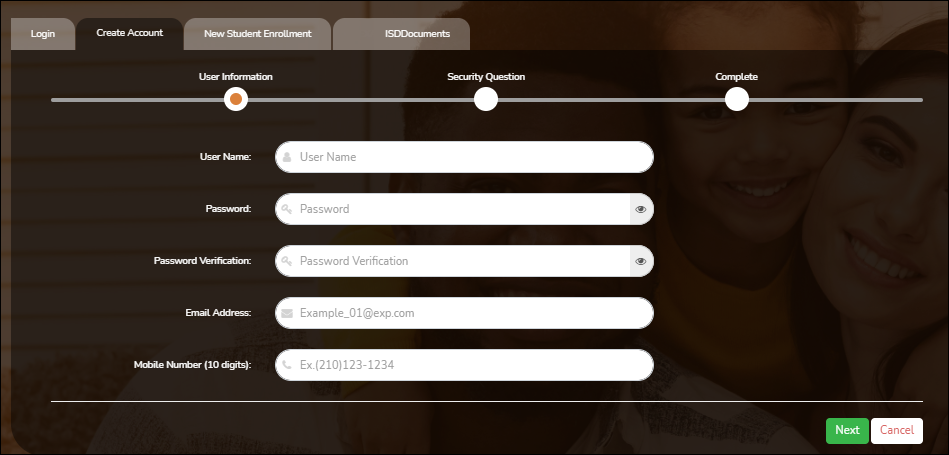
Before enrolling a student, the parent must create a user account in ASCENDER ParentPortal in order to obtain a user name and password to access the system. When you access ParentPortal, the Login page is displayed.
Click Create New Account.

The Create Account - User Info page opens.
Email Address (Required) Type your email address. You cannot enter an address that is already in use.
NOTE: If you have multiple students associated with your account, the email address listed for the guardian at your student's campus must match for ALL students associated with your ParentPortal account in order for Registration features to be activated, and the email address must be validated.
Mobile Number Type your ten-digit mobile number. You cannot enter a number that is in use.
❏ Click Next.
Security Question
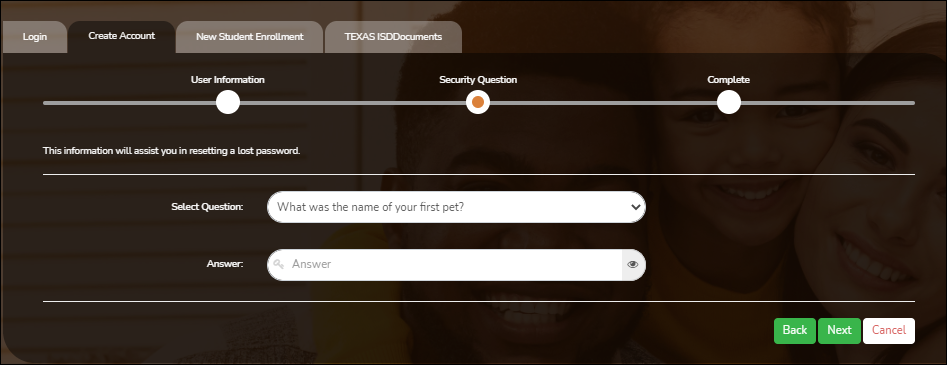
Select Question Select a question. If you need to reset your password, you will be asked this question.
Answer Type the answer to the question.
You will need to answer this question correctly to recover your password. Be sure to select a question for which you will remember the answer easily.
IMPORTANT: The answer is case-sensitive (always write it exactly as it appears here, including upper and lower case letters).
❏ Click Next.
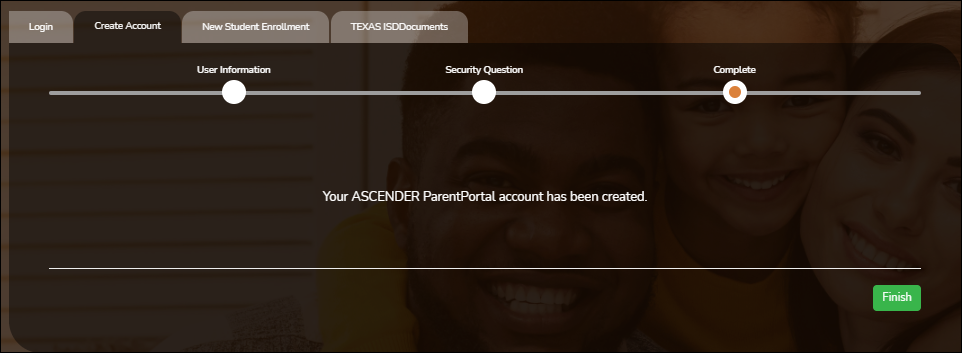
Complete❏ Click Finish.
- The My Account page opens where you can add a student to your account and update your security and contact information.
- If you entered an email address or mobile number, you will receive a notification message containing a verification link.
NOTE: If you are not listed as a contact or as a guardian (i.e., student, step-parent, etc.), you will be a read-only user with limited access.
- Complete the new student enrollment process.
ASCENDER ParentPortal > My Account
If you are continuing from the previous step, the My Account page is displayed. Otherwise, log on and select My Account from the header menu.
If you have not already verified your email address using the link that was sent to your email address, you must do this now to continue.
IMPORTANT: If you do not have access to an email address, contact your student's campus.
❏ Verify the email address:
You must provide and verify your email address before you can access features that require your email address.
You can update your email address at any time.
If no email address has been entered, enter the address.Email Address Type your current email address.
You cannot enter an email address that is already in use.Confirm Email Address Retype the email address to confirm that you typed it as intended.
❏ Click Verify Email Address.
You will receive an email message at that address containing a verification link.
If you entered an email address when you registered for this ASCENDER ParentPortal account, you should have received an email message in your inbox with a code allowing you to verify your email address.
- If the email has been verified, your email address is displayed.
- If your email address has not been verified, you can click Resend Code to send a new code.
❏ To enroll a student who has never been enrolled in the district, click Enroll a New Student.
The New Student Online Enrollment page opens.
You must already have verified your email address before this button is displayed.
ASCENDER ParentPortal > My Account > Enroll a New Student
The New Student Enrollment page allows you to go through the steps required to enroll a new student online using forms provided by the district, and then request an enrollment key which will allow you to complete the New Student Enrollment process.
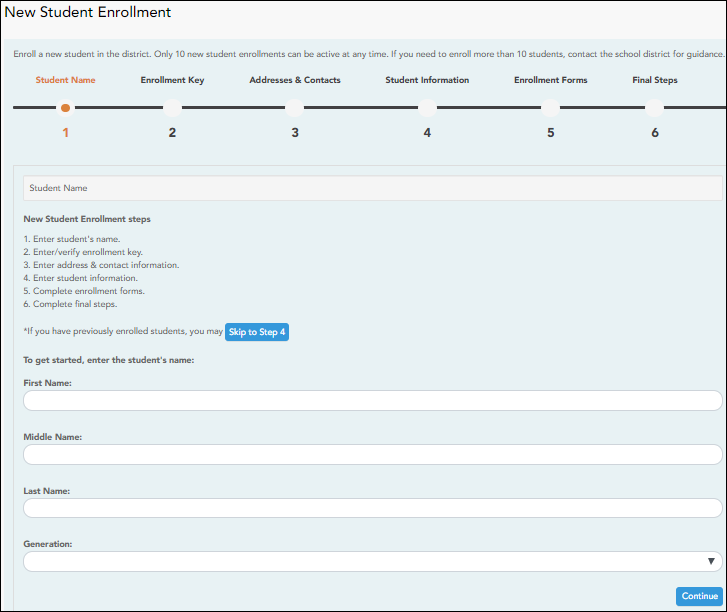
Step 1 - Student Name:
❏ Enter the student's full name and click Continue.
Step 2 - Enrollment Key:
There are two possible methods for requesting an enrollment key. One of the following options will be available, as determined by the district.
- Option 1 - Email Validation
For this option, an enrollment key is sent to you in an email message.
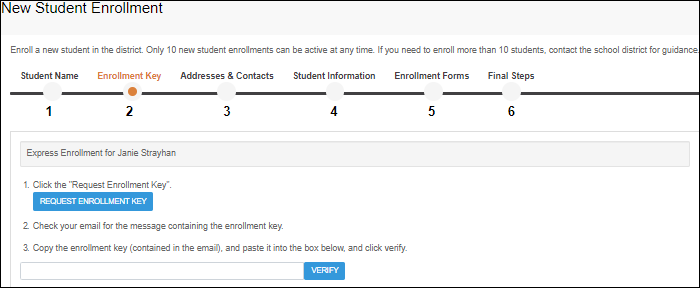
Once you obtain the key, you can enter the key on this page to complete the process. To do this, follow these steps:
❏ Click REQUEST ENROLLMENT KEY to request an enrollment key for your student.A message is sent to your email address that contains the new 16-character student enrollment key.
❏ Check your email inbox for the message that contains the enrollment key.
Enrollment Key You must enter the exact enrollment key in order to complete the enrollment process. The easiest way to enter the code accurately is to copy it from the email message and paste it into the field.
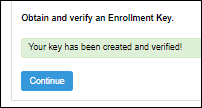
❏ Click VERIFY.If you typed the enrollment key correctly, the message “Your key has been created and verified!” is displayed.
- Option 2 - CAPTCHA Validation
For this option, a key is generated once you correctly enter the CAPTCHA code. To do this, follow these steps:
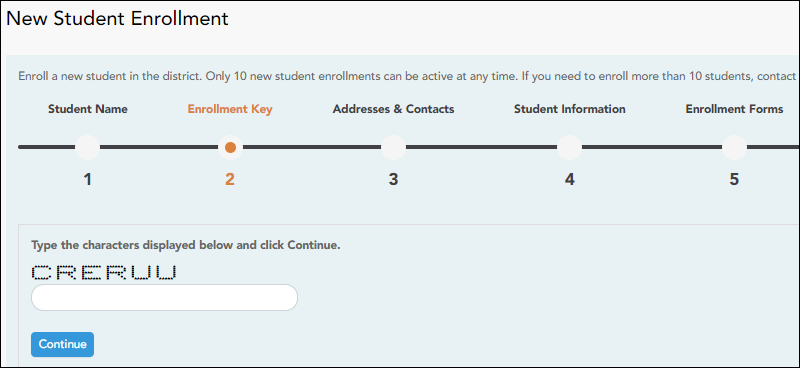
This option is primarily used during a short-term enrollment event, such as Kinder Roundup.
❏ Type the CAPTCHA code exactly as it appears on the page.
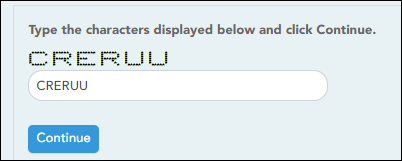
❏ Click Continue.
❏ Click Continue.
Step 3 - Addresses & Contacts:
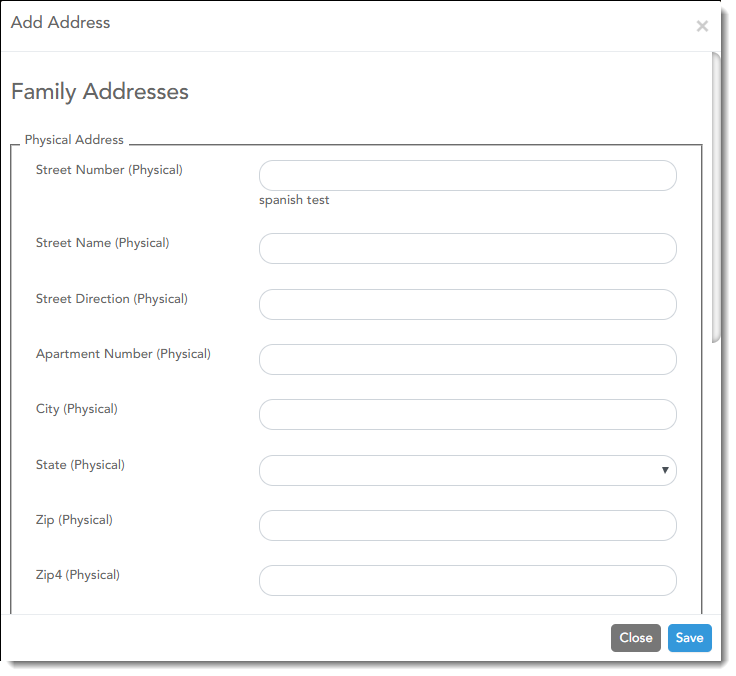
Step 3 allows you to add physical addresses and mailing addresses for the student, family members, and other contacts.
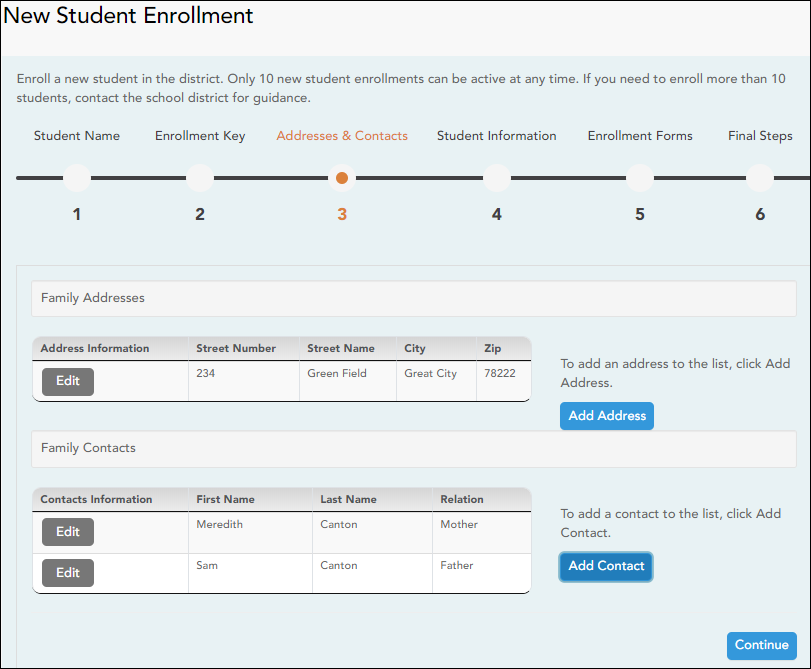
Family Addresses Any existing addresses for the student and family are listed. You can enter multiple sets of addresses if needed.
Add address:❏ Click Add Address to add an address.
❏ Type the complete address in the fields provided.
❏ Click Copy to copy data from the Physical Address fields to the Mailing Address fields if applicable.
❏ Click Save.
Edit address:❏ Click Edit next to the address to edit an existing address.
The Add Address window opens.
❏ Update the fields as needed.
❏ Click Save.
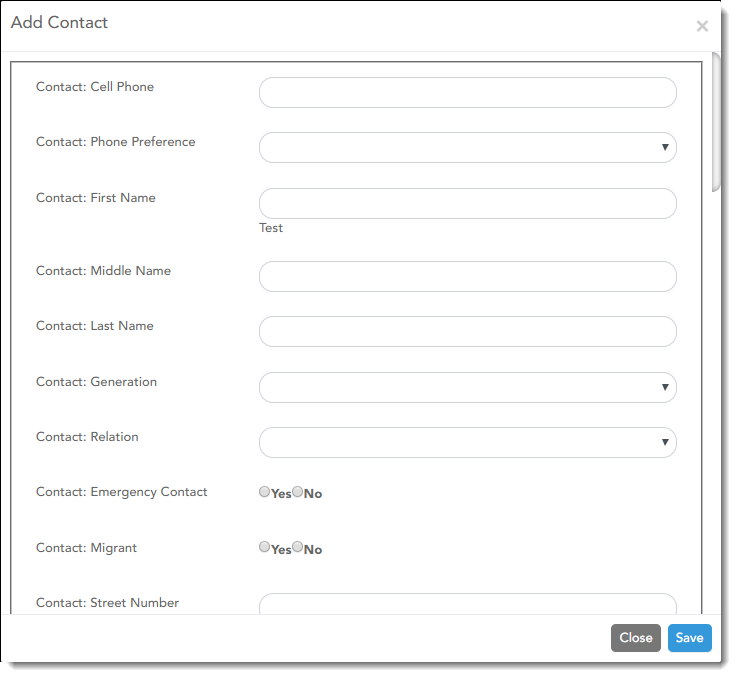
Family Contacts Existing contact information for all of the student's family and emergency contacts. Add up to seven contacts as needed.
Add a contact:❏ Click Add Contact to add a contact.
❏ Enter data in the fields, including the contact's complete name and address.
❏ Click Save.
❏ Add additional contacts as needed.
Edit a contact:❏ Click Edit next to the contact's name.
The Add Contact window opens.
❏ Update the fields as needed.
❏ Click Save.
❏ Click Continue.
Step 4 - Student Information:
Any existing students added to your account are listed.
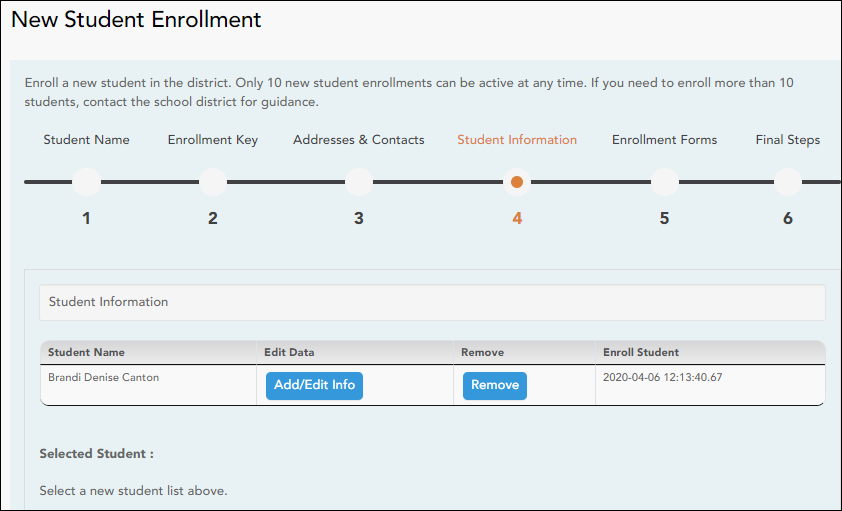
❏ Click Add/Edit Info for the student.The page is re-displayed allowing you to select the student's address and contacts and enter additional information for the selected student.
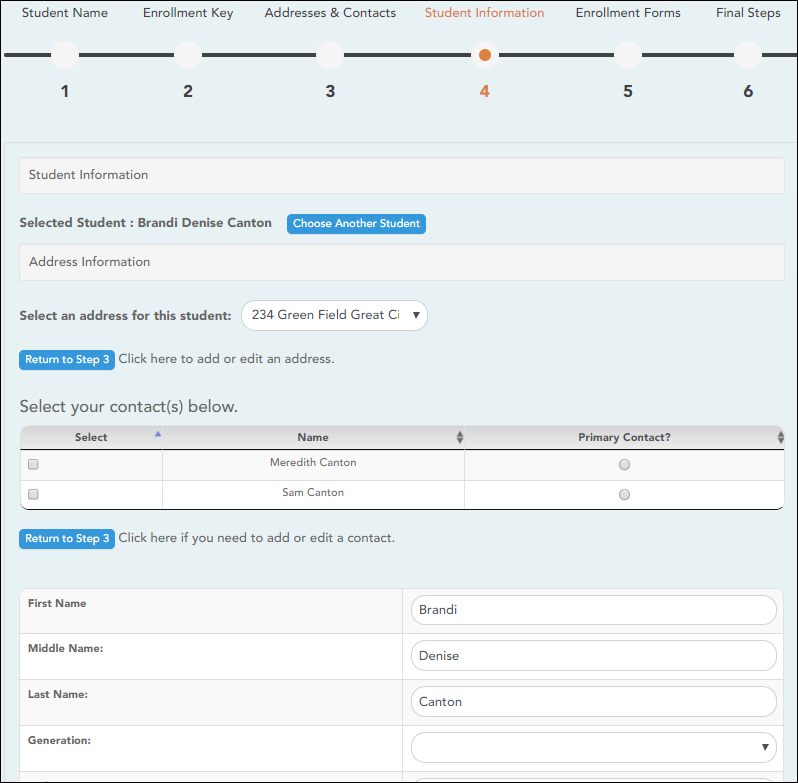
Student Information The name of the selected student is displayed. Click Choose Another Student to enter data for a different student. Address Information Select an address for the student from the drop-down list. These are the addresses entered in Step 3.
If you need to add another address, you can click Return to Step 3 to add another address, and then return to Step 4.Select your contact(s) below Select contacts for the student from those entered in Step 3: • From the list of contacts, select up to seven who should be listed as contacts for the student.
• Of those selected as contacts, select Primary Contact for the one who is the student's primary contact.
If you need to add another contact, click Return to Step 3 to add another contact, and then return to Step 4.student demographic information Enter student demographic data in the fields provided.
Attach a document:
If a field contains the Document button, you can click the button to upload a file related to online enrollment, such as a birth certificate, driver license, immunization record, or proof of residency.
A window opens allowing you select and upload one or more files.
Document Upload Click Choose File. Locate and select the file to be uploaded.
The following file types are acceptable:• PDF
• Text: .txt
• Microsoft applications: .doc, .docx, .pps, .ppt, .pptx, .xls, and .xlsx
• Images: .gif, .jpeg, .jpg, .png, .tif, and .tiff
• Video: .avi, .flv, .mov, .mpe, .mpeg, .mpg, and .wmv
• Audio: .wav
• Zipped: .zipDescription Type a description of the file you are uploading.
❏ Click Upload File.A message is displayed indicating that the file upload was successful, and the details are displayed.
❏ Click Close to close the window.
 - If a document has been uploaded for a particular field, the button displays Documents(+) (with a plus sign).
 - If no document has been uploaded for the field, the button displays Documents(-) (with a minus sign).
View or delete an existing document:
❏ Click Documents(+).
❏ Click Save and Continue.
❏ Or, click Save and Continue Later if you have not completed all information and need to continue at a later time. A message is displayed indicating that the data is saved but not submitted for district processing. You can return at a later time to complete the process.
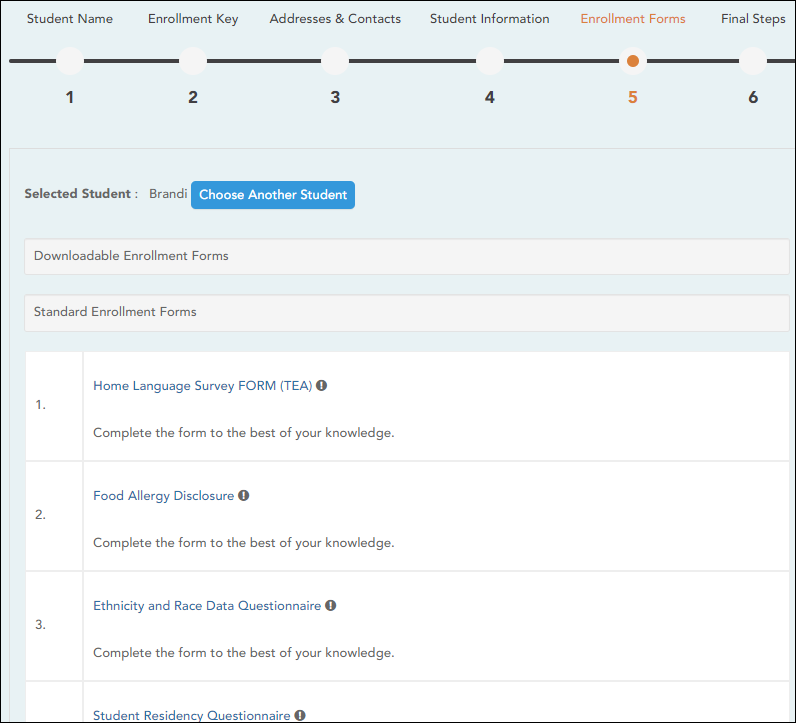
Step 5 - Enrollment Forms:
❏ Under Downloadable Enrollment Forms:
Any additional forms required by the campus or district are listed.
(If you are unable to submit forms online, they can be printed: Download Standard Forms (optional):)
❏ Click each form to view it. The form opens in a new window where it can be viewed and printed.
❏ Print and complete all forms by hand, and take the completed forms to the campus or district if required.
❏ Under Standard Enrollment Forms:The required standard forms are listed. These forms can be completed and submitted online. Icons next to the form name indicate if you have completed the form:
 - Indicates that the parent has not saved the form.
 - Indicates that the parent has already saved the form.
❏ Click each form to view it.The form opens in a pop-up window.
❏ Enter the required information and click Save Changes.
You cannot save a form unless all required data is entered.
NOTE: Some forms do not have data entry fields, but do need to be acknowledged by the parent. In this case, the click Save Changes to acknowledge the contents of the form.
Until all forms are saved, the Enroll Student button remains disabled. (You may need to scroll down to view the Enroll Student button.)
❏ Click Enroll Student when all data and forms are ready.
The student’s enrollment information is submitted to the district for review and acceptance. You will also receive a confirmation notice by email.
Step 6 - Final Steps:

❏ Click Add Another Student if you need to enroll another student, and repeat the process from Step 1.
Under Enrollment Confirmation:
All students are listed whom you have successfully submitted to the district for enrollment, or are in the process of enrolling.
- If you have started the enrollment process for the student, the student's name is displayed.
- If his enrollment has successfully been submitted to the district, the submission date-time stamp is displayed.
❏ (Optional) Click Print to print a confirmation message for each enrolled student.The message contains the student’s name, student enrollment key, and further instructions for your records.
What Happens Next?
Visit in person:
To complete the enrollment process, it may be necessary to go to the district or campus to deliver the downloadable forms and complete any steps that must be handled in person, as required by the district and campus. Contact your campus for these instructions.
Receive a ParentPortal ID:
Once the district or campus has completed your student's enrollment, the campus will issue you a ParentPortal ID for each student you successfully enrolled. You can use the portal ID to add the student to your account.
Once your student is completely enrolled and added to your account, he will be listed on your My Account page under Students.
- Once the campus has accepted the enrollment of your student, the campus will issue you a unique ParentPortal ID for each student allowing you to add to student to your ParentPortal account.
Campus: Accept Student & Issue ParentPortal ID
These steps are completed in ASCENDER Registration.
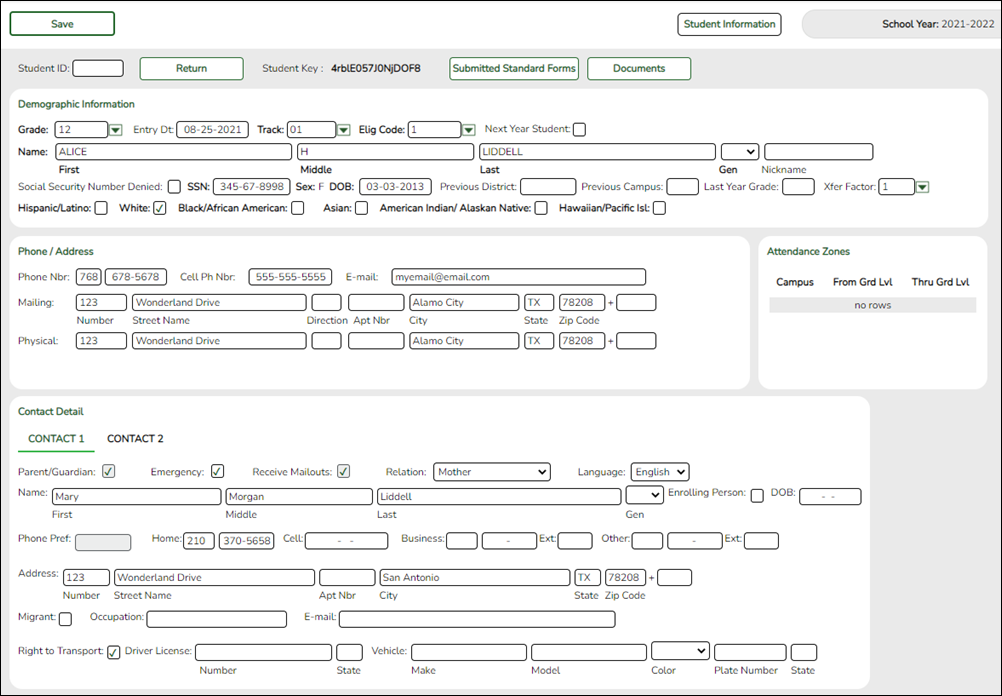
As students are enrolled in the district via ASCENDER ParentPortal, administrators must review and accept each enrollment request, monitor forms and documents submitted by parents, complete the student’s enrollment and assign a student ID, and provide each student's parent with a ParentPortal ID.
- The steps in this guide must be completed in Registration by a user who has access to those pages. Basic knowledge of the Registration application is assumed.
- Students must be enrolled in the district via New Student Enrollment in ParentPortal. See Parent: Enroll New Student.
- Review enrollment request and assign ID.
Registration > Maintenance > Online Registration > New Student Enrollment
This page allows you to review pending new student enrollment requests received from ParentPortal.
As students are enrolled online in ParentPortal, an administrator must review each enrollment request and create a record for each registered student.

A list of new student enrollment requests received from ParentPortal is displayed.
- The list can be re-sorted.
You can re-sort the grid by clicking on an underlined column heading. It will sort in ascending order. Click it again to sort in descending order.
IMPORTANT: Before accepting new students, campus staff should verify that the student has not been enrolled before. Go to Registration > Maintenance > Student Enrollment and click Hist Directory to access the Historical Directory, and search for the student.
It is possible that a student was enrolled with a different ID before. For example, the student may have been enrolled previously with a state-assigned ID, but has now been enrolled with a social security number. Check each student carefully to avoid creating duplicate enrollment records.
❏ To search for a new student enrollment record, do one of the following:Search by Name Type the student's first and last name. Search by Key Type the student's key. This number is generated by ParentPortal when the parent proceeds through the new student enrollment steps.
As you begin typing the name or key, a drop-down list displays records that match the characters you have typed. From the drop-down list you can select the record.
❏ Click to view the details of a pending enrollment request.
The student's enrollment record is displayed on Registration > Maintenance > Online Registration > New Student Enrollment.
Registration > Maintenance > Online Registration > New Student Enrollment > Register Student
This page allows you to enroll a new student using the information that was entered by the student's parent in ParentPortal.
This initial data serves as the basis for a complete student record.
NOTE: Verify whether Auto Assign Student ID is set to automatic or manual assignment of student ID numbers on Registration Maintenance > District Profile > District Information > Control Info.
Student ID Verify whether student IDs are automatically or manually assigned, as indicated in the Auto Assign Student ID field on Registration > Maintenance > District Profile > District Information > Control Info.
• If student IDs are manually assigned, type a student ID. Leading zeros are not required.
• If student IDs are automatically assigned, leave the field blank, and the system will assign the next available student ID when the record is saved.Student Key The enrollment key assigned to the student's enrollment record in ParentPortal is displayed.
❏ Under Demographic Information:
Grade Select the student's grade level for the current school year. Entry Dt Type the student’s enrollment date, which is the first date the student attended the campus.
For students enrolling in the next school year, Entry Dt should be the last day of school in the current school year. When Annual Student Data Rollover (ASDR) occurs, this date will be converted to the first day of school in the upcoming school year.Track Select the attendance track in which to enroll the student. Elig Code Select the student's ADA eligibility code. Next Year Student Select if the student is enrolling for the next school year.
If selected, the student's record will be saved with a record status 5 (i.e., not currently in district will attend next year). Since ASDR does not promote these students to the next grade level, Grade should be set to the next year grade level for any status 5 students.
The following fields are populated using the information that was entered by the student's parent/guardian in ParentPortal.
Verify that the data is valid.Name The student's full name is displayed. Social Security Number Denied Select if the student’s parent/guardian refused to provide the student’s social security number to the district. SSN The student's social security number is displayed. Sex The code indicating the student's sex is displayed. DOB The student's date of birth is displayed. Last Year Grade The grade level entered by the parent when enrolling the student via ParentPortal is displayed but can be updated if needed. Hispanic/Latino The field is selected if the student is of Cuban, Mexican, Puerto Rican, South or Central American, or other Spanish culture or origin, regardless of race. Race One or more fields is selected, regardless of whether the student is Hispanic/Latino. Phone/Address The student's phone number, cell phone, email address, physical address, and mailing address are displayed.
❏ Under Contact Detail:Up to four contact tabs may be displayed. Information entered by the parent is displayed.
Verify that the data is valid, and make changes to each tab if needed. You can save changes to all tabs at the same time.
Parent/Guardian The field is selected if the contact is the student’s guardian. Emergency The field is selected if the contact should be notified in the event of an emergency. Receive Mailouts This field should be selected if the contact will receive student documents (i.e., report cards and interim progress reports (IPRs)). The field is required for a contact who is listed as Priority=1. Relation The contact's relationship to the student is displayed, such as a relative, doctor, neighbor, hospital, caseworker, guardian, or other medical facility/person.
NOTE: For a hospital contact, Hospital should be selected, the hospital name should be entered in the Occupation field.
Language The language in which the student's documents (i.e., report cards and interim progress reports (IPRs)) will be printed for this contact is displayed. If blank, the documents are printed in English. Name The contact's full name is displayed.
NOTE: This field should be blank if Relation is set to Hospital.
Enrolling Person This field is selected if this is the contact who enrolled the student. Only one contact can be an enrolling person. DOB The contact's date of birth is displayed. Phone Preference The contact's preferred phone number is displayed. Home
Cell
Business
OtherThe contact's home, business, cell, and other phone numbers, including area code, are displayed if entered. Address The contact's complete address is displayed. Migrant The field is selected if the contact (parent/guardian) is a migratory agricultural worker. Occupation The contact's occupation is displayed. If Relation is Hospital, this field should display the hospital name. E-mail The contact's email address is displayed. Right to Transport This field is selected if the contact is authorized to transport the student from school. Instructors and administrators are able to view this information in txGradebook on the Student Information page. Driver License The contact's driver license number and the two-character state that issued the driver license are displayed if entered. Vehicle The contact's vehicle make, model, predominant color of the vehicle, plate number, and the two-character state that issued the license plate are displayed.
❏ Click Information Request to view information about previous special program participation or family members in the military, if entered by the parent.This information is view only, as the student has not yet been registered.
WARNING: This information is only displayed until the new student enrollment is accepted. Print this information before clicking Save; otherwise you must run SRG2300 - Student Information Request to view the information.
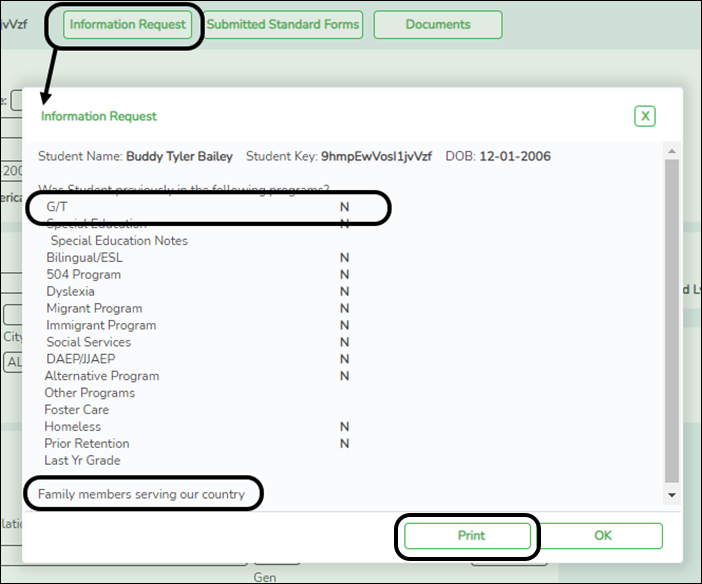
❏ Click Print to print this information.
❏ Click OK to close the window.
❏ Click Submitted Standard Forms to view a list of all forms submitted for the student.A pop-up window opens which displays the form name and date submitted. Click OK to close the window.
❏ Click Save.
- The student is now enrolled and can be retrieved from the Registration > Maintenance > Student Enrollment page. You can add additional registration information for the student on these tabs.
- A student ID is assigned to the student.
- NOTE: A ParentPortal ID is also automatically assigned to the student when the record is saved. It is not necessary to use the Set Parent Portal IDs utility unless you need to verify the student’s ParentPortal ID.
A warning message is displayed if the student was previously enrolled in the district (i.e., the student's social security number and date of birth match a historical record). Demographic information from the student's previous enrollment is displayed, including the previous student ID.
- Click Yes to confirm that this is the same student, and enroll the him with his previous student ID.
- Click No to return to the Register Student page without saving, and make any necessary changes to the record before saving again.
Return Click to return to the New Student Enrollment page to process another student. NOTE: To retrieve a newly enrolled student who was marked as a next year student:
From Maintenance > Student Enrollment, click Directory, and select Next Year Students. - Review submitted forms and documents.
Registration > Maintenance > Student Enrollment > Forms
Once you have completed the student's enrollment and assigned a student ID, the Forms tab displays forms submitted by parents during New Student Enrollment. You can also view any documents attached, such as birth certificate, driver licence, etc.
NOTE: For record status 5 students (not currently enrolled in this district, will attend next year), the submitted forms are displayed in the current year only. After Annual Student Data Rollover (ADSR) is run, the next year forms will be listed as the student's current year forms.
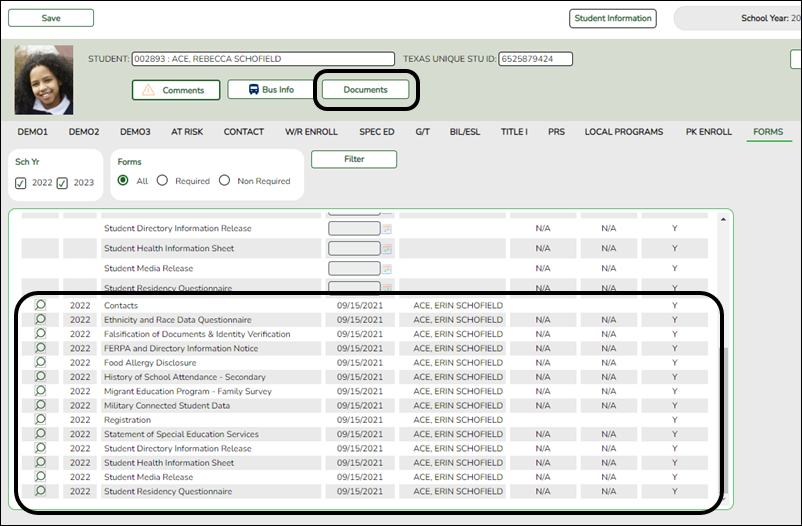
❏ You can filter the listed forms:
Sch Yr Indicate the school year for which you want to view new enrollment data. If the student enrolled during the current school year, select the current school year. If the student is enrolling in the upcoming school year, select the next school year.
Annual Student Data Rollover (ASDR) affects the school years displayed. After ASDR is run, the previous school year drops off, and the next school year is added.
Forms Select which forms you want to view for the selected school year(s).
❏ Click Filter.
Form Name The name of each form is displayed. Submit Date For forms submitted online, the most recent date on which the parent submitted or acknowledged the form via ParentPortal is displayed.
If the parent brings a paper copy of the form to the campus, type the date on which the parent delivered the form in the MMDDYYYY format, or click the calendar icon to select the date from a calendar, and click Save.
The date is saved in the Submit Date field.
IMPORTANT: You cannot enter a date unless you have filtered for one school year. If the Sch Yr field has both school years selected, or if no school year is selected, the field is disabled.Submitter ID For forms submitted online, the full name of the parent who most recently submitted the change or acknowledged the form via ParentPortal is displayed, according to the ID used to log on to ParentPortal.
If the parent delivered a paper copy of the form to the campus, the full name of the campus administrator who entered the Submit Date date is displayed, according to the ID used to log on to ASCENDER.Approval Date 'N/A' is displayed for any form submitted during New Student Enrollment. Approver ID 'N/A' is displayed for any form submitted during New Student Enrollment. Required Form Y or N is displayed to indicate if the form is required in either New Student Enrollment or Online Registration. N is only displayed if the form is not required in any group; otherwise, Y is displayed.
❏ Click to view a standard form.
The standard form resembles the hard copy form and contains the data entered by the parent if applicable. The form submission date and parent name are also displayed on the form.
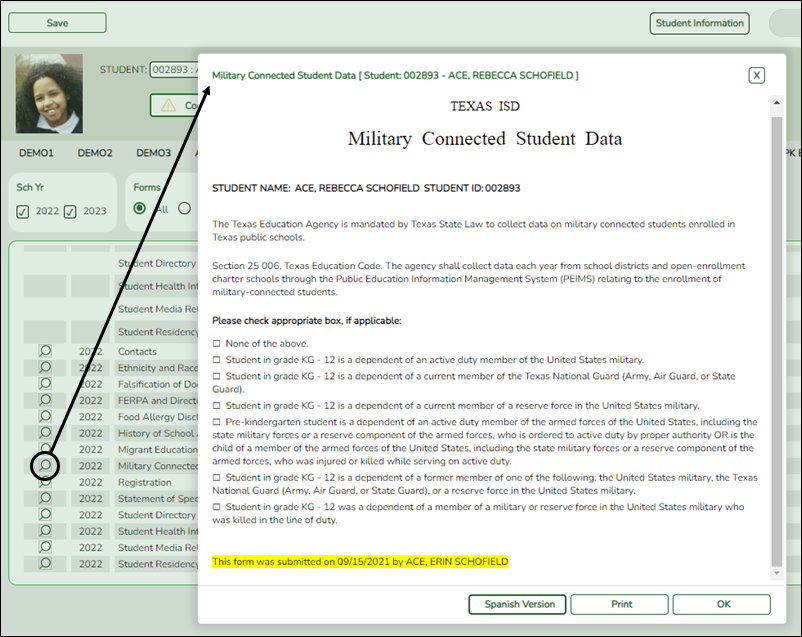
For any form delivered to the campus by the parent, you cannot view the form; the spyglass icon is not available.
Spanish Version Click to view the Spanish version of the form if it is available. English Version Click to return to the English version of the form. ❏ Click Print to print the English or Spanish version of the form.
❏ Click OK to close the form.
❏ Click Save if you entered or changed a date.
- Print ParentPortal ID letters.
IMPORTANT: Before proceeding, be sure that a ParentPortal ID letter has already been created on Registration > Maintenance > ParentPortal > Letters > Update > Letter that includes the nine portal ID variables.
Registration > Maintenance > ParentPortal > Print Letters > Letter Criteria
This tab allows you to set criteria for printing parent letters for the ParentPortal. Each letter provides the portal IDs of the students in one family.
- Letters are printed for active students who have an assigned ParentPortal ID.
- A single letter is printed for multiple guardians with the same last name and same address.
- If the guardian has an invalid address, the student's address is used.
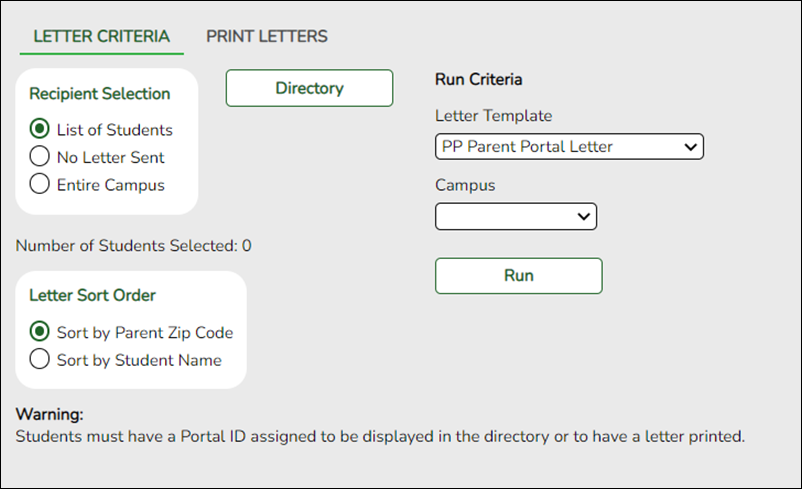
❏ Under Recipient Selection, select the students for whom you want to send letters to the parents.
List of Students No Letter Sent Select to print letters for students for whom letters have not been sent. Entire Campus Select to print letters for all students at the campus, even if letters were sent previously.
Number of Students Selected If you selected List of Students, the number of selected students is displayed.
❏ Under Letter Sort Order, select the order in which you want the letters printed.
Sort by Parent Zip Code Select to sort letters by parent zip code. Sort by Student Name Select to sort letters by student name.
❏ Under Run Criteria:Letter Template Select the letter type. The letter types created on Registration > Maintenance > Parent Portal > Letters > Update > Directory are listed. Campus Select the campus for which letters are being printed.
❏ Click Run.- A pop-up message displays your selection criteria and prompts you to continue. Click Yes.
- The Print Letters tab opens.
Registration > Maintenance > Parent Portal > Letters > Print > Print Letters
The letters open in PDF format in an embedded Adobe Reader window.
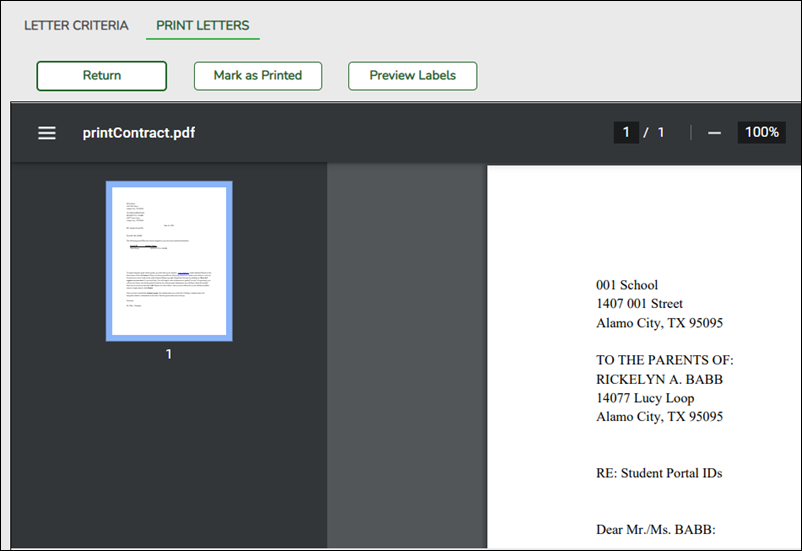
From the Adobe Reader toolbar, you can print the letters, save them to your PC, and perform other functions allowed by Adobe Reader.
If more than one student was selected, only the first student’s letter is visible, but the remainder of the letters follow. You can use the scroll bar to view all letters.
Mark as Printed Click to indicate that you have printed the letter.
Once clicked, when you open the Directory from the Letter Criteria tab, the system date (i.e., current date) will be displayed in the Prt Date field for each student for whom the letter was printed.❏ Click Preview Labels to print mailing labels for the letters, which are printed in the same order as the letters.
The labels use the Avery 5162 template (14 labels per page).
Only the parent name is printed on the labels. The student address is only used if there is no parent address.
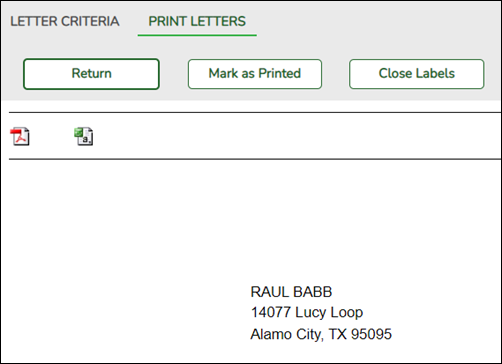
NOTE: The letters and labels may be sorted by either zip code or student name, but the student's name is not printed on the labels. It is recommended that you include the parent name in the letter heading so that it will be easier to match the label with the letter.
❏ Click Close Labels to return to the letter preview.
❏ If errors are found, click Preview Errors to view the errors.Review, save, and/or print the report.
- Review the report:
- Click |‹ to go to the first page of the report.
- Click ‹ to go back one page.
- Click › to go forward one page.
- Click ›| to go to the last page of the report.
The following error reports are generated:
• Invalid addresses for parent or student
• Students without a parent/guardian who receives mailouts
• Students without an assigned ParentPortal ID
❏ Click Close Errors to close the error report.
❏ Click Return to return to the Letter Criteria tab.A message is displayed notifying you that the letters will be cleared when you return to the Letter Criteria tab. Click Yes to continue.
❏ Distribute the letters to parents.
With a valid ParentPortal ID, a parent can add a student to his ASCENDER ParentPortal account.
- If the district has enabled parents to complete online registration and/or update a student’s current year data, a parent can complete registration and make changes to his student’s data using forms available via ParentPortal.
- As parents update data for their students, an administrator must review and approve each change.
Parent: Add/Register Student
With a ParentPortal ID, the parent can add the student to his ASCENDER ParentPortal account and complete Returning Student Registration during the registration window.
- This guide assumes that several required steps have already been performed by the district to enable Returning Student Registration and/or Student Data Maintenance at the campus. See District: Set Up & Enable Forms.
- This guide also assumes that:
- The student is enrolled in the district.
- The parent’s email address for the student is verified via ParentPortal. *
* A parent must have already created a ParentPortal account AND verified his/her email address. (Verifying the email address can be done during the creation of a new account or for an existing account on ParentPortal > My Account (Email Address)). NOTE: The parent’s email address MUST match the E-mail field on Registration > Maintenance > Student Enrollment > Contact for a contact selected as Parent/Guardian.
* If Guardian Verified is selected on Registration > Maintenance > Student Enrollment > Contacts, and the email address for the ParentPortal account matches the email address for that guardian on the Contacts tab, the parent can complete Returning Student Registration and Student Data Maintenance. This workaround allows parents access even if they do not have a valid email address.Once you receive the ParentPortal ID:
- Add the student to your ParentPortal account.
ASCENDER ParentPortal > My Account
If you are continuing from the previous step, the My Account page is displayed. Otherwise, log on and select My Account from the menu.
❏ From the My Account page, click Add or Remove Student. (This step is not necessary if you clicked Add an Already Enrolled Student to My Account on the pop-up window.)
❏ Add the following information under Add Student to ParentPortal.
ParentPortal ID Type the ParentPortal ID provided by the student's campus. If you do not have this ID, you must contact the campus to get the ID. You cannot add a student without entering a valid student portal ID.
The ID is case sensitive and must be entered exactly as it appears (example: qbQgk3qAs2z).Birth Date Type the student's complete birth date. The date entered here must match the birth date in the student's record at the campus. You cannot continue without entering the correct birth date.
❏ Click Add.If your student was successfully added to your account, his name will appear on the page. You will now be able to access your student's data.
During the Registration window:- Register for the upcoming school year.
ASCENDER ParentPortal > Summary
During the annual online registration window:
You can easily see your student's progress in the registration process and access the page where you can complete the forms.
If your student's registration is in progress, a pop-up window opens from this page.

❏ Click Resume Registration to continue the registration process.Or, click
 to close the pop-up window and continue registration later.
Once you have completed registration, the pop-up window will no longer appear.
NOTE: On the Summary page, the Registration button will be red, yellow, or green depending on how far along you are in the process.
• The information is green if all forms are completed (i.e., 100%).
• The information is yellow if most of the forms are completed (i.e., 50%-99%).
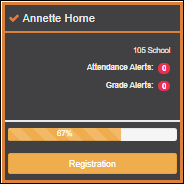
• The information is red if fewer than half of the forms are completed (i.e., 0%-49%).
• The card is highlighted and has a check mark for the selected student.

❏ To begin or resume the registration process, click Resume Registration on the pop-up window, or click the Registration button on the student's card.The Registration page opens.
❏ Click Start Registration.The first form in the list opens on the right side of the page.
Depending on the form type and district requirements, a form will require one of two actions:
• View only or download
• Review and update
- View only or download: View the form and acknowledge that you have viewed the form. There is no data to enter.
- For a static form, click Download Attached Document to open, save, and/or print the form.
- For a standard form, the form automatically opens on the right side of the page.
- By clicking Next Form, you are confirming that you viewed the form.
- Review and update: Review existing data. Add or update data as needed.
- For a dynamic form, add or change data. Type over the existing data with new data where applicable.
- If a field contains the Document button, you can click the button to upload a file related to online enrollment, such as a birth certificate, driver license, immunization record, or proof of residency.
- Texas standard forms must be re-submitted each year. All data must be re-entered.
❏ Click Next Form.
The next form in the list is displayed on the right.
❏ Continue reviewing forms and clicking Next Form until you have reviewed and updated all forms.
- If you are not ready to complete a form, click Save Form to save any data entered so far.
- If you leave ParentPortal before finishing registration updates, a Resume Registration button is displayed allowing you to continue where you left off.
When you have viewed and entered all required data on all required forms, the Finish and Submit to District button is displayed at the bottom of the page.

❏ Click Finish and Submit to District.The final page opens allowing you to print a confirmation for your records.
A page opens in a new window which lists the dates on which each form was completed.

Print this page for your records, then click Close Window.
Edit Data:
❏ To update data you already entered, return to the form, type over existing data, and submit the form again.
- Monitor pending data changes.
Pending Changes:
Dynamic Forms:
Until the change is approved by the campus, both the previous and new data are displayed, and an asterisk is displayed next to the fields to indicate that the change is pending.
If the administrator rejects a change for a dynamic form field, a message will be displayed next to the field indicating the reason for the rejection.
The message is cleared once you change the field and resubmit.
Standard Forms:
Until the change is approved by the campus, the Show Changed Values button appears on the form allowing you to toggle between viewing the previous and new values.
❏ Click Show Changed Values to view the previous data.
The changed data is highlighted and reflects the most recent change. Click Show New Values to return.
If you edit a pending field, your most recent change will overwrite the former pending change. The campus staff will approve the most recent change.
All data changes submitted via ParentPortal must be reviewed by an administrator before the student’s record is updated.
See Campus: Review & Accept Data Changes.
- For a dynamic form, each request is approved or rejected individually. For example, if you update your phone and address, the campus may approve the phone number change, but may require proof of residence before an address change is approved.
- For a standard form, the form is accepted or rejected as a whole.
If campus staff rejects a submitted change, you will be notified by email. The email message should inform you why a particular change was rejected and what to do. Contact the student’s campus for more information.
Campus: Review & Accept Data Changes
These steps are completed in ASCENDER Registration.
Once a parent has a valid ParentPortal ID for an enrolled student, the parent can add a student to his ASCENDER ParentPortal account and access the student’s attendance, grades, and more. If the district has enabled parents to update a student’s registration data, a parent can complete annual online registration for the upcoming school year, as well as submit changes to his student’s current year data from ParentPortal, such as address and telephone number changes.
As parents update data for their students, campus staff must review and approve each change.
The parent can also review, complete, and submit forms via ParentPortal. As parents review and submit forms from ParentPortal, the campus staff can monitor the status and identify students who are missing required forms.
Follow these steps to monitor and approve data changes, and identify students who are missing forms.- The steps in this guide must be completed in Registration by a user who has access to the pages described in these steps. Basic knowledge of the Registration application is assumed.
- For online registration changes, the district must have enabled parents to update student registration data online for the upcoming school year (i.e., the Active Online Registration From and To date fields must be set to allow parents a window of time in which to register.)
- For updates to a student’s current year records, the district must have enabled parents to update student data online (i.e., the Allow parents access to Student Data forms field must be set to Yes.) See District: Set Up & Enable Forms.
- Review submitted changes.
Registration > Maintenance > Online Registration > Pending Updates
The Pending Updates page allows you to review and approve or reject a student’s pending updates received from ParentPortal. The list includes changes submitted for online registration, as well as student data change requests for the current year.
On the ASCENDER landing page, the number of students with pending data updates is displayed.
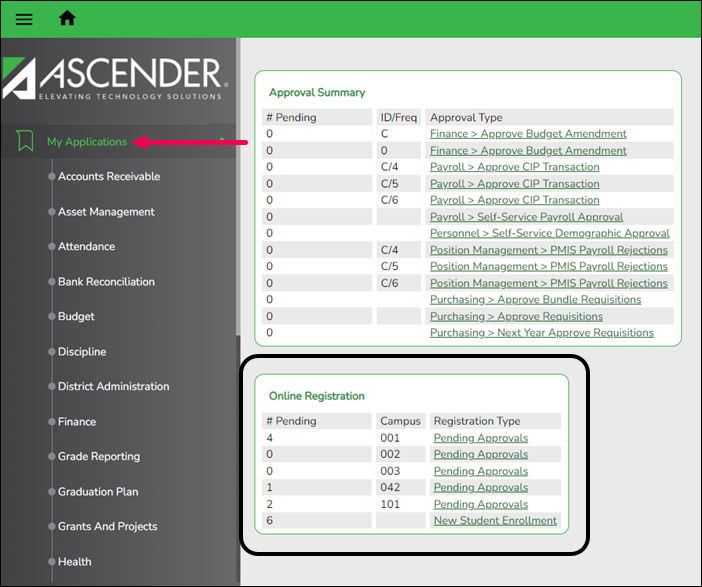
On Registration > Maintenance > Online Registration > Pending Updates a list of students who have pending update requests is displayed.

❏ Click to view the details of the pending updates.
The student's data is displayed on the Pending Update Details page where you can approve or deny each pending update.
Submitted For The student's name for which the request was submitted is displayed. One of the following is displayed:
• For a standard or static form, the form name is displayed.
• For a dynamic form, the ParentPortal field type for which the update was requested is displayed.
For a standard form, you can click next to the form name to view the form in a pop-up window.
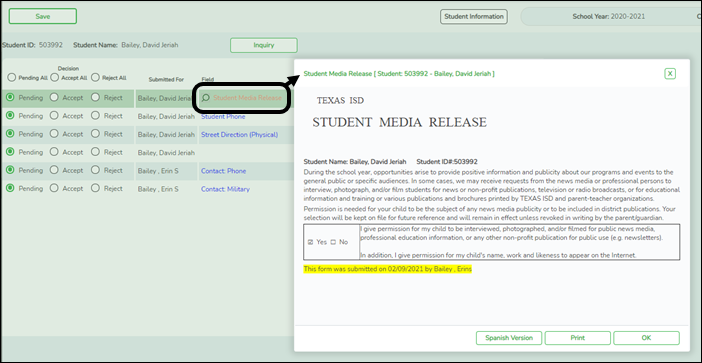
NOTE: If you reject a standard form, a parent will need to re-submit the entire form even if it was previously submitted. Review all form fields.
• Click Spanish Version to view a Spanish version of the form. Click English Version to return to the English version.
• Click Print to print the form.
• Click OK to close the window.
Current Value The current data for the field is displayed, if it exists. This only applies to dynamic form fields. New Value The newly submitted information is displayed. This only applies to dynamic form fields. Submitted By The name of the parent/guardian who submitted the request is displayed. Doc Reqd This field is currently not in use. N is always displayed for dynamic form fields. Decision: Accept All Select to approve all of the student's pending update requests. Accept Select to approve a particular pending update. Reject All Select to reject all of the student's pending update requests. Reject Select to reject a particular pending update. Pending All Select to revert all requests to a pending status. This must be done prior to saving. If you reject an update:
• You must enter comments explaining your decision. Include detailed explanation and action required of the parent.
• An email message is sent to the parent notifying him that the change was not approved.
❏ Click to add comments about your decision to approve or reject a request. The Reviewer's Comment window opens.
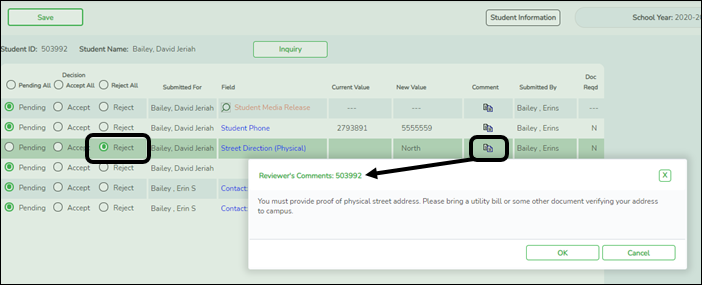
IMPORTANT! Comments are required when you reject a request. Include detailed explanation and action required of the parent.
a. Add or update comments as needed, up to 255 characters.
b. Click OK.
c. You must click Save on the Pending Updates page in order to save the updated data.
A red comment icon indicates that reviewer's comments exist for the request.
❏ Click Save.NOTE: Once you have accepted or rejected all of a student's pending updates, the student's name is no longer displayed on the Pending Updates page.
- Monitor student form submission.
Registration > Maintenance > Student Enrollment > Forms
The Forms tab allows you to view the status of a student’s forms and maintain submission dates for hand-delivered forms.
Form information is displayed differently on this tab depending on the form type.
Some forms may only require the parent to acknowledge that he has reviewed the form. Other forms require the parent to input data. Some data input by parents must be approved by campus staff in order for the change to be made to the student’s record. These settings are established in ParentPortal Admin on the Form Management pages.
- If a parent acknowledges the form via ParentPortal, you can view the form data and submission date.
- If a parent submits a form change via ParentPortal, you can view the form data and status.
- If a parent submits a hard copy of a form to the campus staff, you can manually record the date on which the form was delivered.
The Forms tab is not available until you retrieve a student on the Student Enrollment page. For a new student, you must enter and save all required data on the Demo1 tab before proceeding to this tab.
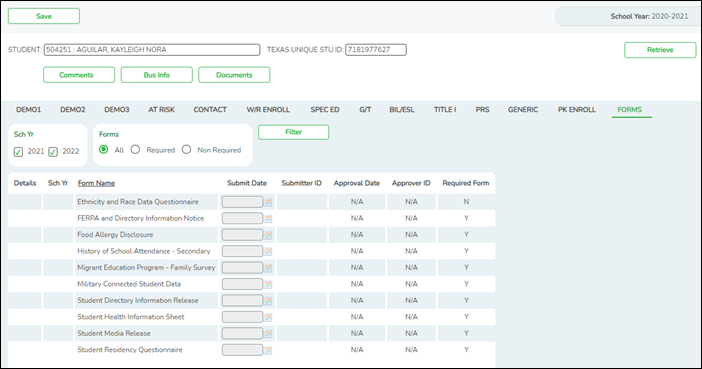
All current and next year forms are listed.- Unsubmitted forms are listed first, according to the selected school year.
- External forms are not listed.
- The list can be re-sorted.
You can re-sort the grid by clicking on an underlined column heading. It will sort in ascending order. Click it again to sort in descending order.
filters You can filter the listed forms: Sch Yr Indicate if you want to view online registration forms (upcoming school year) or student data form changes (current school year).
For example, if it is currently the 2019-2020 school year, and registration is open for the 2020-2021 school year, select 2020 to see student form changes submitted for the current school year, and/or select 2021 to see form changes submitted from online registration.
Annual Student Data Rollover (ASDR) affects the school years displayed. After ASDR is run, the previous school year drops off, and the next school year is added.
Forms Select which forms you want to view for the selected school year(s).
❏ Click Filter.
❏ Click
 to view the form details.
NOTE: For any form delivered to the campus by the parent, you cannot view the form; the spyglass icon is not available.
DYNAMIC FORMS
If the parent submitted a change to any editable field in a dynamic form via ParentPortal, the each field change must be approved/rejected individually on Pending Updates.
If multiple changes have been submitted, the fields display data for the most recent change submitted.
❏ Click to view details of the requested change(s).
A dynamic form is displayed as a table of fields and values. Only fields that have new or updated values are listed.
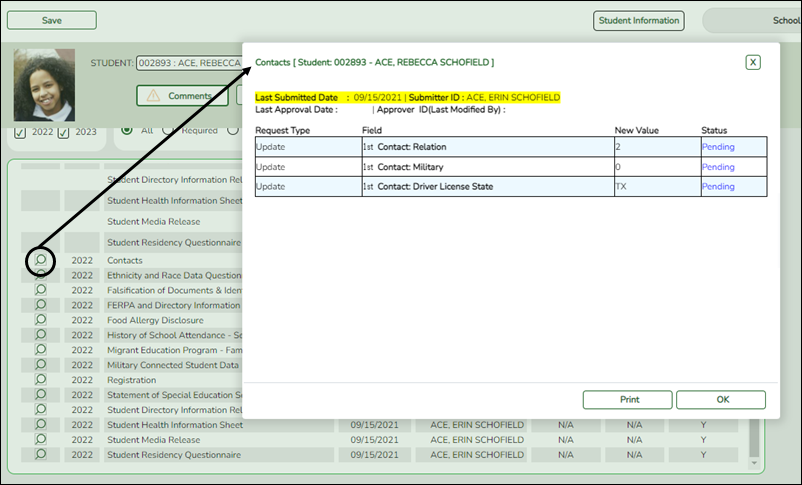
Request Type New Record is displayed if no data currently exists.
Update is displayed if the parent requested to change the existing data.
Delete is displayed if the parent requested to remove the existing data.Field The field indicates which data is being updated. New Value The new value entered by the parent in ParentPortal is displayed. Status Accepted is displayed (in green) if the campus administrator accepted the change.
Rejected is displayed (in red) if the campus administrator rejected the change.
Pending is displayed (in blue) if a campus administrator has not yet accepted or rejected the change.
❏ Click Print to print the form.
❏ Click OK to close the form.
STANDARD FORMS
❏ Click
 to view a standard form.
The standard form resembles the hard copy form and contains the data entered by the parent if applicable. The form submission date and parent name are also displayed on the form.

Spanish Version Click to view the Spanish version of the form if it is available. English Version Click to return to the English version of the form.
❏ Click Print to print the English or Spanish version of the form.
❏ Click OK to close the form.
❏ Click Save if you entered or changed a date. - Run reports.
Several reports are available to assist you in monitoring and maintaining student data changes and forms.
Registration > Reports > Registration Reports > Student > SRG0700 - Student Missing Forms
This report provides a list of students who are missing one or more forms for the current school year. You can use the report to identify all students missing a specific form, or identify students who are missing any forms.
Before you can run the report for a specific form, the form must be set up in ASCENDER ParentPortal Admin - Form Group Management in the Returning Student Registration group or the Student Data Maintenance group. Only forms in these groups are available in the ellipsis lookup for the Form Name parameter.
Public Documents and New Student Enrollment forms, as well as Archived forms, are excluded.
Note that the Submit Date field, as displayed on the Forms tab, is used to associate a student's form with the current year.
You can also run the report for a specific form.
Registration > Reports > Registration Reports > Student > SRG0710 - Standard Forms (Home Language Survey)
This report prints the following forms for the selected students. The hard copies must be retained in the student's folder.
• Home Language Survey
• Home Language Survey -19 TAC (if available)
• Student Health Information Sheet
Only forms that were submitted by the parent via ParentPortal are printed; this report does not include forms that were manually recorded as submitted on Registration > Maintenance > Student Enrollment > Forms.
NOTE: The report was updated in summer 2019 according to revised TEA guidelines; if a parent submitted the old version of the Home Language Survey form, the old form is printed in this report. If the parent has submitted the new form, the new form is printed.
Registration > Reports > Registration Reports > Student > SRG0720 - Online Registration Forms Related Reports
This report displays student form data submitted via the standard forms which are provided to parents in ParentPortal. Various reports can be printed depending on the Report Name selected.
The report heading changes according to the selected report.
• If you select one of the Data Differences reports, the report lists students who have different information in ParentPortal than in ASCENDER. The differing information is highlighted.
—-
• If you select one of the Release Denials reports, the report lists students who denied release of directory information to one or more publications or requestors.
• If you select the Food Allergy Disclosure report, the report lists only modified data columns.
• The other reports list the students who have submitted the associated form and the data submitted.
Registration > Reports > Registration Reports > Student > SRG0730 - Percentage of Forms Submitted per Campus
This report displays the counts and percentages of students who have submitted enrollment, registration, and student data forms per campus, including:
- Students who have submitted all forms.
- Students who have submitted some forms.
- Students who have submitted no forms.
The count of students at the campus is displayed, and a district total is provided for each column.
Registration > Reports > Registration Reports > Withdrawal > SRG2300 - Student Information Request
The report lists special program requests for students who enrolled online via ParentPortal.
Parent: Maintain Student Data
If the district has enabled online student data maintenance, you can submit a request to update your student’s current year records at any time, such as an address or phone number change.
- Update current year data as needed.
ASCENDER ParentPortal > My Account
❏ From the My Account page, click Maintain Student Data.
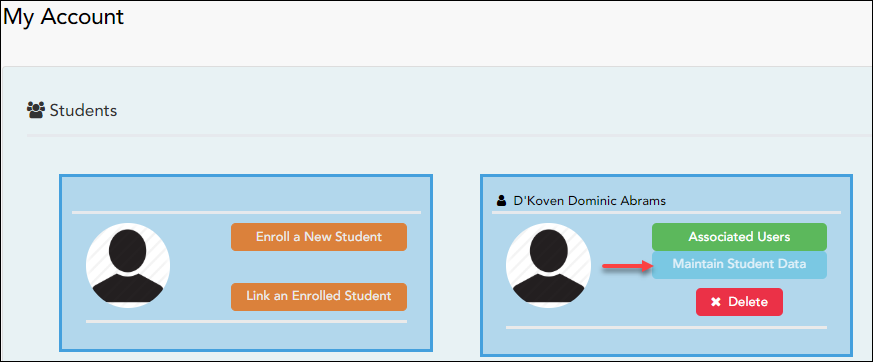
The Student Data Maintenance page opens.
❏ In the left-side navigation bar, click Student Data Editing to expand and view the forms that can be updated.
❏ Click the form name, and the form opens on the right.
❏ Type over existing text with new information.

