User Tools
Sidebar
Add this page to your book
Remove this page from your book
Accounts Receivable Process
The purpose of this document is to guide you through the process of using Accounts Receivable to perform the following functions:
- Maintain customer records
- Maintain invoice details such as invoice number, request date, customer purchase order numbers, and assigned budget codes
- Print invoices
- Run customer and invoice inquiries
- Create credit and debit memos
- Apply full and partial invoice payments
- Print customer notices, statements and aging information
- Interface with Finance to allow real-time general ledger updates
LEAs may use Accounts Receivable to issue invoices for the following:
- ESC contracts, workshops, etc
- Library fees
- Special events
- Tuition payments
This document assumes you are familiar with the basic features of the ASCENDER Business system and have reviewed the ASCENDER Business Overview guide.
Some of the images and/or examples provided in this document are for informational purposes only and may not completely represent your LEA’s process.
Prerequisites
❏ Update Security Administration to access the Accounts Receivable application. You can create a new role or add to an existing role.Ensure that the applicable users have access to the necessary pages in order to perform their assigned tasks.
Set up Accounts Receivable Permissions & Options
To begin using Accounts Receivable, complete the following setup steps:
- Select AR permissions.
Select AR permissions
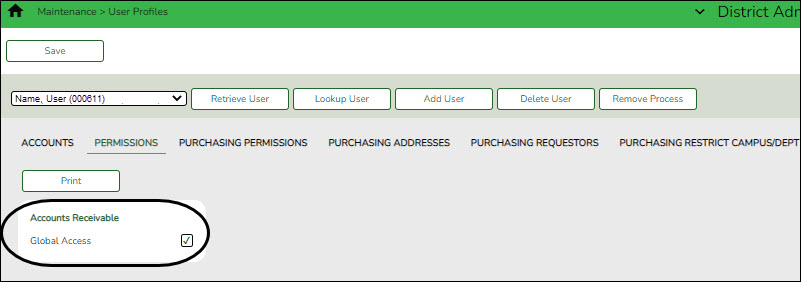
District Administration > Maintenance > User Profiles > Permissions
Under Accounts Receivable, select Global Access to allow the user to view all invoices regardless of the originator.
- Select AR options.
Select AR options
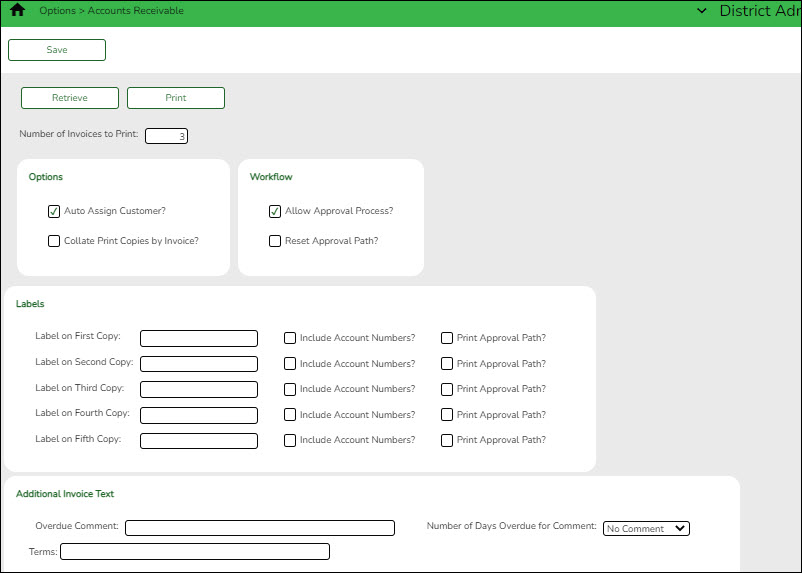
District Administration > Options > Accounts Receivable
Set up Accounts Receivable options such as the number of invoices to print, labels for each invoice copy, payment terms, overdue comments, and whether to review invoices.
- Set up AR workflow.
Set up AR workflow
District Administration > Workflow > Approval Path
Use the following pages to set up the first approver, the approval path (hierarchy of approvers), approval rules, and alternate approvers (as needed) for the Accounts Receivable invoice approval process.
- Verify accounting periods.
Verify accounting periods
Finance > Tables > District Finance Options > Accounting Periods
Verify that the Accounts Receivable Period is accurate. The Accounts Receivable Period field cannot be less than the Current (Open) Accounting Period field nor greater than the Next Accounting Posting Period field.
- Add or verify clearing accounts.
Add or verify clearing accounts
District Administration > Maintenance > User Profiles > Permissions
Under Accounts Receivable, add or verify the following:
- Offset Obj
- Offset Sobj
- Offset Org
The above fields are used as the default account codes for the user when creating invoices on the Accounts Receivable > Maintenance > Create/Modify Invoice page. If these fields are blank, then the Offset Obj and Offset Sobj fields default to the values in the Accounts Receivable field on the Finance > Tables > District Finance Options > Clearing Fund Maintenance tab and the Offset Org field is set to 000.
Finance > Tables > District Finance Options > Clearing Fund Maintenance
Under Finance Automatic Posting Defaults, add or verify the following:
- Accounts Receivable
- Overpayment Account
Create Customer and Product Records
- (Optional) Create vendor records.
(Optional) Create vendor records
Finance > Maintenance > Vendor Information > Vendor Name/Address
Set up customers with a vendor number.
A vendor number is required to process an overpayments (refunds) to the customer.
After creating a vendor number for the customer, add the vendor number to the customer record in the following step as you are creating new customer records or updating existing records.
- Create customer records.
Create customer records
Accounts Receivable > Tables > Customer Information
Set up customers and add vendor information at this time if the previous step was completed. If not, vendor information can be added at a later time.- If Auto Assign Customer is selected on the District Administration > Options > Accounts Receivable Options page, then the Customer Nbr field is automatically populated with the next available customer number.
- If Auto Assign Customer is not selected, type a new customer number.
- Create product information records.
Create product information records
Accounts Receivable > Tables > Product Information
Add product information. This allows invoices that are manually entered to automatically retrieve the product information and unit cost amount.
Invoices and invoice templates may be created without this table. However, if this table does exist when an invoice is created, then the product types are available in the Product Type look up.
Note: A product number is automatically created and saved when a record is created in this table. When creating an invoice and selecting a product type listed in this table, the corresponding product number is registered to the invoice product record. If you select a product type from the drop down when creating an invoice, the associated description and unit cost becomes the default values in the invoice record but can be changed. Even if the description is updated, the product number is still associated with the original description.
The Remittance Address printed on invoices is retrieved from the District Administration > Tables > District Information > District Name/Address page along with “ATT: Accounts Receivable”. The invoice also displays the LEA's phone and fax numbers.
Invoice Customers and Record Payments
- Create invoices.
Create invoices
Accounts Receivable > Maintenance > Create/Modify Invoice or Accounts Receivable > Utilities > Import Invoices
You have two options for creating invoices. You can manually enter invoices on the Create/Modify Invoice page or import the invoices using the Import Invoices page.
- Print invoices.
Print invoices
Accounts Receivable > Utilities > Print Invoices
Print the customer invoices. The following occurs when printing invoices:
- A realized revenue is created in Finance (credit to revenue).
- A receivable is created in the 12XX account in Finance (debit to receivable).
After an invoice is printed, it is no longer available for changes in Accounts Receivable; however, you can reprint it using the Reports menu.
If necessary, printed invoices can be voided or adjusted through Accounts Receivable > Maintenance > Invoice Voids/Adjustments. If the invoice amount needs to be increased, a new invoice must be issued.
You can view invoices by running an inquiry on the Finance > General Ledger Inquiry tab.
- Record customer payments.
Record customer payments
Accounts Receivable > Maintenance > Invoice Payments > Payments
Record the customer payments. You can continue posting to the same cash receipt number throughout the day. This process will:
- Create a cash receipt coded against the 12XX account (credits receivable)
- Debits cash
- If an overpayment was made, the overpayment is recorded in the payable account that was set up on the Finance > Tables > District Finance Options > Clearing Fund Maintenance tab.
You can view recorded payments by running an inquiry on the Finance > Inquiry > General Ledger Inquiry tab.TIP: If you need to reverse a customer payment, use the Accounts Receivable > Maintenance > Invoice Payments > Payment History tab.
Inquiries
The following inquiries are available in Accounts Receivable:
- Accounts Receivable > Maintenance > Invoice Payments > Cash Receipt Inquiry
- Accounts Receivable > Maintenance > Invoice Payments > Invoice Payment History
- Accounts Receivable > Maintenance > Invoice Payments > Apply Overpayment
- Accounts Receivable > Maintenance > Invoice Inquiry/Customer Notes > Inquiry
- Accounts Receivable > Maintenance > Invoice Inquiry Customer Notes > Payment Notes
- Accounts Receivable > Maintenance > Invoice Status Inquiry
Reports
The following reports are available in Accounts Receivable Reports:
- BAR1000 - Customer Listing
- BAR3000 - Customer Statement
- BAR3500 - Invoice Detail Listing
- BAR4000 - Invoice Listing By Revenue Code
- BAR4500 - Outstanding Invoices By Customer
- BAR6000 - Detail Aging Report
- BAR5000 - Summary Aging Report
- BAR6500 - Detail Aging Report By Organization
- BAR7000 - Invoice Offset Accounts Report
- BAR7500 - Reprint Invoices Report
- BAR9000 - Template Listing
- BAR9500 - Payment Listing Report
Americans with Disabilities Act (ADA) and Web Accessibility
The Texas Computer Cooperative (TCC) is committed to making its websites accessible to all users. It is TCC policy to ensure that new and updated content complies with Web Content Accessibility Guidelines (WCAG) 2.0 Level AA. We welcome comments and suggestions to improve the accessibility of our websites. If the format of any material on our website interferes with your ability to access the information, use this form to leave a comment about the accessibility of our website.


