User Tools
Sidebar
Add this page to your book
Remove this page from your book
ASCENDER - August TRS Reporting Process
Created: 07/15/2020
Reviewed: In Progress
Revised: In Progress
The purpose of this document is to guide you through the August TRS reporting process.
This document assumes you are familiar with the basic features of the ASCENDER Business system and have reviewed the ASCENDER Business Overview guide.
Click here to access the RE Portal Resources page for additional reporting information and complete file record layouts.
Some of the images and/or examples provided in this document are for informational purposes only and may not completely represent your LEA’s process.
August TRS Reporting Process
CAUTION: If not yet completed, extract teacher service records for all employees.
Note: If service records were not extracted before moving 11- and 12-month employees from NYR payroll to CYR, it may be necessary to manually update data such as contract begin and end dates, etc.
- Process all August payrolls.
Process all August payrolls
Payroll > Payroll Processing > Interface Processing > Interface to Finance
After all August payrolls are processed, interface the payrolls to Finance.
Before continuing with this process, verify that all service records have been extracted.
- Extract August RP records and interface to Finance.
Extract August RP records and interface to Finance
Payroll > Payroll Processing > TRS Processing > Extract
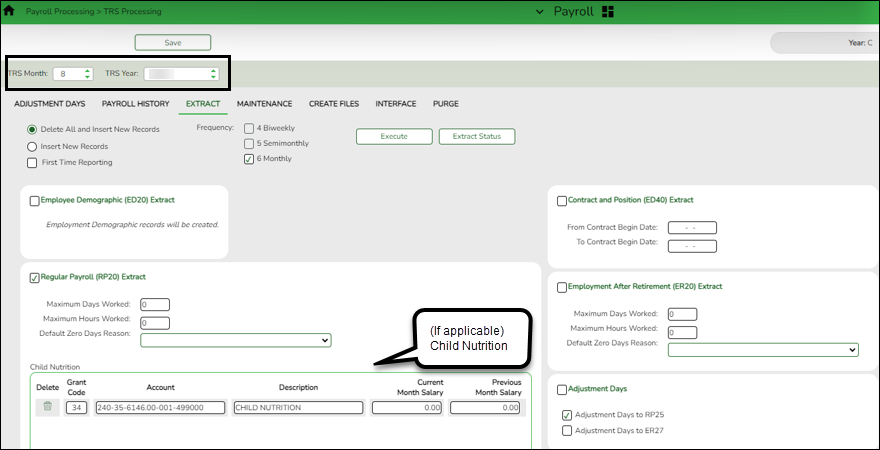
Extract August Regular Payroll (RP) records. Process the RP extract with Child Nutrition amounts (if applicable) and interface to Finance. This allows you to process and interface the TRS On-Behalf journal and continue with end-of-year processing in Finance.
IMPORTANT:
- Save all extract reports in a folder (e.g., Preliminary Aug TRS Reports) as they will be used at a later time in the verification process.
- Do not make any manual corrections to employee RP20 records. Extracting RP20 records again later in this document will override any manual changes.
❏ Select Regular Payroll (RP20) Extract to extract regular payroll data.
Child Nutrition Information
Child Nutrition (i.e. school breakfast and lunch) is a Special Revenue fund as LEAs are reimbursed based on the number of qualifying meals. Each LEA has the option to decide how the monthly child nutrition contributions submitted under the TRS Grant Deposit and TRS Grant Care are determined, either by actual salaries or on the TRS Child Nutrition Calculation Worksheet (two options).
If the LEA bases the amounts on actual salaries, a TRS Grant Code should be entered for that fund (usually 240) on the Personnel > Tables > Salaries > Fund to Grant table. However, if the LEA uses one of the two methods on the TRS Child Nutrition Calculation Worksheet, then an expenditure Account and Previous or Current Month Salary amount should be entered on the RP extract. The system will proportionately distribute the entered salary amount for the employees paid out of the same fund as entered in the expenditure Account field.
❏ If applicable to your LEA, under Child Nutrition, click + Add to add a row and enter data in the following fields:
Grant Code Type the designated TRS grant code. Account Code Type the designated child nutrition expenditure account code. All expense account codes must have the same fund/fiscal year. Description Type a description for the entry. Current Month Salary Type the current month gross salary amount. The entered salary amount is proportionately distributed for the employees paid out of the same fund as entered as the expenditure account. Previous Month Salary Type the prior month gross salary amount. If an amount is entered, the child nutrition salary is calculated based on the specified fund and all employees who were paid in the prior TRS reporting month and year using the child nutrition fund(s) (e.g., 240). If the current TRS reporting month is 09, the prior year TRS Rates table is used.
If an amount is not entered, no processing is completed for the prior month pay dates.
RP25 records are automatically updated/inserted for the current reporting month but adjusting the previous reporting month for child nutrition amounts. (e.g., If you are extracting data for April, the current reporting month is April and the adjusting reporting month is March.) If an RP25 record already exists, the TRS grant gross, grant deposit, and grant care amounts are updated.
Journal entries are created in Finance for the prior month child nutrition TRS grant deposit and care amounts.❏ Click Execute to process the selected extract(s).
❏ Click Extract Status to view the details (extract and error reports, status, user details, etc.) for each processed extract.
The TRS Extract Processing pop-up window opens with the extract Status, Extract Type, Start date and time, End date and time, User ID, and user Email address. If the logged-on user has an email address on the Personnel > Maintenance > Staff Demo > Demographic Information tab, an email message is forwarded for each extract after completion.
❏ Under Error Report, click Print Report to display the selected extract reports. Review the report.
❏ Under Print Report, click Print Report to display the selected extract reports. Review the report.
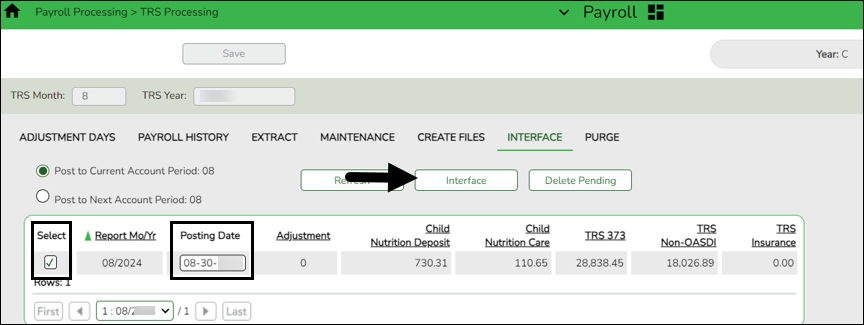
Payroll > Payroll Processing > TRS Processing > Interface
When you access the page, you may need to click Refresh to populate the journal voucher.
❏ Select the transaction and enter the Posting Date.
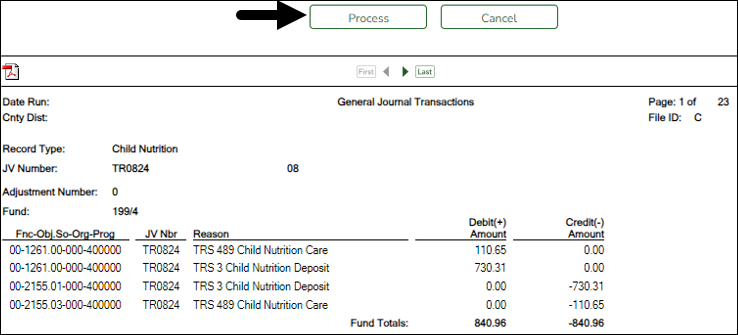
❏ Click Interface. The General Journal Transactions and Fund Transfer preview reports are displayed. Review the report.
❏ Click Process. If the selected transactions are successfully interfaced to Finance, a process successful message is displayed, the report window is closed, and the selected row (transaction) is deleted from the grid.
- Do not report or submit any records to TRS at this time.
- Create user-created report.
Create user-created report
Log on to the next year pay frequency.
Payroll > Reports > User Created Reports
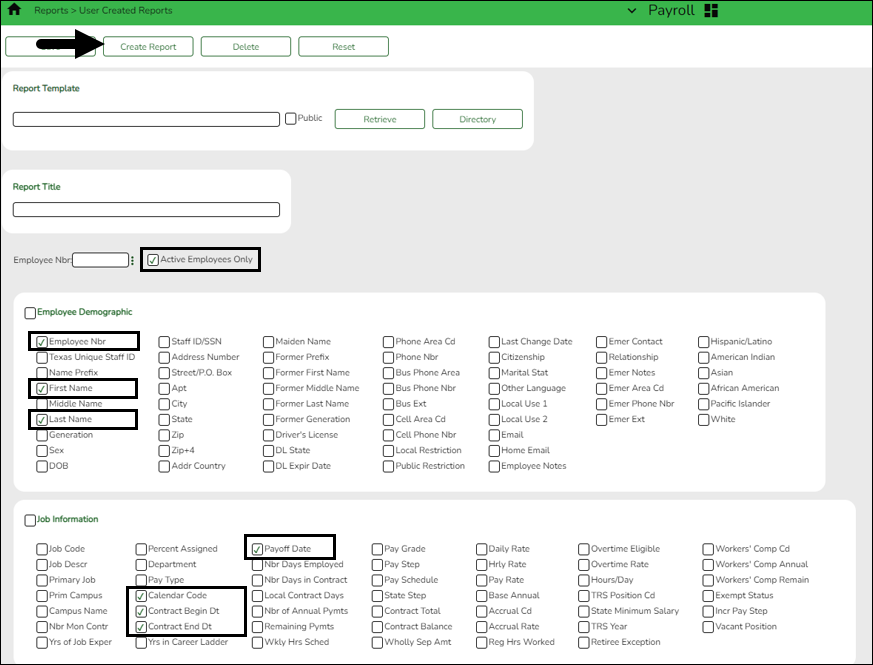
It is recommended to create a user-created report to identify employee contract begin dates in late July or August and their corresponding calendar codes. This report will be used in a later step to copy 10-month employees starting in those months (who won't receive their first paycheck until September) to the current year. Employees starting in September should not be included in this copy process.
❏ Select Active Employees Only to only include active employee records on the report.
❏ Under Employee Demographic, select Employee Nbr, First Name, and Last Name.
❏ Under Job Information, select Contract Begin Dt.
❏ Click Create Report to generate the report.
After you create the report, use the Sort/Filter options to sort by the Contract Begin Dt .
- Copy applicable calendars from NYR to CYR.
Copy applicable calendars from NYR to CYR
Payroll > Next Year > Copy Next Year Tables
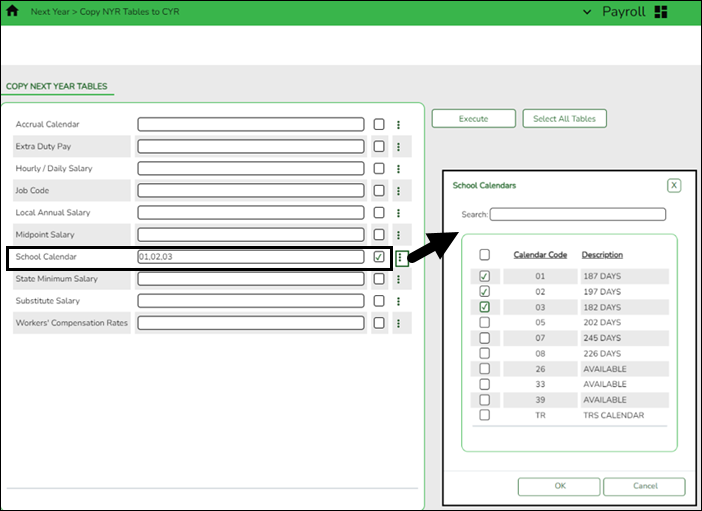
Use the user-created report from Step 4 to identify 10-month employees with contract begin dates in late July or August and their corresponding calendar codes. Keep in mind, these are the employees who receive their first pay check in September. In this step, you will only copy their calendar codes to the current year.
CAUTION: Do not copy the TR calendar or any calendar that begins in September.
Note: If changes were made to the next year payroll tables (extra duty pay, hourly/daily salary, job code, local annual salary, etc.), copy the tables from the next year payroll to the current year payroll.
❏ In the School Calendar field, select the calendar codes to be copied.
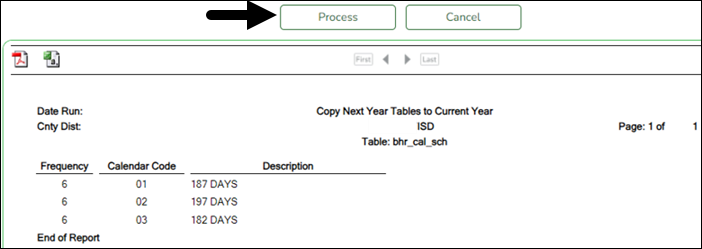
❏ Click Execute. Only the selected tables are processed. As the reports are generated, click Process for each table. Review the reports.
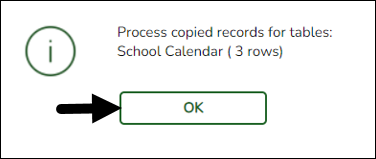
A message is displayed with the table names and the number of rows that were copied. Click OK.
Review the process report to verify that all applicable calendars, extra duty pay, and job codes were copied to the current year payroll frequency. It is recommended that you log on to Personnel > Tables > Workday Calendars to verify this information. If the calendars were not copied over correctly, you may have to individually copy the calendars.
Note: When copying the school calendar table from next year to the current year, the calendar code, description, and days are copied. If a calendar code exists in the next year and current year, the next year data replaces the entire calendar contents for the current year for the specified calendar code.
- Copy employees with August contract begin dates from NYR to CYR
Copy employees with August contract begin dates from NYR to CYR
Log on to the next year pay frequency.
Payroll > Next Year > Copy NYR Staff to CYR
CAUTION: Only copy employees whose contracts begin in August but will not receive first pay of new school year until September.
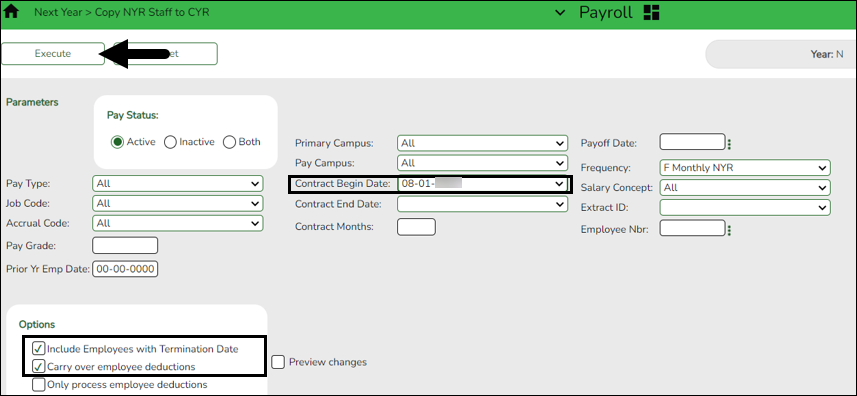
Under Parameters:
❏ Select Active to include employees with an active pay status.
❏ In the Contract Begin Date, select the pay date. You may need to complete this process several times if you have employees with various August contract begin dates.
❏ Under Options, select the applicable options:
- Select Include Employees with Termination Date
- Only select Carry over employee deductions if you updated new year deductions in next year payroll.
❏ Click Execute. A message is displayed prompting you to create a backup. A backup is recommended.
Note: If you need to import the backup file, use the current year Payroll > Utilities > Import HR Tables From Database Tables page. This functionality is not available in next year Payroll.
❏ Click Process to accept the changes and continue. A message is displayed indicating that the process was completed successfully. In addition, a list of the database record tables that were copied is displayed. Click OK.Verify and save the reports before processing.
- Extract August TRS records.
Extract August TRS records
Log on to the current year pay frequency.
Payroll > Payroll Processing > TRS Processing > Extract
Extract records again but do not interface to Finance as the interface was completed in Step 2.
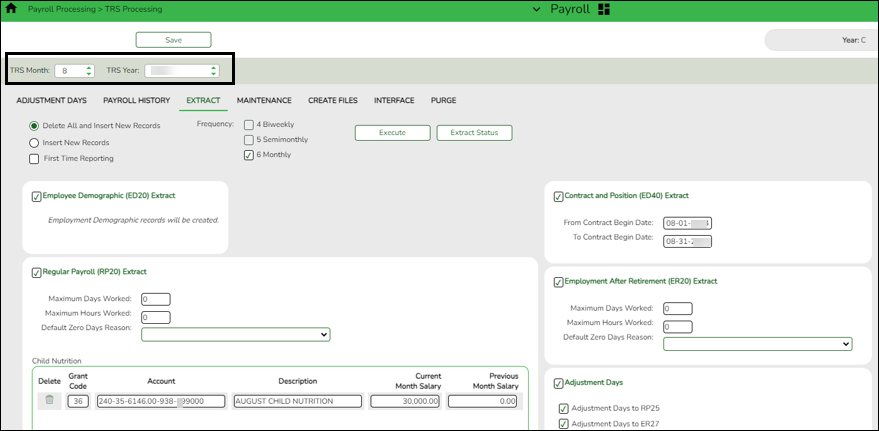
❏ In the TRS Month field, select 8 (August).
❏ In the TRS Year field, select the applicable TRS reporting year.
❏ Select Employee Demographic (ED20) Extract to extract employee demographic data.
❏ Select Contract and Position (ED40) Extract to extract contract and position data.
- In the From Contract Begin Date field, type the first date in August (e.g., 08/01/20XX).
- In the To Contract Begin Date field, type the last date in August (e.g., 08/31/20XX).
❏ Select Regular Payroll (RP20) Extract to extract your August payroll data.
❏ Select Employment of Retirement (ER20) Extract to extract retiree data.
❏ Select Adjustment Days (if applicable) to extract adjustment day data.
❏ Click Execute to process the selected extract.
- Maintenance ED records.
Maintenance ED records
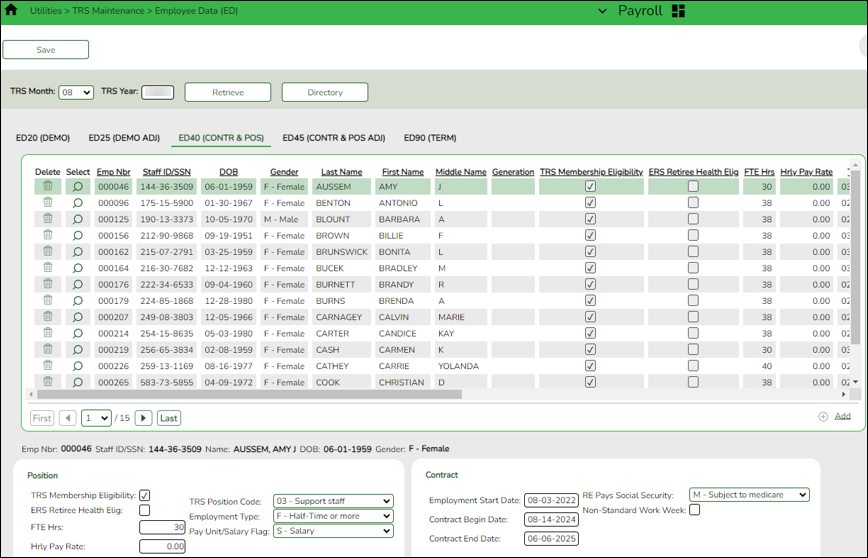
Payroll > Utilities > TRS Maintenance > Employee Data (ED) > ED20 (Demo) & ED40 (Contr and Pos)
Perform ED Maintenance. Use the Payroll > Reports > TRS Reports > HRS8900 - Employee Data (ED) to verify the ED20 and ED40 information that was extracted. You may need to add/edit or delete ED records.
TIP: If ED90 records are added during this step, it is recommended that you submit those records after your August RP has reached completed status, which is included in Step 15 of this document.
- Create ED submission file.
Create ED submission file
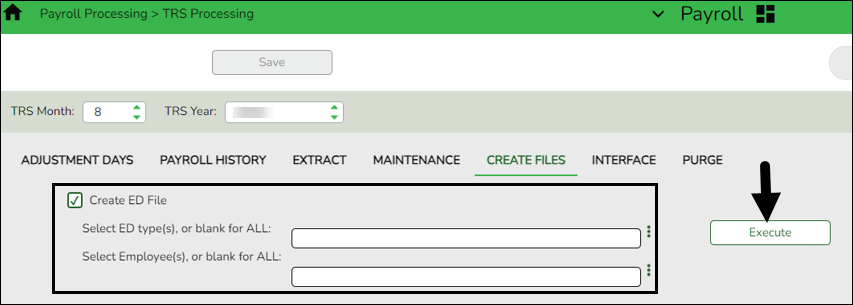
Payroll > Payroll Processing > TRS Processing > Create Files
Create the ED Submission file and upload it to TRS. Be sure to wait until the upload is completed successfully.
❏ In the TRS Month field, select 8 (August).
❏ In the TRS Year field, select the applicable TRS reporting year.
❏ Select Create ED File.
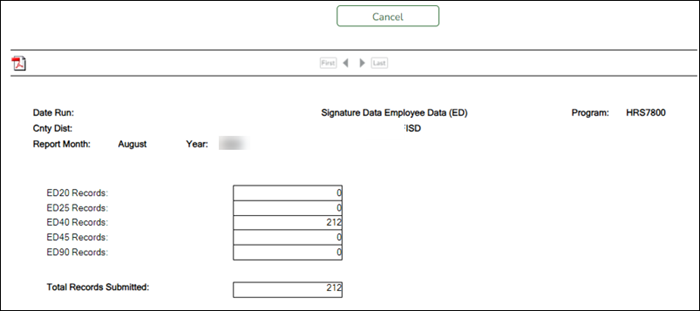
❏ Click Execute. The Signature Data reports are displayed for each selected file type. The summary contains the total number of records submitted for the reporting month and year. In addition, the submission files (.txt) for the RE Portal are created for each selected file type.
- Maintenance RP records.
Maintenance RP records
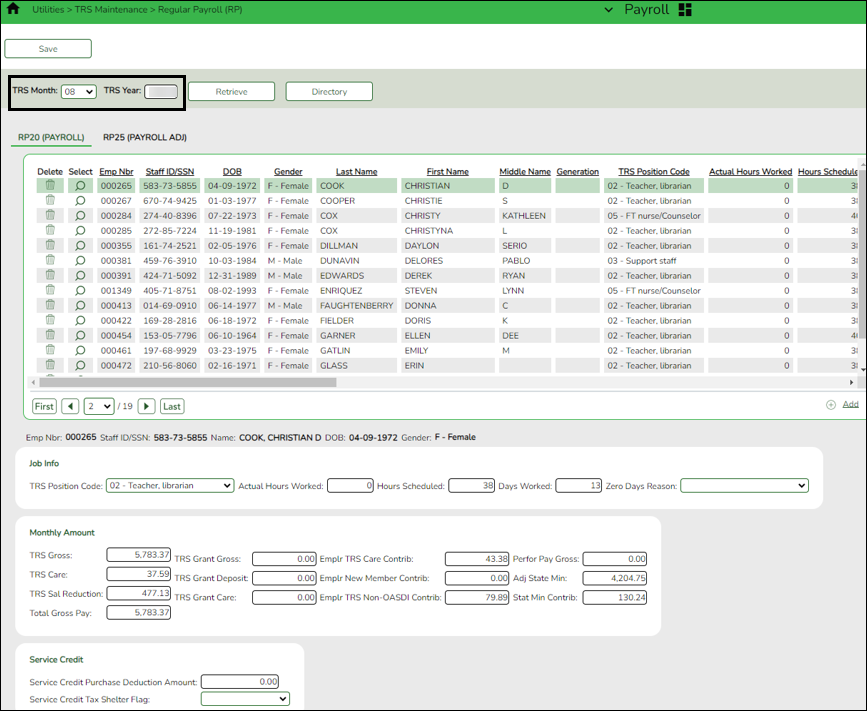
Payroll > Utilities > TRS Maintenance > Regular Payroll (RP) > RP20 (Payroll)
While you are waiting for the ED file to be successfully uploaded, verify employee data and if necessary, perform employee data maintenance.
You may need to manually add all new hires for August to the RP20 record.
❏ To add another row, click +Add. A new row is added with the cursor in the Emp Nbr field.
❏ In the Emp Nbr field of the free-form area, type or select an employee number, and then press TAB. Data associated with the employee number is displayed.
❏ Complete the Hours Scheduled and Days Worked fields for the employee.
❏ Click Save.
Additionally, you can sort the data on this page by the Days Worked. This allows you to determine that a Zero Days Reason is indicated for all employees who actually have zero days worked in August.
If the employee actually worked in August, adjust the Hours Scheduled and Days Worked fields accordingly.
- Create RP submission file
Create RP submission file
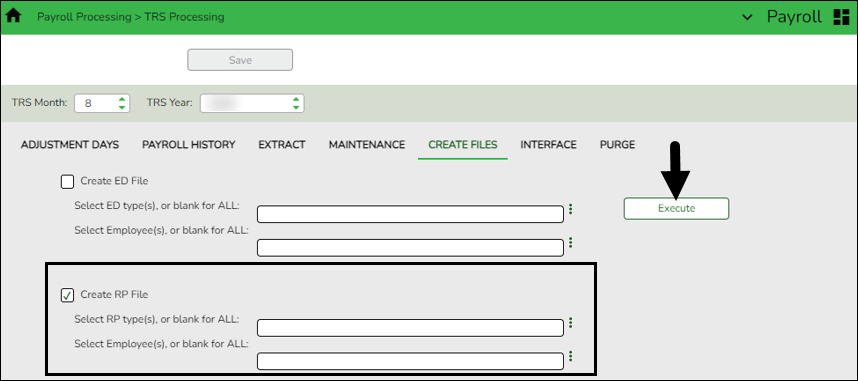
Payroll > Payroll Processing > TRS Processing > Create Files
After the ED submission file is in a Completed status, create the RP submission file and upload it to TRS.
❏ In the TRS Month field, select 8 (August).
❏ In the TRS Year field, select the applicable TRS reporting year.
❏ Select Create RP File.
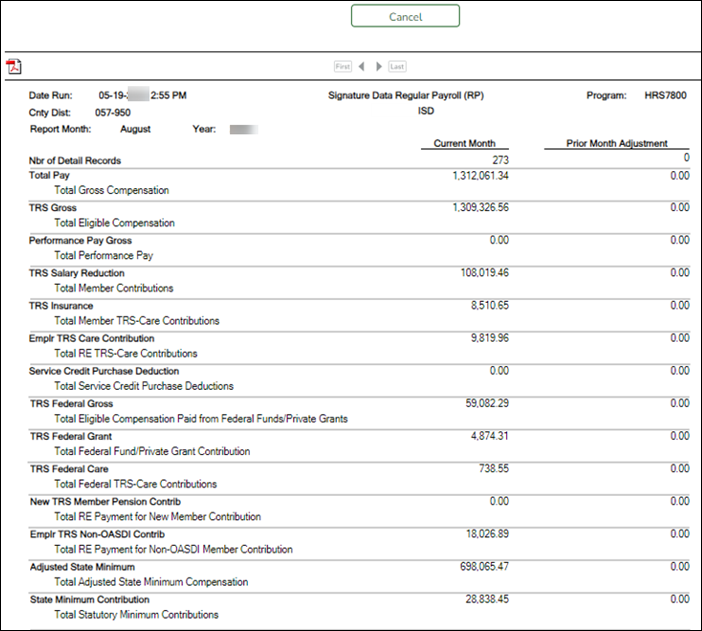
❏ Click Execute. The Signature Data reports are displayed for each selected file type. The summary contains the total number of records submitted for the reporting month and year. In addition, the submission files (.txt) for the RE Portal are created for each selected file type.
- Determine TRS payment.
Determine TRS payment
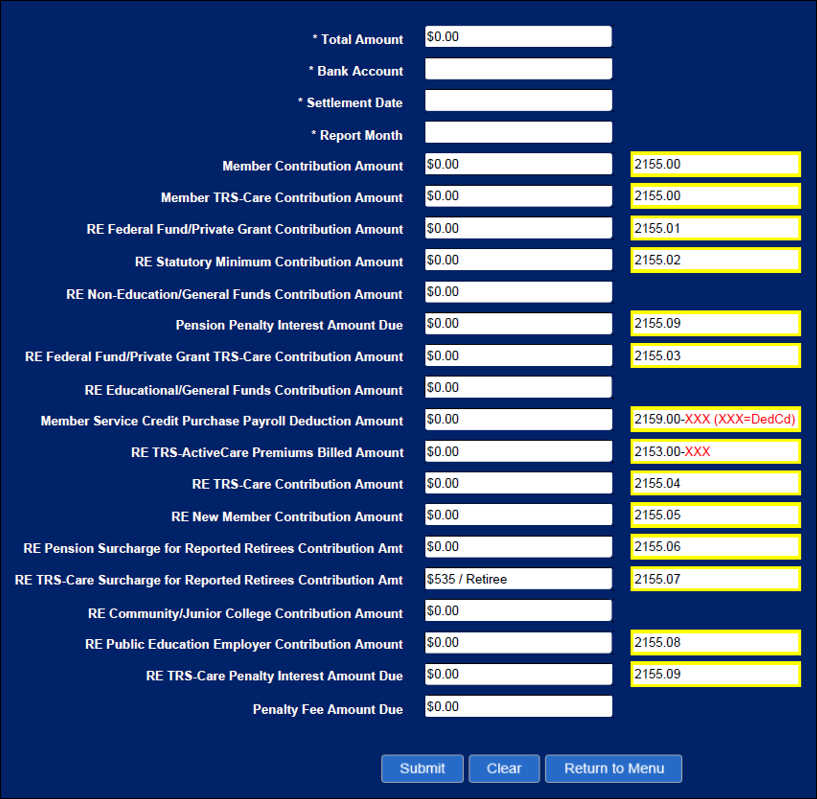
After all submission files are in a Complete status, determine the TRS payment amount, and then make the payment through TEXNET.
- Record TRS payment.
Record TRS payment
After making the TRS payment through TEXNET, use one of the following options to record the actual TRS reporting payment amount and ensure that the transaction is recorded in the correct accounting period.
- Payroll > Utilities > Transfer Transaction Processing
- Finance > Maintenance > Postings > Check Processing - PA - as a district written check
- Finance > Maintenance > Postings > Journal Actual - as a journal entry
- Delete pending TRS interface for August.
Delete pending TRS interface for August
Payroll > Payroll Processing > TRS Processing > Interface
Reminder: This interface was performed in step 2.
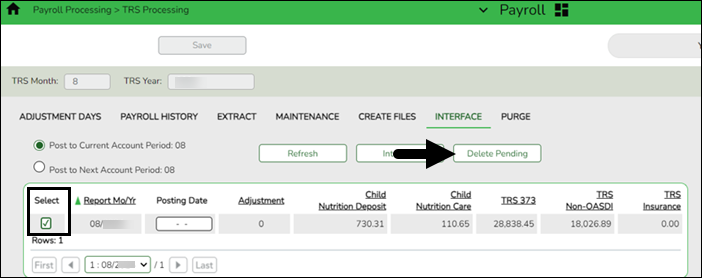
❏ Select the transaction.
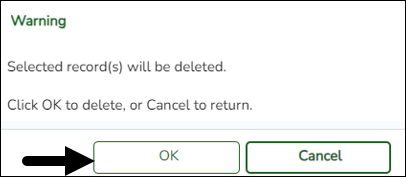
❏ Click Delete Pending. A warning message is displayed prompting you to continue or cancel.
❏ Click OK to delete the selected transaction. A delete successful message is displayed.
- Enter ED90 records/create submission file.
Enter ED90 records/create submission file
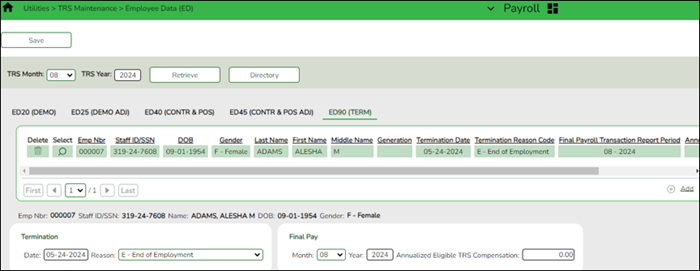
Payroll > Utilities > TRS Maintenance > Employee Data (ED) > ED90 (Term)
After all reports are completed, enter the ED90 Termination records for August.
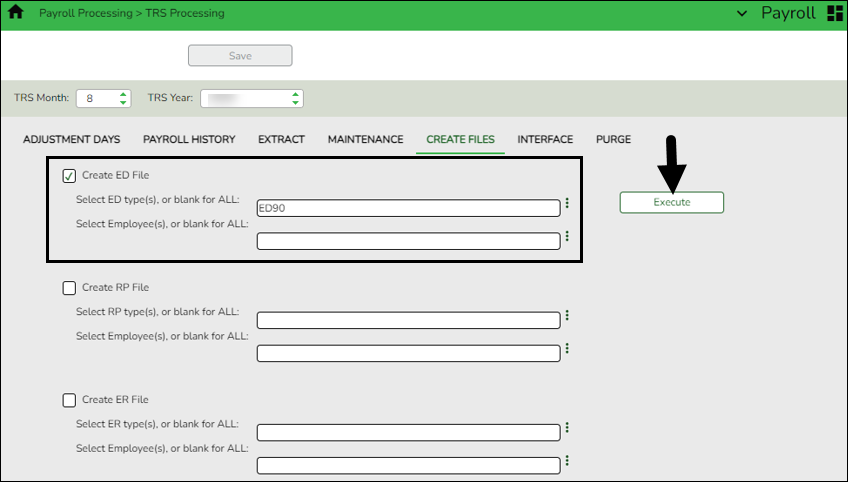
Payroll > Payroll Processing > TRS Processing > Create Files
Create the ED90 submission file and upload it to TRS.
❏ In the TRS Month field, select 8 (August).
❏ In the TRS Year field, select the applicable TRS reporting year.
❏ Under Create ED File, in the Select ED type(s), or blank for ALL field, click
 to open the Employee Demographic (ED) pop-up window.
- Select ED90 Termination.
- Click Select to close the pop-up window and populate the field with the selection.
❏ Click Execute. The Signature Data reports are displayed for each selected file type. The summary contains the total number of records submitted for the reporting month and year. In addition, the submission files (.txt) for the RE Portal are created for each selected file type. - Create ER submission file.
Create ER submission file
Payroll > Payroll Processing > TRS Processing > Create Files
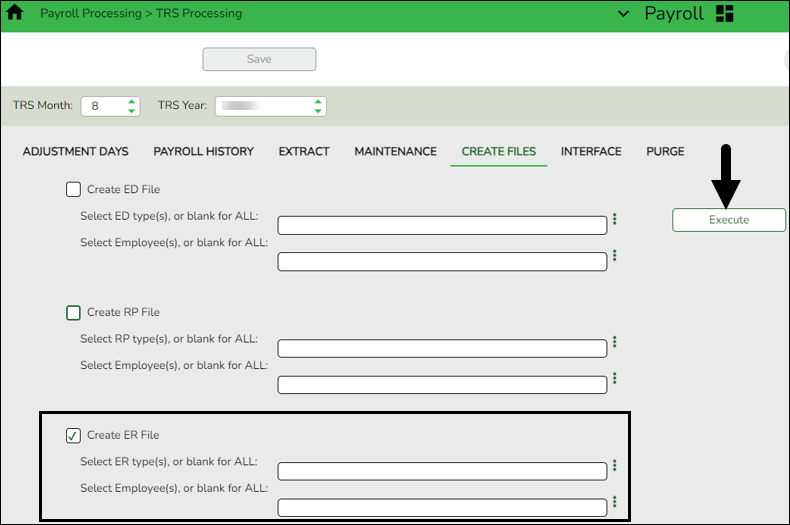
In September, create the ER file and upload it to TRS to submit retiree information.
❏ In the TRS Month field, select 8 (August).
❏ In the TRS Year field, select the applicable TRS reporting year.
❏ Select Create ER File.
❏ Click Execute. The Signature Data reports are displayed for each selected file type. The summary contains the total number of records submitted for the reporting month and year. In addition, the submission files (.txt) for the RE Portal are created for each selected file type.
- Verify TRS On-Behalf is posted.
Verify TRS On-Behalf is posted
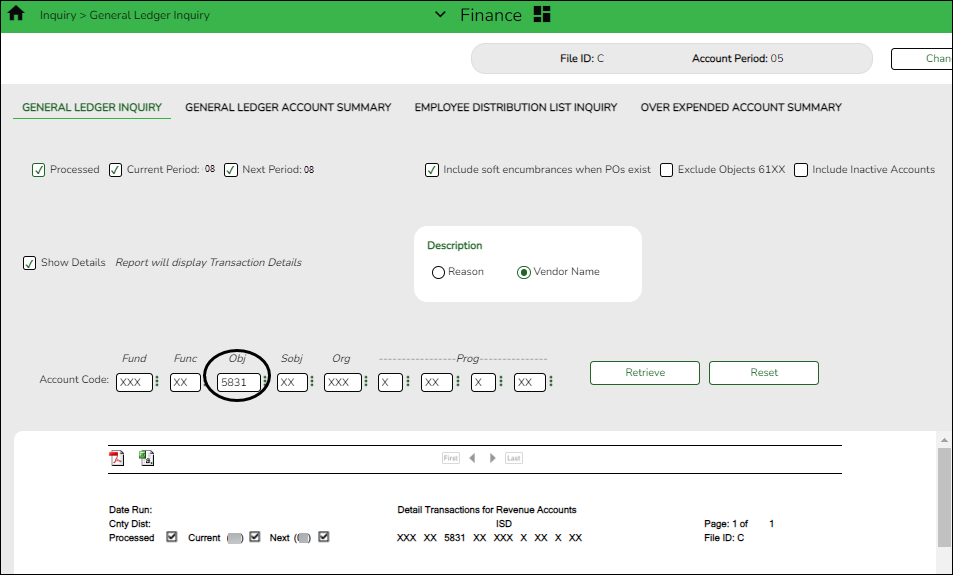
Finance > Inquiry > General Ledger Inquiry > General Ledger Inquiry
Run an inquiry for account codes 5831 (revenues) and 6144 (expenditures) to verify that On-Behalf has been posted for all 12 months.
TIP: If you are performing this step after you closed your fiscal year in Finance, you need to log on to the prior file ID to verify this posting.
- (If necessary) Calculate TRS on-behalf.
(If necessary) Calculate TRS On-Behalf
Log on to the CYR payroll frequency.
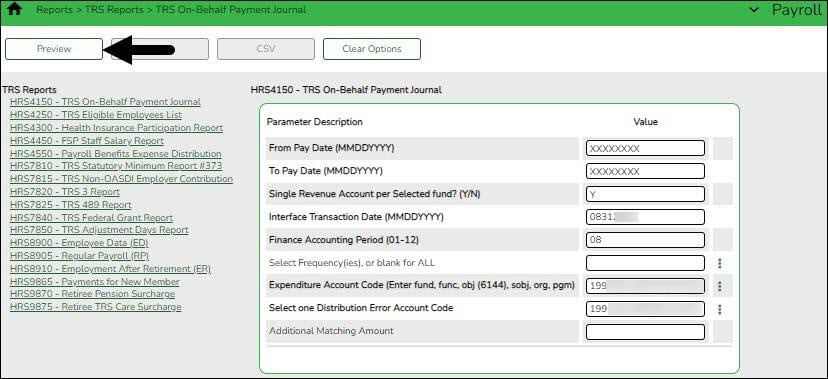
Payroll > Reports > TRS Reports > HRS4150 - TRS On-Behalf Payment Journal
If you do not post your TRS On-Behalf on a monthly basis:
- Calculate your TRS On-Behalf for the year.
- Verify On-Behalf revenue and expenditures are posted for 12 months.
This report must be processed and interfaced after the TRS 373 Stat. Min. report is interfaced to Finance.Generate the HRS4150 - TRS On-Behalf Payment Journal report to calculate the TRS On-Behalf payments, create a journal, and interface the amounts to Finance.
❏ Enter the necessary parameters and generate the report.
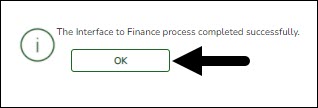
❏ Click Interface to Finance. The following message is displayed.
❏ Click OK.
These are just suggested codes, review your general ledger to verify what codes have been budgeted. It is acceptable under GASB Statement No. 24 for ALL of the “On-Behalf” payments to be charged to the general fund by function. Reference Item 5 section 1.3.3.2 of the Financial Accountability System Resource Guide (FASRG).
Americans with Disabilities Act (ADA) and Web Accessibility
The Texas Computer Cooperative (TCC) is committed to making its websites accessible to all users. It is TCC policy to ensure that new and updated content complies with Web Content Accessibility Guidelines (WCAG) 2.0 Level AA. We welcome comments and suggestions to improve the accessibility of our websites. If the format of any material on our website interferes with your ability to access the information, use this form to leave a comment about the accessibility of our website.


