User Tools
Sidebar
Add this page to your book
Remove this page from your book
ASCENDER - Vendor EFT Process
The purpose of this document is to guide you through the steps in Finance to process payments as electronic funds transfer (EFT) to vendors doing business with the local education agency (LEA).
This document assumes that you are familiar with the basic features of the ASCENDER Business System and have reviewed the ASCENDER Business Overview guide.
Some of the images and/or examples provided in this document are for informational purposes only and may not completely represent your LEA’s process.
Vendor EFT Process Quick Checklist (prints separately) - This is a one-page quick checklist of the following steps.
Vendor EFT Process
- Add/update bank codes.
Add/Update Bank Codes
Finance > Tables > Bank Codes > Bank Codes
Verify the appropriate bank codes exist. If not, add the applicable codes. A bank code is required for each bank participating in electronic funds transfer (EFT) payments. In order for a vendor to receive an EFT payment, you must indicate a specific bank for the vendor.
You can add or edit information in the bank table at any time. The bank name, address, telephone, and contact person information can be updated by accessing the bank code, changing the data, and saving the changes. If the bank code is incorrect, you must delete the incorrect code and then add the new code.
Note: Multiple vendors may use the same bank.
❏ Click +Add to add a new row.
❏ Click Save.
TIP: If you are creating a vendor record for an employee who is also participating in EFT payments in Payroll, you can use the Copy from Payroll functionality on the Vendor Miscellaneous tab and complete the vendor's bank information.
It is recommended that you print your bank details from the Payroll > Tables > Bank Codes > EFT tab and use it as a reference when adding your LEA's bank details on the EFT tab in Step 3. Use caution when typing your Route number to ensure accuracy.
- Add/update EFT information.
Add/Update EFT Information
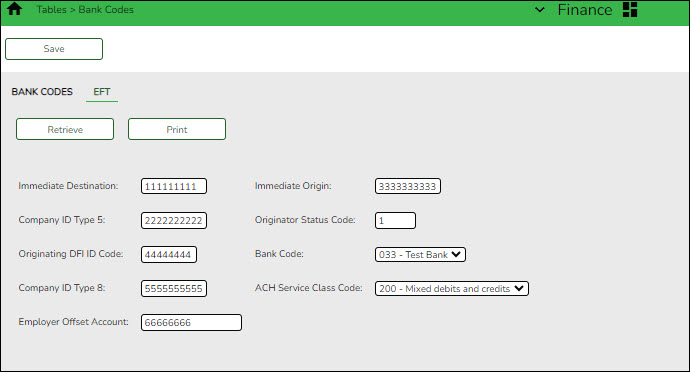
Finance > Tables > Bank Codes > EFT
Create the LEA's EFT record to be used when sending vendor EFT payments to their bank. This function is accomplished by creating an EFT file during a payment run. This file is then given to the local education agency's (LEA) bank to be transmitted to an automatic clearinghouse.
Enter the EFT data for the LEA's EFT bank account to be used for Finance checks. Reference the Payroll > Tables > Bank Codes > EFT tab if using the same EFT bank.
❏ Click Save.
- Add/update bank information.
Add/update Vendor Bank Information
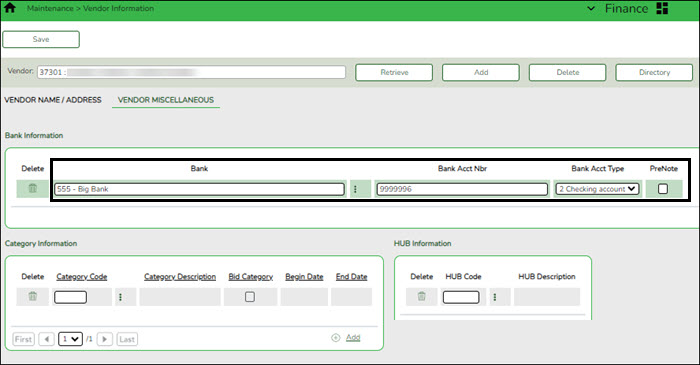
Finance > Maintenance > Vendor Information > Vendor Miscellaneous
Add bank information for each vendor (or employee) doing business with the local education agency (LEA). If a vendor has bank information on file, the vendor can receive electronic payments via an electronic funds transfer (EFT). This bank information is also used for employee travel reimbursements.
❏ Under Bank Information, complete the bank information for each vendor record:
Bank Begin typing a bank code or name. As you type the data, a drop-down list of corresponding data is displayed. The bank information must exist on the Finance > Tables > Bank Codes tab. Select a bank code. If the bank code or name is not known, click
 to select a bank from the Banks lookup or press the SPACEBAR to view a list of banks.
Bank Acct Nbr Type the corresponding bank account number for the selected bank. Bank Acct Type Select the account type for the selected bank and bank account number.
2 Checking account
3 Savings accountPreNote Select to generate a prenote to the bank. ❏ Click Save.
- Add/update vendor EFT email address.
Add/Update Vendor EFT Email Address
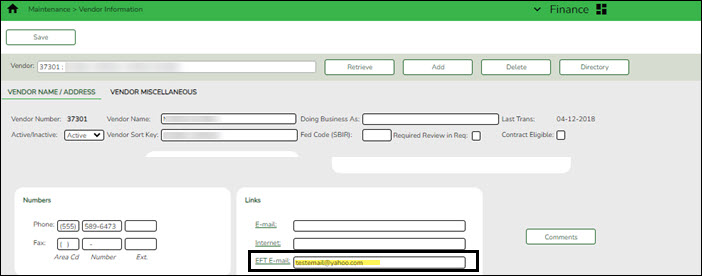
Finance > Maintenance > Vendor Information > Vendor Name/Address
Add a new vendor record or update an existing record with the vendor's EFT email address. The EFT email is required for all vendors participating in electronic funds transfer (EFT) payments.
❏ Under Links, add or update the EFT email address:
EFT E-mail Type the vendor's email address to send the vendor EFT payment information. The field can be a maximum of 45 characters. EFT E-Mail Click to open a new email message using your default email provider. Note: The vendor's EFT email address is required prior to adding the vendor's bank information on the Vendor Miscellaneous page.
❏ Click Save.
- Post transaction(s).
Post Transaction(s)
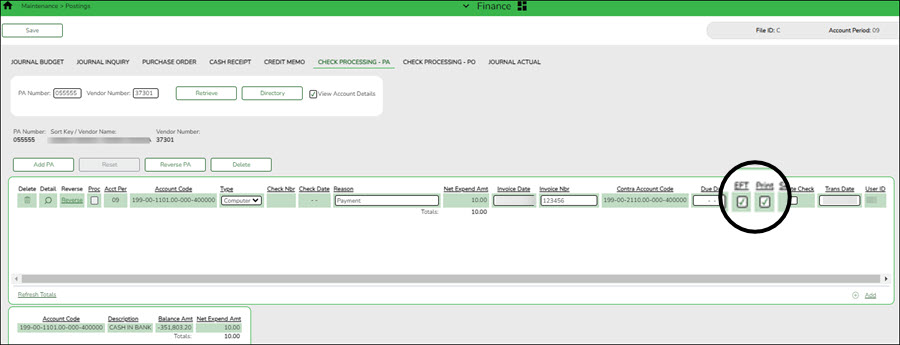
Finance > Maintenance > Postings > Check Processing - PA OR PO
Create a transaction for an existing or new purchase authorization (PA) or purchase order (PO). By default, the EFT checkbox is automatically selected if the vendor retrieved has bank information on the Finance > Maintenance > Vendor Information > Vendor Miscellaneous tab and an EFT email address on the Finance > Maintenance > Vendor Information > Vendor Name/Address tab. If a check is necessary, unselect EFT.
Notes:
- The vendor must have bank information and an EFT email address on file to be eligible for an electronic funds transfer (EFT).
- The EFT checkbox is not displayed for purchase orders that were created using a credit card code.
- If Separate Check is selected, EFT is unselected. Leave Print selected as it allows the transactions to be included and processed during the check run.
- Print check(s).
Print Check(s)
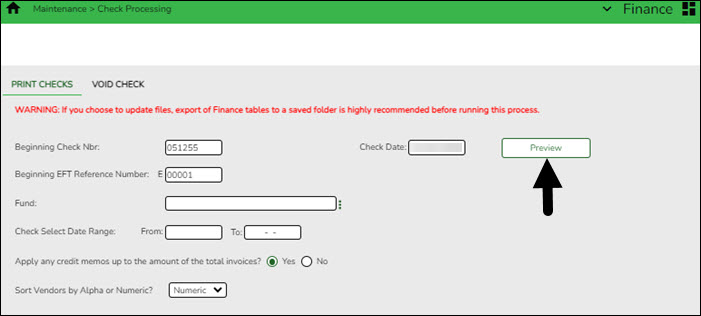
Finance > Maintenance > Check Processing > Print Checks
Process all applicable computer checks/EFT transactions that are ready for the check cycle.
❏ Complete the Print Checks tab. The Beginning EFT Reference Number defaults to 00001 for the first time that EFT transactions are processed, and then increments each EFT run.
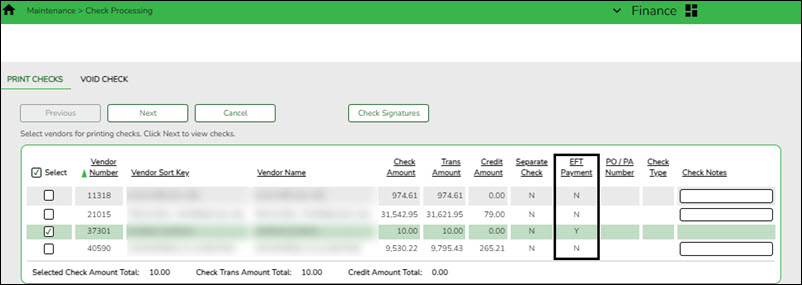
❏ Click Preview. The Vendor Check Processing page is displayed with a list of all transactions (PO, PA, and credit memo transactions are included) to be processed. All transactions listed are selected by default and included in the totals at the bottom of the page.
❏ Select the top-level checkbox to select/unselect the list of transactions. Or, select individual checkboxes to only select specific transactions.
❏ If printing checks, click Check Signatures to select the appropriate signature(s) to be printed on the checks.
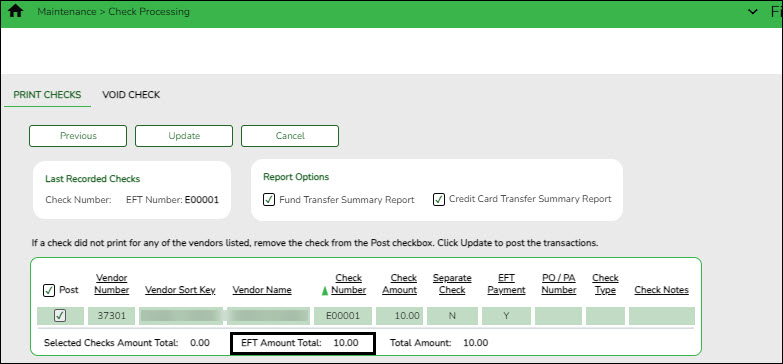
TIP: The total of the Fund Transfer will match the total of all transactions processed.
- Create EFT file.
Create EFT File
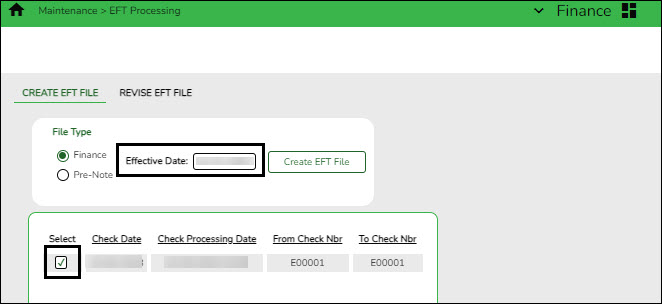
Finance > Maintenance > EFT Processing > Create EFT File
Create the EFT file. The file is then given to the local education agency's (LEA) bank to be transmitted to an automated clearing house (ACH) as a request to electronically transfer the payment to the vendor.
The File Type defaults to Finance.
Field Description Finance When selected, all EFT checks (i.e., payments) for the selected date time stamp(s) are included in the EFT file. If multiple date time stamp records are selected, all records will be included in the same file. A list of data from the last ten check runs is displayed in the grid. Effective Date Type the effective date for the EFT file in the MM-DD-YYYY format. This is the date that the bank will transfer the funds to the vendor's bank. It is recommended to set the Effective Date to allow the bank one to two days to process the file (similar to Payroll EFT dates). You should not enter the actual day you are running the checks/EFT unless there is a special arrangement between your LEA and your LEA's bank.
❏ Select the appropriate check run. Notice the check number assigned will begin with an “E” for EFT.
❏ Click Create EFT File to create the EFT file. The Finance EFT Report is displayed with a list of transactions to be processed.
❏ Click
 to print the report prior to clicking Process.
❏ Click Process to proceed. A dialog box is displayed with a preset File name. The Finance_EFT_MMDDYYYY.txt file is generated with the actual EFT payments for each vendor.
Your EFT file is ready to be sent to your bank contact for EFTs using your LEA's preferred method of sending EFT files.
The following morning at 6:00 AM, ASCENDER will generate and send an email to the vendor's EFT email (listed on the Vendor Name/Address tab) notifying them that an EFT payment (deposit) has been issued to their bank account.
Americans with Disabilities Act (ADA) and Web Accessibility
The Texas Computer Cooperative (TCC) is committed to making its websites accessible to all users. It is TCC policy to ensure that new and updated content complies with Web Content Accessibility Guidelines (WCAG) 2.0 Level AA. We welcome comments and suggestions to improve the accessibility of our websites. If the format of any material on our website interferes with your ability to access the information, use this form to leave a comment about the accessibility of our website.


