Sidebar
Add this page to your book
Remove this page from your book
ASCENDER - Manage Purchasing Approval Workflows
Created: 11/20/2020
Reviewed: 07/26/2022
Revised: 07/26/2022
The purpose of this document is to guide you through managing Purchasing approval workflows.
After the Set up Purchasing Options and Permissions document is addressed, use this document to set up the Workflow pages in District Administration.
The Workflow pages allow you to automate the purchasing approval process by establishing a first approver, approval path, approval rules, and alternate approvers. In addition, you can set up approval conditions such as approval limits, notifications, and alternate approvers.
This document assumes you are familiar with the basic features of the ASCENDER Business system and have reviewed the ASCENDER Business Overview guide.
Some of the images and/or examples provided in this document are for informational purposes only and may not completely represent your LEA’s process.
Manage Approvers, Workflows, and Approval Rules
- Add first approver(s).
Add first approver(s)
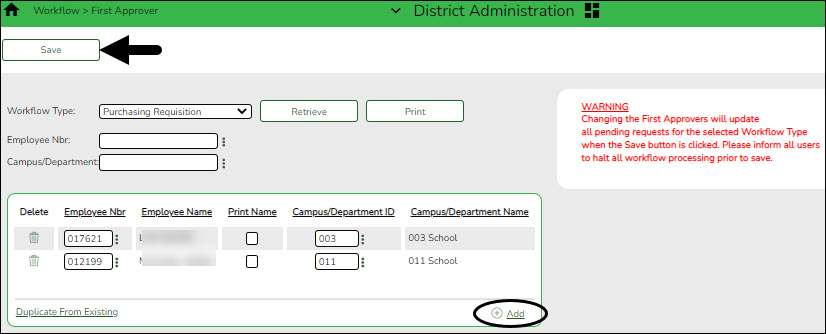
District Administration > Workflow > First Approver
Create and maintain a list of first approvers for requisitions at each campus/department. These individuals are the first people at their assigned campus/department to view the submitted requisitions.
❏ Click Retrieve. If any first approvers exist, a list of first approvers for the various campuses/departments is displayed.
❏ Click +Add to add a first approver.
Employee Nbr Begin typing an employee number or name. As you type the data, a drop-down list of corresponding data is displayed. Select an employee, or click
 to select an employee from the Approver Directory. The Employee Name field is populated based on the selected Employee Nbr.
Note: To view the first approver for a specific campus/department, leave the Employee ID field blank, type a specific campus/department, and click Retrieve.
Campus/Department ID Type a campus ID or click
 to select a one from the Department Directory. A list of all available campus IDs is displayed. The Campus/Department Name field is populated based on the selected Campus/Department ID.
The Department Directory is populated from the campus/departments that are established on the District Administration > Tables > District Information > Campus Name/Address page.
Note: To view all of the campuses/departments for a specific approver, leave the Campus/Department field blank, type a specific employee ID number, and then click Retrieve.
Print Name Select to print the approver's signature on the purchase order. ❏ Click Save.
Notes:
- Only one first approver is allowed per campus/department.
- If an approver is the first approver for multiple departments, that approver needs to be added to the table multiple times.
- Only a first approver is allowed to insert another approver after their name.
- Establish the approval path.
Establish the approval path
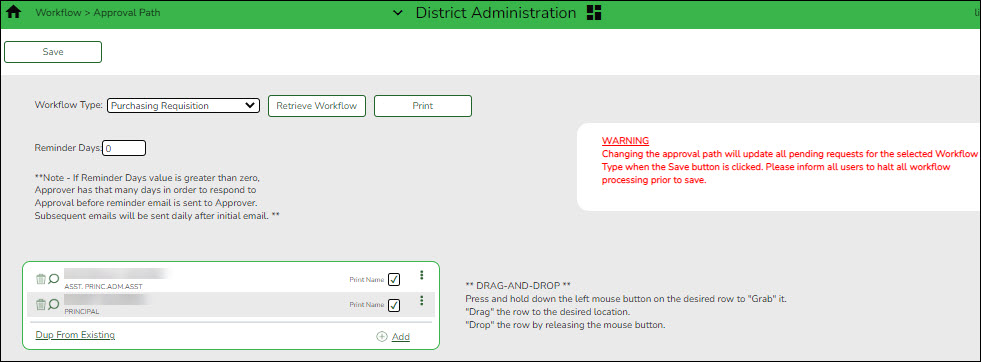
District Administration > Workflow > Approval Path
Create and maintain the sequence or hierarchy of approvers for the approval process. The order in which approvers are listed indicates the approval sequence. You can add to or edit the approval path as needed as long as the approver does not have requisitions pending their approval. If a change is made to the approval path, the change applies to all requisitions that have yet to reach that specific approver.
For the approval process, approvers must exist in Security Administration with an assigned employee number and have a current year payroll record.
Notes:
- Any changes made to the approval path are immediate and automatically update (move) existing requisitions. If there are existing requisitions and you are adding a new user, first create the new user’s approval rules so that any pending items are properly moved when the user is added to the workflow.
- The Purchasing Cutoff Date field on the District Administration > Options > Purchasing Options page can be used to temporarily restrict users from adding requisitions while the approval path is edited. Be sure to clear the date from the field after the approval path changes are completed.
❏ Click Retrieve Workflow. The selected workflow type data is displayed. If an approval path exists, the list of approvers is displayed and you can make changes as needed.
The drag-and-drop feature is available allowing you to change the order of the approval path.
Reminder Days Type the number of days after which no action has been taken on an item, and a reminder email message should be sent to the originator and approver.
By default, this field is set to zero indicating that no reminders will be sent.
If this field is set to a value greater than zero, the approver has that number of days to take action on the requisition before a reminder email message is sent.
After the initial reminder email message is sent, email messages are sent on a daily basis until action is taken.
The number of reminder days also applies to first approvers. If all approvers in the approval path are removed, the field is reset to zero.❏ Click +Add to add an approver to the approval path or click
 to edit an approver. The Approver Directory is displayed.
Employee Name The name of the selected employee ID is displayed. Print Name Select to print the approver's signature on the request or purchase order. ❏ Click Save. Depending on the change, the appropriate application message is displayed indicating the action.
❏ Click
 to display the Approval Rules page for the selected approver.
- Establish approval rules.
Establish approval rules
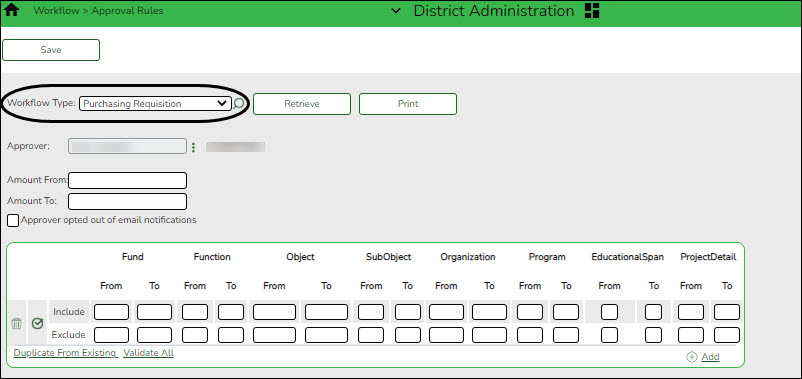
District Administration > Workflow > Approval Rules
Establish account code rules for each approver in the approval path except the first approver. An approver may have multiple sets of approval rules. Approvers must have an employee number in Security Administration.
❏ Click
 to retrieve an approver.
Amount From Type the bypass dollar amount at which a requisition or request must be approved by the indicated approver. The amount must be entered as a whole dollar.
Amount To Type the amount up to which the approver can approve. The amount must be entered as a whole dollar.
Approver opted out of email notifications Select if the originator, first approver, or any approver does not want to receive email notifications. ❏ Click +Add. An Include and Exclude row are added.
Include Type the valid account code components to which the selected user has permission to approve.
For each account code component, type a from and/or to account code component as needed, or with the cursor in the field, press F2. If you press F2, a list of available account code components is displayed. Select the account code component from the list.
Click Cancel to return to the Approval Rules page.Exclude Type the valid account code components to which the selected user does not have permission to approve.
For each account code component, type a from and/or to account code component as needed, or with the cursor in the field, press F2. If you press F2, a list of available account code components is displayed. Select the account code component from the list.
Click Cancel to return to the Approval Rules page.
A complete mask should not be used as it will exclude all occurrences of that component.Each set of Include/Exclude rules are evaluated independently of any other rule sets that are created.
❏ Click Validate All to display a detailed list of account codes that are included in each ruleset.
❏ Click Duplicate to copy approval rules from other users and/or applications.
❏ Click Save.
- (If necessary) Add alternate approvers.
(If necessary) Add alternate approvers
District Administration > Workflow > Alternate Approver
If an approver is unavailable to perform approval duties, you can set up an alternate approver for a specified length of time. Alternate approvers must have an employee number in Security Administration.
A list of all available approvers is displayed.
Use Alternate Select to create an alternative for the approver.
If selected, and no date range is entered in the From Date and To Date fields, the alternate approver becomes the approver.
If selected, and no date range is entered in the From Date and To Date fields, all pending requests are updated with the alternate approver for the selected original approver.
If selected, and a date range is entered in the From Date and To Date fields, all pending requests are updated with the alternate approver for the selected original approver if today’s date falls on or between the from and to dates.
If selected, and a date range is entered in the From Date and To Date fields, and today’s date is outside of the from and to date range, no updates occur for the selected original approver.
If not selected, and/or a date range is entered in the From Date and To Date fields, no updates occur for the selected original approver.
If selected, and then cleared, the alternate approver for all pending requests reverts to the original approver and an email message is sent to the original approver. This includes updating the workflow datetimestamp to today’s date to reset the reminder days for the original approver.Alternate Emp Nbr Type an employee number or click
 to select one from the Approver Directory.
From Date Select a date from the calendar on which the selected employee will begin serving as the alternate approver. To Date Select a date from the calendar on which the selected employee will end serving as the alternate approver. ❏ Click Save.
- Delete users.
Delete users
To completely delete a user from Security Administration, complete the following steps in the order in which they are listed:
❏ District Administration > Workflow
1. Alternative Approver: Click Clear Row.
2. Approval Rules: Delete the rules for the Purchasing Requisition workflow type.
3. Approval Path: Delete the user from the Purchasing Requisition approval path.
4. First Approver: Delete the user from being a first approver.
❏ District Administration > Maintenance > User Profiles- Delete the user's profile.
❏ Security Administration > Manage Users- Under Search Criteria, click Find to perform a search for all users. Or, to perform a search for a specific user, enter data in one or more of the search fields.
- Select Show Deleted Users to include deleted users in your search. Deleted users are highlighted in red.
- Click Find. A list of users matching your search criteria is displayed.
- Select the user to be deleted.
- Click Delete User. A pop-up window prompts you to confirm that you want to delete the user.
- Click OK to delete the user.
A message indicating that the user was deleted successfully is displayed at the bottom of the page.
Note: Administrative users cannot be deleted. If an administrative user is selected, a message is displayed indicating that the administrative user's properties cannot be changed.
Americans with Disabilities Act (ADA) and Web Accessibility
The Texas Computer Cooperative (TCC) is committed to making its websites accessible to all users. It is TCC policy to ensure that new and updated content complies with Web Content Accessibility Guidelines (WCAG) 2.0 Level AA. We welcome comments and suggestions to improve the accessibility of our websites. If the format of any material on our website interferes with your ability to access the information, use this form to leave a comment about the accessibility of our website.


