User Tools
Sidebar
Add this page to your book
Remove this page from your book
Admin Guide: ASCENDER EmployeePortal Travel Reimbursement Setup
The Travel Reimbursement Requests feature allows employees to request reimbursement of mileage, lodging, meals, and incidentals stemming from official business travel.
The purpose of this document is to guide you through the necessary steps to set up the appropriate access for employee travel reimbursement requests via EmployeePortal while allowing employers to swiftly move employee travel reimbursement requests through a customized approval path to ensure timely reimbursement.
Some of the images and examples provided in this document are for informational purposes and may not completely represent your LEA’s process.
This document assumes you are familiar with the basic features of the ASCENDER Business system and have reviewed the ASCENDER Business Overview guide.
Prerequisites
❏ Update roles/users in Security Administration to allow Travel Reimbursement permissions. You can add permissions to an existing role or create a new role.
❏ The Automatic PA Number Assignment field must be selected on the Finance > Tables > District Finance Options > Finance Options tab in order to create travel checks. If this field is not selected, the final approver in the travel approval path cannot approve the request.
Set up District Administration Options
- Maintain user profiles as needed.
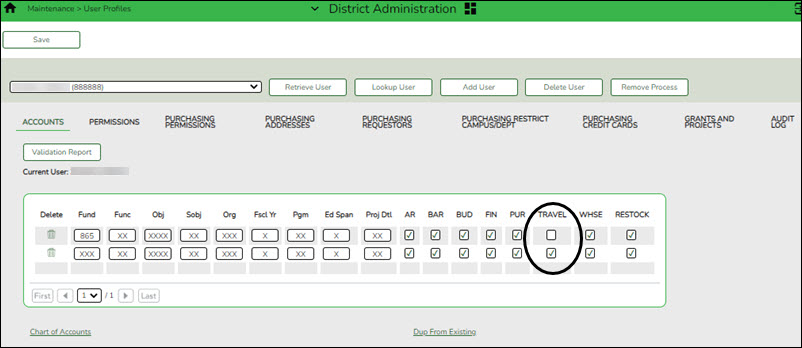
District Administration > Maintenance > User Profiles > AccountsCreate, modify, or delete user profiles as needed. You can allow and/or limit users to certain budget accounts. You can also mass assign travel accounts to user profiles by using the District Administration > Utilities > Assign Travel Accounts utility.
❏ Assign authorized accounts.
- In the account code fields, add a new mask with all Xs to allow the user to have full access to all accounts.
- Type the account code elements of the accounts to which the user authorized to access (e.g., 199 for all 199 account codes). The Account Description is displayed for accounts that exist in the Account Code table.
❏ Select TRAVEL to authorize travel reimbursement requests for the specified account.
❏ Click Save.
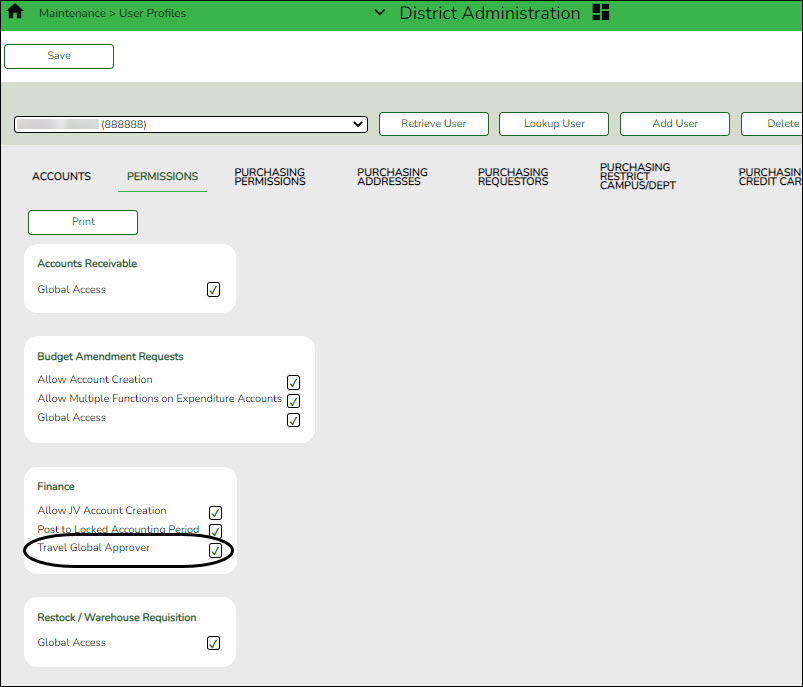
District Administration > Maintenance > User Profiles > Permissions
❏ Under Finance, select Travel Global Approver to allow the user access to view all travel reimbursement records for the LEA regardless of the user's account permissions.
❏ Click Save.
- Mass create user profiles with assigned travel accounts.
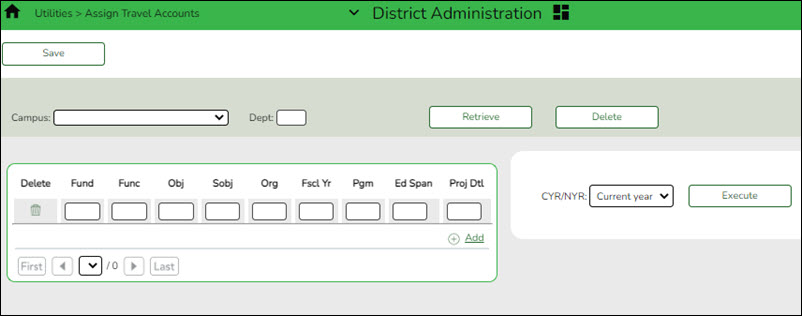
District Administration > Utilities > Assign Travel AccountsMass assign account codes by primary campus, department code (optional), and year for employees using the travel reimbursement request feature in EmployeePortal.
After running this process, a user profile is created with the assigned account codes for each active person with the primary campus/dept on their Job Info record that matches the selection on this page.
When submitting a travel reimbursement request in EmployeePortal, employees will be able to use these account codes to indicate the budget to be charged for a travel reimbursement request.
IMPORTANT: If you are creating records for users by campus and department, you must select a campus, indicate the department, and click Retrieve. This must be done upon initial retrieval. Otherwise, select a campus and click Retrieve.
Field Description Campus Click  to select a campus.
Dept Type a one-character department code. This field is optional. ❏ Click Retrieve. The campus/department record is displayed.
❏ In the CYR/NYR field, click
 to indicate the year (Current or Next) to apply the changes.
❏ Type an account code or mask (X) in each of the account code component fields. Click +Add to add rows as needed.
❏ Click Save to save the record without executing the changes.
❏ Click Execute to execute the process. A user profile is created for each active person with the selected primary campus/dept. The user is assigned the selected accounts for the primary campus/dept and the Travel checkbox is selected to indicate that the user will have access to the assigned accounts when submitting travel requests in EmployeePortal.
- Set up travel reimbursement request workflows.
Use the following pages to set up the applicable approval workflows for Travel Reimbursement:
Verify Travel Accounting Period
- Verify travel accounting period.
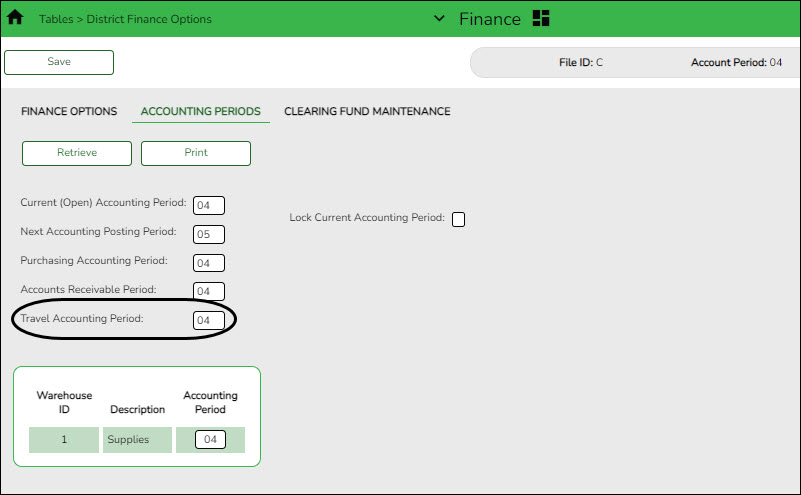
Finance > Tables > District Finance Options > Accounting PeriodsVerify that the travel accounting period is accurate.
Travel Accounting Period Type the Travel accounting period. The field is a two-digit number from 01-12. The period can be the same as the current accounting period or the next accounting posting period. Note: This accounting period is incremented after completing the EOM and Fiscal Year Close processes.
Set up Travel Options
Perform the following tasks to ensure that the travel reimbursement request feature in EmployeePortal is set up properly and functions as intended for employees.
- Set up Finance 2 options.
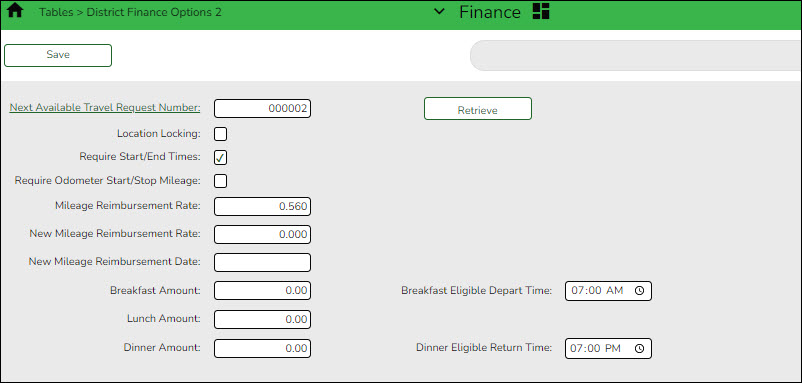
Finance > Tables > District Finance Options 2Set up the appropriate parameters to be used for the LEA's travel reimbursement requests.
Field Description Next Available Travel Request Number Type the next available travel request number. Or, click the Next Available Travel Request Number link to automatically populate the field with the last travel request number plus one.
The field can be a maximum of six characters and can be alphanumeric. If only numeric values are used, the field is zero-filled to equal six digits when a partial travel request number is entered and you tab out of the field (e.g., you entered 123, the field is zero-filled to 000123). If alphanumeric values are used, the field is not zero-filled to equal six characters (e.g., you entered ABC2, the travel request number remains ABC2).
Location Locking Select to lock (disable) the Mileage (Start, Stop, and Map) fields, Point of Origin, and Destination fields on travel requests and require employees to use the Location link to select an origin and destination location from the predefined list of travel locations and distances set up on the Finance > Tables > Travel > Locations and Finance > Tables > Travel > Distances tab.
The Location Locking feature is not available for extended mileage travel requests.Require Start/End Times Select to require the travel start and end times on travel requests. This option is only available for mileage travel requests. The start/end times are always required for extended travel as the times are necessary to determine meal rates and eligibility. Require Odometer Start/Stop Mileage Select to require the beginning and ending odometer readings on travel requests. Mileage Reimbursement Rate Type the mileage reimbursement rate (cents per mile). New Mileage Reimbursement Rate Type the new mileage reimbursement rate. This field is used when the mileage reimbursement rate is set to change on a scheduled date. New Mileage Reimbursement Date Type the date on which the New Mileage Reimbursement Rate takes effect. Use the MM-DD-YYYY format. This field is used when the mileage reimbursement rate is set to change on a scheduled date. When travel requests are entered in EmployeePortal, if the date the travel occurred is equal to or greater than this date, the new mileage reimbursement rate is used. Breakfast Amount Type the allowable limit for breakfast reimbursement. Breakfast Eligible Depart Time Type the time the employee must depart before in order to be reimbursed for breakfast on the first travel day. Use the HH MM format and click  to select AM or PM.
To be reimbursed for breakfast on the first travel day, the Departure Time on the travel request must be earlier than the Breakfast Eligible Depart Time.Lunch Amount Type the allowable limit for lunch reimbursement. Dinner Amount Type the allowable limit for dinner reimbursement. Dinner Eligible Return Time Type the time the employee must return after in order to be reimbursed for dinner on the last travel day. Use the HH MM format and click  to select AM or PM.
To be reimbursed for dinner on the last travel day, the Return Time on the travel request must be later than the Dinner Eligible Return Time.❏ Click Save.
- (Optional) Define travel locations.
Finance > Tables > Travel > LocationsDefine a list of travel locations. These locations can be used on the Finance > Tables > Travel > Distances tab to predefine a list of distances between to/from travel locations. If the Location Locking feature is enabled on the Finance > Tables > District Finance Options 2 page, the Mileage (Start, Stop, and Map) fields, Point of Origin, and Destination fields are disabled on EmployeePortal travel requests and employees will need to use the Locations link to select from the predefined list of locations.
This is an optional method for maintaining a list of locations.❏ Click +Add to add a row.
❏ Click Save.
- (Optional) Calculate to/from location distances.
Finance > Tables > Travel > DistancesAdd a list of distances (in miles) between possible predefined to/from travel locations. These locations are set up on the can be used on the Finance > Tables > Travel > Locations tab. If the Location Locking feature is enabled on the Finance > Tables > District Finance Options 2 page, the Mileage (Start, Stop, and Map) fields, Point of Origin, and Destination fields are disabled on EmployeePortal travel requests and employees will need to use the Locations link to select from the predefined list of locations.
This is an optional method for maintaining a list of locations.❏ Click +Add to add row.
Origination Click  to open the Location lookup and select a starting location.
 Destination Click  to open the Location lookup and select an ending location.
 Distance Type the number of miles from the Origination (starting) location to the Destination (ending) location. ❏ Click Save.
Create and Link Employee/Vendor Records
- Create an employee vendor record.
Finance > Maintenance > Vendor Information > Vendor Name/AddressCreate a vendor record for the employee.
❏ Click Add.
❏ Complete the applicable fields.
TIPS:
- Under EIN/SSN, the Type must be SSN and the Number must match the employee's SSN on the Personnel > Maintenance > Staff Demo > Demographic Information tab. It is important that this information matches as this is the link between the employee's vendor and demographic record, and determines the availability of the copy bank information from payroll functionality on the Vendor Miscellaneous tab.
- The EFT Email is required.
❏ Click Save.
- Add bank information.
Finance > Maintenance > Vendor Information > Vendor MiscellaneousAdd bank information for the vendor/employee.
❏ Under Bank Information:
Bank Begin typing a bank code or name. As you type the data, a drop-down list of corresponding data is displayed. The bank information must exist on the Finance > Tables > Bank Codes tab. Select a bank code. If the bank code or name is not known, click
 to select a bank from the Banks lookup or press the SPACEBAR to view a list of banks.
Bank Acct Nbr Type the corresponding bank account number for the selected bank. Bank Acct Type Select the account type for the selected bank and bank account number.
2 Checking account
3 Savings accountPreNote Select to generate a prenote to the bank. ❏ Click Copy from Payroll to copy the employee’s bank information from the Payroll > Maintenance > Staff Job/Pay Data > Pay Info tab.
- The vendor must have an EFT Email listed on the Vendor Name/Address tab to save the record.
- The bank information on the Pay Info tab must have a zero Bank Acct Amt in order to be copied.
- This button only displays if the vendor and employee SSN records match. On the Finance > Maintenance > Vendor Information > Vendor Name/ Address tab, under EIN/SSN, the Type must be SSN and the Number must match the employee's SSN on the Personnel > Maintenance > Staff Demo > Demographic Information tab.
❏ Click Save. - Update employee's commute distance.
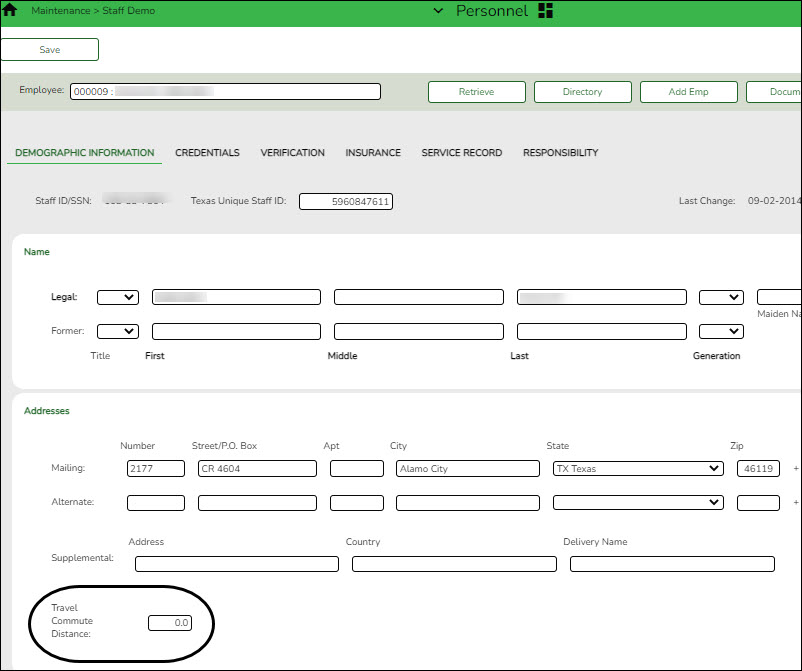
Personnel > Maintenance > Staff Demo > Demographic InformationIndicate the employee's commute distance. This information is used when calculating travel distances for travel reimbursement requests.
❏ In the Travel Commute Distance field, type the commute distance (the number of miles between the employee's home and assigned work location). Valid values are 0-999.9.
This field can also be updated by the employee via the Commute Distance Change link on the Travel Reimbursement Requests page in EmployeePortal.
❏ Click Save.
Enable the Travel Reimbursement Request Feature
- Set up district EP options.
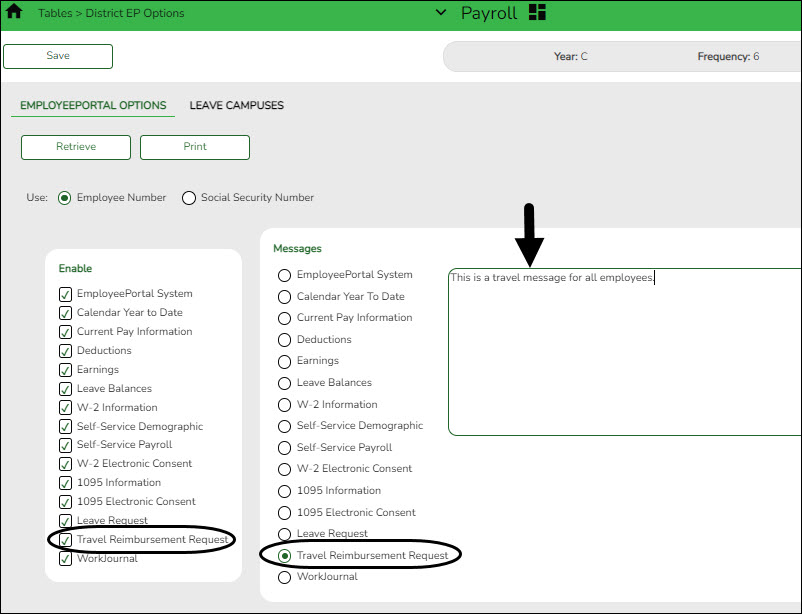
Payroll > Tables > District EP Options > EmployeePortal OptionsSet up the following EP options to allow employees to view the Travel Reimbursement Request menu in EmployeePortal.
❏ Under Enable, select Travel Reimbursement Request to enable the travel reimbursement request feature in EmployeePortal.
❏ Under Messages, select Travel Reimbursement Request to enable employees to view a preset message on the Travel Reimbursement Requests page in EmployeePortal.
- Type the applicable message in the text box.
- The message is displayed in red at the top of the Travel Requests page in EmployeePortal after the record is saved.
❏ Click Save.
After the above steps are completed, employees can submit travel reimbursement requests in EmployeePortal. Reference the Employee Guide: Manage Travel in EmployeePortal for information about submitting travel requests.
Americans with Disabilities Act (ADA) and Web Accessibility
The Texas Computer Cooperative (TCC) is committed to making its websites accessible to all users. It is TCC policy to ensure that new and updated content complies with Web Content Accessibility Guidelines (WCAG) 2.0 Level AA. We welcome comments and suggestions to improve the accessibility of our websites. If the format of any material on our website interferes with your ability to access the information, use this form to leave a comment about the accessibility of our website.


