User Tools
Sidebar
Add this page to your book
Remove this page from your book
This is an old revision of the document!
Close fiscal year
Log on to file ID C.
This utility provides a streamlined method to efficiently end the old fiscal year and begin the new fiscal year. Only one Finance accounting period can be open (i.e., The Finance current and next accounting period should be the same). Also, all other application accounting periods should match on the Finance > Tables > District Finance Options > Finance Options tab.
The following Finance EOY tasks are automatically completed when you execute the Fiscal Year Close process:
- Delete 1099 work table.
- Delete payroll deduction checks.
- Delete payroll transfer transactions.
- Copy current to new file ID.
- Delete credit memos for ending funds.
- Delete prior fiscal year and funds marked for deletion.
- Mass change account codes.
- Delete budget amendments only for increment funds.
- Create new accounts by fund/carry forward totals if selected.
- Update the file ID of all Finance document attachments to the new file ID.
Note: To accommodate ASCENDER Business-only clients, the Fiscal Year Close process creates new year district and campus records in District Administration if executed prior to the Annual Student Data Rollover (ASDR) process.
Reminder: Before processing continuing funds, review overdrawn accounts and/or accounts that have expenditures with no budget. If these deficit balances are not corrected, the negative budget balance will be rolled forward as a negative budget and will need to be corrected in the new year with a JV (Journal Budget).
If an LEA is switching to a July 1 fiscal year, they must change the Starting Accounting Period from 09 to 07 on the Finance > Tables > District Finance Options > Finance Options tab BEFORE closing the year. This allows their data to be updated with the correct month after performing the closing process.
Process the fiscal year close:
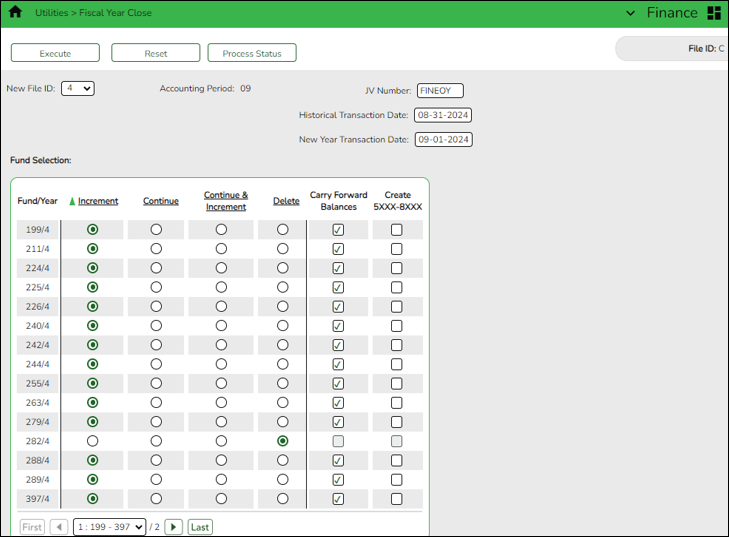
When you access this page, last year's options may be selected by default. This allows you to review what was done last year and decide how to proceed this year.
Before running this process, click Reset to clear last year's selections. This resets all funds to Increment allowing you to manually update each selection as needed.
| Field | Description |
|---|---|
| New File ID | Click  to select the new historical GL file ID to which you want to copy all tables and transactions. The field defaults to the last digit of the “to” school year. The drop-down displays a list of all GL file IDs that are not in use. This is a required field. to select the new historical GL file ID to which you want to copy all tables and transactions. The field defaults to the last digit of the “to” school year. The drop-down displays a list of all GL file IDs that are not in use. This is a required field. |
| Accounting Period | Displays the Starting Accounting Period from the Finance > Tables > District Finance Options > Finance Options tab. This accounting period is used for all JVs created in file ID C. Only one accounting period can be open. |
| JV Number | Type an alphanumeric journal voucher number. This JV number is used for all system JV entries. This is a required field. |
| Historical Transaction Date | Type the historical transaction date in the MM-DD-YYYY format or select a date from the calendar. This date is used for all system entries in the new historical file ID. This is a required field. |
| New Year Transaction Date | Type the new year transaction date in the MM-DD-YYYY format or select a date from the calendar. This date is used for all system entries in the new current file ID. This is a required field. |
❏ Under Fund Selection, a list of each Fund/Year in the signed-on GL file ID is displayed. Select the appropriate option(s) for each fund.
Notes: The following occurs for all funds listed:
- All funds are copied to the new historical file ID.
- All budget amendments are deleted.
- All current year requisitions are reversed.
| Increment |
Select for the funds to be incremented (i.e., funds that will change their fiscal year at the same time that the LEA’s new fiscal year will begin). The increment option is not available if the incremented fund already exists. For example, in September 2023, funds 211/3 and 211/4 already exist; therefore, 211/3 can only be continued or deleted. If selected, the following actions are automatically completed:
The fiscal year is incremented on credit memos.
The following are optional:
Carry Forward Balances
|
|---|---|
| Continue |
Select for the funds to be continued into the new fiscal year (i.e., funds maintaining the fiscal year even after the LEA begins the new fiscal year). If selected, the following actions are automatically completed:
The 1XXX-4XXX account balances are carried forward (the Carry Forward Balances field is automatically selected).
|
| Continue & Increment |
Select for the funds to be incremented and continued into the new fiscal year. The increment option is not available if the incremented fund already exists. For example, in September 2023, funds 211/3 and 211/4 already exist; therefore, 211/3 can only be continued or deleted. If selected, the following actions are automatically completed:
The 1XXX-4XXX account balances are carried forward for the fund in the fiscal year that is continuing (the Carry Forward Balances field is automatically selected). The accounts for the incremented fund/fiscal years are established with a zero balance.
Create 5XXX-8XXX Accounts for the incremented fund |
| Delete | Select to delete the fund. If selected, no additional action occurs for these funds. |
| Carry Forward Balances | Select to carry forward 1XXX-4XXX account balances into the new fiscal year. This field is automatically selected when Continue is selected for a fund. |
|---|---|
| Create 5XXX-8XXX | Select to create 5XXX-8XXX accounts. This field is disabled when Continue is selected for a fund. |
❏ After carefully selecting the appropriate options for each fund, click Execute to begin the Finance year close process.
Note: After you click Execute, your selected options are saved and will be available the next time you open the Fiscal Year Close page.
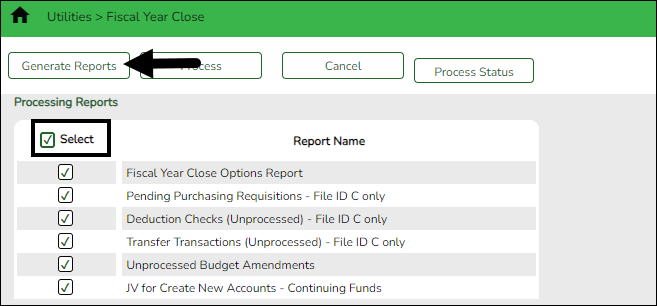
Under Processing Reports, the following reports are available:
- Fiscal Year Close Options Report
- Pending Purchasing Requisitions - File ID C only
- Deduction Checks (Unprocessed) - File ID C only
- Transfer Transactions (Unprocessed) - File ID C only
- Unprocessed Budget Amendments
- JV for Create New Accounts - Continuing Funds
❏ Select the checkbox next to each report you want to generate or click the top Select checkbox to select all reports.
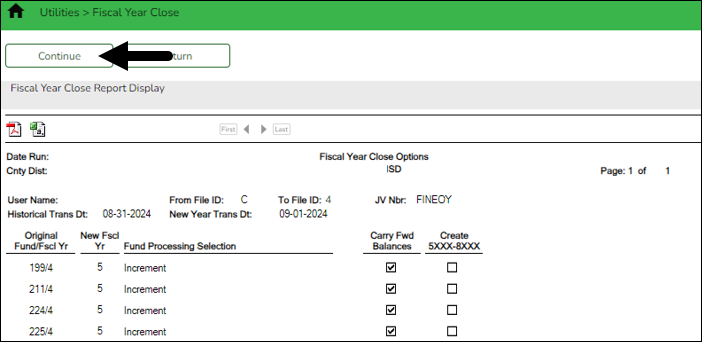
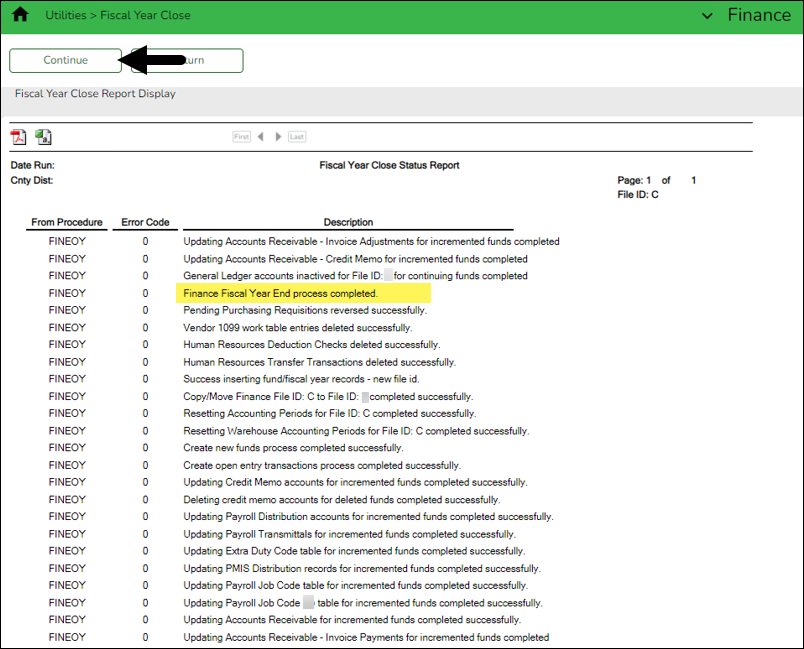
❏ Click Generate Reports to generate the selected reports. Print and/or save the reports and review them for accuracy. The Fiscal Year Close Report Display page is displayed.
- Click Continue. The first report selected is displayed. Click Continue to display the next selected report. When you are done viewing all of the selected reports, you are returned to the Processing Reports page.
- Click Return at any time to return to the Processing Reports page.
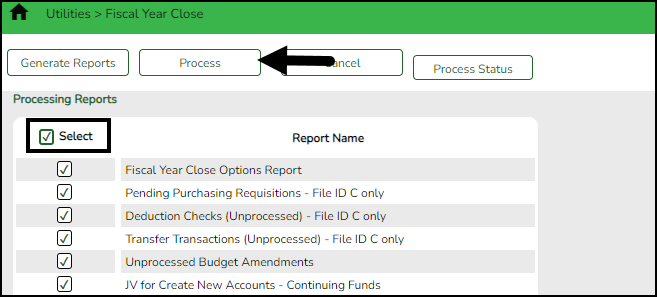
❏ Click Process to process the fiscal year close. You are prompted to create an export. A series of end-of-year Finance tasks will begin to run in the background. After the process is completed, you are returned to the Fiscal Year Close page.
After processing, the Current (Open) Accounting Period on the Finance > Tables > District Finance Options > Accounting Period tab is updated to match the Starting Accounting Period on the Finance > Tables > District Finance Options > Finance Options tab (i.e., the accounting periods will be set to 07 or 09 depending on the LEA). In order to update the File ID and Account Period in the top-right corner of the page, you must exit and re-enter the Finance application.
❏ Click Cancel to return to the Fiscal Year Close page.
❏ Click Process Status to view the details (error report, status, user details, etc.) for the process. The Fiscal Year Close Processing pop-up window opens with the Status, Extract Type, Start date and time, End date and time, User ID, and user Email address.
- If the logged-on user has an email address on the Personnel > Maintenance > Staff Demo > Demographic Information tab, an email message is forwarded when the process is completed.
- Under Error Report, click Print Report to display the selected error report. Review the report.
- Click Continue to continue through the list of reports for the selected extract. Click Return to return to the Fiscal Year Close page.
- Click Close to close the Fiscal Year Close Processing pop-up window and return to the Fiscal Year Close page.
Americans with Disabilities Act (ADA) and Web Accessibility
The Texas Computer Cooperative (TCC) is committed to making its websites accessible to all users. It is TCC policy to ensure that new and updated content complies with Web Content Accessibility Guidelines (WCAG) 2.0 Level AA. We welcome comments and suggestions to improve the accessibility of our websites. If the format of any material on our website interferes with your ability to access the information, use this form to leave a comment about the accessibility of our website.

