User Tools
Sidebar
Add this page to your book
Remove this page from your book
Process grant payments
Grants and Projects > Utilities > Grant Payments > Print Checks
Process reimbursement requests to the member's vendor via check or electronic funds transfer, and then post the transactions to Finance. The payment method is determined by the member's selected payment preference (i.e., if the member has bank information set on the Grants and Projects > Tables > SSA Members > Bank Code tab or the Finance > Maintenance > Vendor Information > Vendor Miscellaneous tab (if the member uses the same account information for vendor EFT payments).
❏ Under Check Options:
| Field | Description |
|---|---|
| Beginning Check Nbr | Populates based on the last check stock number used in the check run for the Finance payment process, but it can be modified. |
| Beginning EFT Reference Number | Populates based on the last EFT reference number used in the check run for the Finance payment process, but can be modified. The field displays an “E” at the beginning of the EFT reference number, which identifies the transaction as an electronic funds transfer throughout the application. |
| Check Date | Type the date in the MM-DD-YYYY format, or select a date from the calendar. This field represents the date of the check/EFT payment. |
❏ Click Execute. The Member Reimbursement payment processing page is displayed with a list of all transactions to be processed. If two different members use the same vendor, there will be separate checks; one for each member payable to the same vendor.
The following transaction details are displayed:
| Member | The county district number and member name are displayed. |
|---|---|
| Vendor Number | The vendor number is displayed. |
| Vendor Name | The vendor name is displayed. |
| Check Amount | The transaction amount is displayed. |
| EFT Payment | Y - Displays if either the member or member's vendor has bank information. Indicates the transaction is an EFT payment. N - Displays if neither the member nor member's vendor has bank information. Indicates the transaction is a check payment. |
All transactions listed are selected by default for processing and included in the totals at the bottom of the grid.
❏ Select the top-level checkbox to select/unselect the list of transactions. Or, select individual checkboxes to only select specific transactions.
The Selected Check Amount Total, EFT Amount Total, and Total Amount of transactions are displayed at the bottom of the grid and are automatically updated as you select/unselect transactions.
❏ Click the Check Signatures button to select the signature(s) to be printed on the check(s).
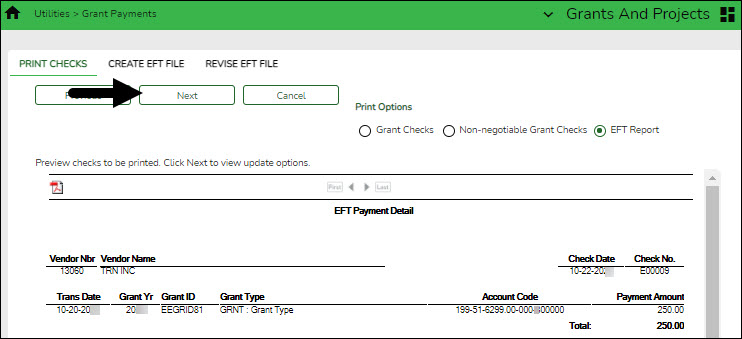
❏ Click Next. A preview of the checks to be printed is displayed. Use the scroll bars to view the check details. If only EFT transactions are included, then the EFT Payment Detail report is displayed.
❏ Under Print Options, select one of the following:
- Grant Checks - Selected by default and displays the grant checks to be printed.
- Non-Negotiable Grant Checks - Select to display the non-negotiable check pages for each transaction, which can be printed for internal use.
- EFT Report - Select to view the EFT Payment Detail report.
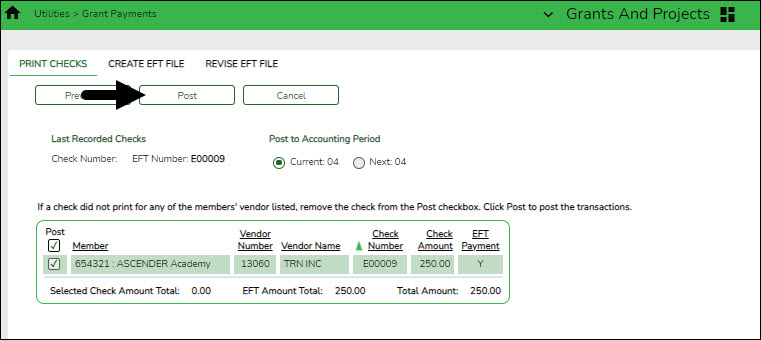
❏ Click Next. A list of the transactions to be processed is displayed.
❏ Under Last Recorded Checks:
| Check Number | The last recorded check number from the list of selected check transactions is displayed. |
|---|---|
| EFT Number | The last recorded EFT number from the list of selected EFT transactions is displayed. |
❏ Under Post to Accounting Period:
| Current | The current accounting period is displayed. Select to post the transactions to the current accounting period. |
|---|---|
| Next | The next accounting period is displayed. Select to post the transactions to the next accounting period. |
❏ If a check did not print for any of the listed vendors, unselect the Post check box for the transaction.
❏ Click Post to post the transactions. A journal entry for each transaction that was included in the check or EFT payment for each member is posted to the general ledger in Finance.
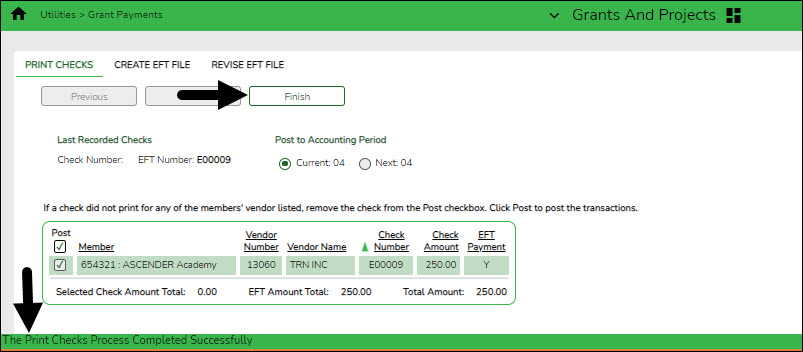
A message is displayed indicating that the print checks process was completed successfully.
❏ Click Finish to return to the Print Checks tab.
If any errors occurred during the process, the Cancel button is displayed.
❏ Click Cancel to return to the Print Checks tab, correct any errors and run the process again. Otherwise, click Previous at any point to return to the previous page.
Americans with Disabilities Act (ADA) and Web Accessibility
The Texas Computer Cooperative (TCC) is committed to making its websites accessible to all users. It is TCC policy to ensure that new and updated content complies with Web Content Accessibility Guidelines (WCAG) 2.0 Level AA. We welcome comments and suggestions to improve the accessibility of our websites. If the format of any material on our website interferes with your ability to access the information, use this form to leave a comment about the accessibility of our website.


