User Tools
Sidebar
Table of Contents
academy:admin_campus_enroll
Book Creator
Add this page to your book
Add this page to your book
Book Creator
Remove this page from your book
Remove this page from your book
ParentPortal Admin: Enrollment, Registration, and Data Updates
Campus: Accept Student & Issue ParentPortal ID
These steps are completed in ASCENDER Registration.
As students are enrolled in the district via ASCENDER ParentPortal, administrators must review and accept each enrollment request, monitor forms and documents submitted by parents, complete the student’s enrollment and assign a student ID, and provide each student's parent with a ParentPortal ID.
- The steps in this guide must be completed in Registration by a user who has access to those pages. Basic knowledge of the Registration application is assumed.
- Students must be enrolled in the district via New Student Enrollment in ParentPortal. See Parent: Enroll New Student.
- Review enrollment request and assign ID.
Registration > Maintenance > Online Registration > New Student Enrollment
This page allows you to review pending new student enrollment requests received from ParentPortal.
As students are enrolled online in ParentPortal, an administrator must review each enrollment request and create a record for each registered student.

A list of new student enrollment requests received from ParentPortal is displayed.
- The list can be re-sorted.
You can re-sort the grid by clicking on an underlined column heading. It will sort in ascending order. Click it again to sort in descending order.
IMPORTANT: Before accepting new students, campus staff should verify that the student has not been enrolled before. Go to Registration > Maintenance > Student Enrollment and click Hist Directory to access the Historical Directory, and search for the student.
It is possible that a student was enrolled with a different ID before. For example, the student may have been enrolled previously with a state-assigned ID, but has now been enrolled with a social security number. Check each student carefully to avoid creating duplicate enrollment records.
❏ To search for a new student enrollment record, do one of the following:Search by Name Type the student's first and last name. Search by Key Type the student's key. This number is generated by ParentPortal when the parent proceeds through the new student enrollment steps.
As you begin typing the name or key, a drop-down list displays records that match the characters you have typed. From the drop-down list you can select the record.
❏ Click to view the details of a pending enrollment request.
The student's enrollment record is displayed on Registration > Maintenance > Online Registration > New Student Enrollment.
Registration > Maintenance > Online Registration > New Student Enrollment > Register Student
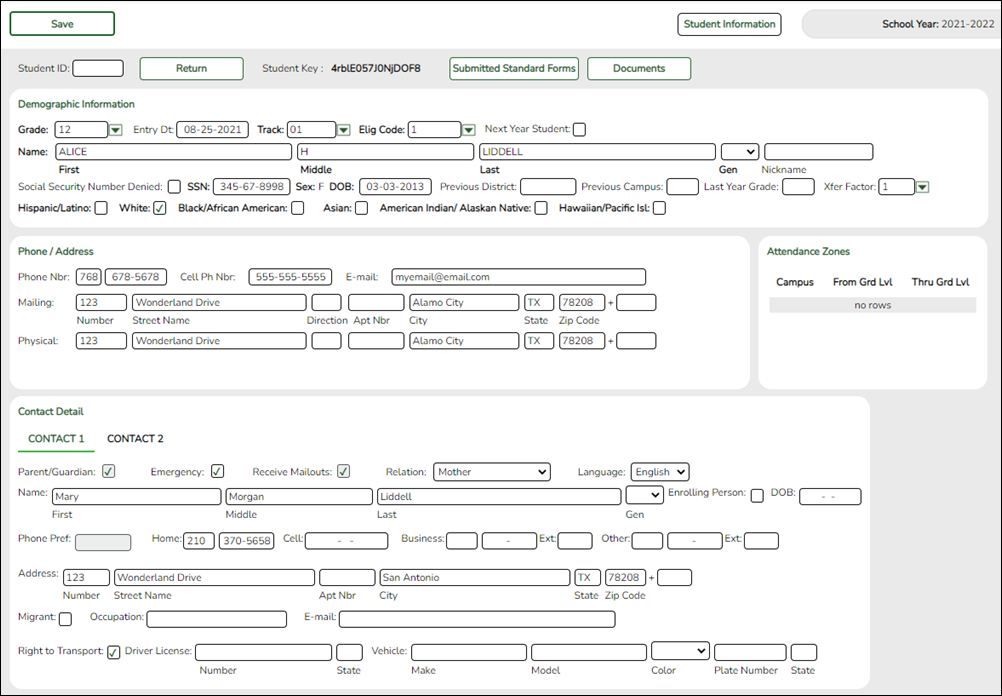
This page allows you to enroll a new student using the information that was entered by the student's parent in ParentPortal.
This initial data serves as the basis for a complete student record.
NOTE: Verify whether Auto Assign Student ID is set to automatic or manual assignment of student ID numbers on Registration Maintenance > District Profile > District Information > Control Info.
Student ID Verify whether student IDs are automatically or manually assigned, as indicated in the Auto Assign Student ID field on Registration > Maintenance > District Profile > District Information > Control Info.
• If student IDs are manually assigned, type a student ID. Leading zeros are not required.
• If student IDs are automatically assigned, leave the field blank, and the system will assign the next available student ID when the record is saved.Student Key The enrollment key assigned to the student's enrollment record in ParentPortal is displayed.
❏ Under Demographic Information:
Grade Select the student's grade level for the current school year. Entry Dt Type the student’s enrollment date, which is the first date the student attended the campus.
For students enrolling in the next school year, Entry Dt should be the last day of school in the current school year. When Annual Student Data Rollover (ASDR) occurs, this date will be converted to the first day of school in the upcoming school year.Track Select the attendance track in which to enroll the student. Elig Code Select the student's ADA eligibility code. Next Year Student Select if the student is enrolling for the next school year.
If selected, the student's record will be saved with a record status 5 (i.e., not currently in district will attend next year). Since ASDR does not promote these students to the next grade level, Grade should be set to the next year grade level for any status 5 students.
The following fields are populated using the information that was entered by the student's parent/guardian in ParentPortal.
Verify that the data is valid.Name The student's full name is displayed. Social Security Number Denied Select if the student’s parent/guardian refused to provide the student’s social security number to the district. SSN The student's social security number is displayed. Sex The code indicating the student's sex is displayed. DOB The student's date of birth is displayed. Last Year Grade The grade level entered by the parent when enrolling the student via ParentPortal is displayed but can be updated if needed. Hispanic/Latino The field is selected if the student is of Cuban, Mexican, Puerto Rican, South or Central American, or other Spanish culture or origin, regardless of race. Race One or more fields is selected, regardless of whether the student is Hispanic/Latino. Phone/Address The student's phone number, cell phone, email address, physical address, and mailing address are displayed.
❏ Under Contact Detail:Up to four contact tabs may be displayed. Information entered by the parent is displayed.
Verify that the data is valid, and make changes to each tab if needed. You can save changes to all tabs at the same time.
Parent/Guardian The field is selected if the contact is the student’s guardian. Emergency The field is selected if the contact should be notified in the event of an emergency. Receive Mailouts This field should be selected if the contact will receive student documents (i.e., report cards and interim progress reports (IPRs)). The field is required for a contact who is listed as Priority=1. Relation The contact's relationship to the student is displayed, such as a relative, doctor, neighbor, hospital, caseworker, guardian, or other medical facility/person.
NOTE: For a hospital contact, Hospital should be selected, the hospital name should be entered in the Occupation field.
Language The language in which the student's documents (i.e., report cards and interim progress reports (IPRs)) will be printed for this contact is displayed. If blank, the documents are printed in English. Name The contact's full name is displayed.
NOTE: This field should be blank if Relation is set to Hospital.
Enrolling Person This field is selected if this is the contact who enrolled the student. Only one contact can be an enrolling person. DOB The contact's date of birth is displayed. Phone Preference The contact's preferred phone number is displayed. Home
Cell
Business
OtherThe contact's home, business, cell, and other phone numbers, including area code, are displayed if entered. Address The contact's complete address is displayed. Migrant The field is selected if the contact (parent/guardian) is a migratory agricultural worker. Occupation The contact's occupation is displayed. If Relation is Hospital, this field should display the hospital name. E-mail The contact's email address is displayed. Right to Transport This field is selected if the contact is authorized to transport the student from school. Instructors and administrators are able to view this information in txGradebook on the Student Information page. Driver License The contact's driver license number and the two-character state that issued the driver license are displayed if entered. Vehicle The contact's vehicle make, model, predominant color of the vehicle, plate number, and the two-character state that issued the license plate are displayed.
❏ Click Information Request to view information about previous special program participation or family members in the military, if entered by the parent.This information is view only, as the student has not yet been registered.
WARNING: This information is only displayed until the new student enrollment is accepted. Print this information before clicking Save; otherwise you must run SRG2300 - Student Information Request to view the information.
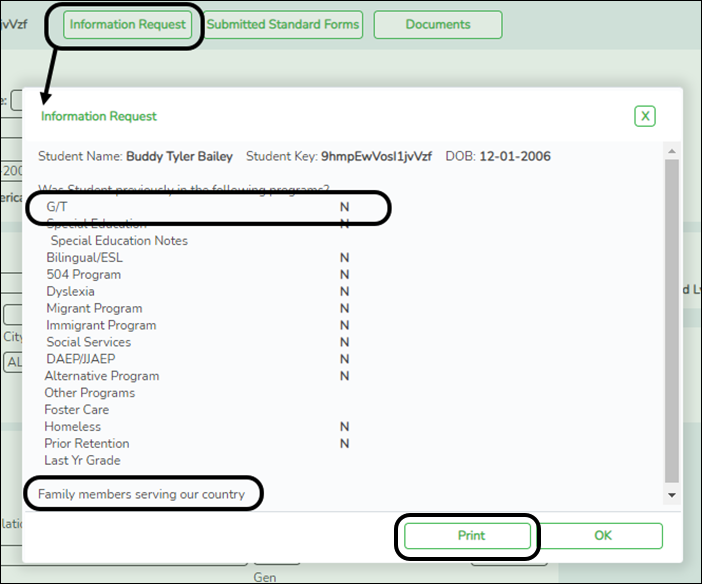
❏ Click Print to print this information.
❏ Click OK to close the window.
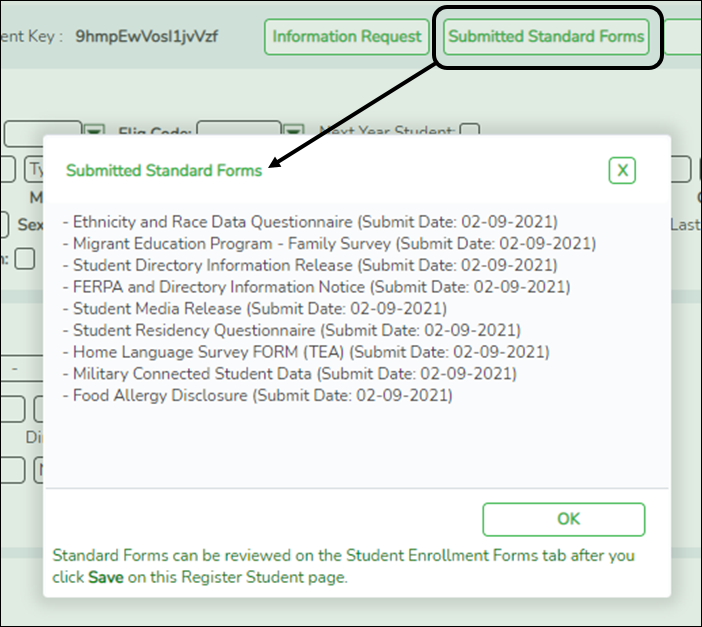
❏ Click Submitted Standard Forms to view a list of all forms submitted for the student.A pop-up window opens which displays the form name and date submitted. Click OK to close the window.
❏ Click Save.
- The student is now enrolled and can be retrieved from the Registration > Maintenance > Student Enrollment page. You can add additional registration information for the student on these tabs.
- A student ID is assigned to the student.
- NOTE: A ParentPortal ID is also automatically assigned to the student when the record is saved. It is not necessary to use the Set Parent Portal IDs utility unless you need to verify the student’s ParentPortal ID.
A warning message is displayed if the student was previously enrolled in the district (i.e., the student's social security number and date of birth match a historical record). Demographic information from the student's previous enrollment is displayed, including the previous student ID.
- Click Yes to confirm that this is the same student, and enroll the him with his previous student ID.
- Click No to return to the Register Student page without saving, and make any necessary changes to the record before saving again.
Return Click to return to the New Student Enrollment page to process another student. NOTE: To retrieve a newly enrolled student who was marked as a next year student:
From Maintenance > Student Enrollment, click Directory, and select Next Year Students. - Review submitted forms and documents.
Registration > Maintenance > Student Enrollment > Forms
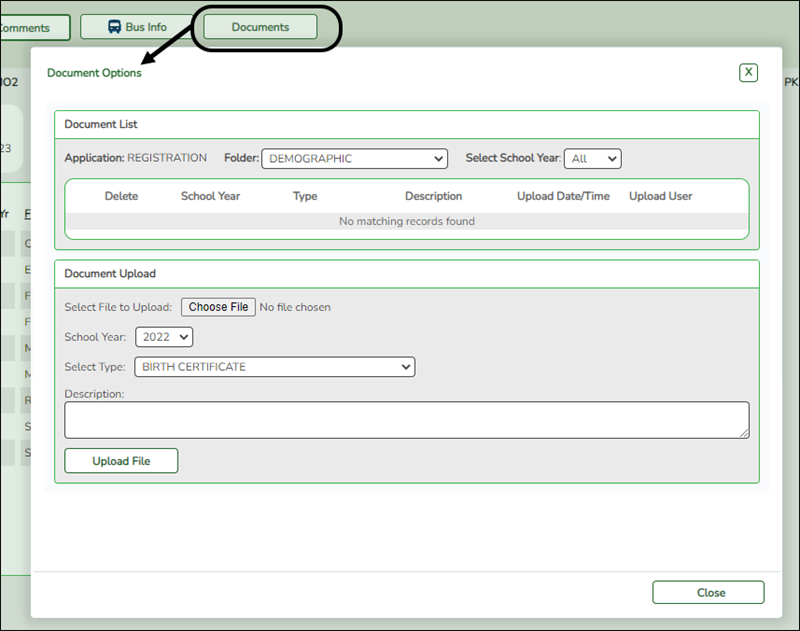
Once you have completed the student's enrollment and assigned a student ID, the Forms tab displays forms submitted by parents during New Student Enrollment. You can also view any documents attached, such as birth certificate, driver licence, etc.
NOTE: For record status 5 students (not currently enrolled in this district, will attend next year), the submitted forms are displayed in the current year only. After Annual Student Data Rollover (ADSR) is run, the next year forms will be listed as the student's current year forms.
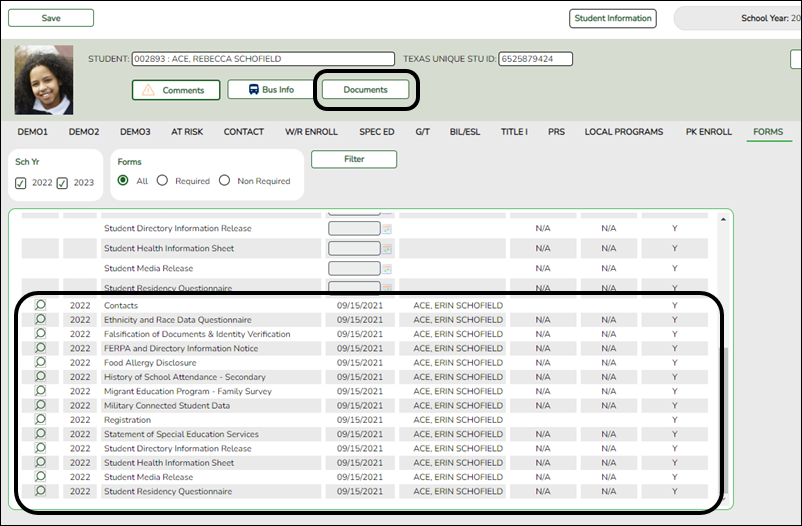
❏ You can filter the listed forms:
Sch Yr Indicate the school year for which you want to view new enrollment data. If the student enrolled during the current school year, select the current school year. If the student is enrolling in the upcoming school year, select the next school year.
Annual Student Data Rollover (ASDR) affects the school years displayed. After ASDR is run, the previous school year drops off, and the next school year is added.
Forms Select which forms you want to view for the selected school year(s).
❏ Click Filter.
Form Name The name of each form is displayed. Submit Date For forms submitted online, the most recent date on which the parent submitted or acknowledged the form via ParentPortal is displayed.
If the parent brings a paper copy of the form to the campus, type the date on which the parent delivered the form in the MMDDYYYY format, or click the calendar icon to select the date from a calendar, and click Save.
The date is saved in the Submit Date field.
IMPORTANT: You cannot enter a date unless you have filtered for one school year. If the Sch Yr field has both school years selected, or if no school year is selected, the field is disabled.Submitter ID For forms submitted online, the full name of the parent who most recently submitted the change or acknowledged the form via ParentPortal is displayed, according to the ID used to log on to ParentPortal.
If the parent delivered a paper copy of the form to the campus, the full name of the campus administrator who entered the Submit Date date is displayed, according to the ID used to log on to ASCENDER.Approval Date 'N/A' is displayed for any form submitted during New Student Enrollment. Approver ID 'N/A' is displayed for any form submitted during New Student Enrollment. Required Form Y or N is displayed to indicate if the form is required in either New Student Enrollment or Online Registration. N is only displayed if the form is not required in any group; otherwise, Y is displayed.
❏ Click to view a standard form.
The standard form resembles the hard copy form and contains the data entered by the parent if applicable. The form submission date and parent name are also displayed on the form.
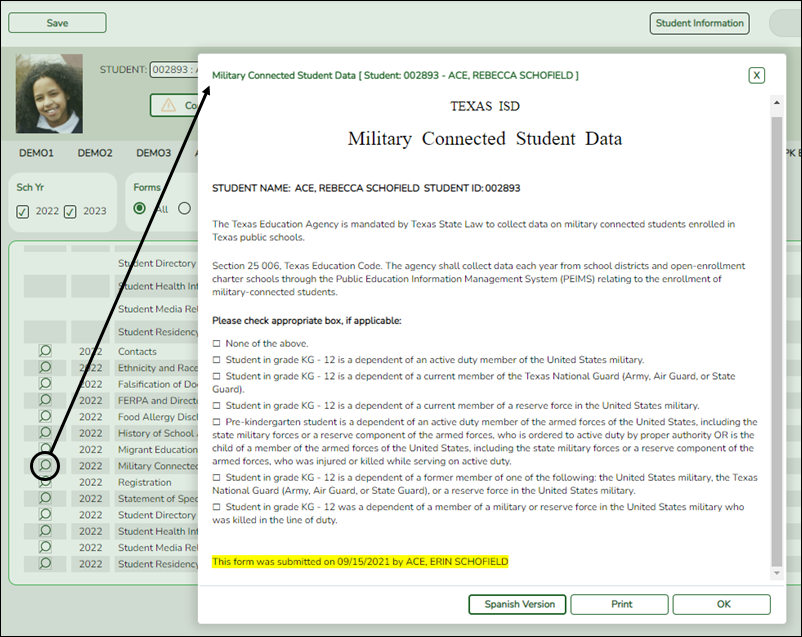
For any form delivered to the campus by the parent, you cannot view the form; the spyglass icon is not available.
Spanish Version Click to view the Spanish version of the form if it is available. English Version Click to return to the English version of the form. ❏ Click Print to print the English or Spanish version of the form.
❏ Click OK to close the form.
❏ Click Save if you entered or changed a date.
- Print ParentPortal ID letters.
IMPORTANT: Before proceeding, be sure that a ParentPortal ID letter has already been created on Registration > Maintenance > ParentPortal > Letters > Update > Letter that includes the nine portal ID variables.
Registration > Maintenance > ParentPortal > Print Letters > Letter Criteria
This tab allows you to set criteria for printing parent letters for the ParentPortal. Each letter provides the portal IDs of the students in one family.
- Letters are printed for active students who have an assigned ParentPortal ID.
- A single letter is printed for multiple guardians with the same last name and same address.
- If the guardian has an invalid address, the student's address is used.
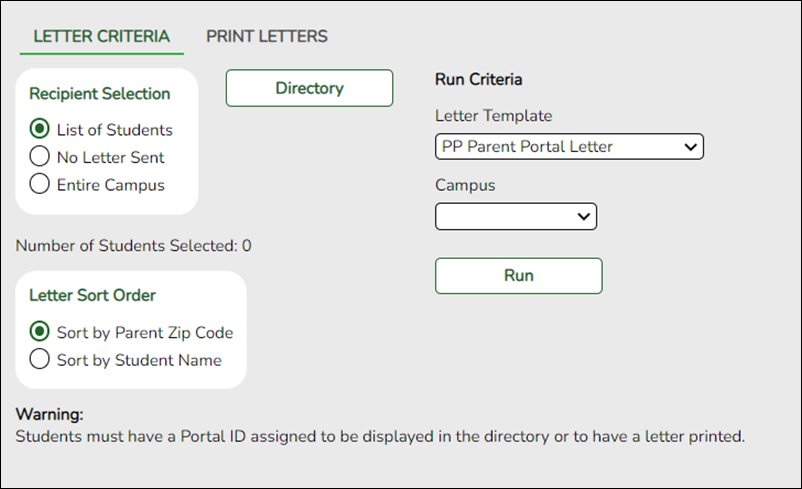
❏ Under Recipient Selection, select the students for whom you want to send letters to the parents.
List of Students No Letter Sent Select to print letters for students for whom letters have not been sent. Entire Campus Select to print letters for all students at the campus, even if letters were sent previously.
Number of Students Selected If you selected List of Students, the number of selected students is displayed.
❏ Under Letter Sort Order, select the order in which you want the letters printed.
Sort by Parent Zip Code Select to sort letters by parent zip code. Sort by Student Name Select to sort letters by student name.
❏ Under Run Criteria:Letter Template Select the letter type. The letter types created on Registration > Maintenance > Parent Portal > Letters > Update > Directory are listed. Campus Select the campus for which letters are being printed.
❏ Click Run.- A pop-up message displays your selection criteria and prompts you to continue. Click Yes.
- The Print Letters tab opens.
Registration > Maintenance > Parent Portal > Letters > Print > Print Letters
The letters open in PDF format in an embedded Adobe Reader window.
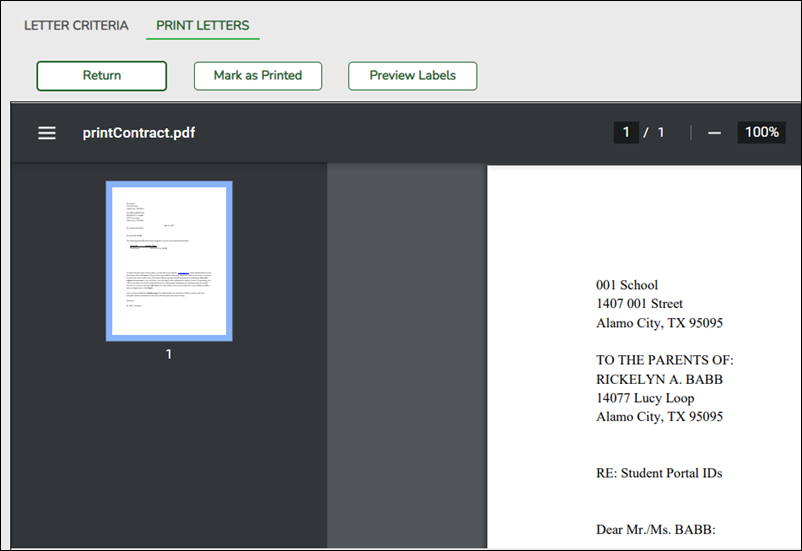
From the Adobe Reader toolbar, you can print the letters, save them to your PC, and perform other functions allowed by Adobe Reader.
If more than one student was selected, only the first student’s letter is visible, but the remainder of the letters follow. You can use the scroll bar to view all letters.
Mark as Printed Click to indicate that you have printed the letter.
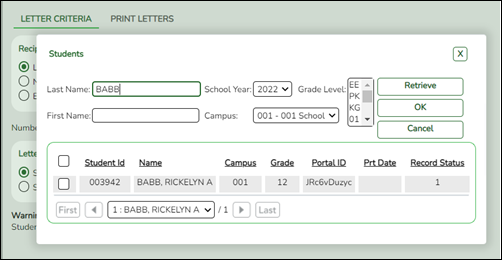
Once clicked, when you open the Directory from the Letter Criteria tab, the system date (i.e., current date) will be displayed in the Prt Date field for each student for whom the letter was printed.❏ Click Preview Labels to print mailing labels for the letters, which are printed in the same order as the letters.
The labels use the Avery 5162 template (14 labels per page).
Only the parent name is printed on the labels. The student address is only used if there is no parent address.
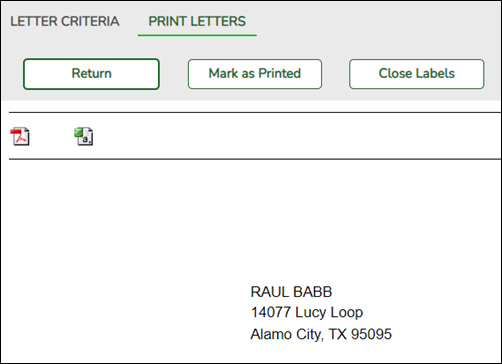
NOTE: The letters and labels may be sorted by either zip code or student name, but the student's name is not printed on the labels. It is recommended that you include the parent name in the letter heading so that it will be easier to match the label with the letter.
❏ Click Close Labels to return to the letter preview.
❏ If errors are found, click Preview Errors to view the errors.Review, save, and/or print the report.
- Review the report:
- Click |‹ to go to the first page of the report.
- Click ‹ to go back one page.
- Click › to go forward one page.
- Click ›| to go to the last page of the report.
The following error reports are generated:
• Invalid addresses for parent or student
• Students without a parent/guardian who receives mailouts
• Students without an assigned ParentPortal ID
❏ Click Close Errors to close the error report.
❏ Click Return to return to the Letter Criteria tab.A message is displayed notifying you that the letters will be cleared when you return to the Letter Criteria tab. Click Yes to continue.
❏ Distribute the letters to parents.
With a valid ParentPortal ID, a parent can add a student to his ASCENDER ParentPortal account.
- If the district has enabled parents to complete online registration and/or update a student’s current year data, a parent can complete registration and make changes to his student’s data using forms available via ParentPortal.
- As parents update data for their students, an administrator must review and approve each change.
academy/admin_campus_enroll.txt · Last modified: 2021/08/06 20:31 by apape
Except where otherwise noted, content on this wiki is licensed under the following license: CC Attribution-Share Alike 4.0 International
Americans with Disabilities Act (ADA) and Web Accessibility
The Texas Computer Cooperative (TCC) is committed to making its websites accessible to all users. It is TCC policy to ensure that new and updated content complies with Web Content Accessibility Guidelines (WCAG) 2.0 Level AA. We welcome comments and suggestions to improve the accessibility of our websites. If the format of any material on our website interferes with your ability to access the information, use this form to leave a comment about the accessibility of our website.


