Sidebar
Table of Contents
general:quickview:txconnect_admin_manage_forms_create_forms
Book Creator
Add this page to your book
Add this page to your book
Book Creator
Remove this page from your book
Remove this page from your book
txConnect Admin > Administrator Options > Settings > Forms Management > Forms
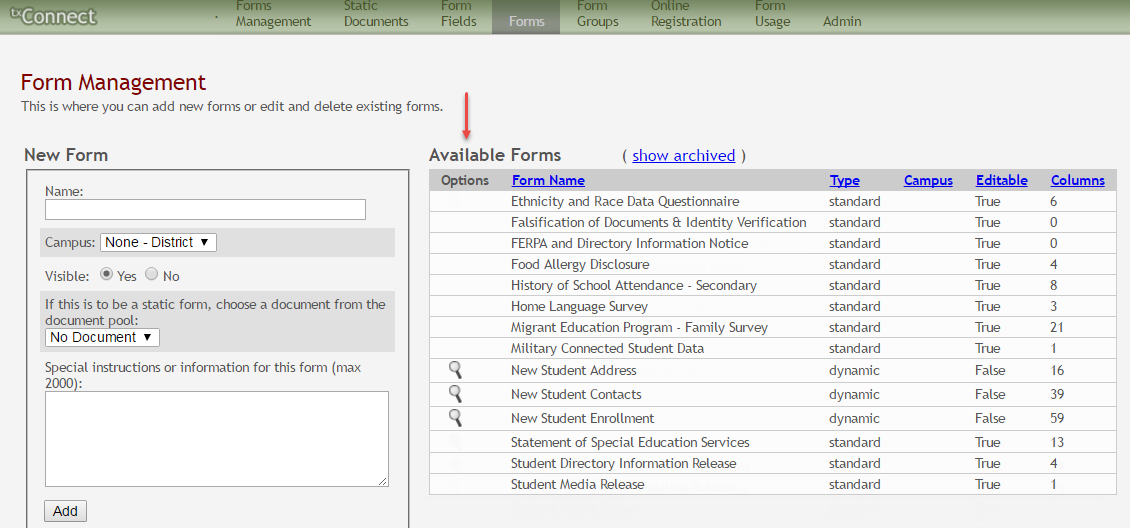
This page allows you to create new forms, as well as delete and edit existing forms. Two types of forms can be created:
- Static forms can be created using the static documents you have already uploaded.
- Dynamic forms can be created using the fields you selected in previous steps.
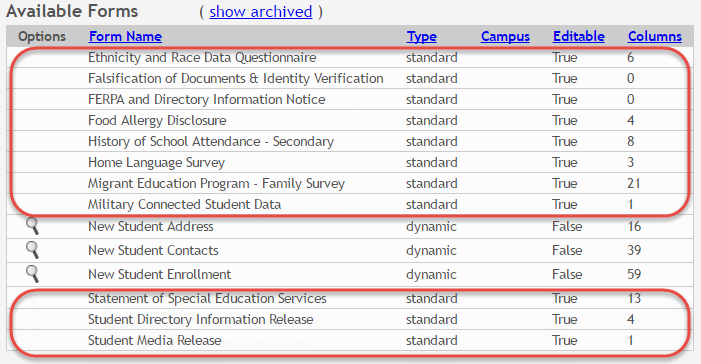
Standard forms are predefined district-level forms that are common throughout Texas. The forms are included automatically and cannot be edited.
A form must be added to a group (or to the Online Registration template) in order to be accessible to parents. You will add the form to a group or to the Online Registration template in a subsequent step.
| Available Forms (right) | |
|---|---|
Any existing forms are listed, including those that are added automatically. |
|
| show archived show active |
By default, archived forms are not displayed. |
| Type | Dynamic, Standard, or Static is displayed. |
| Campus | The specific campus with which the form is associated is displayed if applicable. |
| Editable |
• True - The form is editable. |
| Columns (Fields) | The number of fields currently added to the form is displayed. This does not apply to static forms. |
To change the sort order of the grid, click the column heading. Click it once to sort in ascending order. Click it again to sort in descending order.
Note the standard forms:
Create a new form:
- Create a new form using a static document.
If you uploaded any static documents, you must create a form with each document in order to make it accessible to parents.
NOTE: To create a Spanish version of a static form, you will need to set the Current Language Context for the form to Spanish. This will be done in a subsequent step using the Form Editor page once the static form is created.
To create a static form, do the following under New Form:
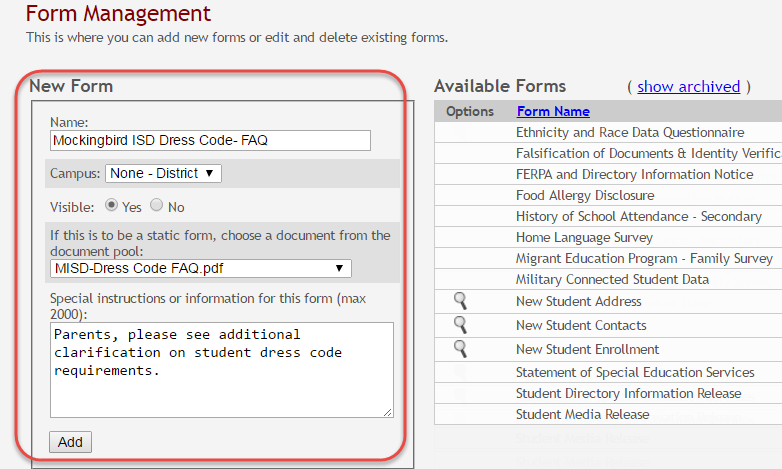
Name Campus Select a campus in order to assign the form to a specific campus. Or, select None if the form is used for all campuses in the district.
Visible Select the form from the list in the drop-down field.

Special Instructions or information for this form Click Add. A message is displayed indicating that the static form was successfully added.
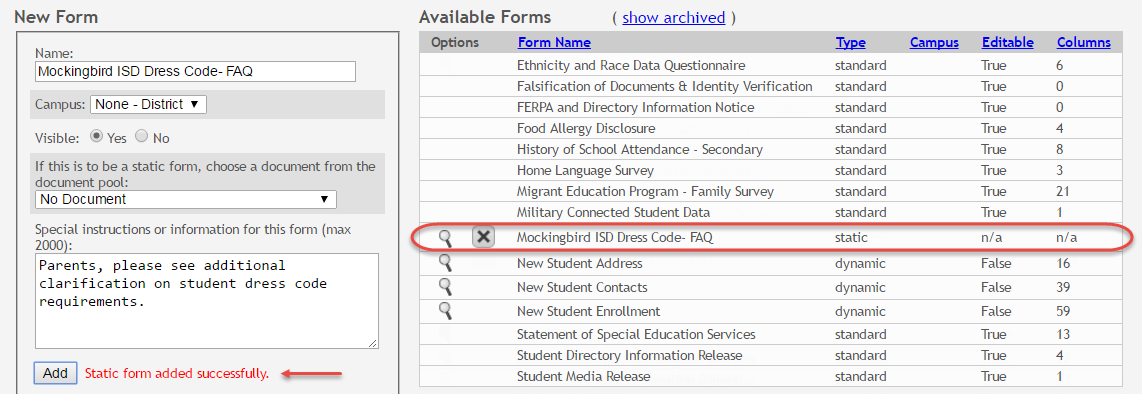
Repeat for all remaining static forms. - Create a Spanish version of a static form.
To create a Spanish static form, you must have already uploaded a Spanish version of the document.
1. Click the spyglass icon for the form. The form opens on the Form Editor page where you can make changes.
2. In the Language Context field, select Spanish.
3. Ensure that the Spanish version of the form is selected for Static document selection.
4. Ensure that the Name and Special instructions are provided in Spanish.
5. Click Save. - Create a new form using a data fields.
To create a dynamic form, do the following under New Form:
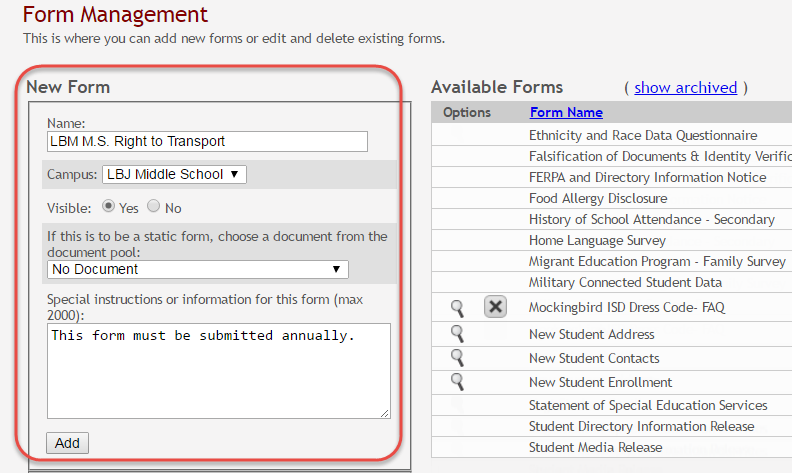
Name Campus Select a campus in order to assign the form to a specific campus. Or, select None if the form is used for all campuses in the district.
Visible
If you are creating a dynamic form, leave the drop-down field set to No Document.
Special Instructions or information for this form
Click Add.
The form opens on the Form Editor page where you can add fields and make other modifications.
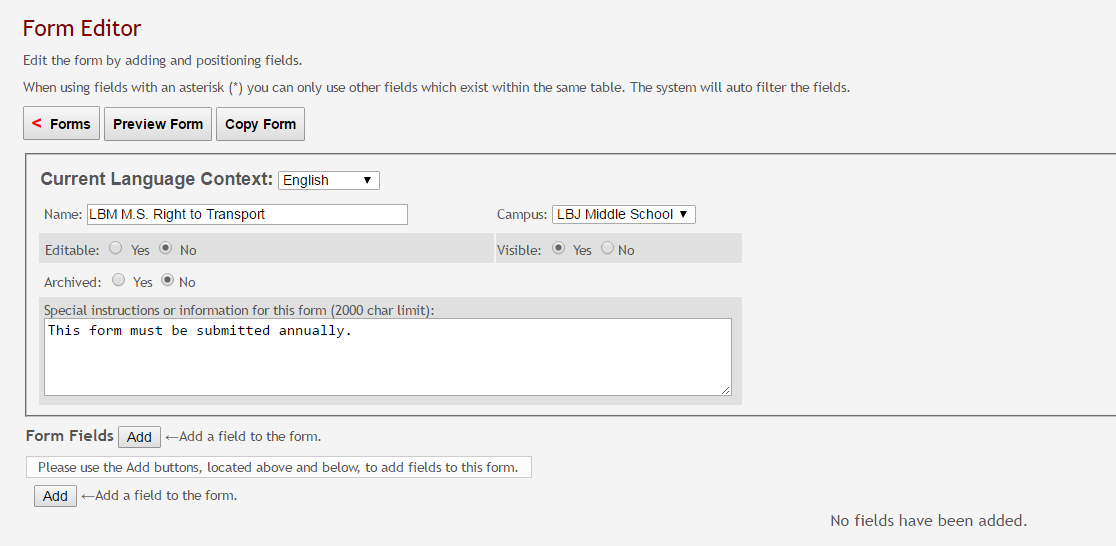
On the Form Editor page:
Current Language Context Select the language of the form you are editing.
Name The form name is displayed as entered in the previous step. Modify the field if necessary.
The name should be typed in the language selected in Current Language Context. If a Spanish name is not provided, the English name will be displayed even if the parent is viewing txConnect in Spanish.
Campus The campus is displayed as entered in the previous step. Modify the field if necessary.
• Select a campus if the form is specific to one campus.
• Select None - District if the form is for all campuses in the district.Editable • Yes - The fields on the form will be editable.
• No - The fields on the form will not be editable.Visible The setting entered on the previous page is displayed, indicating if the form is visible to parents in txConnect. Modify the setting if necessary.
Archived • Yes - Archive the form, which allows you to retain forms that may still be needed for reporting purposes but are no longer used for data collection. An archived form is still accessible to administrators, but is grouped with other archived forms for organizational purposes.
• No - Do not archive the form.
Archived forms are not visible to parents in txConnect.
New Student Enrollment forms cannot be archived.Special Instructions or information for this form The text box displays any text entered on the previous page. Modify the text if necessary, up to 2000 characters.
Form Fields Field Name Select the table-field you want to add to the form. The drop down lists all possible fields, including the field name, sequence number (if applicable), and table name.
Once you select a table-field, all subsequent fields that you add to the form must come from the same type of table (either vertical with multiple records, or single record). The drop-down list in the subsequent rows will filter out the tables that can no longer be selected based on the selection in the first row.
• A hyphen indicates a flat (single-record) table.
• An asterisk indicates a vertical (multi-record) table.
For vertical table, some fields are mandatory, and they will automatically be added to the form even if you do not select them.
Table Mandatory Fields SR_PARENT NAME_L
NAME_F
NAME_MSR_HLTH_MED_COND MED_COND_CD SR_STU_RESTRICT STU_RESTRICT_CD
STU_RESTRICT_CATEG_CD (iTCCS only)SR_DEMO PAR1_NAME_L
PAR1_NAME_F
PAR1_NAME_M
PAR2_NAME_L
PAR2_NAME_F
PAR2_NAME_MSR_DEMO_CONTACT NAME_L
NAME_F
NAME_M
SEQ_NBR (iTCCS only)
The following fields will have edits when used on a dynamic form:
• If a column has a DATA_TYP of STATE in DR_ORD_OPT_TYP, the entry will appear as a drop-down list with all of the US states, territories, and insular areas spelled out. When one is selected, the standard two-character postal abbreviation is stored in the table.
• If a column has a DATA_TYP of NUMERIC in DR_ORD_OPT_TYP, the data entered by the user is checked to ensure that there are no invalid characters. It allows either all numbers or spaces. No alpha or special characters are allowed.
• If a column has a DATA_TYP of DATE in DR_ORD_OPT_TYP, the data is masked to force the format MM/DD/YYYY and checked to verify that it is a valid date. For example, 02/31/1995 is not a valid date, even though it is numeric and in the correct format.
• For a DATA_TYP of AREACODE, the data is masked to force the format ###.
• For a DATA_TYP of PHONENUM, the data is masked to force the format ###-####.
• For a DATA_TYP of ZIP5, the data is masked to force the format #####.
• For a DATA_TYP of ZIP4, the data is masked to force the format ####.
• For a DATA_TYP of SSN, the data is masked to force the format ###-##-####.
• In any cases where there are special characters in the display mask on the page, the characters are removed before saving to the SR_ORD table. Also, the date is reformatted to the format YYYYMMDD before saving.
• For a DATA_TYP of EMAIL, the data is checked to ensure that it fits a standard email format. It must have at least one character before an “@” symbol, at least one character between the “@” and the final period, and at least two characters after the final period. For example, the smallest email address that would be considered valid is a@b.cd. There can be multiple periods in the address (e.g., first.last@email.net).
• If a column has an HTML_TYP of DROPDOWN and includes the name of a lookup table, lookup ID, and value fields, the drop down is populated from that table.
• If a column has an HTML_TYP of RADIO_YN, it displays as Y
Y  N.
N.
• If a column has an HTML_TYP of TEXT, and a FLD_LEN is given, the text entered into the field is limited to the number of characters specified in FLD_LEN.
Friendly Name The default friendly name is displayed. If you selected Spanish for Current Language Context, the default friendly names are Spanish. Modify the name as needed, up to 50 characters.
Order Indicate the order in which you want the fields to be displayed on the form. For example, type 1 if you want to field to be displayed at the top of the form.
Field Set Use this column to group related fields together in the form. For example, you could type “Mailing Address” for all fields that are related to the student’s mailing address.
The fields that you want to physically group together should also be together as indicated by the Order field. The fields with the same Field Set are grouped together in a box, but only if they are adjacent in the order. The box is drawn around one or more sequential fields that have a Field Set specified.
The field set should be typed in the language selected in Current Language Context. If a Spanish field set name is not provided, the English field set name will be displayed even if the parent is viewing txConnect in Spanish.
Vis Select if you want the field to be visible to parents on the form. Clear the check box if you do not want the field visible to parents. For example, you can hide the four-digit zip code extension. The setting of this field overrides all other visibility settings.
Edit Select to allow parents to update data in this field from the form.
• If selected, the form field will be editable, but only if the field is also set to Updateable=true on the Form Field Management page.
• If not selected, this will override the other setting, and the form field will not be editable.
• This setting does not apply to New Student forms.Req Select if the field is required of the parents. If this field is selected, be sure Edit is also selected.
Bold Select if you want the field to be displayed in a bold font.
Italics Select if you want the field to be displayed in an italic font.
Color Bg Color Click the box to select a background color for the field. A pop-up window opens that provides seven background color choices, as well as the option for no color.

Click a color to select it, and the window closes.
The form is automatically shaded with an alternating (light/dark) gray background when displayed for parents in txConnect. If you do not select a color, or if you select No Color, the background will be gray.
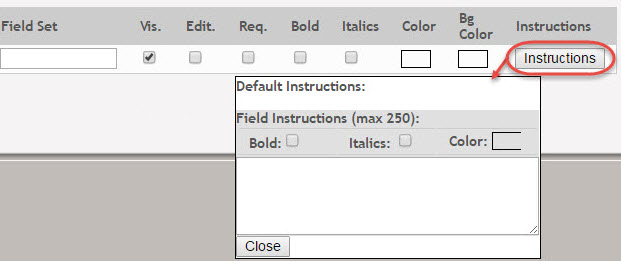
Instructions Default Instructions Any instructions entered on the Form Field Management page are displayed. They cannot be changed here.
Field Instructions Add or update any additional instructions for the field. These instructions will be appended to the Default Instructions when the parent accesses the form in txConnect.
Bold Select if you want the instructions to be displayed in a bold font. This selection will apply to all text typed in the Field Instructions area.
Italics Select if you want the instructions to be displayed in an italic font. This selection will apply to all text typed in the Field Instructions area.
Color
Click Close.
To remove a column from the form, click the delete icon for the column.

It is removed from the list, but it is not actually deleted until you click Save.
Click Save.
NOTE: If you created a form with fields from a vertical table, some required additional fields may be added automatically. If so, a message is displayed prompting you to review the fields before saving.

Note the added fields. These fields cannot be removed; the delete icon is not displayed.
Click Save again.
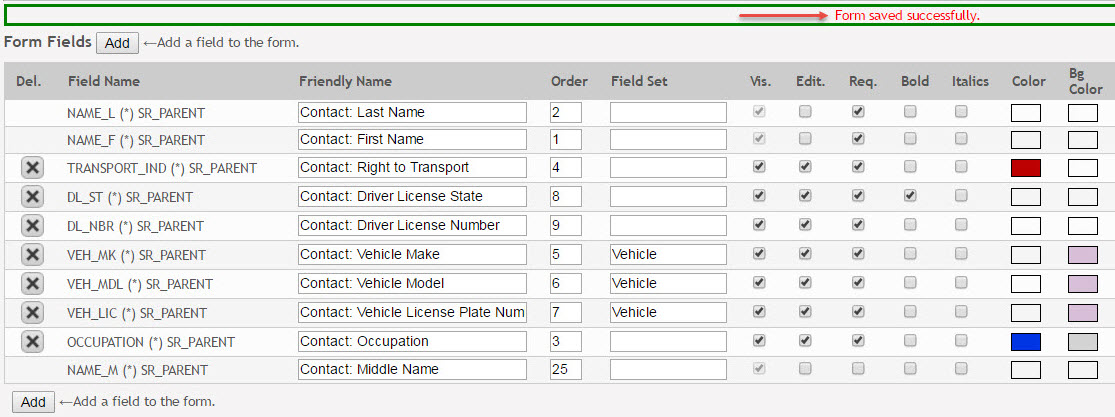
Based on the settings in the example above, the form will look like this to the parent in txConnect:
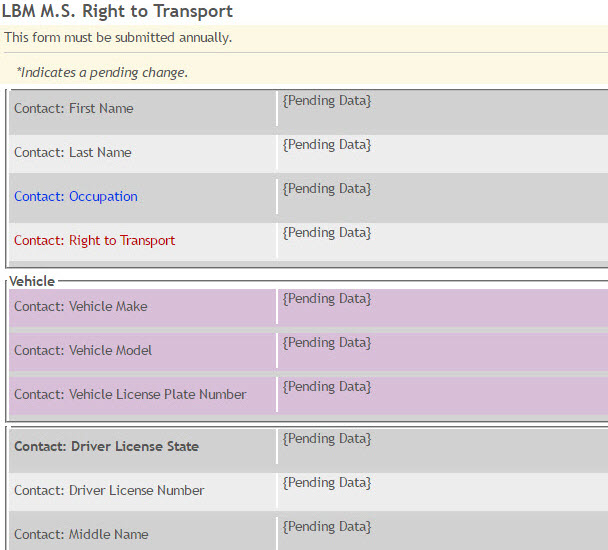
Click < Forms to return to the Form Management page.

- Create a new form by copying an existing form.
Copy Form Click to create a new form that is an exact duplicate of the form you are copying.
• Only static and dynamic forms can be copied.
• Only saved changes are copied to the new form; unsaved changes are not copied.
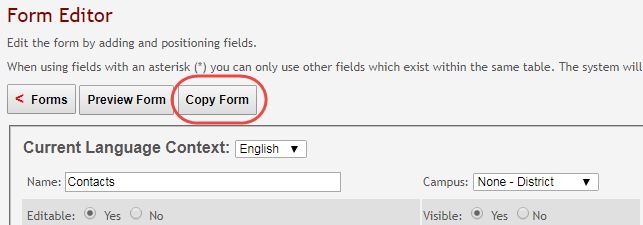
A text box is displayed allowing you to type a name for the new form. The new form name cannot already be in use by another form, and it must be three or more characters.

Click Save.

The new form is now displayed on the Forms Management page and can be modified as needed.
Preview a form:
general/quickview/txconnect_admin_manage_forms_create_forms.txt · Last modified: 2017/12/18 20:51 by jstanford
Except where otherwise noted, content on this wiki is licensed under the following license: CC Attribution-Share Alike 4.0 International
Americans with Disabilities Act (ADA) and Web Accessibility
The Texas Computer Cooperative (TCC) is committed to making its websites accessible to all users. It is TCC policy to ensure that new and updated content complies with Web Content Accessibility Guidelines (WCAG) 2.0 Level AA. We welcome comments and suggestions to improve the accessibility of our websites. If the format of any material on our website interferes with your ability to access the information, use this form to leave a comment about the accessibility of our website.

