User Tools
Sidebar
Add this page to your book
Remove this page from your book
ASCENDER Homepage Dashboard
Depending on your user profile, ASCENDER offers a dashboard that is used to display important information from multiple sources in one, easy-to-access place. Currently, the following dashboard elements are available:
- ASCENDER News - Displays important news or upcoming events. The ASCENDER News is managed by the Texas Computer Cooperative (TCC).
- Each news entry displays a topic and a description. An ellipsis (…) is displayed at the end of the description indicating that additional details are associated with the entry.
- If there are no news entries to display, a message is displayed prompting you to stay tuned for upcoming news.
- LEA News - (All users) Displays important announcements or upcoming events directly from the LEA. The LEA News is managed by the local education agency (LEA) in District Administration.
- Each news entry displays a topic and a description. An ellipsis (…) is displayed at the end of the description indicating that additional details are associated with the entry.
- If there are no news entries to display for the current date range or if you do not have permission to the application or breadcrumb (menu item) associated with the entry, the following message is displayed: “No news is good news”.
- Daily Attendance Listing - (Student users) Displays a list of XXXXX.
- Daily Attendance by Campus - (Student users) Displays a listing of authorized campus attendance figures for the day. This listing will be updated each day at noon.
- Online Registration - (Student users) Displays a list of online registration pending approval items based on the user's profile. If there are no approvals, a message is displayed indicating there are no pending approvals.
All ASCENDER users created in Security Administration are automatically granted permission to view all dashboard elements. However, the content within the dashboard element is driven by your user profile (Profile Name) in Security Administration with the exception of ASCENDER News, which is available to all users. The LEA News may be limited to certain users based on the LEA's preferences when adding the news entry in District Administration.
Each dashboard element tile is enabled with the drag-and-drop feature along with row x column layout options to allow you to customize the layout of your dashboard elements. Your selected layout preferences are automatically saved upon logging out of the software.
Drag-and-Drop Feature
Use the drag-and-drop feature to define the placement of the dashboard element tiles.
- Press and hold down the left mouse button on the desired element (tile) to “Grab” it.
- “Drag” the element (tile) to the desired location.
- “Drop” the element (tile) by releasing the mouse button.
Column x Row Layout Options
Use the following layout options located at the top of each dashboard element tile to adjust the size (column = width and row = height) of the element tile. To view these options, use your mouse to hover over the top-right corner of the element.

- 1×1 = 1 column x 1 row
- 1×2 = 1 column x 2 row
- 1×3 = 1 column x 3 row
- 2×1 = 2 column x 1 row
- 2×2 = 2 column x 2 row
- 2×3 = 2 column x 3 row
- 3×1 = 3 column x 1 row
- 3×2 = 3 column x 2 row
- 3×3 = 3 column x 3 row
Below is just one example of the many dashboard formats available using the drag-and-drop feature and the column x row layout options:
- ASCENDER News - 2×1
- Approval Summary - 2×1
- Online Registration - 1×2
Delete an element:
If you do not want an element displayed on your dashboard, you have the ability to move it out of view to the Quick View or QV column, which is the gray column located along the right side of the page.
Collapsed Quick View
Expanded Quick View
Below is an example of the Online Registration element tile being deleted from the main dashboard view and moved to the Quick View.
NOTE: At any point, you can use the drag-and-drop feature to move elements from the Quick View back to the main dashboard view.
Online Registration
If you have approval responsibilities in ASCENDER, the Online Registration is displayed on the ASCENDER homepage with a list of your approval types.
| # Pending | Displays the number of pending approval items for the corresponding approval type. |
|---|---|
| Campus | Displays the campus tied to the pending item, if applicable. |
| Registration Type | Displays a link to the page where you have pending approval items. |
Pending Approvals
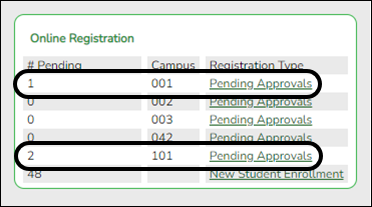
In this example, the user has Pending Approvals for campuses 001, 041, and 101.

❏ Click the link. The selected page opens in a separate browser window.

❏ Perform the necessary action to satisfy the pending item.
❏ Log out of ASCENDER and then log back in to refresh the homepage.
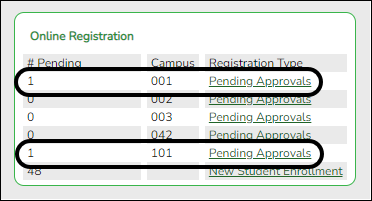
Notice the count under # Pending resets to 0 after the item is approved. In this example, the pending approval item for campus 041 has been approved.

New Student Enrollment
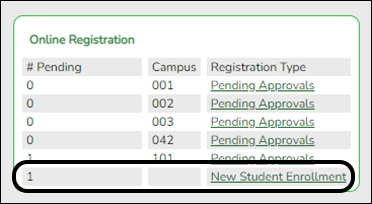
In this example, the user has items to review and complete for New Student Enrollment.

❏ Click the link. The selected page opens in a separate browser window.

❏ Verify the campus of enrollment. Perform the necessary actions to complete the student enrollment.
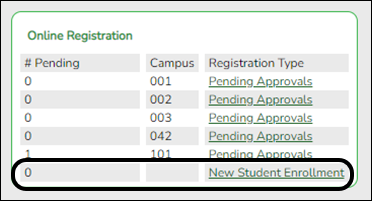
❏ Log out of ASCENDER and then log back in to refresh the homepage.
Americans with Disabilities Act (ADA) and Web Accessibility
The Texas Computer Cooperative (TCC) is committed to making its websites accessible to all users. It is TCC policy to ensure that new and updated content complies with Web Content Accessibility Guidelines (WCAG) 2.0 Level AA. We welcome comments and suggestions to improve the accessibility of our websites. If the format of any material on our website interferes with your ability to access the information, use this form to leave a comment about the accessibility of our website.


