User Tools
Sidebar
Add this page to your book
Remove this page from your book
ASCENDER Grade Reporting - Update the Current Year Master Schedule
This guide covers the steps for updating the master schedule in the current year. Changes to the current year master schedule may be necessary if a course or course-section is added or removed during the course of the school year, such as at the beginning of the second semester.
Prerequisites
❏ This guide assumes you are familiar with the basic features of the ASCENDER Student system and have reviewed the ASCENDER Student Overview guide.
Checklist Overview
❏ Confirm that the new course exists in the district master schedule. Add if necessary.
❏ Add the course to the campus master schedule if necessary.
❏ Adjust the course in the campus master schedule if needed.
❏ Confirm that the instructor is set up at the campus.
❏ (Optional) Create new sections in campus master schedule by copying an existing course-section.
❏ Add or edit section records in the campus master schedule.
❏ Delete a course if necessary.
Confirm Course in District Master Schedule
Before proceeding, confirm that any courses you wish to add to the campus master schedule exist in the district master schedule. Only courses in the district master schedule can be added to the campus master schedule.
The district master schedule can only be updated by staff who have been granted maintenance access to this page.
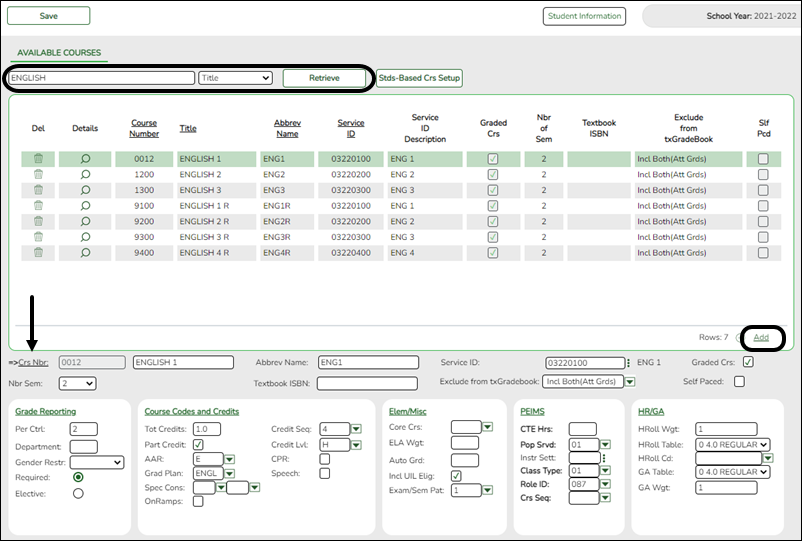
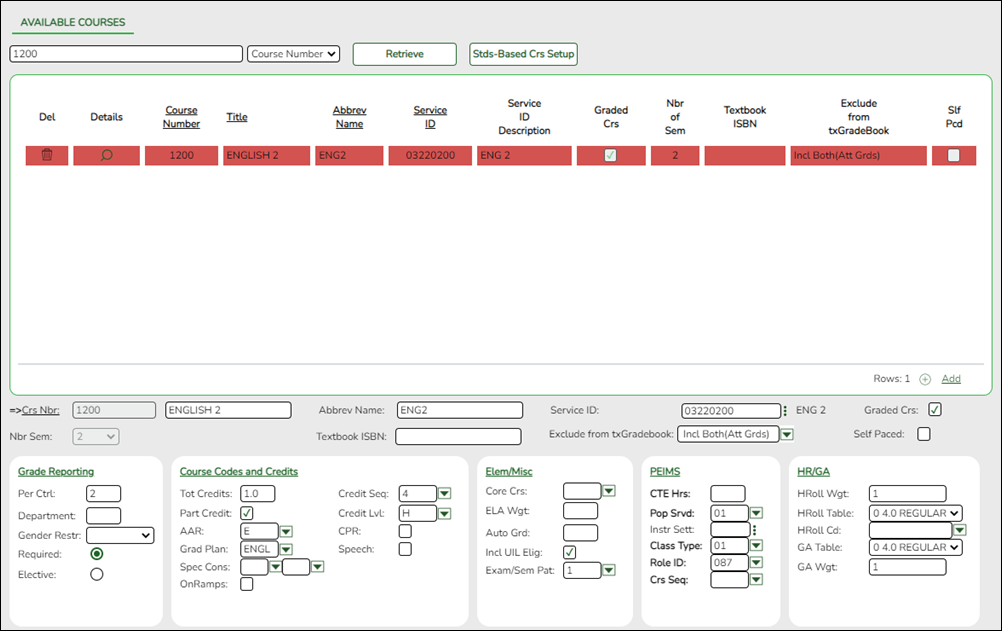
Grade Reporting > Maintenance > Master Schedule > District Schedule
❏ Search for the course by course number, title, abbreviated name, or service ID:
• Select the field by which you want to search for courses.
• Type all or part of the search phrase.
- If you search by course number, title, or service ID, the search retrieves courses that begin with the characters or numbers you typed. For example, if you select Title, type ‘eng’ to retrieve all courses with a title that start with Eng.
- For Course Number, you must include leading zeros.
- If you search by abbreviated name, the search retrieves courses that contain the characters you typed. For example, type ‘math’ to retrieve all abbreviated names that contain the letters math, such as AP MATH.
- Leave blank to retrieve all courses.
• Click Retrieve.
A list of courses that meet the specified criteria is displayed. Confirm that the course is listed in the district master schedule.
- You can re-sort the grid by clicking on an underlined column heading. It will sort in ascending order. Click it again to sort in descending order.
- If more courses are retrieved than can be displayed on one page, you can page through the list. Pagination is only available if more courses are retrieved than can be displayed on one page. See online Help for assistance.
❏ If a course needs to be added, click +Add. The fields are displayed below the grid allowing you to add a course record.
❏ In the Crs Nbr field and the field next to it, type an unused four- to eight-digit course number and the course title (up to 15 characters). Enter all other necessary data for the course. See online Help for assistance with these fields.
❏ Click Save.
Confirm Course in Campus Master Schedule
The campus master schedule includes all courses that can be offered at the campus. A student can only be scheduled into courses that exist in the master schedule at the campus she is enrolled in.
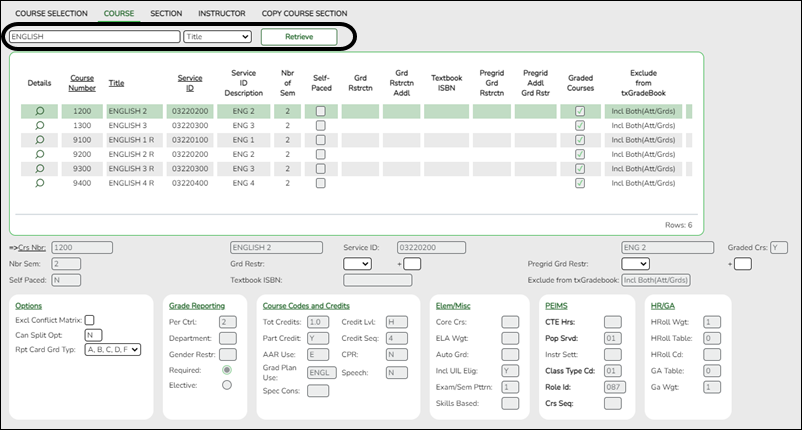
Grade Reporting > Maintenance > Master Schedule > Campus Schedule > Course
❏ Search for the course by course number, title, abbreviated name, or service ID:
• Select the field by which you want to search for courses.
• Type all or part of the search phrase.
- The search retrieves courses that begin with the characters or numbers you typed. For example, if you select Title, type ‘eng’ to retrieve all courses with a title that start with Eng.
- For Course Number, you must include leading zeros.
- Leave blank to retrieve all courses.
• Click Retrieve.
A list of courses that meet the specified criteria is displayed. Confirm that the course is listed in the campus master schedule.
- You can re-sort the grid by clicking on an underlined column heading. It will sort in ascending order. Click it again to sort in descending order.
- If more courses are retrieved than can be displayed on one page, you can page through the list. Pagination is only available if more courses are retrieved than can be displayed on one page. See online Help for assistance.
If the course is not in the campus master schedule, it must be added using the Course Selection tab as described next.
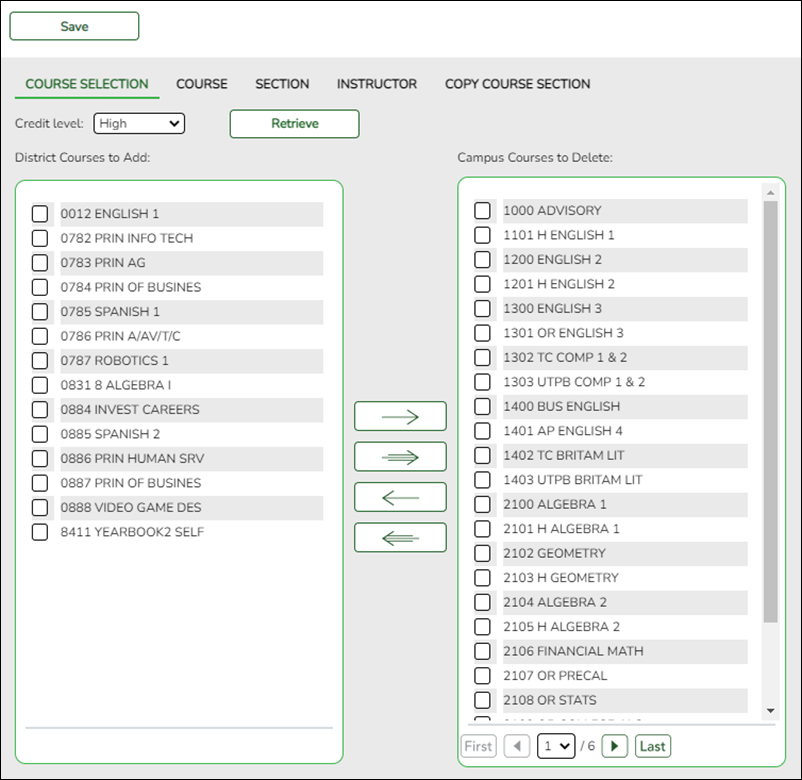
Grade Reporting > Maintenance > Master Schedule > Campus Schedule > Course Selection
❏ Select the Credit Level and click Retrieve.
All courses in the district master schedule are listed under District Courses to Add (left grid), except for courses that have already been selected for the campus master schedule.
❏ Select the course(s) in the left grid that need to be added to the campus master schedule.
❏ Click –> to add the selected course(s) to the campus master schedule. The course(s) move to the right grid.
❏ Click Save. You should now be able to retrieve those courses on the Course tab as described next.
Grade Reporting > Maintenance > Master Schedule > Campus Schedule > Course
❏ Retrieve the course by course number, title, or service ID as described previously.
❏ Click on the spyglass to select the course. The fields below the grid are populated with data copied from the district master schedule.
❏ Some fields can be modified at the campus level. Modify these fields if necessary. See online Help for assistance with these fields.
❏ Click Save.
Confirm Instructor at Campus
Confirm that the instructor who will be teaching any new course is properly set up in the campus master schedule. The instructor must be listed on this tab in order to be assigned to a course-section in the campus master schedule.
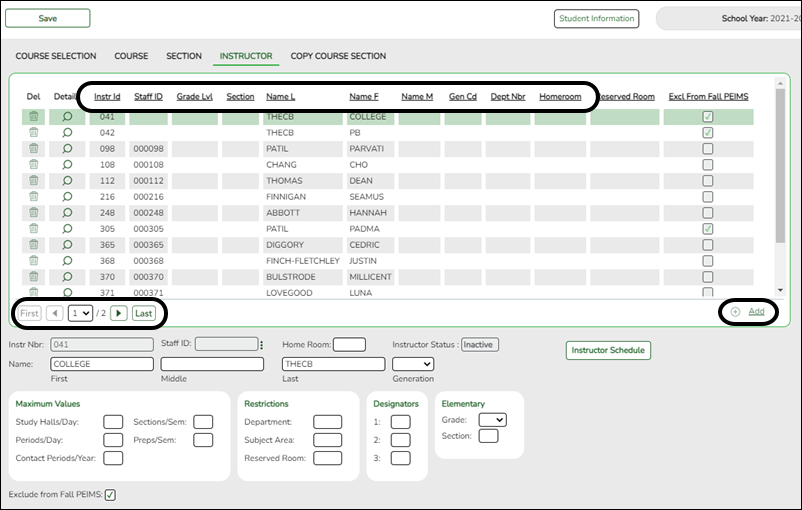
Grade Reporting > Maintenance > Master Schedule > Campus Schedule > Instructor
❏ Locate the instructor.
• You can re-sort the grid by clicking on an underlined column heading. It will sort in ascending order. Click it again to sort in descending order.
• If more instructors are retrieved than can be displayed on one page, you can page through the list. See online Help for assistance.
❏ If the instructor is not found on this tab, add the instructor.
Note: These employees must already be entered in the Human Resources application in order to populate the Staff ID field lookup. The Name fields are automatically populated when the Staff ID is selected.
If the employee is not already added in HR, you can assign a temporary staff ID as described in online Help.
• Click +Add.
• In the Instr Nbr field, type an unused instructor ID (i.e., control number).
• Enter all required data for each employee. See online Help for assistance with the fields.
• Click Save.
Create New Course-Sections
If you need to add a new section to a course that is already offered at the campus, you can copy an existing section of that course. Otherwise, you can add section records from scratch.
Grade Reporting > Maintenance > Master Schedule > Campus Schedule > Copy Course Section
This tab allows you to create new sections for a course by copying an existing section of that course.
❏ Select the course and section from which to copy data.
❏ In the Create Section field, type the new section number(s). Separate multiple section numbers with a comma (e.g., 04,05,06).
❏ Click Create. The grid is populated with the data for the new section(s).
❏ Update the data for the new section(s) as needed. See online Help for assistance with the fields.
❏ Click Save.
Once a section is created, it can be updated on the Section tab as described next.
Grade Reporting > Maintenance > Master Schedule > Campus Schedule > Section
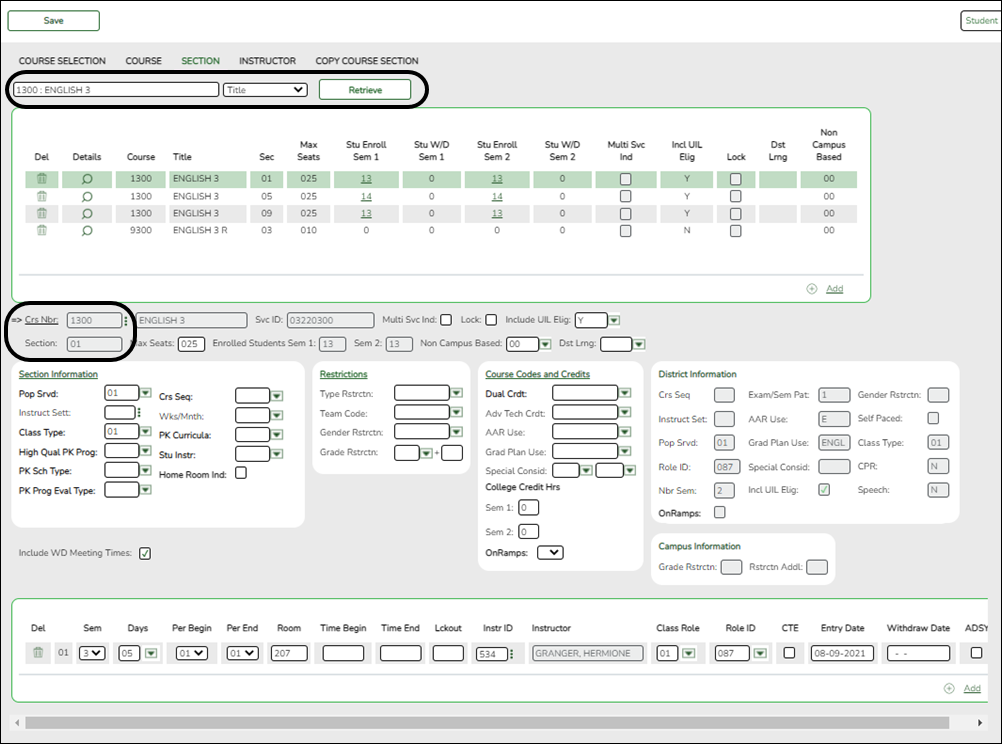
This tab allows you to create new sections of a course or edit existing sections.
❏ Search for the course by course number, title, or instructor:
• Select the field by which you want to search for courses.
• Type all or part of the search phrase.
- The search retrieves courses that begin with the characters or numbers you typed. For example, if you selected Course Number, type 101 to retrieve all course numbers that start with 101.
- For Course Number, you must include leading zeros.
- For instructor, begin typing the instructor’s last name or control number. A drop-down list displays instructors whose last name begins with the characters you typed. Select the instructor.
- Leave blank to retrieve all courses.
• Click Retrieve.
A list of courses that meet the specified criteria is displayed in the upper grid.
If more course-sections are retrieved than can be displayed on one page, you can page through the list. Pagination is only available if more course-sections are retrieved than can be displayed on one page. See online Help for assistance.
Note: Courses that do not have any sections (i.e., new courses) are not listed.
❏ If the course has existing sections, the sections are listed. You can add a new section:
• Click +Add in the upper grid to add a section. The fields below the grid are enabled allowing you to add a section of the course.
• In the Crs Nbr and Section fields, type the course number and new section number. Add or update all other fields as needed, including meeting time data in the bottom grid. See online Help for assistance with these fields.
• Click Save. The new section will now be displayed in the upper grid.
❏ If the course has no existing sections, the course cannot be retrieved using the Retrieve button. You must add one or more sections:
• Click +Add in the upper grid to add a course-section.
• In the Crs Nbr fields, click on the ellipsis to select the course. The course title and service ID are displayed.
• In the Section field, type the new section number.
• Add all other data as needed, including meeting time data in the bottom grid. See online Help for assistance with these fields.
• Click Save. The new course-section will now be displayed in the upper grid.
❏ To edit an existing section, click on the spyglass in the upper grid to select the course-section. The fields below the grid are populated with existing data. Update as needed and click Save.
Delete a Course
To delete a course, all students must be removed from all sections of the course. Then the sections can be deleted, and then the course can be deleted from the campus master schedule and then the district master schedule.
Remove Students from a Course-Section
Grade Reporting > Maintenance > Student > Group Maint > Group Course Change
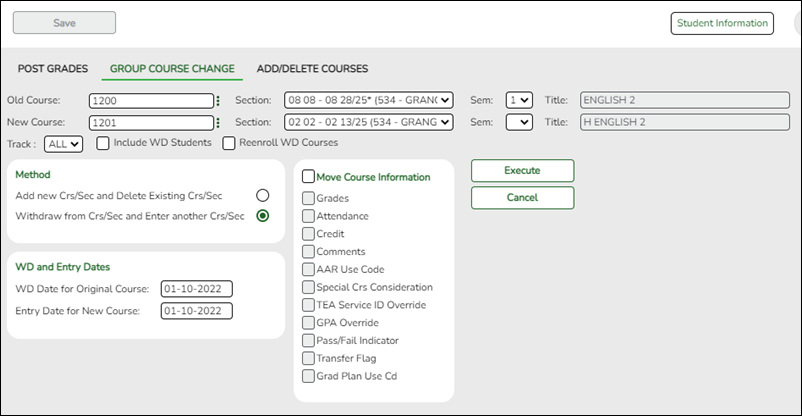
This tab allows you to transfer all students who are currently enrolled in one course-section to another course-section.
❏ In the Old fields, select the course, section, and semester to remove students from.
❏ In the New fields, select the course, section, and semester to move these students to.
❏ Be sure to select Include WD Students to include any students who withdrew from the campus. If these students are not transferred out of the Old course-section, this will prevent you from deleting the section.
❏ Under Method, select Add new Crs/Sec and Delete Existing Crs/Sec. This will cause the section to be deleted once all students are moved to the New course-section.
❏ Under WD and Entry Dates, enter the Entry Date for New Course for the New course-section.
❏ Select any course information that should be moved if applicable.
❏ Click Execute. A report is generated showing the results of the change.
❏ The Save button is disabled and not used on this page.
Delete Course-Sections
Grade Reporting > Maintenance > Master Schedule > Campus Schedule > Section
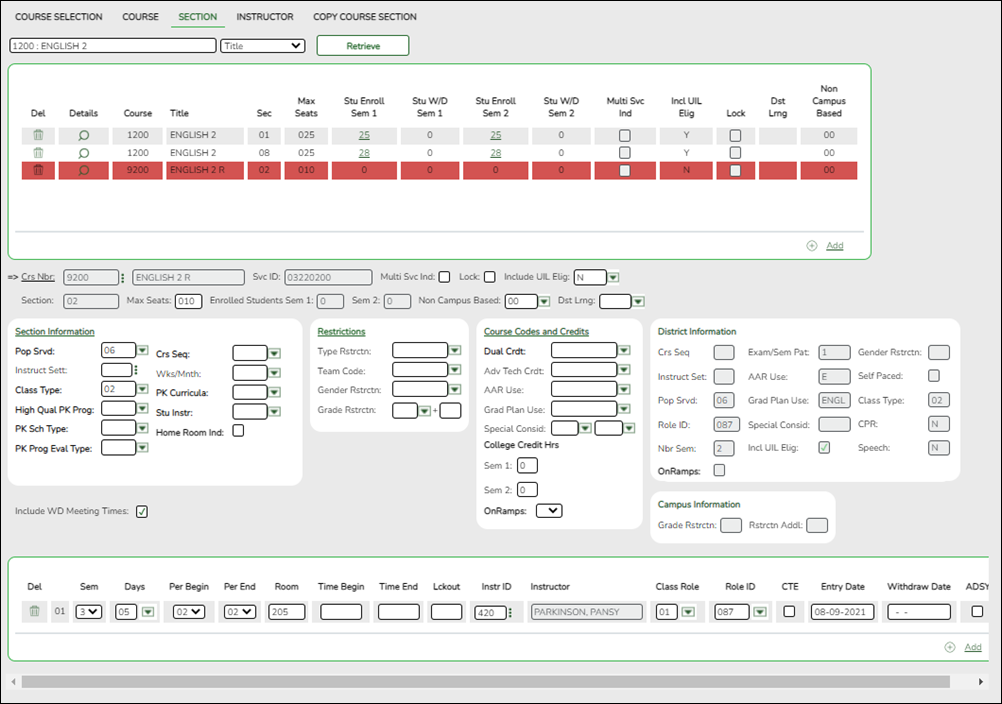
If no students are enrolled in a course-section, the section can be deleted.
Note: Be aware that any students who withdrew from the campus must also be withdrawn from the section.
❏ Retrieve the course as described previously. All existing sections are listed in the top grid.
❏ In the top grid, click the trashcan to select the section to be deleted. Sections must be deleted one at a time.
❏ Click Save.
You are prompted to confirm that you want to permanently delete the course-section. Click Yes.
❏ Repeat for all remaining sections of the course.
Delete the Course
If a course has no sections, it can be removed from the campus master schedule. If a course is not included in any campus master schedules, it can be removed from the district master schedule.
Grade Reporting > Maintenance > Master Schedule > Campus Schedule > Course Selection
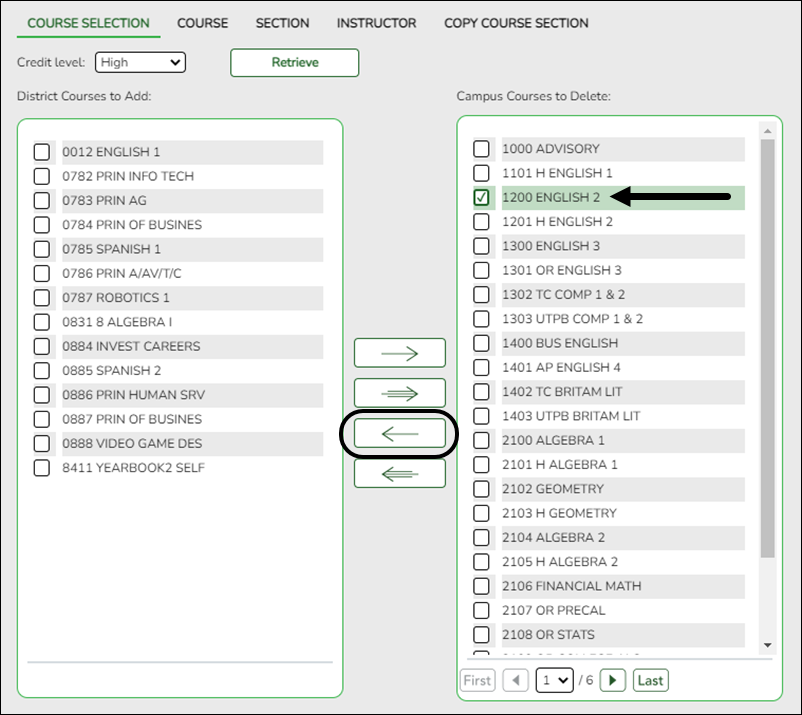
This tab allows you to remove a course from the campus master schedule.
❏ Select the Credit Level and click Retrieve.
❏ In the right grid, all courses in the current year campus master schedule are listed. Locate and select the course to be removed.
❏ Click ←- to remove the selected course. It is moved to the district master schedule list (left grid).
❏ Click Save.
Grade Reporting > Maintenance > Master Schedule > District Schedule
The page allows you to delete a course from the district master schedule.
❏ Retrieve the course.
❏ Click the trashcan for the course to be deleted.
❏ Click Save.
You are prompted to confirm that you wish to delete the course. Click Yes.
Conclusion
Once a course-section is added to the campus master schedule, students can be scheduled into the course. See the ASCENDER Grade Reporting - Schedule Students in the Current School Year “How To” guide for more information.
Americans with Disabilities Act (ADA) and Web Accessibility
The Texas Computer Cooperative (TCC) is committed to making its websites accessible to all users. It is TCC policy to ensure that new and updated content complies with Web Content Accessibility Guidelines (WCAG) 2.0 Level AA. We welcome comments and suggestions to improve the accessibility of our websites. If the format of any material on our website interferes with your ability to access the information, use this form to leave a comment about the accessibility of our website.


