ASCENDER - Approve and Receive Purchase Orders
Created: 11/20/2020
Reviewed: 07/26/2022
Revised: 07/26/2022
The purpose of this document is to guide you through the necessary steps to approve and receive purchase orders in Purchasing.
After the Set up Purchasing Options and Permissions, Manage Purchasing Approval Workflows, and Perform Requisition Maintenance processes are addressed, use the following steps to approve and receive purchase orders in Purchasing.
This document assumes you are familiar with the basic features of the ASCENDER Business system and have reviewed the ASCENDER Business Overview guide.
Some of the images and/or examples provided in this document are for informational purposes only and may not completely represent your LEA’s process.
Dashboard
- Dashboard.
ASCENDER Homepage & Quick View Dashboard
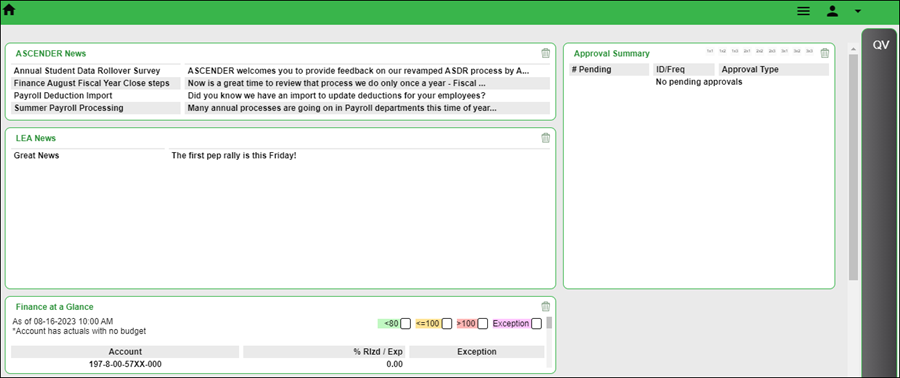
Depending on your user profile, ASCENDER offers a Quick View dashboard that is used to display important information from multiple sources in one, easy-to-access place. Currently, the following dashboard elements are available for Business users:

- ASCENDER News - (All users) Displays important announcements or upcoming events. The ASCENDER News is managed by the Texas Computer Cooperative (TCC).
- Each news entry displays a topic and a description. An ellipsis (…) is displayed at the end of the description indicating that additional details are associated with the entry.
- If there are no news entries to display, a message is displayed prompting you to stay tuned for upcoming news.
- LEA News - (All users) Displays important announcements or upcoming events directly from the LEA. The LEA News is managed by the local education agency (LEA) in District Administration.
- Each news entry displays a topic and a description. An ellipsis (…) is displayed at the end of the description indicating that additional details are associated with the entry.
- If there are no news entries to display for the current date range or if you do not have permission to the application or breadcrumb (menu item) associated with the entry, the following message is displayed: “No news is good news”.
- Finance at a Glance - (Business users with permission to Finance, Purchasing, or Warehouse) Displays a personalized summary of accounts based on your user profile in District Administration. The Finance at a Glance will display a percentage of received/spent monies based on your user profile. This percentage can be filtered for expenditures less than 80 percent, between 80 percent and 100 percent, greater than 100 percent, and those accounts that have spent money with no budget. Accounts are summarized by fund/year, function, major object (first 2 digits), and organization. The table displays the Account, % Rlzd / Exp, and Exception columns.
- This data is retrieved from the general ledger balances in Finance file ID C and is sorted by account code.
- Only account classes 5XXX, 6XXX, 7XXX, and 8XXX are included.
- The table is updated on an hourly basis (at the top of the hour).
- The following filters are available to view selected accounts and are highlighted with a corresponding color. Select the filter checkboxes as needed to narrow the display of accounts in the table.
- >80 (green)
- < =100 (yellow)
- >100 (red)
- Exception (purple)
- Approval Summary - (Business users) Displays a list of pending approval items based on your user's profile. If there are no approvals, a message is displayed indicating there are no pending approvals.
All ASCENDER users created in Security Administration are automatically granted permission to view all dashboard elements. However, the content within the dashboard element is driven by your user profile (Profile Name) in Security Administration with the exception of ASCENDER News, which is available to all users. The LEA News may be limited to certain users based on the LEA's preferences when adding the news entry in District Administration.
Each dashboard element tile is enabled with the drag-and-drop feature along with row x column layout options to allow you to customize the layout of your dashboard elements. Your selected layout preferences are automatically saved upon logging out of the software.
Drag-and-Drop Feature
Use the drag-and-drop feature to define the placement of the dashboard element tiles.
- Press and hold down the left mouse button on the desired element tile to “Grab” it.
- “Drag” the element tile to the desired location.
- “Drop” the element tile by releasing the mouse button.
Column x Row Layout OptionsUse the following layout options located at the top of each dashboard element tile to adjust the size (column = width and row = height) of the element tile. To view these options, use your mouse to hover over the top-right corner of the element.

- 1×1 = 1 column x 1 row
- 1×2 = 1 column x 2 row
- 1×3 = 1 column x 3 row
- 2×1 = 2 column x 1 row
- 2×2 = 2 column x 2 row
- 2×3 = 2 column x 3 row
- 3×1 = 3 column x 1 row
- 3×2 = 3 column x 2 row
- 3×3 = 3 column x 3 row
Below is just one example of the many dashboard formats available using the drag-and-drop feature and the column x row layout options:
- ASCENDER News - 2×1
- Approval Summary - 1×1
- LEA News - 2×1
- Finance at a Glance - 2×1

Delete an element:
If you do not want an element displayed on your dashboard, you have the ability to move it out of view to the Quick View or QV column, which is the gray column located along the right side of the page.
Collapsed Quick View

Expanded Quick View
Below is an example of the Approval Summary element tile being deleted from the main dashboard view and moved to the Quick View.

Note: At any point, you can use the drag-and-drop feature to move elements from the Quick View back to the main dashboard view.
Approval Summary
All users are granted permission to the Approval Summary dashboard element, which provides a list of pending approval items based on the user's profile. If there are no approvals, a message is displayed indicating there are no pending approvals.
Click here for a complete list of approval types that are included in the Approval Summary (based on your user profile).
# Pending Displays the number of pending approval items for the corresponding approval type. ID/Freq Displays the ID or pay frequency tied to the pending item, if applicable. Approval Type Displays a link to the page where you have pending approval items. 
In this example, the user has a pending approval for a CIP transaction.
❏ Click the link. The selected application page opens in a separate browser window.
❏ Perform the necessary action to satisfy the pending item(s).
❏ Log out of ASCENDER and then log back in to refresh the homepage.
If there are no other pending approvals, a message is displayed indicating there are no pending approvals.
Approve Requisitions and Print PO's
- Approve a requisition.
Approve a requisition
Purchasing > Maintenance > Approve Requisition
Only users who have permission to approve requisitions can access the Approve Requisitions page. This page allows approvers to:
- Approve or disapprove individual requisition items.
- Approve or disapprove the entire requisition.
- Return the requisitions and/or line items to the originator for additional editing.
If you are the final approver, the vendor and account codes must be completed before the requisition is approved.If you want another individual to review the requisition before you review it, you can insert an approver prior to your name.
If you want another individual to approve the requisition after you, you can add an approver after your name. Click Path to add approvers to the approval path.
Retrieve an existing record. Requisition Nbr Type the six-digit requisition number to be retrieved, if known. Leading zeros are not required. However, if alphanumeric values are entered, the field is not zero-filled. Click Retrieve. If the requisition number is not known, click Directory.
The selected requisition is displayed. Review the requisition data and make changes as needed. Otherwise, use the following steps to approve, skip, or return a requisition.
Note: If Reset Approval Path Purchasing is selected on the Finance > Tables > District Finance Options > Finance Options page, any changes will cause the requisition to be returned to the originator for resubmission.
Approve Click to approve the requisition and forward the requisition to the next approver in the approval path.
Note: An error message is displayed when approving a requisition that contains a line item without an account code. The originator can submit a requisition without an account code, but a requisition cannot be approved without an account code.
A message is displayed indicating that the approval is completed. Click OK.
If the final approver approves the requisition, the requisition is converted to a purchase order and the following message is displayed.
Skip Click to continue to the next requisition without taking action on the currently displayed requisition. Return Click to disapprove the complete requisition and return the requisition to the originator. If there are changes to the requisition, a pop-window with the requisition details is displayed prompting you to verify and continue. If there are no changes, a pop-window is displayed prompting you to continue.
- Click Yes to continue. A message is displayed indicating that the requisition was returned. Click OK.
- Click No to return to the Approve Requisition page without returning the requisition.
The originator can edit the returned requisition and resubmit it.
Click Comments to provide notes to the originator about the return reason.If there are changes to the requisition, a pop-window with the requisition details is displayed prompting you to verify and continue.
Click Yes to continue. Otherwise, click No. - Print purchase orders
Print purchase orders
Purchasing > Reports > Purchase Order Reports > REQ1450 - Print Purchase Orders
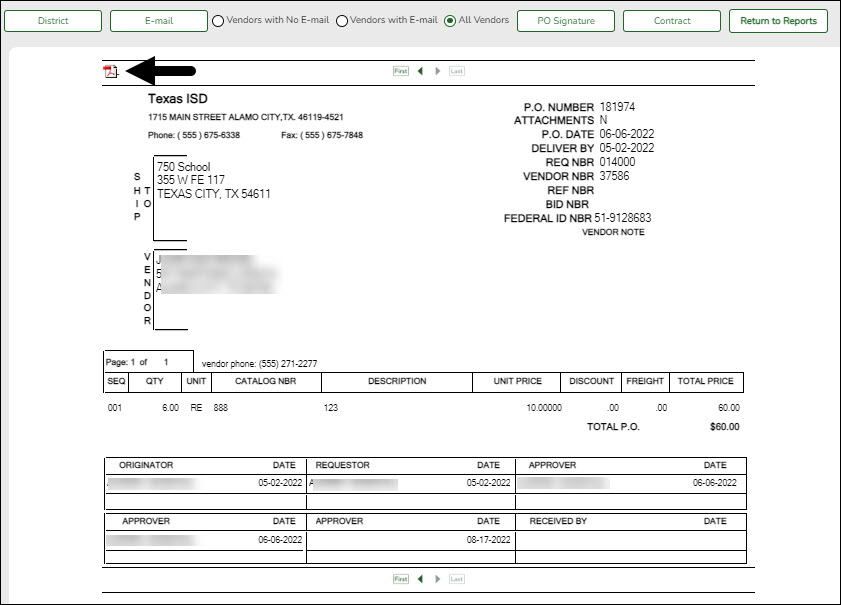
This report provides an automated means of printing purchase orders to send to vendors.
❏ Click PO Signature to select a signature to be displayed on the purchase order.
❏ Click Contract to display contract formats. If purchase orders did not correctly print, use the REQ1500 - Reprint Purchase Orders page to reprint the purchase orders.
Notes:
- The vendor name is not printed on the purchase order if a DBA name exists for the vendor on the Finance > Maintenance > Vendor Information > Vendor Name/Address tab.
Complete the necessary report parameters.
The selected purchase order(s) is displayed.
❏ Click District to view the district copy.
A message is displayed at the bottom of the page indicating that the PO was successfully processed.
If the purchase orders did not correctly print, use the REQ1500 - Reprint Purchase Orders report to reprint.
Receive PO's
- Receive purchase orders.
Receive purchase orders
Purchasing > Maintenance > Receiving > Requisition
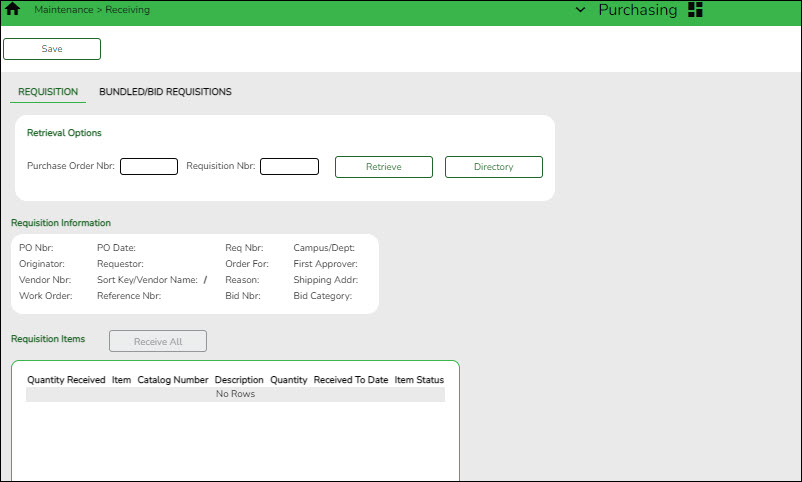
This page is used to receive purchased goods/services. Use the packing slip to accurately update the receiving details.
Only requisitions for which you are the originator are displayed. Receiving is performed by the requisition number within the purchase order number. Purchase orders are displayed in the summary section, and associated requisitions are displayed in the detail section. Purchase orders created in the current accounting period can be received in the next accounting period.
If Create Receiving Payables is selected on the District Administration > Options > Purchasing/Warehouse page, payable transactions are automatically created on the Finance > Maintenance > Pending Payables page.
❏ Under Retrieval Options:
Retrieve an existing record. Purchase Order Nbr Type the purchase order number to be retrieved. If the PO number is numeric, leading zeros are not required. Requisition Nbr Type the requisition number to be retrieved. If the requisition number is numeric, leading zeros are not required. Click Retrieve. If the purchase order or requisition number is not known, click Directory.
Notes: The following receiving options selected on the District Administration > Options > Purchasing/Warehouse page determine how information is displayed as well as if certain requisition items can be received on this page.
If Use Blind Receiving is selected, order quantities are not shown on this page.
If Allow Partial Receiving is not selected, only complete requisition items can be received.
If Allow Receiving Overage is not selected, only the original item quantity ordered or less can be received.❏ Under Requisition Information, the following requisition details are displayed:
- PO Nbr
- PO Date
- Req Nbr
- Campus/Dept
- Originator
- Requestor
- Order For
- First Approver
- Vendor Nbr
- Sort Key/Vendor Name
- Reason
- Shipping Addr
- Work Order
- Reference Nbr
- Bid Category
❏ Under Requisition Items, the following requisition item details are displayed:
- Item
- Catalog Number
- Description
- Quantity
- Received To Date
- Item Status
❏ Complete the receiving details for the requisition:
Date Received This field is automatically populated with the current date. You can edit the date to reflect the actual date that the items were received.
Note: The date is no longer per line item.Quantity Received For each line item, type the number of items received. Note: If a requisition contains line items generated by Finance when a purchase order is changed, payable check transactions can only be received, not created.
❏ Click Receive All to receive all items in the requisition.
❏ Click Save to update the requisition receiving details.


