Payroll > Payroll Processing > TRS Processing > Extract
This tab is used to extract the following TRS reporting data. All six extracts (ED20, ED40, ER20, RP20, Adjustment Days to RP25, and Adjustment Days to ER27) can be run simultaneously while you perform other system tasks. You can extract per frequency or for all frequencies.
Access the RE Portal Resources page for additional reporting information and complete file record layouts.
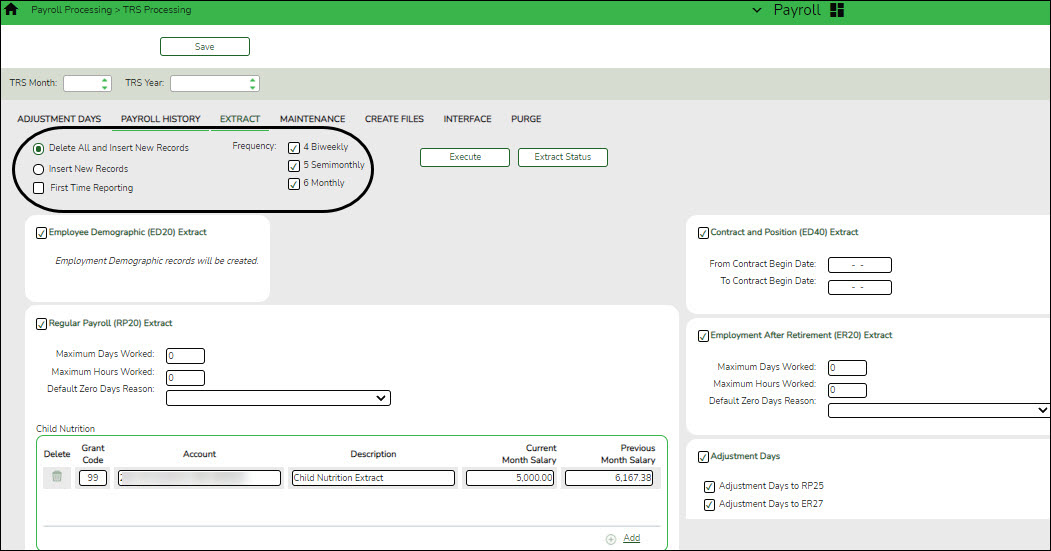
❏ Select one of the following extract options:
- Delete All and Insert New Records - Select to delete existing data and insert new records.
- Insert New Records - Select to only insert new records.
| First Time Reporting | Select if this is the first time the local education agency (LEA) is submitting an ED20 or ED40 report.
ED20 Notes: ED40 Notes: A value must be selected in the TRS Member Pos field on the Payroll > Maintenance > Staff Job/Pay Data > Job Info tab and the contract begin date must be less than or equal to the current month when extracting the ED40 report for the first time. To be considered for the extract, employees must have an active status in CYR payroll and not have a TRS Status Code of 4 or 5 on the Payroll > Maintenance > Staff Job/Pay Data > Job Info tab. |
|---|---|
| Frequency | Select the payroll frequencies (e.g., 4 (biweekly), 5 (semimonthly), 6 (monthly)) to be extracted for the report. Multiple frequencies can be selected. By default, only the pay frequencies that are selected on the District Administration > Tables > District Information > Payroll Frequencies tab are enabled and selected. |
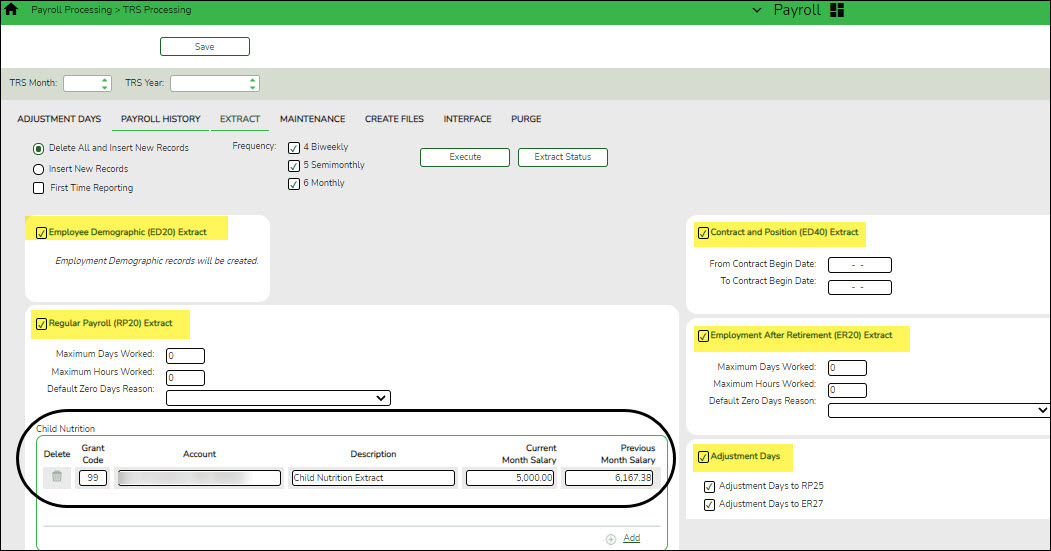
❏ Select the extracts to be processed. You can run multiple extracts simultaneously while you perform other system tasks.
❏ Select Employee Demographic (ED20) Extract to extract employee demographic data.
❏ Select Contract and Position (ED40) Extract to extract contract and position data.
| From Contract Begin Date | Type the from contract begin date in the MM-DD-YYYY format to specify a beginning date range to be used to determine which records should be included in the extract. If this field is populated, the To Contract Begin Date must be populated and vice versa. |
|---|---|
| To Contract Begin Date | Type the to contract begin date in the MM-DD-YYYY format to specify an ending date range to be used to determine which records should be included in the extract. If this field is populated, the From Contract Begin Date must be populated and vice versa.
Notes: |
❏ Select Regular Payroll (RP20) Extract to extract regular payroll data.
Child Nutrition Information
Child Nutrition (i.e. school breakfast and lunch) is a Special Revenue fund as LEAs are reimbursed based on the number of qualifying meals. Each LEA has the option to decide how the monthly child nutrition contributions submitted under the TRS Grant Deposit and TRS Grant Care are determined, either by actual salaries or on the TRS Child Nutrition Calculation Worksheet (two options).
If the LEA bases the amounts on actual salaries, a TRS Grant Code should be entered for that fund (usually 240) on the Fund to Grant table. However, if the LEA uses one of the two methods on the TRS Child Nutrition Calculation Worksheet, then an Expenditure Account Code and Salary amount should be entered below for the RP extract. The system will proportionately distribute the entered salary amount for the employees paid out of the same fund as entered in the Expenditure Account Code field.
❏ Under Child Nutrition, click + Add to add a row and enter data in the following fields:
| Grant Code | Type the designated TRS grant code. |
|---|---|
| Account Code | Type the designated child nutrition expenditure account code. All expense account codes must have the same fund/fiscal year. |
| Description | Type a description for the entry. |
| Current Month Salary | Type the current month gross salary amount. The entered salary amount is proportionately distributed for the employees paid out of the same fund as entered as the expenditure account. |
| Previous Month Salary | Type the prior month gross salary amount. If an amount is entered, the child nutrition salary is calculated based on the specified fund and all employees who were paid in the prior TRS reporting month and year using the child nutrition fund(s) (e.g., 240). If the current TRS reporting month is 09, the prior year TRS Rates table is used. If an amount is not entered, no processing is completed for the prior month pay dates. RP25 records are automatically updated/inserted for the current reporting month but adjusting the previous reporting month for child nutrition amounts. (e.g., If you are extracting data for 04-2019, the current reporting month is 04-2019 and the adjusting reporting month is 03-2019.) If an RP25 record already exists, the TRS grant gross, grant deposit, and grant care amounts are updated. Journal entries are created in Finance for the prior month child nutrition TRS grant deposit and care amounts. |
❏ Select Employment after Retirement (ER20) Extract to extract employment after retirement data.
❏ Select Adjustment Days to extract adjustment days data.
| Adjustment Days to RP25 | Select to extract all adjustments from the Maintenance tab page that do not have an amount in the TRS Posted MO/YR field, and the TRS reporting month and year does not match the Begin Adj Date field. Only records with the TRS Retiree field set to N are extracted. If the adjustment days are a result of a leave dock, and the employee has multiple jobs with multiple position codes, then the adjustment days are recorded for each of the TRS position codes. Only the net difference days worked are extracted to the RP25 record. |
|---|---|
| Adjustment Days to ER27 | Select to extract adjustments from the Maintenance tab. Only records that have the TRS Retiree field set to Y are extracted. If the adjustment days are a result of a leave dock, and the employee has multiple jobs with multiple position codes, then the adjustment days are recorded for each TRS position code. No amounts are extracted to the ER27 record. Only net difference days worked, the contract begin and end dates, and records with the default reason code set to E are extracted. |
❏ Click Execute to process the selected extracts.
❏ Click Extract Status to view the details (extract and error reports, status, user details, etc.) for each processed extract.
The TRS Extract Processing pop-up window is displayed with the extract Status, Extract Type, Start date and time, End date and time, User ID, and user Email address. If the logged-on user has an email address on the Personnel > Maintenance > Staff Demo > Demographic Information tab, an email message is forwarded for each extract after completion.
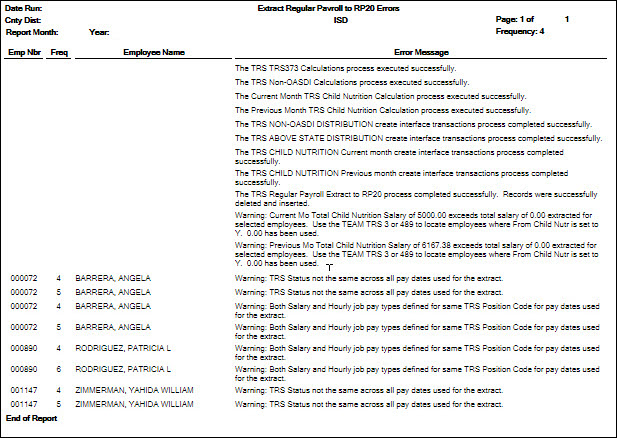
❏ Under Error Report, click Print Report to display the selected error report. Review the report.
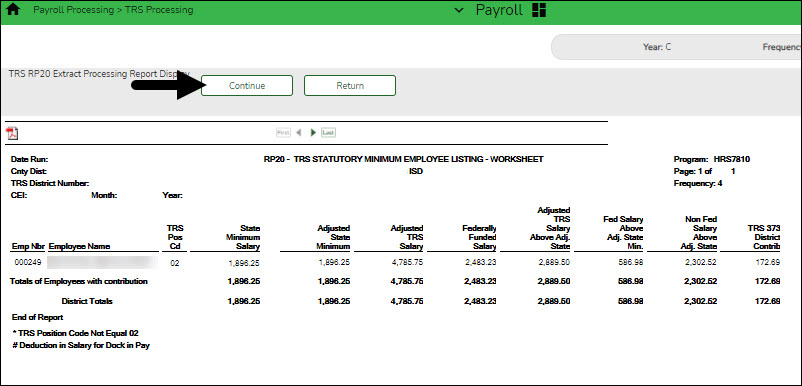
❏ Under Print Report, click Print Report to display the selected extract reports. Review the report.
❏ Click Continue to continue through the list of reports for the selected extract.
❏ Click Return to return to the Extract tab.
Extract Error Report Notes:
- If a Warning message is displayed, the data is extracted and you can address the issue(s) on the Maintenance tab.
- If a Failure message is displayed, the data is not extracted and you must resolve the issue(s) and extract the data again.
❏ Click Close to close the TRS Extract Processing pop-up window and return to the Extract tab.


