User Tools
Sidebar
Add this page to your book
Remove this page from your book
Letter (Attendance)
Attendance > Maintenance > Letters > Update > Letter
This tab allows you to create a form letter or template for each letter type in the Attendance letter directory.
A letter body should be created for each Letter ID in the directory. You can personalize letters using variables.
Best practices for attendance letters
- Decide how you want to notify parents or guardians of a student’s absences from one of the following Letter Type options:
- Semester Absence: Generate letters based on the number of absences for a student per semester. Choose the maximum number of absences per letter. You can use prerequisite IDs for these letters so that the letters will print in the order you set up. Letter control is written to the students’ records.
- School Year Absence: Generate letters based on the number of absences for a student per school year. Choose the maximum number of absences per letter. You can use prerequisite IDs for these letters so that the letters will print in the order you set up. Letter control is written to the students’ records.
- Four-Week/Six-Month Truancy: Generate letters at three and ten absences. Letter control is written to the students’ records (amount of time since the last letter was generated is considered and then the number of absences).
- Create all of the letters you will need at the beginning of the school year.
- Select Select for Prt for all the letters you have created (except Mail out (no ltr control), which will print every time if selected).
- Click Create Letter Control (which appears on Maintenance > Letters > Print > Letters once letters are generated) after printing annual notifications, truancy letters, or absence letters. Letter controls are used to prevent the same letters from generating for students who have already received them.
It is best to run the letters at least once a week. Running the letters at the end of the week, using the first school day of the week for the As of Date gives the students time to supply letters to excuse any unexcused absences.
There are two other Letter Types:
- Annual Notification: Generate letters for all students at a campus one time. It will generate for new students even if it has already been generated for the rest of the campus. Set up multiple Annual Notifications each with a different Ltr ID. This letter should be used for non-attendance issues or single attendance notifications since it does not allow absence variables. Letter control is written to the students’ records.
- Mail out (no ltr control): Generate letters for all students at a campus one time. This letter should be used for non-attendance issues, such as announcements, since it does not allow absence variables. No letter control is written to the students’ records.
Understanding Attendance Letters:
The program works by looking for Nbr Abs Req on Maintenance > Letters > Update > Directory and comparing it to the current total absences for the student.
If the current total absences is greater than the Nbr Abs Req for several letters with the same Letter Type, Absence Type, and Period Type, the letter with the closest Nbr Abs Req (that is not over the current total absences) will print. If Select for Prt is not selected, a letter is not printed.
The Select for Prt field does not control whether the letter is generated, only whether the letters, once generated, are printed. For this reason, it is recommended that you leave Select for Prt selected for all letters.
Update data:
❏ Select a letter type in one of the following ways:
- From the Directory tab, click Retrieve for the letter type.
- Click the Letter tab. In the drop down at the top of the tab, select the letter type.
The selected letter type is displayed in the text editor.
If the letter body has not yet been created, the editor is blank. Otherwise, the existing letter content is displayed.
❏ Type or edit the letter using as many variables as necessary.
The body of a letter can be copied from one letter type to another, including from one campus to another.
If you are copying a letter created in Microsoft Word, first copy the text into a .txt file to remove all formatting, then copy the text from the .txt file to the letter editor.
- In the body of the letter, press CTRL+A to select all of the letter body.
- Press CTRL+C to copy the letter body.
- Open the second letter, and then press CTRL+V to paste the letter body.
- Delete the variables in the second letter, and add new variables.
IMPORTANT: The original variables in the second letter must be deleted to generate letters successfully. The same variables may be added back.
- Modify the letter as necessary.
It is recommended that you do not enter line breaks by pressing ENTER in the paragraph body, as this will cause the text to wrap incorrectly in the actual letter. Instead, let the text wrap naturally in the editor. When you click Preview and print the letters, the line breaks will occur in the appropriate places.
Variables:
❏ To add a variable, position the cursor in the letter where you want to insert a variable.
Variables must be inserted one at a time.
❏ Click Variables to select a variable.
The Letter Variables lookup is used to select letter variables when printing attendance, discipline, or health letters. Some variables are not available, depending on the letter type.
Search for a variable:
Letter variables are listed in alphabetical order by replacement. Replacement describes the content that will appear in place of the variable when letters are generated for students.
You can re-sort the grid by clicking on an underlined column heading. It will sort in ascending order. Click it again to sort in descending order.
A triangle next to the column heading indicates the column by which the grid is currently sorted and whether it is sorted in ascending  or descending
  order.
❏ To search for a specific variable, begin typing the replacement text in the Search field.
The list is automatically filtered to display the variables that contain the characters you have typed.
❏ When you locate the variable you want to retrieve, click the replacement.
The lookup closes, and the letter is populated with the selected variable.
❏ Repeat for the remaining variables.
❏ Click Cancel to close the lookup without selecting a variable.
The variable is inserted into the letter, enclosed in curly brackets.
Variables must be inserted one at a time.
A variable cannot be used in the first line of the letter. If the first character in the letter must be a variable, precede it with a blank line to ensure that the letters process properly.
❏ To delete a variable from the letter, select the variable in the letter body and press Delete.
IMPORTANT:
- The List of Absences variable is used to report absence types and tardy periods if tardy equivalent days are specified; it is not available for Annual Notification and Mail Out letter types.
- The font attributes (bold, italic, underline, strikeout) for the List of Absences variable should not be changed. Otherwise, the letters will not generate.
❏ Click Save.
| Preview |
Click to preview the letter. The letter opens in PDF format in an embedded Adobe Reader window where you can print, save, and perform other functions.
|
|---|
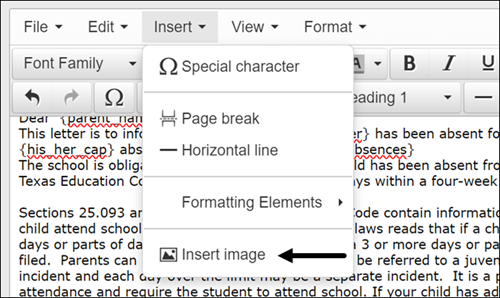
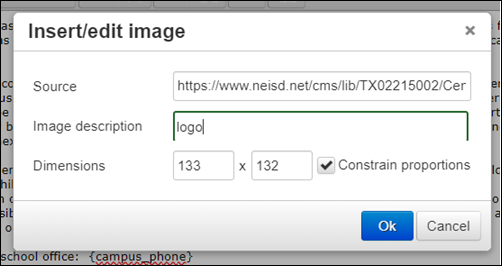
To insert an image using a URL link:
❏ Select Insert image from the Insert dropdown menu.

❏ In the Source field, copy/paste the URL link to the image to be added.
❏ In the Image description field, add a short description of the image.
❏ In the Dimensions fields, enter specific image dimensions or leave blank.
❏ Click OK. The image is placed in the letter.

❏ Click Close.

❏ Click Save.
Americans with Disabilities Act (ADA) and Web Accessibility
The Texas Computer Cooperative (TCC) is committed to making its websites accessible to all users. It is TCC policy to ensure that new and updated content complies with Web Content Accessibility Guidelines (WCAG) 2.0 Level AA. We welcome comments and suggestions to improve the accessibility of our websites. If the format of any material on our website interferes with your ability to access the information, use this form to leave a comment about the accessibility of our website.
