Sidebar
Add this page to your book
Remove this page from your book
Post/View Attendance
Attendance > Post/View Attendance
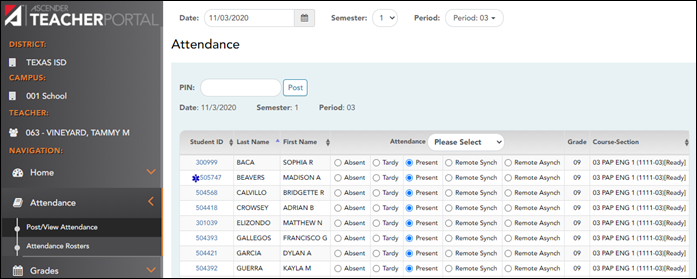
This page allows you to record and post attendance for each period. You can also view attendance data that has already been posted.
NOTE: You can post the data only once for each period-course. If you discover an error after you have posted, you must contact the attendance clerk to correct the record.
Flexible attendance cannot be posted from TeacherPortal.
Student Activation/First Day Counts
Activating students using this process allows you to identify No Show students and correctly enroll students who begin school after the first day of school. It also ensures that students who do show up for school have the proper enrollment dates for the district, campus, special programs, and first semester courses.
The primary way students are activated is by teachers recording attendance in TeacherPortal. Once teachers have marked and posted attendance, the campus staff can address the individual students who could not be activated by teachers.
All students are marked inactive before school starts. As you take attendance, the students are activated as they show up in class. After a period of time (determined by each campus), any student who has not been activated is considered a No Show.
The TeacherPortal Post/View Attendance displays differently during the activation window: Teachers mark present students as Activated rather than Present.
REMINDER: On the first day of school, a student cannot be marked as absent.
From this page, you can print the attendance list for each period-course (or the campus can supply a class roster). If a student shows up in a period who is not on the attendance list, you must write the student's name and ID either in the blank rows provided at the bottom of the list, or on the form provided by the district/campus, and submit to the campus office.
| Last day for mass activation | During the activation window, this field is displayed above the attendance grid, which indicates the final date of the activation window. If there are students from multiple attendance tracks enrolled in the course, and the tracks have different ending dates for mass activation, all dates are displayed with the track number in parentheses. |
||||
|---|---|---|---|---|---|
| Attendance |
On the first day of school, in the Attendance column, the Activate and Inactive fields are displayed for all students instead of the Absent and Present fields. All students are set to Inactive by default.
|
❏ Click Post.
If you activate a student after the first day of school, but during the activation window, the following occurs:
- A No Show record is created for the student on the first day of school.
- An enrollment record is created with the entry date set to the student's activation date.
- The student's enrollment date in all courses on the campus for the semester is set to the activation date.
- The student's special program enrollment date(s) are set to the activation date, if applicable.
- If the student's original entry date has a current year date (i.e., the first day of school), the student's original entry date is changed to the activation date.
During the activation window, you may have a mix of activated and inactivated students in your classes.
• Activated students will have the Present/Absent/Tardy options displayed.
• Inactive students will have the Activate/Inactive options displayed.
The Attendance Roster report will display the Activate and Inactive fields for students who have not yet been activated.
Once the activation window has ended:
Any students who remained inactive will have the message “Attendance Exempt” displayed in the Attendance column. Attendance cannot be marked for these students.
These students will no longer be displayed on the rosters once the campus has created the No Show records.
For campuses NOT using Student Activation/First Day Counts:
On the first day of school, teachers cannot use TeacherPortal to record or post attendance during the ADA period. You can only view and print data, and you must record attendance manually on the printed sheets.
- Click Print to print the attendance list for each period-course. The Attendance Roster Report Selection page opens allowing you to make selections for printing the Attendance Roster report.
- Mark attendance on the list manually.
- If you have students in a period who are not on the attendance list, print their names and student IDs in the rows provided at the bottom of the list.
- Sign and date the list on the lines provided.
Record attendance:
❏ Retrieve the students.
| Date |
The current date is displayed by default. Type another date in the MMDDYYYY format, or click
NOTE: Some campuses may not allow you to post attendance for a prior date. In this case, the Post button is not displayed for prior dates. NOTE: You will get an error message, Attendance posting more than XX days prior not allowed., if the posting date is greater than the number of days entered in the Days field on Grade Reporting > Maintenance > TeacherPortal Options > Campus and the Allow Prior Days Posting field is checked. |
|---|---|
| Semester |
The semester of the selected date is displayed by default. |
| Period |
Select the period-course for which to view or record attendance. By default, the first period for which you have not posted attendance is selected. |
The list of active students for the selected date and period-course is displayed.
The columns can be sorted according to your preferences.
If you sort by the last name column, the table sorts by last name, then first name. If you sort by the first name column, the table sorts by first name, then last name.
NOTE: Sorting the columns overrides the custom sort order established on the Arrange Student Order page. However, if you leave this page and return, the students are displayed in your custom sort order. (This does not apply on the Post/View Attendance page.)
- If attendance is already posted for the selected date-period-course, the attendance data is view only.
- If a student withdrew from the course since attendance was posted for the date, his attendance record is displayed.
- If a student's enrollment date is after the selected attendance date, his attendance record is not displayed.
- If you teach multiple courses for the selected period, by default, all students in all courses are listed. This setting can be changed using the Combine Courses in Attendance field on Settings > Update Profile.
- Attendance-only courses are included in the class list.
- Students whose attendance is excluded from reporting are listed, but you cannot record attendance. (This is a rare circumstance.)
- Students who withdrew from the course are no longer listed.
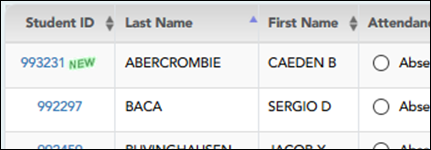
| Student ID |
The student's ID is displayed. Click the student ID to view the student's profile. |
|---|---|
 |
The Star of Life icon is displayed for any student who has medical circumstances you should be aware of. To view details, click the student ID to view the student's profile (Medical Alerts section). |
| Last Name First Name |
The first and last names of the students in the selected course-period are listed. |
❏ Under Attendance:
By default, all students are set to Present. You will see these options if your campus chooses to use Remote Asynch attendance, Remote Sync attendance, or Both.
Present - physically present in the classroom
Remote Synch - online at the time of class
Remote Asynch - will complete the assignment at a later time
As you mark students Absent or Tardy, the rows change color.

• Tardy students are shaded yellow.
• Absent students are shaded red.
If a student's absence is pre-posted (e.g., a scheduled band trip or a student who called in sick), the student is shaded gray, and the Attendance field displays the reason for the absence. Pre-posted absences are handled by the attendance clerk, so you are not able to mark attendance for the student.
• The Absent and Tardy fields are disabled during the ADA period, on the first day of school, and on the first day of enrollment.
• The Absent and Tardy fields are enabled during the ADA period if the student has a withdrawal reason due to a status change.
The Tardy field may not be displayed depending on campus attendance settings.
If the district allows tardies during the ADA period, the tardies may only be valid during a set number of minutes for the period. After this number of minutes has passed, the student should no longer be marked as Tardy and should be marked as Absent, although the program does not prevent you from marking a student as Tardy (except on the first day of semester 1). The number of minutes is determined by the district. If applicable, a message is displayed above the table indicating when tardies are valid.

Students who are on a track that does not meet on the selected date are listed; however, the Absent, Tardy, and Present fields are replaced by a message indicating that the date is not a membership day for the student.
Students whose first day (or re-entry day) is not the official first day of school cannot be marked absent during the ADA period on their first day. The Absent option is disabled.
| Grade | The student's grade level is displayed. |
|---|---|
| Course Section | The course-section is displayed. |
| # Students | The total number of students enrolled in this period is displayed at the bottom of the Student ID column. |
| Click to print the attendance roster for one period or all periods. The Attendance Roster Report Selection page opens allowing you to make selections for printing the Attendance Roster report. |
Post attendance:
❏ After you have recorded attendance for the course, review your input carefully.
Be sure to follow procedures established by the district for recording attendance.
When you are satisfied with your attendance input, you must post the data.
| PIN |
Type your four-digit personal identification number (PIN).
For your convenience, the PIN box and Post button are displayed at the top and bottom of the attendance list. You can use either box to post attendance. |
|---|
❏ Click Post.
If you indicated that all students are present (and no absences were previously entered by the attendance clerk), you are prompted you to confirm that all students are marked present.

❏ Click Confirm to confirm.
Attendance is posted.
Americans with Disabilities Act (ADA) and Web Accessibility
The Texas Computer Cooperative (TCC) is committed to making its websites accessible to all users. It is TCC policy to ensure that new and updated content complies with Web Content Accessibility Guidelines (WCAG) 2.0 Level AA. We welcome comments and suggestions to improve the accessibility of our websites. If the format of any material on our website interferes with your ability to access the information, use this form to leave a comment about the accessibility of our website.


The icon is displayed next to the attendance, if the attendance clerk entered comments associated with a student's attendance for the date and period displayed.
Click the icon to view the comments. The Comments window opens, and the comments are displayed. The date-time and user ID of the person who entered the comments are also displayed.
Click Close to close the Comments window.