User Tools
Sidebar
Add this page to your book
Remove this page from your book
ASCENDER - Position Management: Perform Retro Pay Process
The purpose of this document is to guide you through the necessary steps to process retro pay in Position Management. The following steps should be performed after the 11-month and/or 12-month employees have been rolled over to the current year Payroll and Position Management.
This process calculates the difference between the current salary in Payroll and the new salary in next year Position Management and then pays the difference to the employee via extra duty pay.
This document assumes you are familiar with the basic features of the ASCENDER Business system and have reviewed the ASCENDER Business Overview guide.
Some of the images and/or examples provided in this document are for informational purposes only and may not completely represent your LEA’s process.
Before You Begin
Review the following information:
❏ Review TRS Rules for Retro Pay on the TRS Creditable Compensation page at https://www.trs.texas.gov/Pages/re_creditable_compensation.aspx. Reference item 16. Retroactive Pay Increases Excluded by the Plan’s Terms under Compensation Not Eligible for TRS.
❏ The following two scenarios require a workaround based on how they are currently handled in Position Management:
Scenario 1: Some LEAs may delay giving administrators their raise in July/August when their new contract starts and instead pay them the extra pay owed for the raise in September. However, per TRS, “a pay increase given retroactively after work has commenced under the contract or work agreement is excluded as creditable compensation for TRS purposes because it is not paid pursuant to a valid contract.” This means that retro pay should not be entered on the Payroll > Maintenance > Hours/Pay Transmittals > Extra Duties tab. However, currently, Position Management registers the retro pay transaction on the Payroll > Maintenance > Hours/Pay Transmittals > Extra Duties tab but it should be entered on the Non-TRS tab.
Workaround: It is recommended to use the Retro Pay Processing as it performs the appropriate calculations and updates the Job Info tab with the correct amounts and balances. Then do the following:
- Print the transactions from the Extra Duties tab.
- Manually enter them on the Non-TRS tab.
- Manually delete the transactions from the Extra Duties tab.
Some LEAs may only have a few 11- and 12-month employees, so the number of transactions to reverse and re-enter are minimal. However, larger LEAs with 100 or more 11- and 12-month employees may result in a larger number of manual entries.
Scenario 2: When completing a payoff for an employee in Position Management, the Standard Gross Pay is referenced to determine the employee’s previously paid amounts, which is correct. When an 11- or 12-month employee who received retro pay is paid off, the amount should be retrieved from the Non-TRS tab and included in the payoff calculation in Position Management. Per TRS, “a pay increase given retroactively after work has commenced under the contract or work agreement is excluded as creditable compensation for TRS purposes because it is not paid pursuant to a valid contract”. However, Non-TRS pay does not have an option to indicate that it is part of the Standard Gross Pay. Therefore, it is not retrieved on the CIP Separation when past pay is calculated.
Workaround: It is recommended to process and approve the separation, then manually correct the fields on the Payroll > Maintenance > Staff Job/Pay Data > Job Info tab.
Retro Pay Process
Log on to the next year.
- Create a simulation.
Create a simulation
Position Management > Utilities > Salary Simulation > Simulation Options
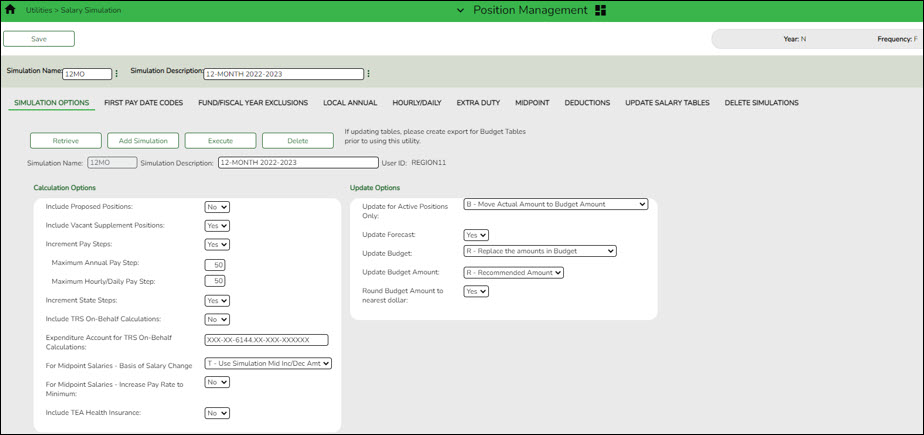
Create a salary simulation for the group of employees who are owed retro pay that includes a raise.
❏ Under Update Options, in the Update Forecast field, select Yes.
❏ Click Execute to begin the simulation process.
❏ Under Calculation Reports:
- Select the report(s) from the list. Click Select All or Unselect All to select all of the reports or unselect all reports.
- Click Generate Reports. The reports are displayed in the order selected.
❏ Click Process to save the data to budget and/or PMIS records based on the Update Options selected. And, then process the simulation. The simulation updates the forecast and clears the Accept Changes checkbox. - Process retro pay.
Perform Retro Pay
Position Management > Utilities > Retro Pay Processing
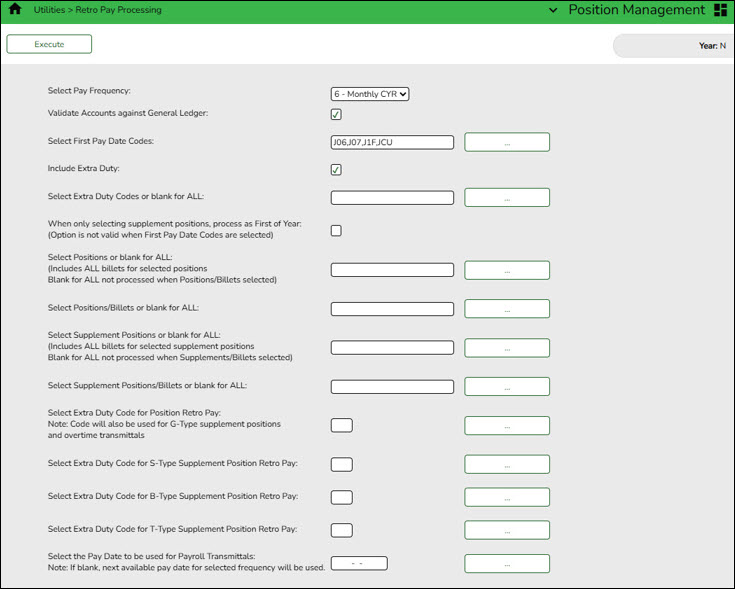
Perform the retro pay processing. You must be logged on to a next year pay frequency to access this utility.
Create an export using Export PMIS Tables prior to using this utility.
- If the employee’s position record has hours per day, the following overtime calculation is used: overtime rate = (daily rate / hours per day) * 1.5, hourly rate = (daily rate / hours per day).
- If the employee’s position record hours per day is zero and the job code table has FTE Hours, the following overtime calculation is used: overtime rate = (daily rate / (fte hours / 5) * 1.5, hourly rate = (daily rate / (fte hours / 5).
- If the employee’s position record hours per day is zero and the job code table has zero FTE Hours, the following overtime calculation is used: overtime rate = (daily rate / standard hrs) * 1.5, hourly rate = (daily rate / standard hrs).
❏ Click Execute to execute the process.
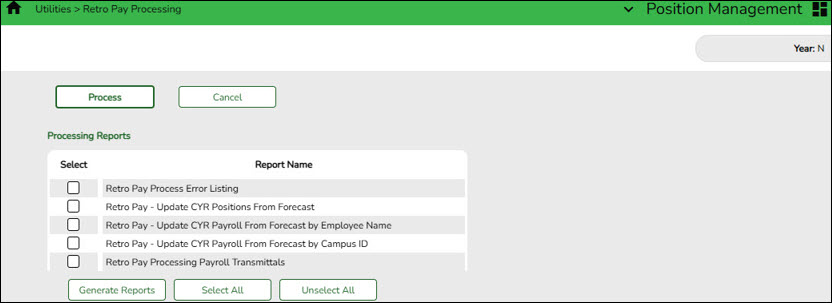
The following reports are available:
- Retro Pay Process Error Listing
- Retro Pay - Update CYR Positions From Forecast
- Retro Pay - Update CYR Payroll From Forecast by Employee Name
- Retro Pay - Update CYR Payroll From Forecast by Campus ID
- Retro Pay Processing Payroll Transmittals
❏ Click Generate Reports. The system displays the first report selected. Review the report.
❏ Click Continue to view the next report. Or, click Return to return to the reports selection page.
❏ Click Process to proceed. You are prompted to create a backup.
After the export process is completed, the actual update is performed. If the update is successful, a message indicating that the retro pay update was processed successfully is displayed.
❏ Click Cancel to return to the Retro Pay Processing page without processing. - Move retro pay extra duties to Non-TRS.
Move retro pay extra duties to Non-TRS
Once retroactive pay has been processed, the Payroll > Maintenance > Hours/Pay Transmittals > Extra Duties tab is populated. According to TRS, retroactive salary increases are not creditable compensation for TRS benefit calculation purposes.
Reference the TRS Salary Increases and Creditable Compensation webpage for additional information: https://www.trs.texas.gov/employers/compensation/salary-increase.
Retro pay must be manually moved from the Payroll > Maintenance > Hours/Pay Transmittals > Extra Duties tab to the Payroll > Maintenance > Hours/Pay Transmittals > Non TRS tab.
Americans with Disabilities Act (ADA) and Web Accessibility
The Texas Computer Cooperative (TCC) is committed to making its websites accessible to all users. It is TCC policy to ensure that new and updated content complies with Web Content Accessibility Guidelines (WCAG) 2.0 Level AA. We welcome comments and suggestions to improve the accessibility of our websites. If the format of any material on our website interferes with your ability to access the information, use this form to leave a comment about the accessibility of our website.


