User Tools
Sidebar
Add this page to your book
Remove this page from your book
Security Administration > Create and Edit Users
This page is used to create new users or edit existing users. You can establish the roles and permissions associated with each user.
In addition, you can establish the components within ASCENDER that a user can access. After creating users and performing other functions, you must exit any applications to which you are logged on to refresh the security permissions.
All users are automatically granted permission to view all three ASCENDER homepage dashboard elements. However, the content within the dashboard element is driven by the user’s profile with the exception of ASCENDER News, which is available to all users.
- ASCENDER News - Displays important news or upcoming events. The ASCENDER News is managed by the Texas Computer Cooperative (TCC).
- Approval Summary - (Business users) Displays a list of pending approval items based on the user's profile.
- Online Registration - (Student users) Displays a list of online registration pending approval items based on the user's profile.
Create a user:
❏ From the Manage Users page, click New User.
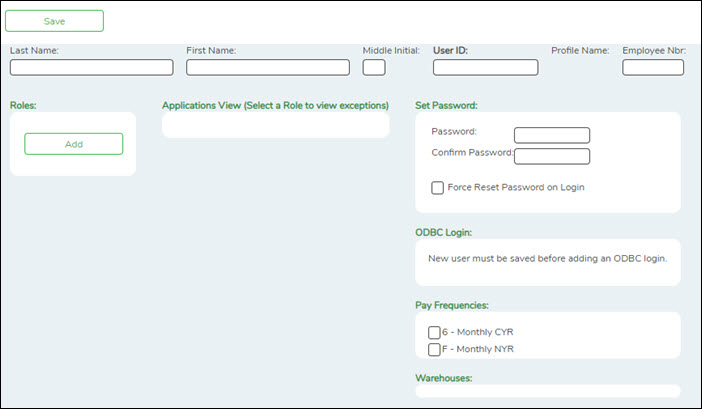
The New User page is displayed.
| Field | Description |
|---|---|
| Last Name | Type the user's last name. The field can be a maximum of 30 characters. |
| First Name | Type the user's first name. The field can be a maximum of 30 characters. |
| Middle Initial | Type the first letter of the user's middle name. This field is optional and is only one character. |
| User ID | Type a user ID for the user. The field can be a maximum of 29 characters. The first character must be a letter. |
| Profile Name |
An automatically generated name assigned to the user that links the user ID to the user permissions is displayed.
|
| Employee Nbr |
Type the six-digit employee number that is assigned to this user in Personnel. The autosuggest displays employee numbers even if the employee does not have an employment info, pay, or job record.
|
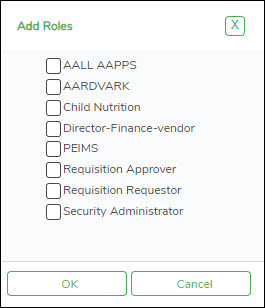
❏ Under Roles, click Add to add roles to the user's profile. The Add Roles pop-up window is displayed.
- Select the role(s) to be added to the user's profile.
- Click OK to add the selected roles.
- Click Cancel to close the pop-up window without adding roles.
❏ Under Applications View, a list of each application available to the user is displayed.
❏ Under Set Password, type a password for the new user. Typically, this is a temporary password that will be provided to the user, and you will have to select Force Reset Password on Login to require the user to set a new password after logging on with the temporary password.
| Password | Type the user password. The password must be 8-46 characters with at least three of the following: uppercase, lowercase, number, and special character. |
|---|---|
| Confirm Password | Retype the password you entered in the Password field. |
For Business users:
❏ Under Pay Frequencies, a list of available pay frequencies is displayed. Select the pay frequencies to be assigned to the user.
❏ Under Warehouses, a list of available warehouses is displayed. Select the warehouses to be assigned to the user.
❏ Click Save. The profile name is populated and the user profile is saved.
After the record is saved and the user profile is created, you can manage user permissions.
- Select a role under Roles to view the role components. The view is changed from Applications View to Manage Permissions. You can add or update permissions by application in the Manage Permissions view.
- Click Applications View to return to the Applications View.
❏ Under Manage Permissions (All Apps):
| Expand All | Click to display all available lower-level applications or components. |
|---|---|
| Collapse All | Click to display only the available upper-level applications or components. |
- Click + - to expand or collapse the available user permissions.
- Select the permissions to be added or removed from the user.
Notes: A component that is cleared is displayed in red. For example, if Maintenance is cleared, Maintenance is displayed in red.
If a component has a subcategory that is cleared, the upper-level title is displayed in italics. For example, if Utilities has many sublevels, one of which has been cleared, Utilities is displayed in italics denoting that not everything under Utilities is granted permission.
If read-only is selected, the component is displayed in brown. The component must be selected along with the read-only option.
Edit a user:
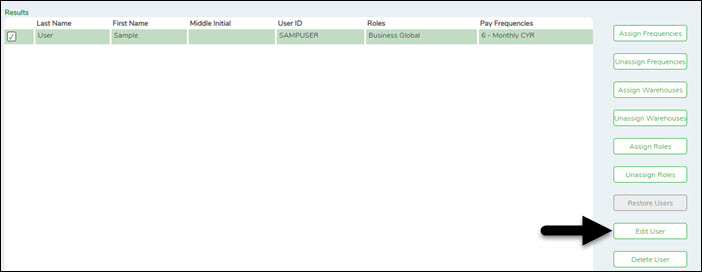
❏ From the Manage Users page, under Search Criteria, click Find to perform a search for all users. Or, to perform a search for a specific user, enter data in one or more of the search fields.
- Select Show Deleted Users to include deleted users in your search. Deleted users are highlighted in red.
- Click Find. A list of users matching your search criteria is displayed.
- Select the user to be edited.
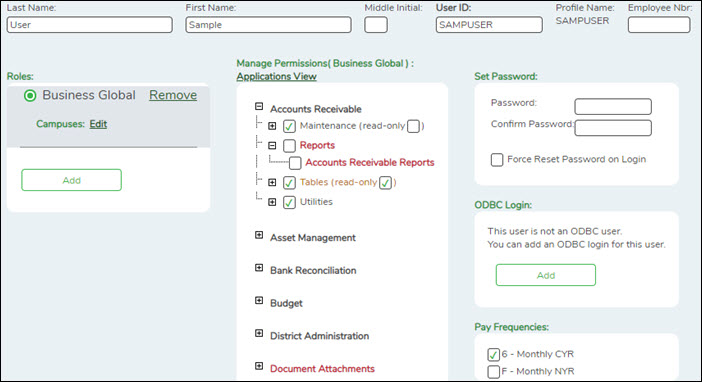
❏ Click Edit User to update the roles and responsibilities associated with the user. The Edit User page is displayed.
- You can make the necessary updates to the user's profile such as password, frequencies, warehouse, etc.
- In addition, you can select a role to view and manage exceptions/permissions to the roles and responsibilities associated with the user profile.
- Click + - to expand or collapse available permissions.
- Select/unselect the permissions to be added to the user.
Notes: A component that is cleared is displayed in red. For example, if Maintenance is cleared, Maintenance is displayed in red.
If a component (i.e., menu item) has a subcategory that is not selected, the upper-level title is displayed in italics. For example, if Utilities has sublevels, one of which has been cleared, then Utilities is displayed in italics denoting that not everything under Utilities is selected for permission.
If read-only is selected, the component is displayed in brown. The component must be selected along with the read-only option.
❏ Click Save.
Delete a user:
To completely delete a user from Security Administration, complete the following steps in the order in which they are listed:
❏ On the District Admin > Workflow page, delete the following:
- Alternative Approver: Click Clear Row.
- Approval Rules: Delete the rules for Purchasing.
- Approval Path: Delete the user from the Purchasing path.
- First Approver: Delete the user from being a first approver.
- District Admin > Maintenance > User Profiles - Delete the user.
❏ From the Manage Users page, under Search Criteria, click Find to perform a search for all users. Or, to perform a search for a specific user, enter data in one or more of the search fields.
- Select Show Deleted Users to include deleted users in your search. Deleted users are highlighted in red.
- Click Find. A list of users matching your search criteria is displayed.
- Select the user to be deleted.
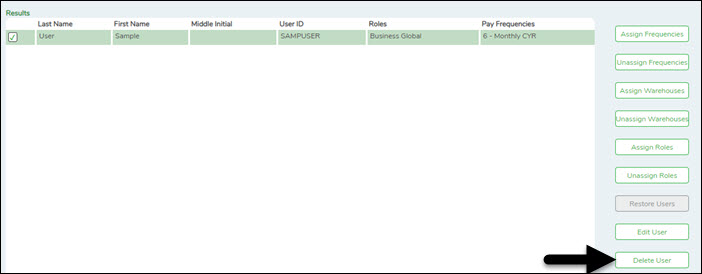
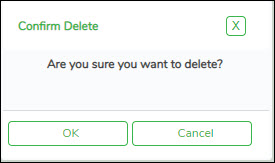
❏ Click Delete User to delete a user. A pop-up window prompts you to confirm that you want to delete the user.
- Click OK to delete the user.
- Click Cancel to not delete the user.
A message indicating that the user was deleted successfully is displayed at the bottom of the page.
Administrative users cannot be deleted. If an administrative user is selected, a message is displayed indicating that the administrative user's properties cannot be changed.
Americans with Disabilities Act (ADA) and Web Accessibility
The Texas Computer Cooperative (TCC) is committed to making its websites accessible to all users. It is TCC policy to ensure that new and updated content complies with Web Content Accessibility Guidelines (WCAG) 2.0 Level AA. We welcome comments and suggestions to improve the accessibility of our websites. If the format of any material on our website interferes with your ability to access the information, use this form to leave a comment about the accessibility of our website.


