User Tools
Sidebar
Add this page to your book
Remove this page from your book
Security Administration Overview
ASCENDER Security Administration provides security administrators or designated users the rights to securely manage roles and permissions for ASCENDER Business and Student users. Additionally, various reports are available to assist with assessing audit information.
This guide provides information about how to create and manage roles and users as well as assign campus rights, pay frequencies, and warehouses.
Before You Begin:
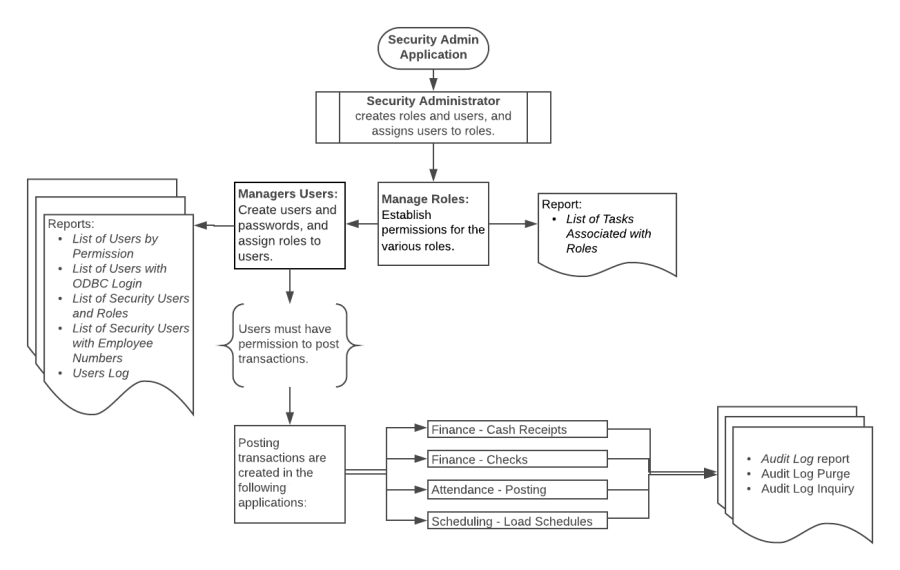
Review the Security Administration flow chart and terminology in order to understand the relationship between roles, users, and permissions and how they integrate into the ASCENDER Business and Student systems.
Security Administration flow chart
Review Security Administration terms.
| Term | Description |
|---|---|
| User | An individual who has access to log on to ASCENDER with a valid user name and password. |
| Authentication | Determines a user's identity via a user name and password that is entered on the ASCENDER Login page. |
| Authorization | Determines the user's system permissions (access) after the user's identity is authenticated. |
| Task | Represents each page or tab within ASCENDER. |
| User Role | Represents the association of a user with a role. The user role provides campus, payroll frequency, and warehouse permissions. |
| Role | A group of tasks (page or tab) to which a user has access. |
| Permission | Determines the relationship between a role and a task in order to extend the appropriate access to the user in ASCENDER. |
| Component | Refers to an application, page, or tab when managing ASCENDER roles and users. |
What is the purpose of a role?
The Security Administration application is structured to assign roles to users instead of individual tasks, which simplifies the designated security administrator's duty of managing user permissions.
For example, if a new page (task) is added to the Attendance application and only the Attendance Clerks require access to the page, the security administrator can provide page permission to only the Attendance Clerk role, which grants access to all users who are assigned the Attendance Clerk role.
If roles did not exist, each individual user profile would have to be manually updated with access to the new page.
To avoid any system issues related to roles, be sure to keep Business and Student roles separate and ensure that Business roles do not have campuses assigned.
You can generate the Security Administration > Reports > List of Users by Permission report to review user details such as the last login date and then modify as needed.
Why use permissions?
In most cases, roles cover all user access; however, special cases may exist. For example, if a user is assigned to a role but this particular user should not have access to a specific page within that role, you can manually update the user's profile to exclude permission to that specific page. The user would still have access to the other role permissions with the exception of the excluded page. You can exclude a permission by simply unselecting a task (page or tab) from the user's profile permissions.
What is a user role?
For Student users, the user role provides campus access. For example, a user may be assigned the Attendance Clerk role for a high school campus but may also have the Discipline Advisor role for the middle school campus. Based on the campus permissions in the user role, the user cannot modify attendance information for the middle school campus, only the high school campus.
For Business users, the user role provides access to payroll frequencies and warehouses. For example, if a user only has access to a specific payroll frequency, the user can only run payroll processes for that specific payroll frequency.
Manage Roles
The Manage Roles page allows you to create, edit, and delete roles. You can create roles with specific permissions to various components, pay frequencies, campuses, and warehouses within ASCENDER. Once roles have been established, you can assign them accordingly to each user.
After creating roles and performing other functions, exit any applications to which you are logged on, and then log back on to refresh the updated security permissions.
For new LEAs, log on to Security Administration as an admin user.
Create, edit, and delete roles:
Security Administration > Create/Edit Roles
This page is used to create new roles or edit existing roles. You can add or edit roles for which a security component is required. Additionally, you can establish permissions for the various roles; for example, you can assign a database administrator permission to the Finance application.
Create a role:
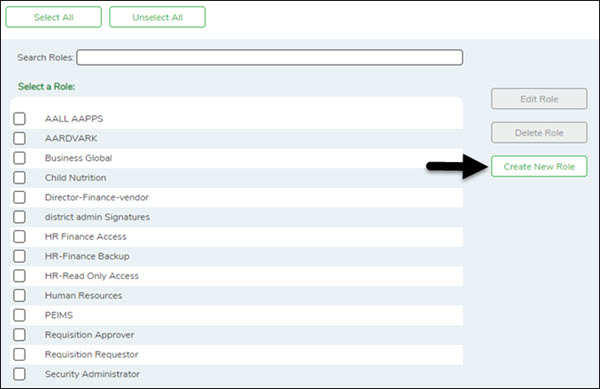
❏ From the Manage Roles page, click Create New Role.
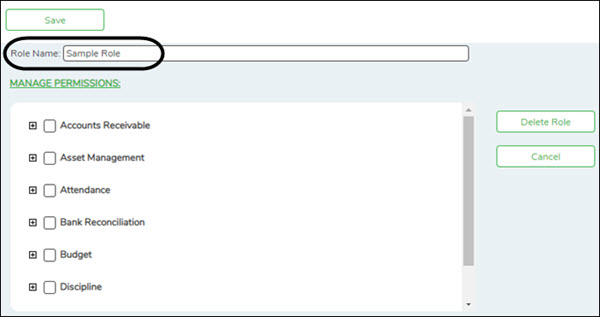
The Create Role page is displayed.
| Role Name | Type the name of the role to be created. |
|---|
❏ Under Manage Permissions:
- Click + - to expand or collapse available role permissions.
- Select the permissions to be added to the role. Once permission is granted to a component, the title is displayed in green and the associated check box is selected.
- Multiple applications can be added to a role.
- Multiple roles can be added to a user.
❏ Click Save. The new role is displayed under Select a Role.
You can continue creating roles as needed.
Edit a role:
❏ From the Manage Roles page, you can type a role name in the Search Roles field. As you type the role name, the existing roles that match the typed data are displayed under Select a Role. The Edit Role and Delete Role buttons are enabled.
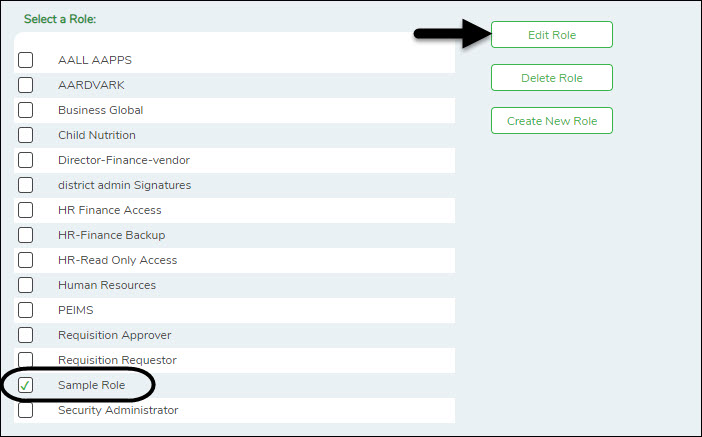
❏ Select the role to be edited.
❏ Click Edit Role to edit the selected role. The Edit Role page is displayed with the selected role name in the Role Name field and the existing role permissions.
❏ Under Manage Permissions, add or remove components (i.e., permissions to a page/menu). Any changes made to a role are effective to all users who are assigned to that role.
Notes:
- Selected components are displayed in green.
- An application with a component that is not selected is displayed in green italics. For example, if a component under Test Scores is not selected, then Test Scores is displayed in italics denoting that not everything under Test Scores has been granted permission.
- For those components with a read-only capability and read-only is selected, the component is displayed in orange. Read-only access limits the user to only be able to view data on a page. The component must be selected along with the read-only option.
- For Budget and Finance, an All Historical File IDs read-only option is available allowing users to view all file IDs when logged on to the application if the option is selected. If the option is not selected, the user can only view the current year.
❏ Click Save.
Delete a role:
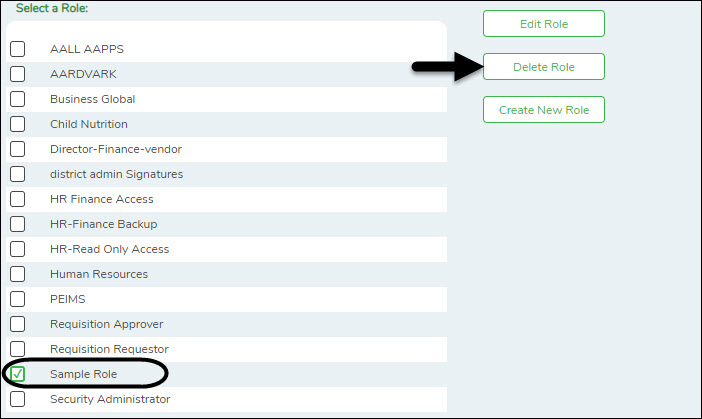
❏ From the Manage Roles page, you can type a role name in the Search Roles field. As you type the role name, the existing roles that match the typed data are displayed under Select a Role. The Edit Role and Delete Role buttons are enabled.
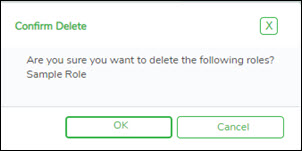
❏ Click Delete Role to delete a role. A pop-up window prompts you to confirm that you want to delete the role.
- Click OK to delete the role.
- Click Cancel to not delete the role.
Manage Users
The Manage Users page allows you to create, edit, and delete users. You can assign various roles to each user, which includes permissions to various components of ASCENDER. Each user can be assigned one or more roles, pay frequencies, campuses, and warehouses.
After creating users and performing other functions, you must exit any applications to which you are logged on to refresh the security permissions.
Create, edit, and delete users:
Security Administration > Create and Edit Users
This page is used to create new users or edit existing users. You can establish the roles and permissions associated with each user.
In addition, you can establish the components within ASCENDER that a user can access. After creating users and performing other functions, you must exit any applications to which you are logged on to refresh the security permissions.
All users are automatically granted permission to view all three ASCENDER homepage dashboard elements. However, the content within the dashboard element is driven by the user’s profile with the exception of ASCENDER News, which is available to all users.
- ASCENDER News - Displays important news or upcoming events. The ASCENDER News is managed by the Texas Computer Cooperative (TCC).
- Approval Summary - (Business users) Displays a list of pending approval items based on the user's profile.
- Online Registration - (Student users) Displays a list of online registration pending approval items based on the user's profile.
Create a user:
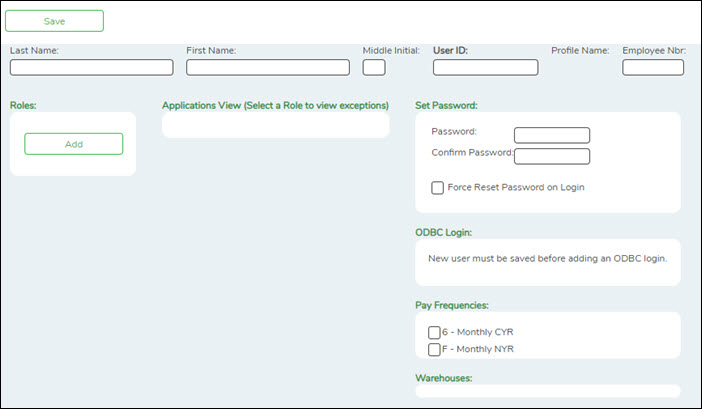
❏ From the Manage Users page, click New User.
The New User page is displayed.
| Field | Description |
|---|---|
| Last Name | Type the user's last name. The field can be a maximum of 30 characters. |
| First Name | Type the user's first name. The field can be a maximum of 30 characters. |
| Middle Initial | Type the first letter of the user's middle name. This field is optional and is only one character. |
| User ID | Type a user ID for the user. The field can be a maximum of 29 characters. The first character must be a letter. |
| Profile Name |
An automatically generated name assigned to the user that links the user ID to the user permissions is displayed.
|
| Employee Nbr |
Type the six-digit employee number that is assigned to this user in Personnel. The autosuggest displays employee numbers even if the employee does not have an employment info, pay, or job record.
|
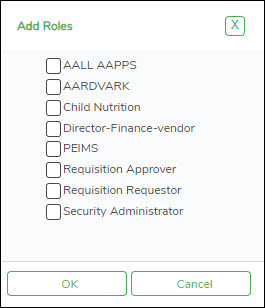
❏ Under Roles, click Add to add roles to the user's profile. The Add Roles pop-up window is displayed.
- Select the role(s) to be added to the user's profile.
- Click OK to add the selected roles.
- Click Cancel to close the pop-up window without adding roles.
❏ Under Applications View, a list of each application available to the user is displayed.
❏ Under Set Password, type a password for the new user. Typically, this is a temporary password that will be provided to the user, and you will have to select Force Reset Password on Login to require the user to set a new password after logging on with the temporary password.
| Password | Type the user password. The password must be 8-46 characters with at least three of the following: uppercase, lowercase, number, and special character. |
|---|---|
| Confirm Password | Retype the password you entered in the Password field. |
For Business users:
❏ Under Pay Frequencies, a list of available pay frequencies is displayed. Select the pay frequencies to be assigned to the user.
❏ Under Warehouses, a list of available warehouses is displayed. Select the warehouses to be assigned to the user.
❏ Click Save. The profile name is populated and the user profile is saved.
After the record is saved and the user profile is created, you can manage user permissions.
- Select a role under Roles to view the role components. The view is changed from Applications View to Manage Permissions. You can add or update permissions by application in the Manage Permissions view.
- Click Applications View to return to the Applications View.
❏ Under Manage Permissions (All Apps):
| Expand All | Click to display all available lower-level applications or components. |
|---|---|
| Collapse All | Click to display only the available upper-level applications or components. |
- Click + - to expand or collapse the available user permissions.
- Select the permissions to be added or removed from the user.
Notes: A component that is cleared is displayed in red. For example, if Maintenance is cleared, Maintenance is displayed in red.
If a component has a subcategory that is cleared, the upper-level title is displayed in italics. For example, if Utilities has many sublevels, one of which has been cleared, Utilities is displayed in italics denoting that not everything under Utilities is granted permission.
If read-only is selected, the component is displayed in brown. The component must be selected along with the read-only option.
Edit a user:
❏ From the Manage Users page, under Search Criteria, click Find to perform a search for all users. Or, to perform a search for a specific user, enter data in one or more of the search fields.
- Select Show Deleted Users to include deleted users in your search. Deleted users are highlighted in red.
- Click Find. A list of users matching your search criteria is displayed.
- Select the user to be edited.
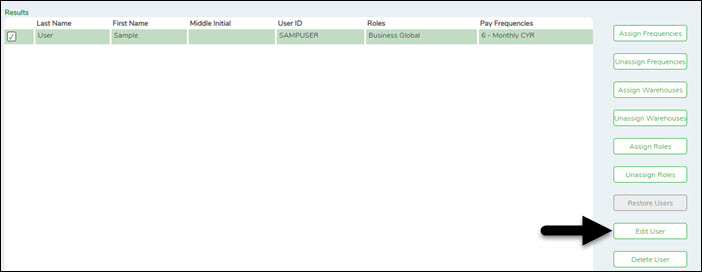
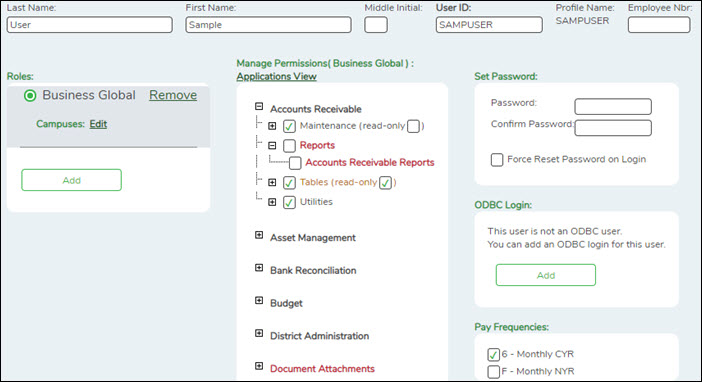
❏ Click Edit User to update the roles and responsibilities associated with the user. The Edit User page is displayed.
- You can make the necessary updates to the user's profile such as password, frequencies, warehouse, etc.
- In addition, you can select a role to view and manage exceptions/permissions to the roles and responsibilities associated with the user profile.
- Click + - to expand or collapse available permissions.
- Select/unselect the permissions to be added to the user.
Notes: A component that is cleared is displayed in red. For example, if Maintenance is cleared, Maintenance is displayed in red.
If a component (i.e., menu item) has a subcategory that is not selected, the upper-level title is displayed in italics. For example, if Utilities has sublevels, one of which has been cleared, then Utilities is displayed in italics denoting that not everything under Utilities is selected for permission.
If read-only is selected, the component is displayed in brown. The component must be selected along with the read-only option.
❏ Click Save.
Delete a user:
To completely delete a user from Security Administration, complete the following steps in the order in which they are listed:
❏ On the District Admin > Workflow page, delete the following:
- Alternative Approver: Click Clear Row.
- Approval Rules: Delete the rules for Purchasing.
- Approval Path: Delete the user from the Purchasing path.
- First Approver: Delete the user from being a first approver.
- District Admin > Maintenance > User Profiles - Delete the user.
❏ From the Manage Users page, under Search Criteria, click Find to perform a search for all users. Or, to perform a search for a specific user, enter data in one or more of the search fields.
- Select Show Deleted Users to include deleted users in your search. Deleted users are highlighted in red.
- Click Find. A list of users matching your search criteria is displayed.
- Select the user to be deleted.
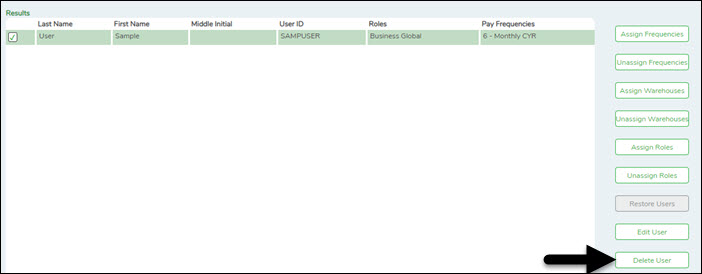
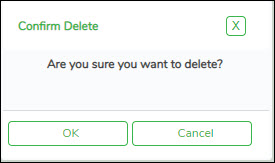
❏ Click Delete User to delete a user. A pop-up window prompts you to confirm that you want to delete the user.
- Click OK to delete the user.
- Click Cancel to not delete the user.
A message indicating that the user was deleted successfully is displayed at the bottom of the page.
Administrative users cannot be deleted. If an administrative user is selected, a message is displayed indicating that the administrative user's properties cannot be changed.
Manage the Audit Log
The Security Administration application allows you to search, view, and purge changes made in the Business or Student systems since the last audit log purge.
Audit Log Inquiry
Security Administration > Utilities > Audit Log Inquiry
This page is used to search and view the audit log for Business or Student records. The audit log contains changes made in the Business and Student systems since the last audit log purge. The settings for the audit log inquiry can be changed in the Audit Log Preferences section on the Set ASCENDER Preferences page in DBA Assistant. The settings allow you to designate the number of days the audit log records are saved before an automatic purge and allow you to specify the path for where the audit log reports are to be saved.
Note: Changes contained in the audit log are manual changes only. Changes made through a mass-update process are not available.
Search for changes:
❏ Under Search Criteria, under Application:
| Business | Select to only display Business audit log records. | OR | Student | Select to only display Student audit log records. |
|---|
❏ Use the following search fields to narrow your search:
| Field | Description |
|---|---|
| Module | Click to select the Business or Student tab for you want to include in the search. The tab only displays in the drop down if items changes were made to the tab. |
| Table | Click to select the table that you want to include in the search. |
| User | Click to select the user name that you want to include in the search. |
| Key |
Type the key (i.e., employee number, vendor number, social security number, etc.) for which you want to search. Note: Each table can only have one key field. In most cases, the key includes the employee number, the vendor number, or the student's social security number. |
| From | Type the beginning date from which you want to include records. Use the MMDDYYYY format. |
| To | Type the ending date to which you want to include records. Use the MMDDYYYY format. |
❏ Click Search to search the audit log. The search results are displayed under Results.
- The action for each change is displayed in the Action column.
- The old and new data is listed for each record, and for each field.
❏ Click Print to print the report. The Security Report is displayed. Review the report.
❏ Click Reset to clear the search criteria on the page.
Audit Log Purge
Security Administration > Utilities > Audit Log Purge
This page is used to purge Business or Student audit records for a selected date range, and to create, display, and print an Audit Log report.
Purge the audit log:
❏ Under Audit Log Purge by Date Criteria:
| Business | Select to only purge Business audit log records. | OR | Student | Select to only purge Student audit log records. |
|---|
❏ Use the following search fields to narrow your search:
| Field | Description |
|---|---|
| From | Type the beginning date for which you want to purge audit log records in the MMDDYYYY format. |
| To | Type the ending date to which you want to purge audit log records in the MMDDYYYY format. |
❏ Click Preview to print a report of the audit log items to be purged. Review the report.
❏ Click Execute to purge the audit log. A preview report is displayed with a message asking you to confirm that you want to purge the audit log for the selected dates.
❏ Click Purge to purge the log. A message is displayed at the top of the page that the records were deleted successfully. Otherwise, click Cancel to not purge the log and return to the Audit Log Purge page.
❏ Click Reset to clear the search criteria on the page.
Reports
The are multiple reports available in Security Administration to assist you in verifying user information such as roles, permissions, user names, and audit information. You can view and print the reports as needed.
The following reports are available from the Reports menu:
| Reports | Description |
|---|---|
| List of Users by Permissions | This report provides a list of permissions granted by user. For example, you can generate a report of users who are granted permission to Grade Reporting or Budget Options. |
| List of Tasks Associated With Roles | This report provides a list of tasks and the read-only status associated with each role. |
| List of Users With ODBC Login | This report provides a list of users that have an ODBC login. |
| List of Security Users and Roles | This report provides a list of users and their associated roles. |
| List of Security Users with Employee Numbers | This report provides a list of users and their associated employee numbers. |
| Audit Log | This report provides an audit log for a specified date range. The audit log contains all changes made in Business or Student since the last audit log purge. |
| Users Log | This report provides a user log that contains a list of all users logged on to the system at the time the report is run. |
Americans with Disabilities Act (ADA) and Web Accessibility
The Texas Computer Cooperative (TCC) is committed to making its websites accessible to all users. It is TCC policy to ensure that new and updated content complies with Web Content Accessibility Guidelines (WCAG) 2.0 Level AA. We welcome comments and suggestions to improve the accessibility of our websites. If the format of any material on our website interferes with your ability to access the information, use this form to leave a comment about the accessibility of our website.


