Sidebar
Add this page to your book
Remove this page from your book
This is an old revision of the document!
Course Request
ASCENDER StudentPortal > Course Request
ASCENDER StudentPortal Navigation Features
Navigation tools are located along the left side of the page, or in the top-right corner. Some tools function differently on mobile devices.
MOBILE DEVICE USERS: On a mobile device, tap  to access the side menu.
Selected Student
Your name and photo are displayed in the top-left corner. The photo is only displayed if provided by the district.
Course Requests Units Remaining
The number of units available for you for course requests is displayed.
Navigation
You can access your data if enabled by the district.
About Me - Your name and current, campus, grade level, and team are displayed. Verify that this information is correct.
Attendance - You can view your detailed attendance, as well as a calendar view and totals.
Grades - You can view your semester, cycle, and assignment grades. Click  to expand the grades menu.
Other Tools
 - Click to hide the left-side navigation bar. Click again to display the navigation bar.
 - Various sections throughout StudentPortal can be collapsed or expanded. Most data is expanded by default. Click
  to hide the section from view. Click
  to show the section.
Top-right
 - Click to view ASCENDER StudentPortal online Help.
 - Click to log out of ASCENDER StudentPortal.
Bottom-left
| Semester | Select the semester you want to view attendance for. |
|---|
Detailed View
Detailed View (All Attendance) is the default view.
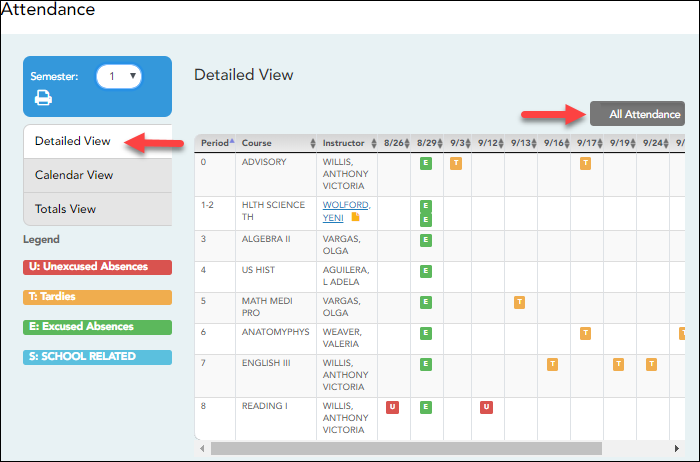
Your schedule is displayed. The date appears in the column heading only if you were marked absent or tardy for any period during that day.
If you were present and on time for the entire day, nothing appears for the date.
If you were not present for the entire class, a code appears for the period and date. A description of each code is displayed in the Legend.
All Attendance/Detailed Toggle
All Attendance:
The All Attendance view is selected by default, which displays the four main absence types:
- Unexcused Absence (U)
- Tardy (T)
- Excused Absence (E)
- School Related (S)
Detailed:
❏ Click or tap All Attendance to toggle to the Detailed view where you can see more specific information for an absence.
All applicable codes are listed in the Legend.
The codes are color coded according to the main absence types (Unexcused, Tardy, Excused, and School Related).
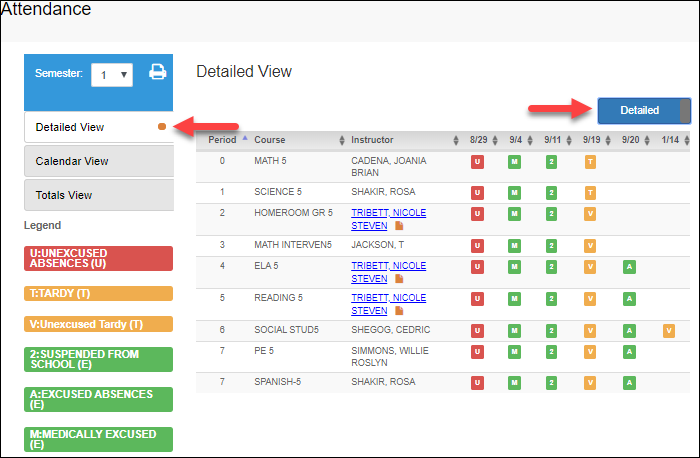
❏ Click or tap Detailed to return to All Attendance view.
MOBILE DEVICE USERS: On a mobile device, if you have numerous absences, you may need to tap a row to open the Details view in order to see all absences for a particular class.
Calendar View
❏ Click or tap Calendar View.
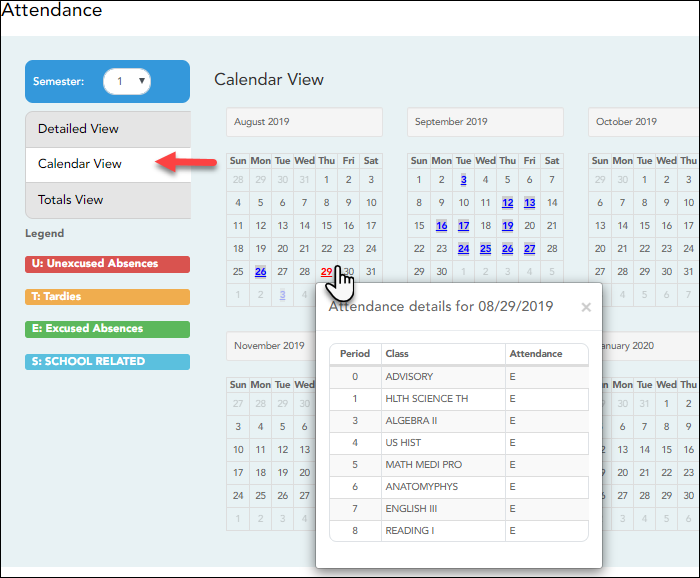
All months for the selected semester are displayed.
If the student was not present for the entire class for any period of the day, the date is shaded. Click the date to view the attendance details for each period. The period is only listed if your student was marked absent or tardy for that period.
Totals View
❏ Click or tap Totals View.
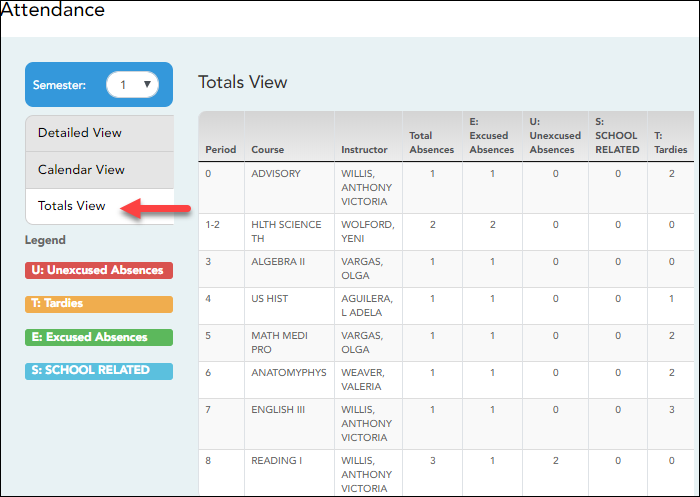
Your classes are listed by period, and the total number of excused absences, unexcused absences, school-related absences (e.g., UIL events or field trips), and tardies for the selected semester are listed.
The Total Absences column displays semester totals for all absence types, excluding tardies.
| Instructor | If the teacher has provided an email address, the teacher's name is displayed as a link to that email address. |
|---|
MOBILE DEVICE USERS: Tap a row to view semester totals for the class.
A message from your campus is automatically displayed in the Campus Message window when you log on. Click Close once you have read the message.
Units Remaining:
To begin selecting courses, you must have the appropriate number of Units Remaining available. The Units Remaining field is located in the left-side navigation bar.
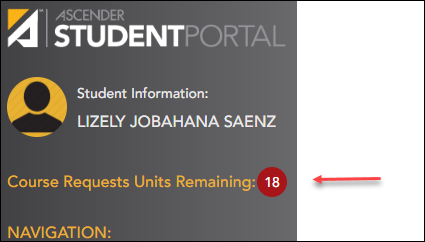
Units Remaining is the number of units available for you to select from the Available Courses section.
- Most courses are worth two units because the course is two semesters long. The units depend on your campus and the number of semesters required for the course.
- The number of units required for each course is displayed in the Units column of the Available Courses section.
- Once Units Remaining is zero, a warning message is displayed notifying you that you will not be able to select additional courses unless you remove a previously selected course from the Requested Courses section.
- Units Remaining will decrease as you add courses.
- Units Remaining will increase as you remove courses.
Select courses:
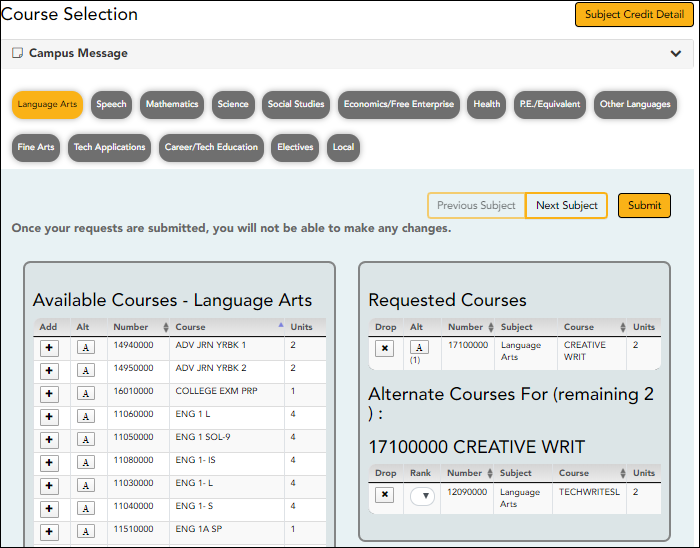
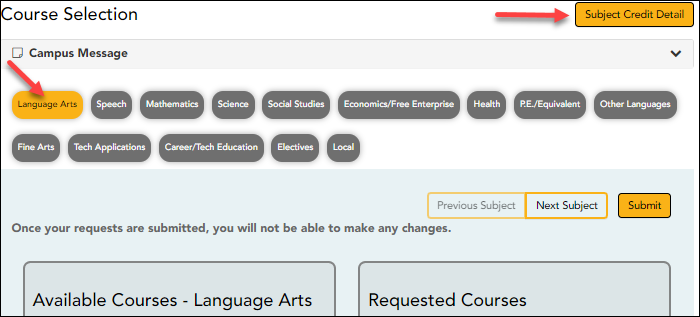
Subjects are listed across the top of the page.

❏ Click the subject area you want to view.
When you click a subject area, the list of courses under the Available Courses section will change to correspond with the subject selected. For example, when you click Science, all courses in the Available Courses section will change to science classes available at your campus.
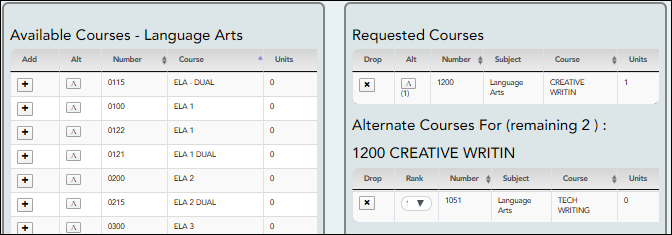
You can click the Number or Course column heading to sort the columns in ascending order by course number and course name.
Left grid:
❏ Under Available Courses, click  to add a course.
• The course is moved to the Requested Courses list (right grid) and is no longer displayed under Available Courses.
• The Units Remaining field decreases by the appropriate number of units.
Right grid:
❏ To remove a course from the Requested Courses list, click  in the Drop column.
• The course moves back to the Available Courses list (left grid) and is no longer displayed under Requested
Courses.
• Units Remaining increases by the appropriate number of units.
NOTE: If a course is displayed in the Requested Courses list and you do not have the ability to remove it, it was added by your campus, and you will need to meet with a counselor to discuss it.
Select alternate courses:
- From the Available Courses list, click
 to add an alternate course.
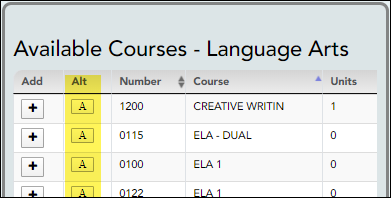
A pop-up window opens allowing you to select the course for which you want to add this alternate course.
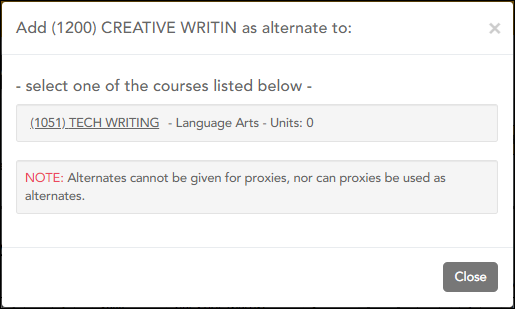
The window lists your requested courses. Click a course to select it.
In the example above, if the YRBK 1 course is not available, the CREATIVE WRIT course will be substituted.
When you click the course, the window closes, and the selected alternate course is displayed in the Alternate Courses For list and is no longer displayed in the Available Courses list.
NOTE:- Only courses with an assigned course number are available.
- Only three alternate courses may be selected per course.
- A proxy course (i.e., a group of courses that are scheduled together) cannot be added as an alternate.
Under Requested Courses, the Alt column displays in parentheses the number of alternate courses added for the course.
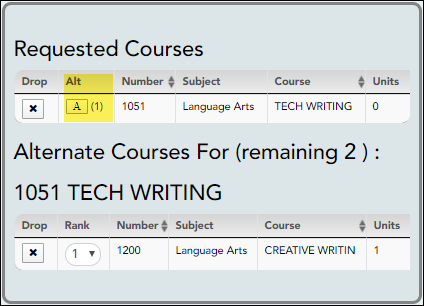
❏ Click  to view the alternate courses.
The alternate courses are displayed in the Alternate Courses For list.
❏ To remove an alternate course from the Alternate Courses For list, click  in the Drop column next to the appropriate course.
- The course is displayed in the Available Courses list and is no longer displayed in the Alternate Courses For list.
- If a course is displayed in the Alternate Courses For list and you do not have the ability to remove it, it was added by your campus, and you will need to meet with a counselor to discuss it.
❏ Under Alternate Courses For in the Rank field, you can rank the order in which you want the alternate courses to be applied to your course requests.
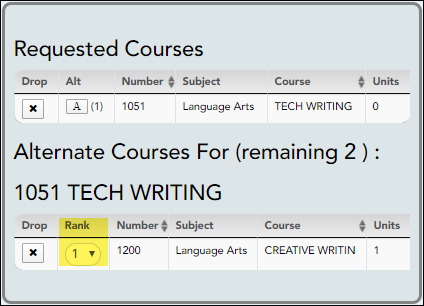
For example, if a course is not available, the alternate course with a rank of 1 will be the first alternate course attempted to replace it. If that course cannot be applied, the course with a rank of 2 will be attempted, and so on.
NOTE: If the counselor has specified the rank order, it cannot be changed.
Submit course requests:
❏ Before submitting your course requests, confirm each of the following:
❏ All information on the About Me page is correct.
❏ You are satisfied with your selections.
No changes can be made once you click Submit.
❏ Units Remaining is equal to zero.
❏ Click Submit to submit your list.
A message is displayed confirming your choice to submit your request.
- Click Continue to view the Confirmation page.
- Or, click Cancel to continue adding or removing courses.
Americans with Disabilities Act (ADA) and Web Accessibility
The Texas Computer Cooperative (TCC) is committed to making its websites accessible to all users. It is TCC policy to ensure that new and updated content complies with Web Content Accessibility Guidelines (WCAG) 2.0 Level AA. We welcome comments and suggestions to improve the accessibility of our websites. If the format of any material on our website interferes with your ability to access the information, use this form to leave a comment about the accessibility of our website.

