Sidebar
Table of Contents
academy:admin_forms_create_dyn
Book Creator
Add this page to your book
Add this page to your book
Book Creator
Remove this page from your book
Remove this page from your book
This is an old revision of the document!
Dynamic forms are built using the fields from Forms Field Management.
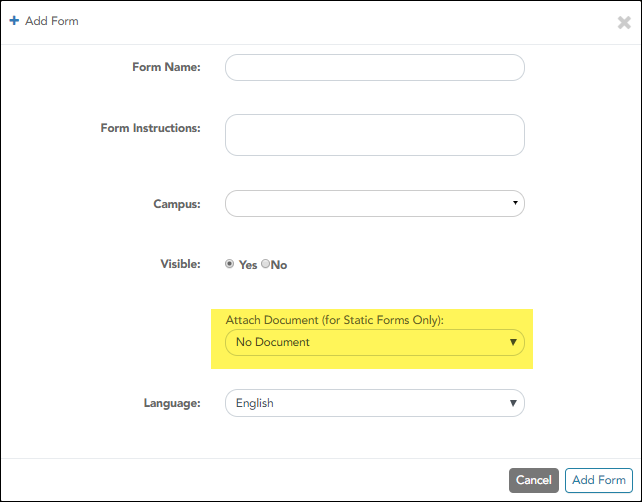
❏ Click Add Form.
IMPORTANT: For a dynamic form, leave the drop-down field set to No Document.
❏ Click Add Form.
The form is added to the Active Forms list on the left side of the page, under Dynamic Forms.
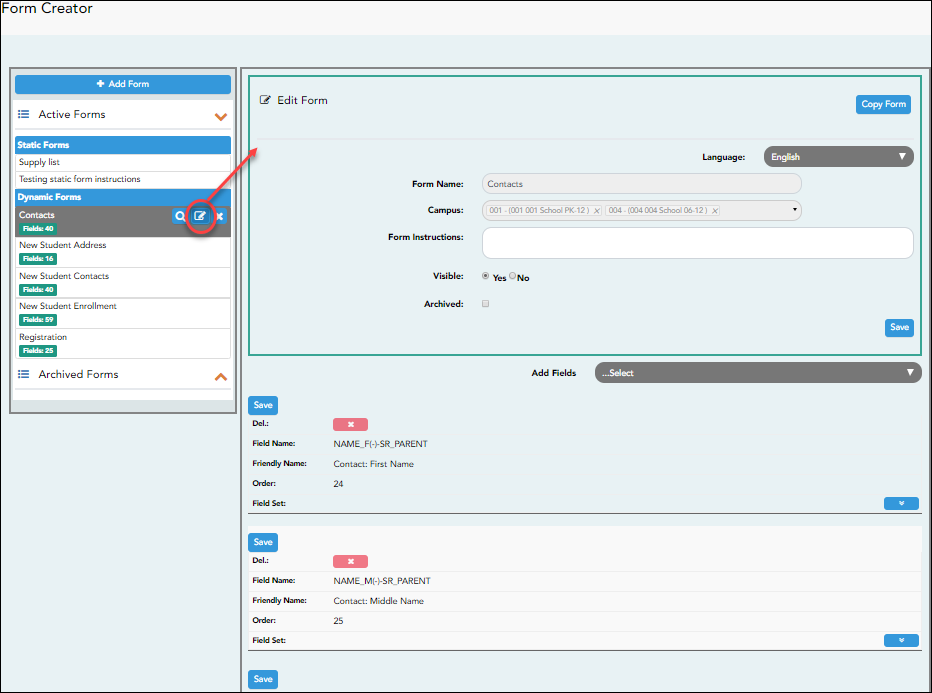
❏ Under Active Forms:
 - Hover over the new or existing dynamic form and click the edit icon.
The form details open in the Edit Form section (right side) where you can add or edit details:

❏ Click Save.
❏ Select the fields to include on the form from the drop-down list:
NOTE: You must save changes for each field individually.
| Field name | The selected FIELD-NAME(-)-TABLE-NAME is displayed. |
|---|---|
| Friendly Name | The English default friendly name is displayed. Modify the name as needed. |
| Order | A default order number is assigned. (Optional) Indicate the order in which you want the fields to be displayed on the form. For example, type 1 if you want to field to be displayed at the top of the form. |
| Field Set | Use this column to group related fields together in the form. For example, you could type 'Mailing Address' for all fields that are related to the student's mailing address. The fields that you want to physically group together should also be together as indicated by the Order field. The fields with the same Field Set are grouped together in a box, but only if they are adjacent in the order. The box is drawn around one or more sequential fields that have a Field Set specified. Field Set does not apply to New Student Enrollment Forms. |
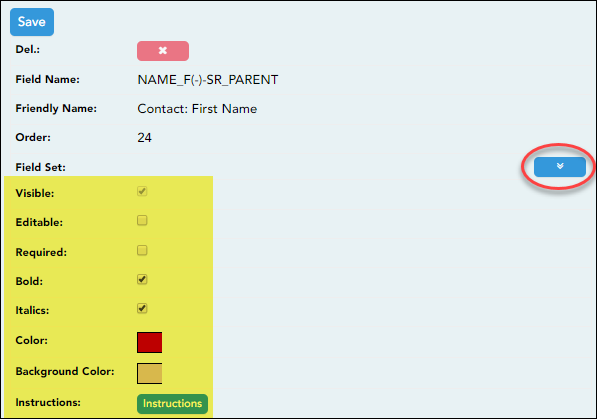
 - Click to view additional fields.

| Visible | Select if you want the field to be visible to parents on the form. Clear the check box if you do not want the field visible to parents. For example, you can hide the four-digit zip code extension. The setting of this field overrides all other visibility settings. |
|---|---|
| Editable | Select to allow parents to update data in this field from the form.
• If selected, the form field will be editable, but only if the field is also set to Updateable=true on Form Field Management. This setting does not apply to New Student forms. |
| Required | Select if the field is required of the parents. If this field is selected, be sure Edit is also selected. |
| Bold | Select if you want the field to be displayed in a bold font. |
| Italics | Select if you want the field to be displayed in an italic font. |
| Color | Click the box to select a color for the field text, if you prefer a color other than black. A pop-up window opens that provides seven color choices, as well as the option for no color (i.e., black). Click a color to select it, and the window closes. |
| Background Color | Click the box to select a background color for the field. A pop-up window opens that provides seven background color choices, as well as the option for no color. Click a color to select it, and the window closes. The form is automatically shaded with an alternating (light/dark) gray background when displayed for parents in ParentPortal. If you do not select a color, or if you select No Color, the background will be gray. |
| Instructions | |
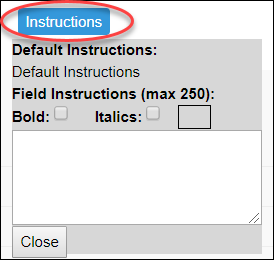
Click the button to view any existing default instructions and add additional instructions for the field. A pop-up window opens. |
|
| Default Instructions | Any instructions entered above are displayed. They cannot be changed here. |
| Field Instructions | Add or update any additional instructions for the field. These instructions will be appended to the Default Instructions when the parent accesses the form in ParentPortal. |
| Bold | Select if you want the instructions to be displayed in a bold font. This selection will apply to all text typed in the Field Instructions area. |
| Italics | Select if you want the instructions to be displayed in an italic font. This selection will apply to all text typed in the Field Instructions area. |
| Color | Click the box if you want the instructions to be displayed in a color. A pop-up window opens that provides seven color choices, as well as the option for no color (i.e., black). Click a color to select it, or click No Color, and the window closes. This selection will apply to all text typed in the Field Instructions area. |
❏ Click Close.
 - Click the corresponding delete icon to remove a column from the form.
It is removed from the list, but it is not actually deleted until you click Save.
❏ Click Save.
NOTE: If you created a form with fields from a vertical table, some required additional fields may be added automatically. If so, a message is displayed prompting you to review the fields before saving.
Note the added fields. These fields cannot be removed; the delete icon  is not displayed.
❏ Click Save.
academy/admin_forms_create_dyn.1643139401.txt.gz · Last modified: 2022/01/25 14:36 (external edit)
Except where otherwise noted, content on this wiki is licensed under the following license: CC Attribution-Share Alike 4.0 International
Americans with Disabilities Act (ADA) and Web Accessibility
The Texas Computer Cooperative (TCC) is committed to making its websites accessible to all users. It is TCC policy to ensure that new and updated content complies with Web Content Accessibility Guidelines (WCAG) 2.0 Level AA. We welcome comments and suggestions to improve the accessibility of our websites. If the format of any material on our website interferes with your ability to access the information, use this form to leave a comment about the accessibility of our website.


