User Tools
Sidebar
Add this page to your book
Remove this page from your book
ASCENDER - Budget Process
Created: 03/09/2018
Reviewed: 02/12/2025
Revised: 03/17/2025
The purpose of this document is to guide users through the Budget processing steps.
Review the following reminders:
- According to TEA Legal Requirements, the budget must be prepared by June 19 for LEAs with a June 30 fiscal year-end and by August 20 for LEAs with an August 31 fiscal year-end.
- The ASCENDER Version displayed on the images may not reflect the current ASCENDER Release Version.
- The Budget and Finance applications are separate applications and do not share data; therefore, updates made in Budget do not affect data in Finance.
- Perform periodic exports (backups) as the budget is processed throughout the spring and summer. It is important to perform an export prior to making a significant change. This allows you to revert data to a certain point in the process, if necessary. An export (backup) is performed on the Budget > Utilities > Export by File ID.
- Verify budget data before approving the budget to meet financial compliance requirements (i.e., PEIMS, Special Program allotments, NCLB and IDEA-B Maintenance of Effort, etc.) and ensure a high FIRST rating.
This guide assumes you are familiar with the basic features of the ASCENDER Business system and have reviewed the ASCENDER Business Overview guide.
Some of the images and/or examples provided in this document are for informational purposes only and may not completely represent your LEA’s process.
Before You Begin
Review the following information and/or complete the tasks listed before you begin the Budget Process steps.
The following terms are used throughout the Budget processing steps.
| Term | Description |
|---|---|
| Export | A backup file of data as it stands at the time it is exported from the system. Export or backup files can later be used to restore data to its original state at the time of extraction. |
| File ID C | Current file ID in Finance. |
| File ID N | Next or new year file ID in Budget. |
| LEA (Local Education Agency) | Refers to the educational entity (e.g., charter, district, etc.). |
Review the following PEIMS Edit rules to alleviate budget data warning errors.
- Need a line for 5829 - Matching State Funds for 5829 for 410 and for 101, 240 or 701.
- At least one record with an amount >$0 that is coded to function 13 - instructional staff development.
- At least one record with an amount >$0 that is coded to function 12, object 6100-6600 - instructional resources and media services.
- At least one record with an amount >$0 that is coded to function 31-33, object 6100-6600 - guidance, counseling, evaluation services or social work services or health services.
- At least one record with object code 6212 - audit services.
- If function code is 41, then org code should be 701-703, 720, 750 or 751.
- If org code is 701-750, then function code should be 41, 53 or 99.
- (This does not apply to nonprofit charter schools.) At least one account code with object code 6491 - Statutorily Required Public Notices.
❏ Create budget folders on your desktop to save any budget exports (backups).
❏ Create backups using the Budget > Utilities > Export by File ID page.
Budget Process
- Update tables.
Update tables
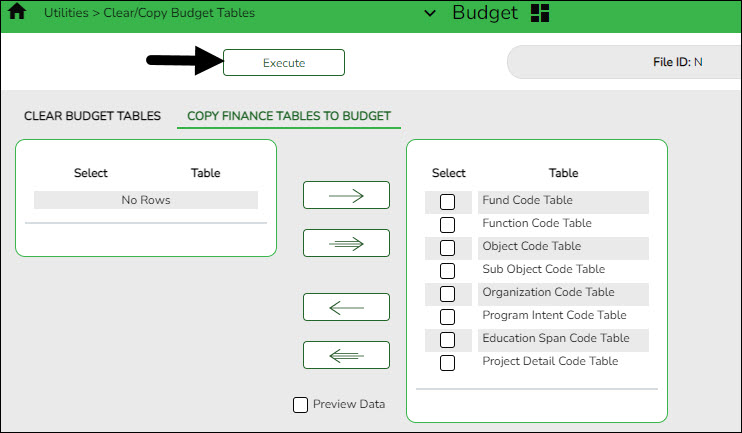
Budget > Utilities > Clear/Copy Budget Tables > Copy Finance Tables to Budget
Update the budget account code tables in the next year file ID (file ID N).
❏ Click
 to move all code tables from the left side to the right side of the page.
Optional: Select Preview Data to view a preview of each Finance table before it is copied to Budget.
❏ If Preview Data is selected:
- Click Execute to begin the process of copying the Finance tables to Budget. The selected Finance table reports are displayed.
- Review the reports and click Process on each report to copy the Finance table data to Budget and continue to the next report. Or, click Cancel on the report if you do not want to copy the selected table.
- When the process is complete, a message is displayed either indicating that all tables were copied successfully or that selected tables have not been copied. Click OK.
❏ If Preview Data is not selected:- Click Execute to copy the Finance tables to Budget. A message is displayed indicating that the selected tables have been copied successfully. Click OK.
If this step is not processed, account codes that exist in the Finance file ID but do not exist in the Budget file ID are not updated.Note: This step adds the fund/fiscal year for the new school year.
- Update Budget data.
Update Budget data
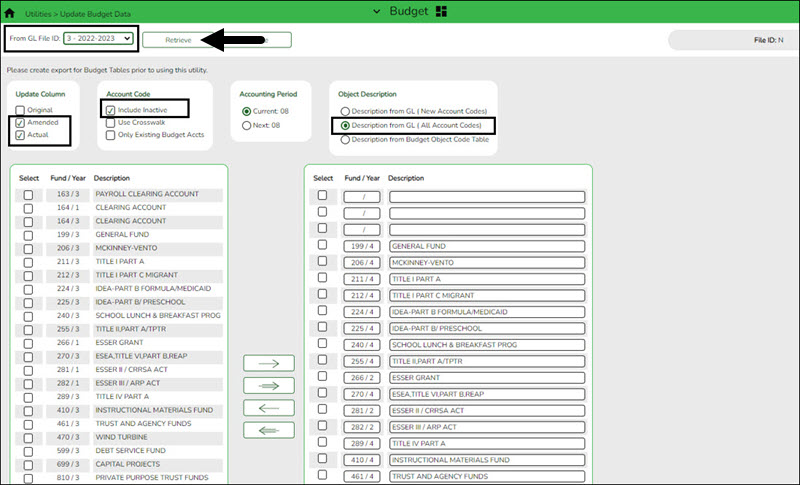
Budget > Utilities > Update Budget Data
IMPORTANT: Be sure to create an export for Budget tables prior to using this utility.
Update the Budget Amended and Actual columns from file ID 4 in Finance or the last completed fiscal year.
Note: For history comparison purposes, it is very important to make sure that all entries for the last school year are updated before preparing this year's new budget file. Entries might include final check runs, journal vouchers, and audit entries that need to be included in the Actual column, and any amendments to last year's budget that need to be included in the appropriate budget column. Processing the Update Budget Data utility at this time ensures that all entries are included in the updated amounts.
❏ In the From GL File ID, select the prior year file ID (file ID 4) and click Retrieve.
❏ Under Update Column, select Amended and Actual to be updated in Budget for the selected fund/year codes.
Amended Select if you have posted entries in Journal Budget or Amended Budget to Estimated Revenue or Appropriations and did not select Original Budget Only in the Move Budget to Finance utility.
Actual Select if you have posted entries that have increased or decreased Realized Revenue, Encumbrance, or Expenditures in Finance.
(Optional step - Depends on individual situations.) It is recommended that Include Inactive is selected under Account Code.
Select one of the following Account Code options:
Include Inactive Select to include inactive account codes and amounts in the list of available account codes to be transferred.
If selected, inactive accounts and amounts in the prior file ID are copied.
If not selected, inactive accounts and amounts in the prior file ID are not copied.Use Crosswalk Select to crosswalk any account code elements for the selected fund/years that exist in the Mask Crosswalk utility. See Mask Crosswalk (Mass Change Account Codes). Only Existing Budget Accts Select to include existing account codes and amounts in the list of available account codes to be transferred. ❏ Under Accounting Period, select the following:
Current The accounting period is set to Current by default, which uses the current accounting period amounts from Finance to populate Budget amounts. ❏ Under Object Description, select Description from GL (all account codes). This description is retrieved from the Chart of Accounts.
❏ All available fund/year codes from Finance are displayed on the left side of the page. Select the available fund/year codes to move to the right side of the page for the budget account code tables, general ledger accounts.
❏ Use the arrow buttons to move the appropriate funds from the left side to the right side of the page.
- (Optional) Compare Budget and Finance account code amounts.
(Optional) Compare Budget and Finance account code amounts
The following inquiries are recommended to verify account code amounts:
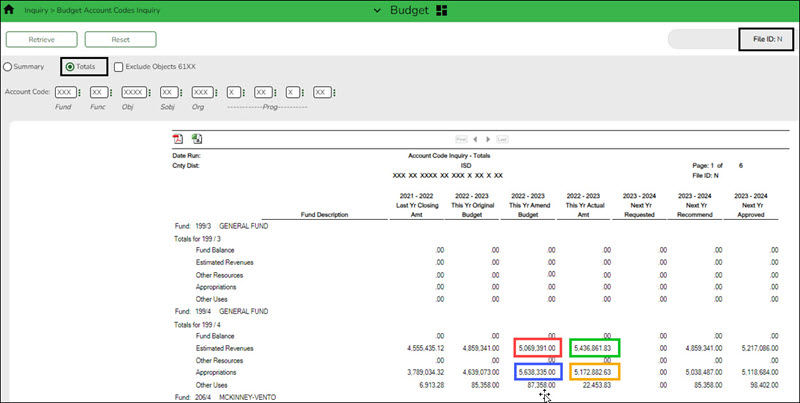
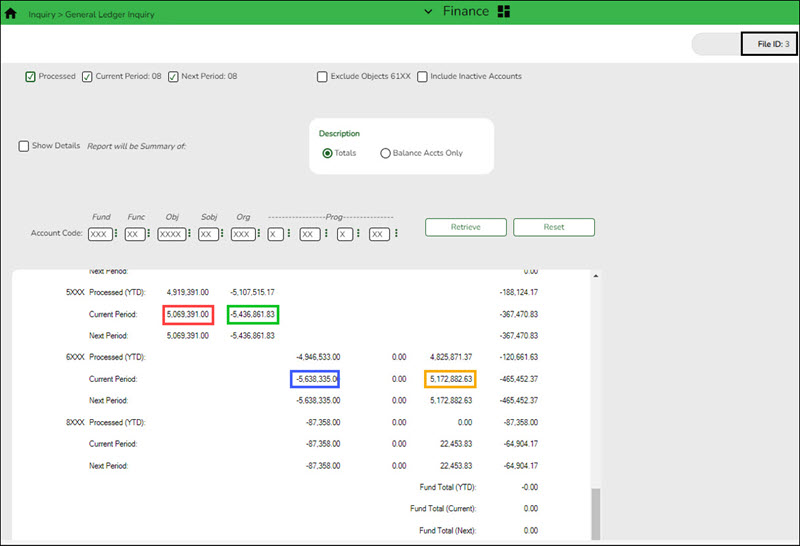
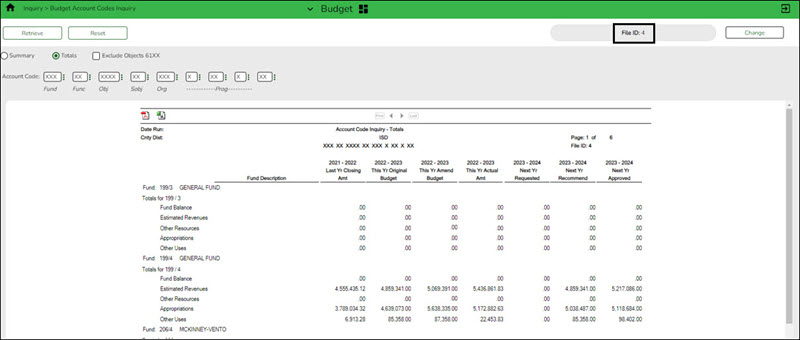
- Budget > Inquiry > Budget Account Codes Inquiry – Select Totals for all funds.
- Finance > Inquiry > General Ledger Inquiry – (Finance file ID 4) Clear the Show Details option for all funds.
Compare fund totals from Budget file ID N to Finance file ID 4 to confirm that the Amended and Actual columns match. Use the colored outlines (i.e., red, blue, green, and yellow) to guide your comparison of the amounts.
Note: If the amounts do not match, contact your regional ESC consultant for assistance.
The following reports can also be generated if needed:
- Export file ID N.
Export file ID N
Budget > Utilities > Export by File ID
This step should be completed prior to continuing the process.
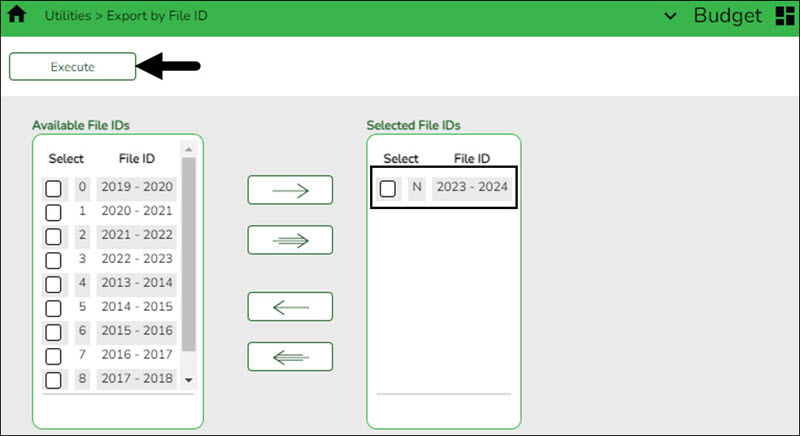
Create an export of file ID N.
This page is used to copy the selected file IDs to a user-designated archive file.
- If the file ID is N (next year), the export includes the budget tables as well as next year requisition and workflow tables.
- If the file ID is anything other than N, the export only includes budget tables.
Export file IDs:
❏ Use the arrow buttons to move the appropriate file ID from the left side to the right side of the page.
❏ Click Execute to execute the process. You are prompted to create a backup.
- (If necessary) Delete file IDs.
(If necessary) Delete file IDs
Budget > Utilities > Delete by File ID
Log on to file ID N when performing this step.
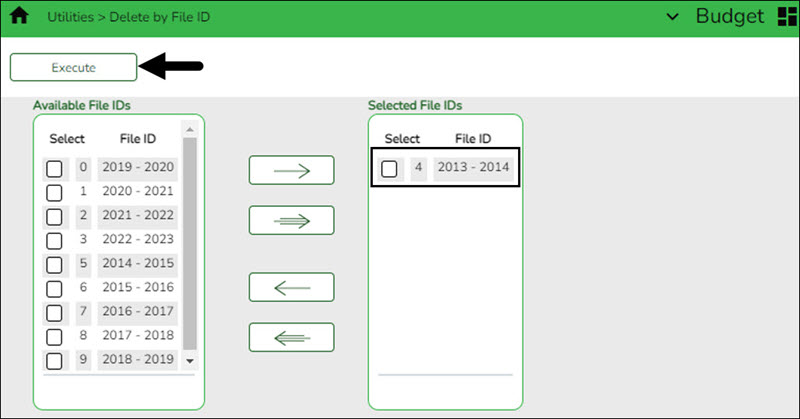
Delete the existing file ID that conflicts with the file ID to be moved.
For example, delete file ID 5 2014-2015 to allow the 2024-2025 fiscal year to be stored in file ID 5.❏ Click
 to move the appropriate file ID from the left side to the right side of the page.
❏ Click Execute to execute the process. A message is displayed indicating that you are about to delete budget tables.
- Click Yes to continue the process.
- Click No to cancel the process.
A message is displayed indicating that the process was completed successfully. Click OK.
- Copy the current year budget.
Copy the current year budget
Budget > Utilities > Copy Current to New File ID
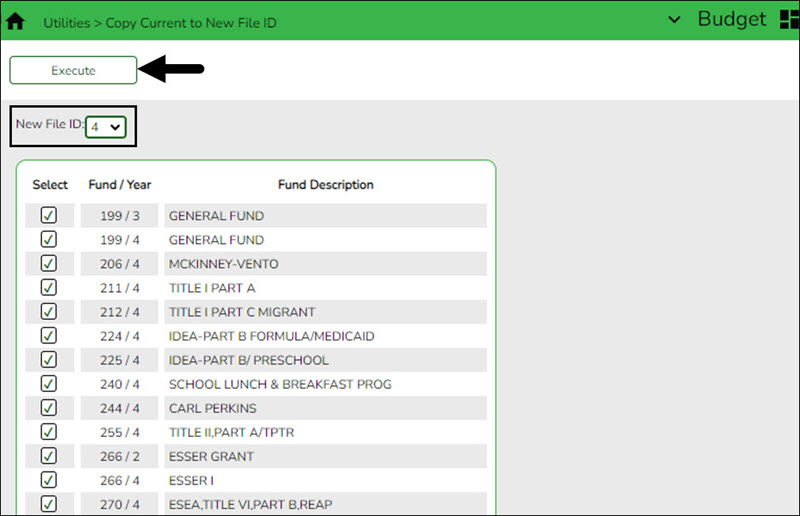
Copy the current year data to another file ID (2024-2025 to file ID 5) for historical purposes.
New File ID Select All Click to select the check boxes for all funds. ❏ Click Execute to copy the selected funds to the new file ID. A message is displayed indicating that you are about to copy data from the current file ID to a new file ID and prompts you to continue.
❏ Click Yes. A message is displayed indicating that the process was successfully completed. Click OK.
❏ Log on to Budget file ID 5 and perform an inquiry to verify that all fund data was copied.
After verifying the fund data, log on to file ID N before continuing with the Budget process.
- Update Budget options.
Update Budget options
Verify that you are logged on to file ID N when performing this step.
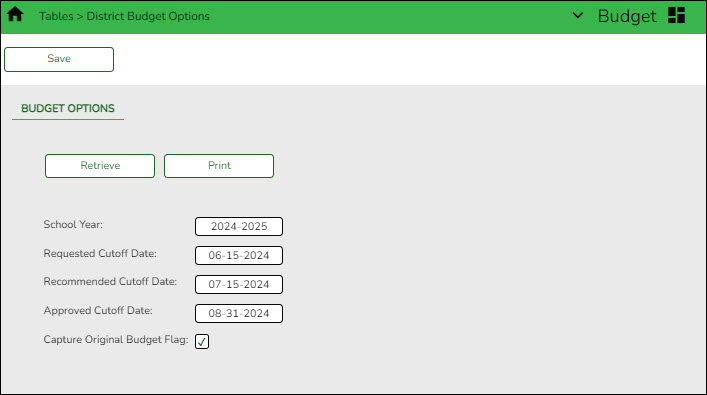
Budget > Tables > District Budget Options
Set up the necessary parameters associated with preparing next year's budget.
Note: 61XX accounts and amounts are not displayed in the Requested column.
The cutoff date fields are optional and may vary depending on the LEA's operations.Set up budget options:
School Year Type the starting year and ending year. The field is only for informational purposes and is displayed on some reports. Requested Cutoff Date Type the date that the budget requests must be submitted in the MM-DD-YYYY format. When this date is less than the current date, those using the Requested column will no longer be able to make changes to accounts or amounts. Recommended Cutoff Date Type the date that the district recommendations for the new budget must be submitted to the board for review in the MM-DD-YYYY format. When this date is less than the current date, those using the Recommended column will no longer be able to make changes to accounts or amounts. Approved Cutoff Date Type the date that the board approval of the budget is required in the MM-DD-YYYY format. When this date is less than the current date, those using the Approved column will no longer be able to make changes to accounts or amounts. Capture Original Budget Flag Select the field to update the original budget amount and the appropriations/estimated revenue amount.
The Capture Original Budget Flag field works in conjunction with the Move Budget to Finance utility. The Full Amount or the Difference options on the Move Budget to Finance utility determine if this field is selected.
If Capture Original Budget Flag is selected, only the original budget is moved. If Capture Original Budget Flag is not selected, transactions entered will update the appropriations/estimated revenue amount only.❏ Click Save.
❏ Use one of the following options to verify the changes:
- Verify that the 2025-2026 column headings are accurate by using the Budget > Inquiry > Budget Account Codes Inquiry and clicking Retrieve.
- Verify that the 2025-2026 fiscal year corresponds to file ID N in the upper-right corner of the page.
TIP: Before continuing to step 8, it is recommended that you run and print the Budget Account Codes Inquiry as it will be needed for verification purposes in step 9.
- Reinitialize the budget.
Reinitialize the budget
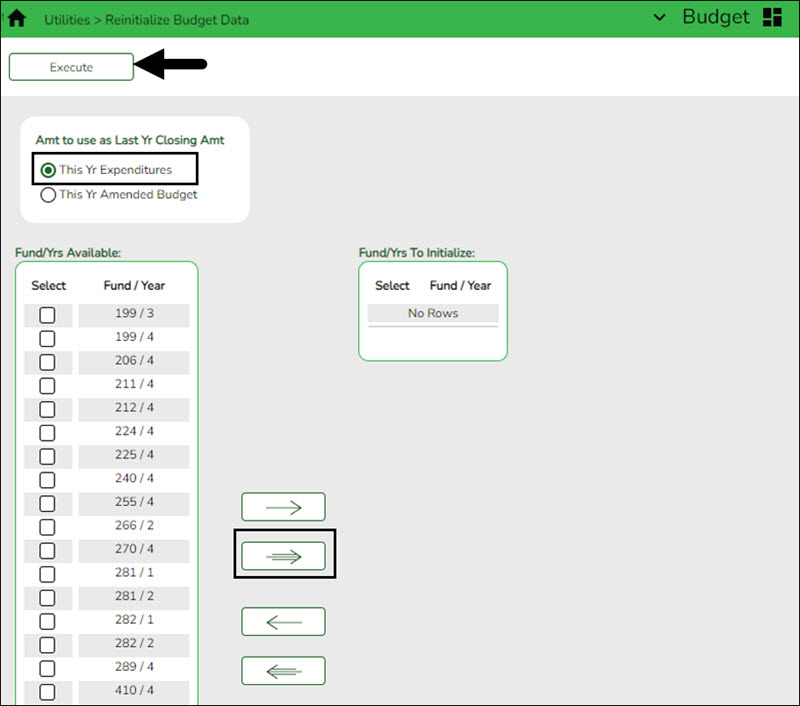
Budget > Utilities > Reinitialize Budget Data
CAUTION: This step should only be performed one time, and you must run the prompted export.
Due to the effects this process has on the Budget file, it is imperative that you back up the Budget file before starting the reinitialization process.
This page is used to prepare the Budget file for the next school year. This process is run when the final budget for the prior school year has been adopted and posted to the general ledger. Amounts are maintained in order to create a budget history in the Budget master file. When reinitializing budget data, you can specify the funds you wish to shift, or you can select all funds. The following changes are made:
- The value in the This Yr Amend Budget or the This Year Actual Amt field is moved to the Last Yr Closing Amt field replacing the value from the previous year.
- The value in the Next Yr Approved field is moved to the This Yr Original Budget field replacing the value from the current year.
- The values for the following fields are set to zero:
- This Yr Amend Budget
- This Yr Actual Amt
- Next Yr Requested
- Next Yr Recommend
- Next Yr Approved
Reinitialize the budget data:
❏ Under Amt to use as Last Yr Closing Amt, select one of the following:
- This Yr Expenditures - Recommended option.
- This Yr Amended Budget - Select this option to update the column with amended budget data.
❏ Use the arrow buttons to move the fund/years to be reinitialized from the left side to the right side of the page.
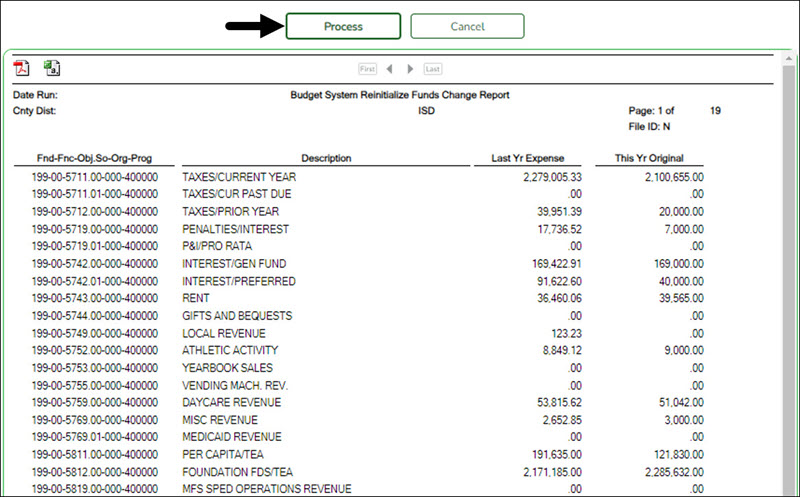
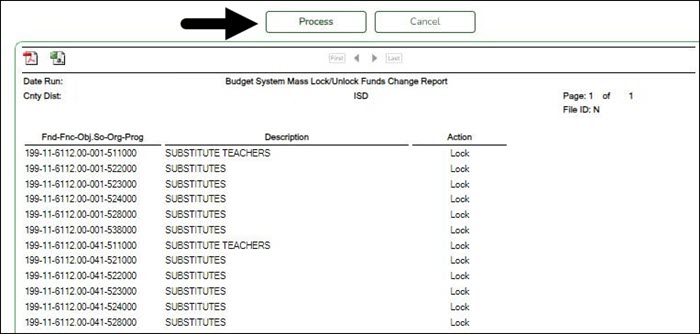
❏ Click Execute to execute the process. The Budget System Reinitialize Funds Change report is displayed. Review the report.
❏ Click Process to process the changes. You are prompted to create a backup. Otherwise, click Cancel to cancel the process.
- Verify the budget reinitialization results.
Verify the budget reinitialization results
Budget > Inquiry > Budget Account Codes Inquiry
Verify the results.
❏ Select Summary.
❏ Type the Account Code components.
❏ Click Retrieve. The Account Code Inquiry - Summary report is displayed.
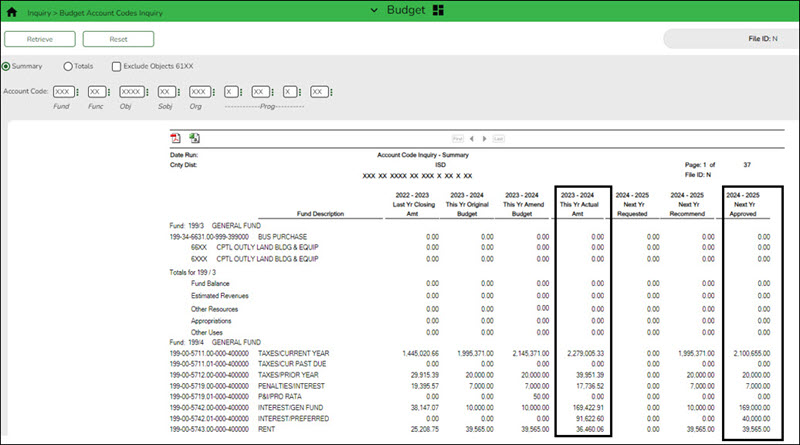
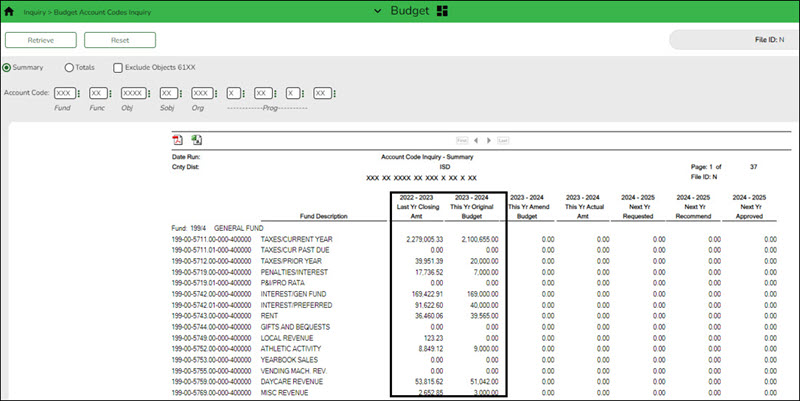
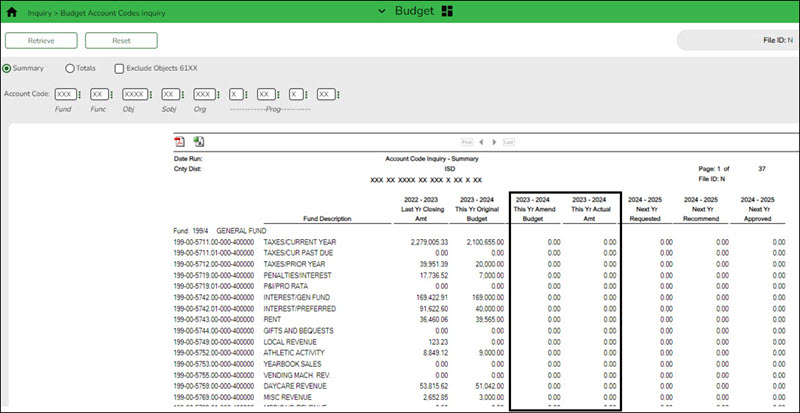
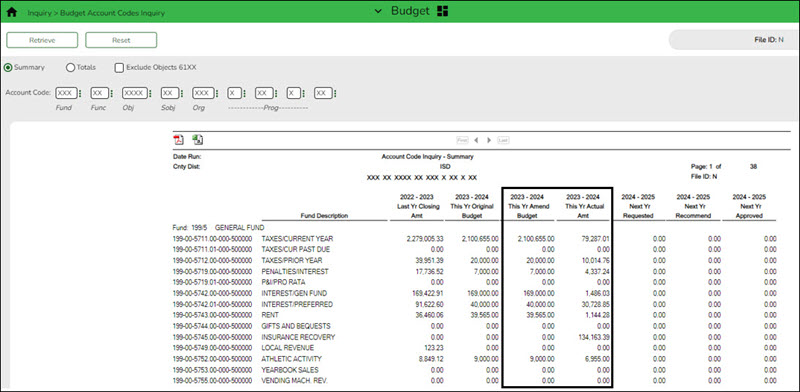
❏ Verify that the amount in the This Yr Actual Amt column (before reinitialization) is moved to the Last Yr Closing Amt column (after reinitialization).
❏ Verify that the amount in the Next Yr Approved column (before reinitialization) is moved to the This Yr Original Budget column (after reinitialization).
- Update the fiscal year.
Update the fiscal year
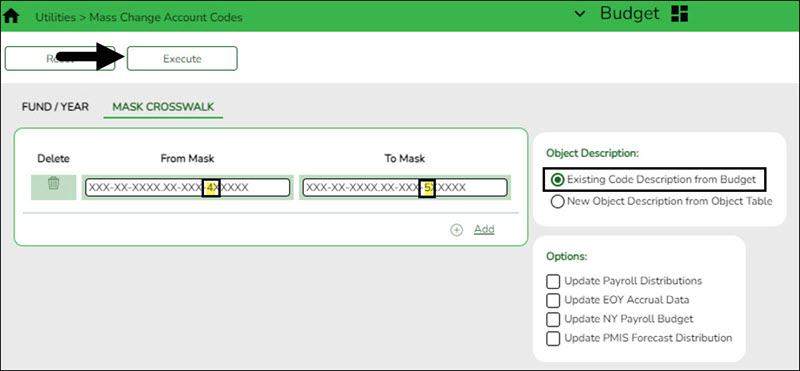
Budget > Utilities > Mass Change Account Codes > Mask Crosswalk
Update the account code fiscal years to the new fiscal year (e.g., update fiscal year 5 to 6).
❏ Complete the From Mask and To Mask fields.
From Mask Type the from fiscal year code you want to crosswalk. To Mask Type the to fiscal year code you want to crosswalk. ❏ Under Object Description, select Existing Code Description from Budget to retrieve the existing code element description from the current budget.
❏ Do not select any Options.
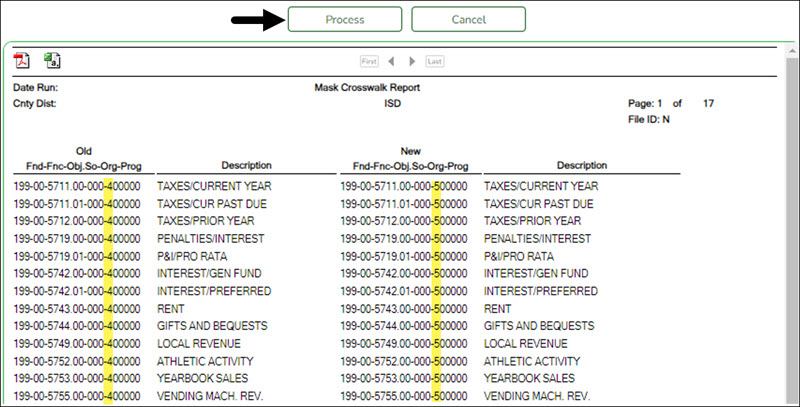
❏ Click Execute to execute the process. Review the report.
❏ Click Process to process the changes. You are prompted to create a backup. Otherwise, click Cancel to cancel processing.
- Manage user profiles
Manage user profiles
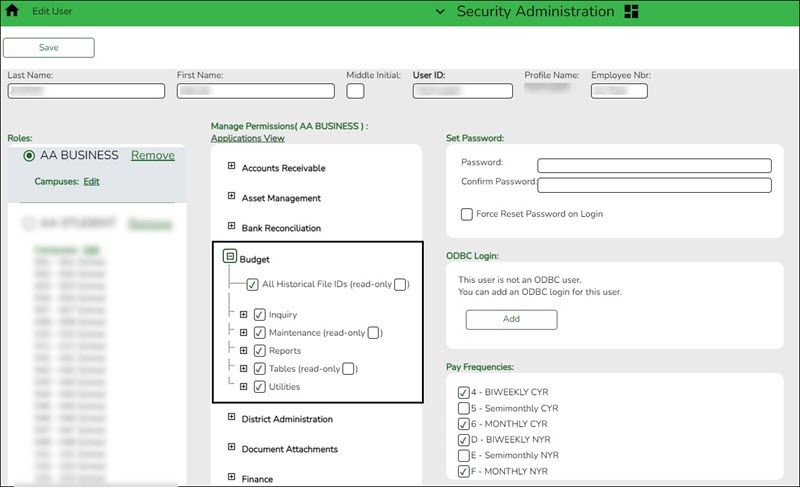
Ensure that the user profiles are correctly set up for Budget use in Security Administration and District Administration.
❏ Create and manage users on the Security Administration > Manage Users > Create/Edit User page.
❏ Set up user profiles on the District Administration > Maintenance > User Profiles > Accounts tab.
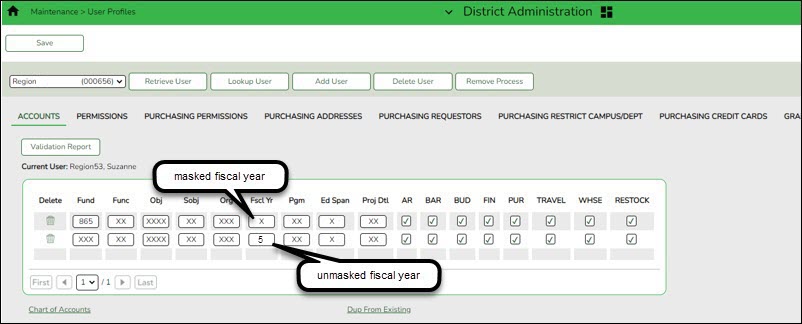
❏ Use one of the following options to update the user account codes:- Option 1 - It is recommended to mask (X) the Fscl Yr (fiscal year) field on the user profile. A masked fiscal year on the account code allows the user to access all account code fiscal years (if the user has access to the account code) and alleviates the task of updating the fiscal year each new fiscal year.
- Option 2 - Depending on the LEA's restriction procedures, manually update the Fscl Yr (fiscal year) field for each user profile to reflect the new fiscal year. Entering a fiscal year limits access to other fiscal year data.
- Option 3 - Run the District Administration > Utilities > Mass Update User Account by Fund utility to update multiple users by fund.
❏ Under Options, select Budget.
❏ Use the arrow buttons to move the fund/year accounts to be mass updated from the left side to the right side of the page.
❏ Click Execute. A message is displayed indicating that the mass update was successfully completed.
- Clear next year requisitions.
Clear next year requisitions
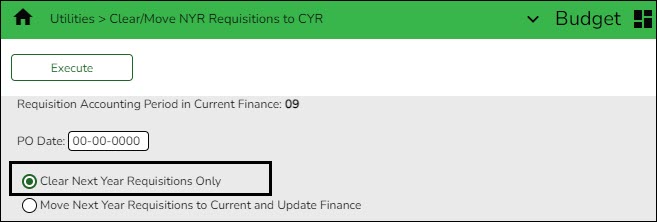
Budget > Utilities > Clear/Move NYR Requisitions to CYR
Skip this step if your LEA does not use the next year requisitions feature.
If your LEA uses the next year requisitions feature, clear the next year requisitions from the database.
❏ Leave the PO Date field as is (00-00-0000).
❏ Select Clear Next Year Requisitions Only to clear all next year requisitions from the database.
❏ Click Execute. When the process is completed, the Clear Next Year Requisitions report is displayed.
❏ Click Process to clear all next year requisitions from the database.
- (Optional) Clear Budget tables.
(Optional) Clear Budget tables
Budget > Utilities > Clear/Copy Budget Tables > Clear Budget Tables
Clear the simulation tables or Budget crosswalk tables.
Clear budget tables:
❏ Select from the following:
Clear Simulation Tables Select to remove all data from the simulation tables unless there are generic tables that are used every year. Clear Budget Crosswalk Table Select to remove all data from the crosswalk tables. ❏ Click Execute. A message is displayed indicating that the tables were cleared.
- Update Budget data.
Update Budget data
Budget > Utilities > Update Budget Data
Note: If mask crosswalks were performed in Finance they need to be performed in Budget before completing this step. If you need assistance with mask crosswalks, contact your regional ESC consultant.
Update the current year Budget Amended and Actual columns from Finance.
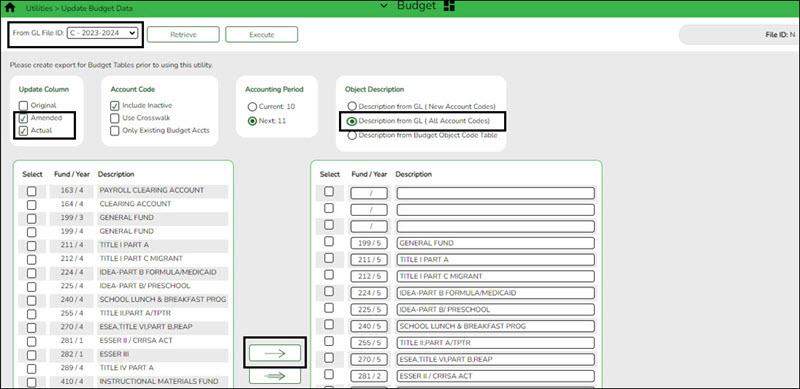
❏ In the From GL File ID, select the current year file ID (file ID C) and click Retrieve.
❏ Under Update Column, select Amended and Actual to be updated in Budget for the selected fund/year codes.
Amended Select if you have posted entries in Journal Budget or Amended Budget to Estimated Revenue or Appropriations and did not select Original Budget Only in the Move Budget to Finance utility.
Actual Select if you have posted entries that have increased or decreased Realized Revenue, Encumbrance, or Expenditures in Finance.
(Optional step - Depends on individual situations.) It is recommended that none of the Account Code options are selected during this process.
Select one of the following Account Code options:
Include Inactive Select to include inactive account codes and amounts in the list of available account codes to be transferred.
If selected, any inactive accounts and amounts in the current file ID are copied over.
If not selected, inactive accounts and amounts in the current file ID are not copied over.Use Crosswalk Select to crosswalk any account code elements for the selected fund/years that exist in the Mask Crosswalk utility. See Mask Crosswalk (Mass Change Account Codes). Only Existing Budget Accts Select to include existing account codes and amounts in the list of available account codes to be transferred. ❏ Select one of the following Accounting Period options:
Current The accounting period is set to Current by default, which uses the current accounting period amounts from the Finance application to populate the Budget application amounts. Next Select to create Budget data using the next accounting period amounts in the Finance application. ❏ Under Object Description, select Description from GL (all account codes). This description is retrieved from the Chart of Accounts.
❏ All available fund/year codes from Finance are displayed on the left side of the page. Select the available fund/year codes to move to the right side of the page for the budget account code tables, general ledger accounts.
❏ Use the arrow buttons to move the appropriate funds from the left side to the right side of the page.
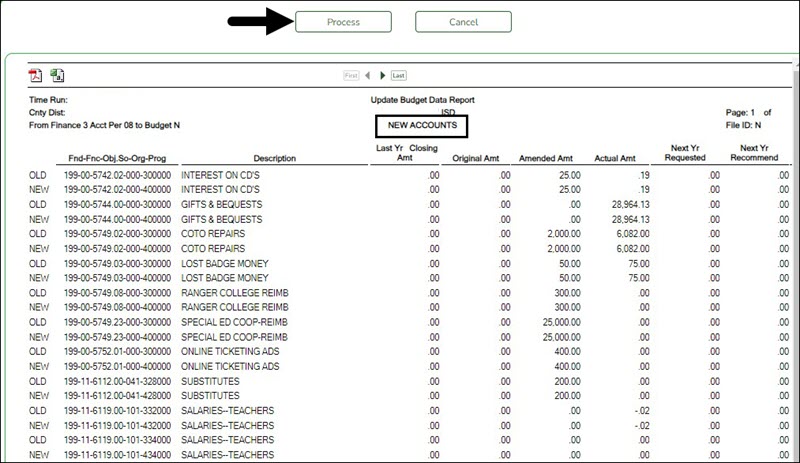
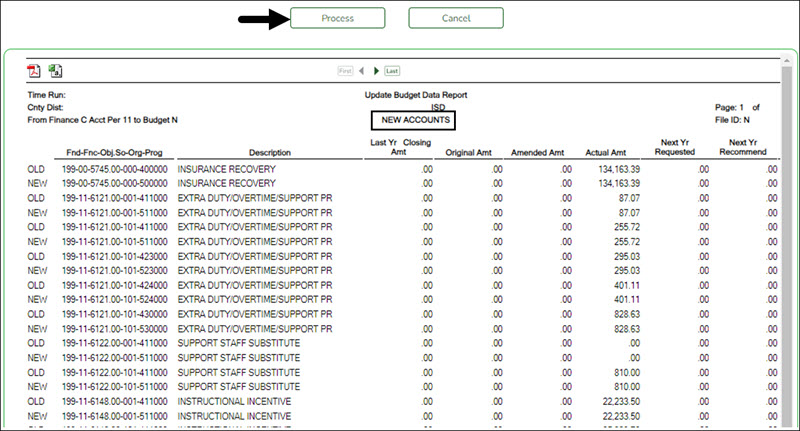
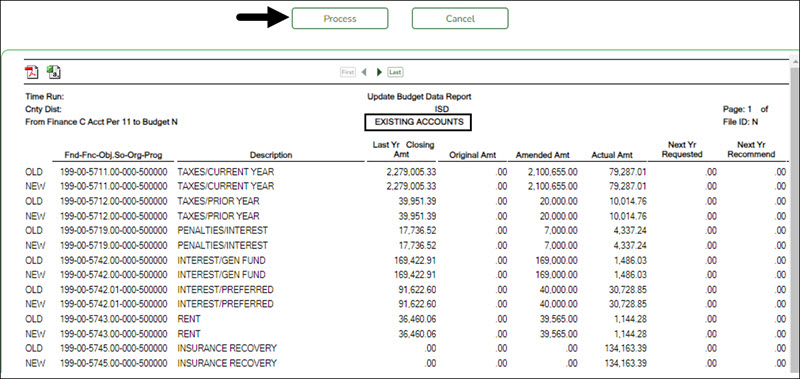
❏ Click Execute to execute the process. The Update Budget Data Report is displayed with the old and new account codes that were updated. Review the report.
❏ Click Process to continue processing. Otherwise, click Cancel to cancel processing.
- Perform update Budget data comparison.
Perform update Budget data comparison
Budget > Inquiry > Budget Account Codes Inquiry
Perform a comparison inquiry.
❏ Select Summary.
❏ Type the Account Code components.
❏ Click Retrieve. The Account Code Inquiry - Summary report is displayed.
❏ The This Yr Amend Budget and This Yr Actual Amt columns are updated in Budget to reflect the amounts in Finance file ID C.
TIP: It is recommended that you update after every check run in order to update Actual expenditures.
Budget maintenance is now available.
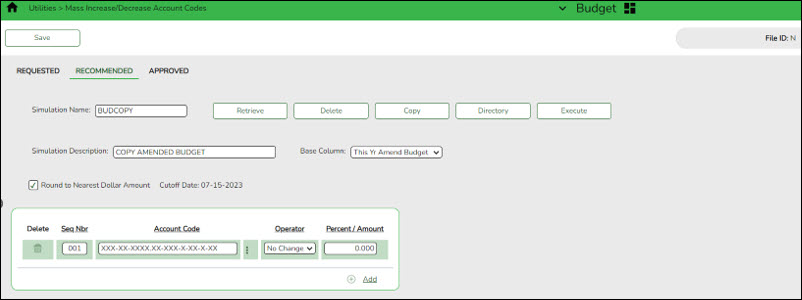
- Create a simulation.
Create a simulation
Use any of the following tabs to create a budget simulation.
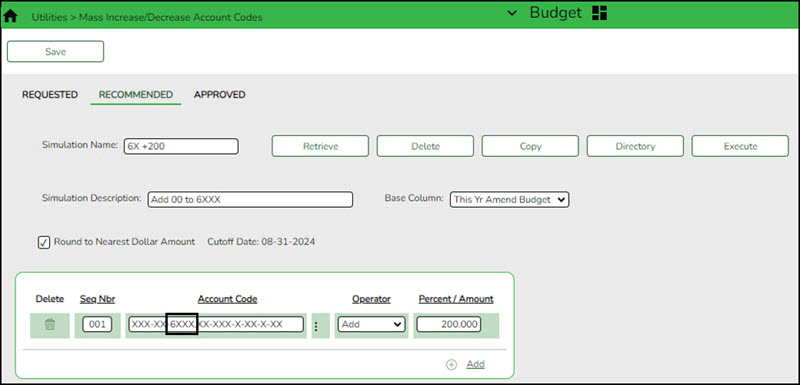
Example: If your user profile only allows access to 62XX accounts and you select, as part of the criteria, to update all 6XXX accounts, only the accounts that meet the 62XX criteria are reflected in the preview report when the simulation is executed. No 61XX, 63XX, 64XX, etc. are included in the calculations.❏ Click Save.
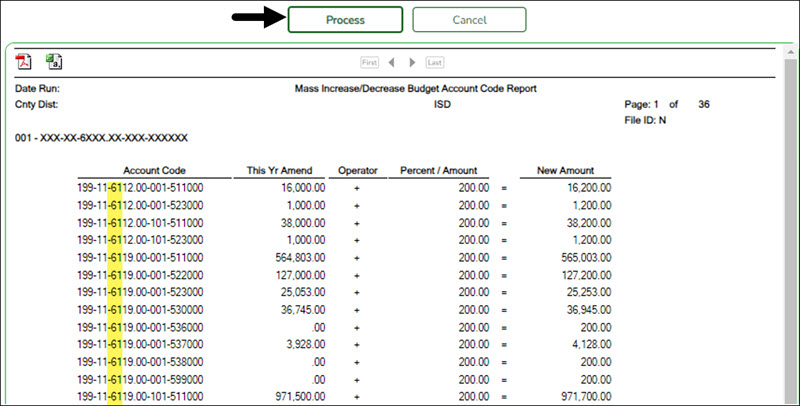
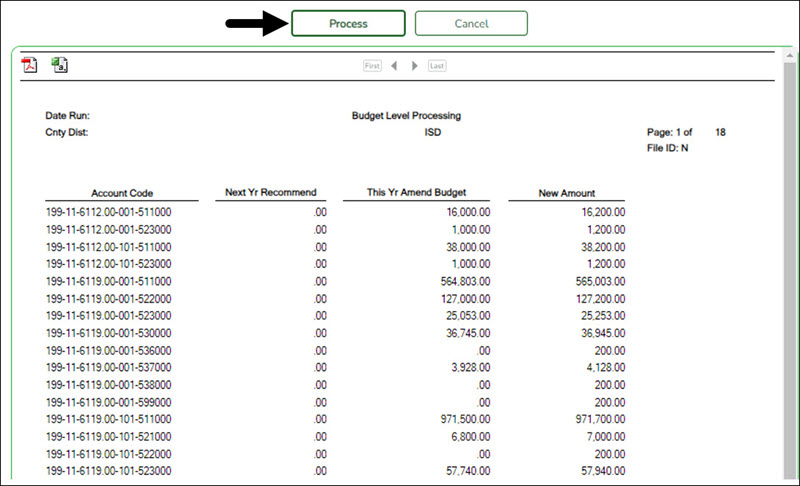
❏ Click Execute to execute the process. A Mass Increase/Decrease Budget Account Code Report is displayed. Review the report.
❏ Click Process to complete the simulation process.
Example: The prior year amended budget can be moved to the new Budget file ID N.
- Post the simulation.
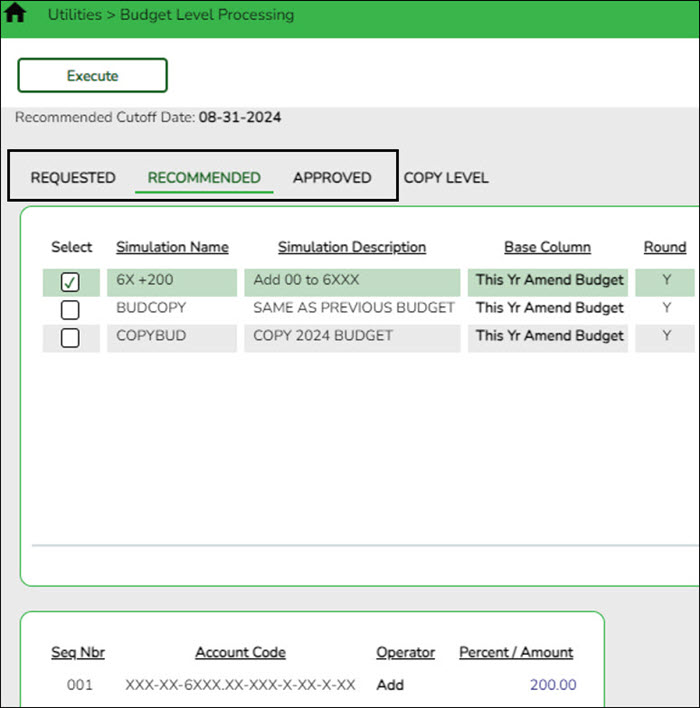
Post the simulation
Budget > Utilities > Budget Level Processing
Post the simulation in the tab of your choice.
CAUTION: You can repeat this step multiple times; however, be aware that each time a simulation is processed, it overwrites the existing data.
Notes:
- Simulations are based on the user profile of the logged-on user.
- Simulations will not update locked accounts.
Use one of the following tabs to complete this step:
- Perform next year Budget data maintenance.
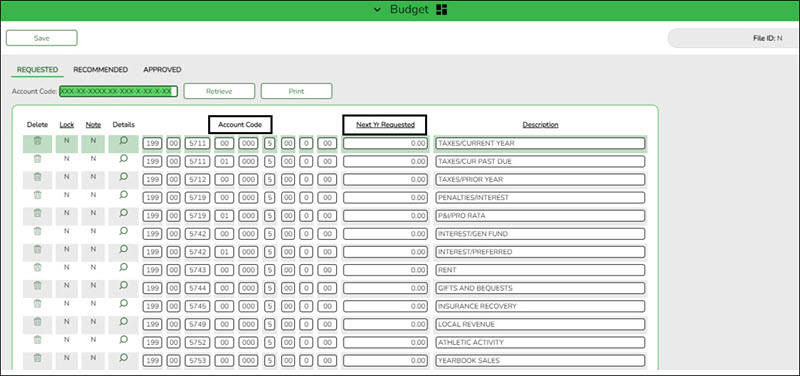
Perform next year Budget data maintenance
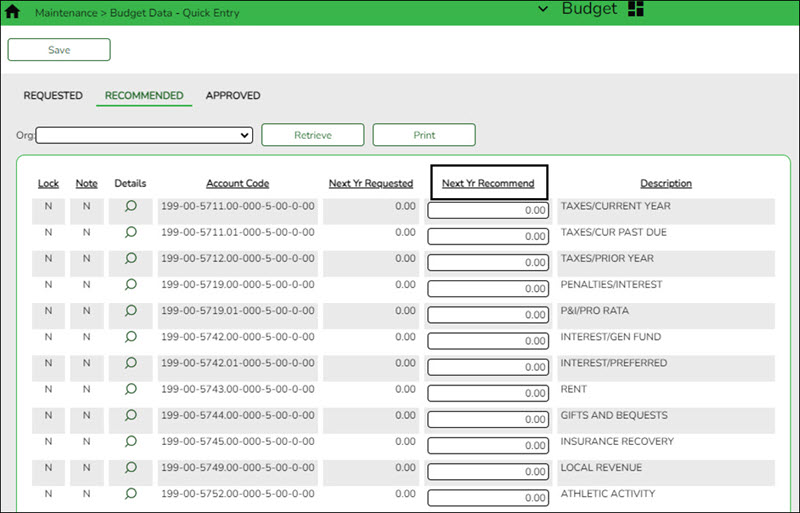
Use the Budget Data maintenance pages to update amounts and descriptions or add/delete accounts.
Use the Budget Data - Quick Entry maintenance pages to only update amounts. These pages are ideal for principals and directors.
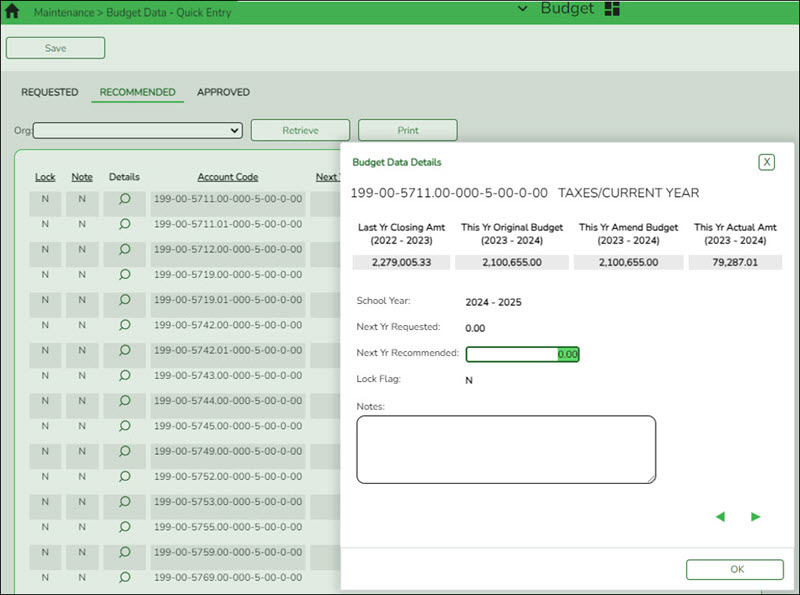
❏ Click
 to view any previously entered notes and other details for the associated account code. The Budget Data Details pop-up window opens.
- (If necessary) Delete funds.
(If necessary) Delete funds
Budget > Utilities > Delete Funds
Delete the funds that are no longer needed in Budget.
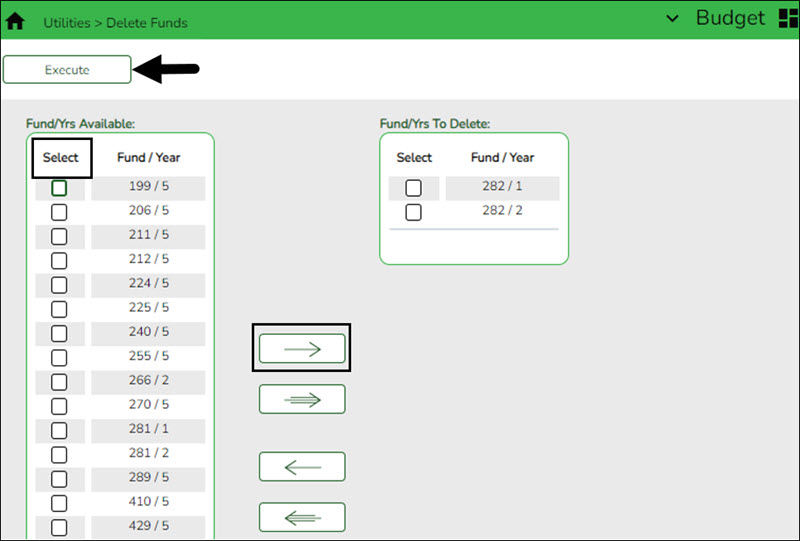
This page is used to delete all accounts for specific funds in the Budget master table. This function saves you from having to delete each account individually. A report of the deleted and not deleted funds is automatically generated.
All budget accounts are deleted for each of the funds selected, except:
- If there are any next year requisitions that have not become a purchase order and the attached account codes for the line items match the selected funds, the selected funds are not deleted, and an error message is displayed on the report.
- If there is an account code that is attached to a purchase order encumbrance transaction that matches the selected funds and the encumbrance transaction has not been reversed, the selected funds are not deleted, and an error message is displayed on the report.
Delete funds:
❏ Use the arrow buttons to move the appropriate funds from the left side to the right side of the page.
❏ Click Execute to delete the selected funds. The Budget System Delete Funds Change Report is displayed. Review the report.
❏ Click Process to process the selected accounts. Otherwise, click Cancel to return to the Delete Funds page without deleting the selected funds.
- Delete prior year fund/fiscal years.
Delete prior year fund/fiscal years
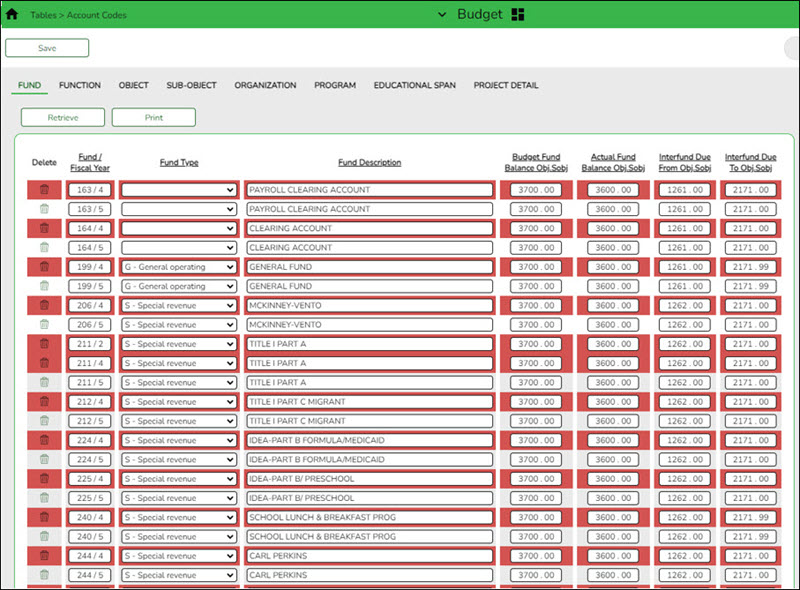
Budget > Tables > Account Codes > Fund
Delete the fund/fiscal year(s) that are not needed in the 2025-2026 budget file.
Select the fund/fiscal years (rows) to be deleted.

Delete a row. Click to delete a row. The row is shaded red to indicate that it will be deleted when the record is saved.
Click Save.If accounts exist in Budget Data that use the fund/fiscal year code, a message is displayed and the fund is not deleted. - Copy level - Budget level processing.
Copy level - Budget level processing
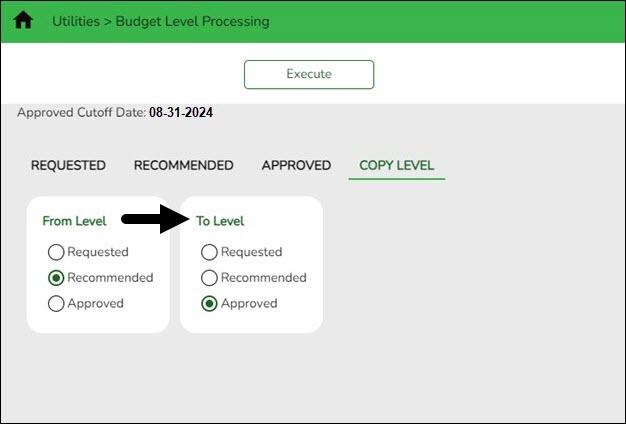
Budget > Utilities > Budget Level Processing > Copy Level
After the Budget is approved, the Next Year Approved column must be populated before the accounts and amounts can be moved to Finance.
This utility is used to copy amounts from one budget level to another budget level. All amounts currently in the From Level are copied to the To Level. This feature enables the user to view and process from different levels. The cutoff date validates against the To level; it does not validate against the From level. The ability to perform this function is not dependent on being authorized to access to the Requested, Recommended, and Approved tabs.
Copy simulation data from one budget level to another:
❏ Under From Level:
Field Description Requested Select to copy the Requested column level. If selected, the data replaces the data in the selected To Level. Recommended Select to copy the Recommended column level. If selected, the data replaces the data in the selected To Level. Approved Select to copy the Approved column level. If selected, the data replaces the data in the selected To Level. ❏ Under To Level:
Requested Select to indicate that the data in the selected From Level column will replace the data in this column. Recommended Select to indicate that the data in the selected From Level column will replace the data in this column. Approved Select to indicate that the data in the selected From Level column will replace the data in this column. Note: You cannot copy the same From Level column to the same To Level column.
❏ Click Execute to copy the selected From Level simulations to the selected To Level. A Copy Level report is displayed. Review the report.
❏ Click Process to process the transfer of the selected simulation. You are prompted to create a backup. Otherwise, click Cancel to cancel the process.
- Export the 2025-2026 Board approved budget.
Export the 2025-2026 Board approved budget
Budget > Utilities > Export by File ID
After the budget is completed and approved by the Board, create an export and copy the budget data to a folder named: 2025-2026 Budget before Move to Finance.
Additional Budget Information
Additional Budget information.
Review the following reports:
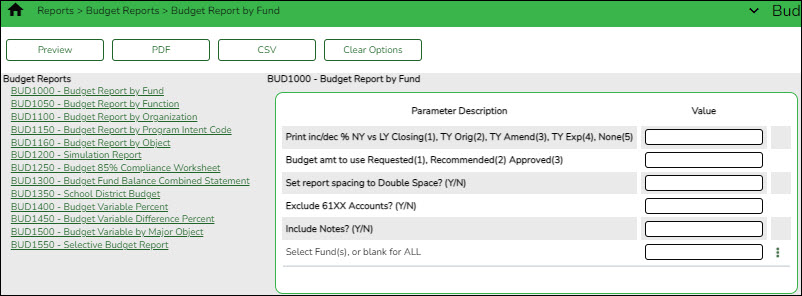
Budget > Reports > Budget Reports
Budget > Reports > Board Reports
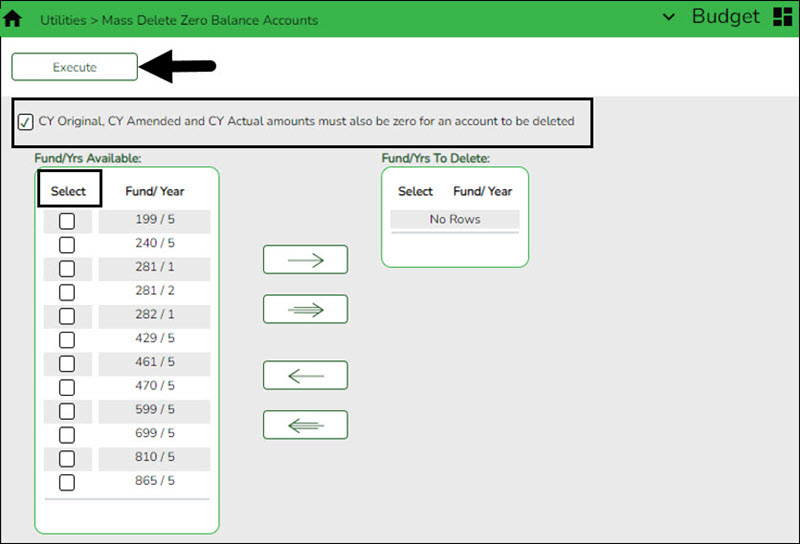
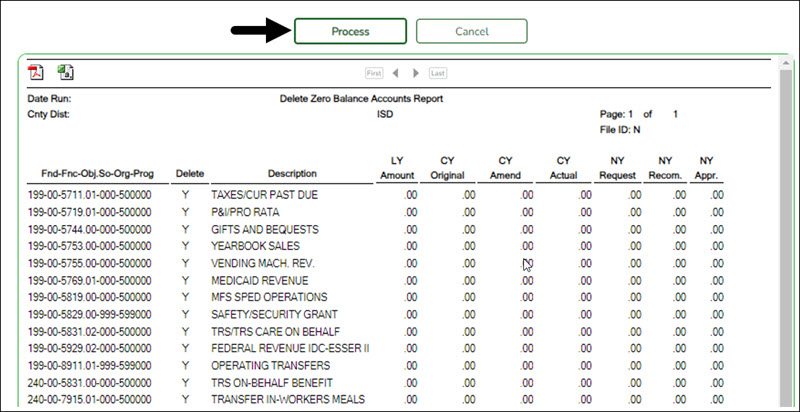
Budget > Utilities > Mass Delete Zero Balance Accounts
Accounts with a zero amount in the Current Year Original, Current Year Amendment, and Current Year Actual columns are deleted.
Budget > Utilities > Mass Lock/Unlock Funds
Lock or unlock single or multiple funds/accounts as needed. Remember, locked funds or accounts cannot be manually updated by the user, updated through utilities, or by a NY payroll interface.
IMPORTANT: Before performing a final backup, unlock funds and account codes as locked accounts are not moved to Finance.
Americans with Disabilities Act (ADA) and Web Accessibility
The Texas Computer Cooperative (TCC) is committed to making its websites accessible to all users. It is TCC policy to ensure that new and updated content complies with Web Content Accessibility Guidelines (WCAG) 2.0 Level AA. We welcome comments and suggestions to improve the accessibility of our websites. If the format of any material on our website interferes with your ability to access the information, use this form to leave a comment about the accessibility of our website.


