Sidebar
Add this page to your book
Remove this page from your book
Admin Guide: ASCENDER EmployeePortal WorkJournal Setup
The WorkJournal feature allows pay type 2 (non-contracted) and pay type 3 (hourly) employees to create timesheet entries for time worked on a specific day.
The purpose of this document is to guide you through the necessary steps to set up the appropriate access for employee WorkJounal requests via EmployeePortal.
Some of the images and examples provided in this document are for informational purposes and may not completely represent your LEA’s process.
This document assumes you are familiar with the basic features of the ASCENDER Business system and have reviewed the ASCENDER Business Overview guide.
Prerequisites
❏ Update roles/users in Security Administration to allow WorkJournal permissions. You can add permissions to an existing role or create a new role.
Set up Personnel Settings
Perform the following tasks to ensure that the WorkJournal request feature in EmployeePortal is set up properly and functions as intended for employees.
- Set EmployeePortal WorkJournal options.
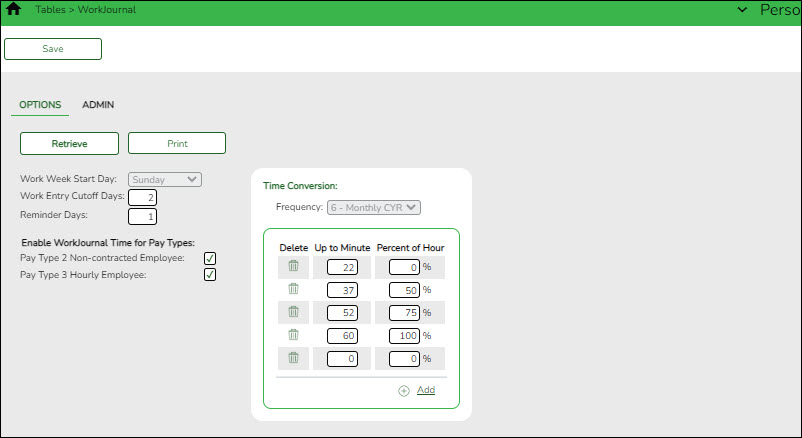
Personnel > Tables > WorkJournal > OptionsSet up the following WorkJournal options to determine how employees enter their time based on the work week, time conversion table, and pay type when creating WorkJournal entries in EmployeePortal.
❏ Under Enable WorkJournal Time for Pay Types:
Pay Type 2 Non-contracted Employee Select to enable WorkJournal time tables for pay type 2 (non-contracted) employees. Pay Type 3 Hourly Employee Select to enable WorkJournal time tables for pay type 3 (hourly) employees. ❏ Under Time Conversion:
Frequency Click  to select the pay frequency for which you want to set up a time conversion table. Depending on the selected pay frequency, the corresponding time conversion table is displayed.
This field is read only if your LEA only uses one pay frequency to pay employees. Pay frequencies are set up on the District Administration > Tables > District Information > Payroll Frequencies tab.❏ Click +Add to add a row.
Up to Minute Type the number of minutes to represent a specific percentage of the day. Valid values are 1-60. Percent of Hour Type the percent of day to represent a specific number of minutes. Valid values are 1-100%. ❏ Click Save.
- Add WorkJournal admin users.
Personnel > Tables > WorkJournal > AdminAt this time, this page does not function as intended. This will be corrected with future programming.
Add WorkJournal admin users. WorkJournal admin users will have access to view timesheet details in ASCENDER EmployeePortal.
Notes:
- It is recommended that LEAs set up at least one admin per campus. For example, each campus could set up a payroll clerk to view timesheet details.
- campus can have multiple admin users; however, admin users cannot be assigned to multiple campuses.
- These admin users cannot edit or delete WorkJournal requests and are not approvers for WorkJournal requests.
- Set WorkJournal options for (CYR/NYR) extra duty codes.
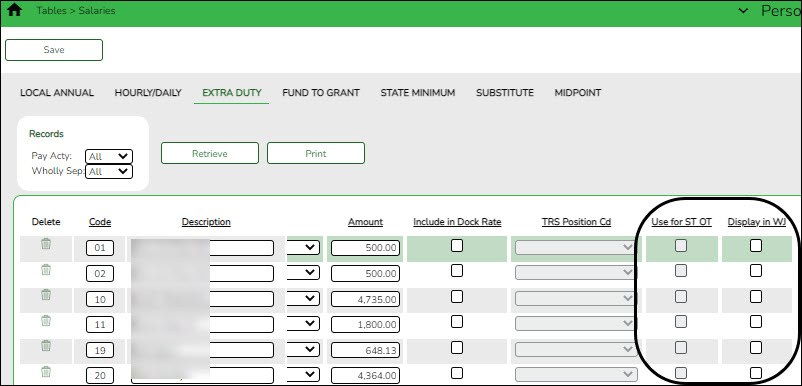
Personnel > Tables > Salaries > Extra DutySelect the following to identify which extra duties will use standard overtime rates and be displayed for WorkJournal in EmployeePortal.
Use for ST OT Select to indicate that the extra duty code will use the standard overtime rate in WorkJournal. This field is only enabled for S-type extra duty codes and can only be selected for one S-type extra duty code. Display in WJ Select to display the extra duty code in WorkJournal. This field is only enabled for G-type and S-type extra duty codes. ❏ Click Save.
- Set WorkJournal options for (CYR/NYR) job codes.
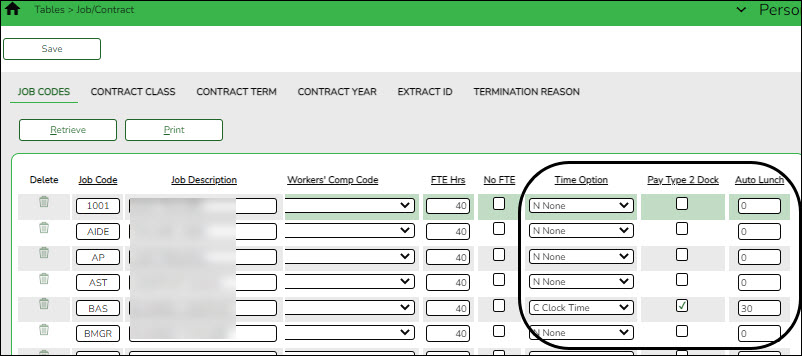
Personnel > Tables > Job/Contract > Job CodesUse the following options to identify how employees with certain job codes enter their time and how their time is calculated for WorkJournal entries in EmployeePortal.
❏ Click Save.
Set up and verify Payroll Settings
- Verify contract begin and end dates.
Payroll > Maintenance > Staff Job/Pay Data > Job InfoVerify that the employee's job info record is set up with accurate data for WorkJournal entries in EmployeePortal.
❏ The employee must be assigned to an active job code in the current year for the date that they are trying to create a WorkJournal entry in EmployeePortal.
❏ Under Calendar Info, verify the employee's contract Begin Date and End Date for the job code. The date of the WorkJournal entry must be within the contract begin and end dates for the applicable job code. If not, the following message is displayed on the Add/Edit Clock time pop-up window in EmployeePortal: “No ACTIVE Job Code for this Date”.
- Only the employee's current year primary active job is displayed in the Job Code drop down in EmployeePortal.
As mentioned previously, the Time Option for the employee's assigned job code must be set to A Attendance Only or C Clock Time on the Personnel > Tables > Job/Contract > Job Codes in order for the job code to be displayed in the Job Code field.
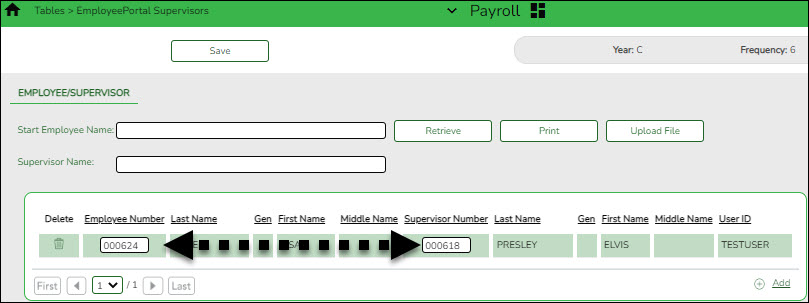
- Designate the employee/direct supervisor relationship.
This setting serves two purposes, it determines the WorkJournal (and Leave Request) approval path for the employee and allows the supervisor to access the Supervisor menu in EmployeePortal.Payroll > Tables > EmployeePortal Supervisors > Employee/Supervisor
Enable the WorkJournal Request Feature
- Set up district EP options.
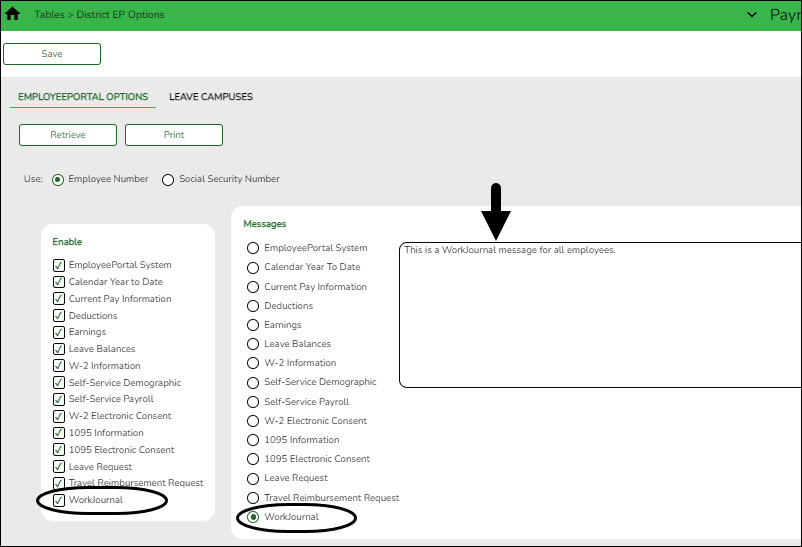
Payroll > Tables > District EP Options > EmployeePortal OptionsSet up the following EP options to allow employees to view the WorkJournal menu in EmployeePortal.
❏ Under Enable, select WorkJournal to enable the WorkJournal request feature in EmployeePortal.
❏ Under Messages, select WorkJournal to enable employees to view a preset message on the WorkJournal page in EmployeePortal.
- Type the applicable message in the text box.
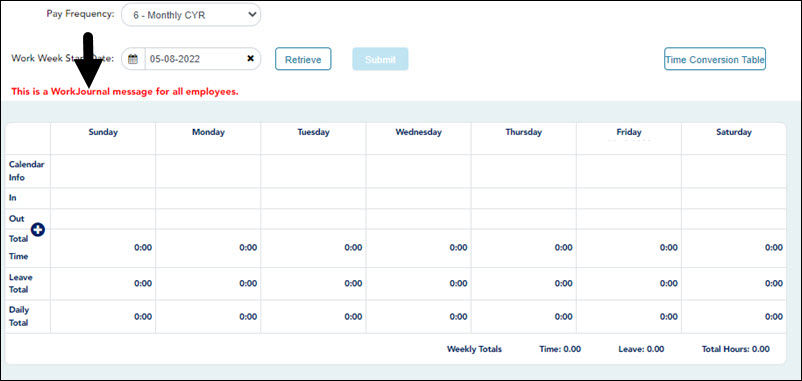
- The message is displayed in red at the top of the WorkJournal page in EmployeePortal after the record is saved.
After the above steps are completed, employees can submit WorkJournal requests in EmployeePortal.
Approve WorkJournal Requests
In EmployeePortal, on the Supervisor > Approve WorkJournal page, supervisors can approve or return WorkJournal requests from their employees.
- Approve or return WorkJournal requests.
When you access the Approve WorkJournal page, a list of WorkJournal requests pending your action is displayed if any.
❏ Select the requests that you want to approve or return. You can select individual requests (checkboxes) or select the top Select All check box to select all requests (checkboxes).
The following information is displayed for each WorkJournal request.
Field Description Detail Click  to view the WorkJournal request details. The WorkJournal request details are display only and cannot be edited.
Click Cancel in the upper-right corner to close the request details and return to the Approve WorkJournal page.Pay Freq The pay frequency for which the employee's WorkJournal request was submitted is displayed. Employee The employee's name is displayed. Week Start The Work Week Start Date for the employee's WorkJournal request is displayed. Pay Date The next unprocessed pay date for the Work Week Start Date and Pay Frequency within the pay period is displayed.
ExamplesWork Total The employee's total WorkJournal work week hours (minus leave hours) is displayed. ❏ Click Approve to approve the request. After you approve the request, an email message is sent to the employee notifying them of the action (approved/returned) taken on the request.
- If the request is approved or returned, the request is no longer displayed in the list of pending WorkJournal requests.
- If the request is not selected and no action is taken, the request remains in the list of pending WorkJournal requests.
❏ Click Return to return the request to the employee. The request is no longer displayed in the list of pending WorkJournal requests.
Import WorkJournal Requests
The payroll department will use the Payroll > Utilities > Import WorkJournal Requests page to import employee WorkJournal requests for each of the work weeks in the pay period that were submitted through EmployeePortal. Only WorkJournal entries that are in an Approved status are imported. This process creates a pay transmittal to be processed by payroll.
Americans with Disabilities Act (ADA) and Web Accessibility
The Texas Computer Cooperative (TCC) is committed to making its websites accessible to all users. It is TCC policy to ensure that new and updated content complies with Web Content Accessibility Guidelines (WCAG) 2.0 Level AA. We welcome comments and suggestions to improve the accessibility of our websites. If the format of any material on our website interferes with your ability to access the information, use this form to leave a comment about the accessibility of our website.


