User Tools
Sidebar
Table of Contents
academy:parent_faq
Book Creator
Add this page to your book
Add this page to your book
Book Creator
Remove this page from your book
Remove this page from your book
Parent Guide to ASCENDER ParentPortal
Having problems using ParentPortal? Click here. (prints separately)
What would you like to do?
Access ParentPortal
I. Create an ASCENDER ParentPortal account and log on.
I. Create an ASCENDER ParentPortal account and log on.
ASCENDER ParentPortal > Login
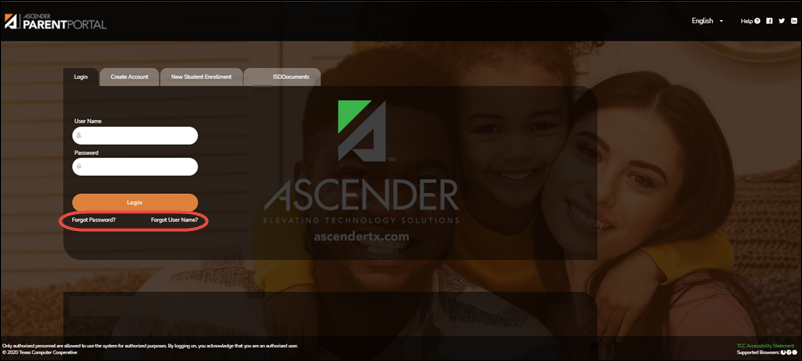
Before enrolling a student, create a user account in ASCENDER ParentPortal in order to obtain a user name and password to access the system. When you access ParentPortal, the Login page is displayed.
❏ Click Create Account.
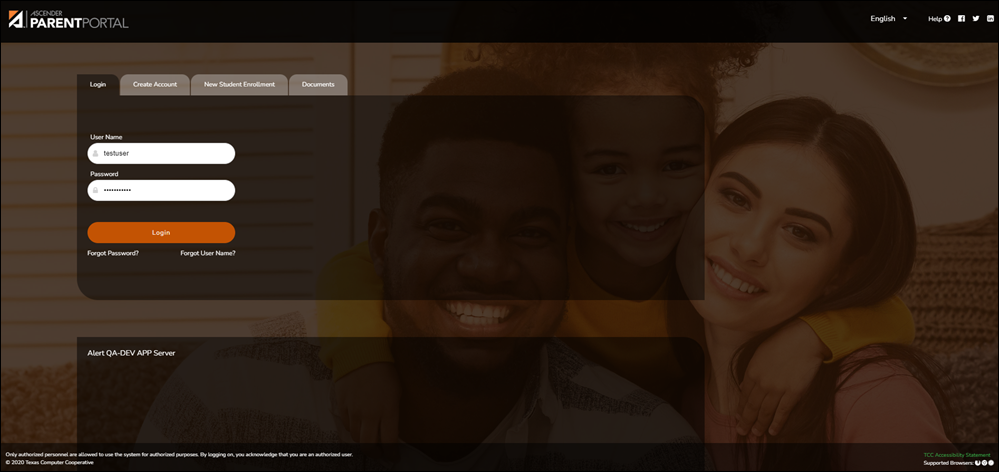
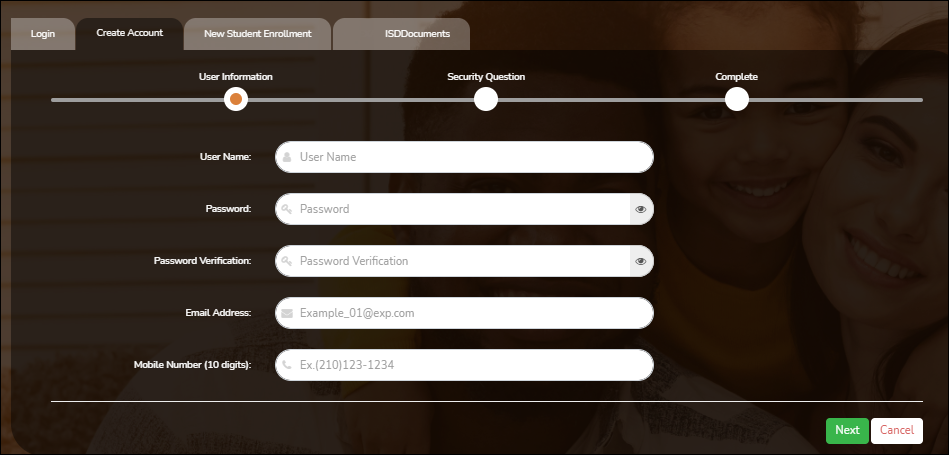
The Create Account - User Information page opens.
| Email Address |
(Required) Type your email address. You cannot enter an address that is already in use. NOTE: If you have multiple students associated with your account, the email address listed for the guardian at your student's campus must match for ALL students associated with your ParentPortal account in order for Registration features to be activated, and the email address must be validated. |
|---|---|
| Mobile Number | Type your ten-digit mobile number. You cannot enter a number that is in use. |
❏ Click Next.
Security Question
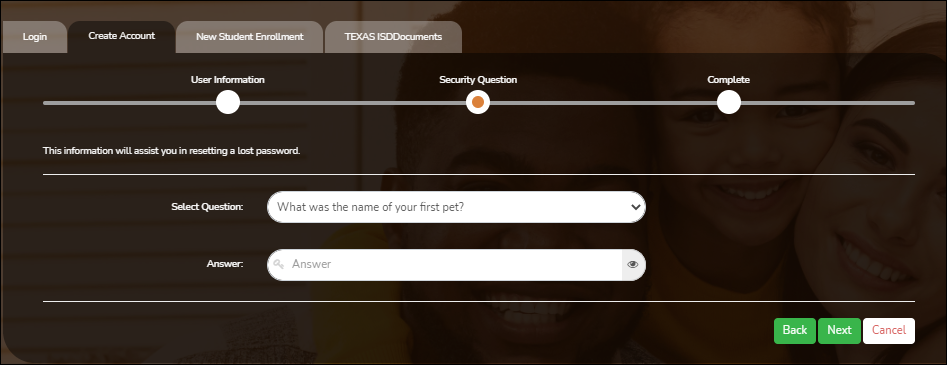
| Select Question | Select a question. If you need to reset your password, you will be asked this question. |
|---|---|
| Answer |
Type the answer to the question. IMPORTANT: The answer is case-sensitive (always write it exactly as it appears here, including upper and lower case letters). |
❏ Click Next.
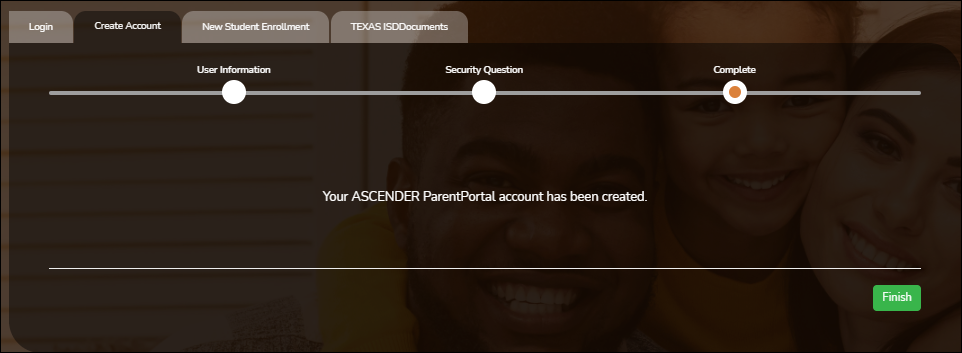
Complete
❏ Click Finish.
- The My Account page opens where you can add a student to your account and update your security and contact information.
- If you entered an email address or mobile number, you will receive a notification message containing a verification link.
NOTE: If you are not listed as a contact or as a guardian (i.e., student, step-parent, etc.), you will be a read-only user with limited access.
II. Retrieve your user name, or update your password.
II. Retrieve your user name, or update your password.
If you have forgotten your password, you can reset it. You can also change your password at any time.
From the Login page, click the link below the login fields to go to the Reset Password page.
MOBILE DEVICE USERS: On a mobile device, tap Login to access this link.
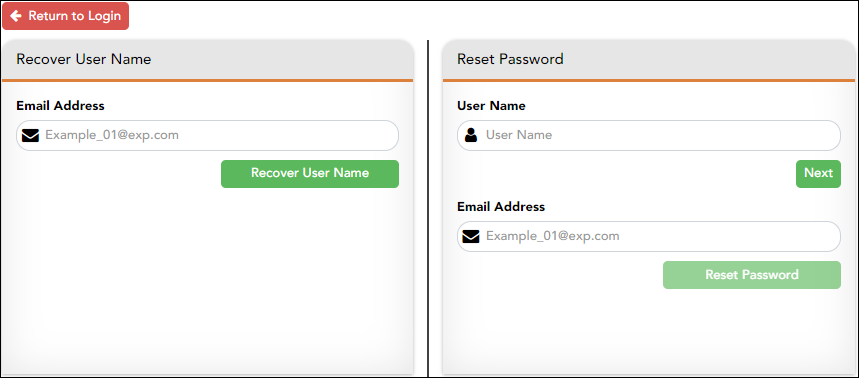
Reset Password
You have two options for resetting your password: By User Name and By Email Address.
By User Name:
| User Name | Type your User Name. |
|---|
❏ Click Next.
You are prompted to enter the answer to one of your hint questions.
❏ Type the answer and click Next.
| Password | Type a new password. |
|---|---|
| Re-enter Password | Re-type a new password. |
Click Finish.
The My Account page opens.
By Email Address:
| Email Address | Type your email address. |
|---|
❏ Click Reset Password.
A message is displayed indicating that instructions for resetting your password were sent to the email address entered.
❏ Click Close to close the message.
Return to ParentPortal, and log on using your user name and password.
III. Change the language.
By default, ASCENDER ParentPortal is displayed in English. To access ParentPortal in Spanish, select Spanish from the drop-down field in the top-right corner of the Login page.

Your language selection will be retained for the current session.
Some content will only be displayed in Spanish if the district has provided Spanish content; otherwise, English content is displayed.
MOBILE DEVICE USERS: On a mobile device, tap the menu in the top-right corner to access the language field.
IV. Access public documents.
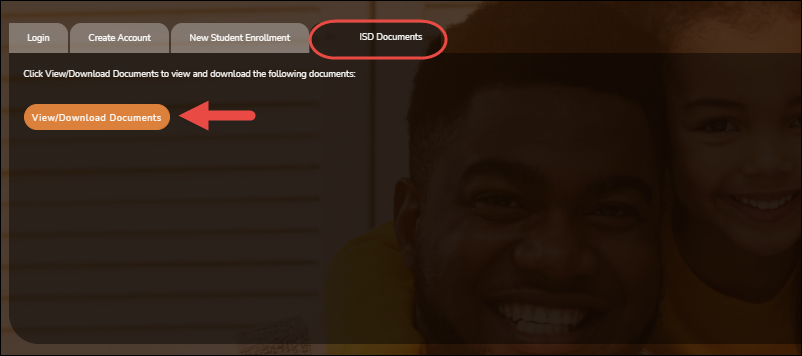
From the Login page under District Name Documents, click View/Download Documents to go to the Public Documents page where you can access documents provided by the district or campus that do not require a login, such as a calendar or sports schedule.
V. Navigate ParentPortal.
Navigation tools are located along the left side of the page, or in the top-right corner. Some tools function differently on mobile devices.
MOBILE DEVICE USERS: On a mobile device, tap  to access the side menu.
Selected Student
The currently selected student's name and photo are displayed in the top-left corner. The photo is only displayed if provided by the district.
If you have multiple students added to your ParentPortal account, click
 next to My Students to select a another student.
Add a Student
Click Add Student to add a student to your ParentPortal account. A pop-up window opens.
Campus
The campus attended by the selected student is displayed. If the student attends multiple campuses, you can select the campus.
Navigation
You can access your student's data. Data is only available if enabled by the district.
Summary - Your student's schedule, current average for each class, and today's attendance are displayed.
Attendance - You can view your student's detailed attendance, as well as a calendar view and totals.
Grades - You can view your student's semester, cycle, and assignment grades. Click  to expand the grades menu.
Discipline - You can view your student's discipline incidents.
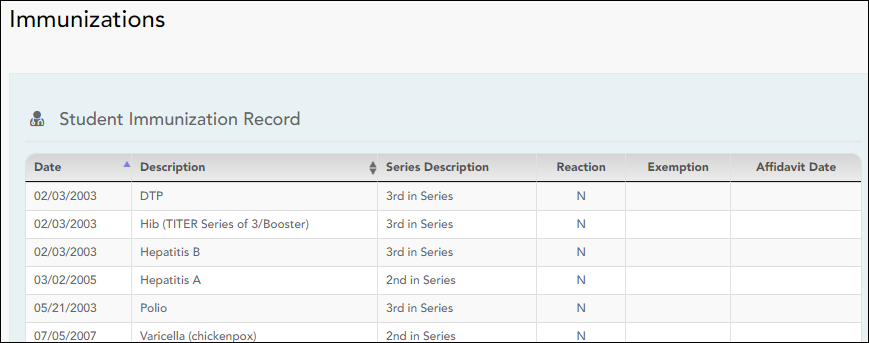
Immunizations - You can view your student's immunizations on file at the campus, as well as a list of immunizations due.
Alerts - You can view alert messages and set up customized alerts.
Links - Your district or campus may provide helpful links.
Other Tools
 - Click to hide the left-side navigation bar. Click again to display the navigation bar.
 - Various sections throughout ParentPortal can be collapsed or expanded. Most data is collapsed by default. Click the arrow to show the section. Click it again to hide the section from view.
 - Various pages throughout ParentPortal can be printed. Using the print icon instead of the browser's print option will ensure the best formatting of the content. Click
  to print the content displayed.
Top-right
 - Click to view alerts for your student. The number of unread alerts (if any) is displayed in a red circle next to the icon.
 - Click to view ASCENDER ParentPortal online Help.
 - Click to change the language or log out of ASCENDER ParentPortal.
Bottom-left
 - Click to open the My Account page.
 - Click to log out of ASCENDER ParentPortal.
Update Your ParentPortal Account
I. Access the My Account page.
II. Update your parent contact information.
II. Update your parent contact information.
ASCENDER ParentPortal > My Account > Contact Information
Contact Information
Update and verify email address and mobile phone information.

You must provide and verify your email address before you can access features that require your email address. You can update your email address at any time.
| Current Email Address |
This field is displayed if your email address has previously been entered.
• The message “Verified” is displayed if the email address has been verified.
If no email address has been entered, type your current email address. |
|---|---|
| New Email Address |
If you have not verified your email address, type the address and click Update Email. |
| Confirm Email Address | Retype the email address to confirm that you typed it as intended. |
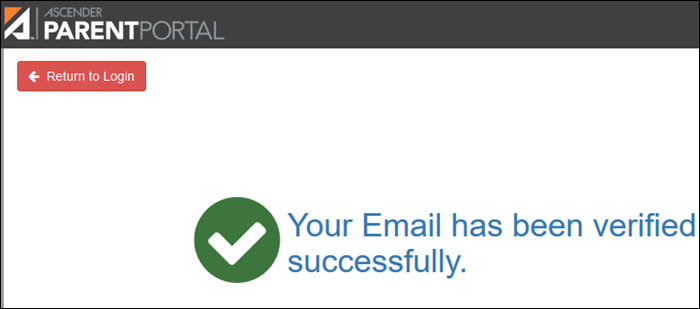
❏ Click Verify Email Address.
You will receive an email message at that address containing a verification link.
If you entered an email address when you registered for this parent portal account, you should have received an email message in your inbox with a code allowing you to verify your email address.
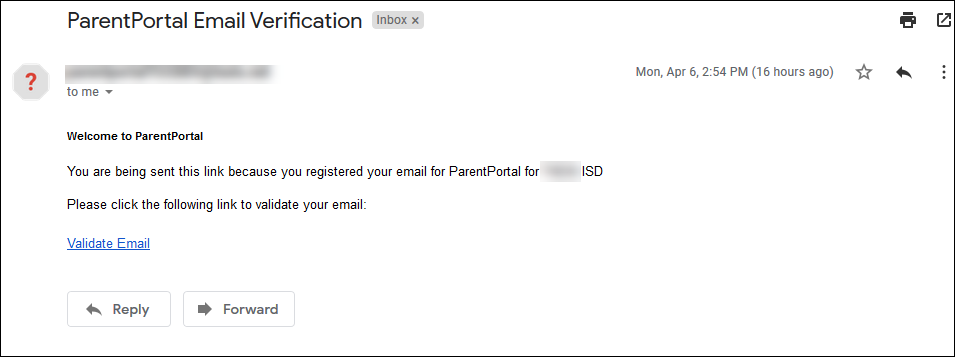
❏ Click Validate email.
Once you have verified your email address, you can click Remove Email at any time to remove and/or change the email address registered, or to remove the email address.
- If you click Remove Email, the current email address is removed.
- The email address field is displayed allowing you to verify another email address.
If you remove or change your email address, your alert notification options will be reset. To reset your alerts, go to Alerts > Subscribe to Alerts and set the Alert Notification Type field according to your preferences. The option to receive alerts by email will not be available unless you have an email address successfully verified.
Mobile
Registering your mobile phone number enables you to receive alert notifications as text messages.
IMPORTANT: If you change cell phone carriers, you may stop receiving alert messages, and you may need to re-register the number.
| Mobile Number | Type the cell phone number to be registered in the AAANNNNNNN format, where AAA is the area code, and NNNNNNN is the number. Do not use hyphens. |
|---|
❏ Click Verify Mobile.
You will receive a text message at the number entered which will contain a verification code.
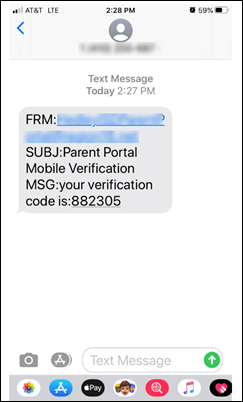
The Verification Code field will appear.
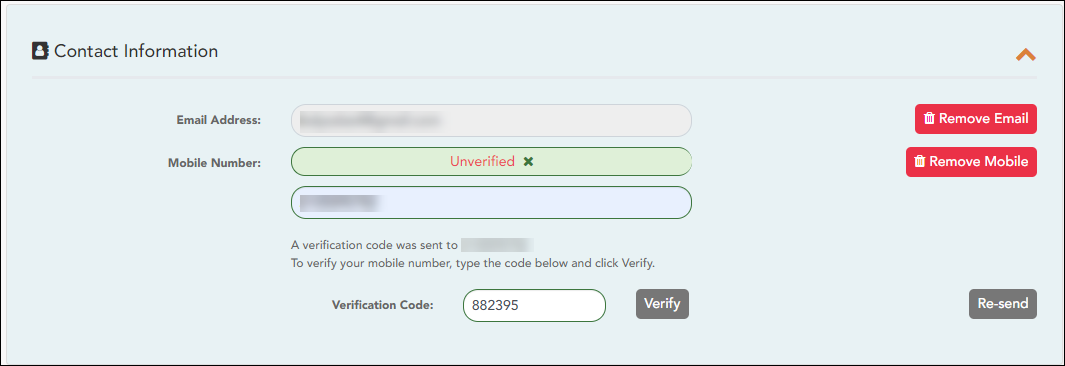
| Verification Code | Type the verification code that was sent in the text message. |
|---|
❏ Click Verify.
- If the code was entered accurately, a message is displayed indicating that you have successfully signed up to receive text messages.
- If the verification code is unsuccessful, click Re-send to send a new code.
Change or remove your mobile number
Once you have verified your mobile number, you can click Remove Mobile at any time to remove and/or change the cell phone number registered.
- If you click Remove Mobile, the current number is removed.
- The mobile number fields are displayed allowing you to verify another number.
III. Update your ParentPortal password.
III. Update your ParentPortal password.
ASCENDER ParentPortal > My Account > Security Information
Password
You can update your ParentPortal account password at any time.

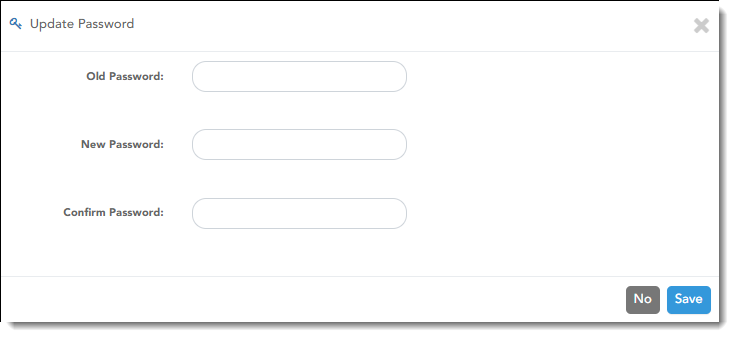
❏ Click Update Password.
| Old Password | Type your current password in order to verify your access. |
|---|---|
| New Password |
Type a password that you will use when you log on to ParentPortal. |
| Confirm Password | Retype your password exactly as it was typed above. This step confirms that you typed your password as you intended. |
❏ Click Save.
The password is changed.
IV. Update your security information (hint questions).
IV. Update your security information (hint questions).
ASCENDER ParentPortal > My Account > Security Information
Security Questions & Answers
Security questions and answers are used to verify your identity if you have forgotten your password. You can change the question, the answer, or both at any time.

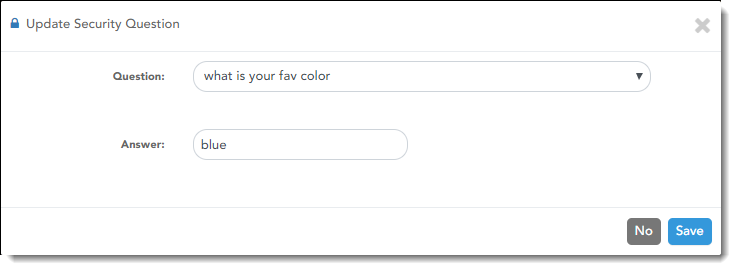
❏ Click Update Security Question.
| Question | Select a question to which you will provide an answer. This question will be asked in the event that you lose your password. |
|---|---|
| Answer |
Type the answer to the question. |
❏ Click Save.
View Your Student's Information
I. Link an enrolled student.
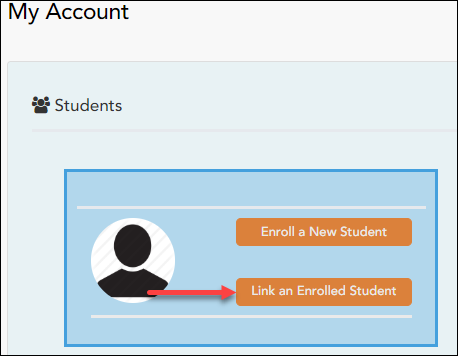
ASCENDER ParentPortal > My Account
❏ Click Link an Enrolled Student.
A pop-up window opens allowing you to add a student to your ParentPortal account.
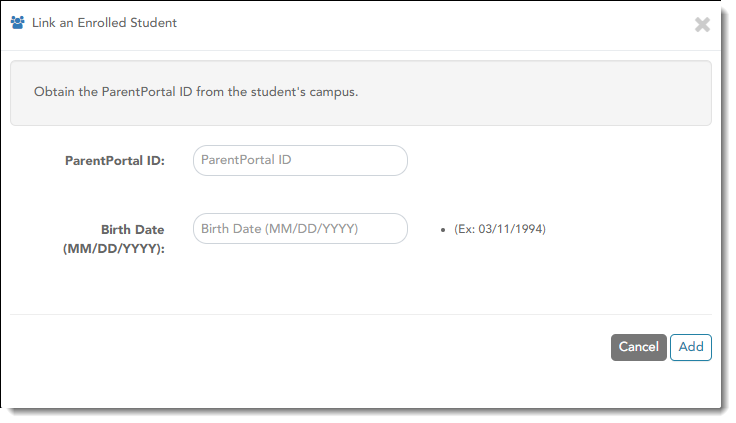
| Student Portal ID |
Type the ParentPortal ID provided by the student's campus. If you do not have this ID, you must contact the campus to get the ID. You cannot add a student without entering a valid ParentPortal ID. |
|---|---|
| Birth Date | Type the student's complete birth date. The date entered here must match the birth date in the student's record at the campus. You cannot continue without entering the correct birth date. |
❏ Click Add.
If your student was successfully added to your account, the student's name will appear on the page. You will now be able to access your student's data.
II. View the Summary page and your student's information (if available).
II. View the Summary page and your student's information (if available).
ASCENDER ParentPortal > Summary
The Summary page is the first page displayed when you successfully log on to ASCENDER ParentPortal. This page provides your student's schedule, current average for each class, and attendance for the current date. You may also see a district or campus message if available.
If your student's report card or IPR is available, a link is provided.
The ASCENDER ParentPortal uses a Responsive Design approach, which means the software detects the screen size and orientation of your device, and changes the layout accordingly so that you have the best viewing experience.
Some features you may experience as the screen gets narrower:
- Objects on the screen will shift from side-by-side to stacked vertically.
- Grids (such as the student's schedule) will adjust by hiding the columns, beginning with the column furthest to the right. Tap the row to view any hidden data.
Some features you may experience as the screen gets wider:
- Buttons will get wider but not taller.
❏ Select Summary from the Navigation menu to access this page.
Student Information
A student summary card is displayed for each student added to your account which displays the number of unread alerts for your student (according to your alert settings).
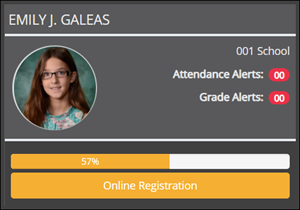
During the Online Registration period, additional information and tools are available on each student summary card.
Online Registration
During the annual online registration window:
You can easily see your student's progress in the registration process and access the page where you can complete the forms.
If your student's registration is in progress, a pop-up window opens from this page.

❏ Click Resume Registration to continue the registration process.
Or, click  to close the pop-up window and continue registration later.
Once you have completed registration, the pop-up window will no longer appear.
NOTE: On the Summary page, the Registration button will be red, yellow, or green depending on how far along you are in the process.
• The information is green if all forms are completed (i.e., 100%).
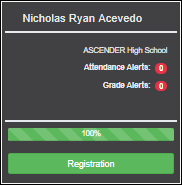
• The information is yellow if most of the forms are completed (i.e., 50%-99%).
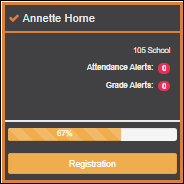
• The information is red if fewer than half of the forms are completed (i.e., 0%-49%).
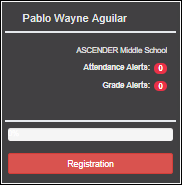
• The card is highlighted and has a check mark for the selected student.

❏ To begin or resume the registration process, click Resume Registration on the pop-up window, or click the Registration button on the student's card.
The Registration page opens.
Campus Message
If campus notes have been entered, they are displayed.
MOBILE DEVICE USERS: On a mobile device, tap View Campus Notes to view any notes provided by the campus.
Published Grades
If your student's report card or interim progress report (IPR) is available, a button is displayed.
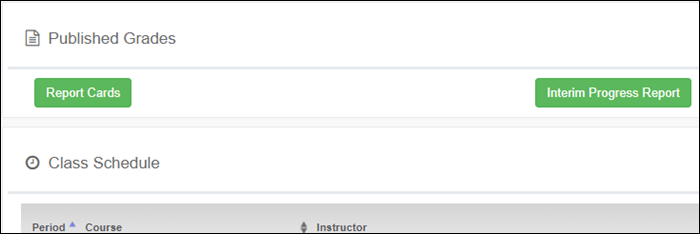
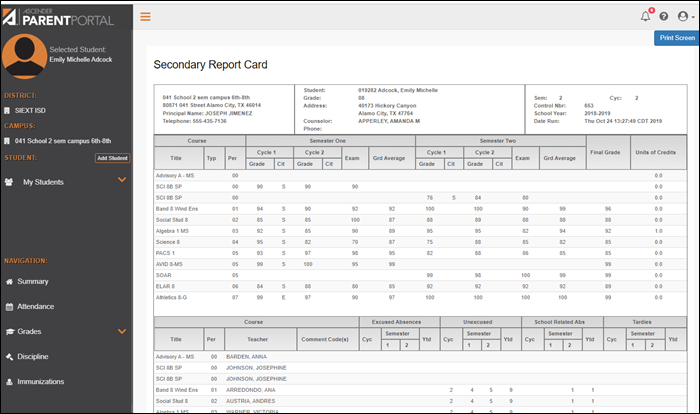
❏ Click the Report Cards button to view the student's report card. If a skills-based report card is available, the Skills Based Report Cards button is displayed.
❏ Click the Interim Progress Report button to view the student's IPR.
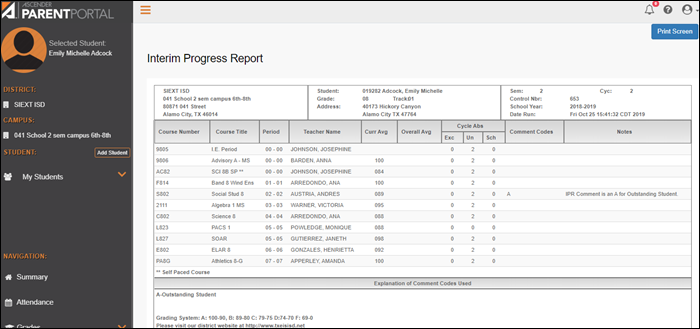
The report is displayed. Click Print Screen to print the screen as it appears on the page. NOTE: Print screen dimension can be no greater than 992 pixels.
Only the most current report card or IPR is provided.
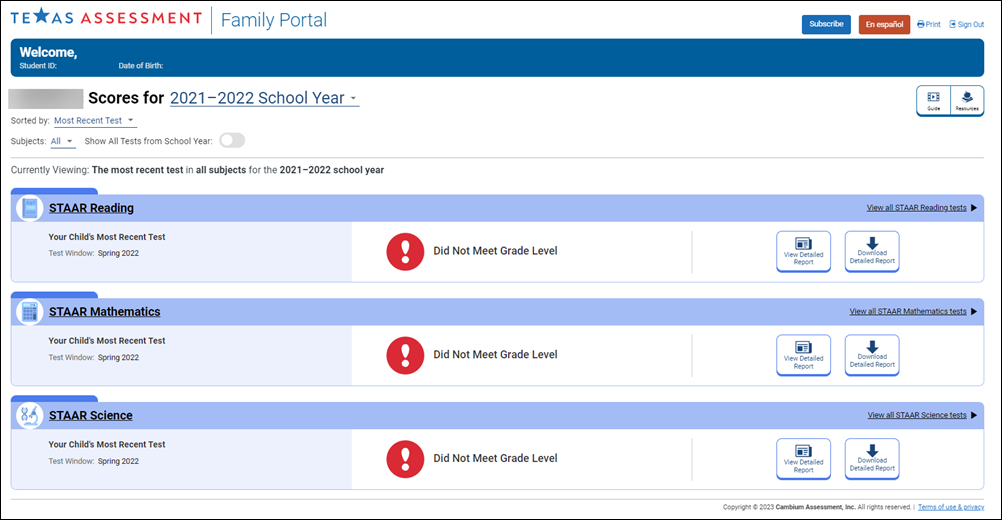
If your student's Texas Assessments are available, a button is displayed.

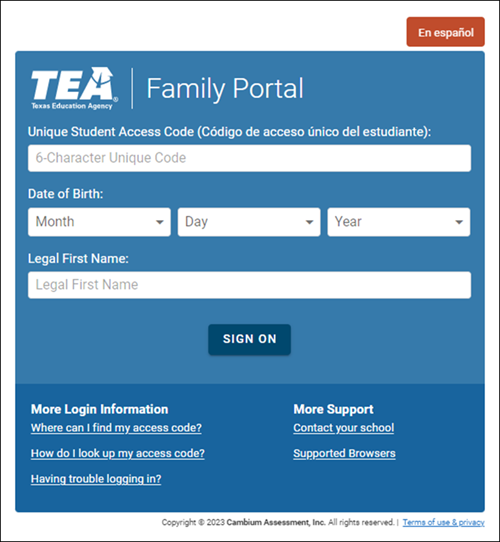
❏ Click the Texas Assessment button to be directed to the Family Portal login page to login and view the student's available assessments, or click here to view information for ASCENDER ParentPortal Single Sign-on.
Class Schedule
The student’s class schedule is displayed if enabled by the district, including period, course title, teacher name, room number, current attendance and current grade average for each class.
MOBILE DEVICE USERS: On a mobile device, only the period, course, and current average are visible initially. Tap a row to view the complete details for each class.
| Last Updated | The date when the teacher last updated grades or attendance is displayed. |
|---|---|
| Current Average |
The student's current grade average for each class is displayed. |
| Today's Attendance |
Attendance for the current date is displayed for each class if it has been posted. Otherwise, it is blank. If the student is enrolled in an elementary campus which has only one period, one attendance status is displayed for the entire day. |
III. View your student's attendance.
III. View your student's attendance.
ASCENDER ParentPortal > Attendance
The Attendance page displays your student's daily attendance and semester totals.
- Detailed View - Displays attendance details in a table view.
- Calendar View - Displays attendance details in a calendar view instead of a table view.
- Totals View - Displays tardies and attendance totals for the semester.
Attendance data is current as of the date and time you logged in. To refresh the attendance data displayed, you must log out and log in again.
MOBILE DEVICE USERS: Your student's attendance data is below the legend. You may need to scroll down to view data.
| Semester | Select the semester you want to view attendance for. |
|---|
Detailed View
Detailed View (All Attendance) is the default view.
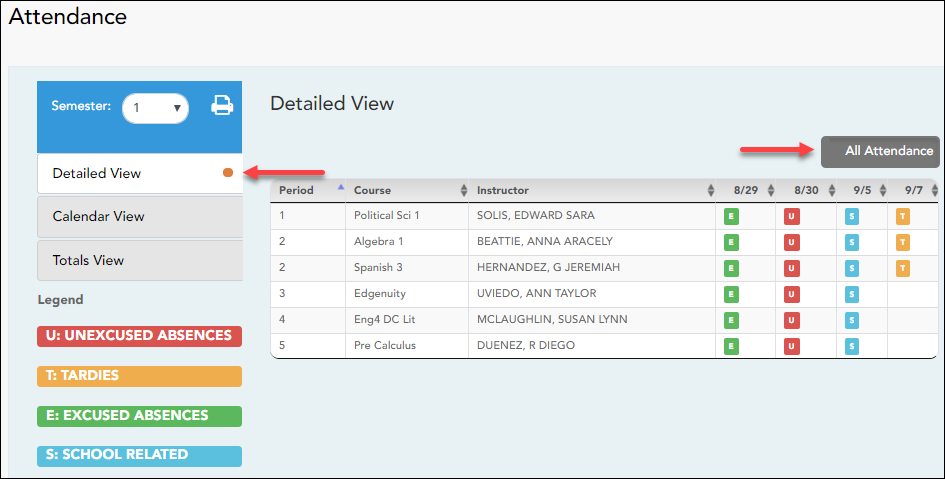
Your student's schedule is displayed. The date appears in the column heading only if your student was marked absent or tardy for any period during that day.
If your student was present and on time for the entire day, nothing appears for the date.
If your student was not present for the entire class, a code appears for the period and date. A description of each code is displayed in the Legend.
All Attendance/Detailed Toggle
All Attendance:
The All Attendance view is selected by default, which displays the four main absence types:
- Unexcused Absence (U)
- Tardy (T)
- Excused Absence (E)
- School Related (S)
Detailed:
❏ Click or tap All Attendance to toggle to the Detailed view where you can see more specific information for an absence, such as whether a doctor note or field trip notice is on file for that absence.
All applicable codes are listed in the Legend.
The codes are color coded according to the main absence types (Unexcused, Tardy, Excused, and School Related).
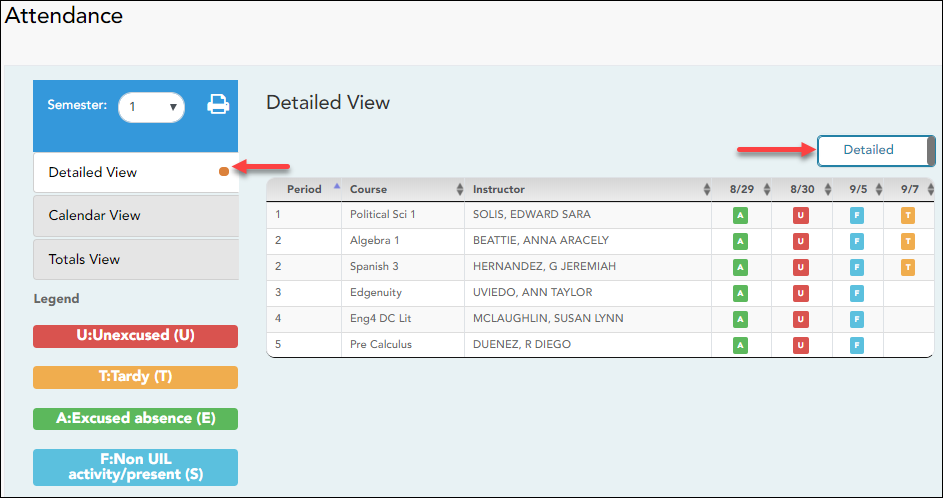
❏ Click or tap Detailed to return to All Attendance view.
MOBILE DEVICE USERS: On a mobile device, if you have numerous absences, you may need to tap a row to open the Details view in order to see all absences for a particular class.
Calendar View
❏ Click or tap Calendar View.
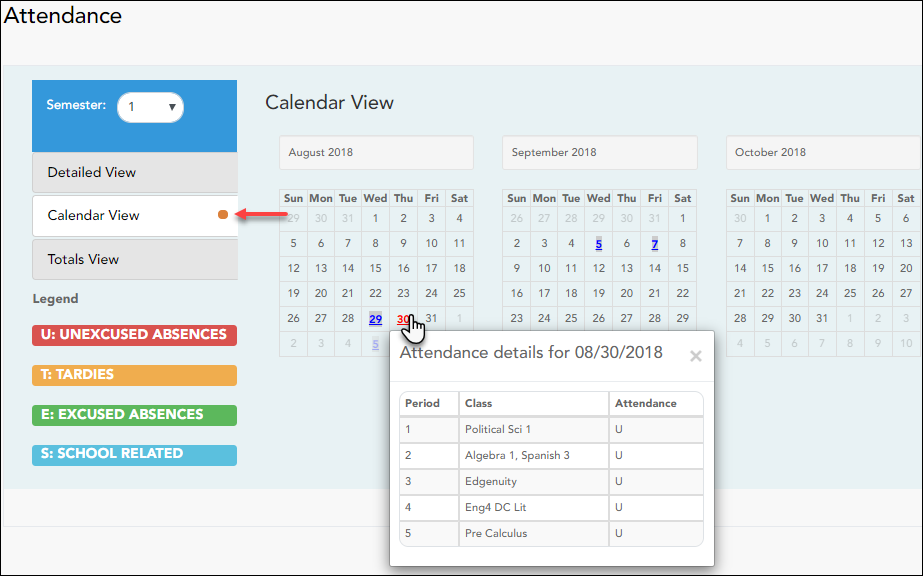
All months for the selected semester are displayed. If the student was not present for the entire class for any period of the day, the date is shaded.
❏ Click the date to view the attendance details for each period.
The period is only listed if your student was marked absent or tardy for that period.
Totals View
❏ Click or tap Totals View.
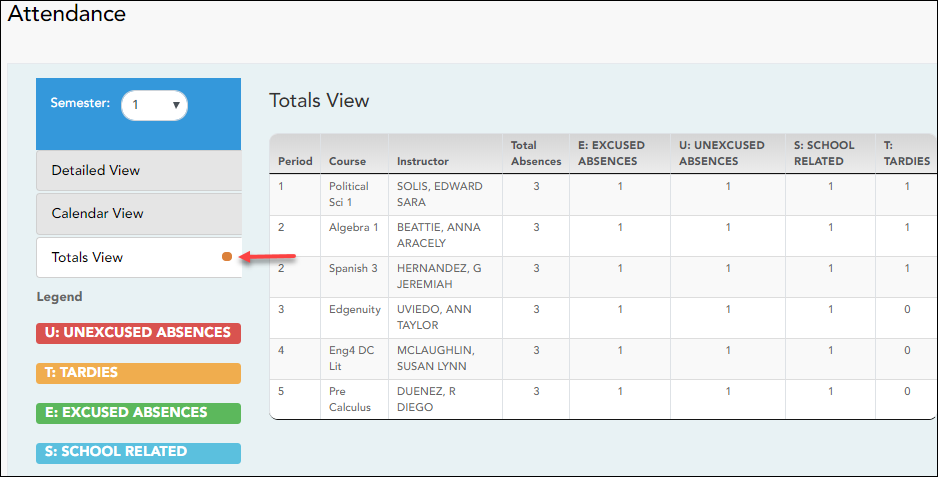
Your student's classes are listed by period, and the total number of excused absences, unexcused absences, school-related absences (e.g., UIL events or field trips), and tardies for the selected semester are listed.
The Total Absences column displays semester totals for all absence types, excluding tardies.
MOBILE DEVICE USERS: Tap a row to view semester totals for the class.
IV. View your student's cycle grades.
IV. View your student's cycle grades.
ASCENDER ParentPortal > Grades > Cycle and Semester Grades
Cycle Grades
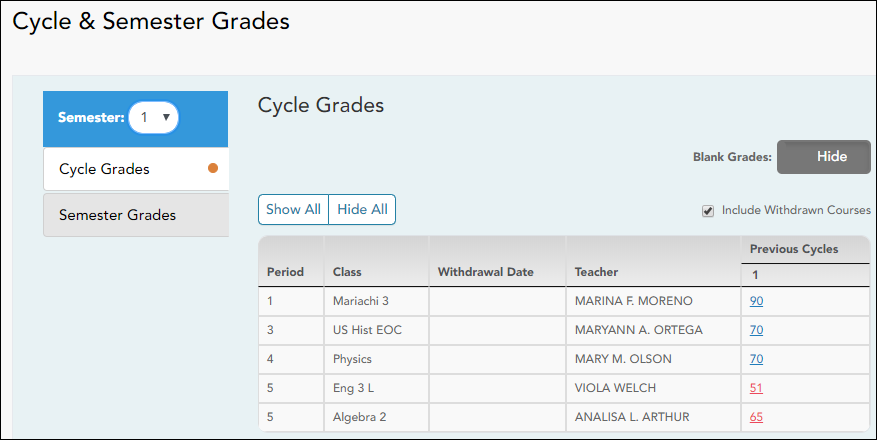
The Cycle Grades page displays current grade averages for the current cycle, and posted grade averages for previous cycles. For the current semester, you can view the assignment grades for each class. For previous semesters, only the posted average is available.
| Semester | Select the semester you want to view grades for. |
|---|---|
| Include Withdrawn Courses | Select if you wish to include withdrawn courses. |
Cycle Grades is the default view.
| Blank Grades | Choose whether to show or hide blank grades from the view. |
|---|
❏ Click the cycle grade to view the assignment grade details for that course-cycle.
The section expands to display all assignments, due dates, and assignment grades, as well as the weight and average for each assignment category in that course.
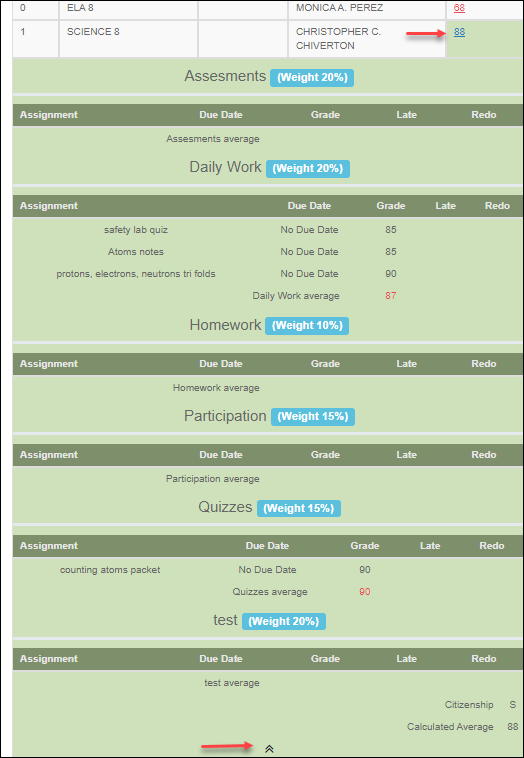
The Citizenship grade, Calculated Average, and Posted Average are also displayed.
❏ Click the close icon  to collapse the expanded view for for a particular course-cycle.
| Show All | Click to show assignment grade details for the cycle for all courses. |
|---|---|
| Hide All | Click to hide the expanded assignment grade details for all courses. |
V. View your student's semester grades.
V. View your student's semester grades.
ASCENDER ParentPortal > Grades > Cycle and Semester Grades
Semester Grades
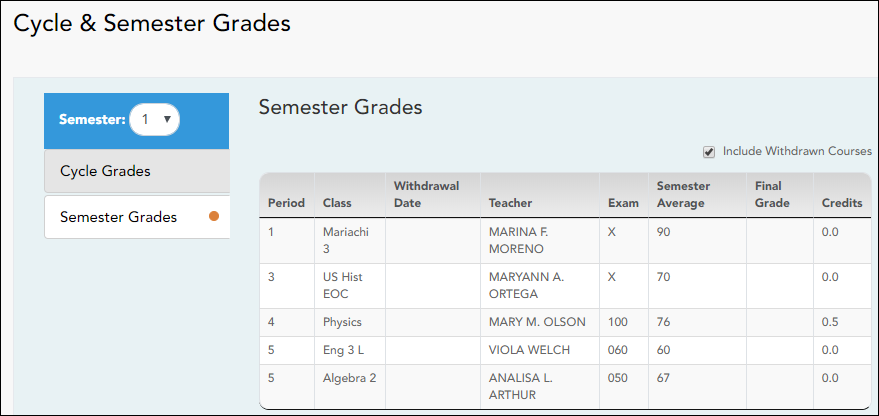
The Semester Grades page displays your student's posted semester and final averages. This data is only available for closed semesters. For the current semester, no data is displayed.
| Semester | Select the semester you want to view grades for. |
|---|---|
| Include Withdrawn Courses | Select if you wish to include withdrawn courses. |
❏ Click or tap Semester Grades.
Your student's posted semester and final averages are displayed. This data is only available for closed semesters. For the current semester, no data is displayed.
| Exam | The student's semester exam grade for the course is displayed. |
|---|---|
| Semester Average | The student's posted semester average for the course is displayed. |
| Final Grade |
The student's posted final grade for the course is displayed. |
| Credits | The number of credits received for the course that count toward graduation requirements is displayed. |
| (note icon) |
Click the icon to view a note entered by the teacher. |
VI. View your student's assignments.
VI. View your student's assignments.
ASCENDER ParentPortal > Grades > Assignments
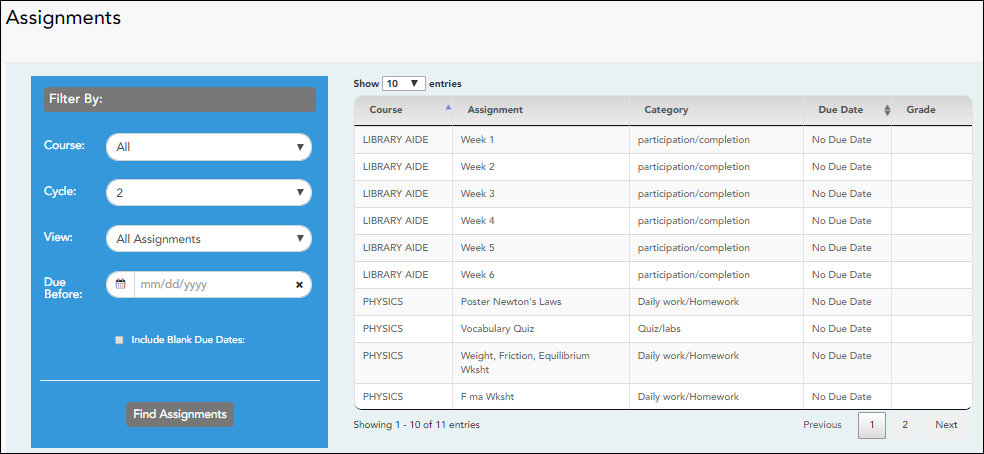
The Assignments page allows you to view your student's assignments for all courses and all cycles, including graded, ungraded, dropped, missing, etc. This data is only available for the current semester.
Filter by:
| Course | Select a specific course, or click All to view assignments in all courses. |
|---|---|
| Cycle | Select a specific cycle, or click All to view assignments for all cycles in a current semester. |
| View |
Select which assignments to view: |
| Due Before |
Enter a date in MM/DD/YYYY format or click on the calendar icon to select a date. |
| Include Blank Due Dates |
Check the box to include assignments that have no due date entered by the teacher in TeacherPortal. |
❏ Click Find Assignments. The assignments are displayed according to your Filter By selections.
MOBILE DEVICE USERS: Your student's assignments are listed below the filters. You may need to scroll down to view data.
TIP: Click a column heading to sort the assignments by that heading in ascending order. Click the column heading again to sort in descending order.
- If an assignment grade has been dropped, the message “dropped” is displayed next to the grade.
- If an assignment grade has been excluded, the message “excluded” is displayed in place of the grade.
- If an assignment is missing, the message “missing” is displayed in place of the grade.
- If an assignment is incomplete, the message “incomplete” is displayed in place of the grade.
- If the student is withdrawn from the course, the message “(withdrawn)” is displayed next to the course title.
STANDARDS-BASED GRADING: If the course uses the standards-based type of grading, assignments are associated with specific standards. For these courses, the Standard Scores heading is displayed in the table. For each assignment, all associated standards and grades are displayed. Note that assignments may have multiple standards. Also, an assignment may be associated with more than one standard, so you may see the same standard for multiple assignments. The grade for the course is calculated from the scores for the standards, not the assignments.
Some districts use the name SKILLS-REFERENCED GRADING to refer to this grading type.
VII. View your student's immunization information.
VIII. View your student's discipline information.
VIII. View your student's discipline information.
ASCENDER Parent Portal > Discipline
The Discipline page displays your student's discipline records for the semester. You can also view records for a particular date.
This is not available at all districts.
If court-ordered restriction exists for a particular discipline incident, that data is restricted.
By default, all of the student's discipline records for the semester are displayed.
| Filter by | To view discipline records for a particular date, type the date… |
|---|
| Date | The date and time of the discipline incident are displayed. |
|---|---|
| Infraction | The specific violation is displayed. |
| Disciplinary Action | A description of the action taken by campus officials in response to the discipline incident is displayed. |
| Reported by | The name of the staff member who reported the incident is displayed. |
| Administrator | The name of the campus administrator who is handling the incident and taking action is displayed. |
Additional comments about the discipline incident may be displayed in italic font below the fields, if entered by campus administrators.
Set Up and View Alerts
I. What are alerts?
Alerts are messages notifying you if the student has any grades or attendance information you should be aware of, such as an absence, tardy, or low grade.
- View Alerts - View alert messages that have been generated according to your alert subscription.
- Set Alerts - Change your alerts subscription at any time so that you only receive the alert messages you want to see.
By default, you are automatically subscribed to two alerts:
- Unexcused absence alerts, first occurrence of the day
- Failing grade alerts
You can change your alerts subscription at any time.
NOTE: To set up and receive alerts:
• Your email address must be verified on the My Account page.
• The same email address must be entered in your student's contact information record at the campus.
• You must set up alerts in ASCENDER ParentPortal.
If any of your students have alerts, the number of alerts is displayed next to the alert icon  in the top-right corner of every page in ParentPortal.
On any page in ParentPortal, click the alert icon ![]() in the top-right corner. You can see the two most recent alerts for the student. To view all alerts, you must go to the Alerts page.
in the top-right corner. You can see the two most recent alerts for the student. To view all alerts, you must go to the Alerts page.
II. View alerts.
ASCENDER Parent Portal > Alerts
View Alerts is the default view.
The number of new, unread alerts is displayed in a red circle.
The complete alert message is displayed under Description.
If the student has more than one alert, the alerts are displayed in the order received, with the most recent alert at the top of the list.
Tips:
- New, unread alerts are bold.
- Once you have read an alert, you can select Read. The alert will be no longer be bold.
- Clear the Read check box to change the alert back to unread.
- You can adjust the page to show or hide any alerts you have already read:
- To see only new, unread alerts, set View Read Alerts to No.
- To see all alerts, set View Read Alerts to Yes.
III. Set up attendance and/or grade alerts.
III. Set up attendance and/or grade alerts.
ASCENDER Parent Portal > Alerts
❏ Click or tap Set Alerts.
Alert preferences must be set for each student on your account.
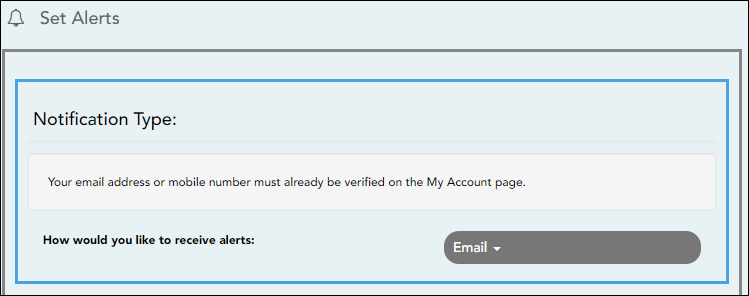
Notification Type
| How would you like to receive alerts? |
Indicate if you want to receive alert notices at your email address, sent as text messages to your cell phone, or not sent. This field is only displayed if the district has set up notification services.
Email - Receive alert notices by email. This option is only available if you have successfully registered your email address on the My Account page.
NOTES: |
|---|
There are three categories of alerts: attendance, class average, and assignment grades.
Attendance Alerts
Attendance alerts allow you to be notified if your student is marked late or absent.
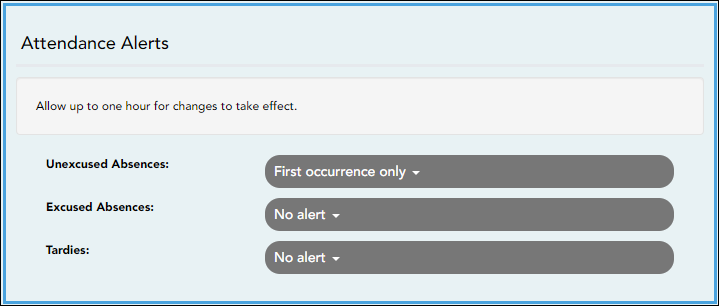
For each type of absence (Excused, Unexcused, and Tardy), indicate when you want to be notified:
No alert - Select if you do not want to be notified of your student's absences.
First occurrence only - Select if you only want to be notified of an absence for the first period the student is absent.
All occurrences - Select if you want to be notified of all absences for all periods of the day.
Class Average Alerts
Class Average alerts allow you to be notified if the student's grade average in a class falls below a specified grade. By default, you will receive an alert any time the student's grade average in a class falls below failing. You can change the alert by specifying another grade.
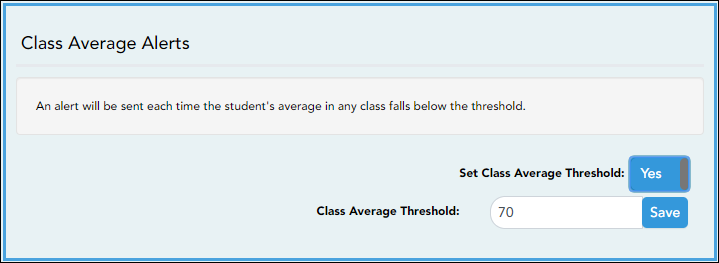
| Set Custom Average Threshold? |
Yes - Change the grade average that triggers an alert. |
|---|---|
| Custom Average Threshold | If you selected Yes, type a numeric grade (0-110). Any time your student's average falls below this grade, you will receive an alert. |
Assignment Grade Alerts
Assignment Grade alerts allow you to be notified if the student receives an assignment grade below a specified grade in any class. By default, you will receive an alert any time the student receives a failing assignment grade in any class. You can change the alert by specifying another grade.
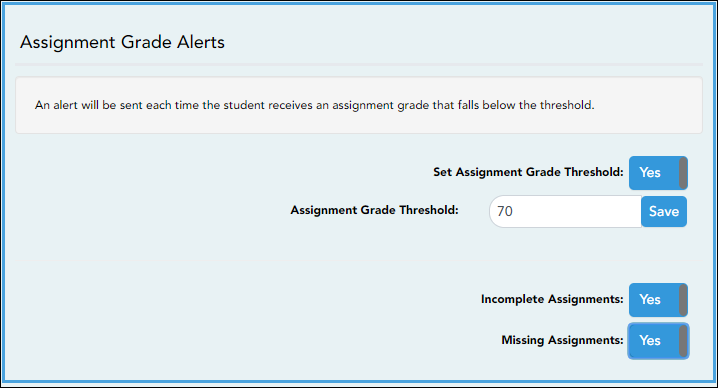
| Set Custom Assignment Threshold |
Yes - Change the assignment grade that triggers an alert. |
|---|---|
| Custom Assignment Grade Threshold | If you selected Yes, type a numeric grade (0-110). Any time your student receives an assignment grade below this grade in any class, you will receive an alert. |
| Incomplete Assignments |
Yes - Receive an alert when the student's assignment is marked as incomplete. |
| Missing Assignments |
Yes - Receive an alert when the student's assignment is marked as missing. |
Did you know?
You can also:
- Enroll new students *
- Register returning students *
- Update your student's information *
See the Parent Guide: New Student Enrollment, Online Registration, & Data Updates.
* If enabled at your district.
academy/parent_faq.txt · Last modified: 2022/10/11 13:47 by apape
Except where otherwise noted, content on this wiki is licensed under the following license: CC Attribution-Share Alike 4.0 International
Americans with Disabilities Act (ADA) and Web Accessibility
The Texas Computer Cooperative (TCC) is committed to making its websites accessible to all users. It is TCC policy to ensure that new and updated content complies with Web Content Accessibility Guidelines (WCAG) 2.0 Level AA. We welcome comments and suggestions to improve the accessibility of our websites. If the format of any material on our website interferes with your ability to access the information, use this form to leave a comment about the accessibility of our website.


