Sidebar
Add this page to your book
Remove this page from your book
StudentPortal: Set Up and Use StudentPortal
Welcome ASCENDER StudentPortal!
StudentPortal is a web-based system for students that provides the tools that will help you view your attendance, grades, and assignments, as well as organize and plan your schedule of classes. StudentPortal includes two applications, Student Course Requests and Student Graduation Plan.
Student Course Requests allows you to request courses for the next school year, including alternate courses. Once you submit your course requests, you cannot go back to change them. If you need to make changes, you will need to visit with your counselor.
Student Graduation Plan allows you to view and change your graduation plan, and view and print the summary and detail of your course credits. Graduation plans are for high school-level students only. Any coursework completed prior to the 9th grade will be reflected in the remaining credits needed, which can be viewed through the Credit Summary and Credit Detail pages of the StudentPortal Student Graduation Plan application.
Admin Setup
The following information will assist you in implementing ASCENDER StudentPortal at your campus.
I. Enable/Disable Access
Enable/disable Graduation Plan in StudentPortal.
Graduation Plan > Maintenance > StudentPortal > Campus Options
This page allows you to enable or disable access to Graduation Plan in ASCENDER StudentPortal for campuses that use Graduation Plan.
| Use Graduation Plan | Enable or disable access to StudentPortal: Closed - Disable graduation plan data in StudentPortal. Students will not see the option. Open - Enable graduation plan data in StudentPortal. Students will be able to update their graduation plan. Read Only - Allow students and parents to view graduation plans in StudentPortal but not make changes. |
|---|
❏ Click Save.
Enable/disable access to Student Course Requests in StudentPortal.
Scheduling > Maintenance > Master Schedule > Campus > Campus Control
This page allows you to grant or deny access by grade level to the Student Course Requests system.
NOTE: In order for students to be able to log in, all grade levels at the campus must have a row in the StudentPortal Course Requests section and the status must be either View or Open.
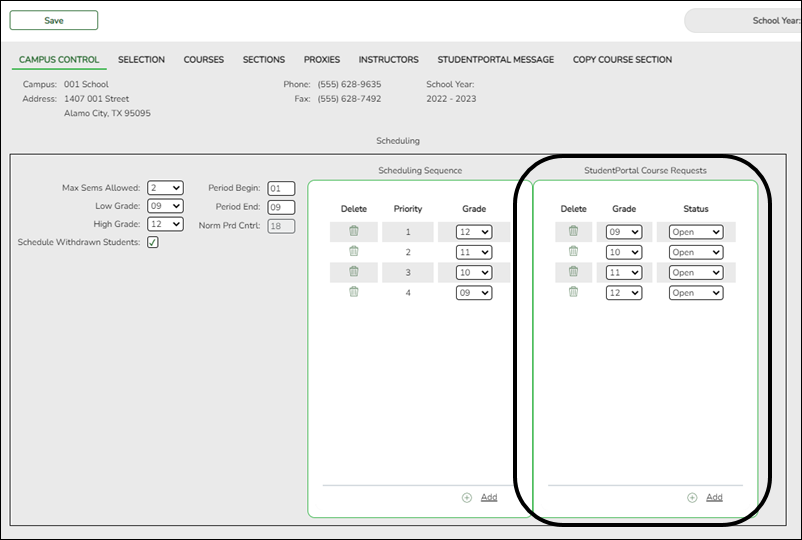
❏ Under StudentPortal Course Requests click +Add to add the access status for a grade level.
A blank row is added to the grid.
| Grade |
Select the grade level that is being assigned/denied access to StudentPortal. All grade levels at the campus must be added. |
|---|---|
| Status |
Select the status for the grade level. |
 | Delete the access status for a grade level.
1. Click You can save edits and delete records in the same step (i.e., the changes are all committed when the record is saved).
|
II. Create StudentPortal Messages
Create the campus welcome message.
Scheduling > Maintenance > Master Schedule > Campus > StudentPortal Message
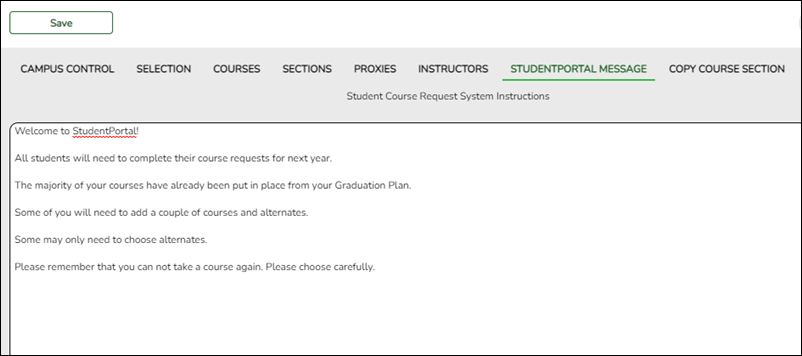
This tab allows you to type instructions to assist students who are using the ASCENDER StudentPortal Student Course Requests system. The instructions entered here are displayed as the Campus Message, which is displayed as soon as the student logs on to StudentPortal.
| Student Course Request System Instructions | Type the instructions, up to 3270 characters. If you type more than 3270 characters, the message will be truncated in StudentPortal. |
|---|
❏ Click Save.
An optional alert message can be displayed on the Login page. This message is displayed in a pop-up window, and the user must click OK to close the window.

The message file (alert.txt) is located on the application server. Contact your technical administrator to enable, disable, or update the message.
III. Verify Data
Verify courses by each grade level, restrictions, and period control.
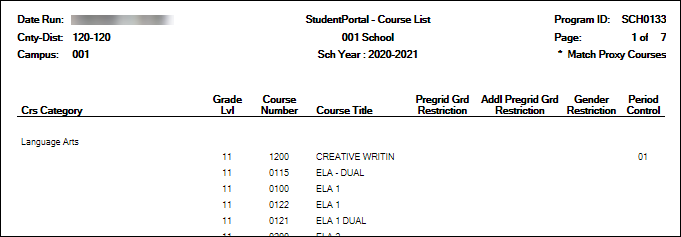
Scheduling > Reports > Scheduling Reports > Master Schedules > SCH0133 - StudentPortal - Course List
This report lists next year course, restrictions, and period control information for a campus. The data can be used for StudentPortal to verify that restrictions and period control are set correctly and to show the courses available for each grade level.
If a course does not have a pre-grid grade restriction for each grade level at the campus, the course is displayed for all grade levels.
Excluded courses are omitted from this report (i.e., if Excl Stu Crs Req is selected on Scheduling > Maintenance > Master Schedule > Campus > Courses.
Scheduling > Maintenance > Master Schedule > Campus > Campus Control
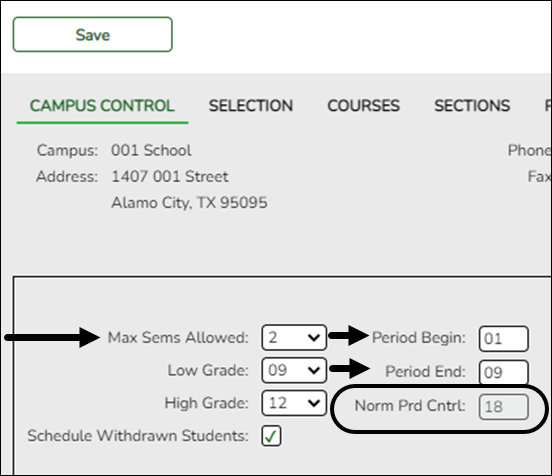
The Course Requests Units Remaining (which is displayed for students in StudentPortal) is the current number of units available to the student for all subjects. The student must select courses according to the units available.
Course Requests Units Remaining is established according to the Norm Prd Cntrl field. This number is automatically calculated, and is equal to number of periods in the school day multiplied by the number of semesters. For example, at a two-semester campus that has eight periods per day, the normal period control is 16.
Verify course units and category.
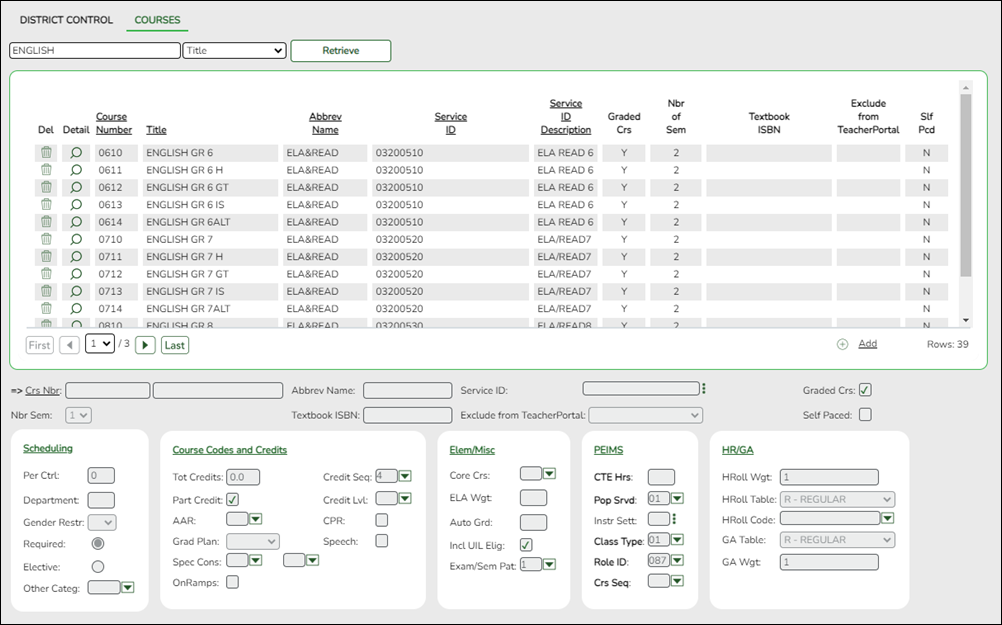
Scheduling > Maintenance > Master Schedule > District > Courses
Units is the number of units displayed for each course in StudentPortal Course Requests. In most cases, the number of units will match the number of semesters required for the course. For example, a year-long course spanning one period is worth two units, so period control is set to 2.
StudentPortal: Set Up and Use StudentPortal
Welcome ASCENDER StudentPortal!
StudentPortal is a web-based system for students that provides the tools that will help you view your attendance, grades, and assignments, as well as organize and plan your schedule of classes. StudentPortal includes two applications, Student Course Requests and Student Graduation Plan.
Student Course Requests allows you to request courses for the next school year, including alternate courses. Once you submit your course requests, you cannot go back to change them. If you need to make changes, you will need to visit with your counselor.
Student Graduation Plan allows you to view and change your graduation plan, and view and print the summary and detail of your course credits. Graduation plans are for high school-level students only. Any coursework completed prior to the 9th grade will be reflected in the remaining credits needed, which can be viewed through the Credit Summary and Credit Detail pages of the StudentPortal Student Graduation Plan application.
Student Use
ASCENDER StudentPortal Navigation Features
Navigation tools are located along the left side of the page, or in the top-right corner. Some tools function differently on mobile devices.
MOBILE DEVICE USERS: On a mobile device, tap  to access the side menu.
Selected Student
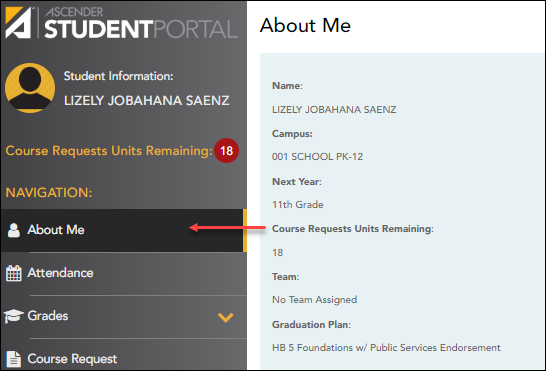
Your name and photo are displayed in the top-left corner. The photo is only displayed if provided by the district.
Course Requests Units Remaining
The number of units available for you for course requests is displayed.
Navigation
You can access your data if enabled by the district.
About Me - Your name and current, campus, grade level, and team are displayed. Verify that this information is correct.
Attendance - You can view your detailed attendance, as well as a calendar view and totals.
Grades - You can view your semester, cycle, and assignment grades. Click  to expand the grades menu.
Other Tools
 - Click to hide the left-side navigation bar. Click again to display the navigation bar.
 - Various sections throughout StudentPortal can be collapsed or expanded. Most data is expanded by default. Click
  to hide the section from view. Click
  to show the section.
Top-right
 - Click to view ASCENDER StudentPortal online Help.
 - Click to log out of ASCENDER StudentPortal.
Bottom-left
I. Log On
Log on to ASCENDER StudentPortal.
| User Name | Type your user name. Your user name is not case-sensitive. |
|---|---|
| Password | Type your password. The typed text is hidden. Your password is case sensitive. |
❏ Click Login.
The Campus Message opens in a pop-up window. Read the message, and then click Close to close the window.

You can access this message again any time by expanding the Campus Message section at the top of the Course Request page.
❏ Use the left-side menu to access the StudentPortal pages.
NOTE: After 20 minutes of inactivity, you will be logged off from the system and will return to the Login page.
Verify that your student data is correct.
ASCENDER StudentPortal > About Me
Your name, campus, next year grade level, team, and graduation plan are displayed. Be sure all information is correct.
II. View Attendance, Grades, & Assignments
Once logged on, the student can view attendance, semester & cycle grades, and assignments.
ASCENDER StudentPortal > Attendance
The Attendance page displays your daily attendance and semester totals.
- Detailed View - Displays attendance details in a table view.
- Calendar View - Displays attendance details in a calendar view instead of a table view.
- Totals View - Displays tardies and attendance totals for the semester.
Attendance data is current as of the date and time you logged in. To refresh the attendance data displayed, you must log out and log in again.
MOBILE DEVICE USERS: Your attendance data is below the legend. You may need to scroll down to view data.
| Semester | Select the semester you want to view attendance for. |
|---|
Detailed View
Detailed View (All Attendance) is the default view.
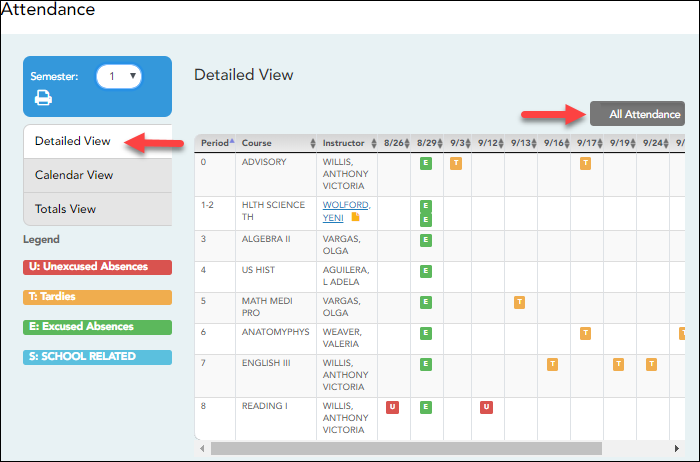
Your schedule is displayed. The date appears in the column heading only if you were marked absent or tardy for any period during that day.
If you were present and on time for the entire day, nothing appears for the date.
If you were not present for the entire class, a code appears for the period and date. A description of each code is displayed in the Legend.
All Attendance/Detailed Toggle
All Attendance:
The All Attendance view is selected by default, which displays the four main absence types:
- Unexcused Absence (U)
- Tardy (T)
- Excused Absence (E)
- School Related (S)
Detailed:
❏ Click or tap All Attendance to toggle to the Detailed view where you can see more specific information for an absence.
All applicable codes are listed in the Legend.
The codes are color coded according to the main absence types (Unexcused, Tardy, Excused, and School Related).
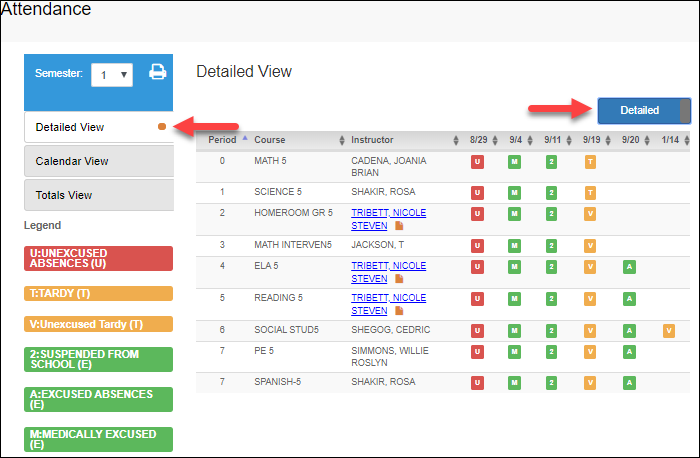
❏ Click or tap Detailed to return to All Attendance view.
MOBILE DEVICE USERS: On a mobile device, if you have numerous absences, you may need to tap a row to open the Details view in order to see all absences for a particular class.
Calendar View
❏ Click or tap Calendar View.
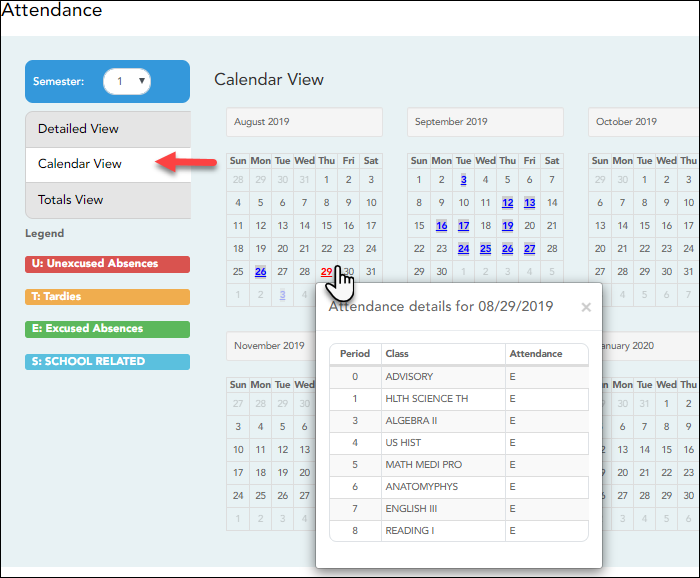
All months for the selected semester are displayed.
If the student was not present for the entire class for any period of the day, the date is shaded. Click the date to view the attendance details for each period. The period is only listed if your student was marked absent or tardy for that period.
Totals View
❏ Click or tap Totals View.
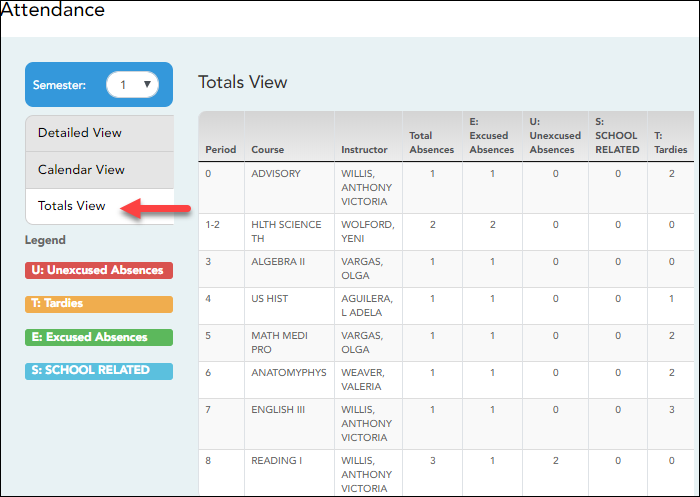
Your classes are listed by period, and the total number of excused absences, unexcused absences, school-related absences (e.g., UIL events or field trips), and tardies for the selected semester are listed.
The Total Absences column displays semester totals for all absence types, excluding tardies.
| Instructor | If the teacher has provided an email address, the teacher's name is displayed as a link to that email address. |
|---|
MOBILE DEVICE USERS: Tap a row to view semester totals for the class.
ASCENDER StudentPortal > Grades > Cycle & Semester Grades
The Cycle & Semester Grades page displays your cycle and semester grade averages. You can also view assignment grades for the current semester.
- Cycle Grades - Displays current grade averages for the current cycle, and posted grade averages for previous cycles. For the current semester, you can view the assignment grades for each class. For previous semesters, only the posted average is available.
- Semester Grades - Displays your posted semester and final averages. This data is only available for closed semesters. For the current semester, no data is displayed.
| Semester | Select the semester you want to view grades for. |
|---|---|
| Include Withdrawn Courses | Select if you wish to include withdrawn courses. |
Cycle Grades
Cycle Grades is the default view.
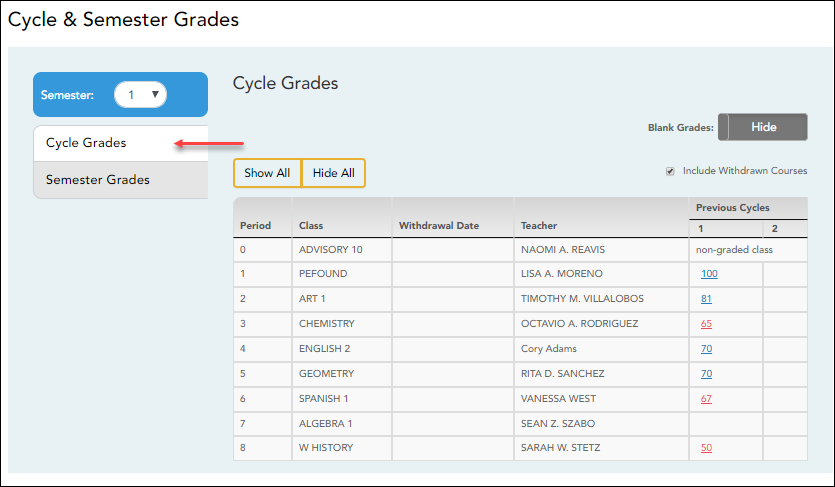
❏ Click the cycle grade to view the assignment grade details for that cycle.
| Blank Grades | Choose whether to show or hide blank grades from the view. |
|---|
❏ Click the cycle grade to view the assignment grade details for that course-cycle.
The section expands to display all assignments, due dates, and assignment grades, as well as the weight and average for each assignment category in that course.
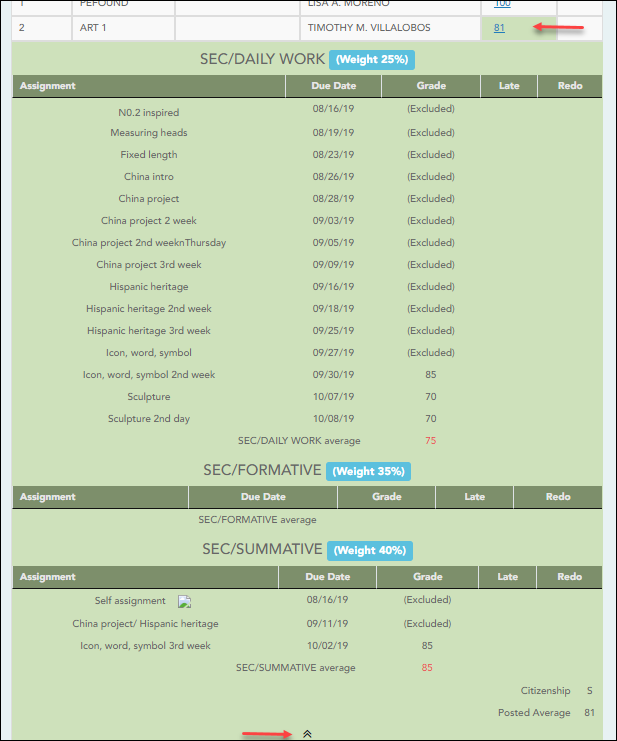
The Citizenship grade, Calculated Average, and Posted Average are also displayed.
Click the close icon  to collapse the expanded view for for a particular course-cycle.
| Show All | Click to show assignment grade details for the cycle for all courses. |
|---|---|
| Hide All | Click to hide the expanded assignment grade details for all courses. |
Semester Grades
❏ Click or tap Semester Grades.
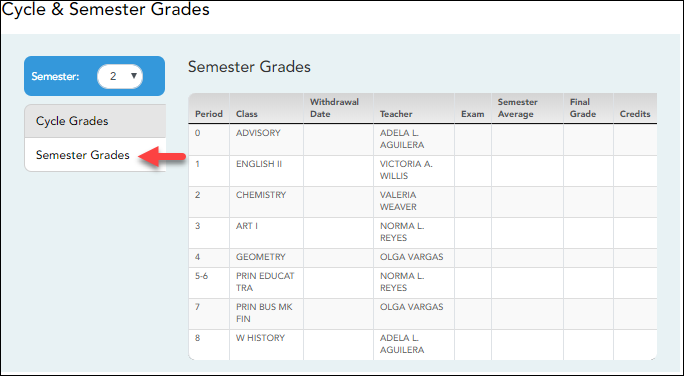
Your posted semester and final averages are displayed.
This data is only available for closed semesters. For the current semester, no data is displayed.
| Exam | Your semester exam grade for the course is displayed. |
|---|---|
| Semester Average | Your posted semester average for the course is displayed. |
| Final Grade | Your posted final grade for the course is displayed.
• For one-semester courses, this grade is posted after the semester is closed. |
| Credits | The number of credits received for the course that count toward graduation requirements is displayed. |
| (note icon) | Click the icon to view a note entered by the teacher. If the teacher has provided contact information, office hours, and/or other notes, an icon is next to the teacher's name. If the teacher has provided course notes or assignment notes, an icon is next to the course and/or assignment. |
ASCENDER StudentPortal > Grades > Assignments
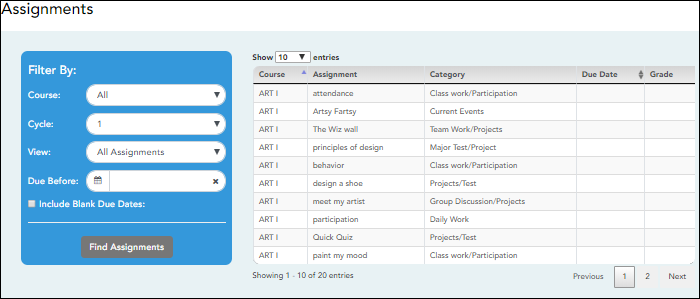
The Assignments page allows you to view your class assignments for all courses and all cycles, including graded, ungraded, dropped, missing, etc. You can only view assignments for the current semester.
Filter By:
| Course | Select a specific course, or click All to view assignments in all courses. |
|---|---|
| Cycle | Select a specific cycle, or click All to view assignments for all cycles. |
| View | Select which assignments to view:
All - View all assignments. |
| Due Before | Select a date to view only assignments due before a particular date. Leave blank to view all assignments. |
| Include Blank Due Dates | Select if you wish to include assignments that do not have a specified due date. |
❏ Click Find Assignments.
The assignments are displayed according to your selections. Only assignments for the current semester are listed.
MOBILE DEVICE USERS: Your assignments are listed below the filters. You may need to scroll down to view data.
TIP: Click a column heading to sort the assignments by that heading in ascending order. Click the column heading again to sort in descending order.
- If an assignment grade has been dropped, the message “dropped” is displayed next to the grade.
- If an assignment grade has been excluded, the message “excluded” is displayed in place of the grade.
- If an assignment is missing, the message “missing” is displayed in place of the grade.
- If an assignment is incomplete, the message “incomplete” is displayed in place of the grade.
- If the student is withdrawn from the course, the message “(withdrawn)” is displayed next to the course title.
STANDARDS-BASED GRADING: If the course uses the standards-based type of grading, assignments are associated with specific standards. For these courses, the Standard Scores heading is displayed in the table. For each assignment, all associated standards and grades are displayed. Note that assignments may have multiple standards. Also, an assignment may be associated with more than one standard, so you may see the same standard for multiple assignments. The grade for the course is calculated from the scores for the standards, not the assignments.
Some districts use the name SKILLS-REFERENCED GRADING to refer to this grading type.
III. Request Courses
If allowed by the campus, the student can request courses for the upcoming school year.
Enter and submit course requests.
ASCENDER StudentPortal > Course Request
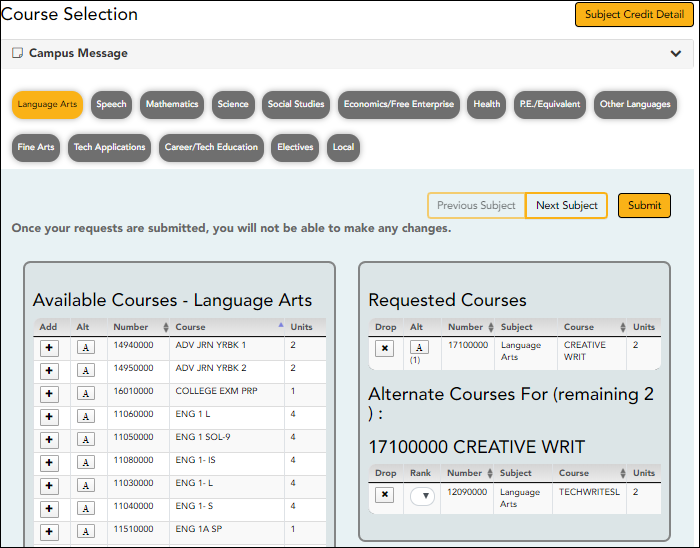
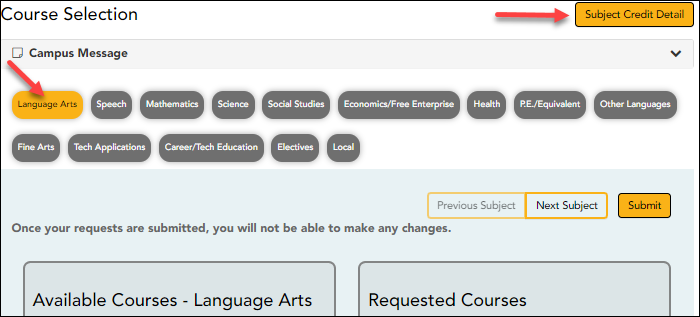
The Course Selection page allows you to select and submit course requests for your next year school schedule.
NOTE: If you log on to the application and you are only able to view the Confirmation page, you have either already submitted your course requests, or your campus has changed the application settings to view only. If no courses are listed on the Confirmation page, you have not requested courses for the next school year and will need to meet with your counselor.
Course Requests Units Remaining:
To begin selecting courses, you must have the appropriate number of Course Requests Units Remaining available. The Course Requests Units Remaining field is located in the left-side navigation bar.
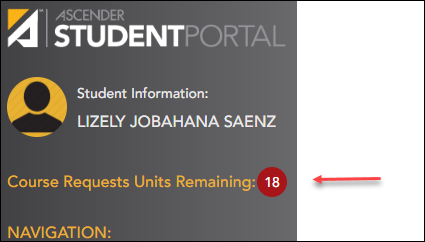
Course Requests Units Remaining is the number of units available for you to select from the Available Courses section.
- Most courses are worth two units because the course is two semesters long. The units depend on your campus and the number of semesters required for the course.
- The number of units required for each course is displayed in the Units column of the Available Courses section.
- Once Course Requests Units Remaining is zero, a warning message is displayed notifying you that you will not be able to select additional courses unless you remove a previously selected course from the Requested Courses section.
- Course Requests Units Remaining will decrease as you add courses.
- Course Requests Units Remaining will increase as you remove courses.
Select courses:
Subjects are listed across the top of the page.

❏ Click the subject area you want to view.
When you click a subject area, the list of courses under the Available Courses section will change to correspond with the subject selected. For example, when you click Science, all courses in the Available Courses section will change to science classes available at your campus.
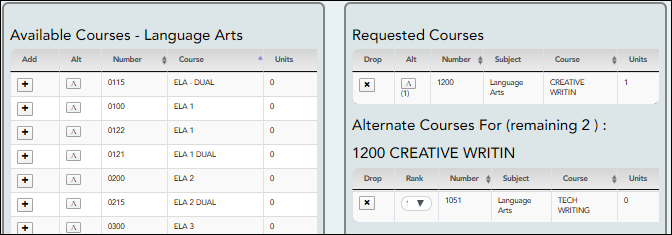
You can click the Number or Course column heading to sort the columns in ascending order by course number and course name.
Left grid:
❏ Under Available Courses, click  to add a course.
• The course is moved to the Requested Courses list (right grid) and is no longer displayed under Available Courses.
• The Course Requests Units Remaining field decreases by the appropriate number of units.
Right grid:
❏ To remove a course from the Requested Courses list, click  in the Drop column.
• The course moves back to the Available Courses list (left grid) and is no longer displayed under Requested
Courses.
• Course Requests Units Remaining increases by the appropriate number of units.
NOTE: If a course is displayed in the Requested Courses list and you do not have the ability to remove it, it was added by your campus, and you will need to meet with a counselor to discuss it.
Select alternate courses:
- From the Available Courses list, click
 to add an alternate course.
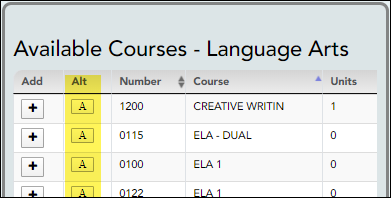
A pop-up window opens allowing you to select the course for which you want to add this alternate course.
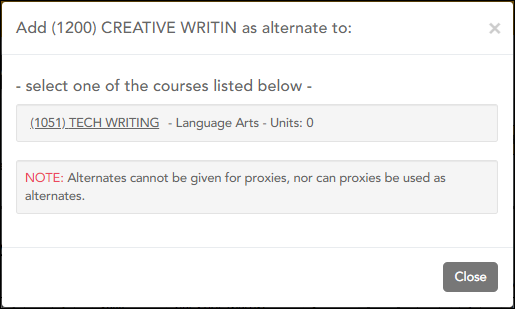
The window lists your requested courses. Click a course to select it.
In the example above, if the TECH WRITING course is not available, the CREATIVE WRIT course will be substituted.
When you click the course, the window closes, and the selected alternate course is displayed in the Alternate Courses For list and is no longer displayed in the Available Courses list.
NOTE:- Only courses with an assigned course number are available.
- Only three alternate courses may be selected per course.
- A proxy course (i.e., a group of courses that are scheduled together) cannot be added as an alternate.
Under Requested Courses, the Alt column displays in parentheses the number of alternate courses added for the course.
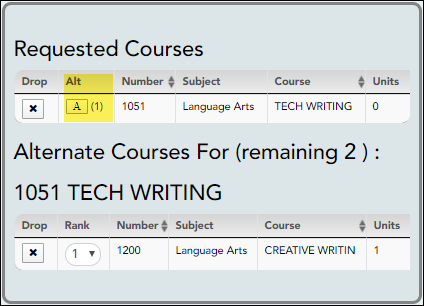
❏ Click  to view the alternate courses.
The alternate courses are displayed in the Alternate Courses For list.
❏ To remove an alternate course from the Alternate Courses For list, click  in the Drop column next to the appropriate course.
- The course is displayed in the Available Courses list and is no longer displayed in the Alternate Courses For list.
- If a course is displayed in the Alternate Courses For list and you do not have the ability to remove it, it was added by your campus, and you will need to meet with a counselor to discuss it.
❏ Under Alternate Courses For in the Rank field, you can rank the order in which you want the alternate courses to be applied to your course requests.
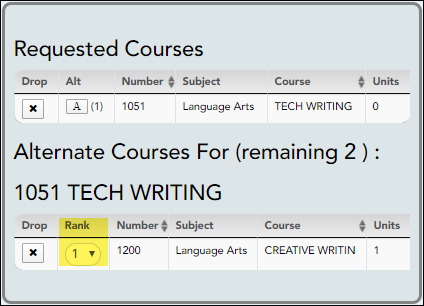
For example, if a course is not available, the alternate course with a rank of 1 will be the first alternate course attempted to replace it. If that course cannot be applied, the course with a rank of 2 will be attempted, and so on.
NOTE: If the counselor has specified the rank order, it cannot be changed.
❏ Before submitting your course requests, confirm each of the following:
❏ All information on the About Me page is correct.
❏ You are satisfied with your selections.
No changes can be made once you click Submit.
❏ Course Requests Units Remaining is equal to zero.
❏ Click Submit to submit your list.
A message is displayed confirming your choice to submit your request.

- Click Continue to view the Confirmation page.
- Or, click Cancel to continue adding or removing courses.
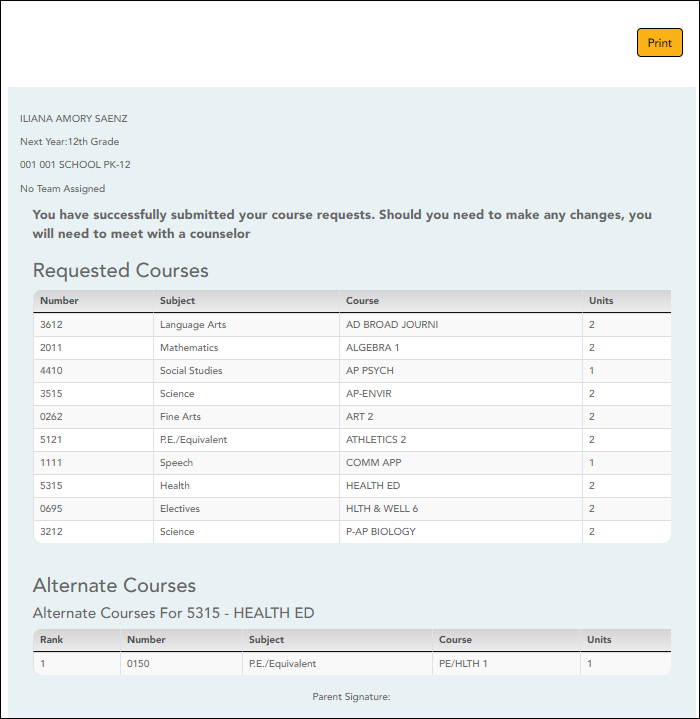
The Confirmation page allows you to view and print your submitted course requests.
Once you have submitted your course requests, you will no longer be able to make changes. If you would like to add or remove any courses, you will need to meet with a counselor.
At any time, you can log on to the Student Course Requests application to view and print this information.
IV. View & Update Graduation Plan
If allowed by the campus, students can view and update their graduation plan.
View and update graduation plan.
ASCENDER StudentPortal > Graduation Plan > Graduation Plan
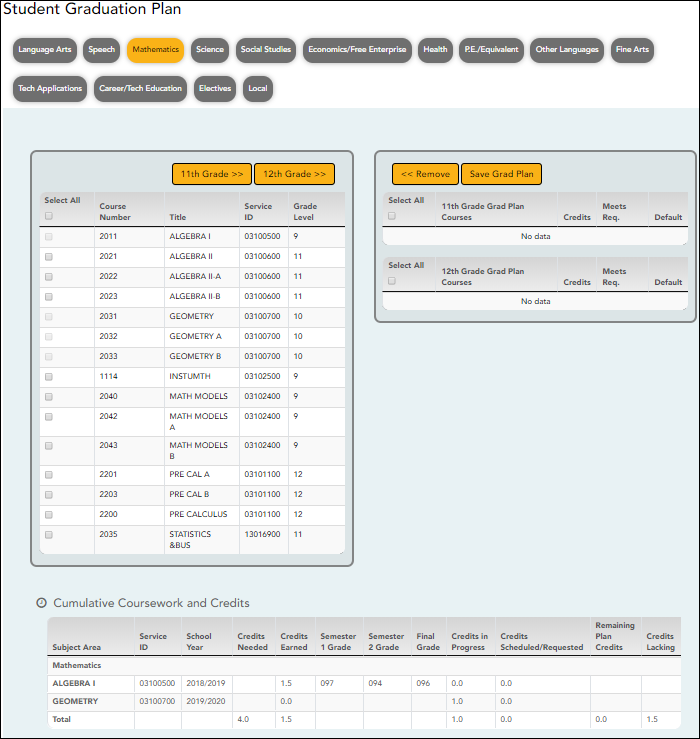
The different subjects available at your campus are displayed across the top.
❏ Click a subject to display courses for that subject area.
Left grid:
The available courses for the selected subject are displayed in the left grid, including course number, course title, service ID, and suggested grade level. Click a different subject to see different courses.
Right grid:
- The courses already assigned to you are displayed in the right grid in order by grade level. You can add or remove courses for each grade level displayed.
- Courses are only displayed for your future grade levels, not your current grade level.
- The listed courses include:
- Courses you previously selected as a part of your graduation plan
- Courses assigned to you automatically by your counselor
- When a course is already included in your graduation plan, or if you have already taken a course, the course is disabled in this list.
Change the Graduation Plan:
❏ From the left grid, select the individual course(s) you want to add to your graduation plan. Or, click Select All to select all courses in that grid.
❏ Click  (or the appropriate grade level button) to move the course(s) from the left grid to the right grid. The course is moved to below the corresponding grade level in the right grid.
❏ To remove any courses from your graduation plan, select the course(s) in the right grid, and then click «Remove.
❏ Click Save Grad Plan to save your graduation plan.
Cumulative Coursework and Credits:
This section displays credit details for the selected subject area, including your completed coursework and projected credits in the subject area. This information can help you make decisions for the upcoming years.
- This is the same information that is displayed on the Credit Detail page.
- Any middle school courses taken for high school-level credit are included.
ASCENDER StudentPortal > Graduation Plan > Credit Summary
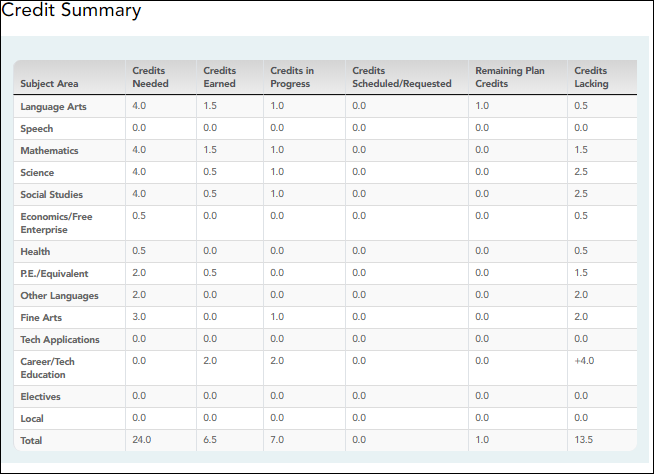
The Credit Summary page allows you to view a report of your total credits needed, credits earned, courses/credits in progress, requested/scheduled courses/credits, and planned courses/credits. If you are lacking any credits for graduation in one or more subject areas, this information is displayed as well.
| Subject Area | The subject areas covered by your assigned graduation plan are listed. |
|---|---|
| Credits Needed | The total number of credits required for the subject area is displayed. This is the total for the plan, not the grade level. |
| Credits Earned | The number of credits you have earned to date in the subject area is displayed. This number includes all grade levels. |
| Credits in Progress | The number of credits you will earn in the subject area is displayed. The number of credits is only correct once you successfully complete the courses that you are currently enrolled in. |
| Credits Scheduled/Requested | The number of credits you are scheduled for or have requested for the upcoming school year is displayed. These courses have not yet been attempted. |
| Remaining Plan Credits | The number of credits included in future years of your graduation plan is displayed. This number also takes into account any scheduled credits for the upcoming school year. For example, a 10th grade student who has successfully taken English I and English II in 9th and 10th grades respectively, and has scheduled English III for 11th grade, will have one remaining plan credit for English IV. |
| Credits Lacking | Includes credits earned, in progress, scheduled/requested, and remaining, and compares them to the credits required for the entire graduation plan. Any difference is displayed in this column.
• If all required credits have been accounted for in the subject area, a zero is displayed. Otherwise, the number is displayed. |
Print the Credit Summary
❏ To preview your credit summary, select the print preview option from your browser menu.
❏ To print your credit summary, click Print.
ASCENDER StudentPortal > Graduation Plan > Credit Detail
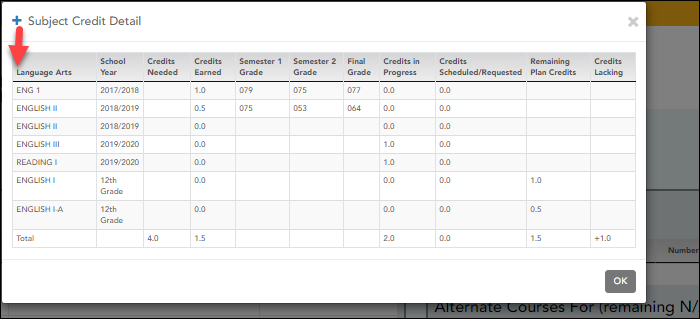
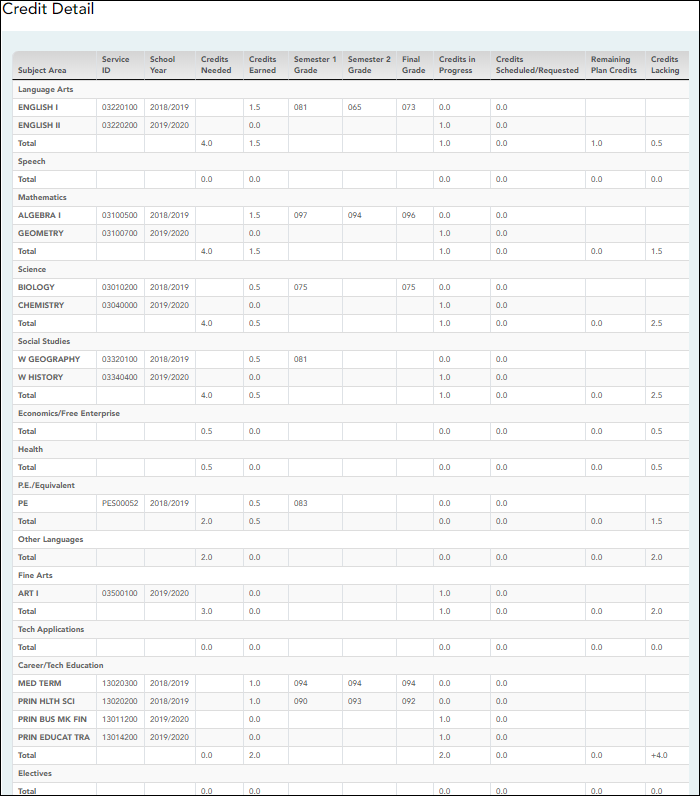
The Credit Detail tab allows you to view expanded detail of your credit summary information. In addition to the credit summary data, the specific courses, service IDs, school years, and grades are displayed.
| Subject Area | The subject areas covered by your assigned graduation plan are listed. Below each subject, the specific courses you have taken are also listed. The same course may be listed twice if you took the course twice (i.e., failed or did not receive credit the first time). |
|---|---|
| Service ID | The service ID for each course is displayed. |
| School Year | The school year in which you took the course is displayed. |
| Credits Needed | The total number of credits required for the subject area is displayed on the Total row for the subject area. |
| Credits Earned | If you have earned credit for the course, the number of credits is displayed by school year. The total credits earned for the subject area is displayed on the subject Total row. |
| Semester # Grade | Your semester grade for each course is displayed by school year. |
| Final Grade | If your final grade has been posted for the course, the final grade is displayed by school year. |
| Credits in Progress | The number of credits you will earn in the subject area is displayed. The number of credits is only correct once you successfully complete the courses that you are currently enrolled in. The total credits in progress for the subject area are displayed on the subject Total row. |
| Credits Scheduled/Requested | The number of credits you are scheduled for or have requested for the upcoming school year is displayed. These courses have not yet been attempted. The total credits scheduled and requested for the subject area is displayed on the subject Total row. |
| Remaining Plan Credits | The number of credits included in future years of your graduation plan is displayed on the subject Total row. |
| Credits Lacking | Includes credits earned, in progress, scheduled/requested, and remaining, and compares them to the credits required for the entire graduation plan. Any difference is displayed in this column.
• If all required credits have been accounted for in the subject area, a zero is displayed. |
Print the Credit Details
❏ To preview your credit detail, select the print preview option from your browser menu.
❏ To print your credit detail, click Print.
Americans with Disabilities Act (ADA) and Web Accessibility
The Texas Computer Cooperative (TCC) is committed to making its websites accessible to all users. It is TCC policy to ensure that new and updated content complies with Web Content Accessibility Guidelines (WCAG) 2.0 Level AA. We welcome comments and suggestions to improve the accessibility of our websites. If the format of any material on our website interferes with your ability to access the information, use this form to leave a comment about the accessibility of our website.


