Sidebar
Table of Contents
academy:admin_forms_create_custom
Book Creator
Add this page to your book
Add this page to your book
Book Creator
Remove this page from your book
Remove this page from your book
ASCENDER Parent Portal Admin > Form Management > Custom Forms > Create Custom Form
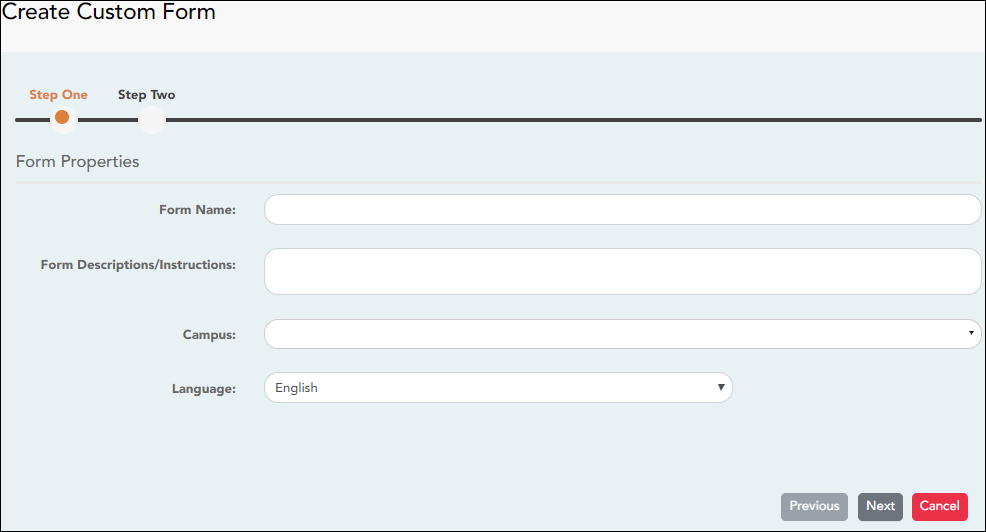
Step 1
If selecting English and Spanish for Language, the English version will be created first. To translate into a Spanish version, use Custom Forms > Edit Custom Forms.
Form Properties:
| Form Name | Type a name for the form, using up to 50 characters. For a Spanish form, provide the name in Spanish. |
|---|---|
| Form Descriptions/Instructions | Type any specific district-level instructions for the form, using up to 500 characters. For a Spanish form, provide the instructions in Spanish. |
| Campus | (Required) Select a campus in order to assign the form to a specific campus. Or, select All Campuses if the form is used for all campuses in the district. If you select All Campuses, each campus is listed, and you can remove individual campuses if needed.  NOTE: If you select All Campus by mistake, click Cancel All to clear all campuses at once. |
| Language | Select the language of the form. If you need the form in both English and Spanish (now or in the future), select English and Spanish. This creates a duplicate of the English form that can later be translated into Spanish on Custom Forms > Edit Custom Forms. WARNING: Once the language option is selected, it cannot be changed. |
❏ Click Next.
Step 2
Question Format Types:
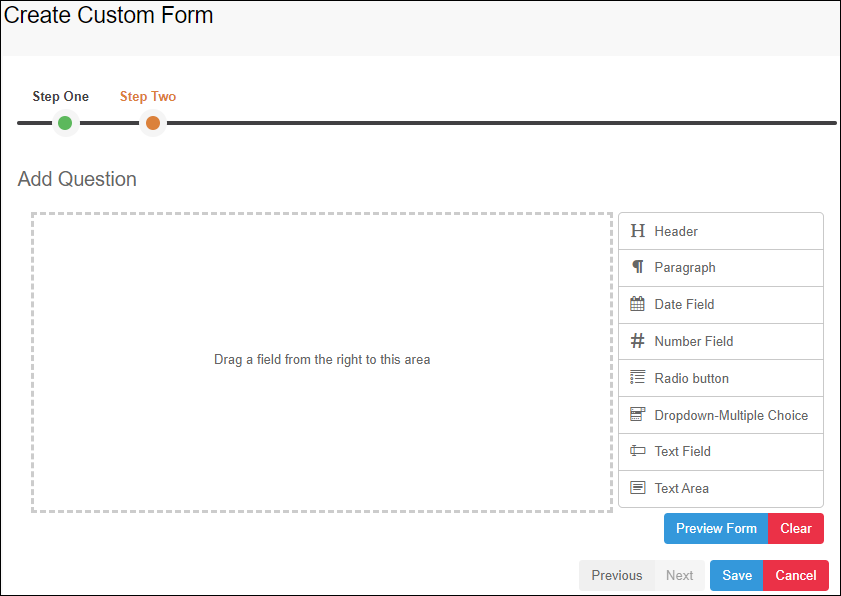
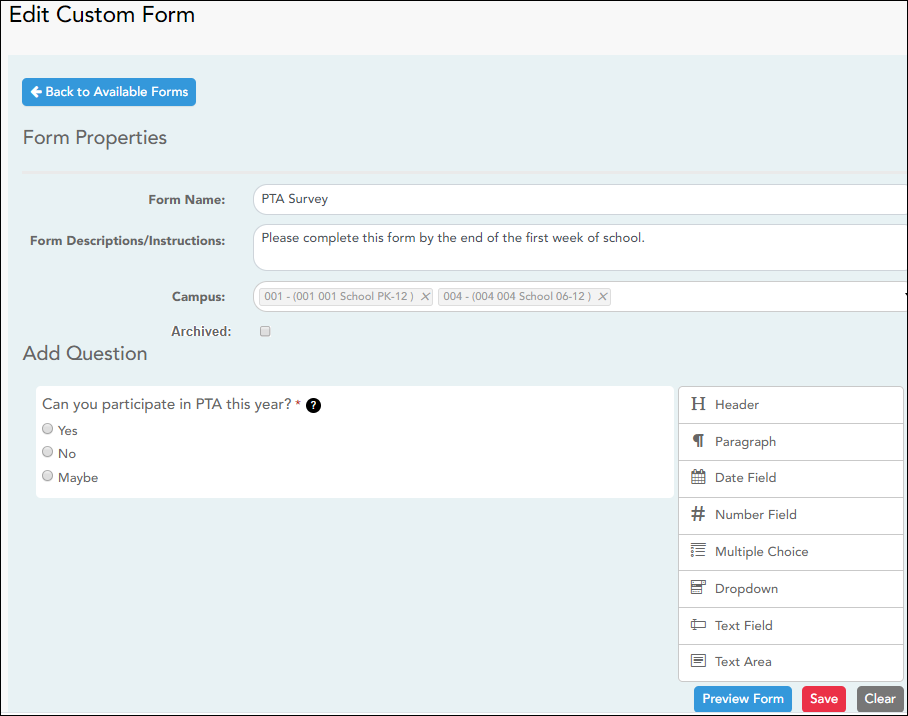
❏ You can add a variety of elements to your form.
- Drag the element from the right to the blank area in the middle.
- You can drag and drop the elements to re-position them within the form.
- Click Preview Form any time to see how the form will look to parents.
The following two options allow you to provide headings and instructions on the form.
| Header | Select to add a heading, up to 50 characters. Example:  |
|---|---|
| Paragraph | Select to provide one or more sentences in the form, such as instructions, up to 1000 characters. Example:  |
The following question format types refer to the answer you are soliciting from the parent.
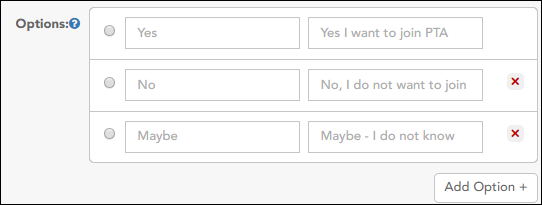
All question format types allow the following properties to be set:
NOTE: For Spanish forms, provide this information in Spanish.
TIP: Be sure to add questions to the custom form that help identify the student that the information is being gathered for (e.g., What is your student’s first name? What is your student’s last name? Grade Level? What school does your child attend? (multiple choice)). The form results do not automatically provide default information such as first name, last name, grade level, campus.
The following properties depend on the type of question format type selected:
NOTE: For Spanish forms, provide this information in Spanish.
❏ You can further adjust the form. Hover over each question in the form:
 - Click to remove the question from the form.
 - Click to view/modify the properties of the question.
Click Close to collapse (i.e., hide) the properties for a particular question.
❏ Click Clear if you need to remove all questions from the form and start over.
❏ Click Save.
❏ Click Previous if you need to return to Step 1 to modify form properties.
NOTE: A custom form must be added to either the Returning Student Registration or Student Data Maintenance group (under Form Group Management) to be visible to parents. Custom forms are not available for use in New Student Enrollment.
ASCENDER Parent Portal Admin > Form Management > Custom Forms > Edit Custom Form
This page allows you to view or modify existing custom forms that you have created. Copy allows you to copy a form and add or remove fields.
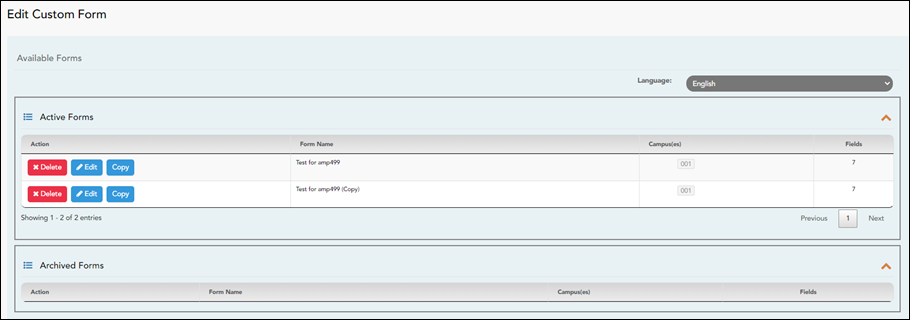
Your existing custom forms are listed. Active Forms are listed first, and Archived Forms are listed below active forms.
To translate an English and Spanish form into Spanish, select Spanish from the Language drop-down menu and select Edit.
WARNING: When translating into Spanish, only translate the text, do not change the order of the Questions or add any Questions. Doing so will cause data in the Spanish version to become out of sync with the English version.
❏ Click Edit to view/modify a form.
The form opens in editing mode. You can make changes as described on Custom Forms > Create Custom Form.
NOTE: Custom Forms with data attached have limited edit capabilities. The campus cannot be edited and fields cannot be rearranged, deleted or duplicated. If major changes are required, it is recommended to use the Copy Form feature to create a new form.
❏ Or, click Copy to copy a form.
The form opens in editing mode. You can make a copy of a form and add or remove fields as described on Custom Forms > Create Custom Form. The Form Name field is limited to 50 characters.
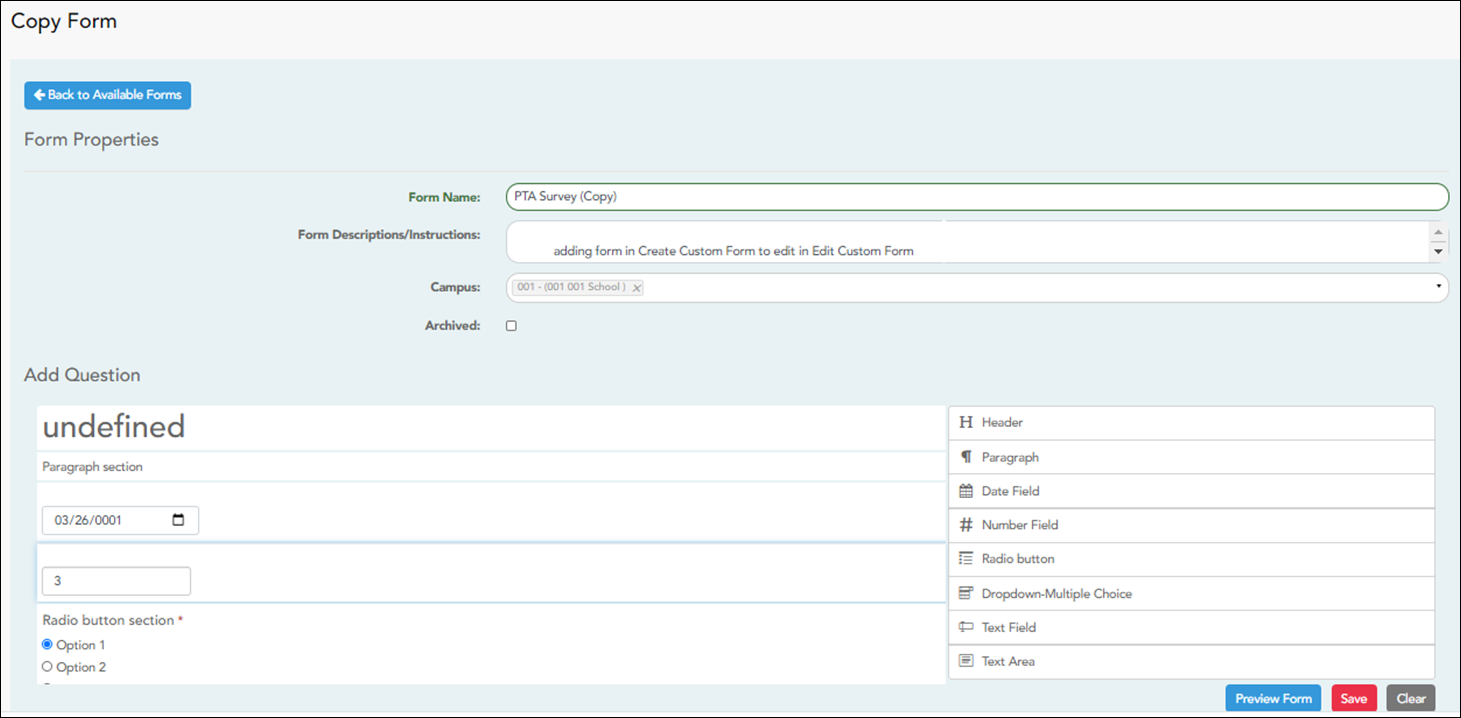
❏ Select Archive to archive the form.
Archiving allows you to retain forms that may still be needed for reporting purposes but are no longer used for data collection. An archived form is still accessible to administrators, but is grouped with other archived forms for organizational purposes.
❏ Click Back to Available Forms to return to the list of existing custom forms.
❏ Click Delete to delete a custom form.
NOTE: A custom form cannot be deleted if there is data associated with it.
ASCENDER Parent Portal Admin > Form Management > Custom Forms > View Custom Form Data
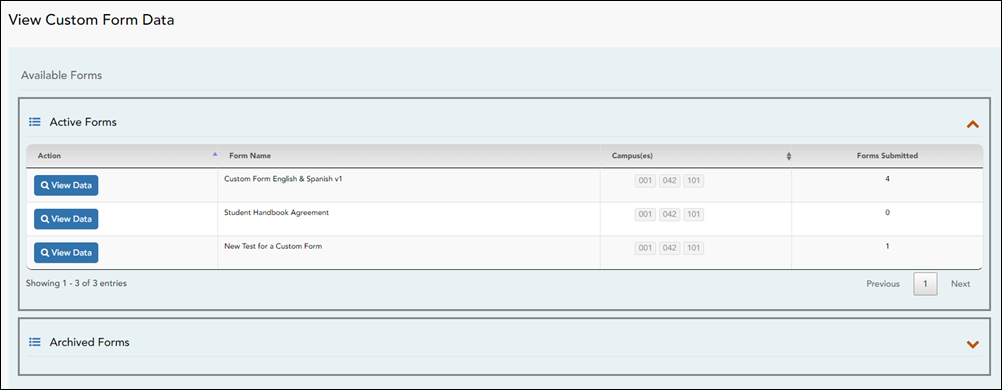
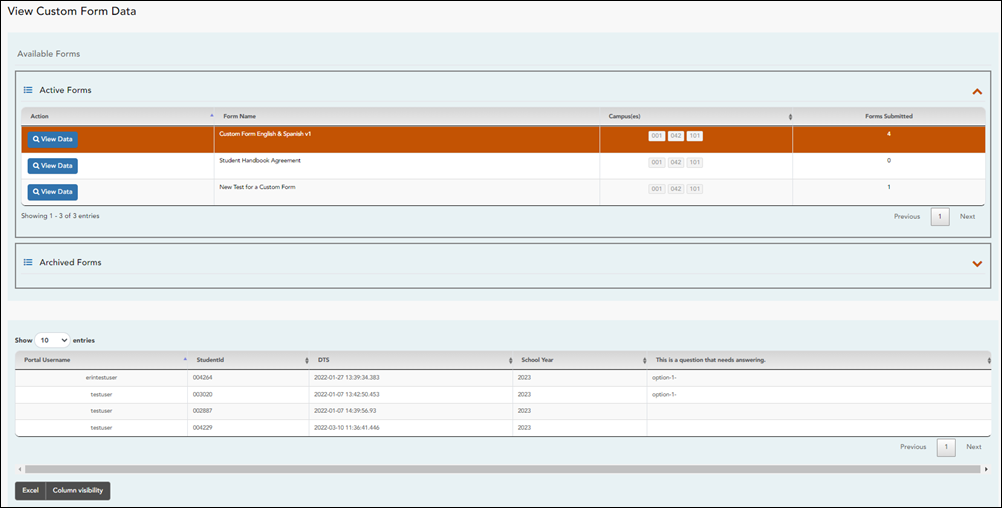
This page allows you to view data submitted by parents in custom forms.
Your existing custom forms are listed. Active Forms are listed first, and Archived Forms are listed below active forms.
NOTE: Archived forms are forms that may still be needed for reporting purposes but are no longer used for data collection. An archived form is still accessible to administrators, but is grouped with other archived forms for organizational purposes.
| Form Name | The name of the custom form is displayed, as entered in Step 1 on the Create Custom Form page. |
|---|---|
| Campus | The campuses using the custom form are listed. |
| Forms Submitted | The number of form responses submitted by parents is displayed. |
❏ Click View Data to view the answers submitted by parents.
<div indent>The answer data is displayed in a grid below the forms list.
TIP: You can click the column headings to sort data by a particular question.
| Excel | Click to export the report as a spreadsheet. |
|---|---|
| Column visibility | Click to select which columns to include in the export. |
NOTE: It is recommended that you save a backup copy of the form once all data is gathered.
academy/admin_forms_create_custom.txt · Last modified: 2019/07/10 22:49 by jstanford
Except where otherwise noted, content on this wiki is licensed under the following license: CC Attribution-Share Alike 4.0 International
Americans with Disabilities Act (ADA) and Web Accessibility
The Texas Computer Cooperative (TCC) is committed to making its websites accessible to all users. It is TCC policy to ensure that new and updated content complies with Web Content Accessibility Guidelines (WCAG) 2.0 Level AA. We welcome comments and suggestions to improve the accessibility of our websites. If the format of any material on our website interferes with your ability to access the information, use this form to leave a comment about the accessibility of our website.

