ASCENDER - First Payroll of the School Year (September Start LEAs)
Created: 05/31/2018
Reviewed: 06/13/2025
Revised: 08/01/2025
CAUTION: Do not begin this process until the End-of-Year Payroll Verification, August Accruals process, and the Finance EOY Process are complete.
For the First Payroll of the School Year process, July start LEAs will reference the (CRT) First Payroll of the School Year (July Start LEAs) guide.
The purpose of this document is to guide you through the necessary steps to process the first payroll of the school year for September start LEAs.
In addition to the above processes, the following steps should be completed prior to continuing with this process.
- Print HRS2250 - Deduction Register by Employee for future reference.
- Print HRS2400 - Bank Account Listing to verify that all employee bank information is correct.
- Print HRS1000 - Roster of Personnel and save it for the auditors.
- Update termination dates and reasons on the Personnel > Maintenance > Employment Info page for all employees who are no longer with the LEA.
- Verify that the budget is moved to Finance.
This document assumes you are familiar with the basic features of the ASCENDER Business system and have reviewed the ASCENDER Business Overview guide.
Some of the images and/or examples provided in this document are for informational purposes only and may not completely represent your LEA’s process.
Before You Begin
Terms:
| Term | Description |
|---|---|
| CYR payroll frequency | Current year payroll frequency |
| LEA (Local Education Agency) | Refers to the educational entity (e.g., charter, district, etc.). |
| Non-standard employee | An employee who receives their first paycheck in July or August should have the TRS Year selected on the Payroll > Maintenance > Staff Job/Pay Data > Job Info tab. |
| NYR payroll frequency | Next year payroll frequency |
Verify important payroll items:
Payroll Verification Items
Review and address the the applicable Payroll verification items. This should be completed before each group of employees start their new pay for the new year.
Run a user-created report to verify the following information:
| ❏ | Verify that service records were created and/or updated with leave. |
|---|---|
| ❏ | Verify that Distribution codes are accurate and reflect the correct fiscal year. |
| ❏ | Verify that the applicable Distribution codes have a federal Fund to Grant Code. (240 may not have a grant code) |
| ❏ | Verify that the Original Employment Date or Latest Re-Employ Date fields are populated. |
| ❏ | Verify if there are any changes to the Employment Type, Retiree Employment Type and/or Sub Type fields. |
| ❏ | Verify all retirees for applicable surcharges. |
| ❏ | Verify that the contract Begin and End Dates are within the applicable school year. |
| ❏ | Verify the Number of Days Employed. |
| ❏ | Verify the % of Day Assigned (Did employees change from part-time/full-time?) |
| ❏ | Verify the Number of Months in the contract. |
| ❏ | Verify the Number of Payments and Number of Remaining Payments. |
| ❏ | Verify TRS eligibility using the View Employee Information screen in the TRS RE Portal. |
| ❏ | Verify the employees who are coded Non-TRS eligible (should only be seasonal, subs, retirees, etc.) |
| ❏ | Verify unemployment. Per the TASB May 2017 newsletter, superintendent wages are now subject to unemployment. Student workers are the only exempt exceptions. |
| ❏ | Reference the FICA/Medicare - Quick Reference to verify FICA eligibility for all employees coded Y specifically substitutes who were hired as full-time employees (e.g., teacher). (only subs, seasonal, not students) |
| ❏ | Verify salaries, distribution codes, and whether Expense 373 is selected for all applicable employees. |
| ❏ | Verify the State Min Days field on the Payroll > Maintenance > Staff Job/Pay Data > Job Info tab for all employees including support staff. Select the number of days closest to their # of Days Employed. |
| ❏ | Verify that Payoff Dates for active employees reflect June, July, or August. |
| ❏ | Verify new Deductions. Deductions can either be manually entered or imported. |
| ❏ | Verify next year payroll to budget. |
| ❏ | Verify employee status; active or inactive. If the employee is inactive, the Termination Date must be populated. Verify that an ED90 has been submitted for non-returning employees. |
| ❏ | Verify salaries and State Minimum salary by either running a user-created report or the Payroll > Reports > Payroll Information Reports > HRS6400 - Salary Verification Report with Pay Type 1 selected. |
| ❏ | Subs - Run a user-created report to verify the following information:
• TRS Member Positions
|
| ❏ | Retirees - Run a user-created report to verify the following information:
• Retiree Employment Type Code
|
| ❏ | Use the August TRS Reporting Process guide to address TRS reporting for August. |
| ❏ | If applicable and not addressed in the August TRS Reporting Process, address August adjustment days. |
| ❏ | Ensure that auxiliary role IDs are set up for applicable employees. This task is included in the TSDS PEIMS Fall Submission Data for Business guide. It is important to verify that this field and additional business data for Fall PEIMS for applicable staff are reported accurately. All business-related data that is reported for Fall PEIMS is listed in the linked guide. |
First Payroll of the School Year (September Start LEAs)
- Verify finance options.
Verify finance options
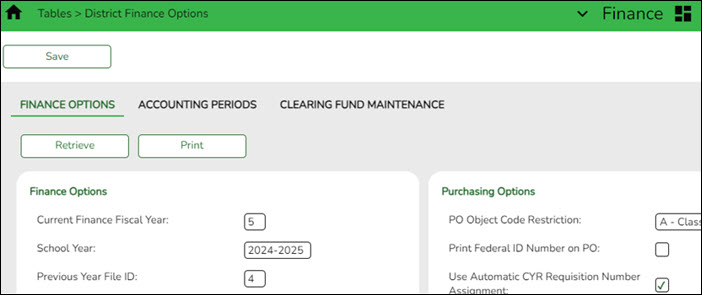
Finance > Tables > District Finance Options
Verify that the School Year field contains the new school year.
Note: If the new school year is not displayed, stop and complete the Finance End-of-Year Process first. Do not update the School Year field until the Finance End-of-Year (EOY) process is complete.
- Verify payroll frequency.
Verify payroll frequency
Each time you prepare to move a group of employees (July contracts, August contracts, and September contracts), be sure to start with this step to ensure you are starting in the correct frequency.
In Payroll, verify that you are in the next year frequency that is associated with your current year frequency. If not:
- Click Change.
- Select Next Year.
- Click Apply.
- Prepare NYR payroll for move to CYR.
Prepare NYR payroll for move to CYR
Use the User Created Reports (or another preferred payroll report) to verify that all employee data is correct prior to moving the next year payroll to the current year.
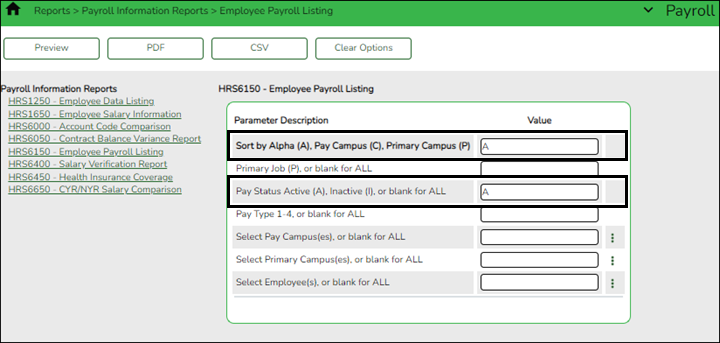
Employees being moved must have an active Pay Status. Generate the Payroll > Reports > Payroll Information Reports > HRS6150 - Employee Payroll Listing to verify the pay status of employees. Print and/or save this report.
Inactivate those employees who do not need to be moved such as employees whose contract days begin in July and/or August (11- and 12-month contracts) or “filler” employees who are used only for budget purposes (i.e., vacancies).
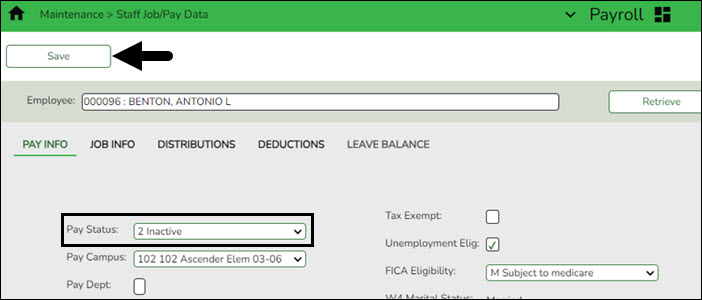
Use the Payroll > Maintenance > Staff Job/Pay Data > Pay Info tab to inactivate an employee.
- Retrieve the employee.
- In the Pay Status field, select 2 Inactive.
- Click Save.
- Copy NYR tables to CYR.
Copy NYR tables to CYR
Log on to the next year payroll frequency.
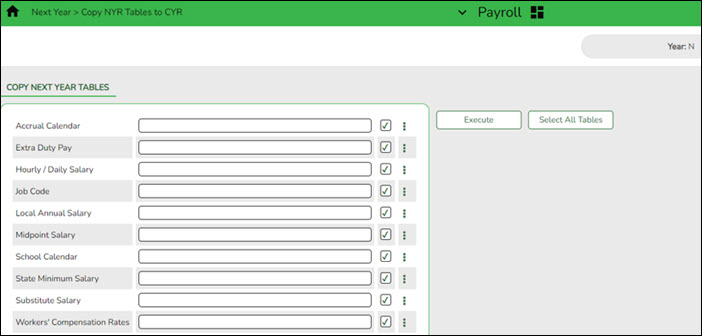
Payroll > Next Year > Copy NYR Tables to CYR
Copy all necessary tables.
CAUTION: If you copied any tables prior to this step, be sure to exclude those tables at this time to avoid overwriting any necessary data such as previously made manual changes.
- Click Select All Tables to select all of the tables.
OR
- Select ❏ next to the table(s) you want to include.
- Select ❏ again to unselect a table.
❏ ❏ Click
 for the School Calendar, Extra Duty Pay, and Job Code fields to open a pop-up window containing the corresponding tables. Select the applicable tables and click OK to populate the selected tables in the applicable fields.
Note: If you receive a database access error referencing your Summer School Calendar, click OK. This error is generated when a Summer School Calendar exists in the current year payroll frequency but does not exist in the next year payroll frequency. Select the tables you previously selected again, but in this instance, select the individual School Calendars to be copied.
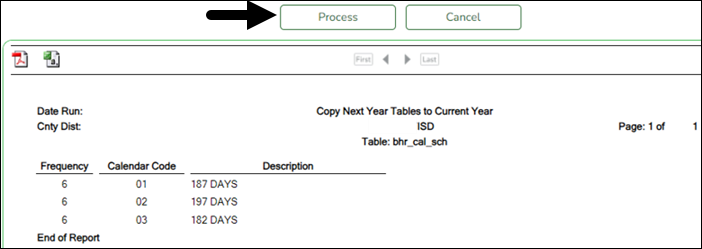
❏ Click Execute. Only the selected tables are processed. As the reports are generated, click Process for each table. Review the reports.
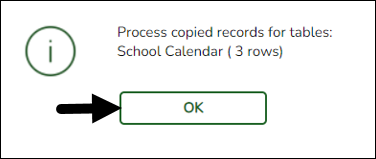
A message is displayed with the table names and the number of rows that were copied. Click OK.
Review the process report to verify that all applicable calendars, extra duty pay, and job codes were copied to the current year payroll frequency. It is recommended that you log on to Personnel > Tables > Workday Calendars to verify this information. If the calendars were not copied over correctly, you may have to individually copy the calendars.
Note: When copying the school calendar table from next year to the current year, the calendar code, description, and days are copied. If a calendar code exists in the next year and current year, the next year data replaces the entire calendar contents for the current year for the specified calendar code.
- Copy deductions.
Copy deductions
Log on to the next year payroll frequency.
Payroll > Next Year > Copy NYR Staff to CYR
If changes were made to employee deductions or you did not move deductions for 11- and 12-month employees, you can copy those deductions at this time.
All insurance selections and rate changes can be made in the current year by using the Payroll > Utilities > Employee Benefits Interface > Import Annual File page as referenced in Step 29 of this guide.
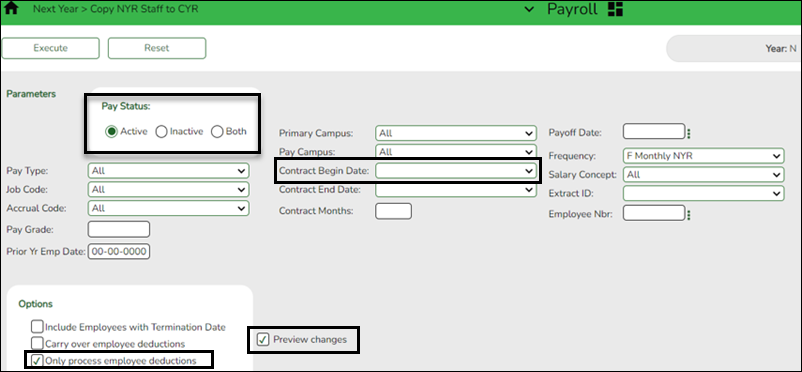
❏ Select the Pay Status applicable to your LEA as 11- and 12-month employees may be inactive at this time depending on the LEA.
❏ Under Options, select Only process employee deductions.
❏ Select Preview Changes.
❏ Use one or more of the following options to select specific employees:
- In the Contract Months field, enter 11 or 12.
- Select a Contract Begin Date. The contract begin date is LEA specific.
- Select an Extract ID.
❏ Click Execute. A preview report is displayed. Review the employee list and click Process. A message is displayed indicating that the process was successful. - Copy active staff to the CYR.
Copy active staff to the CYR
Log on to the next year payroll frequency.
Payroll > Next Year > Copy NYR Staff to CYR
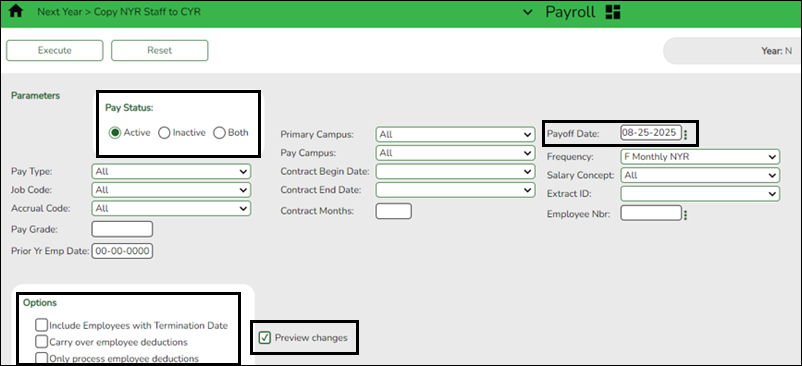
CAUTION: If the 11- and 12-month employees were reactivated to interface to Budget, they must be set to inactive at this time. You can select specific employees to copy using the following parameters: Contract Months, Contract Begin Date, Payoff Date, Extract ID, or Employee Number.
In addition, consider the employee deductions. For example, if you have not updated the new insurance selections and premiums in the next year payroll, then do not copy any deductions to the current year payroll. Also, if you entered all new employees as electing insurance so that employer-paid amounts were generated to budget, then you would not want these “estimated” deductions brought to current year payroll. All insurance selections and rate changes can be made in the current year payroll frequency.
❏ Select Preview Changes.
❏ Click Execute. Review the list and click Process.
- Change to the current year frequency.
Change to the current year frequency
In Payroll, change to the current year frequency that is associated with your next year frequency (i.e., F = 6).
- Click Change.
- Select Current Year.
- Select a pay frequency.
- Click Apply.
The following steps should be performed in the current year frequency unless otherwise noted.
- Update District HR options.
Update District HR options
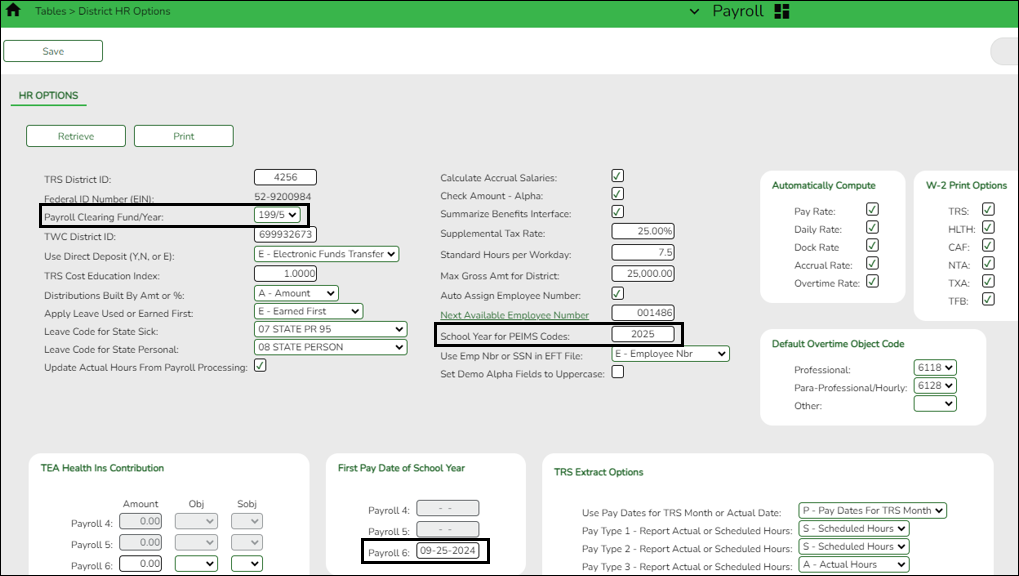
Payroll > Tables > District HR Options
Verify that the following fields are updated. These fields may already be updated.
- The Payroll Clearing Fund/Year field should be set to 163/X or 863/X. If your LEA has a separate payroll clearing fund, use 163/X or 863/X in the Payroll Clearing Fund/Year field. If your LEA does not use a separate payroll clearing fund, use 199/X in the Payroll Clearing Fund/Year field.
- The School Year for PEIMS Codes field should be set to 2026.
CAUTION: No payrolls should be processed for the new (upcoming) school year prior to the First Pay Date of the School Year.
❏ Under First Pay Date of School Year:
- Update the first pay date of the new school year for each payroll frequency. The date(s) must match the first payroll date(s) indicated on the pay dates table.
- In the Payroll 4, 5, 6 fields, enter the first pay date for each of the three pay frequency fields in the MM-DD-YYYY format. Once the pay date is entered, it should not be changed until the next school year. The entered date should represent a payroll that will actually be processed, supplemental or regular. If a date is entered and no payroll is actually posted using that date, the system will have difficulty identifying when the new school year began. This could affect how data is handled in the new school year.
Additional first pay date notes
Fiscal Year versus School Year
- If your fiscal year is July through June and the 10-month employees are paid from September through August, this date should be September.
- If your fiscal year is July through June and all employees (including 10-month employees) are paid from August through July, those employees should all have TRS Year selected on the Payroll > Maintenance > Staff Job/Pay Data > Job Info tab.
- If the First Pay Date of School Year field has an August date, a new school YTD is created and updated with all pay and accrual amounts. The TRS YTD is updated in the old school year. For example, if the first pay date of the school year is August 25, 2024, pay and accruals are updated in the 2025 school YTD and the 2024 TRS YTD is updated. Note: If the First Pay Date of School Year field is set to a date prior to September, be sure to verify that your TRS rates correspond to the appropriate TRS reporting month.
- If the First Pay Date of School Year field is updated with a September date, the school YTD and TRS YTD are updated in the current school year and if accruing, a new school YTD is created and updated with those amounts. For example, if the first pay date of the school year is September 25, 2024, pay and TRS amounts are updated in the 2025 school YTD and the 2025 TRS YTD. If the employee accrues, a 2025 school YTD is also created.
- If your fiscal year is September through August and the 10-month employees are paid from September through August, this date should be September.
- If end-of-year payroll accruals are performed for August days worked and the first paycheck is in September, the first pay date should be September.
- All non-standard employees (those employees who receive their first check in July or August) should have TRS Year selected on the Payroll > Maintenance > Staff Job/Pay Data > Job Info tab.
This first pay date of the school year is used to determine:- The school year to be used for the school YTD records for regular and non-standard employees. If the employee is a non-standard employee (TRS Year is selected), and the contract begin date is greater than this date, then the payroll calculation stores the accrual amounts in the next year school YTD record.
- The school year that should be used for the TRS rates and employee TRS record.
- The pay history records that should be used for accruals.
- The leave transmittals that should be accumulated to determine if the leave duration has been met for the school year.
Notes:
If the LEA does not use one of the pay frequencies, access to that field is not allowed. If a user does not have security access to a pay frequency, access to that field is not allowed.
When the first pay date of the school year is changed, if any message displayed includes information about contacting your regional consultant, there are processed pay dates where amounts need to be moved from one school year to another. If these amounts are not moved, it can adversely affect school YTD historical amounts, TRS historical amounts, and reporting, workers’ compensation historical amounts and reporting, and payroll accrual calculations. Do not proceed without addressing this issue.
❏ Click Save.
- Enter school year pay dates.
Enter school year pay dates
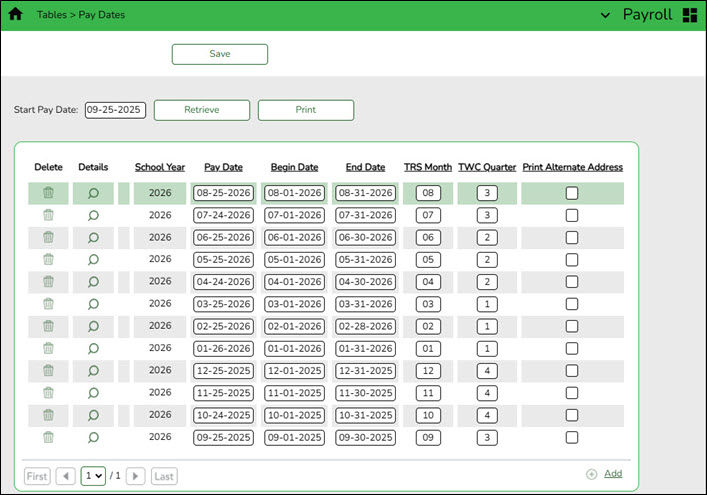
Enter pay dates for the new school year and click Save.
If your LEA accrues, verify the pay dates from this table match the pay dates on your accrual calendar.
- (If applicable) Complete the accrual calendar.
(If applicable) Complete the accrual calendar
Log on to the current year pay frequency.
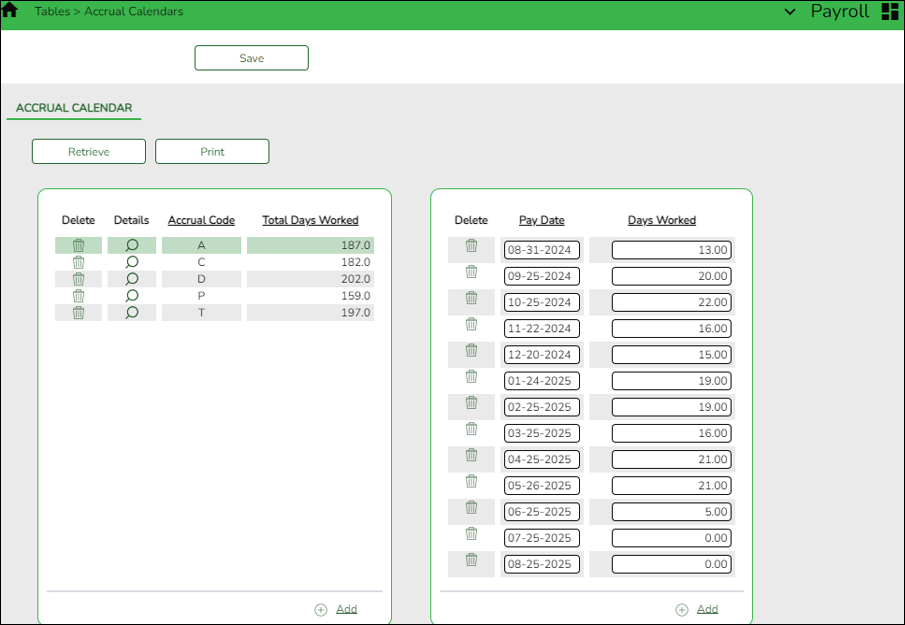
Payroll > Tables > Accrual Calendars > Accrual Calendar
August year-end LEAs - If your LEA accrues monthly, complete this step if it is not already completed.
❏ Enter the new pay dates and accrual days for all applicable accrual codes. The total number of days should equal the number of days employed for that group of employees.
- For August year-end LEAs, start with your accrual run date (08-31-20XX) and enter the number of August workdays.
- Continue adding pay dates and days worked for the remainder of the school year. The dates must equal the dates in your pay dates table. All pay dates should be entered even if zero days are accrued for that month. This information is LEA-specific.
Note: For a standard 187-day calendar in a monthly pay frequency, there should be 13 entries including the date for the August Accrual process and the 12 pay dates including the months that may have zero workdays.
- Complete fund to grant information.
Complete fund to grant information
Log on to the current year payroll frequency.
Personnel > Tables > Salaries > Fund to Grant
IMPORTANT: All applicable federal grants must have a fund to grant code listed in the TRS Grant Cd field on this tab. If not, TRS federal grant care and TRS federal grant deposit amounts will not be calculated for that specific fund during payroll.
Verify that the applicable federal grant funds (200-300) have a two-digit TRS grant code. Update this table as needed.
Exception: If using the TRS Child Nutrition worksheet for TRS reporting, the child nutrition funds (240 and 242) should NOT have a fund to grant code assigned.
This generates salaries for the TRS 3 and TRS 489 reports.
In order for a fund to be displayed on this page, the fund must exist in an account code on the Finance Chart of Accounts. The codes are LEA-specific.
- Verify/update TRS rates.
Verify/update next year TRS rates
Log on to the CYR payroll frequency.
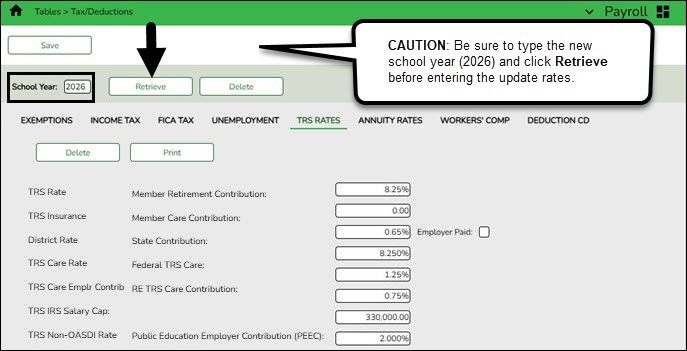
Payroll > Tables > Tax/Deductions > TRS Rates
Update the TRS rates.
CAUTION: Be sure to retrieve the 2026 school year data prior to updating this tab.
IMPORTANT: Be sure to visit the TRS website: https://www.trs.texas.gov/Pages/re_contribution_rates.aspx to obtain the updated rates for the next school year, and then return to this table to update the new rates.
To create a new TRS rates record:
- Type the new year (2026) and click Retrieve. A message is displayed indicating that the new record is populated based on the prior year's (2025) TRS rates record.
- Complete the applicable fields.
- Click Save.
- Verify/update Unemployment rates.
Verify/update Unemployment rates
Log on to the current year pay frequency.
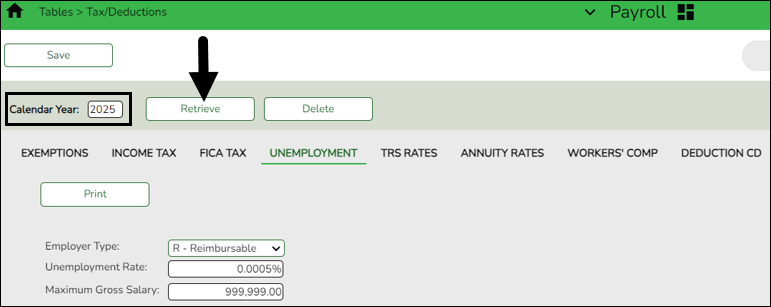
Payroll > Tables > Tax/Deductions > Unemployment
Verify that you are in the correct calendar year. If not, in the Calendar Year field, type 2026 and click Retrieve.
Note: Unemployment rates are based on the calendar year and not the fiscal year.
- Verify the accuracy of the rates.
- Make the necessary updates and click Save.
- Verify/update Workers' Compensation rates.
Verify/update Workers' Compensation rates
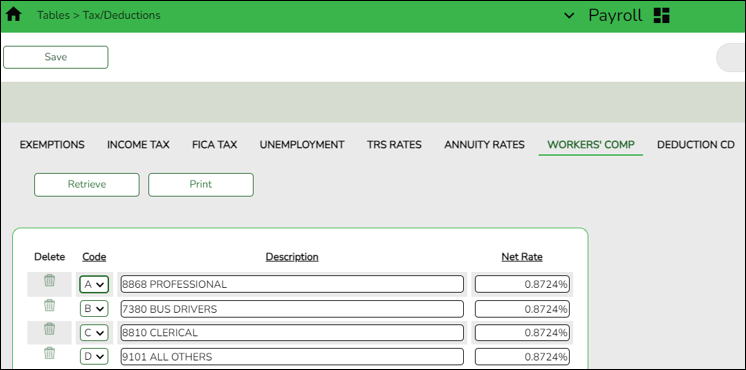
Payroll > Tables > Tax/Deductions > Workers’ Compensation
Verify that the workers' compensation rates are accurate for the new school year. If not, update the rates.
For example, if the Workers' Compensation letter provides a rate of .001792, move the decimal two places to the right and enter that number in the Net Rate field.
Codes, descriptions, and rates are LEA-specific.
Note: The number of months in the contract should correlate with the number of workers' compensation payments. For example, if the employee has a 10-month contract, then the employee will have ten workers' compensation payments for the year.
Use the User Created Reports to verify the number of Workers' Compensation remaining payments.
If the report displays an incorrect number of remaining payments, use the Payroll > Utilities > Mass Update > Employee tab to reset the number of remaining payments.
- Recalculate the state minimum salary.
Recalculate the state minimum salary
Log on to the current year pay frequency.
Note: For Districts of Innovation, the statutory minimum days should reflect 187 days. The statutory minimum days should not be less than 187 (e.g., 177, 182, etc.). You can use the Mass Update utility to change the number of days to 187 and calculate the state min salary. Then, use the Mass Update utility to replace the accurate number of days.
If your LEA is a District of Innovation or operates on a non-standard (4-day) workweek, contact your regional ESC consultant for additional assistance, as extra steps are required.
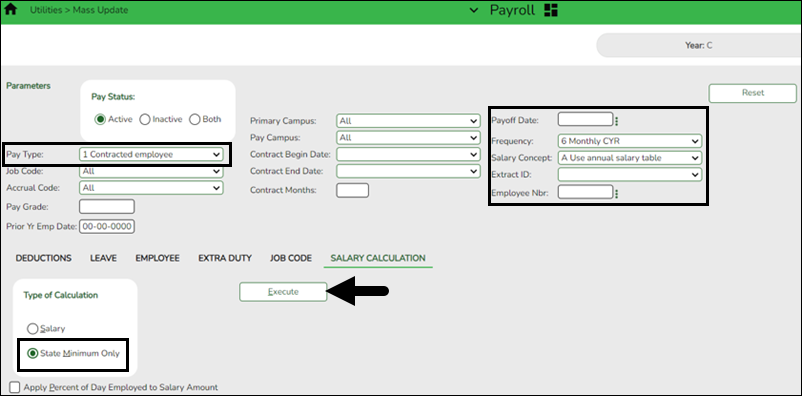
Payroll > Utilities > Mass Update > Salary Calculation
❏ In the Pay Type field, select 1 Contracted employee.
❏ Under Type of Calculation, select State Minimum Only to recalculate the state minimum salary for the new school year.
❏ In the Salary Concept field, select A Use annual salary table.
❏ Click Execute.
- (If applicable) Update substitute information.
(If applicable) Update substitute information
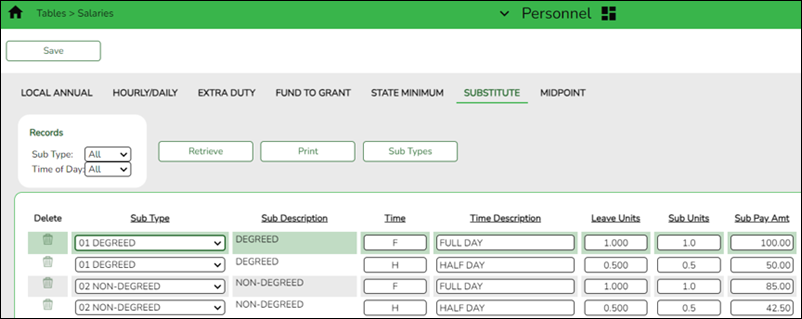
Update the substitute information on the Personnel > Tables > Salaries > Substitute tab.
- Generate the Account Code Comparison report.
Generate the Account Code Comparison report
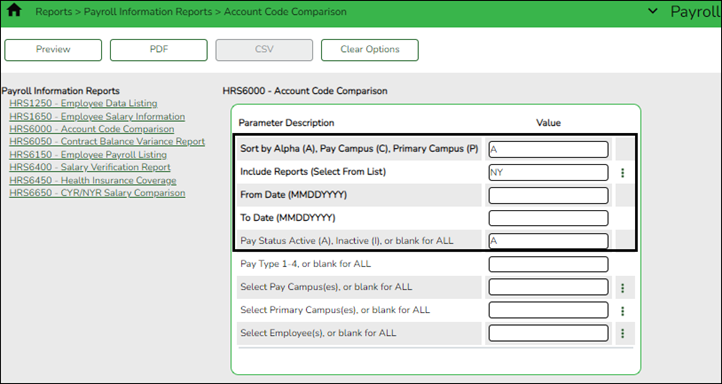
Payroll > Reports > Payroll Information Reports > HRS6000 - Account Code Comparison
Complete the applicable report parameters and generate the report. Print and/or save this report and review it for accuracy.
- Review the report and correct all of the errors.
- Verify that all employee master distribution records have matching accounts in Finance.
If there are account codes on the report that do not exist in Finance, perform one of the following steps:- If there are accounts that have a 5 for July and August start employees, perform a mass update of Payroll distributions. You can either mass update records by fund/year using the Payroll > Utilities > Mass Change Payroll Account Codes > Mask Crosswalk page OR mass update all records by using the Fiscal Year field on the Payroll > Utilities > Mass Update > Employee tab. Employees who are paid out of federal funds may need their distributions reviewed and changed for a different fund year, if necessary. For example, federal funds may still be available for the previous year.
- If there are other accounts that need to be added, add them on the Finance > Maintenance > Create Chart of Accounts page.
After all of the account codes are added, generate the Payroll > Reports > Payroll Information Reports > HRS6000 - Account Code Comparison report again. If all account codes exist, a blank report should be generated. - Generate the Employee Payroll Listing report.
Generate the Employee Payroll Listing report
Payroll > Reports > Payroll Information Reports > HRS6150 - Employee Payroll Listing OR Payroll > Reports > User Created Report
The report provides a single-spaced list of employees that includes the tax information, contract information, pay rates, and primary job account code. Print the report by employee name for the entire district or group the report by campus. Include all employees, those with an active status or inactive status. When primary job (P) is not selected, all jobs are displayed with one account per job with a total for all jobs displayed. The criteria for which account is chosen to display for a job are as follows:
- The account with the highest percent.
- If there is more than one account with the highest percent for a job, the lowest account is displayed.
Complete the applicable report parameters and generate the report. Print and/or save this report and review it for accuracy. Verify that all current employees are listed.
- Correct necessary payroll errors.
Correct necessary payroll errors
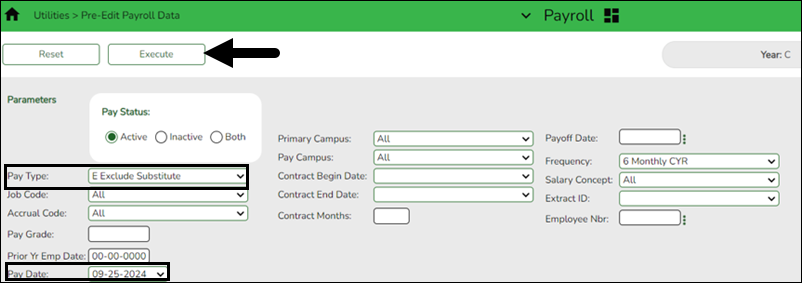
Payroll > Utilities > Pre-Edit Payroll Data
If applicable, correct necessary payroll errors for employees with August contracts.
❏ Under Pay Status, select Active.
❏ In the Pay Type field, select E Exclude Substitute.
❏ In the Pay Date field, select the first available pay date (LEA's first pay date).
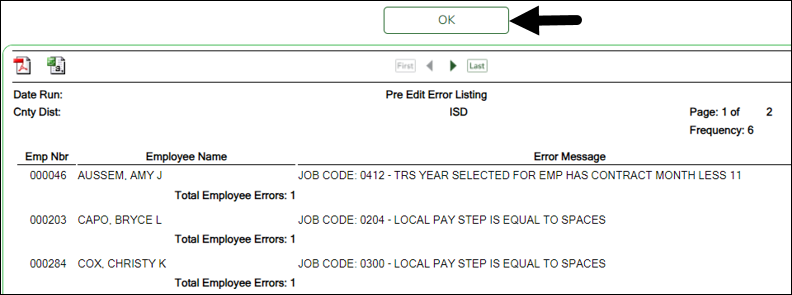
❏ Click Execute. Review the report.
❏ Click OK. Keep in mind that the errors displayed on this report are not exactly the same as the errors received during the Run Payroll process. Be sure to review and correct errors as needed and repeat the process until all necessary errors are corrected. There is a possibility that not all errors require a correction.
- Address leave.
Address leave
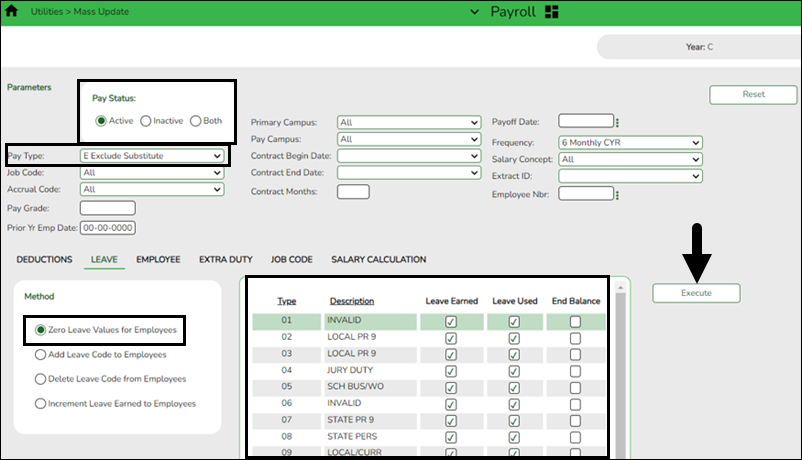
Payroll > Utilities > Mass Update > Leave
Update the employee master leave record balances.
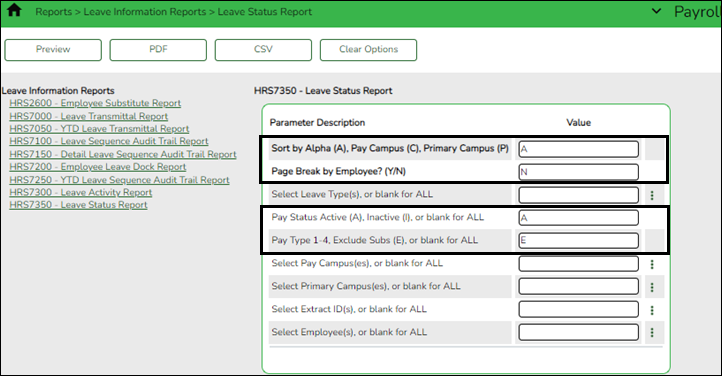
❏ In the current year payroll frequency, generate the Payroll > Reports > Leave Information Reports > HRS7350 - Leave Status Report for active employees and exclude substitutes. Print and/or save this report and review it for accuracy.
❏ Use the Payroll > Utilities > Mass Update > Leave tab to update employee master leave record balances. This is a three-step process.
Leave type codes are LEA-specific.
1a. This step clears the Leave Used and Leave Earned fields and rolls the ending balances to the following year beginning balances:
- Under Pay Status, select Active.
- In the Pay Type field, select E Exclude Substitute.
- Under Method, select Zero Leave Values for Employees.
- Under Leave Earned and Leave Used, select all leave types to be set to zero for the new school year. Be sure to process both options at the same time to prevent inaccurate balances.
- Do not select End Balance unless you want to set the balance to zero for that specific leave type. If this field is not selected, the 2024-2025 ending balances are rolled to the beginning balance fields for the 2025-2026 school year.
- Click Execute.
- Review and print the report.
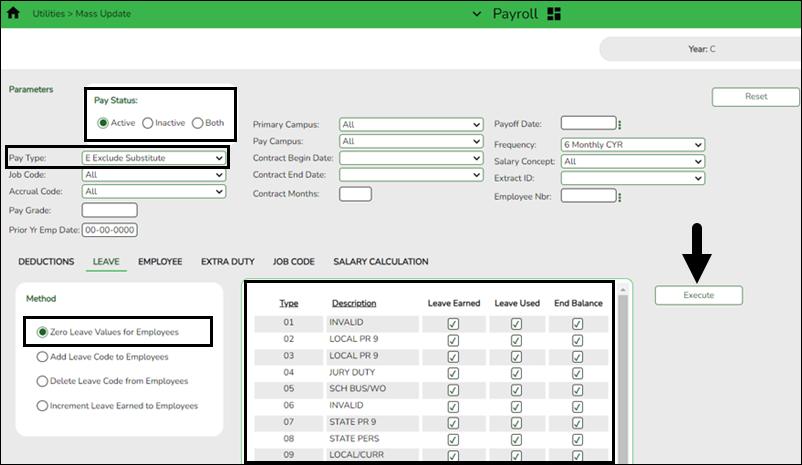
1b. You may have leave codes for which you want to zero the end-of-year balance. For example, Jury Duty, School Business, etc.- Under Pay Status, select Active.
- In the Pay Type field, select E Exclude Substitute.
- Under Method, select Zero Leave Values for Employees.
- Select Leave Earned, Leave Used, and End Balance for all leave types you want to zero out completely and not carry forward ending balances.
- Click Execute.
- Review and print the report.
- If the report is accurate, click Process to complete the changes.
2. This step automatically adds leave types to active employees who do not have the leave type assigned on their leave balance record. This step must be completed before leave is mass incremented in step 3.
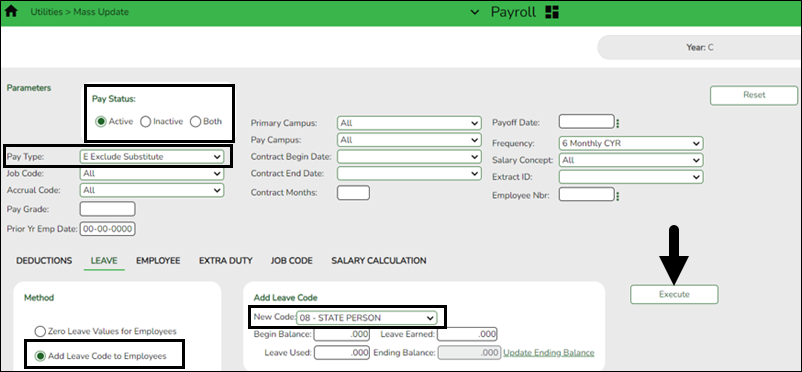
- Under Pay Status, select Active.
- In the Pay Type field, select E Exclude Substitute.
- Under Method, select Add Leave Code to Employees.
- In the New Code field, select the leave code.
- Do not add balances.
- Click Execute.
- Review and print the report. The report only displays the employees who will have the leave code added.
- Repeat this step for each leave type to be added before it is incremented in step 3.
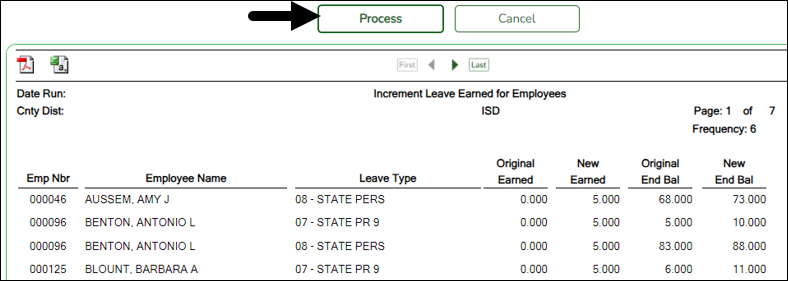
3. This step increments leave earned to employees:
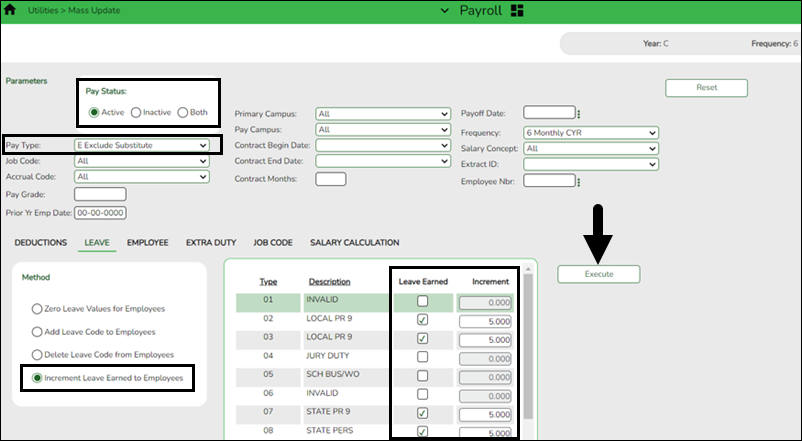
Note: If you have a maximum balance designated on the leave type table, this step will not allow the leave balance to exceed the maximum number set on the leave type table.
- Under Pay Status, select Active.
- In the Pay Type field, select E Exclude Substitute.
- Under Method, select Increment Leave Earned to Employees.
- Select Leave Earned for the applicable leave types (as defined in your local policy).
- In the Increment field, enter the number of days to increment.
- Click Execute.
- Review and print the report. The report includes a list of those employees who have reached a maximum of any leave type.
- If the report is accurate, click Continue.
- The second report displays the newly incremented leave earned and the new ending balances. Click Process.
- Click OK.
For new employees, leave balances must be individually updated from their service record information on the Payroll > Maintenance > Staff Job/Pay Data > Leave Balance tab.❏ Use the Payroll > Reports > Leave Information Reports > HRS7350 - Leave Status Report to verify the accuracy of the leave information. Print and/or save this report and review it for accuracy.
If necessary, use the Payroll > Maintenance > Staff Job/Pay Data > Leave Balance tab to make changes to individual employees who are working less than the full school year or less than 100% percent of the day.
- Post to master file.
Post to master file
Payroll > Payroll Processing > EOY Payroll Accruals > Post to Master
Skip this step if you are a June year-end LEA or if your LEA does not use this process for accruals.
CAUTION: Before the first payroll of the school year is processed, you must post the master file that was created during the August Accruals process.
The Post to Master tab automatically creates a School YTD Maintenance page for the new school year and updates the page with accrued pay, accrued benefits, and days earned for all employees that are included in the record.
❏ Select a data row to be posted. If more than one frequency is used, there may be multiple data rows displayed.
❏ Click Post. The following message is displayed.
❏ Click OK.
- (If applicable) Verify the accrual expense table.
(If applicable) Verify the accrual expense table
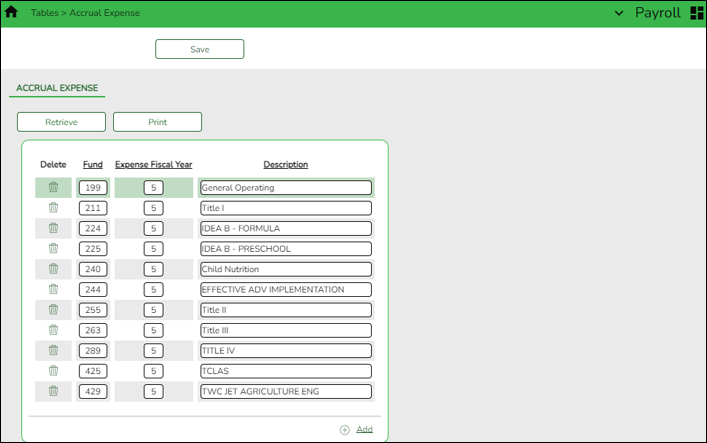
Payroll > Tables > Accrual Expense
If your LEA accrues, verify the accrual expense table and update the fund/fiscal year to reflect the fiscal year for the new school year (e.g., 199/X and 211/X).
Be sure to include all funds with payroll expenses. Also, add new fund codes if necessary.
- Generate the School YTD report.
Generate the School YTD report
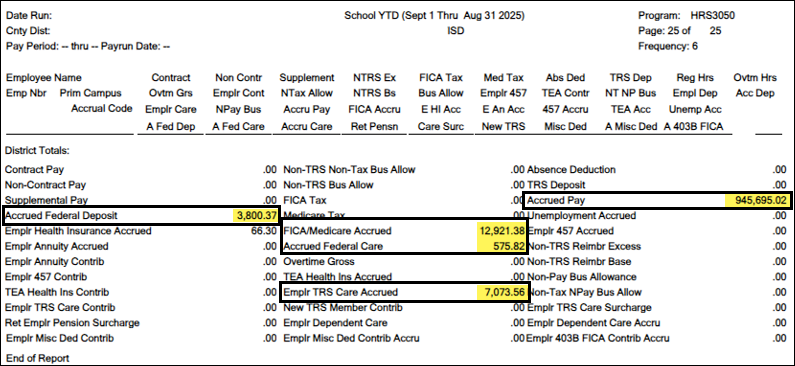
Payroll > Reports > Year To Date Reports > HRS3050 - School Year to Date Report
Complete the applicable report parameters and generate the report. Print and/or save this report and review it for accuracy.
❏ Verify that the accrual data is correctly posted for the 2026 school year.
❏ Use the Accrual Information Reports that were printed during the August Accrual Process to verify information. Accruals for employees who accrue monthly and who were included in the EOY payroll accrual process are displayed. Non-accrued employees are not displayed.
- Generate the School YTD Accrual Payroll Account Distribution Report.
Generate the School YTD Accrual Payroll Account Distribution Report
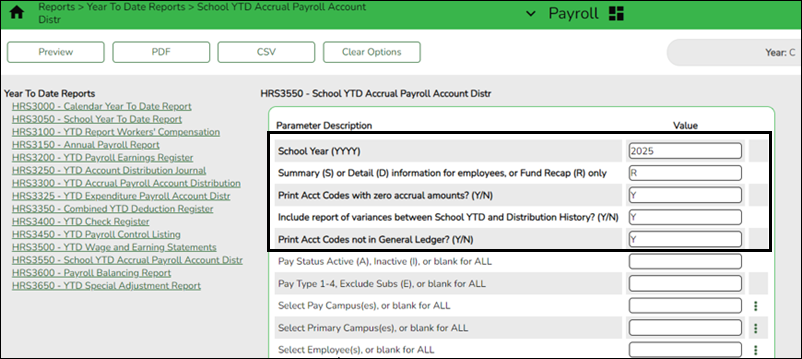
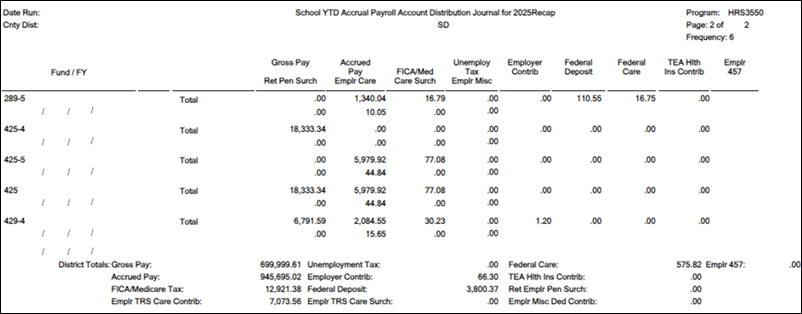
Payroll > Reports > Year To Date Reports > HRS3550 - School YTD Accrual Payroll Account Distr
Complete the applicable report parameters and generate the report. Print and/or save this report and review it for accuracy.
Verify the accrual amounts balance with the amounts on the HRS3050 - School Year to Date Report.
- Generate the Contract Balance Variance Report.
Generate the Contract Balance Variance Report
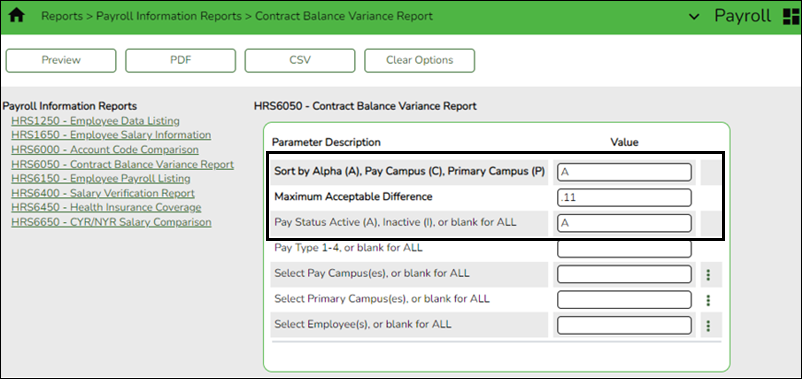
Payroll > Reports > Payroll Information Reports > HRS6050 - Contract Balance Variance Report
Complete the applicable report parameters and generate the report. Print and/or save this report. This report should have been reviewed during the Finance EOY Process but be sure to verify the information is accurate at this time.
IMPORTANT: Verify the accuracy of payroll over the course of the school year. Based on your LEA's pay frequency, investigate the maximum acceptable differences and correct if needed.
Use the following variance thresholds accordingly:
Pay Frequency # of Pymts Maximum Acceptable Difference Monthly 12 .11 Semi-monthly 24 .23 Bi-weekly 26 .25 - Generate the Employee Verification report.
Generate the Employee Verification report
Personnel > Reports > Personnel Reports > HRS1100 - Employee Verification Report OR Payroll > Reports > Personnel Reports > HRS1100 - Employee Verification Report
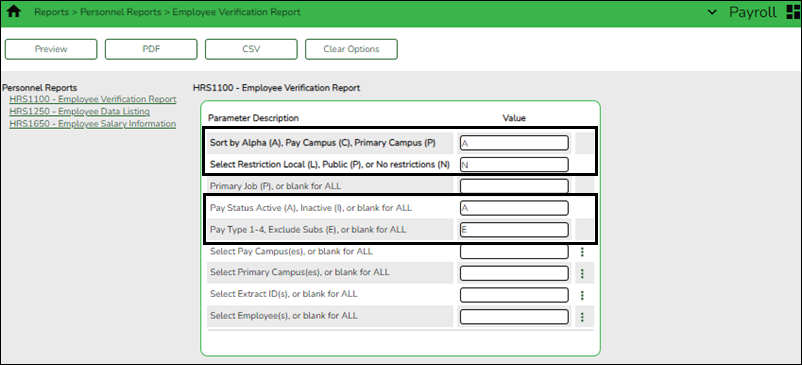
Run the report with the Pay Status Active (A), Inactive (I), or blank for ALL parameter set to A - Print active employees only and the Pay Type 1-4, Exclude Subs (E), or blank for ALL parameter set to E - Exclude substitute employees from the report.
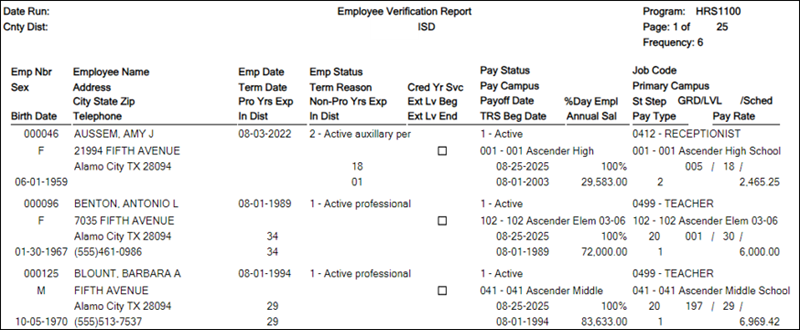
Print and/or save this report and review it for accuracy.
Verify that the employee information (e.g., years of experience) is correct to start the new school year. If individual corrections are needed, use the Personnel > Maintenance > Employment Info tab to update the employee's record.
- (If necessary) Mass update employee experience.
(If necessary) Mass update employee experience
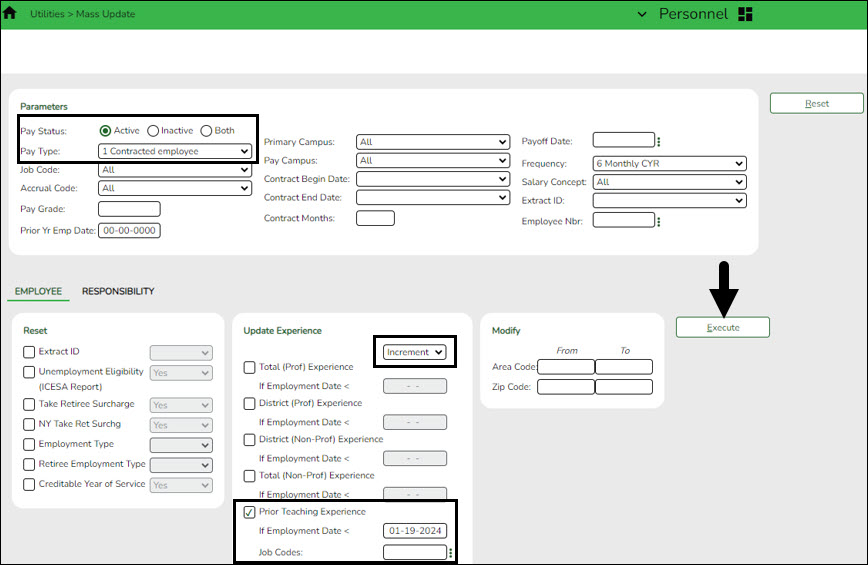
Personnel > Utilities > Mass Update > Employee
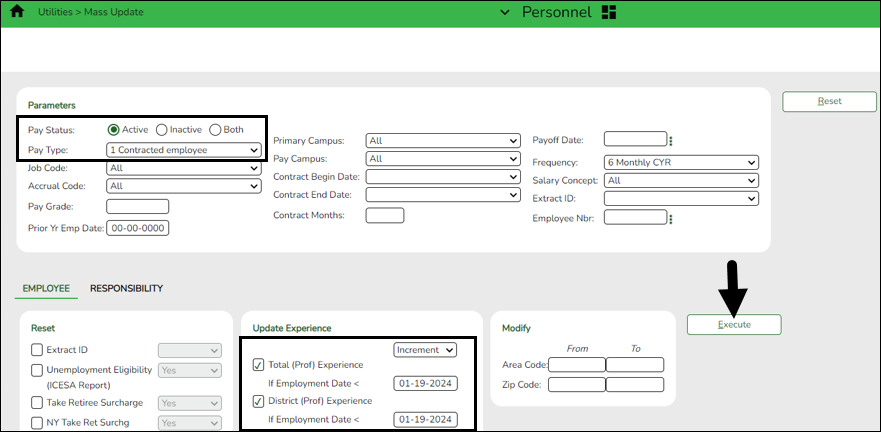
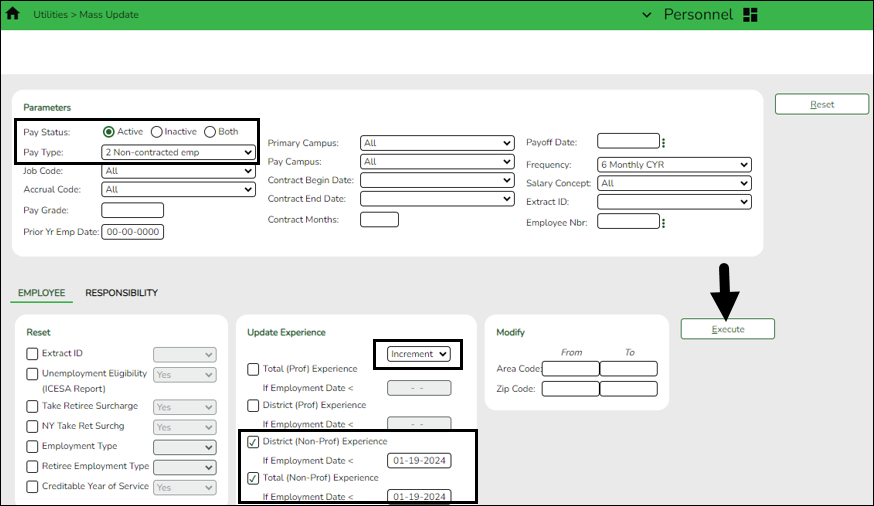
If your LEA has not already done so, increment the years of total professional and non-professional experience, and the years of district professional and non-professional experience.
Additionally, you can use this page to increment the prior years of teaching experience for those individuals in a teaching role. The Prior Teaching Experience is the total number of years that an individual has previously held a teaching position in one or more education institutions and is collected during the PEIMS Core Collection: Class Roster.
If this process has not already been completed, it must be done at this time. It is highly important to confirm that it is completed.
- The Commissioner's Rules on Creditable Years of Service, Title 19, Texas Administrative Code (TAC) §153.1021, serve as a baseline for minimum requirements when determining an individual's years of experience.
- The Prof Experience Yrs and Non-Prof Experience Yrs should be incremented in separate instances.
Total (Prof) Experience:
❏ Click Execute. The Employee Mass Update Report is displayed.
❏ Click Process. The following message is displayed.
Total (Non-Prof) Experience:
❏ Click Execute. The Employee Mass Update Report is displayed.
❏ Click Process. The following message is displayed.
Use the Personnel > Reports > Personnel Reports > HRS1100 - Employee Verification Report to verify the accuracy of the years of experience.
Prior Teaching Experience:
❏ Click Execute. The Employee Mass Update Report is displayed.
❏ Click Process. The following message is displayed.
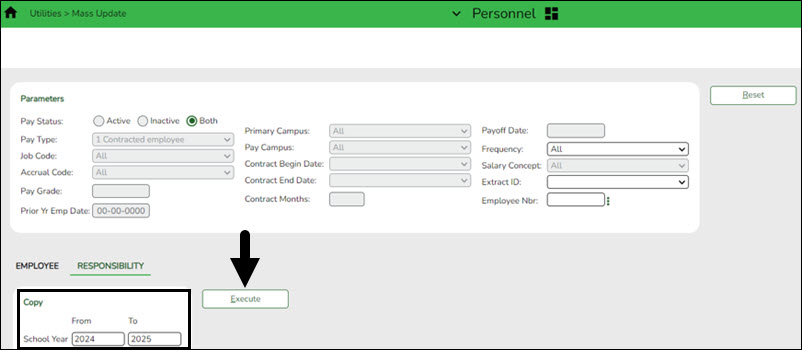
Responsibility:
❏ Click Execute. The Responsibility Employee Mass Update Report is displayed.
❏ Click Process. The following message is displayed.
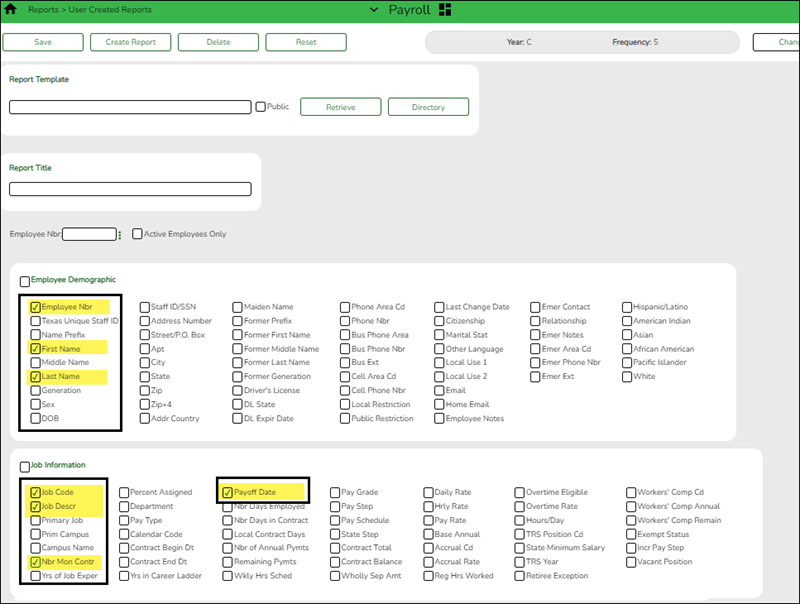
- Verify payoff dates.
Verify payoff dates
Payroll > Reports > User Created Reports
Verify that all pay type 1 and 2 employees have payoff dates that match the pay dates in the pay dates table. (June, July, and August as referenced in Step 9 of the ASCENDER - First Payroll of the School Year (September Start LEAs).
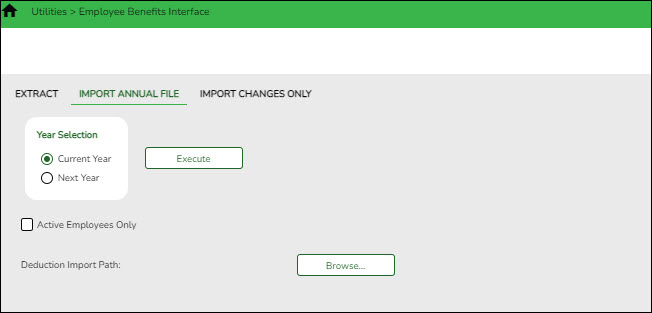
- (If available) Import annual benefits file.
(If available) Import annual benefits file
Payroll > Utilities > Employee Benefits Interface > Import Annual File
If available, import your LEA's file of employee deduction records file created by your third-party administrator.
- Generate the Employee Salary Information report.
Generate the Employee Salary Information report
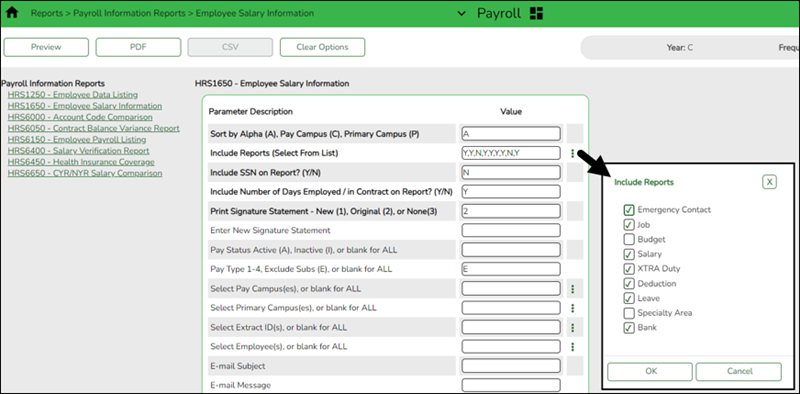
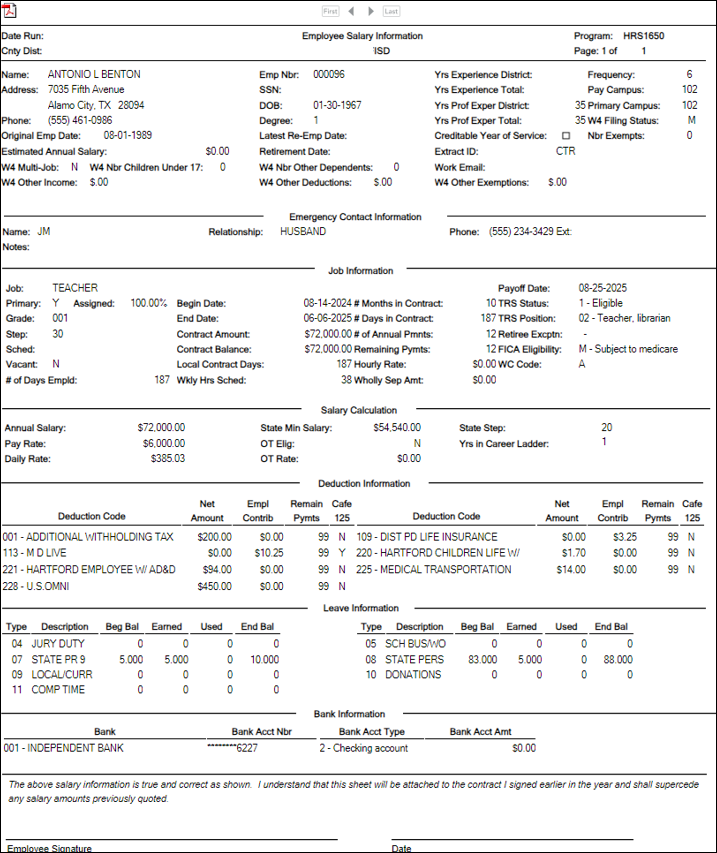
Payroll > Reports > Payroll Information Reports > HRS1650 - Employee Salary Information
Complete the applicable report parameters and generate the report. Print and/or save this report and review it for accuracy.
Print the report for employee verification. If needed, print an Addendum from the Payroll > Utilities > Payroll Simulation.
- Calculate a sample payroll.
Calculate a sample payroll
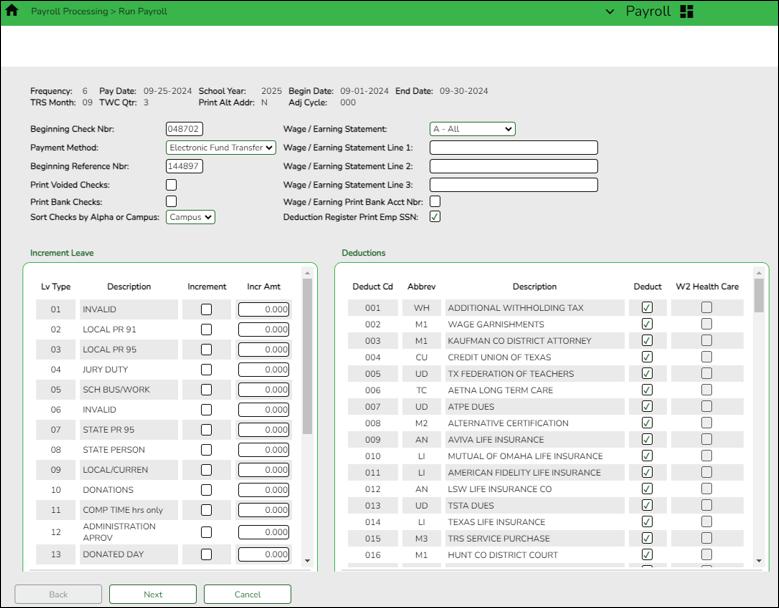
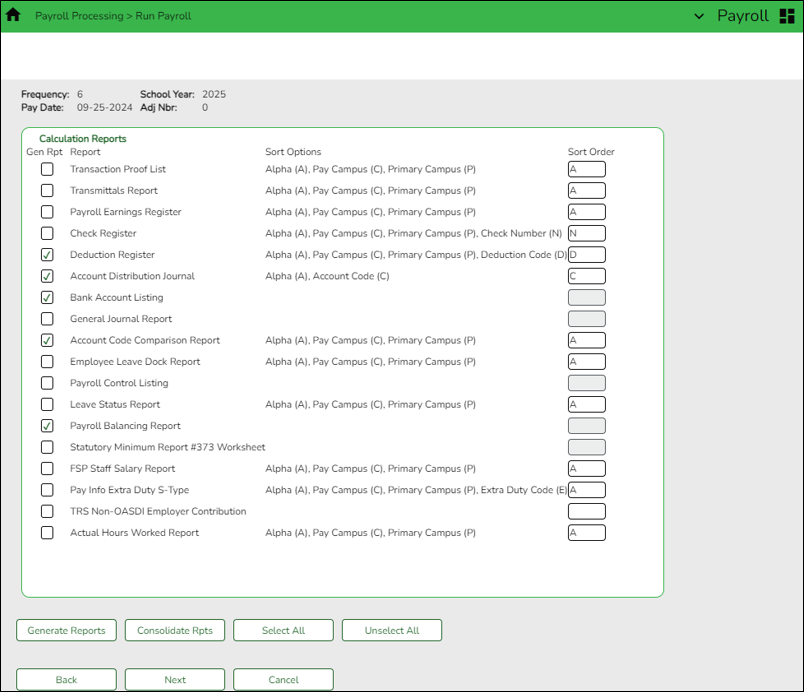
Payroll > Payroll Processing > Run Payroll
Calculate a sample payroll to identify any errors that need to be corrected prior to processing the first payroll.
IMPORTANT:
- If applicable, increment leave types.
- Verify the selection of deduction codes on the Payroll > Payroll Processing > Run Payroll page before processing the first payroll.
Review the selected Calculation Reports to verify the accuracy of data for the new year.
Do not update and/or access Finance during the next step.
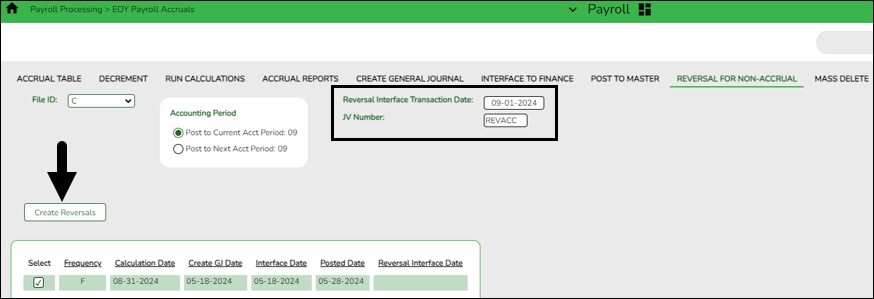
Reverse accruals
Payroll > Payroll Processing > EOY Payroll Accruals > Reversal for Non-Accrual
This process is used to reverse accruals for all employees who do not accrue monthly and were processed by EOY Payroll Accruals.
❏ Select a data row to create the reversal transactions to be posted to Finance.
❏ Click Create Reversals to create the reversal transactions. The EOY Accrual General Journal Transactions report is displayed. If you receive a message stating that there are no rows to process for the reversal, no further action is required.
❏ Click Interface Reversals to update Finance. If no errors were encountered during the process, a message is displayed indicating that the affected tables were successfully interfaced. Click OK.

