Sidebar
Add this page to your book
Remove this page from your book
ASCENDER - Finance End-of-Year Process
Created: 05/10/2019
Reviewed: 05/28/2025
Revised: 05/28/2025
The purpose of this document is to guide you through the process of ending the old fiscal year 2024-2025 (FY 5) and beginning the new fiscal year 2025-2026 (FY 6). LEAs must be in the last accounting period prior to beginning this process.
The following processes are covered in this document:
- Copy the 2024-2025 fiscal year (FY 5) funds to a new historical file ID 5 so that you can continue to access FY 5 data.
- Close the 2024-2025 accounts for revenues, expenditures, other resources, and other uses in file ID C.
- Copy the balance sheet accounts (cash, accounts payable, etc.) from 2024-2025 (FY 5) funds to fiscal year 2025-2026 (FY 6) funds in file ID C.
- Delete all FY 5 transactions and funds in file ID C (the transactions are still accessible in file ID 5) unless the LEA chooses to keep some FY 5 funds open with prior year transactions.
- Move the approved budget for FY 6 to Finance file ID C.
- Prepare to move next year payroll to the current year payroll.
❏ August year-end LEAs should ensure that the August payroll accruals are processed and interfaced to Finance. Reference the August Accruals document for more information.
❏ June year-end LEAs should reference the EOY Accruals for June Year-End LEAs document to address payroll accruals.
This document assumes you are familiar with the basic features of the ASCENDER Business system and have reviewed the ASCENDER Business Overview guide.
Click here for The Exchange Instructions.
Some of the images and/or examples provided in this document are for informational purposes only and may not completely represent your LEA’s process.
Prerequisites
❏ Confirm that there are no users logged into the Budget or Finance applications while processing these steps.
❏ (If applicable) Review next year requisitions and approve if necessary. Keep in mind that after the move, any unapproved next year requisitions will need to be approved using the Purchasing > Maintenance > Approve Requisition page.
❏ Warehouse Users: Before completing the Finance End-of-Year Process, complete Steps 1-6 of the Warehouse End-of-Year Process to end the current year and begin the new year for your warehouse(s). Then, after completing the Finance End-of-Year Process, return to the Warehouse End-of-Year Process and complete Step 7.
❏ As you proceed with the End-of-Year fiscal closing process, review the following items carefully. Your responses may have an impact on the required steps, as the process can vary.
- Are all of the payroll runs and adjustments interfaced? Payroll processes cannot be posted against the historical file ID.
- Has the Payroll > Payroll Processing > TRS Processing > Interface been completed?
- Is the TRS On-Behalf Journal posted for the entire year?
- Verify TRS GASB 24 Medicare Part D Revenue and Expenditure is posted. Information may be located on the TRS website: https://www.trs.texas.gov/Pages/Homepage.aspx. Amounts are posted with a debit to 6144 and a credit to 5831.
REMINDER: If you have not already done so, now is a good time to budget for Medicare Part D Revenue and Expenditure amounts.
- Are the payroll accruals balanced?
- Is the Cutoff Date updated on the District Administration > Options > Purchasing/Warehouse > Current Year and Next Year pages, if necessary, to prevent purchasing requisitions from being created?
- Is the Amendment Cutoff Date updated on the Finance > Tables > District Finance Options page to prevent budget amendment requests from being created?
- Are all of the finance checks printed?
- Are all of the payroll liability checks (deduction checks and transfer transactions) printed and/or processed?
- Reprint or save a copy of all yearly purchase orders alphabetically and numerically for historical purposes.
- Are all purchase orders processed and the final check run completed?
- Are you bringing balances forward now or in the future (after the audit)?
- It is best practice to finalize bank reconciliations before closing the fiscal year.
Before You Begin
Review the following information and/or complete the following steps before you begin the Finance EOY closing process.
| Term | Description |
|---|---|
| CYR payroll frequency | Current year payroll frequency in Payroll. |
| June Year-End (early fiscal year) | A Finance fiscal year that runs July through June. |
| Export | A backup file of data as it stands at the time it is exported from the system. Export or backup files can later be used to restore data to its original state at the time of extraction. |
| File ID C | Current year file ID in Finance. |
| Historical file ID | Refers to any prior year file ID that is not the current year file ID. |
| LEA (Local Education Agency) | Refers to the educational entity (e.g., charter, district, etc.). |
| NYR payroll frequency | Next year payroll frequency in Payroll. |
| August Year-End (standard fiscal year) | A Finance fiscal year that runs September through August. |
EOY Flowchart for September Start LEAs
IMPORTANT
Consider the following information when closing the fiscal year:
❏ Will you select to increment or continue funds on the Fiscal Year Close utility?
❏ Review each action and the corresponding results to make an informed decision.
Note: For continuing funds, verify that there is not a balance in the Budget offset account (e.g., 3700) prior to running the Fiscal Year Close process. If there is a balance prior to running the process, the fund will be out-of-balance by the amount from the Budget offset account.
| Continuing Fund | vs. | Increment Fund |
|---|---|---|
Continuing funds are funds that will be continued into the new fiscal year (i.e., funds maintaining the fiscal year even after the LEA begins the new fiscal year). If a fund is continued, the following actions are automatically completed when the Fiscal Year Close utility is processed:
• The 1XXX-4XXX account balances are carried forward (the Carry Forward Balances field is automatically selected).
| Incremented funds are funds that will be incremented in the next fiscal year (i.e., funds that will change their fiscal year at the same time that the LEA’s new fiscal year will begin). The increment option is not available if the incremented fund already exists. For example, in September 2023, funds 211/3 and 211/4 already exist; therefore, 211/3 can only be continued or deleted. If a fund is incremented, the following actions are automatically completed when the Fiscal Year Close utility is processed:
• The fiscal year is incremented on credit memos.
The following are optional:
• Carry Forward Balances
|
Finance EOY Process
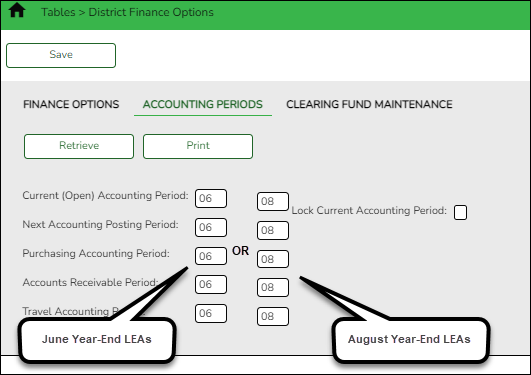
Prior to beginning this process, complete all end-of-month closing procedures except the final accounting period. Both the current and next accounting periods should be 06 for June year-end LEAs and 08 for August year-end LEAs.
- Perform an export.
Perform an export
Log on to file ID C.
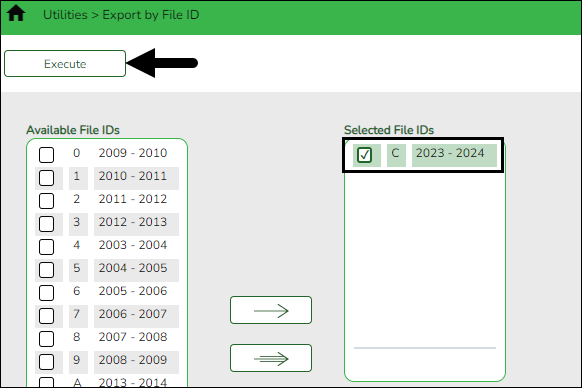
Finance > Utilities > Export by File ID
It is important to perform an export prior to making significant changes. This allows you to revert data to a certain point in the process if necessary.
This step should be completed prior to continuing the process.
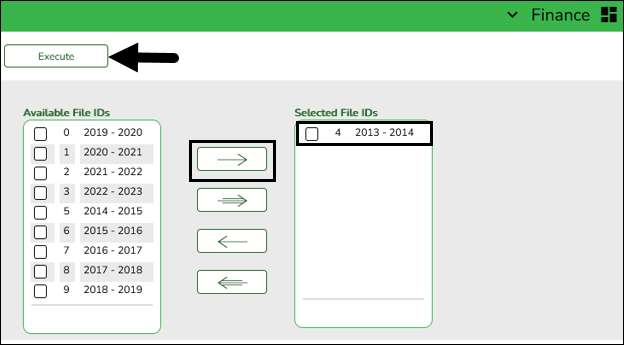
Create an export of file ID C.
Reminder: Do not change the export file name as it may cause issues during the import process.
❏ Under Available File IDs, select the checkbox next to file ID C.
❏ Click
 to move the selected file ID to the Selected File IDs column.
❏ Click Execute to execute the process. A message is displayed indicating that you are about to export Finance tables.
❏ Click Yes to continue. Or, click No to return to the Export by File ID page.
- In the Enter the Password to be used for the Archive, type a password for the file and click OK.
- Click Cancel to cancel the process.
- Generate, print, and review Outstanding Purchase Orders Report.
Generate, print, and review Outstanding Purchase Orders Report
Log on to file ID C.
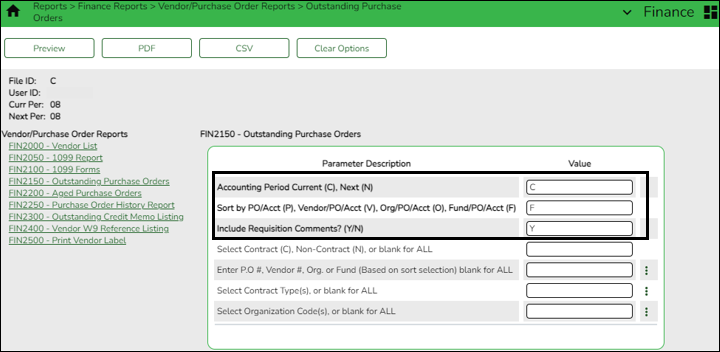
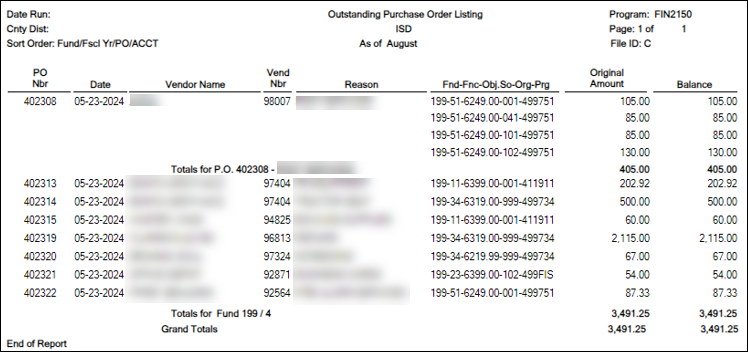
Generate the Outstanding Purchase Orders report for audit purposes. Print and/or save this report and review it for accuracy. Identify which purchase orders can be reversed in the next step.
Consider how the purchase orders will be handled for continuing and incremented funds during the Fiscal Year Close process. Only purchase orders that include continuing funds are re-encumbered. Purchase orders that are split-funded and include funds where the fiscal year is only being incremented will be deleted. For example, if a purchase order is split between 211 (continuing fiscal year) and 199 (incremented fiscal year), then you will have to re-enter the purchase order in the new file ID.
- (If applicable) Reverse purchase orders.
(If applicable) Reverse purchase orders
Log on to file ID C.
If your LEA uses the purchase orders functionality in the Purchasing application, use one of the following methods to reverse purchase orders:
Finance > Utilities > Fiscal Year Processing > Mass Purchase Order Reversal > Reverse PO by Fund OR Reverse PO by Range
Reverse the applicable purchase orders by fund or range.
Note: Keep in mind that the Fiscal Year Close process automatically re-encumbers purchase orders for continuing funds in the new file ID. If a purchase order should not be re-encumbered because it was not fully liquidated but should have been or it was not fully liquidated and will be canceled, use the Reverse PO by Range tab to delete the purchase orders by number.
Prior to reversing outstanding purchase orders, determine if purchase orders are going to be paid against your historical file ID.
It is recommended to proceed with the reversals and pay the purchase orders with a payment authorization in the historical file ID if needed. Be sure to reference the purchase order number.
If you have additional questions about this process, contact your regional ESC consultant.
❏ Select the fund/years for which you want to reverse purchase orders. Use the arrow buttons to move fund/years from the left side to the right side of the page. Only select the fund/years that are not staying in the current year. For example, if you have a multi-year fund that will continue into the new year, do not move it over.
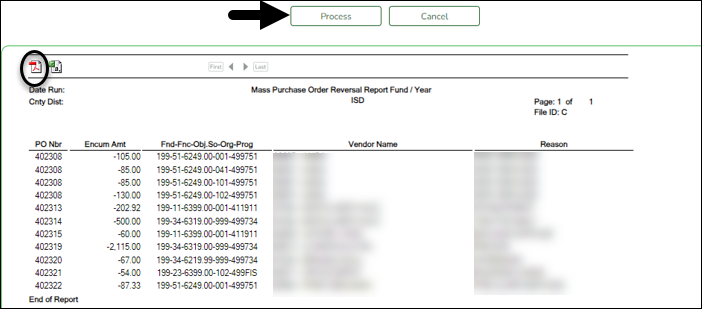
❏ Click Execute. A preview report is displayed with a list of purchase orders to be reversed.
❏ Click Process to continue.
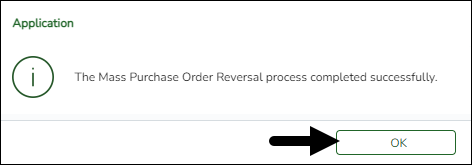
❏ If you receive a message about deleting related requisition records, click Yes. A message is displayed indicating that the process was completed successfully.
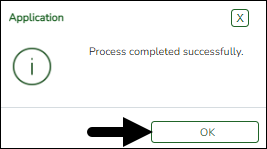
❏ Click OK to close the message box.
Use the Finance > Inquiry > General Ledger Inquiry > General Ledger Account Summary tab to verify the reversals. Enter a 4310 object code and mask (X) the rest of the account code to verify the reversals.
- Address unprocessed payment authorizations.
Address unprocessed payment authorizations
Log on to file ID C.
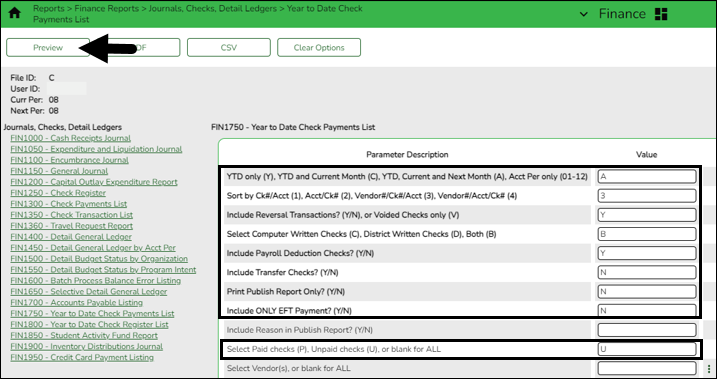
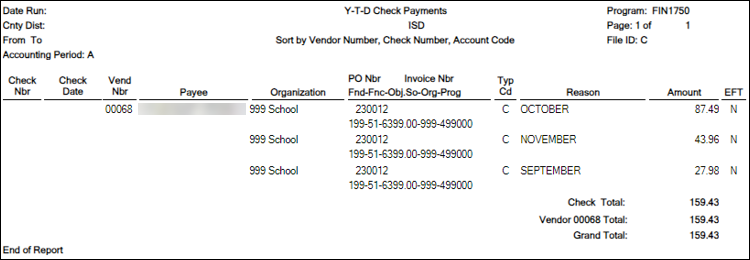
Run the FIN1750 report with the Select Paid checks (P), Unpaid checks (U), or blank for ALL parameter set to U - Include only unpaid checks on the report.
This allows you to determine if there are any unpaid payment authorizations. All unpaid payment authorizations need to be processed or reversed.
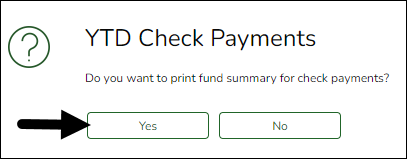
❏ Click Yes to print the fund summary for check payments.
Use one of the following options to address any unpaid payment authorizations:
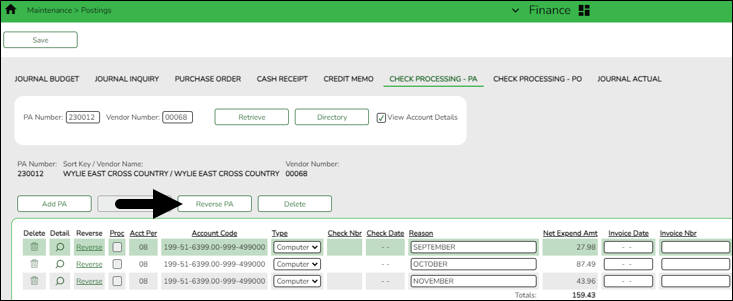
Option 1: Reverse an unprocessed payment authorization - Use this option if the payments are no longer valid or necessary. This helps prevent overstating expenditures for the prior fiscal year.
Finance > Maintenance > Postings > Check Processing - PA
❏ Retrieve all existing payment authorizations. Individually review and reverse each payment authorization as needed.
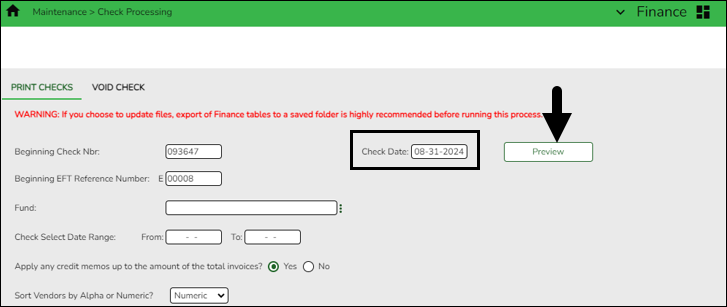
Option 2: Process a payment authorization - Use this option if the obligation is still valid and payment is still required.
Finance > Maintenance > Check Processing > Print Checks
❏ Type a Check Date (typically August 31st).
❏ Click Preview to view any outstanding items.
❏ Click Next to proceed with the usual check processing steps.
- Review and print credit memos.
Review and print credit memos
Log on to file ID C.
Finance > Maintenance > Postings > Credit Memo OR Finance > Reports > Finance Reports > Vendor/Purchase Order Reports > FIN2300 - Outstanding Credit Memo Listing
It is recommended that you review and print the Credit Memo page if credit memos exist for an ending fund. Or, review and print the Outstanding Credit Memo listing report.
TIP: Printing the credit memo data is helpful, as Fiscal Year Close Process (Step 14) will delete credit memos for ending funds and you may need to re-enter the credit memos in the new file ID after the Fiscal Year Close is complete.
- Review budget amendments.
Review budget amendments
Log on to file ID C.
Finance > Budget Amendment > Post to General Ledger
Verify that all existing budget amendments have been posted to the Finance general ledger. The Fiscal Year Close process will delete budget amendments for incremented funds and clear the budget amendment table.
- Delete existing pending payables.
Delete existing pending payables
Log on to file ID C.
If your LEA has multiple pages of pending payables that need to be deleted, contact your regional ESC consultant to obtain an SQL to mass delete the transactions.
OR
Use the Finance > Maintenance > Pending Payables page to delete individual pending payable transactions.
❏ Click
 to select a transaction. The purchase order details are displayed.
❏ Click Delete to delete the pending payable transaction.
- Verify actual fund balance obj.sobj codes.
Verify actual fund balance obj.sobj codes
Log on to file ID C.
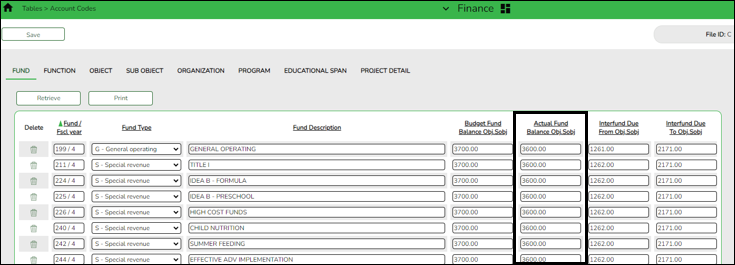
Finance > Tables > Account Codes > Fund
The Annual Audit page references your specific fund balance object codes (Schedule C-1) to determine which codes the auditor uses to be compliant with the specific GASB 54 object codes.
Review your LEAs Schedule C-1 to verify that the appropriate object codes exist in the Actual Fund Balance Obj.Sobj column.
Note: If federal funds will be deleted from this table, delete the fund code from the Personnel > Tables > Salaries > Fund To Grant table. It is recommended to print the Fund to Grant table prior to deleting the fund codes.
❏ Make any necessary changes or corrections.
- Delete unused funds.
Delete unused funds
Log on to file ID C.
Finance > Tables > Account Codes and Budget > Tables > Account Codes > Fund
Delete the funds that are no longer needed in both the Budget and Finance tables.
❏ Select the funds to be deleted.
TIP: Reference the pagination information at the bottom of the grid to view the number of pages with data and begin deleting rows from the last page.
❏ Click Save. A message is displayed prompting you to continue.
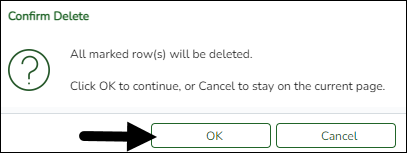
❏ Click OK to continue. A message is displayed indicating that the rows were successfully deleted.
Note: If grant codes were removed, be sure to communicate with your Human Resources/Payroll department to ensure that the appropriate grant codes are reassigned as needed.
- Review file IDs.
Review file IDs
Prior to creating the new historical file ID, review the existing file IDs to determine if any need to be deleted or copied to a new file ID.
Note: Keep in mind that all existing historical file IDs are subject to open records requests.
TIP: It is recommended to only keep the numerical file IDs. This makes it easier for LEAs to use the fiscal year when defining the Next Available numbers on the Finance > Tables > District Finance Options > Finance Options tab.
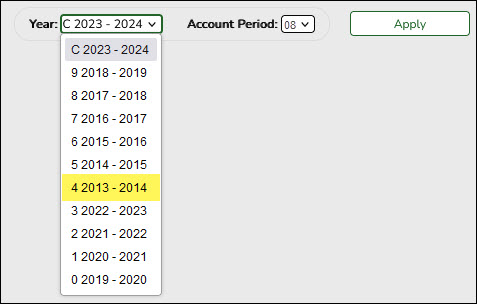
If file ID 5 (2014-2015) exists and you want to retain it for historical purposes, log on to file ID 5 and copy it to a new unused alpha file ID using the Finance > Utilities > Move Current to New File ID page.
If you do not need to copy to a new file ID, proceed to Step 11.
Log on to the applicable historical file ID as this utility cannot be processed in the current file ID (file ID C).
❏ In the New File ID field, select the file ID to which you want to copy all funds.
❏ It is recommended to copy all funds. Click the Select checkbox in the column heading to select all funds.
❏ Click Copy in the column heading to select Copy for all funds.
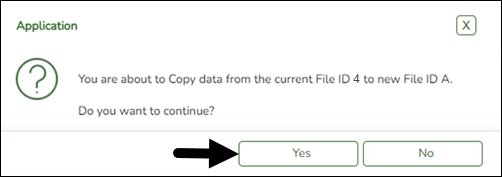
❏ Click Execute. A message is displayed indicating that data is about to be copied from one file ID to another.
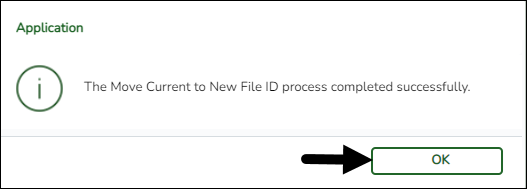
❏ Click Yes to continue. You are prompted to create a backup (export). A message is displayed indicating that the process was successfully completed.
❏ Click OK to close the message box.
❏ Log on to the historical file ID to verify that the copy was successful.
Proceed to the next step to delete file ID 5 (2014-2015). Deleting file ID 5 (2014-2015) allows the 2024-2025 fiscal year data to be saved in file ID 5.
- Delete file IDs.
Delete file IDs
Log on to file ID C.
Finance > Utilities > Delete by File ID
❏ Select the file ID (file ID 5 (2014-2015)) to be deleted. Use the arrow buttons to move the file ID from the left side to the right side of the page.
❏ Click Execute. A message is displayed indicating that you are about to delete the selected file ID.
❏ Click Yes to continue. A message is displayed indicating that the process was completed successfully.
❏ Click OK to close the message box.
- Correct out-of-balances.
Correct out-of-balances
Log on to file ID C.
Finance > Utilities > Out of Balance Correction
In the current file ID (soon to be historical file ID), correct any out-of-balance occurrences. If there are no out-of-balance occurrences, continue to the next step.
This utility is designed to locate out-of-balance accounts in the End-of-Month (EOM), current, and next accounting periods.
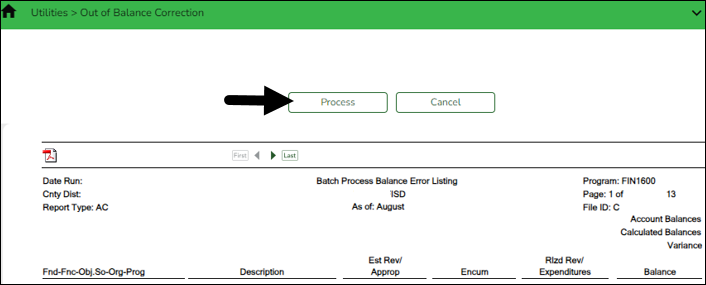
If out-of-balance accounts exist, the FIN1600 - Batch Process Balance Error Listing Report is displayed with a list of the accounts. These out-of-balance situations may have been inadvertently caused by the system (e.g., missed transactions in the End-of-Month (EOM)). After processing the utility, the totals are recalculated and corrected in the general ledger.
IMPORTANT: The utility will not correct a true out-of-balance entry where a Fund Total is displayed in the General Ledger; those still need to be submitted for correction.
The ASCENDER processing logo is displayed upon accessing the page indicating that the program is searching for any out-of-balance accounts in the EOM, current, and next accounting periods.
If all accounts are in balance, the following message is displayed: All accounts for EOM, Current and Next Accounting Periods are in balance.
If any out-of-balance accounts exist for YC, AC, AA, the FIN1600 - Batch Process Balance Error Listing Report is displayed with a list of the accounts. Review the report.
- Click Process to recalculate the totals and correct out-of-balances in the general ledger.
- Click Cancel to cancel the process.
A message is displayed indicating that the process was completed successfully.
- Verify that all fund totals are zero.
Verify that all fund totals are zero
Log on to file ID C.
Finance > Inquiry > General Ledger Inquiry
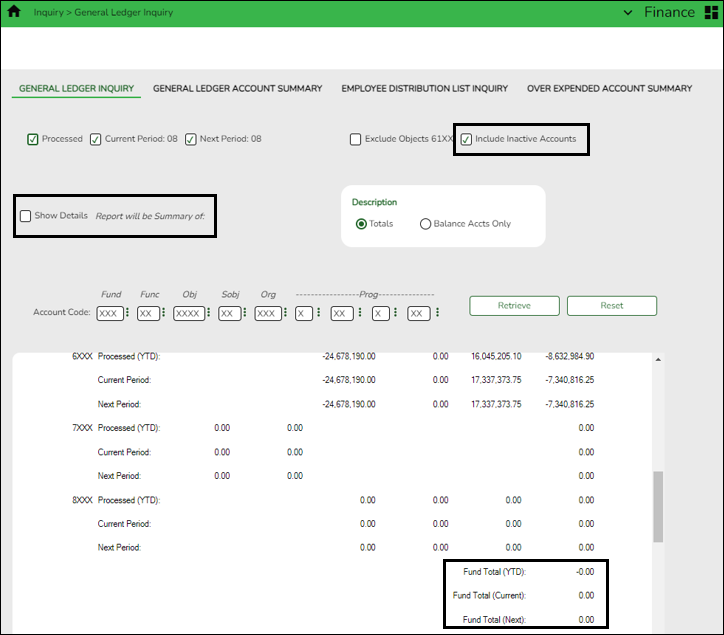
Run an inquiry to verify that Fund Total (YTD), Fund Total (Current), and Fund Total (Next) amounts are zero.
Note: If amounts are not zero, contact your regional ESC consultant for further assistance.
❏ Select Include Inactive Accounts. Selecting this option may prevent out-of-balance accounts.
❏ Unselect the Show Details checkbox.
❏ Leave all account code components masked (X).
❏ Click Retrieve to generate a summary for all accounts.
- Close fiscal year.
This utility provides a streamlined method to efficiently end the old fiscal year and begin the new fiscal year. Only one Finance accounting period can be open (i.e., The Finance current and next accounting period should be the same). Also, all other application accounting periods should match on the Finance > Tables > District Finance Options > Finance Options tab.
The following Finance EOY tasks are automatically completed when you execute the Fiscal Year Close process:
- Delete 1099 work table.
- Delete payroll deduction checks.
- Delete payroll transfer transactions.
- Copy current to new file ID.
- Delete credit memos for ending funds.
- Delete prior fiscal year and funds marked for deletion.
- Mass change account codes.
- Delete budget amendments only for increment funds.
- Create new accounts by fund/carry forward totals if selected.
- Update the file ID of all Finance document attachments to the new file ID.
Note: To accommodate ASCENDER Business-only clients, the Fiscal Year Close process creates new year district and campus records in District Administration if executed prior to the Annual Student Data Rollover (ASDR) process.Reminder: Before processing continuing funds, review overdrawn accounts and/or accounts that have expenditures with no budget. If these deficit balances are not corrected, the negative budget balance will be rolled forward as a negative budget and will need to be corrected in the new year with a JV (Journal Budget).
If an LEA is switching to a July 1 fiscal year, they must change the Starting Accounting Period from 09 to 07 on the Finance > Tables > District Finance Options > Finance Options tab BEFORE closing the year. This allows their data to be updated with the correct month after performing the closing process.
Process the fiscal year close:
When you access this page, last year's options may be selected by default. This allows you to review what was done last year and decide how to proceed this year.
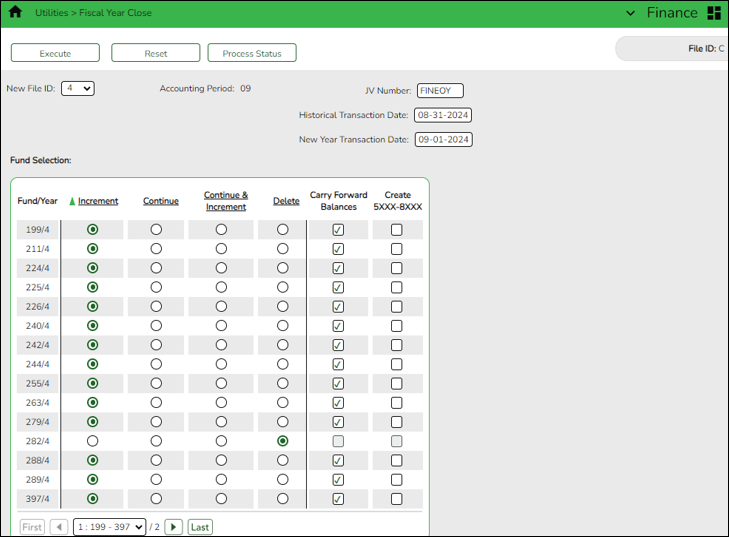
Before running this process, click Reset to clear last year's selections. This resets all funds to Increment allowing you to manually update each selection as needed.
Field Description New File ID Click  to select the new historical GL file ID to which you want to copy all tables and transactions. The field defaults to the last digit of the “to” school year. The drop-down displays a list of all GL file IDs that are not in use. This is a required field.
Accounting Period Displays the Starting Accounting Period from the Finance > Tables > District Finance Options > Finance Options tab. This accounting period is used for all JVs created in file ID C. Only one accounting period can be open. JV Number Type an alphanumeric journal voucher number. This JV number is used for all system JV entries. This is a required field. Historical Transaction Date Type the historical transaction date in the MM-DD-YYYY format or select a date from the calendar. This date is used for all system entries in the new historical file ID. This is a required field. New Year Transaction Date Type the new year transaction date in the MM-DD-YYYY format or select a date from the calendar. This date is used for all system entries in the new current file ID. This is a required field. ❏ Under Fund Selection, a list of each Fund/Year in the signed-on GL file ID is displayed. Select the appropriate option(s) for each fund.
Notes: The following occurs for all funds listed:
- All funds are copied to the new historical file ID.
- All budget amendments are deleted.
- All current year requisitions are reversed.
Increment Select for the funds to be incremented (i.e., funds that will change their fiscal year at the same time that the LEA’s new fiscal year will begin). The increment option is not available if the incremented fund already exists. For example, in September 2023, funds 211/3 and 211/4 already exist; therefore, 211/3 can only be continued or deleted.
If selected, the following actions are automatically completed:
The fiscal year is incremented on credit memos.
The fiscal year is incremented on outstanding Accounts Receivable invoices.
The fiscal year is incremented on the payroll and PMIS distributions for active employees only.
Only purchase orders that include continuing funds are re-encumbered. Purchase orders that are split-funded and include funds where the fiscal year is only being incremented will be deleted. For example, if a purchase order is split between 211 (continuing fiscal year) and 199 (incremented fiscal year), then you will have to re-enter the purchase order in the new file ID.
The following are optional:
Carry Forward Balances
Create 5XXX-8XXX AccountsContinue Select for the funds to be continued into the new fiscal year (i.e., funds maintaining the fiscal year even after the LEA begins the new fiscal year).
If selected, the following actions are automatically completed:
The 1XXX-4XXX account balances are carried forward (the Carry Forward Balances field is automatically selected).
The 5XXX-8XXX account balances are created (the Create 5XXX-8XXX field is automatically disabled).
The budget amounts that match the ending balances in the historical file ID are set up for the 5XXX-8XXX accounts. For example, if only $8,000 of a $10,000 grant has been received, then the difference of $2,000 is established as the estimated revenue.
The difference between revenue and expenditures will post to the Obj.Sobj in the Actual Fund Balance Obj.Sobj field on the Finance > Tables > Account Codes > Fund tab.
In the new historical file ID, accounts are inactivated for all continuing funds. Incremented funds remain active.
Only purchase orders that include continuing funds are re-encumbered. The purchase order is re-encumbered in file ID C for the original amount +/- encumbrance adjustments, +/- liquidation amounts from check and credit card transactions. Purchase orders that are split-funded and include funds where the fiscal year is only being incremented will be deleted. For example, if a purchase order is split between 211 (continuing fiscal year) and 199 (incremented fiscal year), then you will have to re-enter the purchase order in the new file ID.
Be aware that purchase orders containing continuing funds will be displayed in both the historical and new current file ID but should be paid in the new file ID.
The fiscal year is not updated on credit memos.
The fiscal year is not updated on outstanding Accounts Receivable invoices.
The fiscal year is not updated on payroll and PMIS distributions.Continue & Increment Select for the funds to be incremented and continued into the new fiscal year. The increment option is not available if the incremented fund already exists. For example, in September 2023, funds 211/3 and 211/4 already exist; therefore, 211/3 can only be continued or deleted.
If selected, the following actions are automatically completed:
The 1XXX-4XXX account balances are carried forward for the fund in the fiscal year that is continuing (the Carry Forward Balances field is automatically selected). The accounts for the incremented fund/fiscal years are established with a zero balance.
The budget amounts that match the ending balances in the historical file ID are set up for the 5XXX-8XXX accounts. For example, if only $8,000 of a $10,000 grant has been received, then the difference of $2,000 is established as the estimated revenue.
The difference between revenue and expenditures will post to the Obj.Sobj in the Actual Fund Balance Obj.Sobj field on the Finance > Tables > Account Codes > Fund tab.
In the new historical file ID, accounts are inactivated for all continuing funds. Incremented funds remain active.
Only purchase orders that include continuing funds are re-encumbered. The purchase order is re-encumbered in file ID C for the original amount +/- encumbrance adjustments, +/- liquidation amounts from check and credit card transactions. Purchase orders that are split-funded and include funds where the fiscal year is only being incremented will be deleted. For example, if a purchase order is split between 210 (continuing fiscal year) and 199 (incremented fiscal year), then you will have to re-enter the purchase order in the new file ID.
Be aware that purchase orders containing continuing funds will be displayed in both the historical and new current file ID but should be paid in the new file ID.
The fiscal year is not updated on credit memos.
The fiscal year is not updated on outstanding Accounts Receivable invoices.
The fiscal year is not updated on payroll and PMIS distributions.
The following is optional:Create 5XXX-8XXX Accounts for the incremented fund
Delete Select to delete the fund. If selected, no additional action occurs for these funds. Carry Forward Balances Select to carry forward 1XXX-4XXX account balances into the new fiscal year. This field is automatically selected when Continue is selected for a fund. Create 5XXX-8XXX Select to create 5XXX-8XXX accounts. This field is disabled when Continue is selected for a fund. ❏ After carefully selecting the appropriate options for each fund, click Execute to begin the Finance year close process.
Note: After you click Execute, your selected options are saved and will be available the next time you open the Fiscal Year Close page.
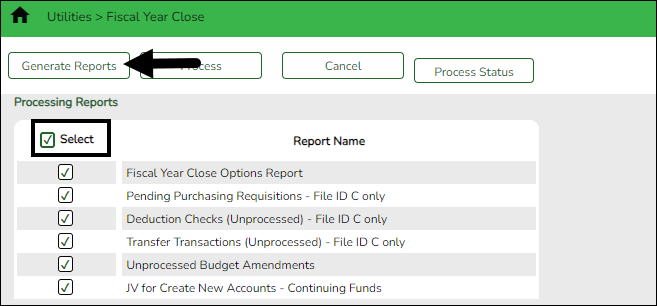
Under Processing Reports, the following reports are available:
- Fiscal Year Close Options Report
- Pending Purchasing Requisitions - File ID C only
- Deduction Checks (Unprocessed) - File ID C only
- Transfer Transactions (Unprocessed) - File ID C only
- Unprocessed Budget Amendments
- JV for Create New Accounts - Continuing Funds
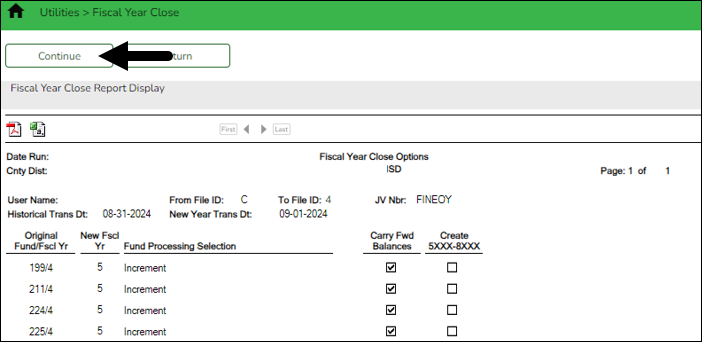
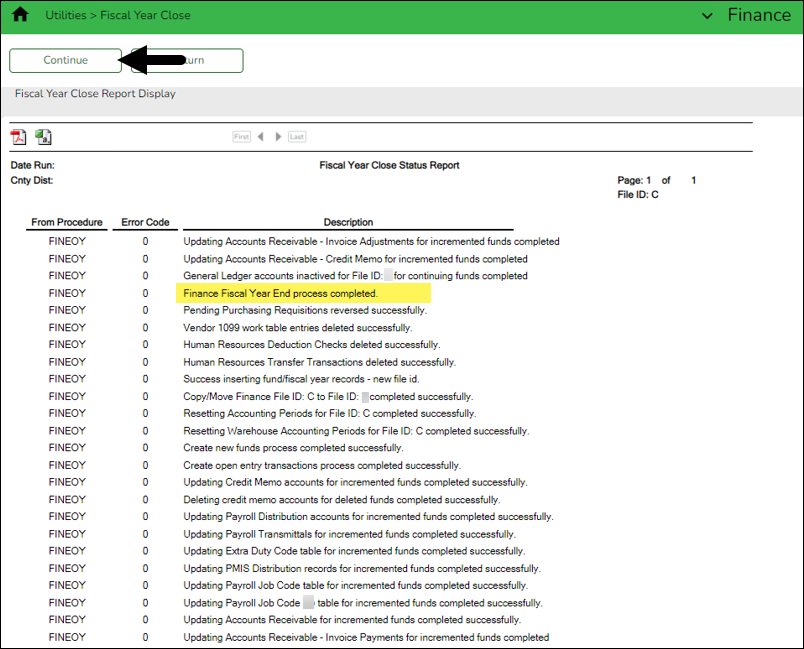
❏ Select the checkbox next to each report you want to generate or click the top Select checkbox to select all reports.❏ Click Generate Reports to generate the selected reports. Print and/or save the reports and review them for accuracy. The Fiscal Year Close Report Display page is displayed.
- Click Continue. The first report selected is displayed. Click Continue to display the next selected report. When you are done viewing all of the selected reports, you are returned to the Processing Reports page.
- Click Return at any time to return to the Processing Reports page.
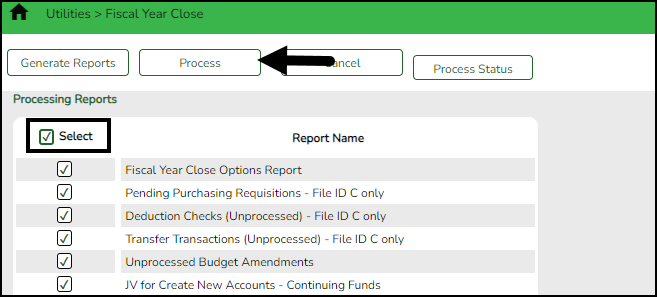
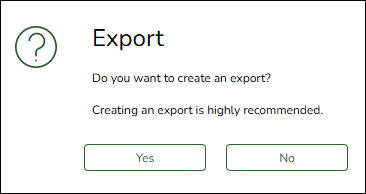
❏ Click Process to process the fiscal year close. You are prompted to create an export.
A series of end-of-year Finance tasks will begin to run in the background. After the process is completed, you are returned to the Fiscal Year Close page.
After processing, the Current (Open) Accounting Period on the Finance > Tables > District Finance Options > Accounting Period tab is updated to match the Starting Accounting Period on the Finance > Tables > District Finance Options > Finance Options tab (i.e., the accounting periods will be set to 07 or 09 depending on the LEA). In order to update the File ID and Account Period in the top-right corner of the page, you must exit and re-enter the Finance application.
❏ Click Cancel to return to the Fiscal Year Close page.
❏ Click Process Status to view the details (error report, status, user details, etc.) for the process. The Fiscal Year Close Processing pop-up window opens with the Status, Extract Type, Start date and time, End date and time, User ID, and user Email address.
- If the logged-on user has an email address on the Personnel > Maintenance > Staff Demo > Demographic Information tab, an email message is forwarded when the process is completed.
- Under Error Report, click Print Report to display the selected error report. Review the report.
- Click Continue to continue through the list of reports for the selected extract. Click Return to return to the Fiscal Year Close page.
- Verify that the Finance Fiscal Year end process was completed.
- Click Close to close the Fiscal Year Close Processing pop-up window and return to the Fiscal Year Close page.
- Log on to current file ID.
Log on to current file ID
Log on to file ID C.
If you have not done so already, after the Fiscal Year Close process is complete, exit and re-enter the Finance application to update the File ID and Account Period in the top-right corner of the application.
- Verify/update Finance options.
Verify/update Finance options
Log on to file ID C.
Finance > Tables > District Finance Options > Finance Options
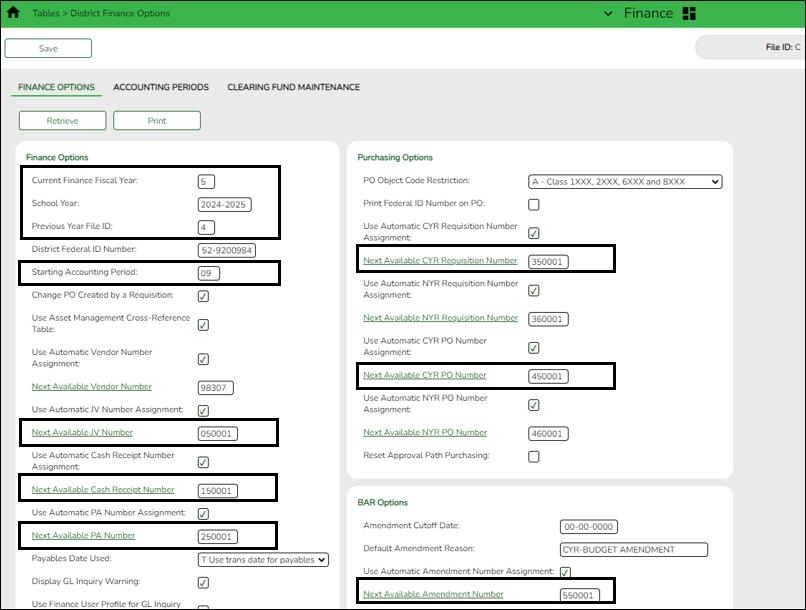
Verify that the data is accurate for the new fiscal year and update the fields as needed.
❏ Under Finance Options, ensure that the following fields reflect data for the new school year:
- Current Finance Fiscal Year
- Previous Year File ID
- School Year and Starting Accounting Period - These fields should be automatically updated after the Fiscal Year Close utility is processed. The starting accounting period should be either 07 for June year-end LEAs or 09 for August year-end LEAs.
IMPORTANT: If the School Year and Starting Accounting Period fields were not automatically updated, contact your regional ESC consultant for further assistance.
While on this page, you can also update your next available numbers under Finance, Purchasing, and BAR if you choose to.
- It is recommended that you incorporate the year in the next available number sequences. In this example, for fiscal year 2025-2026, 6 is the second digit in the next available numbers.
- Do not update the Next Available Vendor Number as this number should remain in the same sequence from the prior year(s).
Notes:
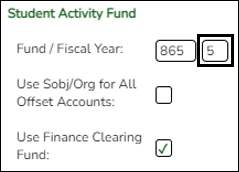
- If applicable, update the Student Activity Fund/Year field.
- If your LEA has started using the revenue and expenditure codes for the Student Activity Fund, then this section should be blank.
Finance > Tables > District Finance Options > Clearing Fund Maintenance
Update the Finance and Payroll Clearing Fund/Fiscal Year fields. Be sure to verify your offset accounts for the new fiscal year.
Verify that the data is accurate for the new fiscal year and update the fields as needed.
IMPORTANT: Some LEAs may have old data for fiscal year 6; therefore, it is required to complete the following steps to ensure that you are creating a new fiscal year 6 record.
❏ In the Codes for Fiscal Year field, select 6 and click Retrieve. If data exists for fiscal year 6, it is displayed.
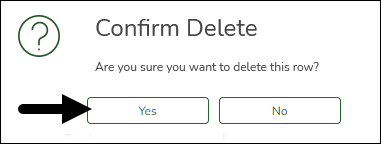
❏ Click Delete. The following message is displayed.
- Click Yes to continue.
- Click Save to save the changes.
- Click Add to create the 6 fiscal year record and complete the following fields:
- In the Finance Clearing Fund/Fiscal Year field, type the applicable fund (e.g., 164/6, 864/6, etc.) according to your LEA.
- In the Payroll Clearing Fund/Fiscal Year field, type the applicable fund (e.g., 163/6, 863/6, etc.) according to your LEA.
Review and complete the other fields on the page as needed.
The fiscal year value is automatically populated in the Overpayment Account field.
❏ Click Save.
Review the fields under Payroll Automatic Posting Defaults to ensure that all fields are correctly populated.
- Correct out-of-balances.
Correct out-of-balances
Log on to file ID C.
Finance > Utilities > Out of Balance Correction
In the new current file ID, correct any out-of-balance occurrences. If there are no out-of-balance occurrences, continue to the next step.
This utility is designed to locate out-of-balance accounts in the End-of-Month (EOM), current, and next accounting periods.
If out-of-balance accounts exist, the FIN1600 - Batch Process Balance Error Listing Report is displayed with a list of the accounts. These out-of-balance situations may have been inadvertently caused by the system (e.g., missed transactions in the End-of-Month (EOM)). After processing the utility, the totals are recalculated and corrected in the general ledger.
IMPORTANT: The utility will not correct a true out-of-balance entry where a Fund Total is displayed in the General Ledger; those still need to be submitted for correction.
The ASCENDER processing logo is displayed upon accessing the page indicating that the program is searching for any out-of-balance accounts in the EOM, current, and next accounting periods.
If all accounts are in balance, the following message is displayed: All accounts for EOM, Current and Next Accounting Periods are in balance.
If any out-of-balance accounts exist for YC, AC, AA, the FIN1600 - Batch Process Balance Error Listing Report is displayed with a list of the accounts. Review the report.
- Click Process to recalculate the totals and correct out-of-balances in the general ledger.
- Click Cancel to cancel the process.
A message is displayed indicating that the process was completed successfully.
- Verify bank account group fund fiscal year.
Verify bank account group fund fiscal year
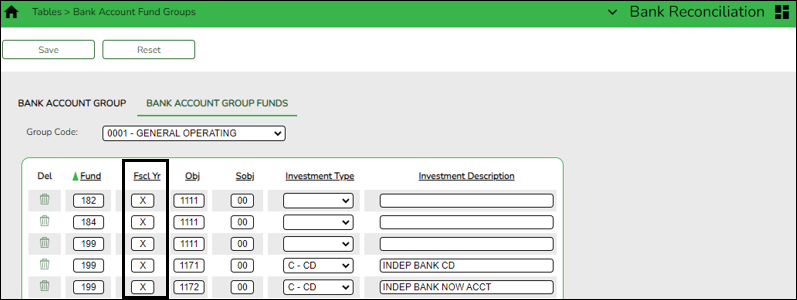
Bank Reconciliation > Tables > Bank Account Fund Groups > Bank Account Group Funds
By default, the fiscal year is masked (i.e., X). It is recommended that the fiscal year remain masked; however, it can be changed to the next fiscal year.
TIP: This is a good time to add, remove, or clean up funds if necessary.
- Move Budget to Finance.
Move Budget to Finance
Log on to file ID C.
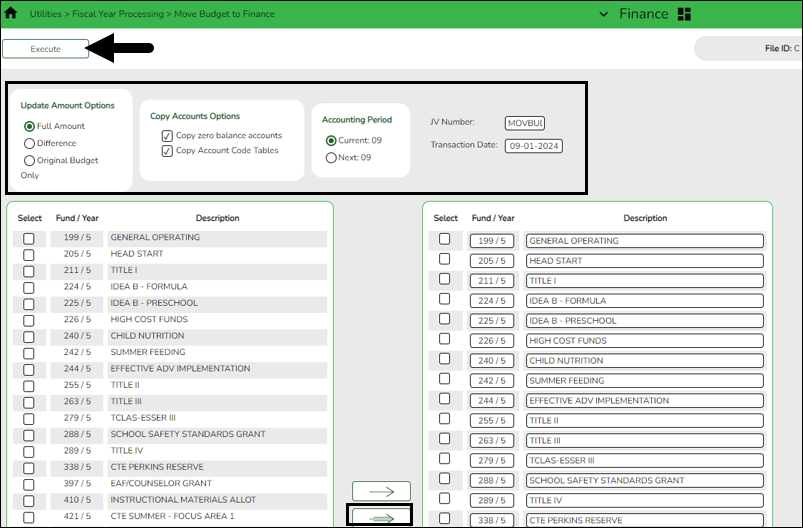
Finance > Utilities > Fiscal Year Processing > Move Budget To Finance OR Budget > Utilities > Move Budget To Finance
IMPORTANT: If you perform this process in Finance, it is recommended that you manually create a backup (export) using the Finance > Utilities > Export by File ID page. If you perform this process in Budget, the system will prompt you to create a backup (export) automatically.
Once the next year budget is approved and in the Approved column, the Budget is ready to be moved to Finance.
❏ Click here if you need to copy Budget from the Recommended level to the Approved level.
❏ It is important to address account locks prior to moving Budget to Finance.
- Use the Maintenance > Budget Data or Budget Data - Quick Entry pages to review account locks.
- Use the Budget > Utilities > Mass Lock/Unlock Funds page to unlock funds.
Use one of the following to ensure accuracy:
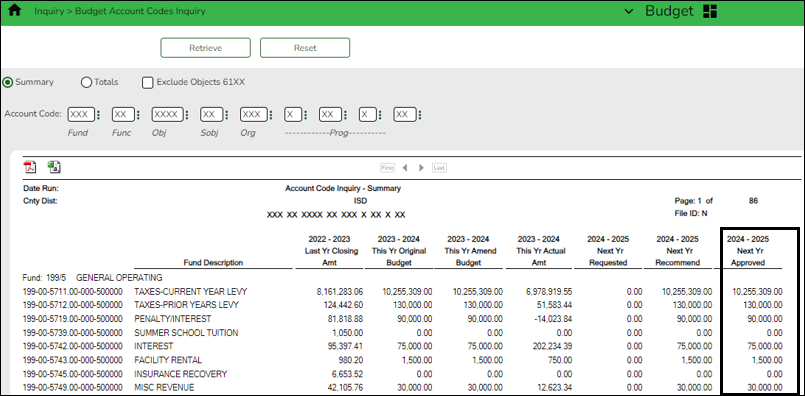
❏ Run an inquiry on the Budget > Inquiry > Budget Account Codes Inquiry page and compare the Next Year Approved column to the board-approved budget.
❏ Generate the BUD2050 - Budget Board Report by Function report and compare it to the board-approved budget.
❏ It is recommended that the federal fund budget is verified with the NOGA/Grant application.
❏ All federal and state grant funds should be in balance (estimated revenues = appropriations).
When data is moved from Budget to Finance, the following occurs:
- The JV Number Description field is populated with MOVE BUDGET TO FINANCE.
- The Reason field is populated with OPENING ENTRY.
Under Update Amount Options:
Full Amount Select if you are moving your budget to Finance for the first time. If Capture Original Budget Flag is selected on the Tables > District Budget Options page, Finance is populated with the original budget. The estimated revenues, appropriations, and if necessary, a 3XXX balancing account are updated/created each time this option is performed. If an account has an existing balance in Finance, the Budget amount is added to the existing balance (e.g., an existing account has a $1000.00 balance, and the Budget amount is $1500.00; the Budget amount is added to the balance to equal $2500.00). Other options include:
Difference Select if an account has an existing balance in Finance, the difference between the Budget amount and the existing balance is added to the account (e.g., an existing account has a $1000.00 balance, and the Budget account is $1500.00; only $500.00 is added to make it $1500.00, or if Finance has $1500.00 and Budget has $500.00, $1000.00 is subtracted to make it $500.00). If Capture Original Budget Flag is selected on the Tables > District Budget Options page, Finance is populated with the original budget. The Estimated Revenues, Appropriations, and if necessary, a 3XXX balancing account is updated/created each time this option is performed.
Original Budget Only Select to allow to capture the original budget. No other columns in the Finance general ledger are updated, and no transactions are inserted. If the account does not exist in the general ledger, it is created. When this option is used, Capture Original Budget Flag on the Tables > District Budget Options page is ignored. If an account has an existing original budget amount in Finance, the Budget amount is added to the existing original budget amount (e.g., an existing account has a $1000.00 balance, and the Budget amount is $1500.00; the Budget amount is added to the original budget amount to make it $2500.00).
If you need to run the utility again, contact your regional ESC consultant before proceeding, as your selections could significantly impact the results.
A warning message is displayed with a preview of the accounts informing you that account codes with balances exist in Finance.
❏ Under Copy Account Options, select the following option to ensure that any new account component is available in Finance. If there is a missing account code component, Finance will not update the budget. If you select Copy zero balance accounts, general ledger accounts that do not have a value in the Approved Budget column are created.
Copy Account Code Tables Select to add this account code table to the existing Finance account code table for all funds, functions, objects, etc. that do not exist in the current Finance account code table. If accounts do exist in the current Finance account code table and changes were made to the descriptions, the existing description in the Finance account codes are replaced.
Note: If you manually added the new account codes to the Finance account code table, this option does not need to be selected. However, if the account codes do not exist in the current Finance account code table and this option is not selected, database errors may occur.
❏ Select one of the following Accounting Period options:
- If Current (Open) Accounting Period is selected on the Finance > Tables > District Finance Options > Accounting Periods tab, Current is selected by default.
- If Next Accounting Posting Period is selected on the Finance > Tables > District Finance Options > Accounting Periods tab, Next is selected by default.
JV Number Set to 999999 by default but can be changed. Type an alphanumeric journal voucher number. If a duplicate journal voucher number other than 999999 is entered, an error message is displayed. If a duplicate journal voucher number other than 999999 is typed, an error message is displayed. This field is required. Transaction Date Defaults to the system date but can be changed.
Type 09-01-20XX for standard fiscal year LEAs.
Type 07-01-20XX for early start LEAs.
This field is required.❏ Select the current fund/years. Use the arrow buttons to move the selected fund/years from the left side to the right side of the page.
❏ Click Execute to move the budget funds to the Finance general ledger. If performing this process in Budget, you are prompted to create a backup (export).
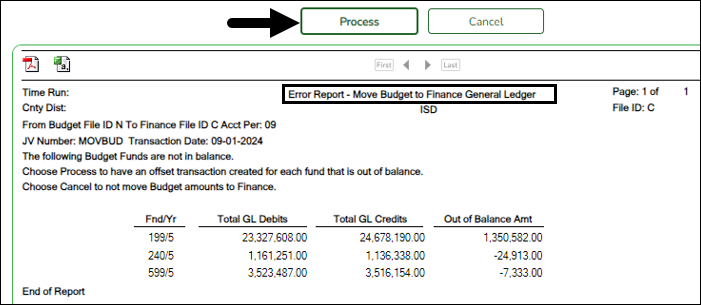
Review the error report, if available.
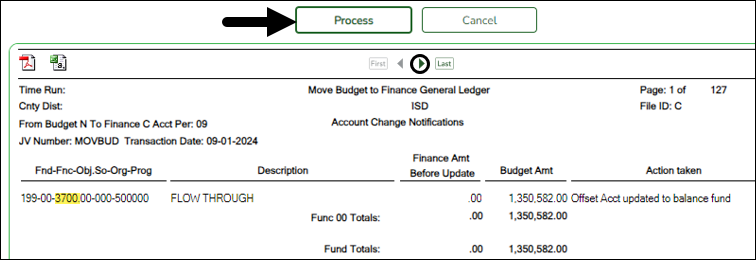
If an error report is not displayed or if Process is clicked on the error report (for out-of-balance), the following reports are displayed:
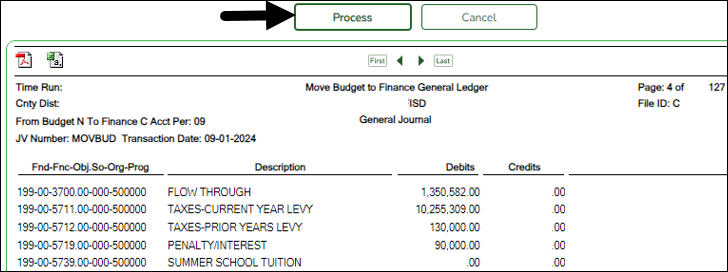
Note: The first report displays the account changes (i.e., fund balance entries) and the second report displays the budget data.
- While users may manually enter fund balances, Account Change Notifications are produced if a fund being moved is not in balance (e.g., Estimated Revenues + Other Resources does not equal Appropriations + Other Uses). The journal voucher number and the transaction date are displayed in the report header. If the budget is not in balance, the move can still be processed. The difference is automatically entered in the Budgetary Fund Balance, or you can cancel the move and correct the budget. All federal and state grant funds should be in balance (estimated revenues = appropriations).
A general journal is produced if any accounts are updated for Finance. The journal voucher number and the transaction date are displayed in the report header.
❏ Click Process to post the selected accounts to the Finance general ledger. Either the estimated revenues, appropriations, or balance columns are updated based on the account class and the accounting period.
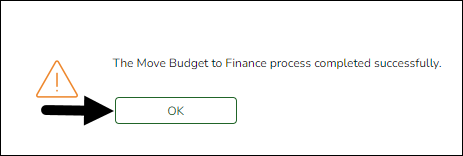
A message is displayed indicating that the Move Budget to Finance process was completed successfully.
❏ Click OK.
- Verify Budget moved to Finance.
Verify Budget moved to Finance
Log on to file ID C.
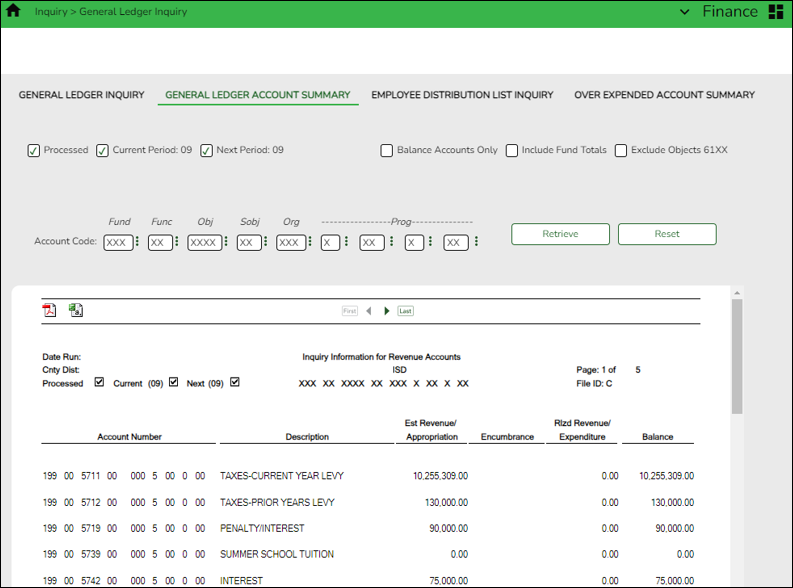
Finance > Inquiry > General Ledger Inquiry > General Ledger Account Summary
Larger districts should allow extra time for Move Budget to Finance processing, then log out and log back in to refresh the system before running the inquiry.
Run an inquiry to verify that the Budget moved to Finance successfully.
Use the Finance > Utilities > Out of Balance Correction page to view and correct any out-of-balance accounts.
- (If applicable) Address due to funds for credit cards.
(If applicable) Address due to funds for credit cards
Log on to file ID C.
This tab is used to determine the new fiscal year for any new entries that are created using existing credit card transactions.
Retrieve a starting fund:
Field Description Starting Fund Type the starting fund from which you want to retrieve data.
Click Retrieve. A list of fund codes equal to and greater than the entered starting fund is displayed.
Add a fund:
Fund Type a fund from which the credit card transaction was created. To Fiscal Year Type the fiscal year to which the new transactions created from the Fund field will be posted. Description Type a user-defined description for the due to fund. The field can be a maximum of 30 alphanumeric characters. ❏ Click Save.
- Update payroll clearing fund/year.
Update payroll clearing fund/year
Log on to the current year.
Payroll > Tables > District HR Options
Update the Payroll Clearing Fund/Year field.
Payroll Clearing Fund/Year This field is automatically populated with the payroll clearing fund/year selected on the Finance > Tables > District Finance Options > Clearing Fund Maintenance tab.
If not, click to select the fund/fiscal year for the current year to be used as the clearing fund/fiscal year when interfacing to Finance.
 - Update accrual expense table.
Update accrual expense table
Log on to the current year.
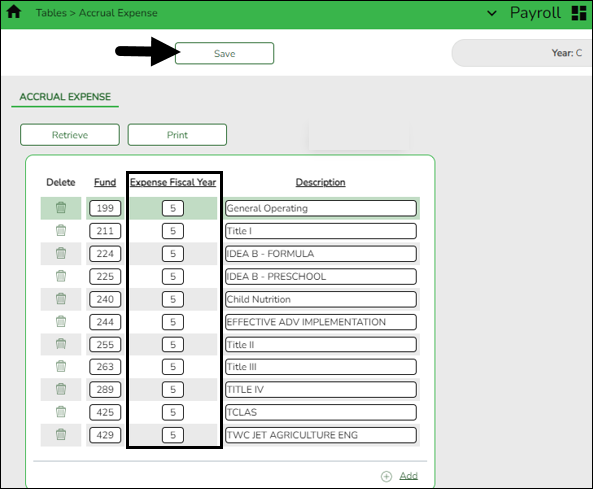
Payroll > Tables > Accrual Expense
If your LEA accrues, the accrual expense table must be updated.
❏ Click +Add to add a row.
Field Description Fund Type a three-digit fund that may be in the employees’ distribution history (accrual) records where an alternate fiscal year needs to be used for the posting of the accrual expense. The first search is for a specific fund (all three digits match). If the fund is not found, the next search starts with the first two digits of the fund, and if not found, it searches for the first digit of the fund. If no match is found, no change occurs, and the accrual expense is posted according to what is in the account distribution history.
Note: A complete fund mask (XXX) cannot be used.
Expense Fiscal Year Type a one-digit code to be used in conjunction with the Fund field to identify employee distribution history (accrual) records that need to be posted with a different fiscal year (see the step above). Description Type the fund description. The field can be a maximum of 30 characters. ❏ Click Save.
- (If applicable) Clear/move NYR requisitions to CYR
(If applicable) Clear/move NYR requisitions to CYR
Log on to file ID C.
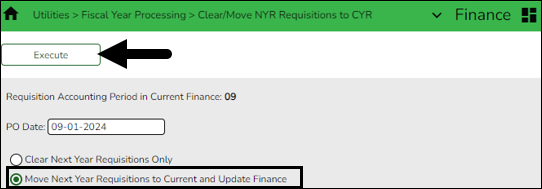
Finance > Utilities > Fiscal Year Processing > Clear/Move NYR Requisitions to CYR
If your LEA uses the next year Purchasing feature, move all purchase orders and requisitions that were created in next year Purchasing to Finance and current year Purchasing.
The Requisition Accounting Period in Current Finance field is display only and is populated by the requisition accounting period data from the Finance > Tables > District Finance Options page. Requisitions that are moved to Finance are created in the current accounting period.
❏ In the PO Date field, type 07-01-20XX for June year-end LEAs or 09-01-20XX for August year-end LEAs.
❏ Select Move Next Year Requisitions to Current and Update Finance to transfer all next year requisitions to the current year and update the Finance general ledger.
❏ Click Execute. The Over Expend Report is displayed if you have account codes that are over budget. Review and print all of the reports.
❏ Click Continue. The Move Next Year Requisitions to Current Year report is displayed. Use this report to determine if budget amendments need to be done in Finance.
❏ Click Process. The following message is displayed indicating that the process was successfully completed.
❏ Click OK to close the message box.
- Update Purchasing cutoff date.
Update Purchasing cutoff date
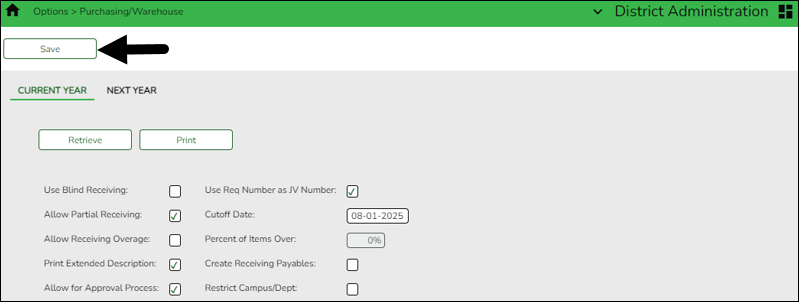
District Administration > Options > Purchasing/Warehouse > Current Year
Depending on your LEA's needs, update the Purchasing Cutoff Date to allow users to create purchasing requisitions.
It is recommended to update the Amendment Cutoff Date under BAR Options on the Finance > Tables > District Finance Options > Finance Options tab.
- Update user accounts.
Update user accounts
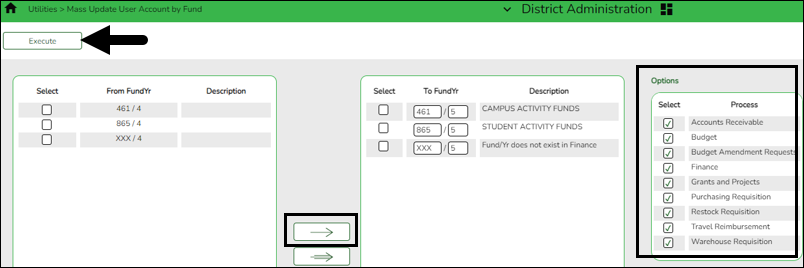
District Administration > Utilities > Mass Update User Account by Fund
Mass update all account codes assigned to specific years. The fund/year does not need to exist on the Finance > Tables > Account Codes > Fund tab. If the fund/year exists in the table, but the Fund Description field is blank, or if the fund/year does not exist in the table, the following message is displayed in the To Fund/Yr Description field: “Fund/Yr does not exist in Finance.” The process will run correctly regardless of this message.
❏ Select the fund/years to be updated. Use the arrow buttons to move the fund/years from the left side to the right side of the page.
❏ Under Options, select the processes to be included.
❏ Click Execute. A message is displayed indicating that the update was successfully completed.
❏ Click OK to close the message box.
To prevent system issues related to roles, be sure to keep Business and Student roles separate in Security Administration. Also, make sure Business roles do not have campuses assigned.
You can generate the Security Administration > Reports > List of Users by Permission report to review user details such as the last login date and then modify as needed.
- Notify Human Resources/Payroll department to proceed with first payroll.
Notify HR/Payroll to proceed with the first payroll
This step does not apply to June year-end LEAs, as they are not processing the first payroll of the school year at this time.
Reminder: Since the fiscal year was updated for only active employees during the Fiscal Year Close process, be sure to verify that the fiscal year is correct for all employees.
After all of the above steps are completed:
❏ Notify your LEA's Human Resources/Payroll department to proceed with the First Payroll of the School Year (September Start LEAs) process.
❏ The first payroll of the school year cannot be processed until the budget is moved to Finance and the clearing fund for the new fiscal year is created.
- (If applicable) Perform Asset Management EOY steps.
(If applicable) Perform Asset Management EOY steps
If your LEA uses the Asset Management application, reference the Asset Management Annual Process guide for information about ending the current year and beginning the new year.
- (If applicable) Update Grants and Projects tables.
(If applicable) Update Grants and Projects tables
If your LEA uses the Grants and Projects application to track grants across multiple file IDs, review and update the applicable tables as needed. Reference the Grants and Projects Tracking guide for additional information.
Post-Finance EOY Process Tasks
- Create ASCII file
Create ASCII file
Log on to the historical file ID.
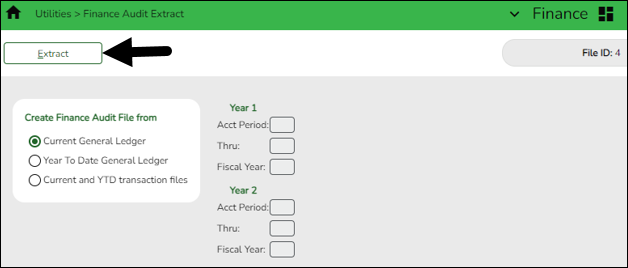
Finance > Utilities > Finance Audit Extract
When all of the necessary end-of-year entries are posted and the auditor requests the ASCII file, use this utility to create the file.
Note: The utility can be run more than one time; however, all necessary end-of-year entries must be posted prior to running the utility.
Field Description Current General Ledger Select this option to display the balances for all accounts in the current month only (not next month balances) (e.g., use this option if the last month of the fiscal year has not been closed in the file ID you are extracting from).
CAUTION: If the extract is run a second time and saved to the same drive or CD on the same day, the file is not overwritten as indicated, but all records are added to the first file. It is important to note that if you are doing multiple extracts on the same day, it is highly recommended that you rename your path or folder so you have both copies. Submit the copy that reflects your August 31 balances.
❏ Leave the Year 1 and Year 2 fields blank.
❏ Click Execute. A text file is created with the current balances, which your auditor can upload.
Additional Resources
The below document can be used by LEAs bringing forward balances from the historical file ID after the Fiscal Year Close process is complete.
Americans with Disabilities Act (ADA) and Web Accessibility
The Texas Computer Cooperative (TCC) is committed to making its websites accessible to all users. It is TCC policy to ensure that new and updated content complies with Web Content Accessibility Guidelines (WCAG) 2.0 Level AA. We welcome comments and suggestions to improve the accessibility of our websites. If the format of any material on our website interferes with your ability to access the information, use this form to leave a comment about the accessibility of our website.


