G&P SSA Fiscal Agent Management Setup
The Shared Service Arrangement (SSA) Fiscal Agent Management feature provides fiscal agents a more efficient way to handle grant budget revision requests and reimbursement requests from SSA members as well as manage budget adjustments. Education Service Centers (ESCs) and Local Education Agencies (LEAs) can both serve as designated fiscal agents.
The purpose of this document is to guide you through the necessary steps to assist fiscal agents in administering member LEA grant funds. As members submit requests through MemberPortal, fiscal agents have the ability to promptly move the requests through a customized approval path to ensure timely budget revisions and reimbursements.
If the Document Attachments feature exists on a page/pop-up window, depending on your access, you may have the ability to upload or view supporting documentation by clicking the Documents button or the paper icon.
This document assumes you are familiar with the basic features of the ASCENDER Business system and have reviewed the ASCENDER Business Overview guide.
Some of the images and/or examples provided in this document are for informational purposes only and may not completely represent your LEA’s process.
Prerequisites
❏ Update roles/users in Security Administration to allow SSA Fiscal Agent Management permissions. You can add permissions to an existing role or create a new role.
Terms:
| ASCENDER MemberPortal | An integrated portal that allows SSA member LEAs to submit grant budget revision and reimbursement requests to their respective fiscal agents. |
|---|---|
| Budget Adjustment | A budget adjustment is used to add or subtract an amount from an object's total award. |
| Budget Revision | A budget revision is used to move an amount between object classes within the total award. |
| Grant | A grant is funds that are given to an LEA by an entity such as a public body, charitable foundation, or specialized grant institution to provide a specific level of support for a specified period of time. |
| Reimbursement | A reimbursement is used to create a transaction to reimburse a member LEA's vendor using an amount that is equal to or less than the amount available in a grant's eligible remaining amount. |
| Shared Service Arrangement (SSA) | A financial arrangement used by Local Education Agencies (LEAs) and Education Service Centers (ESCs) to share and manage services for other LEAs referred to as members. |
| SSA Fiscal Agent | A fiscal agent is an organization that manages the accounting and financial reporting responsibility for grant funds on behalf of another organization. Education Service Centers (ESCs) and Local Education Agencies (LEAs) can both serve as designated fiscal agents. |
| SSA Member | An SSA member enters into a Shared Service Arrangement with a fiscal agent and is the LEA for which the fiscal agent manages services. The member designates a fiscal agent to conduct administrative duties for any grant funds issued to their LEA. |
Upload Signatures in District Administration
- Upload signatures.
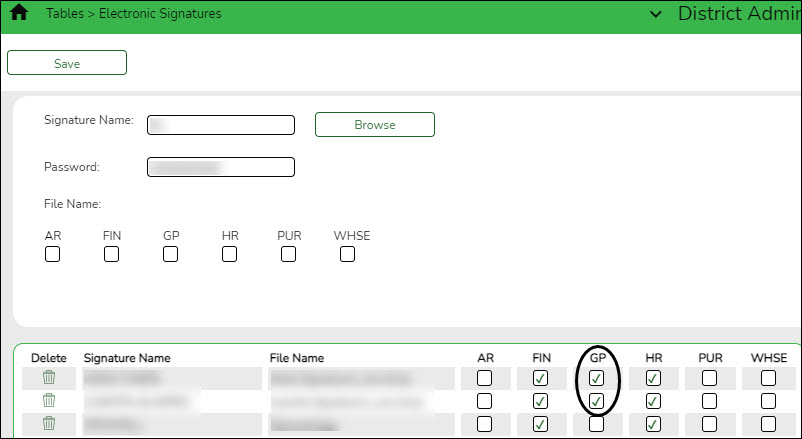
Upload signatures for payment
District Administration > Tables > Electronic Signatures
Upload electronic signatures to be used for grant check payments.
Field Description Signature Name Type the name of the signature to be displayed across the applications.
• Click Browse to open the Import window.
• Select the desired file and click Open to select the signature file. You can import a .bmp, .jpeg, .jpg, gif., or .png file.
• The signature image is displayed and the File Name field is automatically populated with the file name.
• Click Cancel to close the window without selecting a signature file.Password Type a password to encrypt the signature file. This password is required for decryption each time you select and use the signature in an application.
If you upload a signature file that was previously password encrypted, a pop-up window is displayed prompting you for that password.
• In the Password field, type the password to decrypt the signature file.
• Click OK to upload the signature file.
• Click Cancel to return to the Electronic Signatures page.
Passwords can be a minimum of one character and a maximum of 16 characters. The following special characters are not allowed: #, %, &❏ Select GP to allow the signature to be used for payment processing in Grants and Projects.
❏ Click Save.
Define Grants
The following steps allow fiscal agents to define grants and set up approved grant applications for their member LEAs.
- Create member records.
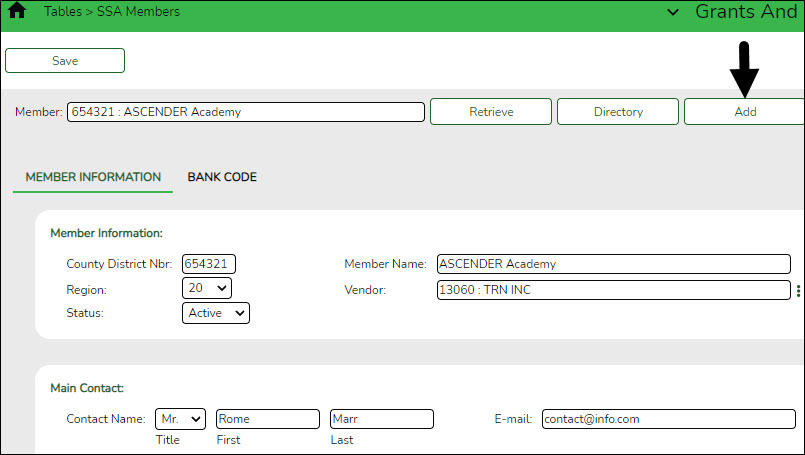
Create member records
Grants and Projects > Tables > SSA Members > Member Information
Add member data to create a member record. Member information records cannot be deleted; however, they can be set to an inactive status.
For privacy purposes, fiscal agents can use the Security Administration application to limit the users who can view this information.
❏ Click Add to add a new member record.
❏ Under Member Information:
County District Nbr Type a six-digit county-district number. This field is required. Member Name Type the member name. This field can be a maximum of 35 alphanumeric characters. Special characters are limited to the following: apostrophe, colon, comma, and dash. This field is required. Region Click  to select the two-digit Education Service Center (ESC) region number. This field is required.
 Vendor Type a valid vendor name or number. If the vendor number is not known, click  to select a vendor from the Vendors directory.
The Vendors directory is populated from the vendor records established on the Finance > Maintenance > Vendor Information > Vendor Name/Address tab. This field is required.Status Click  to select the member's status (i.e., Active or Inactive). This field is required.
 ❏ Under Main Contact:
❏ Click Save.
- Add member bank information.
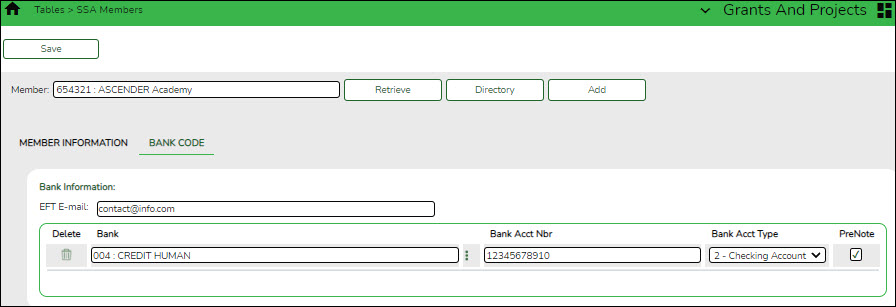
Add member bank information
Grants and Projects > Tables > SSA Members > Bank Code
Add the member's bank information to be used for EFT payments that are processed in the Grants and Projects application. If the member uses the same bank account information for vendor EFT payments, this page does not need to be completed.
The bank information hierarchy is as follows: This tab is the primary source of bank information for grant payments. If this tab is blank, the bank information from the Finance > Maintenance > Vendor Information > Vendor Miscellaneous tab is used. If the Vendor Miscellaneous tab is blank, a check is issued.
❏ Under Bank Information:
EFT E-mail Type the member's email address to send EFT payment information. The field can be a maximum of 100 characters. This field is required when adding a bank information record.
Bank Begin typing a bank code or name. As you type the data, a drop-down list of corresponding data is displayed. The bank information must exist on the Finance > Tables > Bank Codes tab. Select a bank code. If the bank code or name is not known, click
 to select a bank from the Banks lookup or press the SPACEBAR to view a list of banks.
Bank Acct Nbr Type the corresponding bank account number for the selected bank. Bank Acct Type Select the account type for the selected bank and bank account number.
• 2 Checking account
• 3 Savings accountPreNote Select to generate a prenote to the bank. ❏ Click Save.
- Set up grant types.
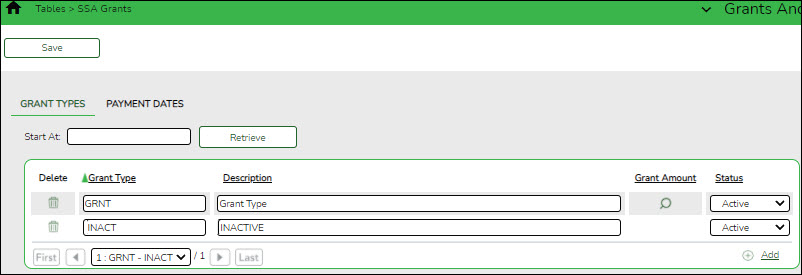
Set up grant types
Grants and Projects > Tables > SSA Grants > Grant Types
Set up a list of grant types and descriptions that can be used to facilitate the appropriate workflows and member notifications for each grant. Grant types are tied to a Grant ID and Member on the Grant Maintenance page. Grant types cannot be changed once they are in use; however, grant descriptions can be changed at any time.
Additionally, you can use the grant amounts spyglass feature to maintain annual budget amounts for multi-year grant types.
❏ Click +Add to add a row.
❏ Click Save.
- (Optional) Set up grant type payment dates.
(Optional) Set up grant type payment dates
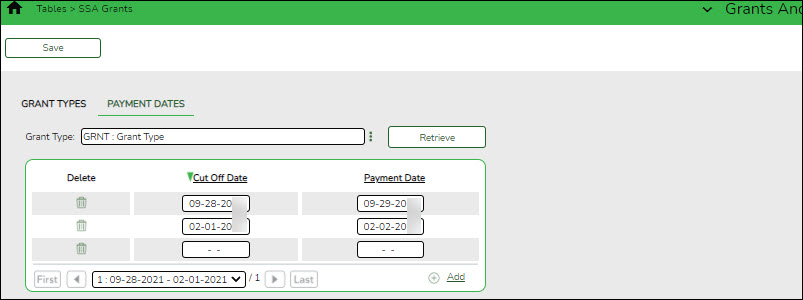
Grants and Projects > Tables > SSA Grants > Payment Dates
Set up a list of cut-off dates and expected payment dates for each grant type. These dates are for informational purposes only. The payment cut-off date is displayed for the grant type in MemberPortal to remind member LEAs of the fiscal agent's cut-off date.
Grant Type Begin typing a grant type or description. As you type the data, a drop-down list of corresponding data is displayed. Select a grant type. If the grant type or description is not known, click  to select a grant type from the Grant Types lookup or press the Spacebar to view a list of grant types.
 ❏ Click Retrieve. The payment dates for the grant type are displayed.
❏ Click +Add to add a row.
Cut Off Date Type the grant cut-off date in the MM-DD-YYYY format. Or, select a date from the calendar. Payment Date Type the grant payment date in the MM-DD-YYYY format. Or, select a date from the calendar. ❏ Click Save.
- (Optional) Copy payment dates.
(Optional) Copy payment dates
Grants and Projects > Utilities > Copy Payment Dates
Copy payments dates from one grant type to another. Payment information can be copied from one grant type to multiple grant types.
❏ Under Copy Pay Dates from Grant Type, retrieve a grant type from which you want to copy payment dates:
Field Description Grant Type Begin typing a grant type or description. As you type the data, a drop-down list of corresponding data is displayed. Select a grant type. If the grant type or description is not known, click  to select a grant type from the Grant Types lookup or press the SPACEBAR to view a list of grant types.
 ❏ Click Retrieve. The selected grant type is displayed with a list of cut-off dates and payment dates for the grant.
❏ Under Copy Pay Dates to Grant Type, select the grant type(s) to which you want to copy pay dates. Only active grant types are displayed.
- Select the Select All check box to select all grant type check boxes.
- Select the individual check box for the grant type(s) to which you want to copy data.
❏ Click Execute. A message is displayed prompting you to continue the process.
- Click Yes to execute the process. Any existing data will be overwritten.
- Click No to cancel the process.
Use the Grants and Projects > Tables > SSA Grants > Payment Dates tab to verify the changes.
Set up Notice of Grant Award (NOGA)
The following steps allow fiscal agents to track all facets of a NOGA so that member LEAs can be reimbursed appropriately.
- Create grant maintenance records.
Create grant maintenance records
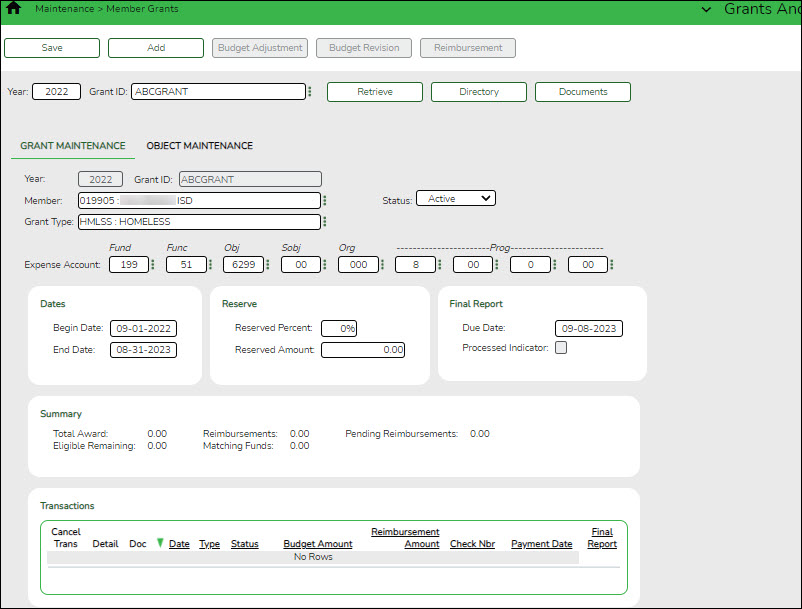
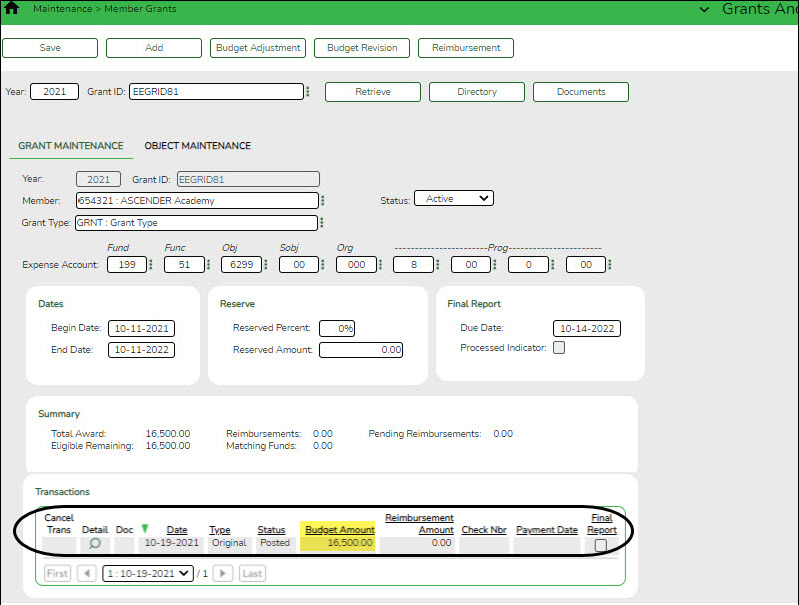
Grants and Projects > Maintenance > Member Grants > Grant Maintenance
Add and maintain various details related to a specified grant year, ID, type, or member (county-district) record. You can manage the grant type that is tied to a Grant ID and Member.
Fiscal agents can create, save, and submit budget adjustment requests, budget revision requests, and reimbursement requests. Expense accounts must exist in Finance file ID C.
Retrieve an existing grant record:
Field Description Year Type a four-digit grant year. This field defaults to the current school year. Grant ID Begin typing a grant ID or description. As you type the data, a drop-down list of corresponding data is displayed. Select a grant ID. If the grant ID or description is not known, click  to select a grant ID from the Grant IDs lookup or press the Spacebar to view a list of grant IDs.
The grant ID autosuggest list and the Grant IDs lookup is based on the Year field. For example, if you type 2020 in the Year field and tab to the Grant ID field, only active 2020 grant IDs are displayed in the autosuggest list and in the lookup.❏ Click Retrieve. The grant record is displayed.
If the grant information is not known, click Directory to perform a search of all grants.
Note: If only the original transaction (first entry) exists, the Member (county district) and Grant Type fields can be edited. Once budget revision and reimbursement requests are applied to a grant ID/Year, the Member (county district) and Grant Type fields can no longer be edited.
Add a new grant record:
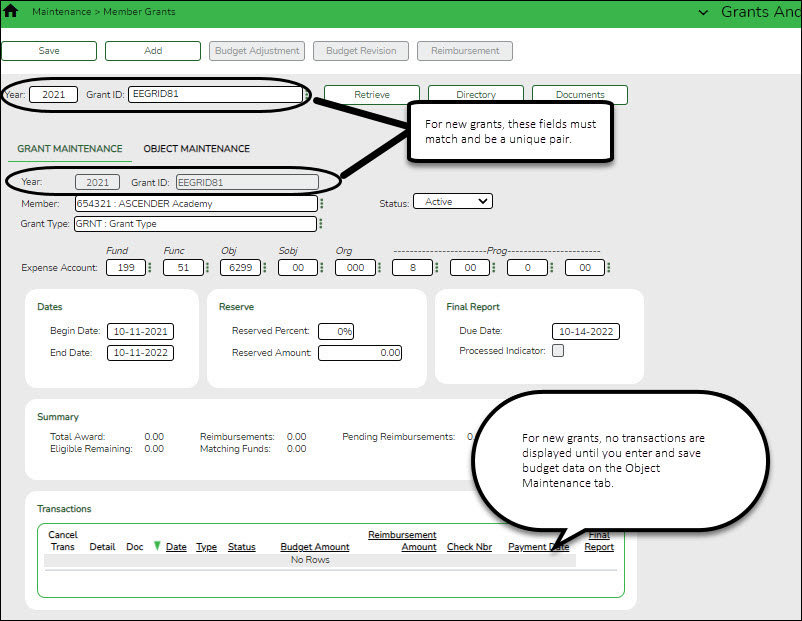
❏ Click Add to add a grant record. You have the option to select an existing year and grant ID for the new grant record using the Year and Grant ID fields at the top of the page. Or, you can type a new year and grant ID in the Year and Grant ID fields below the Grant Maintenance tab. If adding a new grant ID, you must enter the same year and grant ID in the Year and Grant ID fields at the top of the page and under the Grant Maintenance tab.
Year Type a four-digit grant year. The grant year and ID must be a unique pair. Grant ID Type a grant ID. Dashes are allowed. This field can be a maximum of 20-alphanumeric characters. Or, click  to select an existing grant ID from the Grant IDs lookup. The grant year and ID must be a unique pair.
❏ Under Grant Maintenance:Year Type the four-digit grant year. The grant year and ID must be a unique pair. Grant ID Type a grant ID. Dashes are allowed. This field can be a maximum of 20 alphanumeric characters. Or, click  to select an existing grant ID from the Grant IDs lookup. The grant year and ID must be a unique pair.
 Member Begin typing a member name or six-digit county district number. As you type the data, a drop-down list of corresponding data is displayed. Select a member. If the member name or county district number is not known, click  to select a member from the Member lookup or press the SPACEBAR to view a list of members.
When creating a new record, only members that exist on the Grants and Projects > Tables > SSA Members > Member Information tab can be selected.Grant Type Begin typing the grant type or description. As you type the data, a drop-down list of corresponding data is displayed. Select a grant. If the grant type or description is not known, click  to select a grant from the Grant Types lookup or press the SPACEBAR to view a list of grant types.
When creating a new record, only grant types that exist on the Grants and Projects > Tables > SSA Grants > Grant Types tab can be selected.Status Click  to select a status (Active, Closed, or Canceled) for the grant.
Expense Account Type the account number to be charged for any reimbursements processed for the grant ID. Or, in each of the account code fields, click  to select an account code component from the corresponding lookup. The selected account code component is populated in the corresponding field.
The selected account code must exist in Finance file ID C. Student Activity Funds are not allowed.❏ Under Dates:
Begin Date Type the grant begin date in the MM-DD-YYYY format. Or, select a date from the calendar. End Date Type the grant end date in the MM-DD-YYYY format. Or, select a date from the calendar. ❏ Under Reserve:
The following fields can be used to track reserve amounts. For example, if a grant guideline requires the grantee to hold back a portion (percentage or amount) of the grant until the end of the grant. This field is for information purposes only and does not affect grant calculations or totals.
Reserved Percent Type the reserved percentage amount. Valid values are 0-100. Reserved Amount Type the reserved amount. This amount cannot be greater than 999,999,999.99. ❏ Under Final Report:
Due Date Type the final reporting due date for the grant. This date must be after the grant End Date. Processed Indicator This check box is display only and is automatically updated after the final transaction is submitted for a Year and Grant ID. The following information is only displayed for existing records:
❏ Under Summary:
Total Award The original amount of the award plus or minus any revisions that have been approved (posted) is displayed. Reimbursements The reimbursement amounts that have been paid are displayed. Pending Reimbursements The reimbursement amounts that have been approved but not paid are displayed. Eligible Remaining The eligible remaining amount of the award (calculated Total Award - Reimbursements and Pending Reimbursements = Eligible Remaining) is displayed. Matching Funds The total amount of matching funds is displayed. ❏ Under Transactions, a list of transactions for the selected Year and Grant ID is displayed. The transaction list is sorted in descending order by date. The status and payment date are updated when a transaction is processed and paid.
TIP: For new grants, no transactions are displayed until you enter the budget data on the Object Maintenance tab and save the record. After the record is saved, the opening (original) entry is posted with the total award amount for all object classes.
If you need to cancel a transaction:
❏ Under Cancel Trans, click
 to cancel the transaction. A message is displayed confirming that you want to cancel the transaction. The
  is only displayed for transactions that can be canceled (i.e., transactions with a Saved, Returned, or Pending status).
- Click OK to cancel the transaction.
- Click Cancel to return to the Grant Maintenance page without canceling the transaction.
View details for existing transactions:
❏ Under Detail, click
 to view the corresponding details for the transaction and any documents attached to the transaction (if applicable). You can edit, save, and submit budget adjustment requests, budget revision requests, and reimbursement requests. Depending on the transaction type and status, either the Budget Adjustment Request, Budget Revision Request, or the Reimbursement Request pop-up window opens.
- Budget Adjustment Request
Budget Adjustment Request
If the transaction type is Budget Adjustment, the Budget Adjustment Request pop-up window opens with the corresponding details.
• If the transaction status is Posted or Submitted, the details in the pop-up are read-only.
• If the transaction status is Returned or Saved, the details in the pop-up can be edited depending on your access.
The transaction date and status are displayed.❏ Review the Budget data, indicate the adjustment amount, and save or submit the request.
Object Displays a list of the six predefined object classes for each year and grant ID: 61XX, 62XX, 63XX, 64XX, 65XX, and 66XX. Total Award Displays the total award amount for the corresponding object class, which includes the original amount of the award plus or minus any revisions that have been approved (posted). Adjustment Amount Type the applicable budget adjustment amounts. Amounts can be negative or positive values. A budget adjustment is used to add or subtract an amount from an object's total award. Reimbursements Displays the reimbursement amounts that have been paid. Pending Reimbursements Displays the pending reimbursement amounts that have been approved but not paid. Eligible Remaining Displays the eligible remaining amount of the award (calculated Total Award - Reimbursements and Pending Reimbursements = Eligible Remaining). Matching Funds Displays the total amount of matching funds. Total Displays the totals for each column. ❏ Click Save to save the request without submitting it for approval.
❏ Click Submit to submit the request for approval.
❏ Click Cancel to close the pop-up window and return to the previous page.
Documents:
If documents exist for the request,
 is displayed on the Documents button.
• Click Documents to open the Document Attachments pop-up window. You can view, upload, or delete documents as needed.
• If a document is uploaded in this pop-up,
 is displayed for the transaction in the Doc column under Transactions.
❏ Click Cancel or X to close the pop-up window. - Budget Revision Request
Budget Revision Request
If the transaction type is Original or Budget Revision, the Budget Revision Request pop-up window opens with the corresponding details.
• If the transaction status is Posted or Submitted, the details in the pop-up are read-only.
• If the transaction status is Returned or Saved, the details in the pop-up can be edited depending on your access.
The transaction date and status are displayed.❏ Review the Budget data, indicate the revision amount, and save or submit the request.
Object Displays a list of the six predefined object classes for each year and grant ID: 61XX, 62XX, 63XX, 64XX, 65XX, and 66XX. Total Award Displays the total award amount for the corresponding object class, which includes the original amount of the award plus or minus any revisions that have been approved (posted). Revision Amount Type the applicable budget revision amounts. Amounts can be negative or positive values. A budget revision is used to move an amount between object classes within the total award. The total revision amount for the request must net to zero. The total revision amount for the request must net to zero. For example, if you add 50.00 to an object class, you must deduct -50.00 from another object class for a Total of 0.00. Reimbursements Displays the reimbursement amounts that have been paid. Pending Reimbursements Displays the pending reimbursement amounts that have been approved but not paid. Eligible Remaining Displays the eligible remaining amount of the award (calculated Total Award - Reimbursements and Pending Reimbursements = Eligible Remaining). Matching Funds Displays the total amount of matching funds. Total Displays the totals for each column. ❏ Click Save to save the request without submitting it for approval.
❏ Click Submit to submit the request for approval.
❏ Click Cancel to close the pop-up window and return to the previous page.
Documents:
If documents exist for the request,
 is displayed on the Documents button.
• Click Documents to open the Document Attachments pop-up window. You can view, upload, or delete documents as needed.
• If a document is uploaded in this pop-up,
 is displayed for the transaction in the Doc column under Transactions.
❏ Click Cancel or X to close the pop-up window. - Reimbursement Request
Reimbursement Request
If the transaction type is Periodic, the Reimbursement Request pop-up window opens with the corresponding budget details.
• If the transaction status is Pending, Posted, or Submitted, the details in the pop-up are read-only.
• If the transaction status is Returned or Saved, only the Reimbursement Request and Matching Funds fields in the pop-up can be edited depending on your access.
The transaction date and status are displayed.❏ Review the data, indicate the reimbursement and matching fund amounts (if any), and save or submit the request.
Over Expend Notes:
If changes are made to a reimbursement request (amounts are moved between object classes), the amount must be less than the over expenditure limit. Use the following calculation to find the over expenditure limit for an object class:
Over Expenditure limit = (Total Budget * (1 + Overexpend %)) less (Reimbursement + Pending Reimbursement)
Example: The Total Award for an object class is 5000, the Over Expend % is set to 10%, the Reimbursement amount is 400 and the Pending Reimbursement is 0.The calculation is: 5100 = (5000 * (1 + 10%)) – (400 +0)
In this example, the Reimbursement Request cannot exceed 5100.
If any of the transaction's object class Reimbursement Requests are greater than the Over Expenditure limit, a budget revision is needed.
Object Displays a list of the six predefined object classes for each year and grant ID: 61XX, 62XX, 63XX, 64XX, 65XX, and 66XX. Total Award Displays the total award amount for the corresponding object class, which includes the original amount of the award plus or minus any revisions that have been approved (posted). Reimbursements Displays the reimbursement amounts that have been paid. Pending Reimbursements Displays the pending reimbursement amounts that have been approved but not paid. Eligible Remaining Displays the eligible remaining amount of the award (calculated Total Award - Reimbursements and Pending Reimbursements = Eligible Remaining). Reimbursement Request Type the amount of the reimbursement request. This field can only be edited if the transaction Type is Periodic and the Status is Saved. Otherwise, the field is disabled. A reimbursement is used to create a transaction to reimburse a member LEA's vendor using an amount that is equal to or less than the amount available in a grant's eligible remaining amount not to exceed the over expenditure percentage amount, if applicable. Matching Funds Type the total amount of matching funds. This field can only be edited if the transaction Type is Periodic and the Status is Saved or when adding a new request. Otherwise, the field is disabled.
This field can be used when a grantee is required to “match” the grant in some way from other sources and it has to be reported back to the granting agency. This is a way for the fiscal agent to collect that information for reporting. This field is for information purposes only and does not affect grant calculations or totals.Total Displays the totals for each column. Final Report Select to indicate that the reimbursement request will be the last transaction for the Year and Grant ID. After the final transaction is submitted for a grant year and ID, no other requests can be submitted, the transaction type is changed to Final, and the Processed Indicator is automatically selected.
• Pending Periodic transactions that were submitted before or with the request with the Final Report Indicator selected will be allowed to be processed.
• Any pending or returned Periodic transactions that have not been submitted will not be allowed to be submitted for approval.❏ Click Save to save the request without submitting it for approval.
❏ Click Submit to submit the request for approval.
❏ Click Cancel to close the pop-up window and return to the previous page.
Documents:
If documents exist for the request,
 is displayed on the Documents button.
• Click Documents to open the Document Attachments pop-up window. You can view, upload, or delete documents as needed.
• If a document is uploaded in this pop-up,
 is displayed for the transaction in the Doc column under Transactions.
❏ Click Cancel or X to close the pop-up window.
Note: After the final transaction is submitted for a grant year and ID, no other requests can be submitted.
Doc If documents exist for the transaction,  is displayed. Click
  to open the Document Attachments pop-up and view the existing uploaded documents. The Document Attachments feature in this view is read-only.
Date The transaction date is displayed in the MM-DD-YYYY format. Type The transaction type is displayed.
• Budget Adjustment - Budget Adjustment Request
• Budget Revision - Budget Revision Request
• Original - Original Budget
• Periodic - Reimbursement Request
• Final - Final RequestStatus The transaction status is displayed.
• Canceled - The transaction was canceled (reversed or voided).
• Paid - The reimbursement transaction completed the approval process and is approved and paid.
• Pending - The reimbursement transaction completed the approval process and is approved but pending payment.
• Posted - The budget revision transaction completed the approval process and is approved.
• Returned - The transaction was returned back to the originator for review during the approval process.
• Saved - The transaction was saved but not submitted for approval.
• Submitted - The transaction was submitted for approval.Budget Amount The transaction budget amount is displayed. If the transaction type is periodic, the budget amount is 0.00. Reimbursement Amount The transaction reimbursement amount is displayed. If the transaction type is original or amended, the reimbursement amount is 0.00. Check Nbr The check or EFT number for the reimbursement transaction is displayed after the payment is processed. Payment Date The transaction payment date is displayed. If the transaction type is original or amended, the payment date will be blank. Final Report This check box is automatically selected to indicate that the final reimbursement transaction has been paid for the Year and Grant ID (i.e., Final Report was selected when the transaction was processed.)
Once the final transaction is processed, the Budget Adjustment, Budget Revision, and Reimbursement buttons are disabled and no other transactions can be submitted.❏ Click Save. The changes made on this tab and the Object Maintenance tab are saved.
- Add object code data.
Add object code data
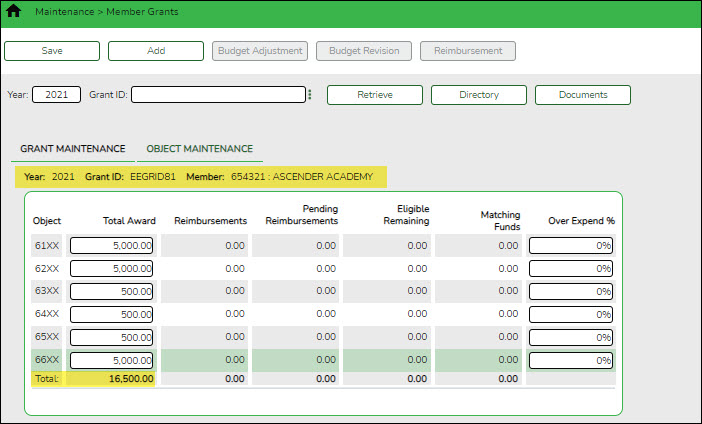
Grants and Projects > Maintenance > Member Grants > Object Maintenance
Add budget details allocated by object class for a specified year and grant ID. Amounts can be added until the original budget is saved. If you need to make changes after the original budget is saved, a budget adjustment or revision is required.
Field Description Year Type a four-digit grant year. Grant ID Begin typing a grant ID or description. As you type the data, a drop-down list of corresponding data is displayed. Select a grant ID. If the grant ID or description is not known, click  to select a grant ID from the Grant IDs lookup or press the SPACEBAR to view a list of grant IDs.
The grant ID list in the autosuggest and the Grant IDs lookup is based on the Year field. For example, if you type 2020 in the Year field and tab to the Grant ID field, only active 2020 grant IDs are displayed.❏ Click Retrieve. The grant record is displayed.
If the grant information is not known, click Directory to perform a search of all grants.
Notes:
- If you retrieved an existing record, only the Over Expend % field can be edited. All other fields are display-only.
- If you are adding a new record, only the Total Award and Over Expend % fields can be edited. All other fields are display-only.
The Year, Grant ID, and Member fields are populated for the selected Grant ID. Or, if adding a new record, only the Year field is populated.
Object A list of the six predefined object classes for each year and grant ID is displayed: 61XX, 62XX, 63XX, 64XX, 65XX, and 66XX. ❏ Complete the applicable fields for each object class:
Total Award Type the total award amount (original amount of the award plus or minus any approved (posted) budget revisions). Reimbursements Displays the reimbursement amounts that have been paid. Pending Reimbursements Displays the pending reimbursement amounts that have been approved but not paid. Eligible Remaining Displays the eligible remaining amount of the award (calculated Total Award - Reimbursements and Pending Reimbursements = Eligible Remaining) is displayed. Matching Funds Displays the total amount of matching funds. Over Expend % Type the maximum percentage allowed for expenditures over the originally indicated amount of the grant. Valid values are 0-999%.
Over Expend Notes:
If changes are made to a reimbursement request (amounts are moved between object classes), the amount must be less than the over expenditure limit. Use the following calculation to find the over expenditure limit for an object class:
Over Expenditure limit = (Total Budget * (1 + Overexpend %)) less (Reimbursement + Pending Reimbursement)
Example: The Total Award for an object class is 5000, the Over Expend % is set to 10%, the Reimbursement amount is 400 and the Pending Reimbursement is 0.The calculation is: 5100 = (5000 * (1 + 10%)) – (400 +0)
In this example, the Reimbursement Request cannot exceed 5100.
If any of the transaction's object class Reimbursement Requests are greater than the Over Expenditure limit, a budget revision is needed.
❏ Click Save. The changes made on this tab and the Grant Maintenance tab are saved. The total award amount for all object classes is posted as the opening (original) entry for the grant ID under Transactions on the Grant Maintenance tab.
Set up & Manage Grant Request Workflows
- Set up approval path.
Set up approval path
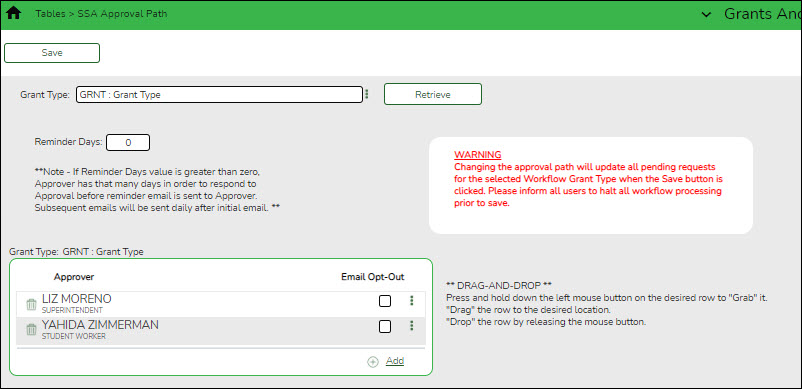
Grants and Projects > Tables > SSA Approval Path
Create and maintain the sequence or hierarchy of approvers for grant requests.
Field Description Grant Type Begin typing a grant type or description. As you type the data, a drop-down list of corresponding data is displayed. Select a grant type. If the grant type or description is not known, click  to select a grant type from the Grant Types lookup or press the Spacebar to view a list of grant types.
 ❏ Click Retrieve. If an approval workflow exists, the list of approvers is displayed and you can make changes as needed.
The drag-and-drop feature is available allowing you to change the order of the approval path.
Reminder Days Type the number of days after which no action has been taken on an item and a reminder email should be forwarded to the originator and approver. This field has a maximum of three digits.
By default, this field is set to zero indicating that no reminders will be sent.
If the value is greater than zero, the Approver has that many days to respond to the approval before a reminder email is sent to the Approver. After the initial reminder email message is sent, email messages are sent on a daily basis until action is taken.❏ Click +Add to add an approver. The Approver Directory is displayed. Or, click
 to open the directory and select an approver.
Approver The selected approver name is displayed. Email Opt-Out Select to indicate that this approver is opted out of receiving approval workflow emails. ❏ Click Save. Depending on the change, the appropriate application message is displayed indicating the action.
- Set up alternate approvers as needed.
Set up alternate approvers as needed
Grants and Projects > Tables > SSA Alternate Approvers
Assign an alternate approver to an approver who is unable to perform their assigned approval duties during a specified timeframe for grant requests.
Field Description Grant Type Begin typing a grant type or description. As you type the data, a drop-down list of corresponding data is displayed. Select a grant type. If the grant type or description is not known, click  to select a grant type from the Grant Types lookup or press the SPACEBAR to view a list of grant types.
 ❏ Click Retrieve. If an approval workflow exists for the selected grant type, the list of approvers is displayed.
Field Description Approver Emp Nbr The employee number of the approver is displayed. Approver Name The name of the approver is displayed. Use Alternate Select to use the alternate approver instead of the approver.
If selected, and no date range is entered in the From Date and To Date fields, the alternate approver becomes the approver.
If selected, and no date range is entered in the From Date and To Date fields, all pending requests are updated with the alternate approver for the selected original approver.
If selected, and a date range is entered in the From Date and To Date fields, all pending requests are updated with the alternate approver for the selected original approver if today’s date falls on or between the from and to dates.
If selected, and a date range is entered in the From Date and To Date fields, and today’s date is outside the range of the from and to dates, no updates occur for the selected original approver.
If not selected, and/or a date range is entered in the From Date and To Date fields, no updates occur for the selected original approver.
If selected, and then cleared, the alternate approver for all pending requests reverts to the original approver and an email message is sent to the original approver. This includes updating the workflow datetimestamp to today’s date to reset the reminder days for the original approver.Alternate Emp Nbr Type an employee number or click
 to select one from the Approver Directory.
Alternate Approver Name The selected alternate approver name displays based on the Alternate Emp Nbr field. From Date Type the beginning date from which the alternate approver will serve as the approver. Use the MM-DD-YYYY format. Or, select a date from the calendar. To Date Type the ending date on which the alternate approver will end serving as the approver. Use the MM-DD-YYYY format. Or, select a date from the calendar. ❏ Click Save.
- Approval emails.
Approval emails
When a grant request is submitted, it is sent through the appropriate approval path and an email is generated to the approver to notify them of the pending request. If it is a direct request (i.e., the originator is the final approver) and no one else is in the approval path, an email is not generated.
Approvers will receive the following workflow emails:
- Approved email notifications are generated for fully approved grant requests.
- Returned email notifications are generated for returned grant requests.
- Pending approval email notifications are generated for submitted/pending grant requests.
Set up & Manage Users
The following steps allow fiscal agents to create and manage Grants and Projects and MemberPortal user profiles.
- Create and maintain user profiles.
Create and maintain user profiles
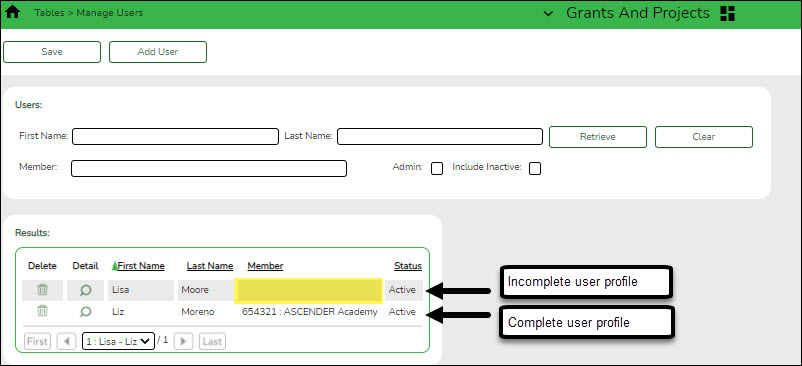
Grants and Projects > Tables > Manage Users
This page is used to manage user accounts in Grants and Projects and MemberPortal. In order for users to have the appropriate access to a grant, user profiles must be completed by linking the user to a specific member and grant type, and assigning the level of access the user has to a grant type. Fiscal agents can use this page to add, change, and delete user accounts in both Grants and Projects and MemberPortal.
Member users can create an account via MemberPortal; however, they will not have access to any grant information until the fiscal agent or MemberPortal admin user completes their user profile.
TIP: It is recommended that fiscal agents create at least one MemberPortal user with admin permission for each member LEA. Admin users will have access to a Manage Users page in MemberPortal where they can perform all of these same tasks for users within their member LEA.
If the user created an account in MemberPortal, the user's information is displayed in the list of results. However, you will notice that the Member column is blank since their user profile has not been completed. At this point, the user does not have access to view any grant information in MemberPortal.
❏ Click to open the User detail pop-up window and enter the applicable data to complete the user's MemberPortal profile. The user's First Name, Last Name, E-mail, and User Name fields are automatically populated.
Add a record:
❏ Click Add User to open the User detail pop-up window and enter the applicable data to add a new user and complete the user's profile.
When creating a new MemberPortal user or resetting a user's password, the change password date is set to 01/01/2000, which requires the user to change their password upon logging on to MemberPortal.
❏ Under User:
First Name Type the user's first name. This field can be a maximum of 50 characters. Last Name Type the user's last name. This field can be a maximum of 50 characters. ❏ In the Phone fields:
Area Cd Type the three-digit area code of the phone number. Phone Nbr Type the seven-digit phone number. Ext Type the four-digit extension number if any.
Member Begin typing a member name or six-digit county district number. As you type the data, a drop-down list of corresponding data is displayed. Select a member. If the member name or county district number is not known, click  to select a member from the Member lookup or press the SPACEBAR to view a list of members.
 Admin Select to indicate that the user is an admin user. Users designated as Admin users will be able to manage users for their assigned member in MemberPortal. Status Click  to select the user's status (A - Active or I - Inactive).
 E-mail Type the user's email address. The field can be a maximum of 250 characters. E-mail Opt-Out Select to indicate that this user is opted out of receiving emails. User Name Type a 6-25 character user name. (No embedded spaces are allowed.) Password Type a new password. If the user initiated the account profile via MemberPortal, this field is populated with an encoded and masked version of the user's password to secure their credentials. Fiscal agents or admin users can update user passwords as needed.
Requirements:
• 8-46 alphanumeric characters
• Three of the following: uppercase, lowercase, numeric, and special characters
• Case-sensitive❏ Under Grant Types:
Grant Type Begin typing the grant type or description. As you type the data, a drop-down list of corresponding data is displayed. Select a grant. If the grant type or description is not known, click  to select a grant from the Grant Types lookup or press the SPACEBAR to view a list of grant types.
 Accessibility Click  to select the user's level of access to the corresponding grant type.
• All
• Inquire Only
• Enter and Save Data
• Submit Reimbursement Request
• Submit Budget Revision Request
Note: If a user only has access to enter and save requests, they can only update their requests.❏ Click +Add to add additional rows.
❏ Click Save. Otherwise, click Cancel to return to the Manage Users page without adding data.
After fiscal agents have completed the above setup process in Grants and Projects, Grants and Projects users and MemberPortal users can begin submitting grant requests.
- Fiscal agent users (on behalf of the member) can submit grant requests using the Grant Maintenance page in Grants and Projects.
- Member users can submit grant requests using the Budget Revision Request and Reimbursement Request pages in MemberPortal.
Review the following guides for further information about fiscal agents entering grant requests, approving grant requests, and processing approved grant requests for payment.
Reports
The following reports are available in the Grants and Projects application:
| Report ID | Report Name | Report Summary |
|---|---|---|
| GP1000 | Grant Summary Status Report | This report provides a summary of grant status information. |
| GP1100 | Grant Payment Transaction Report | This report provides a list of grant payment transactions. |
| GP1200 | Past Final Date Without Final Report | This report provides a list of grant years and IDs that have a Final Report Due Date without a reimbursement transaction designated as the final reimbursement for the grant year and grant ID before the date entered in the Effective Date (MMDDYYYY) report parameter. |
| GP1300 | Grant Detail General Ledger Report | This report provides a list of detailed transactions from the general ledger for a specified grant code. You can view grant/project data for the entire grant period regardless of the school year or file ID, or you can retrieve data based on the school year, file ID, and from/to accounting periods. |

