Teacher Guide to ASCENDER TeacherPortal
Mid-Cycle Tasks
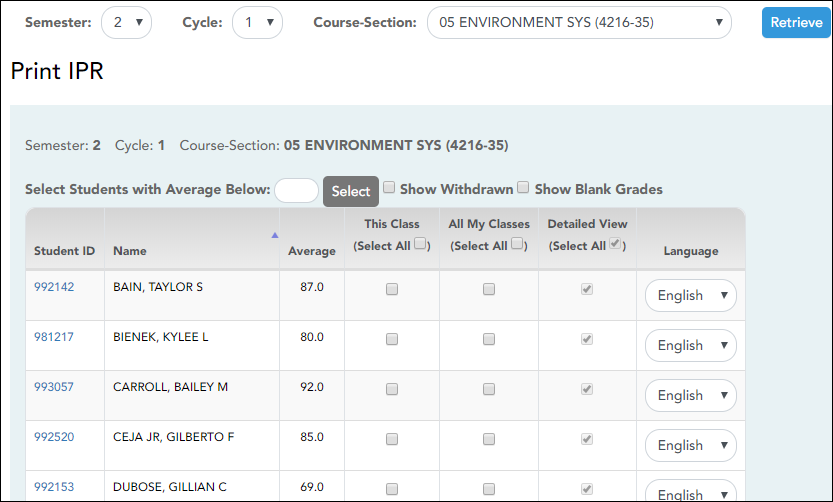
This page allows you to select the students to print IPRs for. The IPR is generated for a specific point in time during the current semester-cycle to provide a report of a student's grades up to that point. You can run IPRs any time throughout the semester, including occasions when you are meeting with a student's parents and want to show them a detailed report of the student's grades. You can also print IPRs for previous semesters-cycles.
For each student, you can select the semester and cycle, the courses you want to print IPRs for, and the level of detail you want to include on the report.
❏ Select the course-section you want to print IPRs for:
| Semester | The current semester is displayed by default. You can select another semester. |
|---|---|
| Cycle | The current cycle is displayed by default. You can select another cycle. |
| Course-Section |
Select the course-section you want to print IPRs for. NOTE: IPRs cannot be produced for elementary skills-based courses. |
❏ Click Retrieve.
The grid displays all students currently enrolled in the course-section. Students are sorted by last name, unless you have specified a custom sort order on Settings > Arrange Student Order.
The columns can be sorted according to your preferences.
If you sort by the last name column, the table sorts by last name, then first name. If you sort by the first name column, the table sorts by first name, then last name.
NOTE: Sorting the columns overrides the custom sort order established on the Arrange Student Order page. However, if you leave this page and return, the students are displayed in your custom sort order. (This does not apply on the Post/View Attendance page.)
| Show Withdrawn | Withdrawn students are displayed in a blue row, and the message “Withdrawn” and the withdrawal date are displayed by the student's name. The withdrawal date may be the student's withdrawal date from school or his withdrawal date from the class. |
|---|---|
| Show Blank Grades | Select to include all assignments on the IPR, including assignments with blank grades. This does not apply for courses that use standards-based grading. |
| Student ID | The student's ID is displayed. Click the student ID to view the student's profile. |
|---|---|
| Average | The student's working cycle average is displayed. For more information on calculating averages, view the online Help for Weighting Type on Settings > Manage Categories. |
❏ Select the students and level of detail:
| Select Students with Average Below | To print IPRs only for students with an average below a specific average for the course-section, type the average in this field and click Select. The students are selected for printing. |
|---|
| This Class | Select to print an IPR for the student for only the selected course-section. If selected, Default View is selected and cannot be changed.
|
||
|---|---|---|---|
| All My Classes | Select to print IPRs for the student for all classes you teach in which the student is enrolled. If selected, the default view for the IPR is the summary view.
|
||
| Detailed View |
Select to print the detailed IPR. If not selected, the summary IPR is printed.
|
||
| Language |
For each student, select the language in which to print the IPR. |
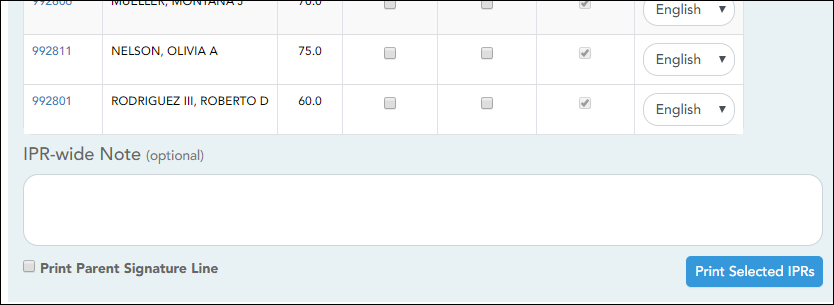
| IPR-wide Note | (Optional) Type a note to be displayed on all IPRs selected for printing. This note will be appended to any notes entered in the Note field on the IPR Comments page. (Notes entered on the IPR Comments page are student-specific.) |
|---|---|
| Print Parent Signature Line | Select to print a parent signature line at the bottom of the IPR. |
❏ Click Print Selected IPRs.
The Interim Progress Reports page opens. Click Return to IPR Selection to return to this page.
Print IPRs for students whose average is below specified number.
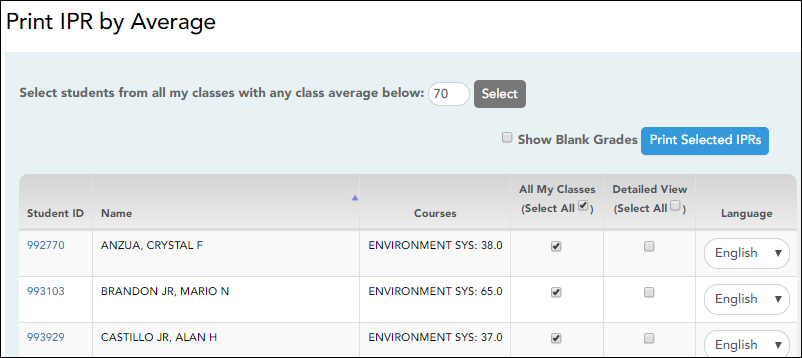
This page allows you to print IPRs for students in all of your courses who have a working cycle average below a specified average.
❏ Select students:
| Select students from all my classes with any class average below: | Type the average. All of your students with a working cycle average below this average will be selected. |
|---|
❏ Click Select.
| All My Classes | Select to print IPRs for the student for all classes you teach in which the student is enrolled. If selected, the default view for the IPR is the summary view.
|
||
|---|---|---|---|
| Detailed View |
Select to print the detailed IPR. If not selected, the summary IPR is printed.
|
||
| Language |
For each student, select the language in which to print the IPR. |
| IPR Wide Note | (Optional) Type a note to be displayed on all IPRs selected for printing. This note will be appended to any notes entered in the Note field on the IPR Comments page. (Notes entered on the IPR Comments page are student-specific.) |
|---|---|
| Print Parent Signature Line | Select to print a parent signature line at the bottom of the IPR. |
❏ Click Print Selected IPRs.
The Interim Progress Reports page opens. Click Return to IPR Selection to return to this page.
Reports:
Generate percent failing report.
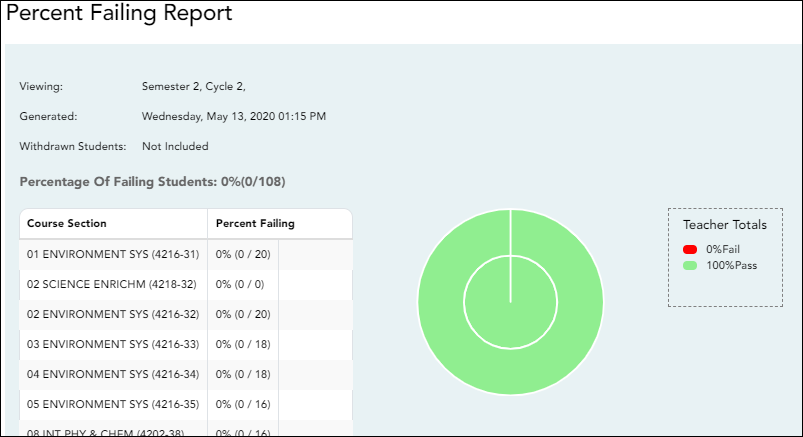
This report provides the percentage of a teacher's students who have a failing working cycle average for each class, as well as a total for all of the teacher's classes. The data can be displayed in a pie chart or grid format. Non-graded courses are not included.
Administrative users have the option to view the data for all teachers across the campus.
NOTE: Background colors may not automatically print, depending on your browser settings. For more information, click here.
❏ Specify report options:
| Semester | The current semester is displayed. You can select a different semester. | ||||
|---|---|---|---|---|---|
| Cycle | The current cycle is displayed. You can select a different cycle. | ||||
| Viewing Options |
|
||||
| Admin Options | These fields are only displayed if you are logged on as an administrative user.
|
❏ Click Generate.
- The report opens in a new window, and you can print the report from that window.
- The report selection page remains open on your desktop.
Generate student grade report (and UIL Eligibility) (if granted access).
Reports > Student Grades Report (and UIL Eligibility)
Reports > Student Group Reports > Student Grades Report
Settings > Student Group Manager > Group Reports > Student Grades Report
This report lists student working cycle averages for all of their courses. Courses in which the student has failing grades are shaded pink.
- If a posted grade exists for the semester and cycle, the posted grade is displayed.
- If an override grade exists, the override grade is displayed.
The report is available to users who log on to TeacherPortal with a district- or campus-level administrative ID, teachers who have access to run the student groups report, or teachers who have UIL access. However, the report can also be run for a student group by any user who has existing groups.
❏ Specify report options:
| Semester | The current semester is displayed. You can select a different semester. |
|---|---|
| Cycle | The current cycle is displayed. You can select a different cycle. |
| Course-Section Student Groups | Select the course for which to produce the report, or select NO SELECTION to run the report for all course-sections. You must specify either a course-section or special program, or both. If you are running the group report, Student Groups is displayed instead of Course-Section. Select the student group for which to run the report. |
| Special Programs | This field is only displayed if you have been granted access to run group reports. Select the group for which to produce the report. If a program is selected, the report only includes students enrolled in that special program. You can select both a course-section and a special program. If you make selections in both fields, the report includes only students enrolled in the course-section who are also enrolled in the special program. If you select Generic, the generic program field appears allowing you to select a specific generic program. Only generic programs for the campus are listed. If a local program is selected, the report only includes students enrolled in that program. |
|---|---|
| Show only students with at least one grade below | Select to limit the report to students who have at least one course with a working cycle average below a specific grade (e.g., below 70), and type a grade in the field. |
| Show only students and courses that are UIL Eligible |
Select to display only the UIL eligible courses in order to check for UIL eligibility. |
❏ Click Generate.
- The report opens in a new window, and you can print the report from that window.
- The report selection page remains open on your desktop.
Generate student group reports.
Settings > Manage Student Groups
| Group Manager (left grid) | Your existing groups are listed. Otherwise, the message “No Student Groups were found” is displayed. |
|---|---|
| Group Reports (right grid) | The available student group reports are listed; they are linked to the reports in the Reports > Student Group Reports submenu. Some of the group reports mirror other reports available in the Reports menu. If no groups exist, the message “No Student Groups Exist” is displayed in place of any reports. |
| Group Reports (left grid) |
Click a report title to run the report for a student group:
• The group Admin Student Grades page allows you to run the Admin Student Grades report for a student group. |
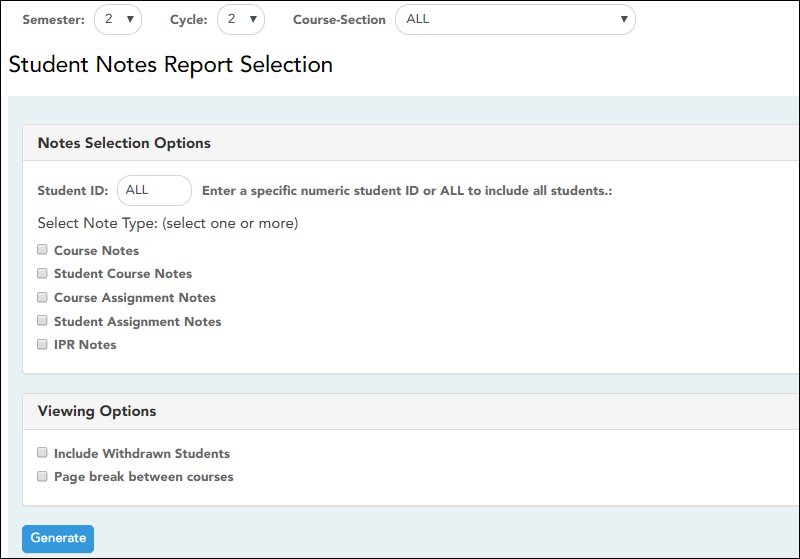
Generate student notes report.
This report displays any of the following notes for one or all courses, and for one or all students.
- Course Notes: Notes entered in the Course Notes field on Settings > Manage Courses. These are comments and notes entered by teachers about their courses, such as reminders, announcements, and other course-specific information. These notes are displayed to parents in ParentPortal.
- Student Course Notes: Notes entered by clicking the note icon next to the student's name on Grades > Assignment Grades. These are course-specific notes entered by teachers about the student, and the notes are associated with specific categories. These notes are note displayed to parents in ParentPortal.
- Course Assignment Notes: Notes entered in the Notes field on Settings > Manage Assignments. These are notes entered by teachers about their assignments. The notes are displayed to parents in ParentPortal.
- Student Assignment Notes: Notes entered by clicking the note icon next to the student's assignment grade on Grades > Assignment Grades. These are assignment-specific notes entered by teachers about the student. The teacher has the option to display the note to parents in ParentPortal.
- IPR Notes: Notes entered in the Note field on Grades > IPR Comments. These are student-specific notes entered by the teacher about the student relative to the IPR. These notes are printed on the IPR that is distributed to parents.
❏ Specify report options:
| Semester | The current semester is displayed. You can select a different semester. The selected semester affects the courses listed in the Course-Section drop-down list, but it does not affect the notes displayed; the notes are not semester-specific. For example, for a two-semester course, the notes are displayed for the entire year. |
|---|---|
| Cycle | The current cycle is displayed. You can select a different cycle. |
| Course-Section | Select the course-section for which to print the report. Or, select ALL to produce the report for all of your course-sections. The drop down lists the two-digit period and course name. The course number and section number are in parentheses. |
❏ Under Notes Selection Options:
| Student ID | Begin typing the student's ID. As you begin typing the ID, a drop-down list displays students whose student ID matches the numbers you have typed. From the drop-down list, select a student. | ||||||
|---|---|---|---|---|---|---|---|
| Select Note Type |
Select one or more note types to be printed. The descriptions for each note type are listed above.
|
❏ Under Viewing Options:
| Include withdrawn students | Withdrawn students are not automatically included. Select the field to include withdrawn students in the report. |
|---|---|
| Page break between courses | Select to print one course per page. Otherwise, the data will print continuously. |
❏ Click Generate.
- The report opens in a new window, and you can print the report from that window.
- The report selection page remains open on your desktop.



Grades > IPR Comments
This page allows you to enter IPR comments and notes that will be displayed on the printed IPRs.
❏ Select the course:
❏ Click Retrieve.
The students in the course-section or group are displayed.
Students are sorted by last name, unless you have specified a custom sort order on Settings > Arrange Student Order.
The columns can be re-sorted.
The columns can be sorted according to your preferences.
If you sort by the last name column, the table sorts by last name, then first name. If you sort by the first name column, the table sorts by first name, then last name.
NOTE: Sorting the columns overrides the custom sort order established on the Arrange Student Order page. However, if you leave this page and return, the students are displayed in your custom sort order. (This does not apply on the Post/View Attendance page.)
Type up to five one-character comment codes to specify the comments you want to print on the IPR (e.g., “Conference requested”).
(located below the grid) Click to view a list of valid IPR comment codes and descriptions. These codes are created in the Student system.
NOTE: If a description exists in Spanish, the Spanish description is displayed below the English description. If the student's report card is generated in Spanish, and a Spanish comment exists, the Spanish comment is printed on the report card. If a Spanish comment does not exist, the English comment is printed on the report card. These codes and descriptions are maintained at the campus level.
Click to enter notes about the student that will appear on the printed IPR. Click Ok to save the note, or click Clear to clear the note. If a note is entered for the student, the yellow note icon
  is displayed.
NOTE: Your comments and notes are not actually saved until you type your PIN and click Save. When you click Ok, it only saves your notes until you save all data on the page.
Click to clear all comments for all displayed students. Notes are not cleared.
NOTE: Your comments are not actually cleared until you enter your PIN and click Save.
Save data:
❏ Click Save.
If your changes were saved successfully, the page reloads, and a message is displayed indicating that the grades were saved successfully.
To print IPRs for the selected students, go to Grades > Print IPR. Follow the instructions provided in the online Help for the page.