User Tools
Sidebar
Add this page to your book
Remove this page from your book
Teacher Guide to ASCENDER TeacherPortal
TeacherPortal Setup
Beginning of the school year:
The following tasks should be done at the beginning of the year and not modified during the year.
(Optional) Create course groups.
Settings > Manage Course Groups
Course Grouping Flow Chart
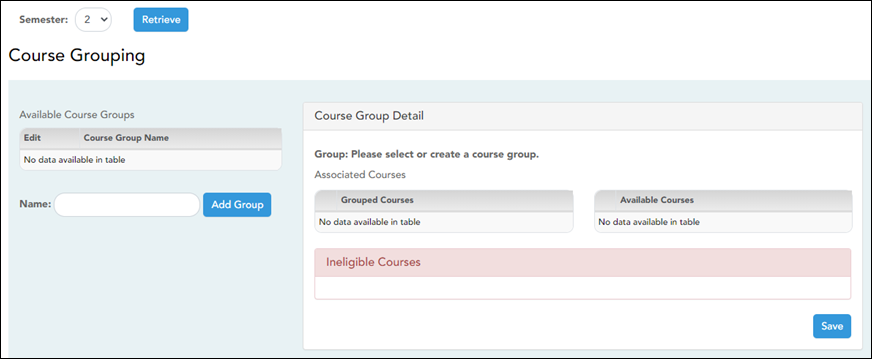
This page allows you to group courses by semester, which allows you to enter grades, manage categories and assignments, and copy categories and assignments for multiple sections at the same time (e.g., if you teach multiple section of Algebra I) without having to switch from section to section.
IMPORTANT: You must group your courses at the beginning of the semester before any categories are added.
Once you have grouped the courses, all categories and assignments for the courses will match. The courses will be displayed as grouped on the following pages:
- Grades > Assignment Grades
- Grades > IPR Comments
- Grades > Print IPR
- Reports > Class Roster
- Settings > Manage Assignments
- Settings > Manage Categories
The following courses cannot be added to a group:
- A standards-based or elementary skills-based course. Only category-based (i.e., regular) courses can be grouped.
- A course that does not exist in the selected semester.
- A course that has already been added to another group, either for the current teacher or a prior teacher. The message “Exists in another group” will be displayed next to the course in the Ineligible Courses list.
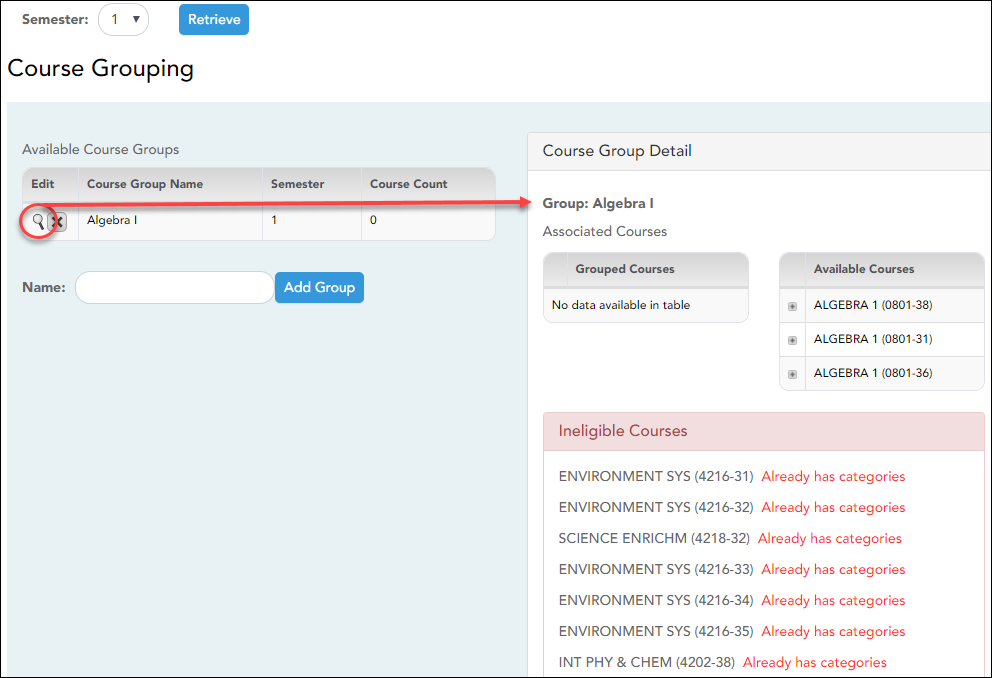
- A course that has any categories already set up. The message “Already has categories” will be displayed next to the course in the Ineligible Courses list.
- A course that has any students who are in another course already added to the group.
- A self-paced course.
The following restrictions also apply:
- A course cannot be added to a group if the group has any categories already set up.
- If the course-section is part of a group, and the teacher for a course changes during the year, the new teacher will not be able to add the course to a group. The message “Exists in another group” will be displayed next to the course in the Ineligible Courses list.
To resolve this issue so that the new teacher can add the course to a group, a TeacherPortal administrator must delete the course from the original teacher's group as follows:
- Log on to TeacherPortal and impersonate the new teacher.
- While impersonating the new teacher, go to Settings > Manage Courses. Retrieve the course-section, and then click
 to delete the course from the group.
 - Click Save.
- Repeat for all applicable courses.
- You must be the class role 01 teacher (i.e., Teacher of Record) for the course in order to add the course to your group. Class role 02 and 03 teachers for the course cannot add the course to a group.
If the class role 01 teacher becomes unavailable (e.g., long-term leave)...
If the class role 01 teacher becomes unavailable (e.g., long-term leave), and a class role 02 or 03 teacher becomes responsible for the class, the courses must be un-grouped (i.e., the course must be deleted from the group). Otherwise, the class role 02 or 03 teacher will not be able to add any additional assignments for the class.
If the class role 01 teacher is unable to un-group his/her courses before leaving, an administrator can un-group the courses.
❏ Specify the semester:
| Semester | The current semester is displayed by default. You can select another semester. |
|---|
❏ Click Retrieve.
❏ Under Available Course Groups (left grid):
Existing groups are listed. Otherwise, the message “No data available in table” is displayed.
Add a group:
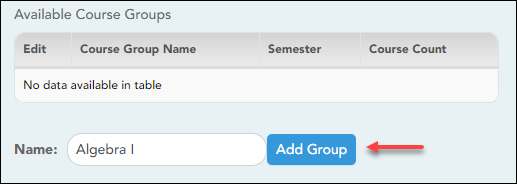
| Name | To add a group, type a unique name for the group. |
|---|
❏ Click Add Group.
The new group name is displayed under Available Course Groups (left grid).
❏ Click  to add courses to the group.
❏ Under Course Group Detail (right grid):
❏ Click Save.
Edit a group:
❏ Under Available Course Groups (left grid):
This page allows you to establish categories that describe the types of assignments you will use in the selected semester and course-section.
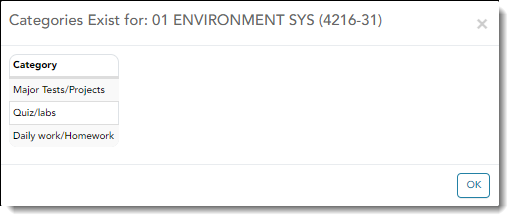
An initial set of categories, defined by the campus, is set at the beginning of the year. If you have an assignment that falls under a category that is not included in the list, you can create a new category, if allowed by the campus. The category you create is added to the master list and will be available for all teachers to use. The list of categories will continue to grow as you and the other teachers add categories.
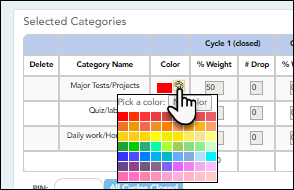
For your selected categories, you must specify the type of weighting to use for calculating averages (percent-based, point-based, or multiplier-based). You can also assign your own category colors to enable color-coding of assignments on the Assignment Grades page.
From this page, you can also copy categories from one course to other course-sections.
This page is disabled for standards-based courses, because categories are not used for these courses.
This page should not be used for course-sections that are skills-based courses, because categories are not used for these courses.
About grouped course-sections and teacher changes:
If the course-section is part of a group, and the teacher for a course changes during the year, the new teacher will not be able to make changes to categories. The following message will be displayed: “This course belongs to a group for another teacher. No category maintenance may be done except by that teacher.”
In order to resolve this issue so that the new teacher can maintain categories for the course, a TeacherPortal administrator must delete the course from the group. Then, the new teacher can create a new group if needed.
The administrative user must do the following:
- Log on to TeacherPortal and impersonate the new teacher.
- While impersonating the new teacher, go to Manage Courses. Select the course-section, and then click
 to delete the course from the group. Repeat for all applicable courses.
- Click Save.
❏ Specify a course-section:
| Semester | Select the semester to set up categories for. |
|---|---|
| Course-Section | Select the course-section to set up categories for. |
❏ Click Retrieve.
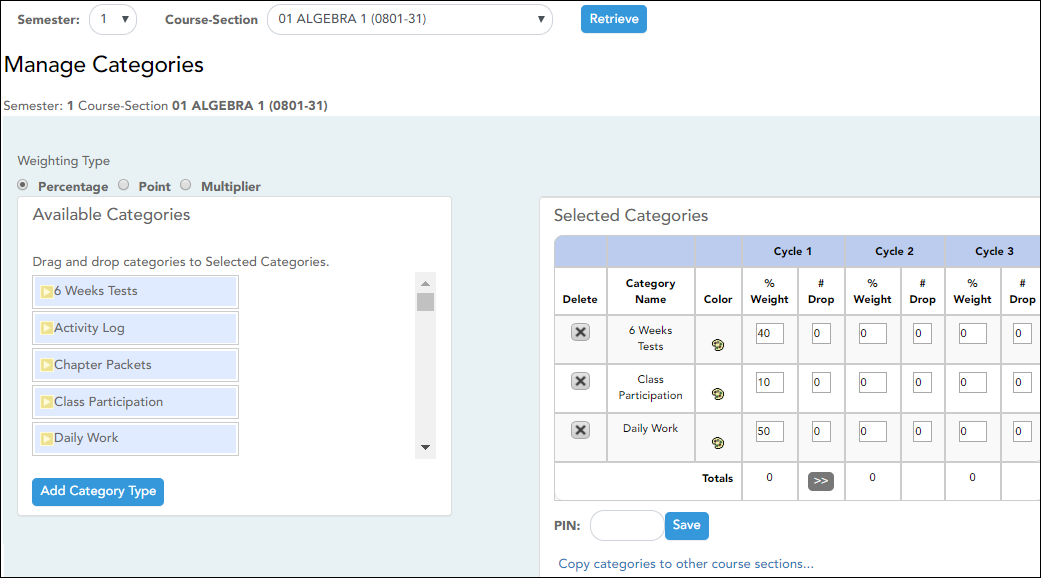
The available categories are listed under Available Categories, and your current category list for the selected course-section is displayed under Selected Categories.
❏ Under Weighting Type:
Select the weighting type to use for the categories. You must use the same weighting type for all cycles in a semester.
| Percentage | If selected, you must assign percentages to each category. The percentages must total 100%. |
|---|---|
| Point | Point values are determined when the assignment is created. They are not entered on the Manage Categories page. Point values for each category accumulate as assignments are added. When using point-based weighting, the categories are only used for grouping similar assignments. The calculation is based on the total points, not weighting. |
| Multiplier | If selected, you must provide a multiplier number (between 1-9) for each category. For multipliers greater than one, the individual assignment grades are counted multiple times. |
See the Calculate Averages guide for an explanation of calculating averages for each weighting type.
NOTE:
The category weight for current cycle can be changed for the current cycle, as long as grades have not been posted.
You cannot change the weighting type for the second semester of a two-semester course. The weighting type must be the same for all semesters of a course.
If you post an override cycle grade for a student even if there are no categories for the course, the weighting type is automatically set to percentage.
Each weighting type is only displayed if the campus allows the weighting type (or if the teacher has already started using the weighting type before the restriction was put in place). Any weighting types not allowed by the campus are not displayed. If you are using a weighting type that the campus decides to disallow partway through the current year, the following applies:
• You can continue to use the weighting type until the end of the current year. After the current year, that weighting type will no longer be available.
• If you select another weighting type during the current year, you will not be able to reselect the disallowed weighting type.
If a category is specific to a particular weighting type (as specified at the campus level), the category is only displayed on this page if the appropriate weighting type is selected.
❏ Under Available Categories (left side):
The available categories are listed in alphabetical order.
If a category weight is locked (by campus admin), a lock icon  is displayed next to the category name. The weight specified by the campus must be used and cannot be changed.
❏ Click Add Category Type to add a new category to the list of available categories.
The Add Category section is displayed below the available categories.
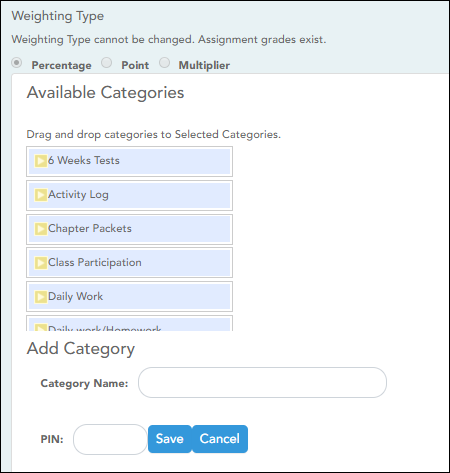
NOTE: If the campus disallows teachers from adding categories, the Add Category Type button is disabled; you must use the categories established by the campus.
| Add Category |
The new category is displayed in the list of available categories in alphabetical order. You can then add it to your Selected Categories list.
IMPORTANT: Once a category is added to the list of available categories, it cannot be deleted from the list. If you add a category by mistake, you must contact your campus administrator to have it removed at the campus level. The category cannot be removed if it has assignments associated with it. |
|---|
❏ To add one of the Available Categories to the Selected Categories list, do one of the following:
- Click-and-hold the category and drag it to the Selected Categories list.
- Double-click the category.
The category is added to the bottom of the Selected Categories list. If there is a default or locked weight, that weight is copied to all open cycles.
❏ Under Selected Categories (right side):
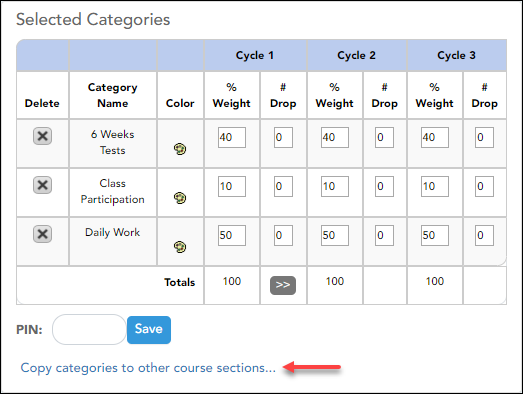
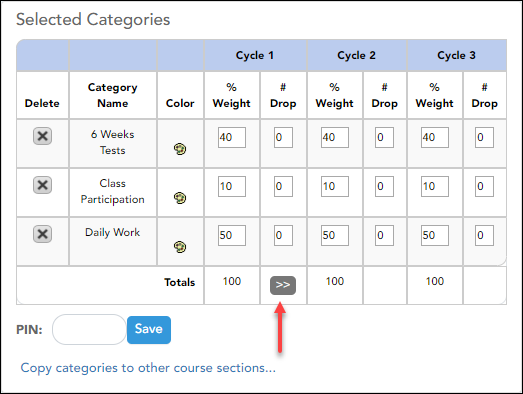
All selected categories for the specified course-section are displayed for all cycles in the semester.
The table changes according to your selection in the Weighting Type field. For each cycle, the column heading is % Weight, Points, or Multiplier according to your selection.
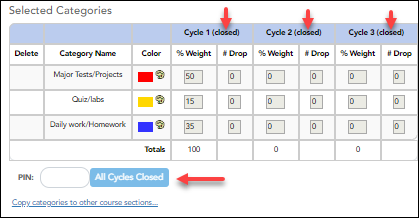
| Cycle # | If a cycle is closed, the column heading for the cycle displays (closed), and the data cannot be changed. |
|---|---|
| % Weight |
If the Weighting Type is Percentage, type the percentage for each category. The percentages must total 100% for the cycle. |
| Points | If the Weighting Type is Point, you cannot enter the total point values in the Points field. The field automatically displays the sum of the total points entered for all assignments for the category. For example, on the Administer Assignments page, if you enter five quizzes in the Quiz category, each with total points set to 100, the field displays 500. |
| Multiplier | If the Weighting Type is Multiplier, type a value between 1-9. |
| # Drop |
For each cycle, type the number of items to be dropped during a cycle. For example, you may want to drop the student's three lowest grades from the homework category. The student's category average will always reflect the dropped grades. WARNING: If all assignments in the category do not have the same total points value (as entered on the Manage Assignments page), the calculations for dropping a specified number of assignments for the category may result in an average that is different than expected. If the total points value varies, the grade with the lowest number of points may not necessarily be the lowest grade. |
Color  | |
 |
Click to remove a category from your Selected Categories list.
NOTE: You cannot delete a category that has assignments associated with it during any cycle. To delete a category, you must first delete all grades and assignments for the semester, including grades for withdrawn students. All grades must be deleted before you can delete assignments. |
Copy values from one cycle to another:
After you enter the weighting type value and number of assignments to drop for cycle 1, you can click  to copy the values to cycles 2 and 3.
Save data:
| PIN | Type your four-digit personal identification number (PIN). |
|---|
❏ Click Save.
Copy categories from one course-section to another:
Once you save the categories for a course, you can copy the categories to another course-section.
❏ From the Manage Categories page, use the Semester and Course-Section fields to select the course-section from which to copy categories.
❏ Click Copy categories to other course-sections.
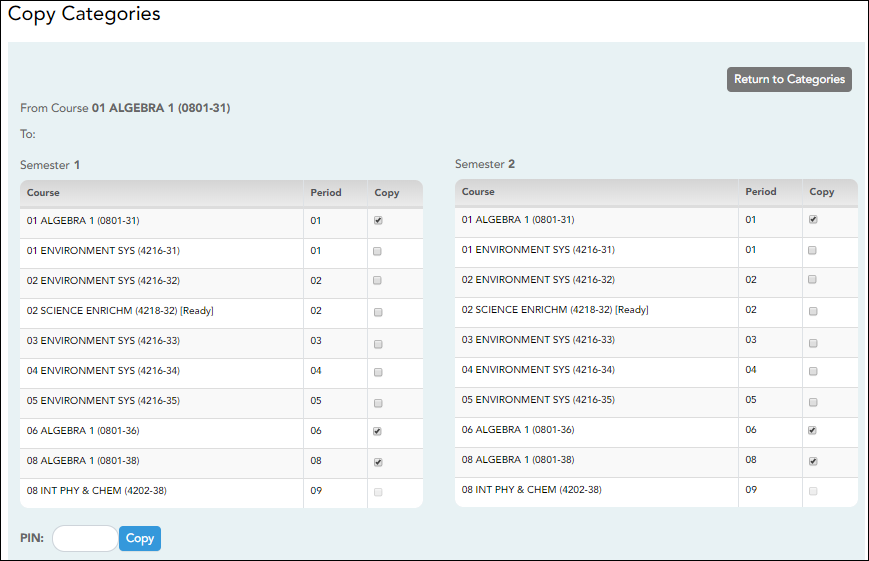
The Copy Categories page opens.
Your active courses are listed.
| PIN | Type your four-digit personal identification number (PIN). |
|---|
❏ Click Copy.
NOTE: If you attempt to copy categories to a course that already has categories (but no assignments), a warning message is displayed stating that you will override any categories that exist for the other course(s).

Click Continue if appropriate.
❏ Click Return to Categories to return to the Manage Categories page.
During the school year:
The following tasks should be done at the beginning of the year but can be modified during the year.
Settings > Manage Seating Charts
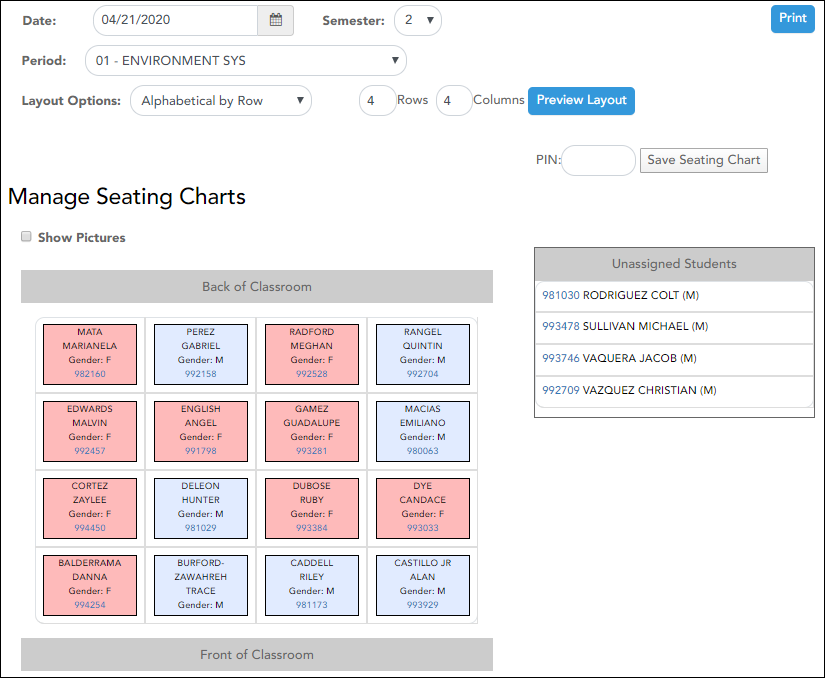
This page allows you to create and maintain seating charts for all of your classes. The seating chart lists the student name, gender, and ID. The seats are color coded by gender.
Seating charts in TeacherPortal are tied to the 1st Period Nbr and Last Period Nbr fields on ASCENDER > Attendance > Maintenance > Campus > Campus Attendance Options. The system uses these fields to determine which periods are available for seating charts and attendance posting.
Student seats can be rearranged at any time.
You must create a new seating chart for each semester of a course. If the course is more than one semester, you can copy the seating chart to subsequent semesters.
IMPORTANT: It is recommended that you set the Combine Courses in Attendance field on your Update Profile page the way you want it for the semester before creating the seating chart.
About combining and uncombining courses
If you change the setting of the Combine Courses in Attendance field, the data will be preserved as much as possible; however, you must then verify that your seating charts are correct for all periods, make the necessary changes, and then save the seating charts again.
If you change the Combine Courses in Attendance field during the semester, the following applies:
- If Combine Courses in Attendance was not originally selected and you have only one course per period, you created a seating chart, and then you selected Combine Courses in Attendance, the seating chart is not affected; however, you must re-save the seating charts for all periods.
- If Combine Courses in Attendance was not originally selected and you have some periods with multiple courses (each with its own seating chart), you created a seating chart, and then you selected Combine Courses in Attendance, the following occurs when you retrieve one of the periods on the Seating Chart Setup page:
- Only the seating chart for the first course in the list is preserved.
- The remaining students are displayed under Unassigned Students.
- If the first course in the list has no students enrolled, no seating chart is preserved. You must recreate the chart.
- If Combine Courses in Attendance was originally selected and you have only one course per period, you created a seating chart, and then you cleared Combine Courses in Attendance, the seating chart is not affected, you must re-save the seating charts for all periods.
- If Combine Courses in Attendance was originally selected and you have some periods with multiple courses, you created a seating chart for students from multiple courses, and then you cleared Combine Courses in Attendance, the following occurs when you retrieve a period/course on the Seating Chart Setup page:
- Only the chart dimensions of the seating chart for the first period/course you attempt to edit is preserved.
- Only seats for students enrolled in the course are preserved.
- The remaining students are displayed under Unassigned Students.
- You must recreate the chart for the other courses that were previously combined in the period.
If a student transfers to the class, he is listed under Unassigned Students.
If a student drops the course, his seat is blank.
| Date |
Type a date in the MMDDYYYY format, or click NOTE: If you are setting up a seating chart before the first day of school, enter the date of the first class. |
|---|---|
| Semester | The current semester is displayed by default. You can select another semester. |
| Period |
Select the period-course to create a seating chart for. NOTE: If Combine Courses in Attendance is selected on your Settings > Update Profile page, the courses are combined by period. |
If a seating chart already exists for the period, the seating chart is displayed.
| Layout Options |
Select a layout for the seating chart: If you previously saved a seating chart and return to this page, the student seats are arranged according to your last saved layout; however, the Layout Options field is always set to Random by default. Even if you selected an alphabetical or numerical arrangement, you may have manually moved students; therefore, the program assumes the students may have been moved. |
|---|---|
| Rows Columns | Type the number of rows (horizontal) and columns (vertical) for the seating chart. You can have up to 11 rows and 11 columns. |
❏ Click Preview Layout.
The seating chart is displayed according to the criteria entered.
REMINDER: When you click Preview Layout, the changes are not saved. You must type your PIN and click Save Seating Chart to save the changes.
| Unassigned Students | If there are more students enrolled in the class than seats available, the extra students are listed either beside or below the seating chart (depending on the size of the chart). |
|---|---|
| Show Pictures | Select to display student photos in the seating chart. Photos are only available if they have been added by the district. |
- Each seat lists the student's name, gender, and student ID.
- The seats are color-coded by gender. Seats for females are shaded pink, and seats for males are shaded blue.
❏ You can manually arrange students as needed by dragging a student to a new location.
- If a student is dragged to a new location that is currently occupied, the two students switch seats.
- If the student is dragged to an unoccupied location, his original location becomes unoccupied.
- You can drag students to and from the Unassigned Students list. If a student is dragged to a new location that is currently occupied, the two students switch places. The student from the list now has a seat, and the student who had a seat is now in the list.
- To re-sort the students using one of the layout options, select an option from the Layout Options field, and then click Preview Layout. The students are sorted according to the new layout.
Save changes:
| PIN | Type your four-digit personal identification number (PIN). |
|---|
❏ Click Save Seating Chart.
Print the seating chart:
❏ Click Print.
The Seating Charts Report Selection page opens allowing you to make selections for running the report.
Generate seating chart report.
This report prints a teacher's seating charts for all periods or one period. For each period, the seating chart is displayed followed by a list of students who are not assigned to seats. The seating chart lists the student name, gender, and ID.
If printed for all periods, each period prints on a separate page.
NOTE: If that field has been changed, and the seating charts have not been re-saved on Settings > Manage Charts since the setting was changed, a warning message is displayed when the report is generated indicating that the reports will not be accurate until the Manage Seating Charts page has been re-saved. You must review the seating chart for each period on the Manage Seating Charts page, make any necessary changes, and then re-save each chart.
❏ Specify report options:
| Semester | The current semester is displayed. You can select a different semester. | ||||
|---|---|---|---|---|---|
| Period | Select the period-course(s) to print the seating chart for, or select ALL CLASSES to print seating charts for all periods. If Combine Courses in Attendance is selected on your Settings > Update Profile page, the courses are combined by period. |
||||
| width | Select the width setting for the report.
For either width setting, you can adjust the orientation when you print. Select Landscape to increase the number of students that fit on the page. |
||||
| Show Pictures | Select to display student photos in the seating chart. Photos are only available if they have been added by the district. |
❏ Click Generate.
- The report opens in a new window, and you can print the report from that window.
- The report selection page remains open on your desktop.
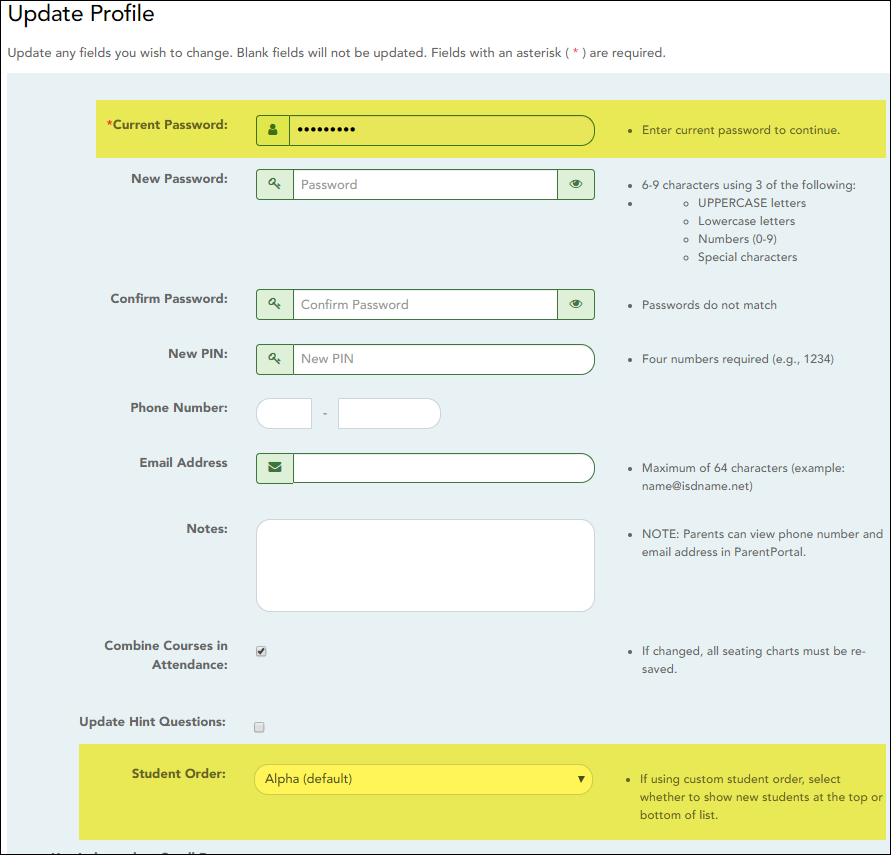
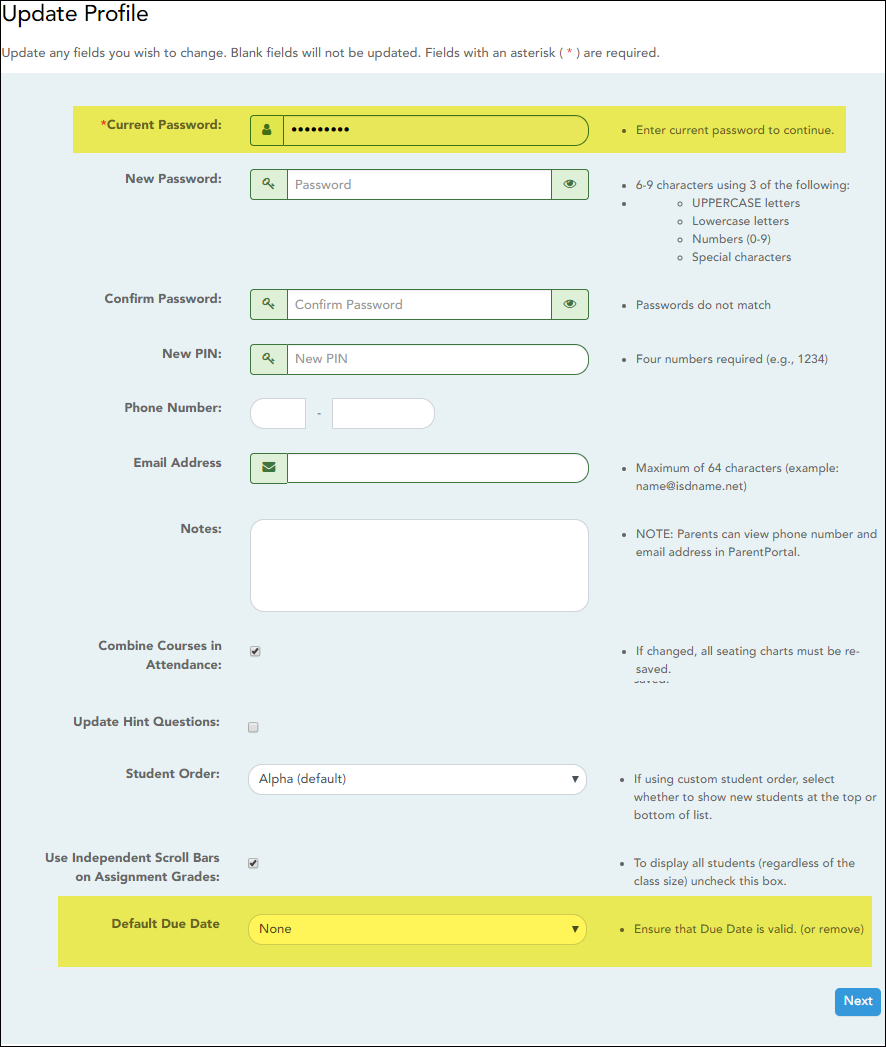
There are two steps for arranging the order of students in your classes. First, specify the default order for new students on the Update Profile page. Then, use the Arrange Student Order page to arrange current students.
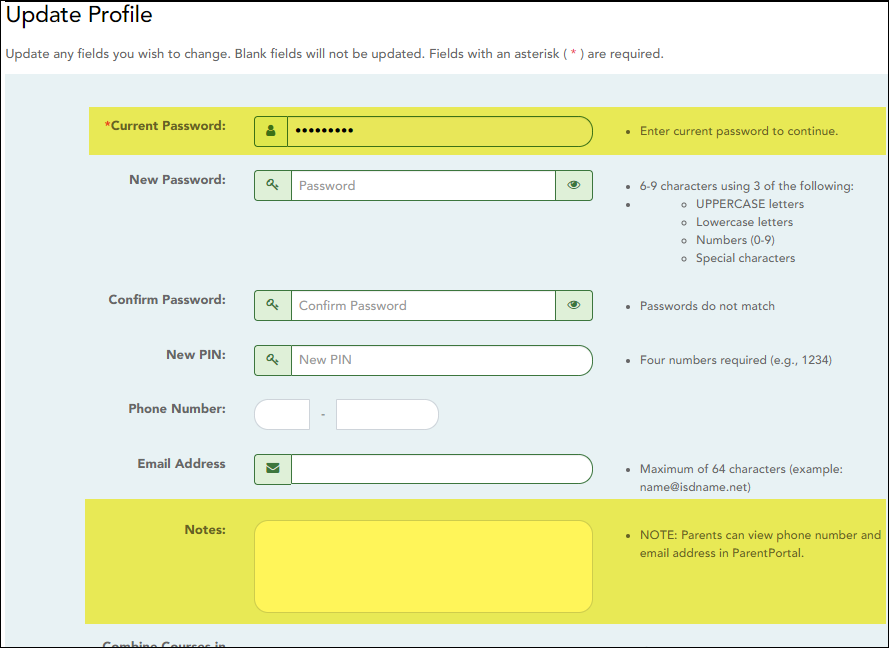
| Current Password | For added protection of this information, you must type your current password to update data on the Update Profile, even though you have already logged on to TeacherPortal. IMPORTANT: If you have three unsuccessful attempts to access the page (invalid password), you will be logged out of your account. If this occurs, contact your campus administrator to have your account reset. To exit without saving any changes, click Home or any other menu item to go to another page. |
|---|---|
| Student Order | Select where you want new students to be listed on the following pages and reports:
• Assignment Grades
This field works in conjunction with Settings > Arrange Student Order and is only available to users who are logged on as teachers. The field is not available to administrative users. |
❏ Click Next.
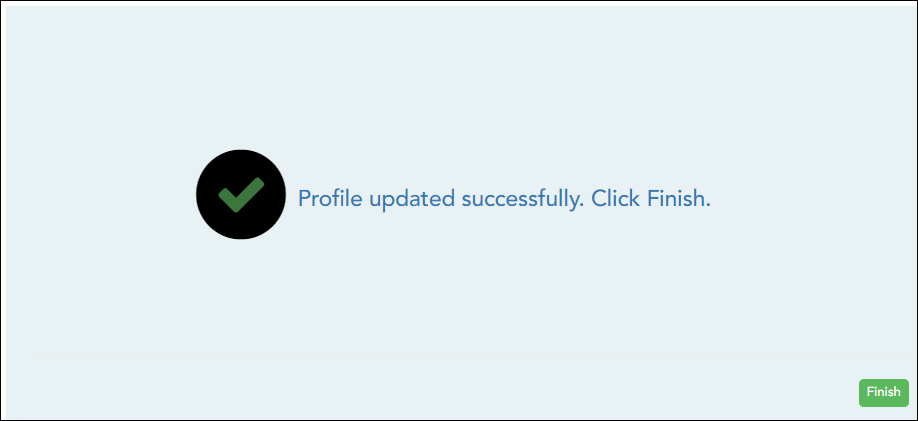
If you did not select Update Hint Questions, the Success page is displayed.
❏ Click Finish.
You are redirected to the Announcements page.
Settings > Arrange Student Order
This page allows you to determine the order in which your students are listed on the following pages:
- Grades > Assignment Grades
- Grades > Cycle Grades
- Grades > IPR Comments
- Grades > Print IPR
- Reports > Assignment Grades (listed as a sorting option)
- Reports > Class Roster
The order is set by semester. You must re-do the order each semester.
You must be logged on as a teacher to use this page. The page is not displayed for administrative users.
IMPORTANT: Before using this page, you must set a preference for new students in the Student Order field on Settings > Update Profile. The field must be set to add students to the top of the list or bottom of the list. Otherwise, the order established on this page is not utilized on the other pages throughout TeacherPortal.
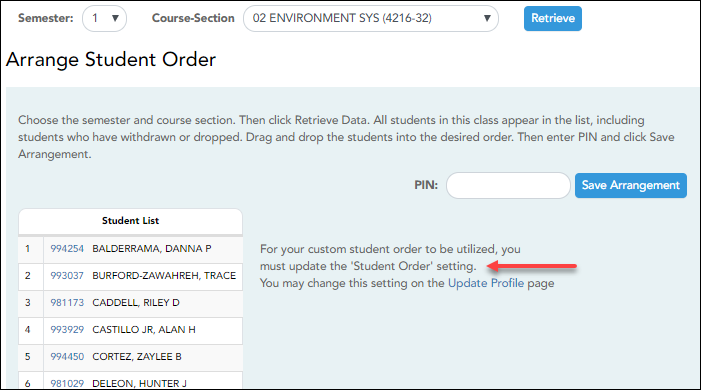
Once the Student Order is set on Settings > Update Profile:

❏ Specify the course-section:
| Semester | The current semester is displayed by default. You can select another semester. |
|---|---|
| Course-Section | Select the course-section you want to arrange students for. |
❏ Click Retrieve.
All students in the selected course-section are listed, including withdrawn students.
- If you have not previously arranged students in this course-section, the students are listed in alphabetical order.
- If you have previously arranged the students, the students are listed in the last saved order.
- To the right of the student list, a message indicates your current setting on the Settings > Update Profile page regarding the placement of new students. A link to the page is provided, allowing you to easily change your setting.
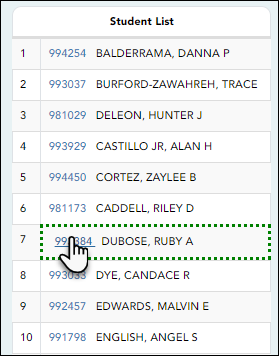
- You can click the student ID to view the student profile.
❏ Rearrange students using drag-and-drop. Click and hold the student ID, and drag the student to the new position.
Save changes:
When you are satisfied with the arrangement, you must save your changes.
| PIN | Type your four-digit personal identification number (PIN). |
|---|
❏ Click Save Arrangement.
If your changes were saved successfully, the page reloads, and a message is displayed indicating that the student list order was saved.
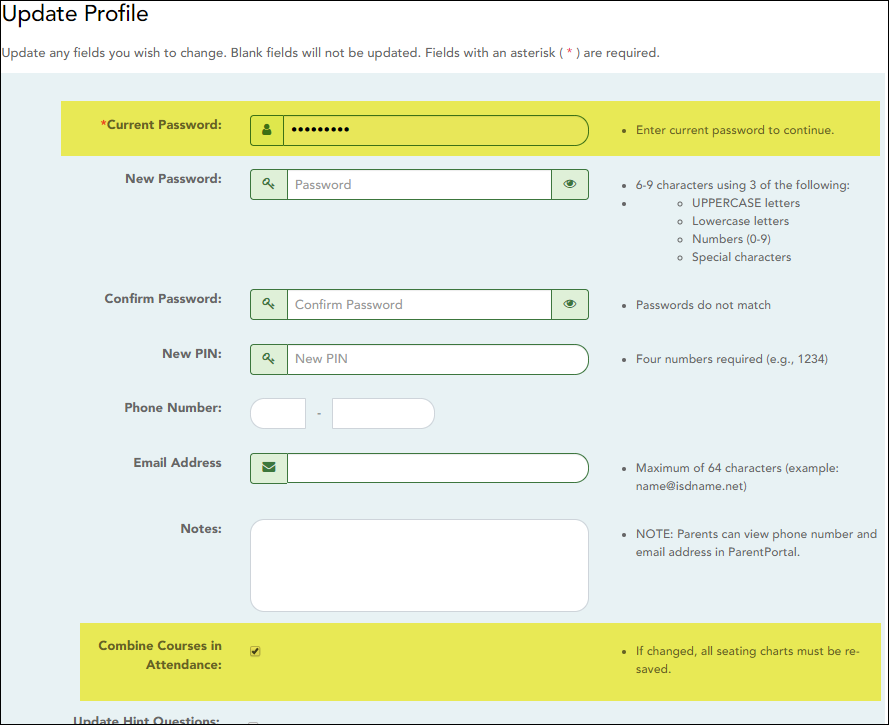
Combine courses in attendance.
| Current Password | For added protection of this information, you must type your current password to update data on the Update Profile, even though you have already logged on to TeacherPortal. IMPORTANT: If you have three unsuccessful attempts to access the page (invalid password), you will be logged out of your account. If this occurs, contact your campus administrator to have your account reset. To exit without saving any changes, click Home or any other menu item to go to another page. |
|---|---|
| Combine Courses in Attendance |
Select if you want to combine classes for attendance reporting. |
❏ Click Next.
❏ Click Finish.
You are redirected to the Announcements page.
Set a default due date for assignments.
| Current Password | For added protection of this information, you must type your current password to update data on the Update Profile, even though you have already logged on to TeacherPortal. IMPORTANT: If you have three unsuccessful attempts to access the page (invalid password), you will be logged out of your account. If this occurs, contact your campus administrator to have your account reset. To exit without saving any changes, click Home or any other menu item to go to another page. |
|---|---|
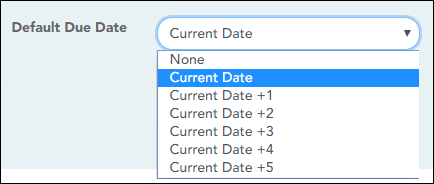
| Default Assignment Due Date |
Indicate if you want a default date to be displayed in the Date Due field on Settings > Manage Assignments. |
❏ Click Next.
❏ Click Finish.
You are redirected to the Announcements page.
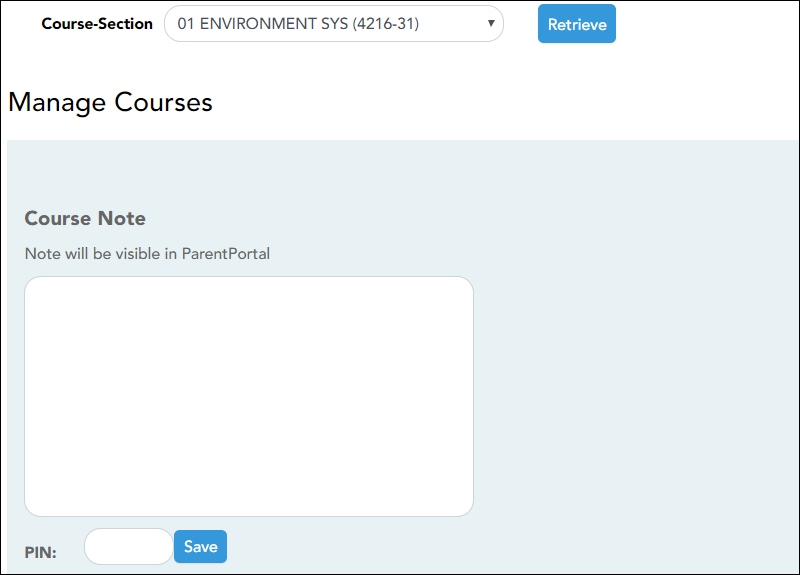
This page allows you to set course-wide information. Data entered on this page affects only the selected course-section.
❏ Specify the course-section:
| Course-Section | Select the course-section you want to enter data for. The drop down lists the two-digit period and course name. The course number and section number are in parentheses. |
|---|
❏ Click Retrieve.
| Course Note |
(Optional) Type comments and notes about this course, such as reminders, announcements, and other course-related information. These comments are viewable to parents in ParentPortal. NOTE: A course note must be added for each course individually, including courses that are part of a course group. If the note applies to all courses in the group, it must be added for each course in the group. |
|---|
| PIN | Type your four-digit personal identification number (PIN). |
|---|
❏ Click Save.
Add teacher notes such as conference periods and contact information.
| Current Password | For added protection of this information, you must type your current password to update data on the Update Profile, even though you have already logged on to TeacherPortal. IMPORTANT: If you have three unsuccessful attempts to access the page (invalid password), you will be logged out of your account. If this occurs, contact your campus administrator to have your account reset. To exit without saving any changes, click Home or any other menu item to go to another page. |
|---|---|
| Notes | Use the field to provide additional notes to parents in ParentPortal, such as conference periods or any other general information they may need. |
❏ Click Next.
If you did not select Update Hint Questions, the Success page is displayed.
❏ Click Finish.
You are redirected to the Announcements page.
Create rubrics for grading assignments (if enabled for campus).
The rubric feature is only available if enabled by the campus.
To use a rubric for grading an assignment, you must first create the rubric, and then associated the rubric with a particular assignment.
This page allows you to create rubric charts that can be used for grading assignments. A rubric chart is a set of criteria (i.e., skills) used for assessing a student's work or performance and includes levels of potential achievement (i.e., scores) for each criterion.
Once a rubric is created, you can associate the rubric chart with an assignment on Settings > Manage Assignments. Then, the rubric will be available for the assignment on Grades > Assignment Grades.
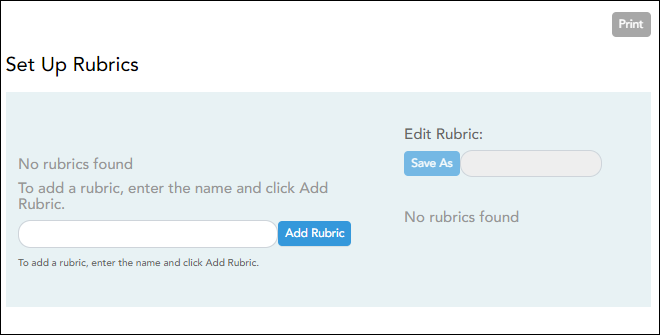
Your existing rubric charts (i.e., rubric charts created by you) are listed. Otherwise, the message “No rubrics found” is displayed.
Add a rubric chart:
In the field next to the Add Rubric button, type a unique name for the new rubric chart, then click Add Rubric.
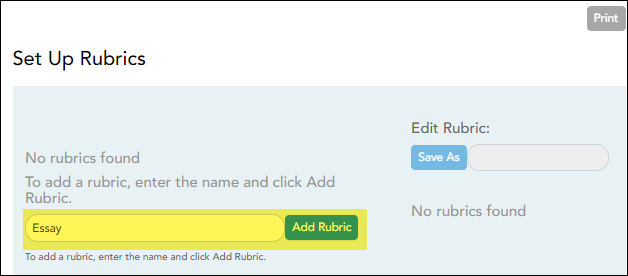
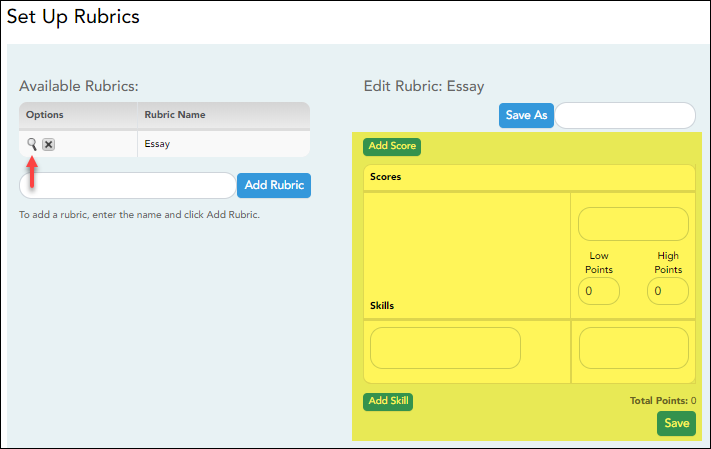
The new rubric chart is added to the Available Rubrics list.
❏ Under Editing Rubric: {Rubric Name}:
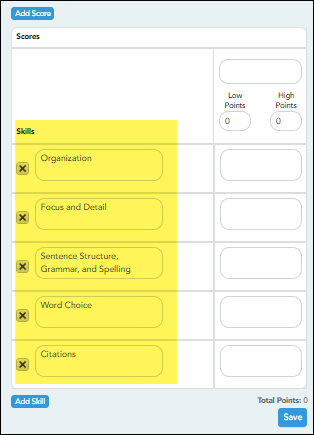
A grid is displayed allowing you to enter criteria (i.e., skills) and scores for each criterion.
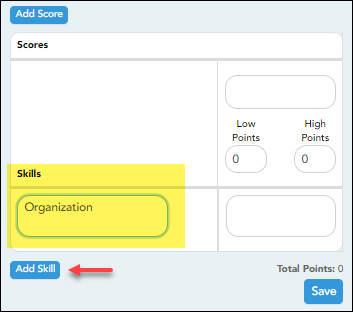
❏ Add Skills:
❏ Add Scores:
Each rubric chart must have at least one column under Scores.
Establish a set of score names. For example, you could create the following set of five score names: Not Attempted, Below Average, Average, Above Average, and Exceeds Expectations.
To add a score, type the first score name (e.g., Not Attempted), up to 50 characters, and then click Add Score. The score is added to the grid, and a blank field is displayed allowing you to add another score.
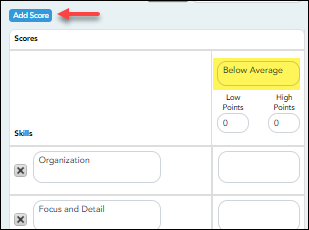
Continue adding scores as needed.
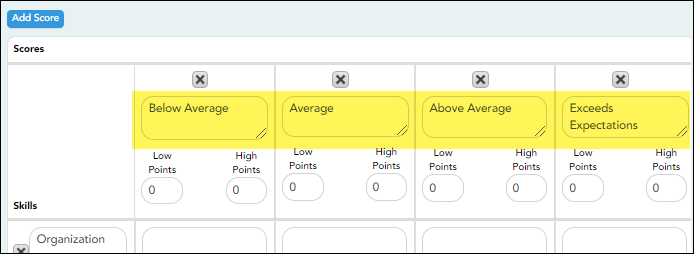
❏ Enter Low/High Points:
For each score, use the Low Points and High Points fields to establish a range of possible points within each score. Or, you can assign a single point value for each score.
The fields can have up to three digits.
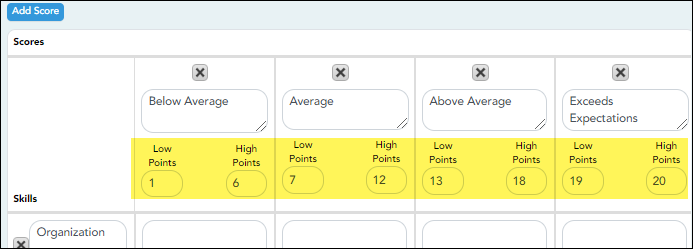
Example 1 (with score ranges):
Within each score, you can establish a range of possible points:
The Not Attempted score may have Low Points and High Points both set to 0, because 0 points would be awarded if the student did not attempt the skill.
The Below Average score may have Low Points set to 1, and High Points set to 10, so a student who performed below average on the skill can earn between 1 and 10 points.
The Average score may have Low Points set to 11, and High Points set to 20, so a student who had average performance on the skill can earn between 11 and 20 points.
The Above Average score may have Low Points set to 21, and High Points set to 30, so a student who had above average performance on the skill can earn between 21 and 30 points. The highest score a student could receive would be 30.
The Exceeds Expectations score may have Low Points set to 31, and High Points set to 40, so a student who had above average performance on the skill can earn between 31 and 40 points. The highest score a student could receive would be 40.
In this example, if 10 skills were scored, the student could earn a maximum of 400 points for the assignment.
Example 2 (without score ranges):
To assign a specific number of points to each score, type the number of possible points in the Low Points field and leave the High Points field blank. When you save, the High Points field will automatically be set to the value in the Low Points field.
The Not Attempted score may have Low Points set to 0, because 0 points would be awarded if the student did not attempt the skill. Leave High Points set to 0 or blank.
The Below Average score may have Low Points set to 1, because 1 point would be awarded if the student had below average performance for the skill. Leave High Points set to 0 or blank.
The Average score may have Low Points set to 2, because 2 points would be awarded if the student had average performance for the skill. Leave High Points set to 0 or blank.
The Above Average score may have Low Points set to 3, because 3 points would be awarded if the student had above average performance for the skill. Leave High Points set to 0 or blank. The highest score a student could receive would be 3.
The Exceeds Expectations score may have Low Points set to 4, because 4 points would be awarded if the student had above average performance for the skill. Leave High Points set to 0 or blank. The highest score a student could receive would be 4.
In this example, if 10 skills were scored, the student could earn a maximum of 40 points for the assignment.
❏ Enter a score note:
(Optional) For each skill, type a note about the score as it relates to the specific skill, up to 255 characters. The note is used to further clarify the requirements for awarding points for the skill.

See Notes on Special Characters and Copy/Paste From Other Documents.
Scores must be entered in ascending order from left to right.
Scores cannot be out of sequence; however gaps can exist.
❏ Click Save.
| Total Points |
|---|
❏ To save a copy of the displayed rubric chart with another name (e.g., to use the rubric chart as a template for another rubric chart), type the new name in the field next to the Save As button, then click Save As.
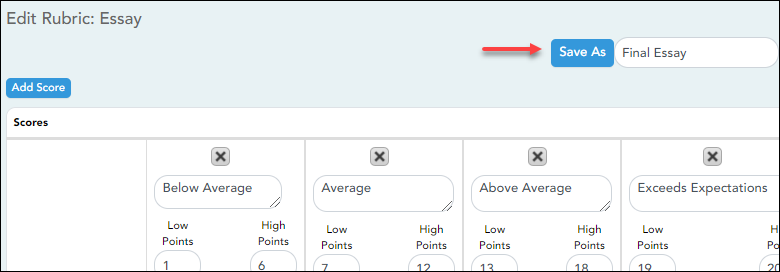
The new rubric chart is added to the Available Rubrics list. The new rubric chart can be modified as needed.
Edit a rubric chart:
❏ Under Available Rubrics (left), click  for the rubric chart you want to change.
The rubric chart opens under Editing Rubric (right). Modify the chart as needed, and then click Save.
NOTE:
If you attempt to edit a rubric chart that is in use, a message is displayed indicating the number of assignments using the rubric chart; however, you are not prevented from modifying some parts of the rubric chart:
- The skills cannot be changed.
- You cannot add a skill; the Add Skill button is not displayed.
- You must keep at least one column under Scores.
- The score note field can be modified.
- You can add scores, but you must maintain the same Total Points.
Delete a rubric chart:
❏ Under Available Rubrics (left), click  to delete an existing rubric chart.
❏ You are prompted to confirm that you want to delete the rubric chart. Click OK.
NOTE: You cannot delete a rubric chart that is in use (i.e., associated with any assignment).
Associate a rubric with an assignment:
Settings > Manage Assignments
❏ Click Add new assignment to add a new assignment.
❏ In the Rubric column:
You can assign an existing rubric chart to the assignment, which allows you to grade the assignment using a rubric chart. The rubric charts are created on Settings > Rubric Setup.
• If a rubric chart is not currently associated with the assignment, the  icon (three black squares) is displayed.
• If a rubric chart is currently associated with the assignment, the  icon (four multicolored squares) is displayed.
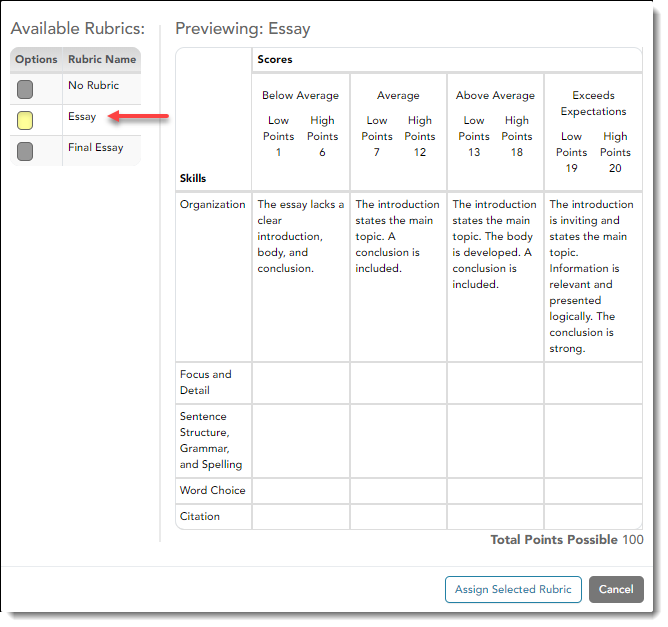
❏ Click the icon to associate a rubric chart with the assignment or to change the associated rubric chart.
The rubric chart window opens.
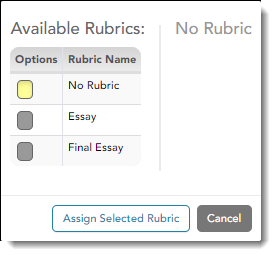
Under Available Rubrics, any rubric charts you have created that have at least one skill and one score are listed.
❏ Click Assign Selected Rubric.
The window closes.
IMPORTANT: The Total Points field for the assignment changes to display the maximum possible points for the rubric chart (maximum possible points x skill count) and is read-only.
| PIN | Type your four-digit personal identification number (PIN). |
|---|
❏ Click Save.
The icon changes to multicolored squares to indicate that a rubric is associated with the assignment.

Use a rubric to grade an assignment:
Once a rubric chart has been associated with the assignment, you can use the rubric for determining the student’s assignment grade.
❏ Select the semester, cycle, course section, and any other applicable criteria, and then click Retrieve.
The assignment grades table displays all students currently enrolled in the course-section and the assignments according to your selections.
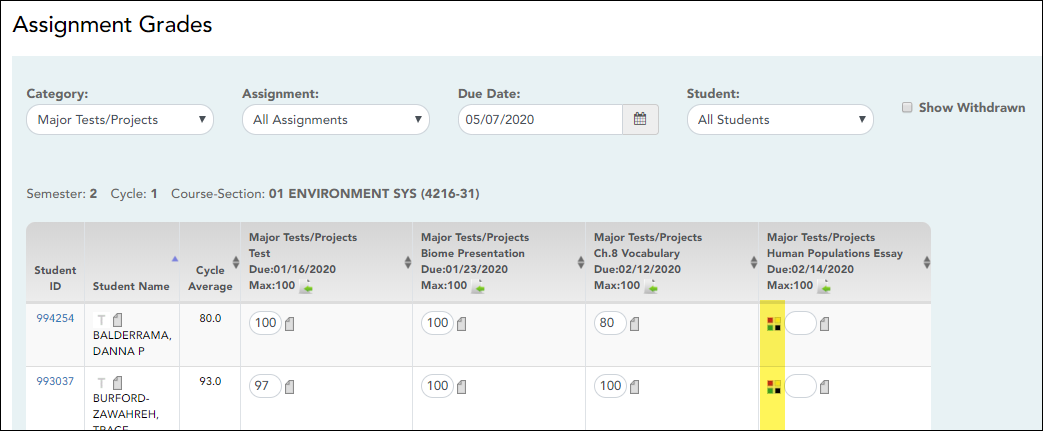
If a rubric chart has been associated with the assignment, the multicolored squares icon  is displayed next to the grade field allowing you to grade the assignment using
a rubric chart.
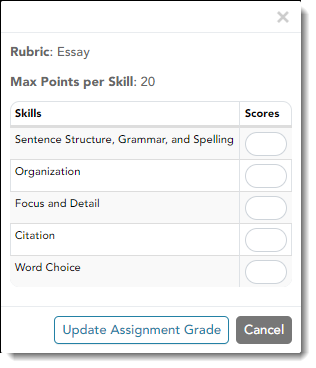
❏ Click  to open the rubric in a window.
❏ In the Scores field, type the number of points earned by the student for each skill.
For your reference, the Max Points per Skill field displays the highest number of points for a skill, as indicated on the Rubric Setup page; however, you are not prevented from entering a score above this number.
❏. When all scores have been entered, click Update Assignment Grade.
The grade (i.e., the sum of all scores entered) is calculated and displayed in the grade field.
❏ Type your PIN and click Save.
NOTES:
- You can type a grade directly into the grade field even if a rubric chart is assigned to the assignment.
- When entering a score for a skill, you are not limited to the range specified in the rubric chart. For example, if the score range is 0-5, you are not prevented from typing 0 or 6.
- If the grade for the assignment should be zero, you must type 0 for one of the skill scores in the rubric chart.
- If you type a score for some skills but not all skills in the rubric chart, the sum of the scores entered is calculated and displayed in the grade field.
Generate rubric report (if enabled for campus).
There are two ways to access the rubric printing options:
- From the Manage Rubric Charts page, click Print.
- From the Reports menu, select Rubrics.
Print the rubric chart:
❏ Click Print to print a report of the displayed rubric chart.

The Rubric Report Selection page opens allowing you to make selections for printing the report.
This report prints a rubric chart which has been set up on Settings > Manage Rubric Charts. You can print only the rubric chart (i.e., blank), or you can print the rubric chart with student grades for a particular assignment.
❏ Specify report options:
| Rubric Name | Select the rubric chart you want to print. Only rubric charts that have skills and scores already set up are listed. | ||||||
|---|---|---|---|---|---|---|---|
| Title | (Optional) Type a title for the report, up to 50 characters. If blank, the rubric chart name is used as the title. | ||||||
| Print with grades |
Select to print the report with student grades. This field is only displayed if the selected rubric chart has already been used to grade an assignment.
|
❏ Click Generate.
- The report opens in a new window, and you can print the report from that window.
- The report selection page remains open on your desktop.
Manage Student Groups
Settings > Manage Student Groups
This page allows you to create and maintain groups of students for reporting purposes. The student groups can be campus-wide and are not limited to a particular course-section. Special group reports are available to provide data for the student groups.
Teachers are given access by administrators to create student groups as follows:
- No access: (Teacher cannot create student groups.) If you do not have access, the Student Group Manager page is not listed in the menu.
- Course-wide access: (Teacher can create student groups that include only students enrolled in your courses.)
- Campus-wide access: (Teacher can create student groups that include any students at the campus.) If you do not have this access, an administrative user (impersonating you as the teacher) can create groups for you. Groups can only be created for teachers who have a TeacherPortal account.
Users can run group reports for their own groups, regardless of who created the group.
Create a group:
| Group Manager (left grid) | Your existing groups are listed. Otherwise, the message “No Student Groups were found” is displayed. | ||||
|---|---|---|---|---|---|
| Group Reports (right grid) | The available student group reports are listed; they are linked to the reports in the Reports > Student Group Reports menu. Some of the group reports mirror other reports available in the Reports menu. If no groups exist, the message “No Student Groups Exist” is displayed in place of any reports. |
||||
| Group Manager (left grid) |
To add a new group, type a unique group name in the field next to the Add Group button, then click Add Group. See notes on Special Characters allowed when entering the group name.
|
||||
| Group Reports (left grid) |
Click a report title to run the report for a student group:
• The group Admin Student Grades page allows you to run the Admin Student Grades report for a student group. |
Copy a group to another teacher:
This is only available for administrative users.
❏ Click Copy Group to Another Teacher to copy a teacher's student groups to another teacher.
The Copy Student Groups page opens.
Americans with Disabilities Act (ADA) and Web Accessibility
The Texas Computer Cooperative (TCC) is committed to making its websites accessible to all users. It is TCC policy to ensure that new and updated content complies with Web Content Accessibility Guidelines (WCAG) 2.0 Level AA. We welcome comments and suggestions to improve the accessibility of our websites. If the format of any material on our website interferes with your ability to access the information, use this form to leave a comment about the accessibility of our website.


