ASCENDER - Position Management: Setup and Processing for New Users
Created: 12/07/2020
Reviewed: 06/29/2022
Revised: 11/4/2025
The purpose of this document is to guide you through the necessary steps to begin using the Position Management application.
This document assumes you are familiar with the basic features of the ASCENDER Business system and have reviewed the ASCENDER Business Overview guide.
Some of the images and/or examples provided in this document are for informational purposes only and may not completely represent your LEA’s process.
Set up Position Management Current Year Payroll Tables
- Review and/or update job codes.
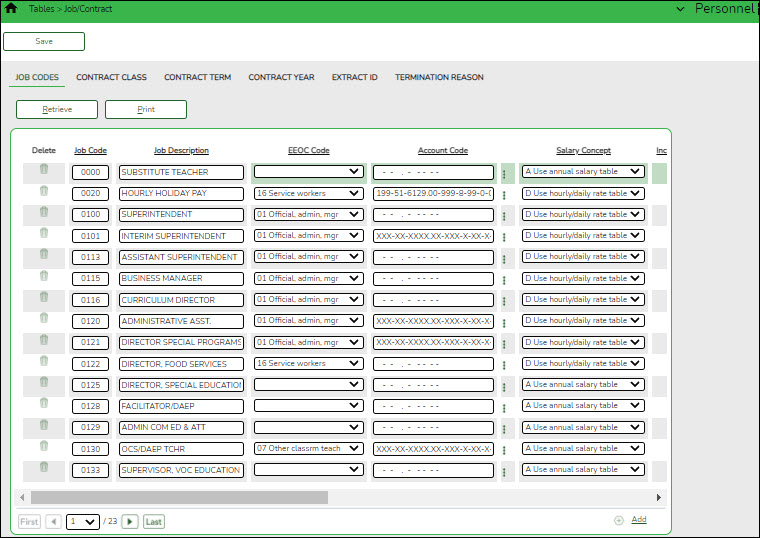
Personnel > Tables > Job/Contract > Job CodesBefore beginning this process, consider the existing job codes in the current year payroll. It is important that there are no changes made to the existing job codes that are already assigned to employees in the current year; however, you can add new job codes to the table.
For LEAs that accrue, each job code can only tie to one accrual code. You may need to perform maintenance to ensure a good starting point. For example, if a job code is set up for a teacher and you have employees with 187 work days and employees with 197 work days tied to that job code, a new job code should be added so that an accrual code exists for both sets of employees. Do not make changes to existing job codes that are tied to employees, changes can be made when creating positions.
If the LEA expenses workers' compensation, it is important to set up those codes on the job code table. If workers' compensation codes are not established, expensing will not occur for that position. For each position, the workers' compensation code is retrieved from the job code.
- Update salary tables.
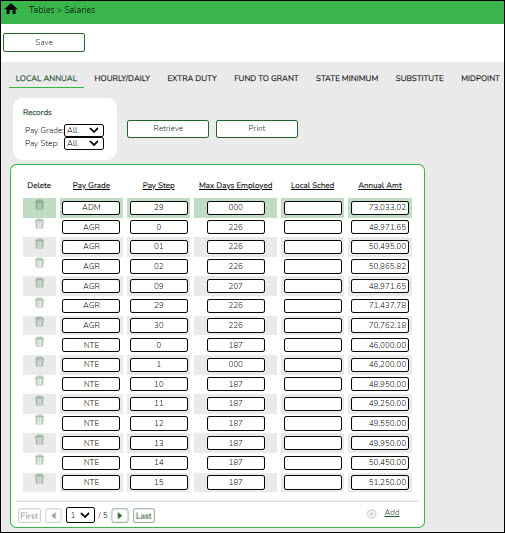
When using Position Management, all employees must be tied to one of the following salary tables:Personnel > Tables > Salaries > Local Annual - Contracted employees
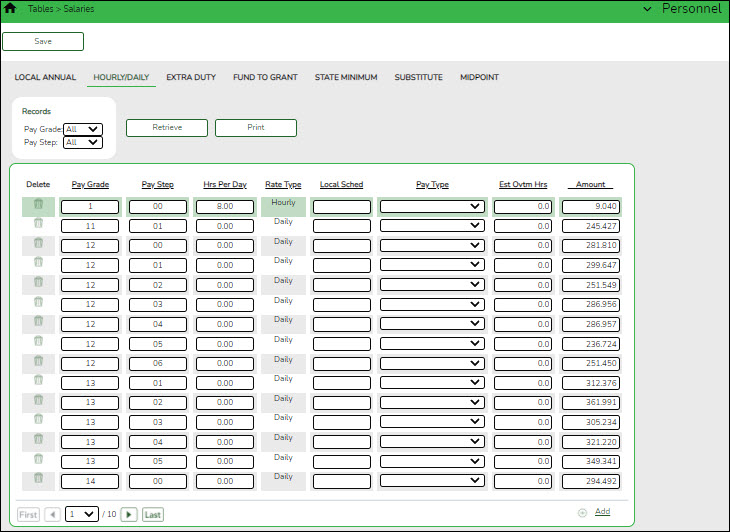
Personnel > Tables > Salaries > Hourly/Daily - Contracted and Non-contracted employees
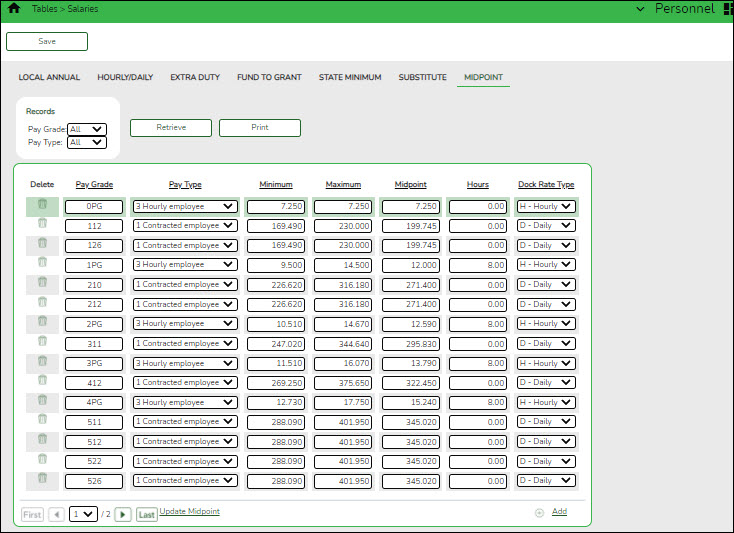
Personnel > Tables > Salaries > Midpoint - Contracted and Non-contracted employees
If your LEA has employees who are not tied to a salary table, it may be helpful to create a midpoint table. For instance, if all LEA employees are assigned to a pay scale except for cafeteria workers and bus drivers, whose salaries vary, it can be difficult to maintain a consistent table setup. In this case, you can set up a midpoint table with different pay grades for each job and then assign employees to that table.
TIP: Consider grouping “like” jobs when setting up the midpoint table.
❏ Click +Add and enter the following information:
- Pay Grade
- Pay Type
- Minimum - The lowest daily pay rate an employee would receive in this pay grade/pay type.
- Maximum - The highest daily pay rate an employee would receive in this pay grade/pay type.
❏ Click Save. The Midpoint is automatically calculated. - Update school calendar.
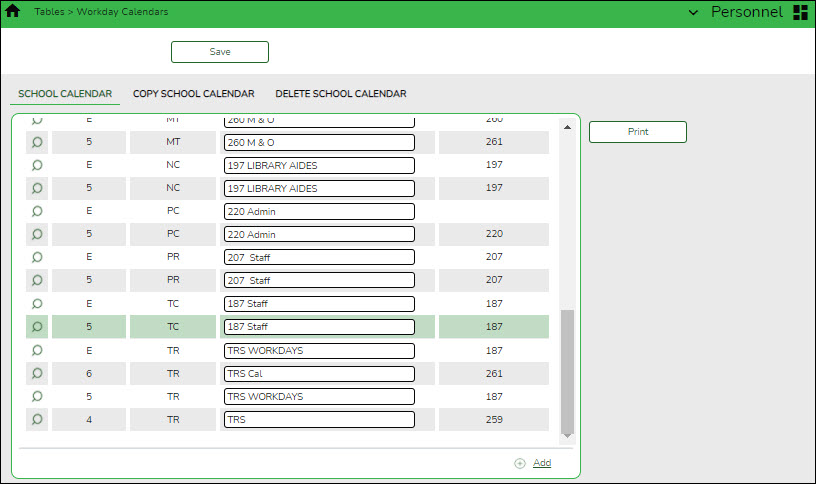
Personnel > Tables > Workday Calendars > School CalendarAll positions must be tied to a school calendar code. Existing school calendar codes can be used. If there are positions that do not follow the existing calendar codes, you can add new calendar codes. Calendar codes can be alpha or numeric.
It is important that the begin and end dates match the calendar. For example, when entering the begin and end dates, many LEAs use 7/1-6/30 for 12-month employees. If 7/1 and/or 6/30 fall on a weekend and your calendar has a begin date of 7/2, then the employee's begin date should be 7/2.
- Set up next school year pay dates.
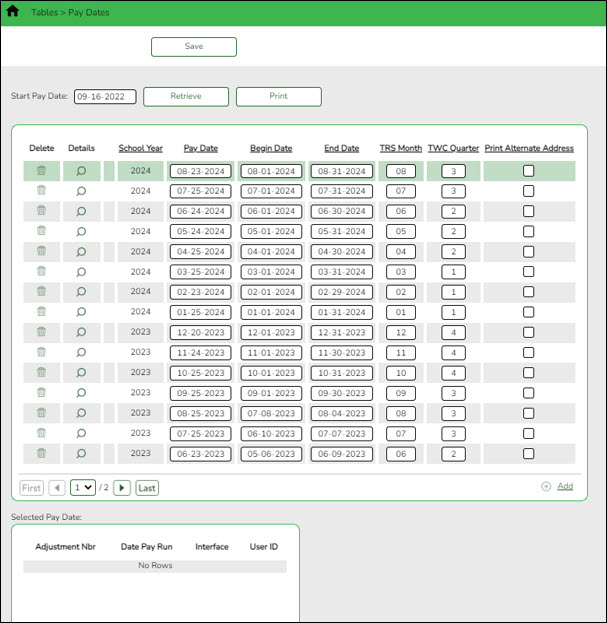
Pay dates can be created for the next school year. The current year dates are used at this time, but the pay dates for the next year must be set up prior to rolling positions to the next year Position Management.
- Clear next year payroll tables and copy all tables from current to next year.
Log on to the current year pay frequency.CAUTION: Before moving forward, keep in mind that this step clears all manual changes that were made to next year salary tables.
Perform the following two processes:
Payroll > Next Year > Copy CYR Tables to NYR > Clear Next Year Tables
This tab is used to clear:
- All next year tables for all pay frequencies regardless of the pay frequency to which you are logged on.
- Only EOY accrual data.
- Only next year payroll budget data.
Individual frequencies cannot be selected for deletion.
Note: EOY accrual reversals must be created and interfaced to Finance before clearing next year tables or EOY accrual data only.
Clear next year tables:
Field Description Clear EOY Accrual Data Only Select to clear the EOY accrual data records only. All other next year data is left intact. Clear NY Payroll Budget Only Select to clear the next year payroll budget records only. All other next year data is left intact. Note: If an option is not selected, all displayed next year tables for all pay frequencies (regardless of the pay frequency to which you are logged on) are cleared when you click Execute.
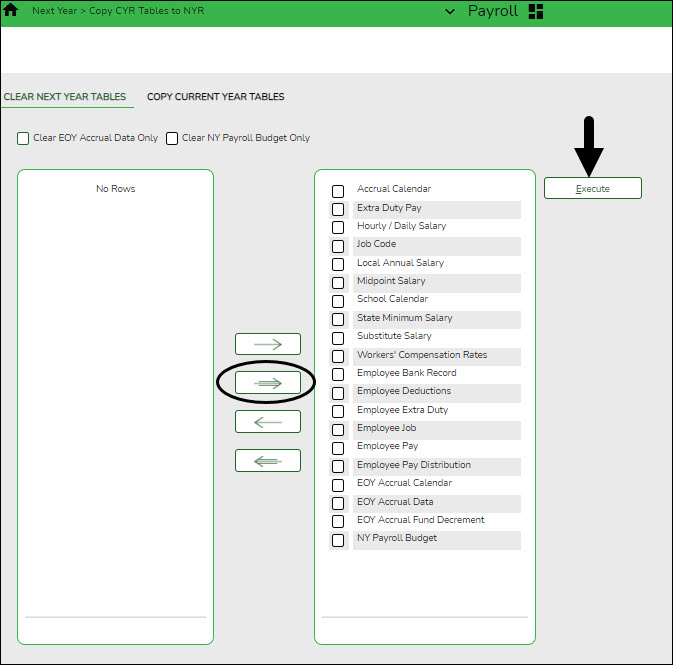
All available next year payroll tables are displayed on the left side of the page. Select the tables to clear. Use the arrow buttons to move the selected tables from the left side to the right side of the page.
 - Click to move selected entries from the left side to the right side of the page.
 - Click to move all entries from the left side to the right side of the page.
 - Click to move selected entries from the right side to the left side of the page.
 - Click to move all entries from the right side to the left side of the page.
❏ Click Execute. A message is displayed indicating that the next year records have been cleared. Click OK.
Payroll > Next Year > Copy CYR Tables to NYR > Copy Current Year Tables
This tab is used to copy all tables or selected tables as next year records for the corresponding next year frequency (e.g., CYR = 6, NYR = F; CYR = 5, NYR = E; and CYR = 4, NYR = D). The tables are copied from all current year frequencies to all next year frequencies (except the School Calendar table). The School Calendar table header is only copied for the frequency to which you are logged on. To copy the school calendar for another frequency, log on to the other frequency and copy the School Calendar table. The calendar itself is not copied, only the calendar code and calendar description. Type the year in the Start Year field and the beginning month in the Start Month field to begin the process of building the next year calendar.
Copy current year tables:
All available current year tables are displayed on the left side of the page. Select the tables to copy. Select the corresponding check boxes to select a table. At least one table option must be selected.
- Select ❏ next to the table(s) to copy.
- Select ❏ again to clear the selected check box.
❏ Click if you do not want to copy the entire table, but want to include specific data from a table.
Notes:
- Only the selected tables are processed.
- If the tables are copied multiple times and the record in the current year does not exist in the next year, the new record is inserted in the next year.
- If the tables are copied multiple times and a description is changed in the next year but not in the current year, the description is replaced by the description in the current year table.
❏ Click Select All Tables to select all current year tables to copy to the next year.
❏ Click Execute. A separate preview report is displayed for each selected table.
❏ Click Process on each report page to copy the table. Or, click Cancel not to copy the table. A message is displayed indicating that the tables were successfully copied. Click OK.
- Copy current year staff to next year payroll.
Log on to the current year pay frequency.Payroll > Next Year > Copy CYR Staff to NYR
Complete the following:
❏ In the Pay Type field, select E - Exclude Substitute.
❏ Under Options:
- Select Include Employees with Termination Date.
- In the Next Year’s Funding Code, type the fiscal year that exists in Budget.
❏ Click Execute. If the process is successful, a preview report is displayed. Review the employee list to verify that the correct data was copied to the next year records. Also, review the total employee count at the end of the report.❏ Click Process to accept the changes and continue. A message is displayed indicating that the process was completed successfully. In addition, a list of the database record tables that were copied is displayed. Click OK.
❏ Click Cancel to return to the Copy CYR Staff to NYR page without making the changes.
Set up District Administration Options
- Update Position Management options.
District Administration > Options > Position ManagementThis page is used to create and maintain Position Management options including the types of calculations that should be used in Position Management and the specified default values to be used for certain types of Position Management transactions. These options are not typically changed throughout the school year.
❏ Verify that the following fields are completed and accurate:
- Current Year
- Next Year
- Minimum Foundation Year - Type the four-digit current or next school year in the YYYY format to allow the system to select the corresponding tables to calculate the state minimum salary amount. If this year matches the current year value, the current Personnel state minimum table is used. If this year matches the next year value, the next year Personnel state minimum table is used.
- Set up category codes.
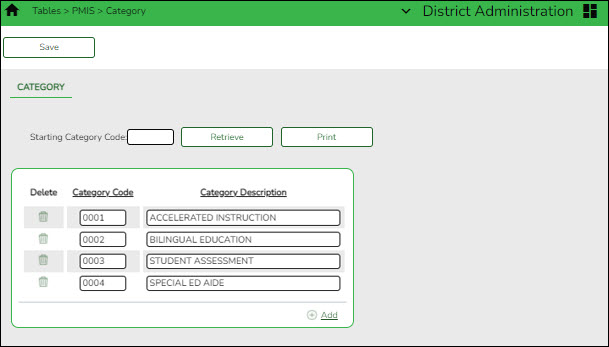
District Administration > Tables > PMIS > CategoryThis step is optional.
This page is used to create and maintain a list of LEA-defined category codes to be used for Position Management. The category codes can be assigned to positions to allow for easier inquiries. There are no calculations done based on the category. The codes are strictly for Position Management and do not impact any other system. Categories can be used in User Created Reports; however, they are not available in any other report parameters.
- Update first pay date codes.
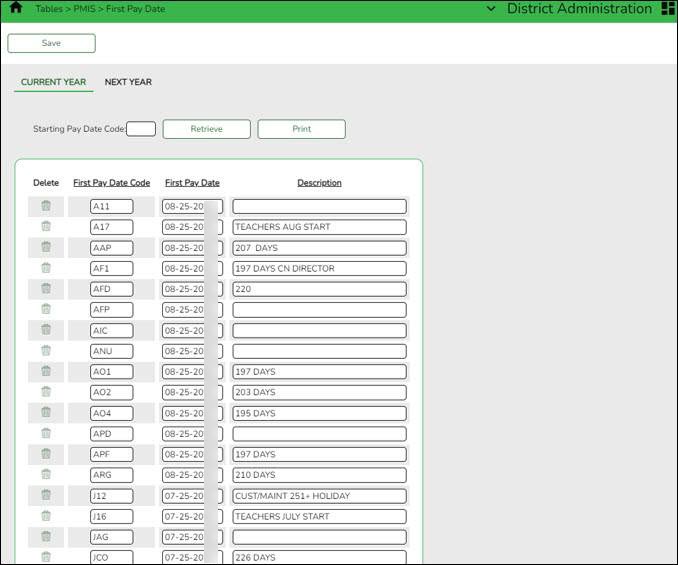
Use the following pages to establish the current and next year first pay dates and codes.District Administration > Tables > PMIS > First Pay Date > Current Year
This tab is used to create and maintain a list of codes associated with current year pay dates to be used for Position Management. The codes are used:
- To establish an association between a table ID and a starting pay date.
- To establish a start date for a new teacher so that a new teacher can be paid over 13 months.
- To determine the first pay date of the new school year when calculating the amounts already paid to an employee.
- To calculate the amount to be paid to an employee during the change-in-compensation processing.
- To update the payroll data with the data in the forecast records, and to move the forecast data into the current position records.
In this example, the first pay date codes begin with J, A, or S to represent the first pay date month (July, August, or September). The subsequent two characters represent the calendar code. Codes can be a maximum of three characters and any letters should be uppercase.
Complete the Current Year and Next Year tabs. The Current Year tab represents the first pay dates for the current school year, and the Next Year tab represents the first pay dates for the next school year.
District Administration > Tables > PMIS > First Pay Date > Next Year
- Set up action reason codes.
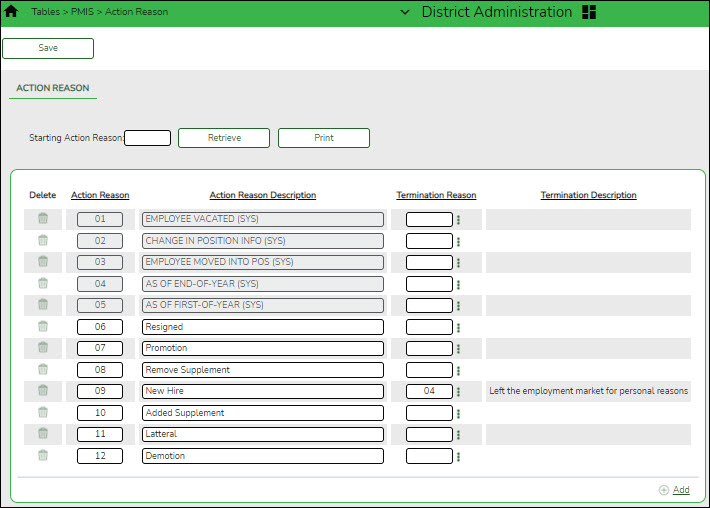
District Administration > Tables > PMIS > Action ReasonThis page is used to create and maintain a list of action reason codes to be used for Position Management.
An action code is required when a change is made to a position record that creates a historical record. Action Codes for termination transactions can be cross-referenced with the Termination Reason Codes on the Personnel > Tables > Job / Contract > Termination Reason tab. Be sure to consider LEA-required data and statistics when creating action reason codes. - Set up inactivate reason codes.
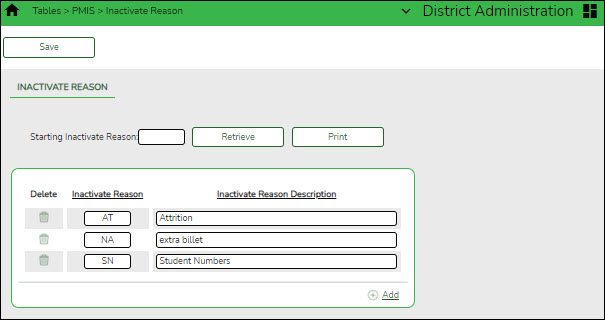
District Administration > Tables > PMIS > Inactivate ReasonThis page is used to create and maintain a list of inactive reason codes to be used for Position Management. When a position is changed to inactive status, you are prompted to enter a reason, which is saved in the historical records.
- Update forecast conversion data.
Prior to completing this step, the calendars and pay dates must exist in the next year payroll files.
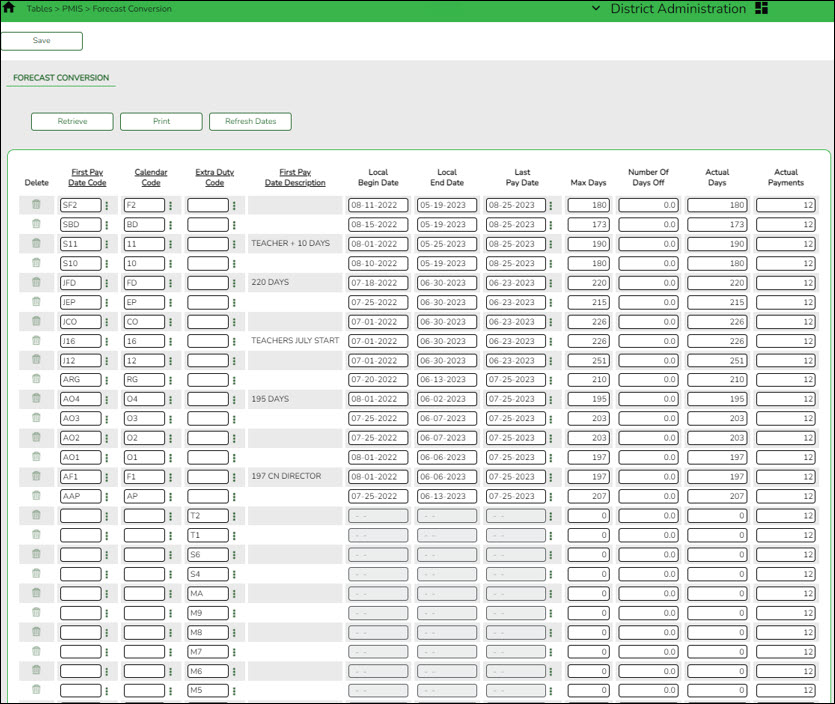
District Administration > Tables > PMIS > Forecast Conversion
This page is used to create forecast data for the next year's records. This table maintains the data conversion information by the First Pay Date Code for the Calendar Code, Begin Date, End Date, Payoff Date, Max Days, Number Of Days Off and Actual Payments. These fields should be updated with the dates to be used for the next school year. From this data, the appropriate calendar data is located and the following calculation is performed: The Local Begin Date is subtracted from the Local End Date, and then the Number of Days Off is subtracted resulting in the number of Actual Days. This data is moved to the next year's records at the time the budget is created for the next year.
For each pay date code, complete the fields on the page. The next year begin and end dates must match the new calendars in the next year payroll files, and the payoff dates must exist in the pay dates table for each first pay date code.
This process updates the table and replaces the mass updating process that is done in the next year payroll.
The Days Off field is used to reduce the days worked without tying back to unavailable days on a calendar. For example, a district police officer may work every day (or have the potential to work every day) but may have a certain number of days off per year that can be taken at any time.
Import Position and Distribution Data
- Import checklists.
After the setup steps are completed, use the following checklists to import position and distribution data.
Import Position Data to PMIS Checklist (prints separately)
Import Distribution Data to PMIS Checklist (prints separately)
- Verify imported data.
Use the following reports to verify that the records were correctly imported to the current year Position Management.
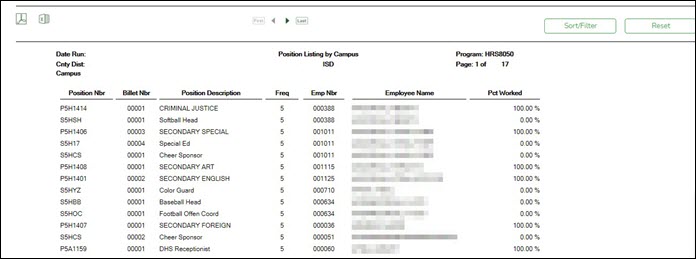
❏ Generate the Position Management > Reports > PMIS Reports > HRS8050 - Position Listing by Campus report to verify that all positions exist with accurate information.
The report provides a list of all positions within a campus. The report is sorted by campus number and includes each job position along with a position number, billet number, description, employee number, employee name, percentage of day worked, and pay frequency.
❏ Generate the Position Management > Reports > PMIS Reports > HRS8054 - PMIS/Payroll Discrepancy Report to verify that there are no discrepancies.
The report allows you to print a list of all positions that do not have payroll records or a list of payroll records that do not have position management records.
❏ Generate the Position Management > Reports > PMIS Reports > HRS8053 - Midpoint Salaries Exception Report if your LEA uses midpoint.
This report provides a list of positions that have salary rates that are not within the minimum and maximum salary ranges.
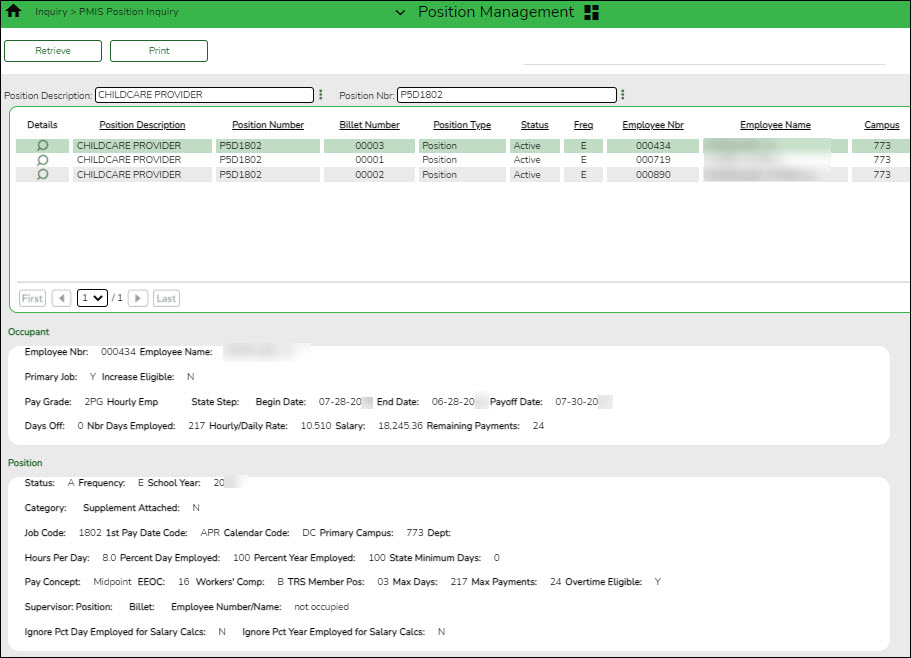
❏ For additional information, use the Position Management > Inquiry > PMIS Position Inquiry page to perform a position inquiry.
Perform Position Management Maintenance
Log on to the next year.
- Delete next year PMIS.
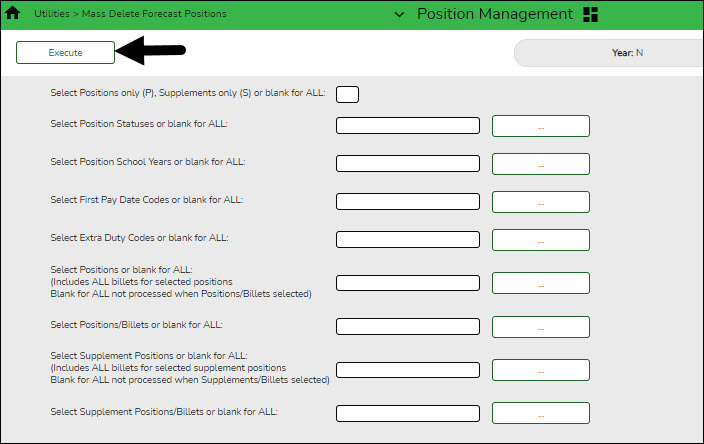
Position Management > Utilities > Mass Delete Forecast Positions❏ Leave all fields blank and click Execute. A list of processing reports is displayed.
❏ Select the reports to generate, and print or save the reports.
❏ Click Process to delete the forecast records. You are prompted to create a backup.
- Copy current year positions to the next year.
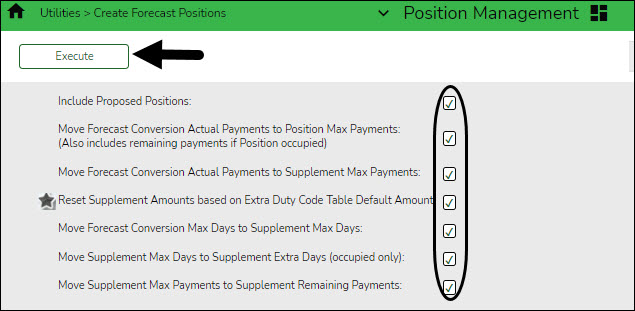
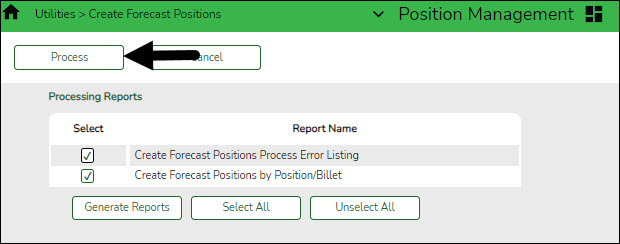
Position Management > Utilities > Create Forecast PositionsIf an LEA has the Percent of Year field set to less than 100% of the stipend amount on the Position Management > Maintenance > PMIS Supplement Modify > Position Record tab, they should consider whether or not to select the Reset Supplement Amounts based on Extra Duty Code Table Default Amount field.
If the Reset Supplement Amounts based on Extra Duty Code Table Default Amount field is selected, the amount on the supplement position record is reset to match the amount on the extra duty table.
❏ Select all fields and click Execute. A list of processing reports is displayed.
❏ Select the reports to generate and print or save the reports. Verify any errors and make corrections as needed.
❏ Click Process. You are prompted to create a backup.
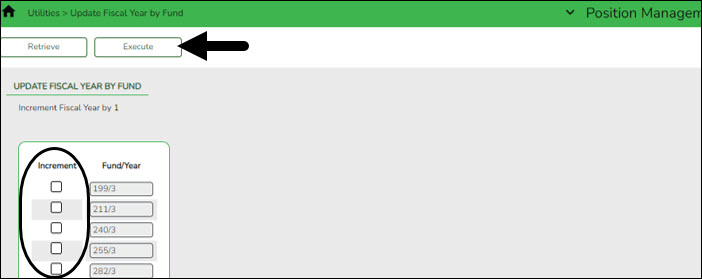
- Update the fiscal year for distributions.
Prior to completing this step, verify that the new year budget is initialized in ASCENDER.Position Management > Utilities > Update Fiscal Year by Fund
❏ Select the fund/years to be incremented. This process increments the position distribution fiscal year by 1.
❏ Click Execute.
- Generate the Position Listing by Campus Report.
Position Management > Reports > PMIS Reports > HRS8050 - Position Listing by CampusGenerate the Position Listing by Campus Report from next year Position Management to determine the following:
- If any employees need to be moved to a different position.
- If you have vacant positions you need to update with employee information.
- If you have any supplemental positions that need to be updated for stipends.
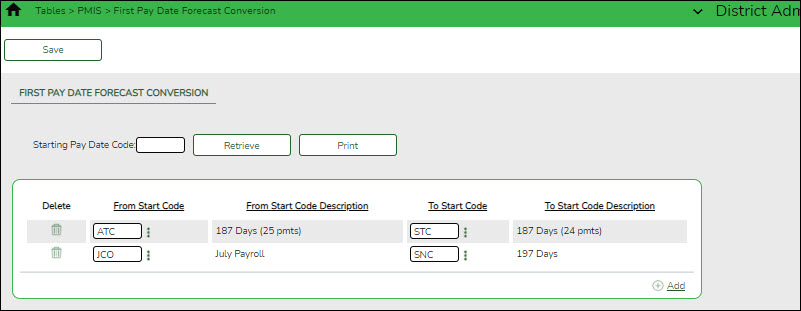
- (If necessary) Transfer positions from one first pay date code to another.
District Administration > Tables > PMIS > First Pay Date Forecast ConversionThis page is used to change a start date code to another for forecast conversion, and should only be used if you need to transfer all positions from one First Pay Date Code to a different First Pay Date Code. All positions tied to the From Start Code will be added to the To Start Code. For example, the program could be used to update the first pay date code when a new hire employee on a 13-month pay date cycle needs to convert to a regular 12-month pay date cycle.
- (If necessary) Update regular and supplemental positions.
Note: If your LEA comes across a situation where teachers are not being captured in the ASCENDER Student system for grade reporting or scheduling, contact your regional ESC consultant for guidance.
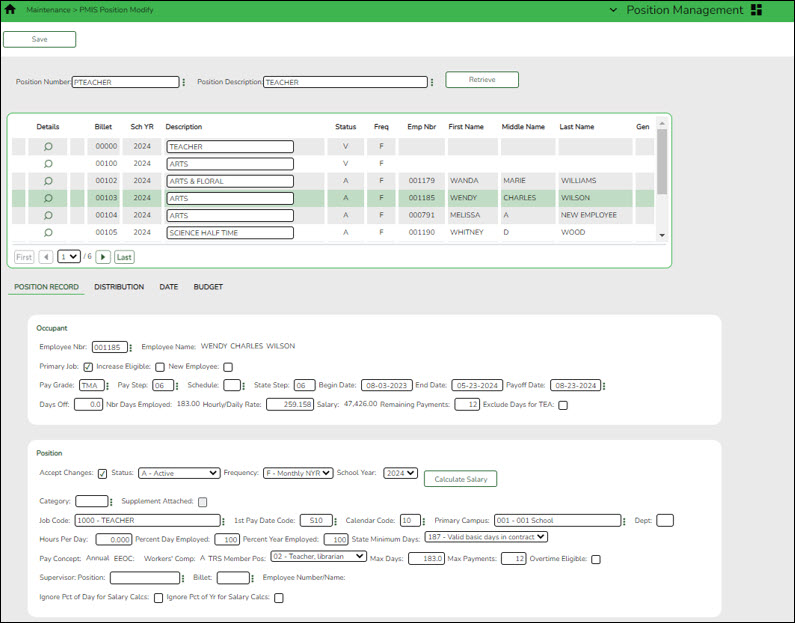
Position Management > Maintenance > PMIS Position Modify or PMIS Supplement Modify
If working on the Distribution tab, you must select an account code from the autosuggest drop down in the Account Code field versus typing in the full account code in order to validate against the grant code table.
If necessary, use one of the following options to vacate an employee from a position:
❏ Option 1: It is best practice to use the Position Management > Utilities > Vacate Employee from Forecast Positions page to vacate a position.
Typically, when an employee decides to leave the LEA at the end of the year, the employee is paid off in payroll at the end of their contract; therefore, no additional action is necessary for the current year. However, in the forecast records, the employee must be removed from all existing positions.
- Retrieve the employee's position record.
- Select the Vacate check box for each position.
- Click Save.
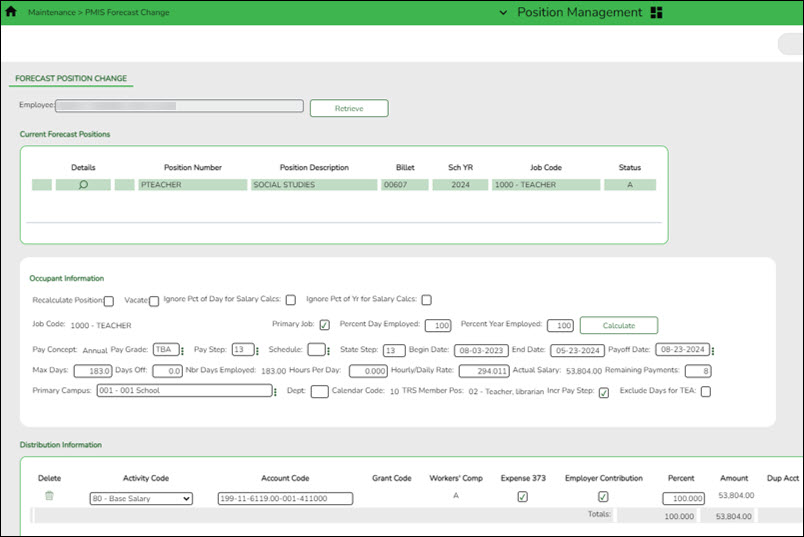
❏ Option 2: Use the Position Management > Maintenance > PMIS Forecast Change page (only available in the next year payroll) to change an employee from one position to another. A list of the employee's existing positions is displayed with a section to either enter a new position or vacate a position. - Generate the PMIS/Payroll Discrepancy Report.
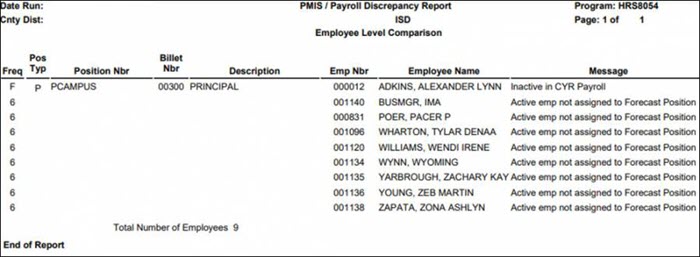
Position Management > Reports > PMIS Reports > HRS8054 - PMIS/Payroll Discrepancy ReportGenerate the PMIS/Payroll Discrepancy report to determine if there are any active employees not assigned to a forecast position. Below are some examples of the PMIS/Payroll Discrepancy report:
- Generate a user-created report.
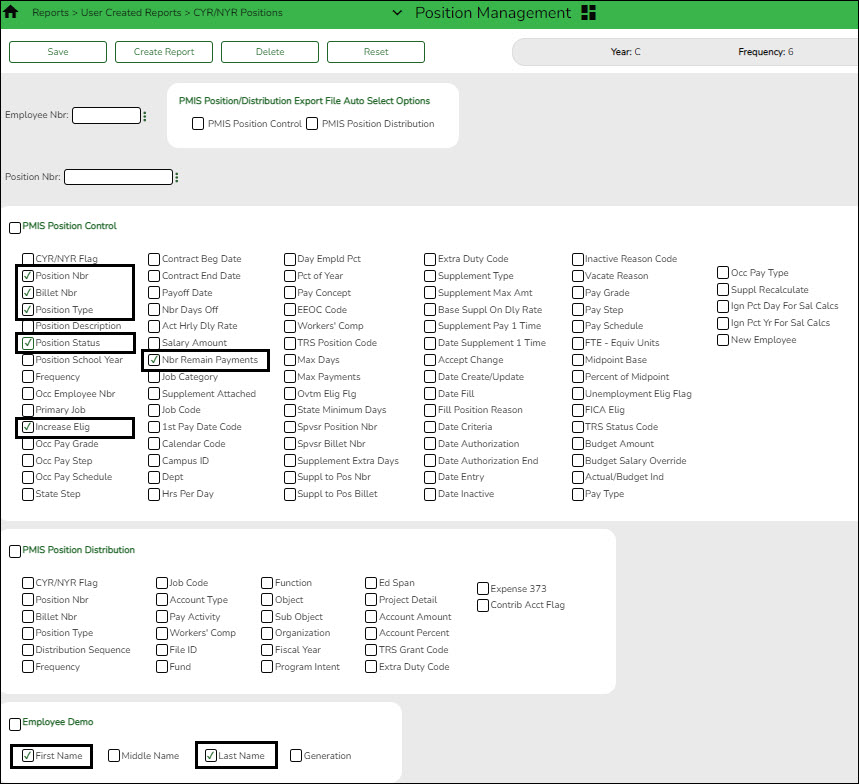
Position Management > Reports > User Created Reports > CYR/NYR PositionsGenerate a PMIS user-created report to verify that the Increase Eligible field is selected for applicable positions. It is possible that the field is not selected for new LEA employees from last year.
❏ It is recommended to verify the Nbr Remain Payments field prior to calculating salaries.
❏ Select the following fields on the user-created report:
❏ Click Create Report. The report is displayed. Use the sort/filter functionality to group the applicable data.
Note: The number of remaining payments reflected on the report is displayed on the Job Info tab as the number of annual payments and the number of remaining payments for the employee for any P position type. If the LEA uses S acct types or business allowances for extra duties, S position types on this report should reflect the correct number of remaining payments. Prior to continuing, make the necessary position corrections.
- Update position records.
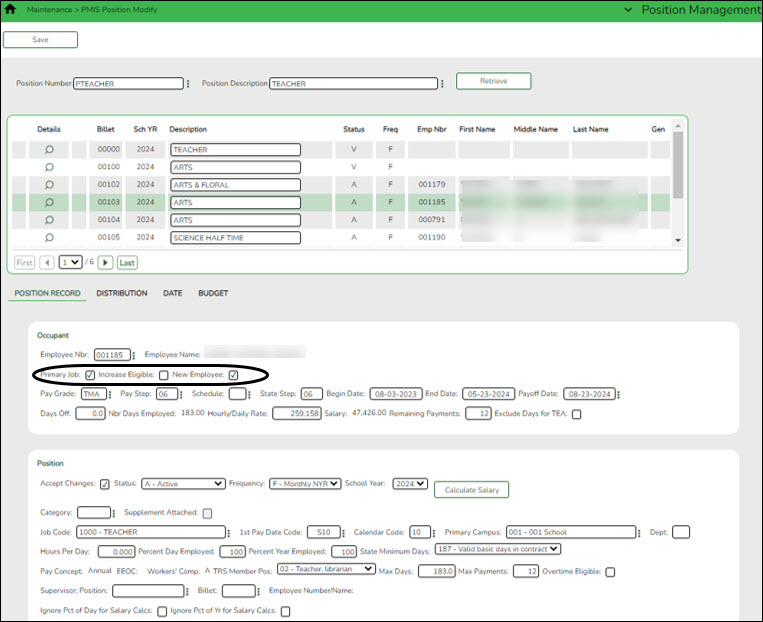
Position Management > Maintenance > PMIS Position Modify > Position RecordIf necessary, update the Increase Eligible field to identify the employees who are eligible to receive a salary increase for the new school year when running simulations. Only the employees with this field selected will receive a salary increase.
❏ Clear the Increase Eligible field for new employees who are not entitled to a salary increase. Remember that the next year Position Management pay step reflects the same current year Position Management pay step, and the step is increased in the salary simulations if the Increase Eligible field is selected.
❏ If necessary, update the New Employee field to identify new employees on forecast position records. If selected, the salary simulations will budget the employer contribution for new employees even though they do not have current year payroll records.
Notes:
This field is not displayed on supplemental position records.
If the position is changed to any status other than Active, the field is disabled.❏ Clear this field If an employee is no longer new to the LEA.
Position Management > Maintenance > PMIS Position Modify > Budget
If there are retirees who work in the LEA, confirm that the TRS Status field is set to 5 - Retired. If the TRS status is incorrect, there is a possibility that the status will be incorrect (TRS-eligible) when the employee is moved to the current year payroll.

