User Tools
Sidebar
Add this page to your book
Remove this page from your book
Set up Purchasing Options and Permissions
Use the following steps to establish the necessary settings to begin using the Purchasing application to create, submit, and approve requisitions.
These steps are performed in the Security Administration, District Administration, and Business applications.
This guide assumes you are familiar with the basic features of the ASCENDER Business system and have reviewed the ASCENDER Business Overview guide.
Set up Security Administration Roles and Users
- Manage roles and users.
Manage roles and users
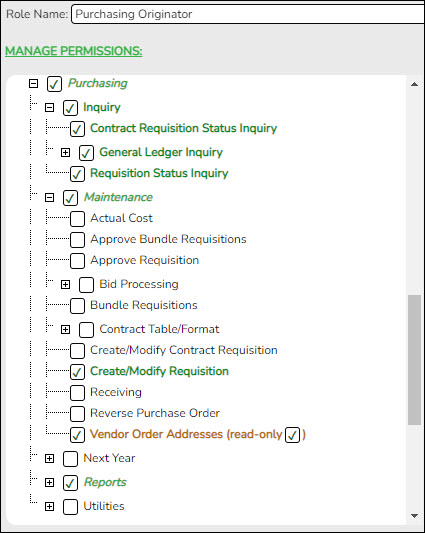
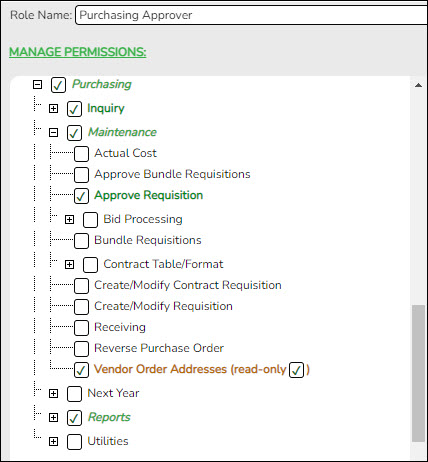
In Security Administration, set up the necessary purchasing roles (originators, approvers, etc.). Once the purchasing roles are established, assign the roles to the appropriate users. If a component (i.e., menu item) has a subcategory that is not selected, the upper-level title is displayed in italics. For example, if Utilities has sublevels, one of which has been cleared, then Utilities is displayed in italics denoting that not everything under Utilities is selected for permission.
To avoid any system issues related to roles, be sure to keep Business and Student roles separate and ensure that Business roles do not have campuses assigned.
You can generate the Security Administration > Reports > List of Users by Permission report to review user details such as the last login date and then modify as needed.
Security Administration > Manage Roles
Review the suggested minimum access for Purchasing originators and approvers.
Use the Security Administration > Manage Users page to assign the appropriate roles to the appropriate users.
Set up Finance Purchasing Options
- Set up Finance purchasing options.
Set up Finance purchasing options
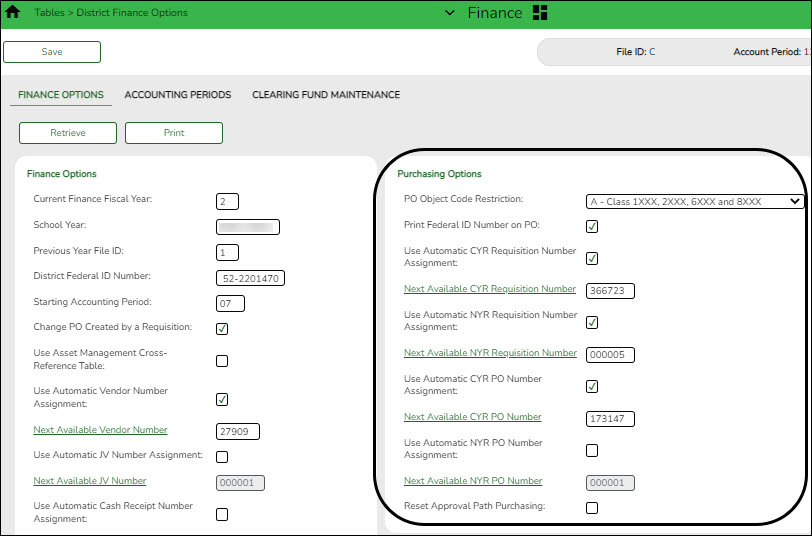
Finance > Tables > District Finance Options > Finance Options
Under Purchasing Options, complete the following fields:
- Set the purchasing accounting period.
Verify or add Purchasing accounting period
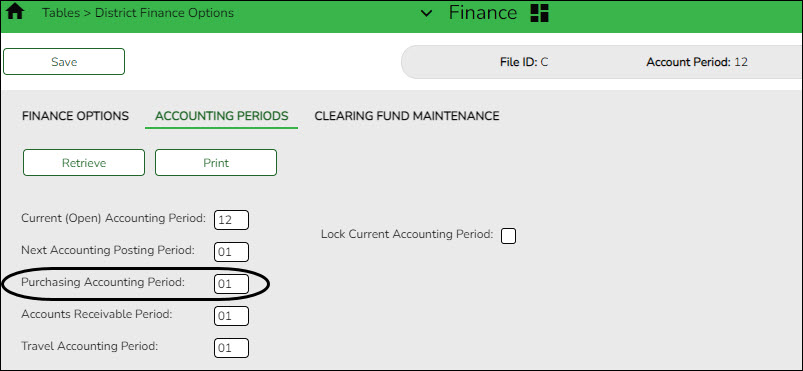
Finance > Tables > District Finance Options > Accounting Periods
Verify or add the purchasing accounting period.
Purchasing Accounting Period Type the purchasing accounting period. The field is a two-digit number from 01-12. The period can be the same as the current accounting period or the next accounting posting period. ❏ Click Save.
Set up District Administration Purchasing Options
- Add receiving addresses.
Add receiving addresses
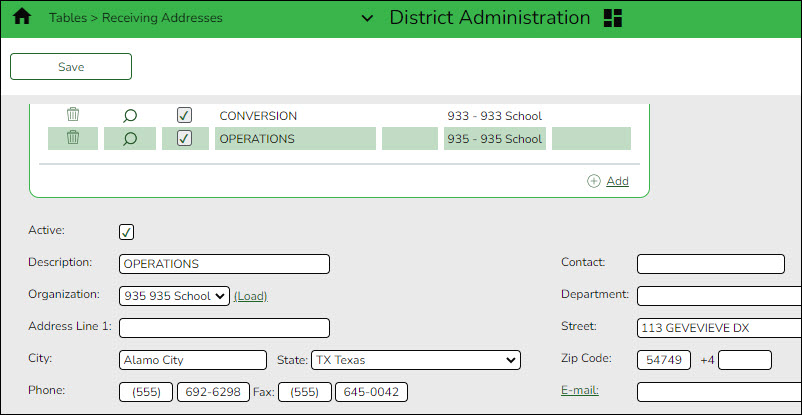
District Administration > Tables > Receiving Addresses
Create a contact list of receiving addresses for the LEA. There can be multiple receiving sites at one campus and multiple addresses for an individual.
- Set up District Administration purchasing options.
Set up District Administration purchasing options
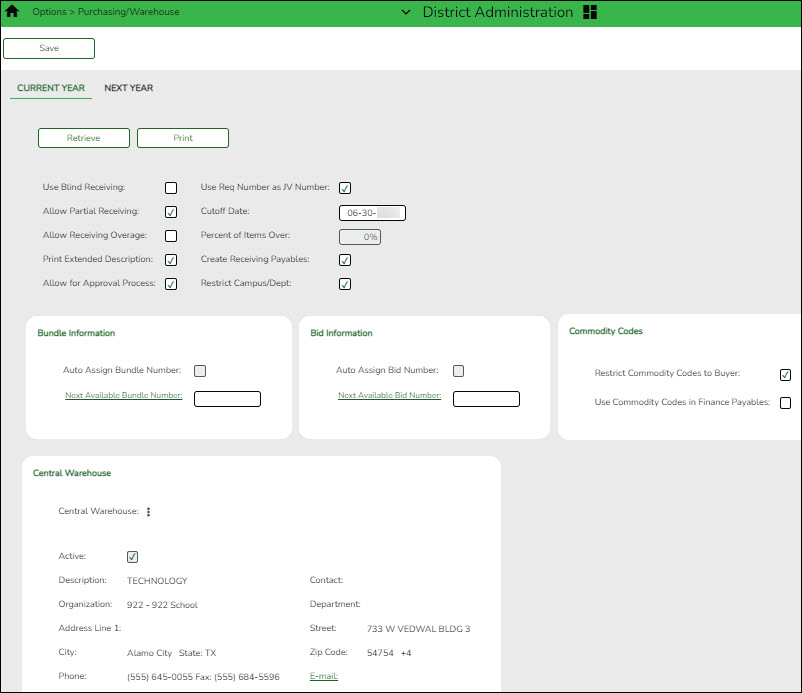
District Administration > Options > Purchasing/Warehouse > Current Year
Select the applicable options to set up purchasing tables and files for the current year. These options enable the LEA to determine how receiving is used, if requisition/purchase order numbers are automatically assigned, and if payable transactions are automatically created on the Finance > Maintenance > Pending Payables page.
Use Blind Receiving Select to hide the item quantities on the Purchasing > Maintenance > Receiving > Requisition tab.
If blank, the item quantities are displayed.Use Req Number as JV Number Select if you want to automatically populate the journal voucher numbers for general journal transactions when submitting, approving, or returning requisitions.
If not selected, the journal voucher numbers for general journal transactions are populated with RQMMDD (e.g., November 12 would be RQ1112) when submitting, approving, or returning requisitions.Allow Partial Receiving Select to receive less than the amount ordered. Cutoff Date Type the final date that the requisitions can be created in the MMDDYYYY format. When the date is less than the current date, new requisitions can no longer be created. If blank, requisitions can be entered at any time. Allow Receiving Overage Select to receive more than the amount ordered.
If selected, you have to indicate the maximum percentage of overage in the Percent of Items Over field. If the Percent of Items Over field is 100% and you ordered one item, you can receive two items.Print Extended Description Select to print the extended description on the purchase order forms. Create Receiving Payables Select to automatically create payable transactions on the Finance > Maintenance > Pending Payables page when using the receive feature.
If not selected, payable transactions are not created in Finance when using the receive feature.Allow for Approval Process Select to use the approval process in Purchasing. If this field is not selected, the Campus/Dept field is not displayed on the Purchasing > Maintenance > Create/Modify Requisition page. Restrict Campus/Dep Select to limit the campus list to the campuses listed on the District Administration > Maintenance > User Profiles > Purchasing Restrict Campus/Dept tab. By default, this field is not selected and all first approver campuses are allowed. ❏ Under Bundle Information:
Auto Assign Bundle Number Selected by default to automatically assign a bundle number when using the bundle requisitions feature.
In the Next Available Bundle Number field, type the next bundle number to be assigned or click Next Available Bundle Number to populate the next available bundle number to be assigned.❏ Under Bid Information:
Auto Assign Bid Number Selected by default to automatically assign a bid number when using the bid processing feature in Purchasing.
In the Next Available Bid Number field, type the next bid number to be assigned or click Next Available Bid Number to populate the next available bid number to be assigned.❏ Under Commodity Codes:
Restrict Commodity Codes to Buyer Select to restrict the use of commodity codes to only buyers (i.e., Buyer is selected on the District Administration > Maintenance > User Profiles > Purchasing Permissions tab). If selected, only buyers can view the Commodity Code field on the Purchasing > Maintenance > Create/Modify Requisition, Create/Modify Contract Requisition and Warehouse > Maintenance > Inventory Maintenance pages.
If Restrict Commodity Codes to Buyer is not selected, then all users can view the Commodity Code field.Use Commodity Codes in Finance Payables Select to use the commodity code functionality on the Finance > Maintenance > Pending Payables page.
❏ If selected, then:
• The Actual Cost field can be modified.
• The Net Expend Amt field cannot be modified.
• If the Freight % is greater than zero, then the Freight Amt field can be modified. If not, then the field cannot be modified.❏ If is not selected, then:
• The Actual Cost field cannot be modified.
• The Net Expend Amt field can be modified.
• The Freight Amt field cannot be modified.❏ Under Central Warehouse:
Central Warehouse Click
 to select the LEA's default receiving address. You can add or edit address information on the District Administration > Tables > Receiving Addresses page.
Note: The central warehouse address is printed in the Ship To field on the purchase order if the shipping addresses are different for each requisition in a bundled requisitions purchase order. In this case, you must indicate the requesting campus, department, and requestor in the line item comments on the purchase order. The line item comments are only printed on the District PO copy.❏ Click Save.
- Set up user profiles.
Set up user profiles
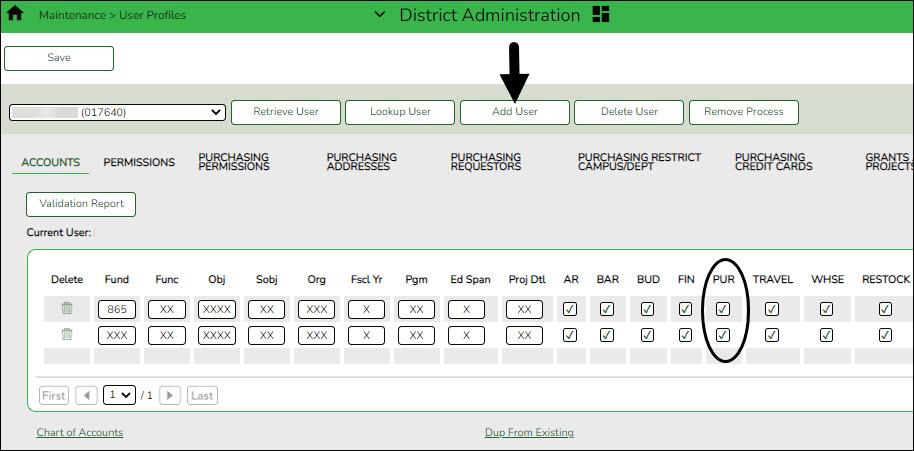
District Administration > Maintenance > User Profiles > Accounts
Establish user profiles and assign the accounts to be used in Purchasing.
❏ Retrieve a user or click Add User to add a user.
❏ Enter the accounts to which the user can access. Once the account codes/masks are entered, click Validation Report to display a detailed listing of all accessible accounts.
❏ Select PUR (Purchasing) to indicate that the user has permission to use the account in Purchasing.
❏ Click Save.
Note: You can use the Dup from Existing feature to duplicate another user's profile. This feature copies the accounts, applications, and various settings for the selected user.
- Set up purchasing permissions.
Set up purchasing permissions
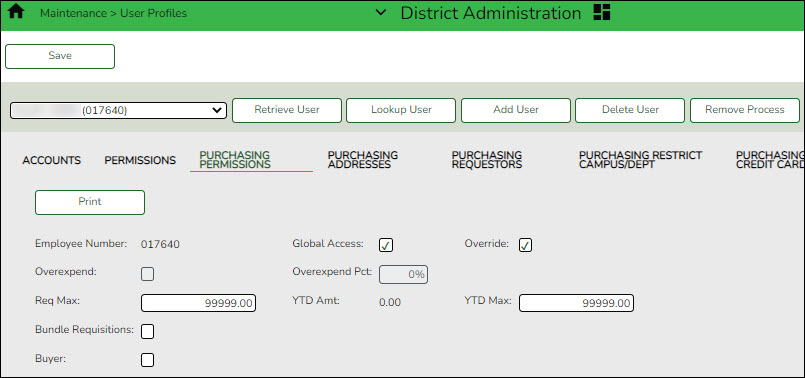
District Administration > Maintenance > User Profiles > Purchasing Permissions
Complete the applicable fields to provide additional purchasing permissions to a user who is authorized to create requisitions, approve requisitions, or inquire about requisitions.
Global Access Select to allow the user to view all account codes in reports and inquiries.
If not selected, only accounts and inquiries for the account codes listed on the user's profile (District Administration > Maintenance > User Profiles > Accounts tab) can be viewed.Override Select to allow the user to create an encumbrance that is greater than the budget amount for the account code when creating or submitting a requisition. It is important to note that the override capability is tied to the requestor (not the originator) on the Purchasing > Maintenance > Create/Modify Requisition page. When creating a requisition and this user is selected as a requestor, then the override is applicable. If this user is selected as an originator but not as a requestor, and the requestor does not have override capability, then no override occurs.
If selected, Overexpend is cleared, Overexpend Pct is reset to zero, and both fields are disabled.
If not selected and the user (originator) attempts to create an encumbrance that is greater than the budget amount of the account code for the requestor, an error message that the encumbrance exceeds the budget amount for the account code is displayed when the user (originator) attempts to submit or save the requisition. The user (originator) cannot submit or save the requisition.Overexpend Select to allow the user to expend an amount greater than what was provided in the requisition.
If selected, you must indicate the maximum percentage over the expenditure in the Overexpend Pct field. The system will calculate using any percent entered (e.g., 999%).Req Max Type the maximum dollar amount per requisition that the user is allowed to expend per requisition. Even if the user is allowed to overexpend, the user cannot exceed the amount in the Req Max field. The requisition maximum amount must be less than or equal to 999,999,999.99. YTD Amt Indicates the total dollar amount already expended by the user in the fiscal year. It also includes soft encumbrances. The field is display only. YTD Max Type the maximum dollar amount that the user can expend in the fiscal year. If the amount in the YTD Amt field is greater than the amount in the YTD Max field, the requisition is not created. The amount is based on the user, not the account. The year-to-date maximum amount must be less than or equal to 999,999,999.99. Bundle Requisitions Select to allow the user access to bundle requisitions in Purchasing. Buyer Select to identify the user as a buyer for purchasing/commodity code purposes.
If Restrict Commodity Codes to Buyer is selected on the District Administration > Options > Purchasing/Warehouse page, then only Buyers can view the Commodity Code field on the Purchasing > Maintenance > Create/Modify Contract Requisition & Create/Modify Contract Requisition pages. If Restrict Commodity Codes to Buyer is not selected, then all users can view the Commodity Code field.❏ Click Save.
- Add receiving addresses.
Add receiving addresses
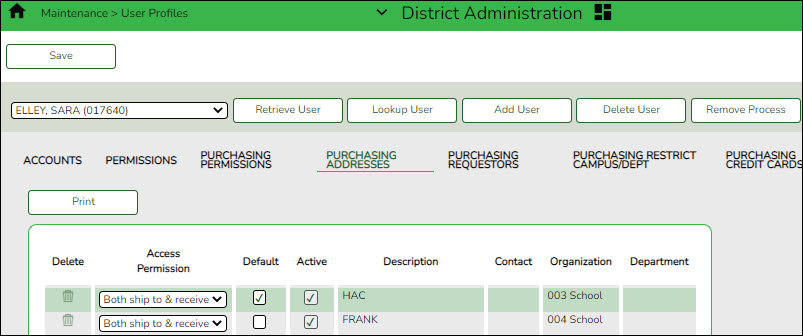
District Administration > Maintenance > User Profiles > Purchasing Addresses
Add user receiving addresses. Only one address can be selected as the default receiving address.
The Purchasing Address Directory is populated with the addresses that are established on the District Administration > Tables > Receiving Addresses page.
❏ Click +Add to add a row. The Purchasing Address Directory is displayed.
- Select the receiving address.
- Click OK.
❏ Click Save.
- Set up purchasing requestors.
Set up purchasing requestors
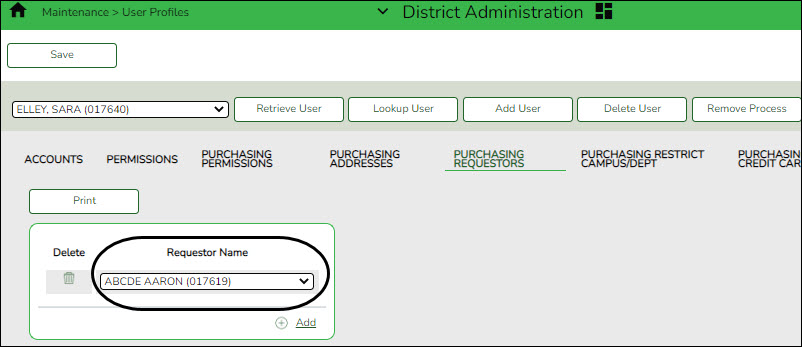
District Administration > Maintenance > User Profiles > Purchasing Requestors
If necessary, you can limit the requestors for whom the user (originator) can create or modify requisitions. The requestor must have a user profile that includes authorized accounts to expense against as well as any approvers who are associated with the requestor.
If this option is not used, an originator can select the requestor for whom they are creating the requisition on the Purchasing > Maintenance > Create/Modify Requisition page.
❏ Click +Add to add a requestor name.
❏ Click Save.
- Restrict campus/department.
Restrict campus/department
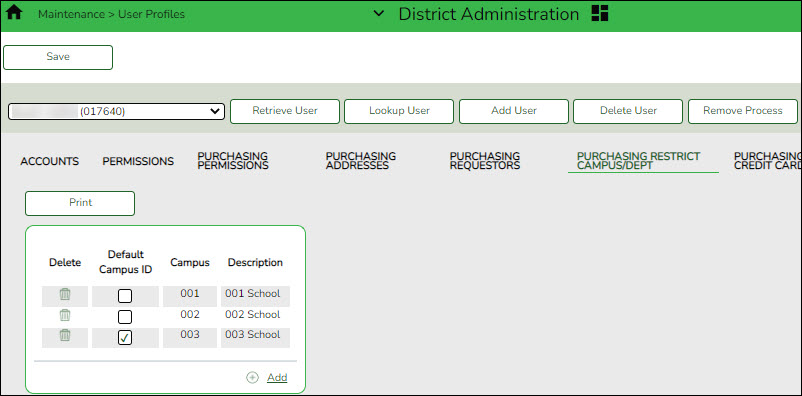
District Administration > Maintenance > User Profiles > Purchasing Restrict Campus/Dept
This tab is used to restrict users to specific first approver campuses for purchasing requisitions. This feature can only be used if Restrict Campus/Dept is selected on the District Administration > Options > Purchasing/Warehouse > Current Year page.
❏ Click +Add to add a campus. The Campus Directory is displayed.
❏ Select the applicable campus(es).
Default Campus ID Select to indicate the primary campus of the selected user. Campus The three-digit campus ID is displayed. Description The campus name associated with the campus ID is displayed. ❏ Click Save.
- Set up purchasing credit card data.
Set up purchasing credit card data
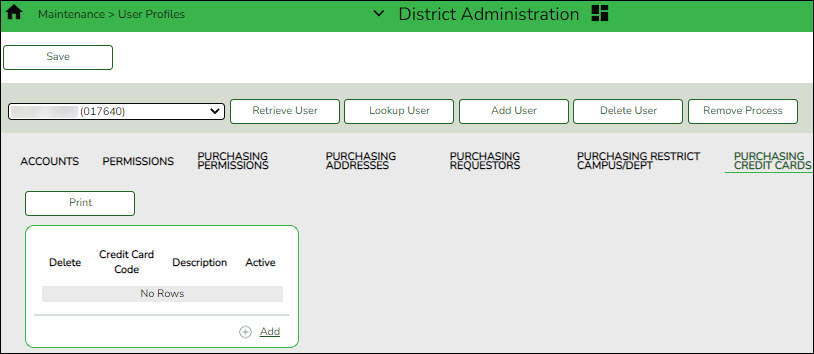
District Administration > Maintenance > User Profiles > Purchasing Credit Cards
If your LEA uses the credit card functionality and has existing credit card codes on the Finance > Tables > Credit Card Codes tab, you can assign those credit card codes to individual users. This allows users to select from a list of active and assigned credit card codes when entering requisitions on the Purchasing > Maintenance > Create/Modify Requisition page.
❏ Click +Add to add a credit card code.
Credit Card Code The user-defined credit card code is displayed. Description The user-defined credit card code description is displayed. Active Indicates the credit card code status. ❏ Click Save.
Americans with Disabilities Act (ADA) and Web Accessibility
The Texas Computer Cooperative (TCC) is committed to making its websites accessible to all users. It is TCC policy to ensure that new and updated content complies with Web Content Accessibility Guidelines (WCAG) 2.0 Level AA. We welcome comments and suggestions to improve the accessibility of our websites. If the format of any material on our website interferes with your ability to access the information, use this form to leave a comment about the accessibility of our website.


