User Tools
Sidebar
Add this page to your book
Remove this page from your book
ASCENDER - Next Year Payroll Process
Created: 03/09/2018
Reviewed: 02/21/2025
Revised: 02/21/2025
The purpose of this document is to guide you through the necessary steps to create next year's payroll. This process includes updating tables and employee information, calculating salaries, performing edits, and interfacing payroll to Budget. This process occurs in the next year and does not interfere with the current year processing.
This document assumes you are familiar with the basic features of the ASCENDER Business system and have reviewed the ASCENDER Business Overview guide.
Some of the images and/or examples provided in this document are for informational purposes only and may not completely represent your LEA’s process.
Prerequisites
Gather Beneficial Data:
This section is strictly for informational purposes.
Before performing the next year payroll process, review the following tables and gather the data that will be beneficial while you are updating this information for the new school year.
Proposed/Approved Next Year Salary Schedule
Personnel > Tables > Salaries
Once a salary table is assigned to an employee on the Payroll > Maintenance > Staff Job/Pay Data > Job Info tab, the table can be updated and salary calculations can be run for all affected employees eliminating the need to update the information for each individual employee.
Proposed/Approved Next Year Workday Calendars
Personnel > Tables > Workday Calendars > School Calendar
After receiving the upcoming approved school year calendars, you can create a calendar(s) to assist with documenting employee workdays and holidays. It is helpful to plan future pay dates and payoff dates for the next school year in advance.
Reference State Minimum Salary Schedule
Review the TEA Minimum Salary Schedules for changes effective with the new school year.
Accrual Calendar Information
Payroll > Tables > Accrual Calendars > Accrual Calendar
❏ Creating and assigning an accrual calendar to employees allows you to maintain the accrual calculations throughout the school year. You can obtain workdays by month information from the workday calendars.
❏ Be sure to keep the same accrual codes for each accrual calendar. This method allows for consistency and eliminates the need to update the information for each individual employee.
❏ Accounting for the August EOY accrued days in the accrual calendar and using the EOY Payroll Accruals process assists in properly accounting for accruals across the fiscal years.
Update Next Year Staffing Changes
When payroll opens for the next year, be sure to keep up with the following staffing updates:
- Resignations and new hires: Update the employee status as resignations and new hires are approved to allow the appropriate budget amounts to be created and interfaced.
- Campus level changes: Update the job table and employment information as jobs move from one campus to another.
- Distribution changes: Update employee distributions based on budget changes.
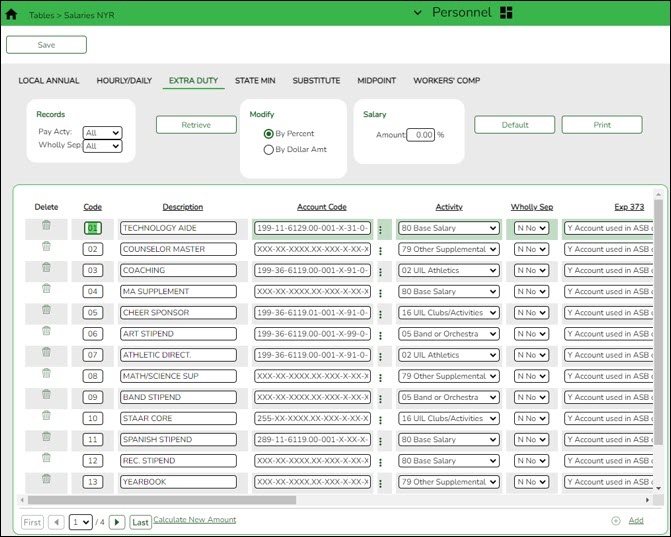
- Update extra duty/stipend pay: Update the extra duty table to reflect changes and payments. Also, update the balance on the Payroll > Maintenance > Staff Job/Pay Data > Pay Info tab. The next year payroll budget calculations use the s-type extra duty remaining amount; therefore, it is important to verify that these amounts have been updated.
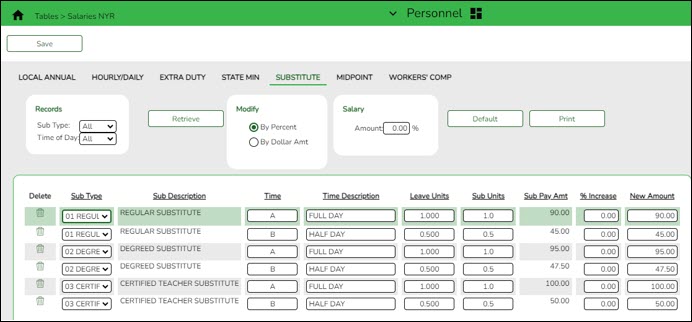
- Update substitute pay: If substitute pay rates change, update the Personnel > Tables > Salaries > Substitute tab, which is associated with entering employee substitute leave transmittals.
Extract Third Party Administrator (benefits) Information
Payroll > Utilities > Employee Benefits Interface > Extract
Perform an extract to create the files containing deductions and demographic data to be sent to the third-party vendor.
Only deduction codes that have an Extract Ded Cd (extract deduction code) on the Payroll > Tables > Tax/Deduction > Deduction Code are extracted.
After the new premiums are updated by the third-party administrator and the file is returned, you can import the updated file making the changes to the next year deductions in one step.
Payroll > Utilities > Employee Benefits Interface > Import Annual File
This utility imports the next year employee benefit choices via a file created by your third-party vendor. Importing data decreases the amount of time it takes to enter individual employee data changes.
Manage Employee Change Requests
❏ Create a form for next year employee change requests. This form assists with data entry and provides documentation.
❏ Set a deadline for employee change requests prior to the end of the current school year to allow time for clarification if needed.
❏ Update employee direct deposit information. Use caution when updating this information in the next year frequency as the system will prompt you to update this information in the current year frequency.
❏ If your LEA has not already done so, set up the EmployeePortal application. EmployeePortal allows employees to submit demographic changes and payroll (W-4 and direct deposit) changes. LEA-defined options determine what changes can be made by the employee and the necessary approvals.
Before You Begin
Things to Remember Prior to Beginning NYR Payroll
❏ Ensure open communication exists between the payroll office and business office.
- Verify that the Budget process is complete and the budget is open.
- Set potential deadlines for various presentations.
❏ Verify that you are logged on to the current pay frequency.
❏ Remember: Next year calculations and distributions are validated to the new budget (N). Make sure that the fiscal year on the distribution pages matches what is in the new budget (N). If it changes during the process, perform a mass update.
Current and Next Year Shared Pages
The following pages are shared between the current year and next year. Use Caution when updating these pages in the next year:
- Personnel or Payroll > Tables > District HR Options
- Personnel > Tables > Credential
- Payroll > Tables > Tax/Deductions
- Payroll > Tables > Bank Codes
- Personnel > Maintenance > Staff Demo (all tabs)
- Personnel > Maintenance > Employment Info
Reminders
- New employees must have a Unique ID. Create a Personnel record and copy it to NY Payroll to ensure that they are included in the Unique ID Extract.
- Do not update years of service or leave until Service Records have been created. This usually occurs between the June and July payrolls and is covered in the Service Record guide.
- Medicare On-Behalf is usually posted to the TRS website in late summer. In most cases, a reminder is sent by your ESC so you can book actuals to Finance for the year and create a budget for next year.
- Remember to update NY Payroll in Budget periodically to ensure that changes are updated. This allows Budget to remain as current as possible.
Extract IDs
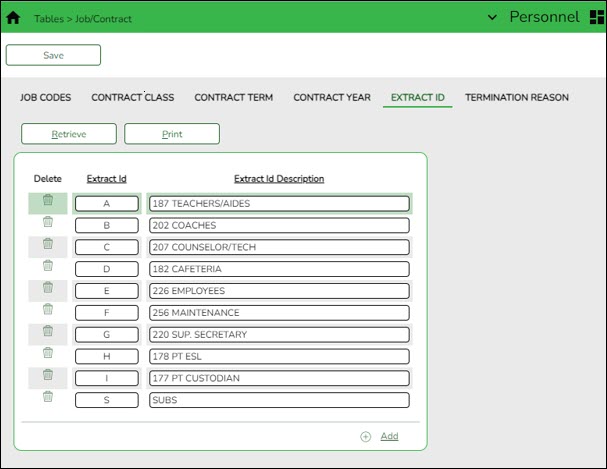
Extract IDs can be used to group similar employees to allow for easier and more accurate mass updates. For example, most 187-day teachers/aides have the same contract Begin and End Dates, same Calendar Code, and the same Payoff Date, which may allow them to be grouped together by extract ID making it easier to select that group of employees when performing Mass Updates.
To use extract IDs:
Personnel > Tables > Job/Contract > Extract ID
❏ Add or modify extract IDs.
These extract IDs must meet your LEA's criteria so it is important for the Payroll and Personnel departments to communicate about the setup and use of extract IDs.
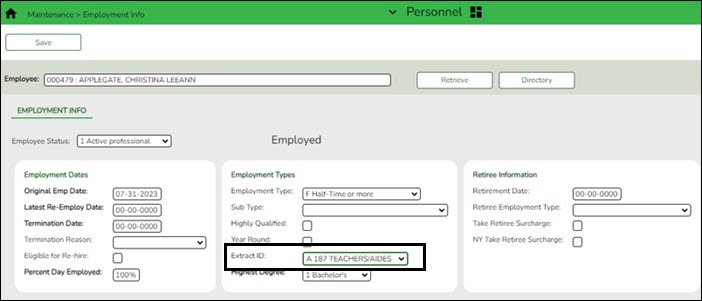
Personnel > Maintenance > Employment Info
❏ After extract IDs are established, assign or modify the extract IDs for each individual employee record.
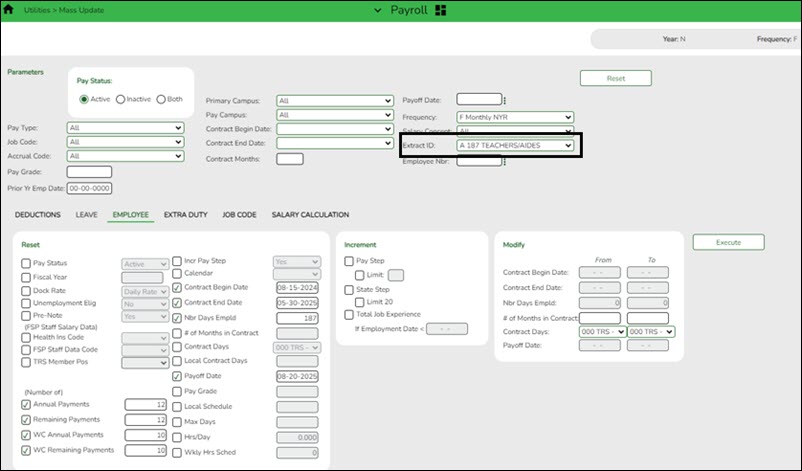
Payroll > Utilities > Mass Update
❏ After extract IDs are assigned as needed, select the applicable Extract ID and run the necessary mass update for a specified group of employees. Extract IDs can also assist in sorting and filtering report data.
Personnel > Reports > User Created Reports
If your LEA uses extract IDs to group employees for mass updates, generate a user-created report to verify that extract IDs are correctly assigned to employees.
If extract IDs are missing or need to be changed, you can manually update individual employee records using the Personnel > Maintenance > Employment Info page.
Next Year Payroll Process
- Verify August EOY payroll accruals.
Verify August EOY payroll accruals
This step applies to LEAs that included non-accrued employees in the EOY payroll accrual process.
❏ If ASCENDER is used for the EOY payroll accruals, verify that the accrual reversal process was completed in September 2024.
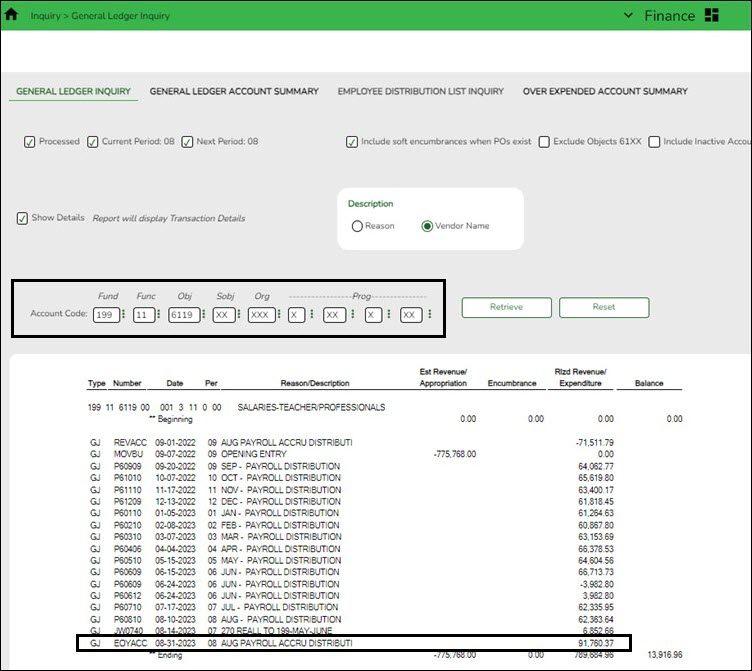
Log on to Finance file ID 4.
Finance > Inquiry > General Ledger Inquiry > General Ledger Inquiry
- Type 199.11.6119 or 199.00.2161 in the Fund, Function, and Object Code fields.
- Leave all other fields masked (Xs).
- Click Retrieve.
- Verify that “Payroll Accrual” (or an LEA-defined description) with a positive expenditure amount was posted (typically in August 2024).
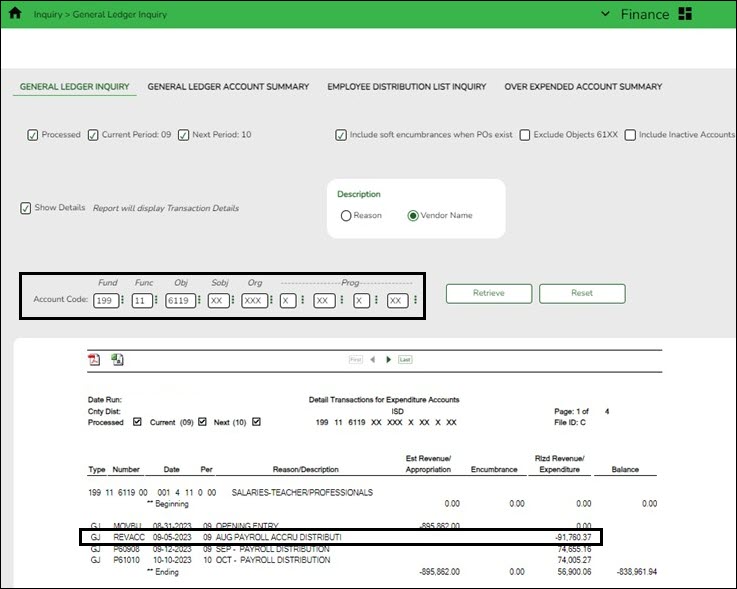
Log on to Finance file ID C.
Finance > Inquiry > General Ledger Inquiry > General Ledger Inquiry
- Type 199.11.6119 or 199.00.2161 in the Fund, Function, and Object Code fields.
- Leave all other fields masked (Xs).
- Click Retrieve.
- Verify that “August Payroll Accru” (or an LEA-defined description) reversal entry with a negative expenditure amount was posted (typically in September 2024).
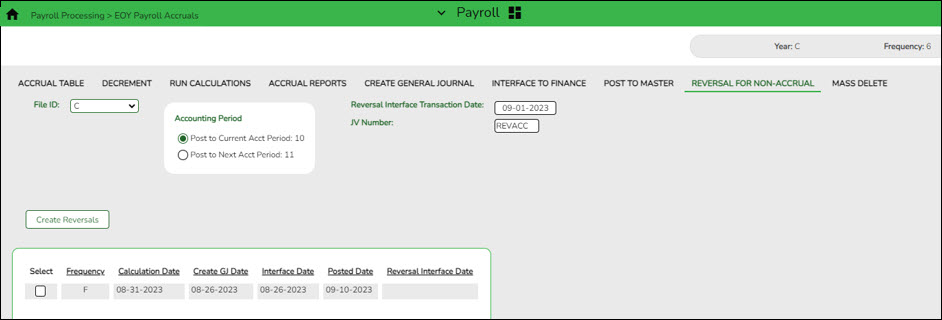
❏ If ASCENDER is not used for the EOY payroll accruals (days worked in August), there is no computer journal entry. Verify that the manual JV entries were posted for EOY payroll accruals.❏ If a reversal entry is not displayed, use the Payroll > Payroll Processing > EOY Payroll Accruals page to complete the process.
- Clear next year tables.
Clear next year tables
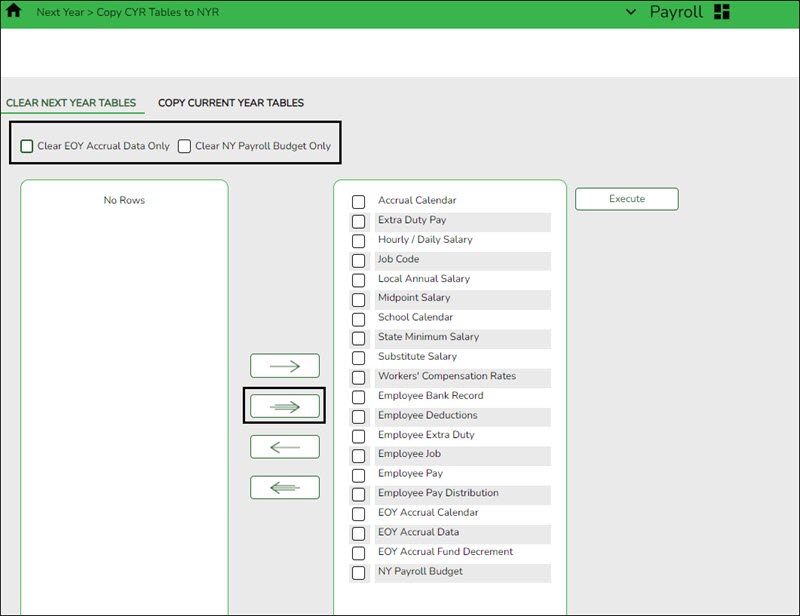
Payroll > Next Year > Copy CYR Tables to NYR > Clear Next Year Tables
Log on to the current pay frequency.
If the next year payroll process was used last year and those records were not cleared, use the following steps to clear the records.
❏ Do not select the Clear EOY Accrual Data Only and Clear NY Payroll Budget Only fields. The EOY accrual data and next year payroll budget data is cleared whether or not these fields are selected.
❏ Move all of the tables from the left side to the right side of the page.
❏ Click Execute. All existing employees are deleted from the next year payroll files and a clean work file is now available allowing you to begin building next year data.
Note: This process clears all tables in all pay frequencies; therefore, it is only necessary to perform this process in one pay frequency even if your LEA has multiple pay frequencies.
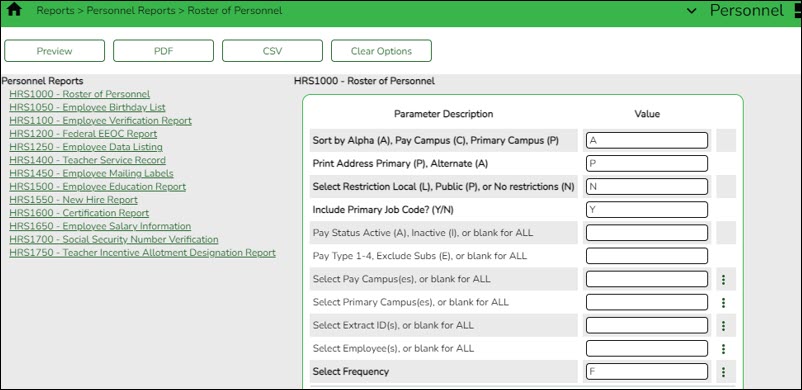
This process can be verified by logging on to the next year pay frequency and running the Personnel > Reports > Personnel Reports > HRS1000 - Roster of Personnel Report for active and inactive employees. The report results should be blank.
- Copy current year tables.
Copy current year tables
Payroll > Next Year > Copy CYR Tables to NYR > Copy Current Year Tables
Log on to the current pay frequency.
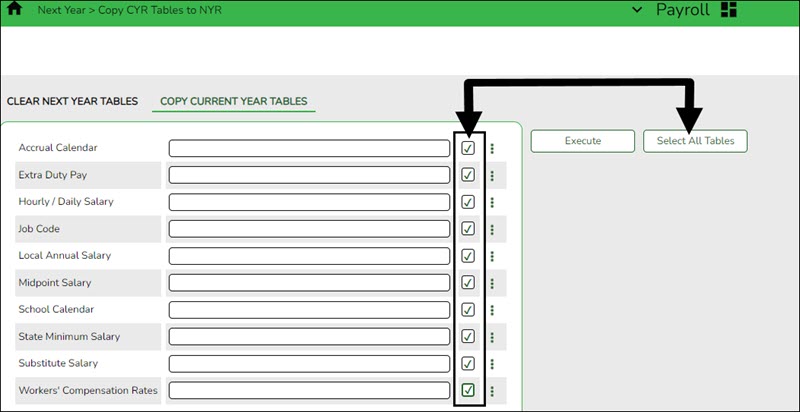
❏ Click Select All Tables to select all current year tables to be copied to the next year. It is recommended that all tables are copied so that you have immediate access to any selected table.
- This process copies all tables (except the school calendar table) for all next year pay frequencies, regardless of the pay frequency to which you are logged on.
- To copy the school calendar, log on to each pay frequency to do so. The school calendar is not copied, only the calendar code and the calendar description are copied.
❏ Click Execute. A separate preview report is displayed for each selected table.
❏ Click Process on each report page to copy the table. Or, click Cancel not to copy the table. A message is displayed indicating that the tables were successfully copied. Click OK.
- Copy current year staff to next year.
Copy current year staff to next year
Payroll > Next Year > Copy CYR Staff to NYR
Log on to the current pay frequency.
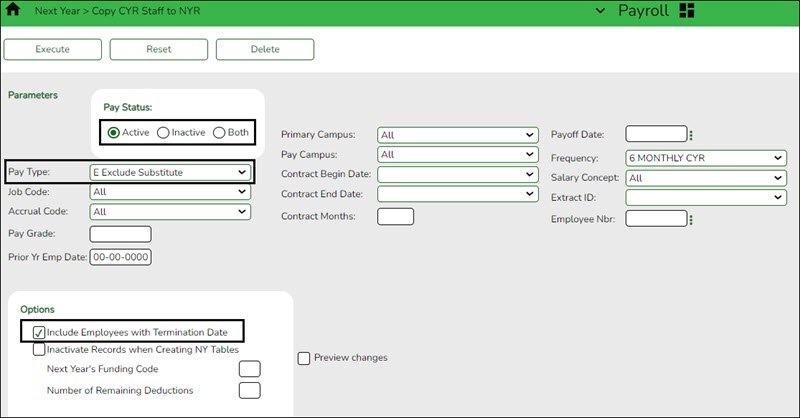
Copy the employees from the current year payroll to the next year payroll. If you have multiple pay frequencies, complete this task in all pay frequencies.
Reminder: Be aware of where the budget is in terms of the fiscal year.
What happens?
A complete copy of the current employee record is moved to the next year. Employees can be inactivated or activated when copying to the next year and those with termination dates can also be included in the copy process. When copying, you can change the fiscal year in distribution as well as the remaining deductions in the employee master record. If you update the number of remaining deductions, all deductions on the employee Deduction tab are updated to the designated default value. Be careful of deductions that should not be activated for the next year and those that the number of remaining deductions should be different from the default value and perform any necessary cleanup. The Payroll > Utilities > Mass Update tabs can be used to modify remaining payments for deduction codes.
If this process is performed multiple times for employees without deleting their NYR records, the system either updates or inserts distribution records from CYR to NYR and cleanup may be necessary.
Employees in the next year must be active to extract distribution information to Budget. If you do not activate employees when copying to next year, you can activate them when you perform a mass update.
❏ Under Pay Status, select Active to copy only active employees.
❏ In the Pay Type field, select E Exclude Substitute.
❏ Under Options:
- It is recommended to select Include Employees with Termination Date to copy active employees with a termination date on the Personnel > Maintenance > Employment Info tab.
- Do not select Inactivate Records when Creating NY Tables.
- In the Next Year's Funding Code field, type the fiscal year to be used when updating the distribution account code fiscal year in the next year employee master distribution records.
Leave blank if the distribution account code fiscal year in the next year employee master distribution record is to remain the same as the current fiscal year until the next year budget is in place. Then, use the Mass Update utility to update to the correct fiscal year. - It is recommended that the Number of Remaining Deductions is left blank to copy deductions with the number of remaining deductions as they exist in the current pay frequency.
❏ Click Execute. If the process is successful, a preview report is displayed. Review the employee list to verify that the correct data was copied to the next year records. Also, review the total employee count at the end of the report.❏ Click Process to accept the changes and continue. A message is displayed indicating that the process was completed successfully. In addition, a list of the database record tables that were copied is displayed. Click OK.
❏ Click Cancel to return to the Copy CYR Staff to NYR page without making the changes.
Prior to continuing this process, log on to the next year pay frequency.
- Generate reports to verify employee data.
Generate reports to verify employee data
Generate the following reports to assist in verifying employee data.
- Personnel > Reports > Personnel Reports > HRS1000 - Roster of Personnel - If an employee was not copied over to the next year, run the Copy CYR Staff to NYR utility again for only the single employee.
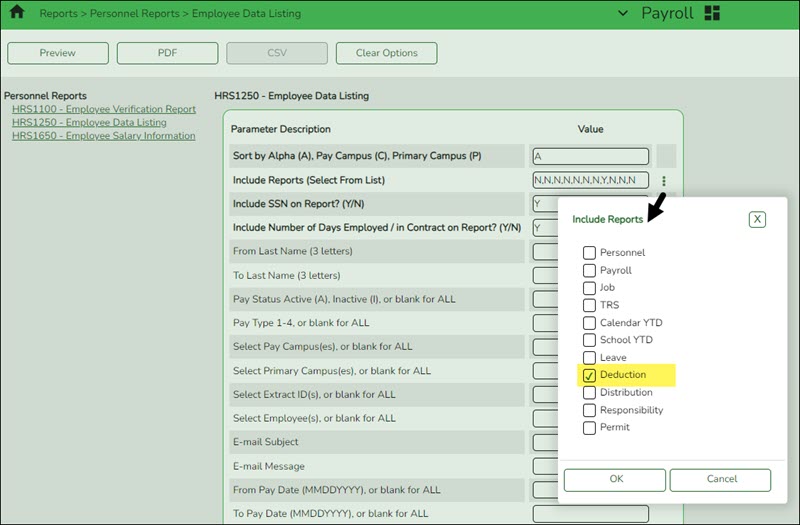
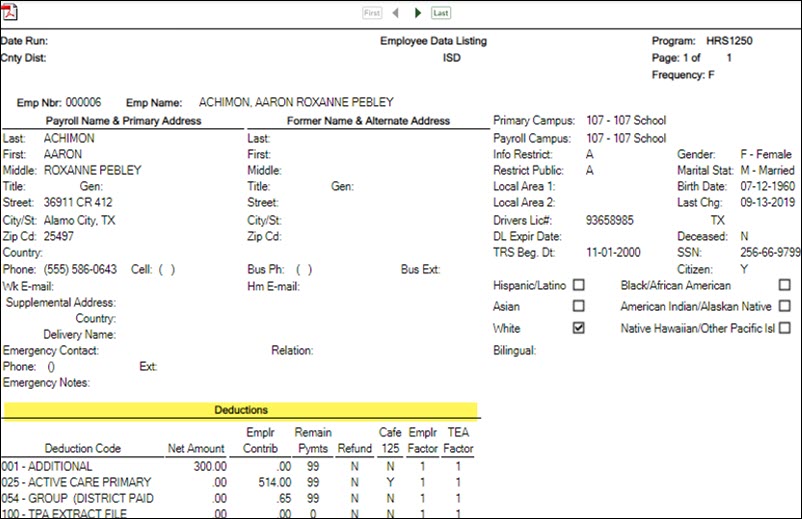
- Payroll or Personnel > Reports > Personnel Reports > HRS1250 - Employee Data Listing - This report can be used to verify deduction information and is available in Personnel or Payroll. Run the report with only the Include Reports parameter set to Deductions. A user created report can be created to only include deduction information. It can be sorted by deduction code and remaining payments.
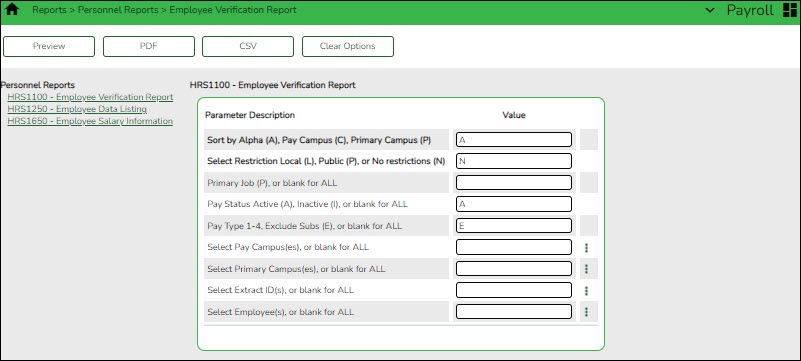
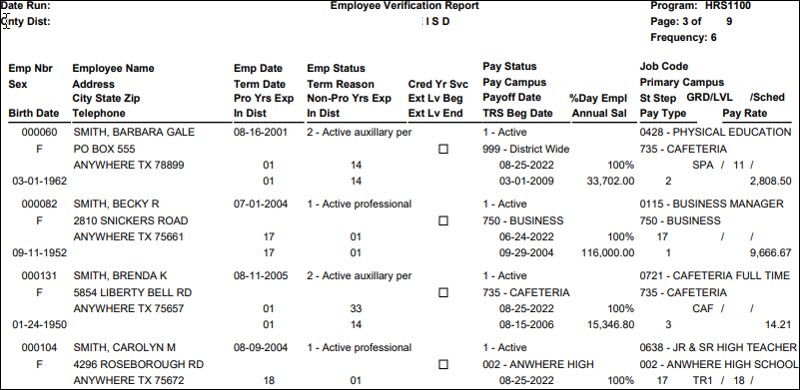
- Payroll or Personnel > Reports > Personnel Reports > HRS1100 - Employee Verification Report - This report provides detailed employee data such as employment dates, salary, address, and other information for reference or to verify recent input and processing.
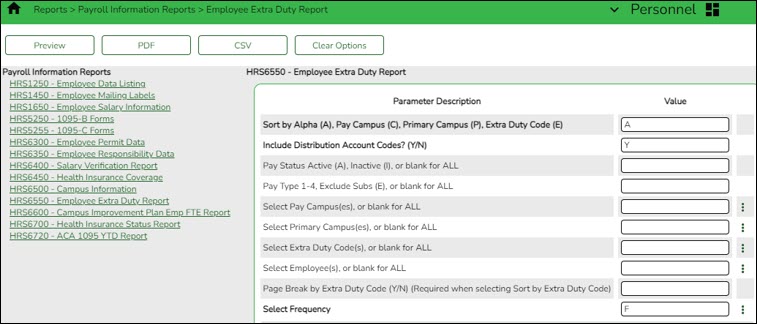
- Personnel > Reports > Payroll Information Reports > HRS6550 - Employee Extra Duty Report - The report lists all employees with extra duty codes on the Pay Info tab. The report can be sorted by name, campus, or extra duty code. The Include Distribution Account Codes parameter includes S-type distributions for the selected employees.
- Update employee credentials.
Update employee credentials
Personnel > Tables > Credential
Update the Credential tabs as needed. This information is used to maintain teacher credentials, is usually done by the personnel department and does not affect salary calculations.
The Credential tabs are shared between the current year and next year records; therefore, changes to the current year records are effective in the next year records, and vice versa.
Note: The Teaching Specialization tab is used to report Pre-K teachers for Class Roster so if there have been changes, you can make those updates now in anticipation of the submission.
- Update next year salary tables.
Update next year salary tables
Personnel > Tables > Salaries NYR
Update the following next year salary tables to reflect any changes to the salary schedules (anticipated or known).
These tables are not shared between the current year and next year records.
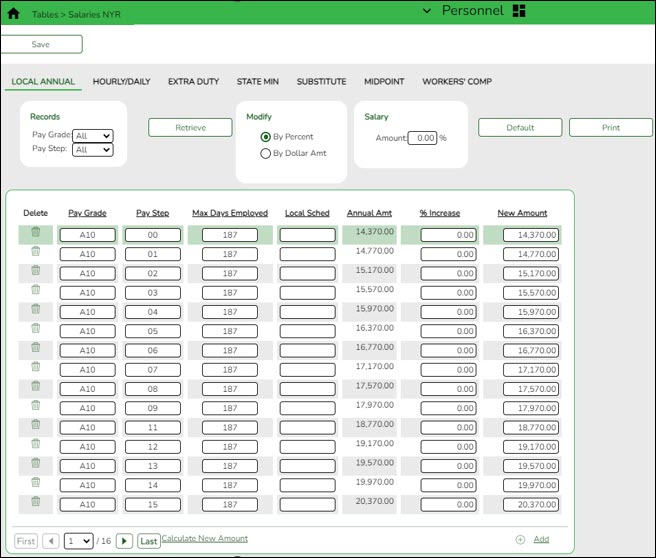
Personnel > Tables > Salaries NYR > Local Annual
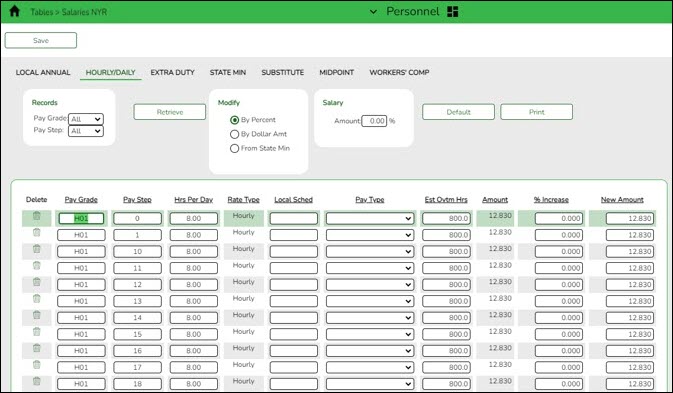
This tab is the most commonly used. You can make mass updates by percent or dollar amount, or by employee. To see a change before saving the record, enter the change and click Default. The original annual amount is displayed in the Annual Amt column, the percent or dollar is increased, and the New Amount is displayed. Click Save. If decreasing a salary, enter a negative percent or dollar amount.
On the Personnel > Tables > Job/Contract > Job Codes tab, this salary concept can be attached to the applicable job(s). When the job is selected on the Job Info tab, the system populates the Base Annual field automatically in the Daily Rate section on that page and can calculate the daily rate based on the number of days employed. In addition, when the Mass Update Salary Calculations feature is used, the system uses this table to extract the correct salary information, perform calculations, and populate many fields on the Job Info tab.
Personnel > Tables > Salaries NYR > Hourly/Daily
The Hourly/Daily and Midpoint tabs can be updated in the same way if used by your LEA.
Personnel > Tables > Salaries NYR > Extra Duty
Personnel > Tables > Salaries NYR > State Min
This tab is updated via a file upload when applicable. These instructions are sent separately with the file as needed.
Personnel > Tables > Salaries NYR > Substitute
This tab can be manually updated as needed.
- Update job code table.
Update job code table
Personnel > Tables > Job/Contract NYR > Job Codes
Add or update job codes as needed.
The job codes table is not shared between the current year and next year records.
❏ Select the appropriate Salary Concept for each job.
❏ (Optional) Update the distribution Account Code fields.
Notes:
- In the FTE Hrs field, type the appropriate full-time hours for each job code. Effective September 2017, the scheduled weekly hours are used by TRS reporting.
- You can assign accrual codes, Workers’ Comp codes, and FTE hours to lessen the workload when completing tabs for new employees.
- Create calendars.
Create calendars
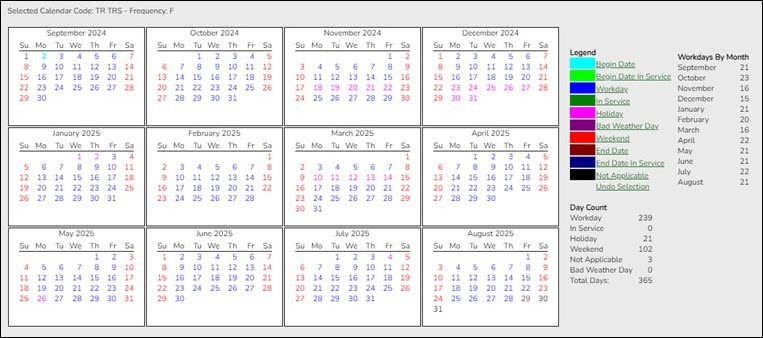
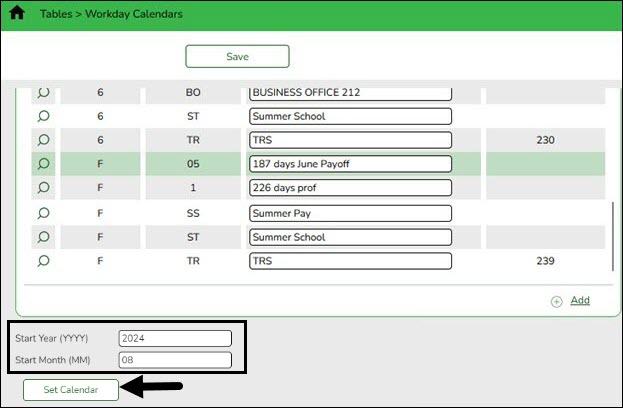
Personnel > Tables > Workday Calendars > School Calendar
Only complete this step if it is applicable to your LEA. All LEAs must create a TR calendar.
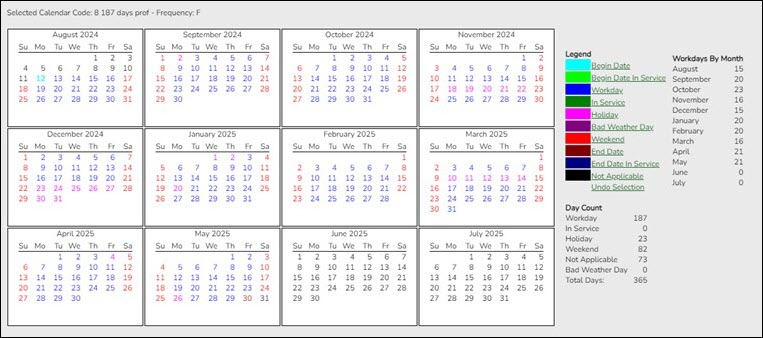
Create school calendars to accommodate the varied number of days employees work at the LEA. The calendar is used on the Payroll > Maintenance > Staff Job/Pay Data > Job Info tab to calculate the Number of Days Employed field if the beginning and ending contract dates are entered. Additionally, using a calendar can provide an easier way to manage payoffs and verify your accrual days.
Notes:
- Calendars tied to a numeric frequency (e.g., 6) are used for current year.
- Calendars tied to an alpha frequency (e.g., F) are used for next year. Use the spyglass to create or edit calendars as needed.
- You can copy calendars that begin in the same month. Example: If you create the 10-month calendar beginning in August for teachers for 187 days, you can copy the calendar to the Food Service and Bus Driving calendar codes, and then edit them to reflect the differences such as begin dates and holidays.
❏ Create calendars with the same calendar code as the current year to avoid having to update the calendar code on the individual employee's job info record.
❏ Select the calendar to be updated.
Start Year Type the starting calendar year in the YYYY format. Start Month Type the starting calendar month in the MM format (e.g., 07 for July). ❏ Click Set Calendar to display the calendar. The calendar is rearranged to begin with the entered starting month.
It is recommended that you build the calendar with the greatest number of days worked first, and then use the Copy School Calendar tab to build other calendars by making modifications to the original.
IMPORTANT:
- For TRS purposes, a TR calendar with a calendar code of TR must be created for all available workdays beginning 09/01. (TIP: If 9/01 falls on a weekend day, select the first working day of the month.) The TR calendar is used to populate the number of days worked on the RP report for employees who are not assigned to a school calendar
- For TRS purposes, ASCENDER submits retirees' contract days one month at a time. This allows maintenance on the reporting of half time or full time from month to month on retirees.
- Update staff demographic data.
Update staff demographic data
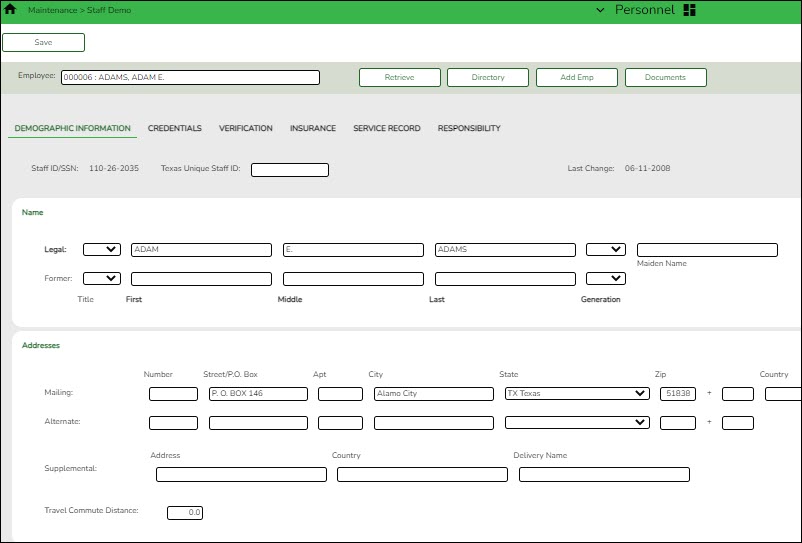
Personnel > Maintenance > Staff Demo > Demographic
❏ Add new employees or update existing employees. Refer to the ASCENDER - New Employee Setup guide for additional information about adding new employees.
The Staff Demo information is shared between the current year and next year records; therefore, changes to the current year records are effective in the next year records and vice versa.
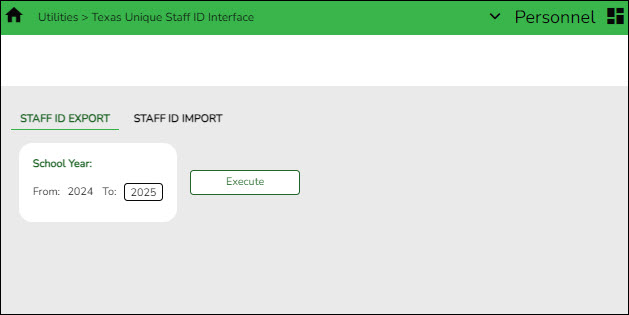
Remember: All employees must have a TX Unique ID number. The TX Unique ID number can be extracted on the Personnel > Utilities > Texas Unique Staff ID Interface > Staff ID Export tab.
❏ Save the file and forward it to your District PEIMS Coordinator to be processed.
- Update employment info.
Update employment info
Personnel
Add or update employee information.
Personnel > Maintenance > Employment Info - This tab is shared between the current year and next year records; therefore, changes to the current year records are effective in the next year records and vice versa.
❏ Select the NY Take Retiree Surcharge field to include the retiree surcharge when the Extract Payroll to Budget process is performed.
Note: If service records have not been created, do not update data such as the Percent Day Employed, Years Experience and Grade(s) Taught fields for existing employees.
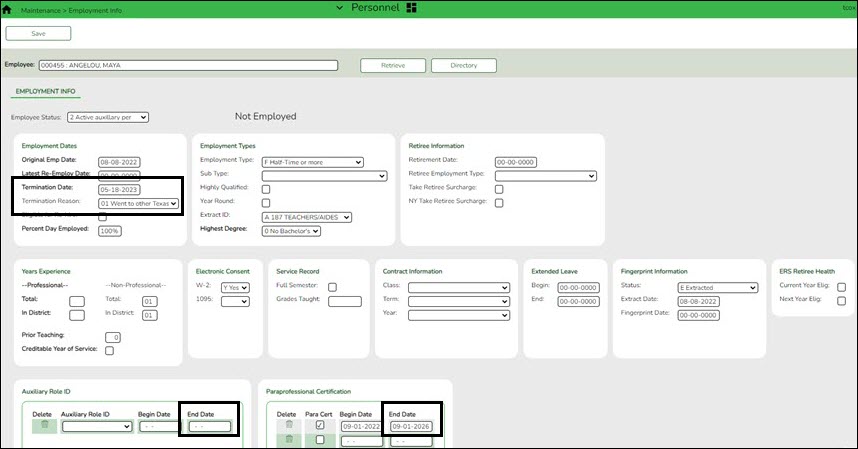
Terminated Employees
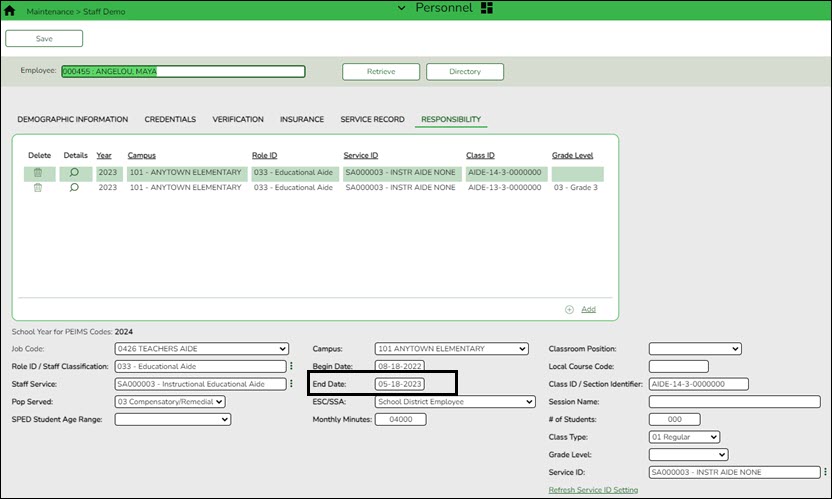
It is best practice to not only update the Termination Date and Reason but, if applicable, update the Auxiliary Role ID and Paraprofessional Certification End Date.
Personnel > Maintenance > Staff Demo > Responsibility
In addition, update the End Date on the employee's responsibility record.
- Update tax/deductions.
Update tax/deductions
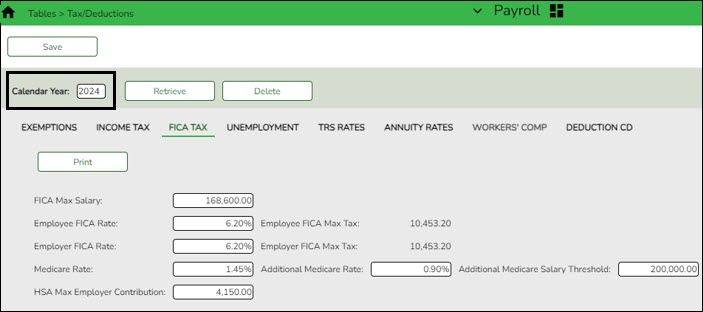
Payroll > Tables > Tax/Deductions > FICA Tax
Retrieve the FICA rates for the 2025 calendar year and print a copy for reference. Then, retrieve the 2026 calendar year record and manually enter the 2025 rates for 2026 and click Save.
CAUTION: Be sure to retrieve the 2026 year record prior to updating this tab.
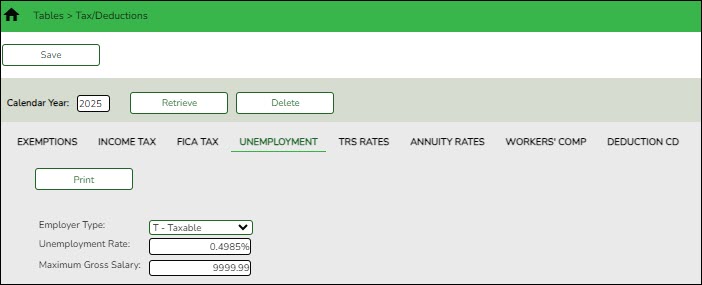
Payroll > Tables > Tax/Deductions > Unemployment
If your LEA allows ASCENDER to calculate unemployment, select T - Taxable in the Employer Type field and enter the Unemployment Rate. Type the percent rate determined or assigned by the TWC (e.g., 0.4985% for 0.004985).
The rates displayed in the below image are sample rates. Only use the rates provided by the Texas Workforce Commission (TWC).
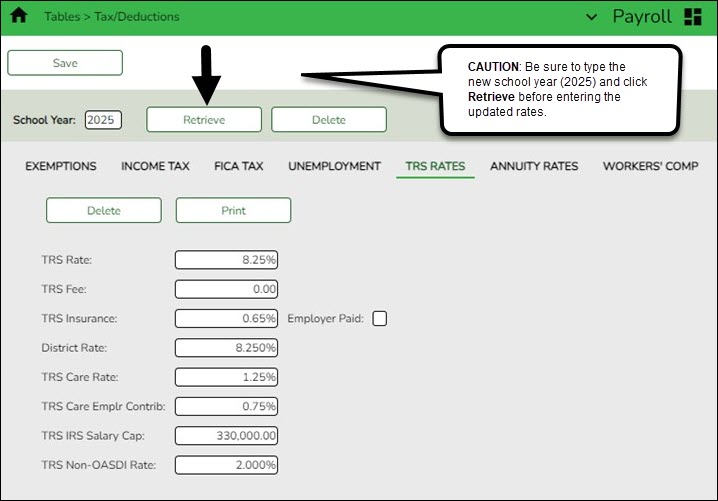
Payroll > Tables > Tax/Deductions > TRS Rates
Update the TRS rates.
CAUTION: Be sure to retrieve the 2026 data prior to updating this tab.
IMPORTANT: Be sure to visit the following TRS websites: https://www.trs.texas.gov/Pages/re_contribution_rates.aspx and https://www.trs.texas.gov/Pages/re_salary_cap_provision.aspx to obtain the updated rates for the next school year, and then return to this table to update the new rates.
Note: The below image displays the TRS rates for the 2024-2025 calendar year. This image will be updated to reflect the TRS rates for the 2025-2026 calendar year as soon as they are published.
❏ To create a new TRS rates record, type the new year (2026) and click Retrieve. A message is displayed indicating that the new record is populated based on the prior year's (2025) TRS rates record, click Save to retain the record.
❏ Complete the applicable fields. This information is used when performing calculations and extracts to Budget.
Payroll > Tables > Tax/Deductions > Deduction Code
❏ Update the deduction codes. The Deduction Code tab is shared between the current year and next year records; therefore, changes to the current year records are effective in the next year records, and vice versa.
- (Optional) Update accrual calendars.
(Optional) Update accrual calendars
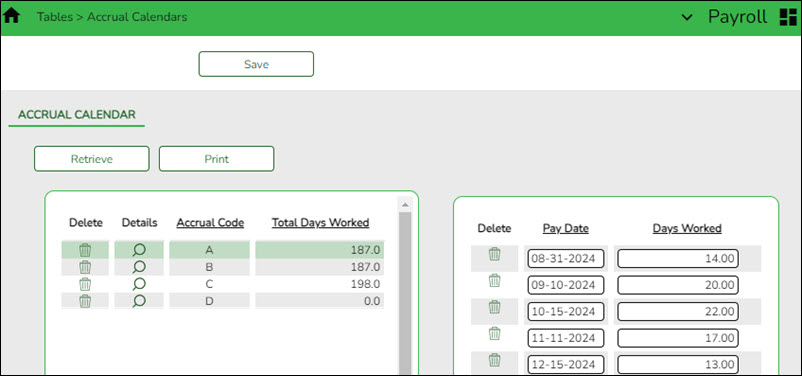
Payroll > Tables > Accrual Calendars > Accrual Calendar
This step is for LEAs that perform monthly accruals.
Create accrual calendars to accommodate the varied number of days employees work at the LEA. The calendar is used on the Payroll > Maintenance > Staff Job/Pay Data > Job Info tab to calculate the Accrual Rate when the calendar code is entered in the Accrual Info section.
Verify that the calendar code reflects the actual number of days the employee will work for the new school year; otherwise, the salary amount that should accrue over the school year will be incorrect.
- You can use the school calendar created in the previous step to get the actual workdays by month.
- If you have not set up the budget for the 2025-2026 school year, you can only enter pay dates through the 2025 calendar year. If the budget is set up for the 2025-2026 school year, you can enter 2026 pay dates in these fields.
Notes:
- This table can be updated after the move to current. All pay dates should be entered even if zero days are accrued (e.g., summer months).
- Most districts only accrue 10-month employees. If that is true for you, each code should begin with August 31 and show the number of days that group of employees will work in August. Add 12 more lines and enter the true/regular Pay Dates. Enter the days employees work in the month associated with each pay date.
- Typically, July and August (and sometimes June) will show the pay date and zero days, but they still must be included.
- Dates used (with the exception of August 31) must match the Pay Dates that will be built in the Pay Date Table.
- (If applicable) Mass update employer contribution and remaining payments.
(If applicable) Mass update employer contribution and remaining payments
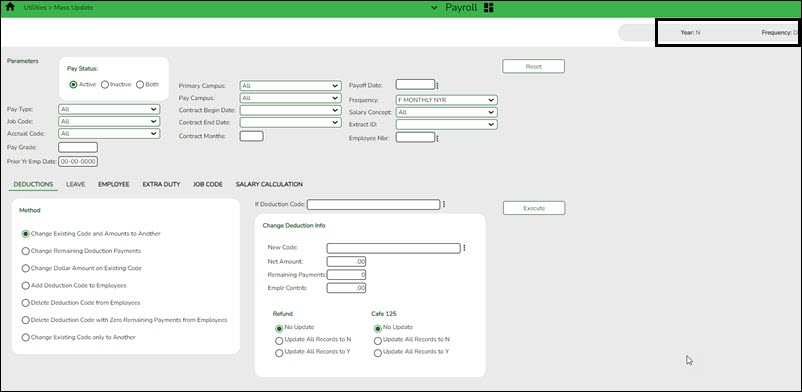
Use the Mass Update utility to update employee data in preparation for the new school year. This utility allows you to quickly and easily mass change data resulting in minimal manual changes to individual employee records with less possibility of manual entry errors.
CAUTION: To avoid entering data in an incorrect pay frequency, be mindful of the pay frequency to which you are logged on as you may be changing back and forth between the current year and next year's pay frequencies for several months.
If applicable, mass update the Employer Contribution and Remaining Payments for all employees with health care and other employer paid deductions.
It is recommended to update the number of remaining payments for deductions to ensure they are fully budgeted for.
This utility is used to update deductions for a number of employees at a single time. Deduction data may be updated by a variety of criteria including pay type, pay grade, primary campus, and pay frequency. The Deductions tab allows users to add, change, and delete deduction codes as well as alter the number of remaining payments and the existing dollar amounts associated with the deductions. Mass deduction updates are very useful at the beginning of the year when many employees are being added to insurance programs. Once deductions are added using this tab, they are reflected in the individual deduction records.
❏ Under Parameters, select the employees whose deduction data is to be changed.
TIP: Prior to processing a mass update, capture a screenshot of the parameters used for future reference.❏ Under Method, select the type of deduction change to be implemented.
❏ Click Execute. A preview report is displayed. Review the report.
❏ Click Process to accept the changes and continue. Or, click Cancel to return to the Mass Update page.
- Mass update pay and state step fields.
Mass update pay and state step fields
Use the Mass Update utility to update employee data in preparation for the new school year. This utility allows you to quickly and easily mass change data resulting in minimal manual changes to individual employee records with less possibility of manual entry errors.
CAUTION: To avoid entering data in an incorrect pay frequency, be mindful of the pay frequency to which you are logged on as you may be changing back and forth between the current year and next year's pay frequencies for several months.
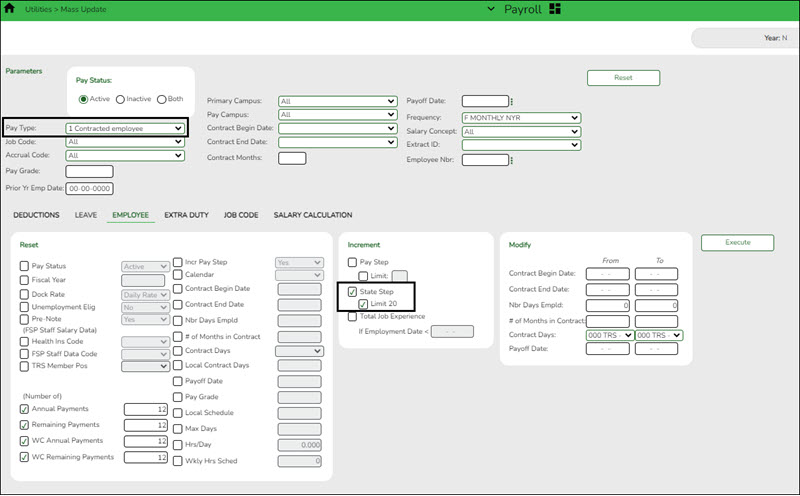
Mass update the Pay Step and State Step fields for all employees tied to a salary table. This allows preliminary payroll data to be sent to Budget as a starting point.
Consider repeating this step as follows for each pay type to ensure that all employees are incremented properly.
• For Pay Type 1 (Contracted Employees), increment once for both the Pay Step and State Step.
• For Pay Type 2 (Non-contracted Employees), only increment the Pay Step for these employees as they are not subject to Stat Min making the State Step unnecessary.
• If needed, repeat for Pay Type 3 (Hourly Employees).This utility is used to update employee data for a number of employees at a single time. Employee data may be updated by a variety of criteria including pay type, pay grade, primary campus, and pay frequency. The Employee tab allows users to reset, increment, or modify employee data. The data that may be altered includes the number of annual payments, number of days employed, contract begin date, and number of years of local experience. Once employee data is altered using this page, changes are reflected in the individual employee records.
- Mass update various employee fields.
Mass update various employee fields
Use the Mass Update utility to update employee data in preparation for the new school year. This utility allows you to quickly and easily mass change data resulting in minimal manual changes to individual employee records with less possibility of manual entry errors.
CAUTION: To avoid entering data in an incorrect pay frequency, be mindful of the pay frequency to which you are logged on as you may be changing back and forth between the current year and next year's pay frequencies for several months.
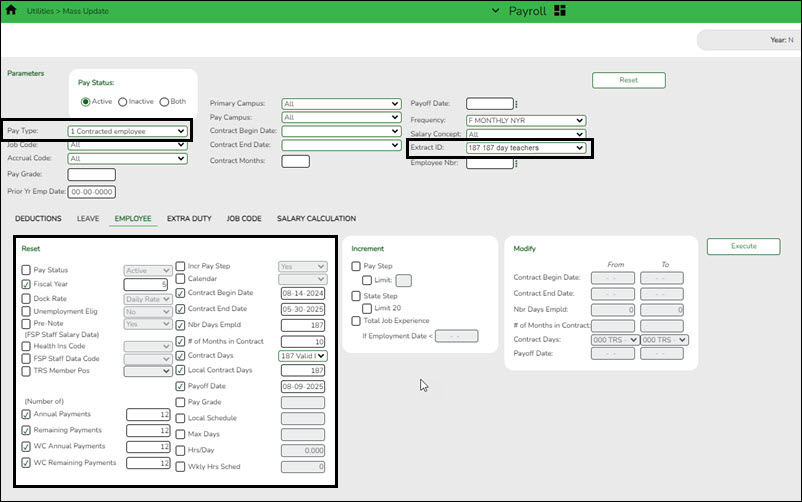
Mass update data as needed. The following fields are commonly updated.
• Fiscal Year - If some employees should not be incremented to the next fiscal year, repeat this step only selecting specific employees and mass update them back to the correct fiscal year. An example of this may include those paid with Elementary and Secondary School Emergency Relief (ESSER) Programs.
• Contract Begin Date
• Contract End Date
• Nbr Days Empld
• # of Months in Contract
• Payoff Date
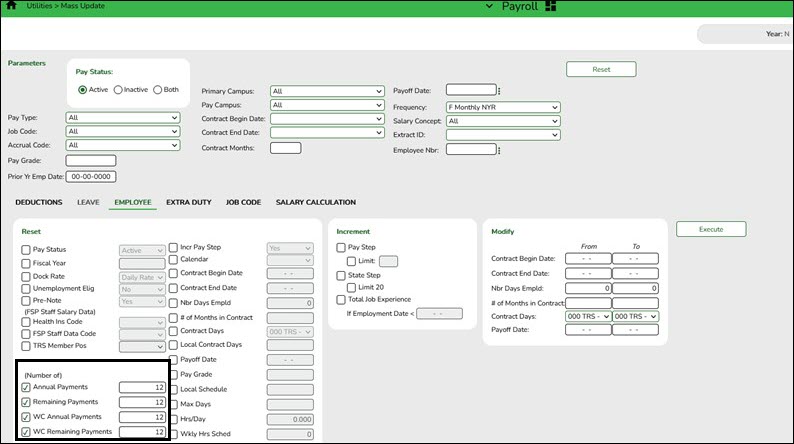
• (Number of) Annual Payments
• (Number of) Remaining Payments
• (Number of) WC Annual Payments
• (Number of) WC Remaining PaymentsThis utility is used to update employee data for a number of employees at a single time. Employee data may be updated by a variety of criteria including pay type, pay grade, primary campus, and pay frequency. The Employee tab allows users to reset, increment, or modify employee data. The data that may be altered includes the number of annual payments, number of days employed, contract begin date, and number of years of local experience. Once employee data is altered using this page, changes are reflected in the individual employee records.
❏ Under Parameters, select the employees whose employee data is to be changed.
TIP: Prior to processing a mass update, capture a screenshot of the parameters used for future reference.
Note: Never use the Reset, Increment, and Modify options at the same time.
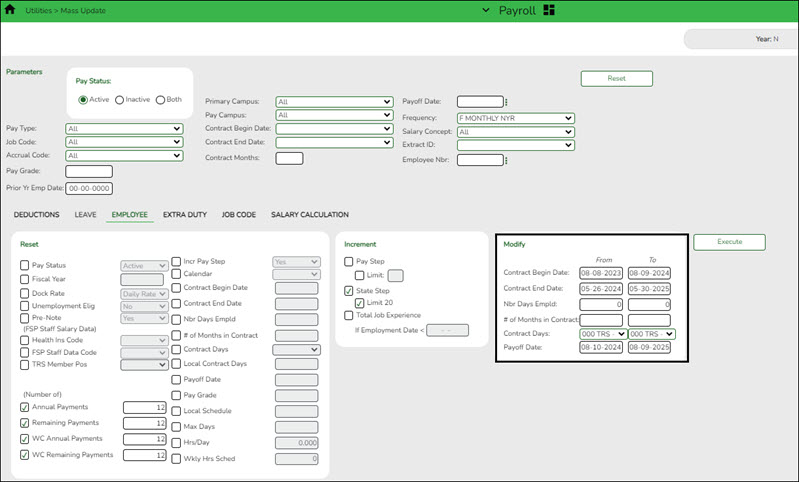
Example of Reset:
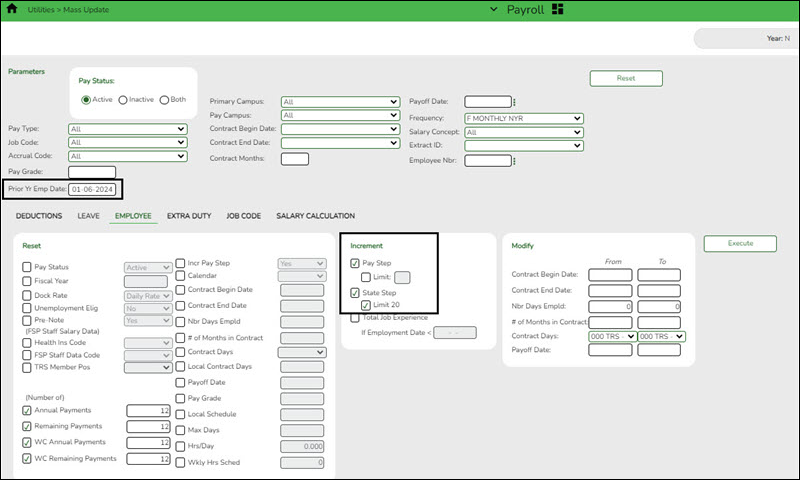
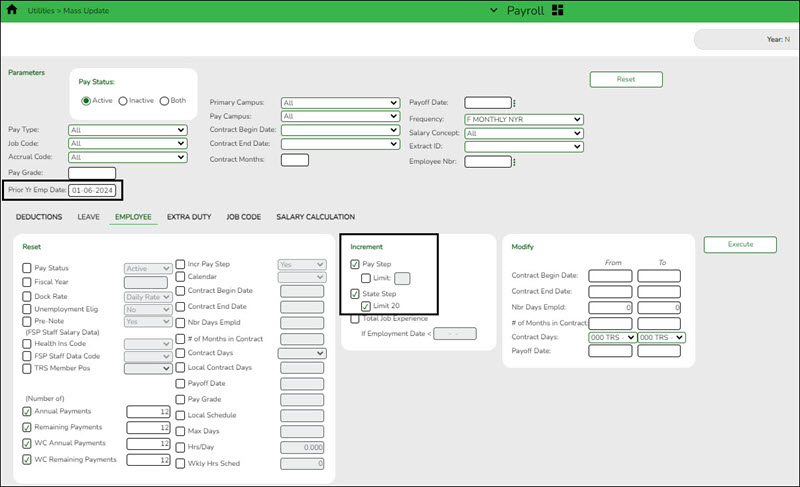
Example of Increment:
Example of Modify:
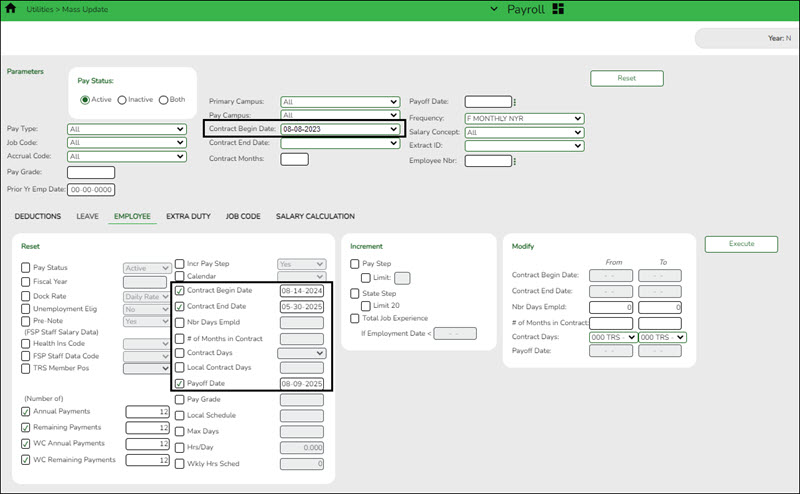
❏ The first run is to update the contract dates, but not increment any pay steps. Complete only the fields under Modify.
- Under Modify, complete the applicable fields.
- In the Prior Year Employment Date field, type today's date in the MM-DD-YYYY format and select the pay frequency. This changes the contract dates for all employees, regardless of the date they came to work for the LEA.
Note: The Prior Year Employment Date field uses the date in the Latest Re-Employ Date field on the Personnel > Maintenance > Employment Info. If this date is blank or contains zeros, it uses the date in the Original Emp. Date field. If no date exists in either field, the employee is not updated.
❏ The second run is for pay purposes to update all employees with one year of earned experience.
- In the Prior Year Employment Date field, enter a date in January (i.e., 01-XX-XXXX) that represents the maximum number of days required for the employee to have earned a pay step advance (e.g., 90 days).
- This run does not include any employees hired after that date because they should not receive a step advance for pay purposes but consult your LEA's policy.
- Under Increment, complete only the Pay Step and State Step fields.
CAUTION: Do not update any Experience fields at this time. Experience should not be updated until after the service records have been extracted and saved. Once the service records are complete, you can update records in either the current year or the next year. It is important not to forget this step as it must be completed prior to PEIMS reporting in October.
❏ Click Execute. A preview report is displayed. Review the report.
❏ Click Process. A message is displayed indicating that the process was completed successfully. Or, click Cancel to return to the Mass Update page.
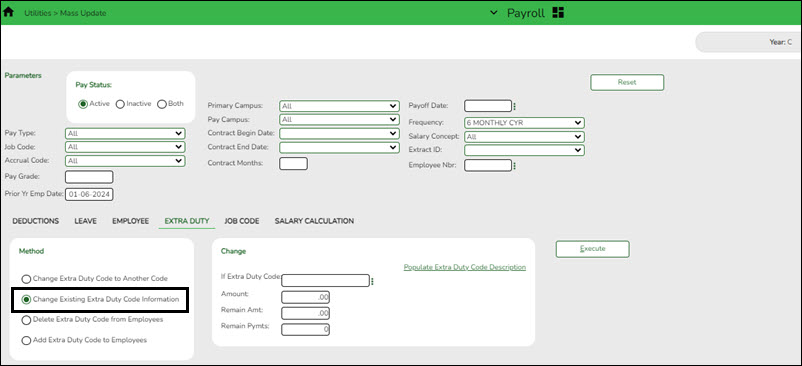
❏ Use the Extra Duty tab to change employee extra duty assignments that display on the Pay Info tab.
❏ Run the Personnel > Reports > Payroll Information Reports > HRS6550 - Employee Extra Duty Report by code before performing the extra duty mass updates. Once you update your changes, run the HRS6550 report in the NYR frequency to verify that the changes are correct.
- Mass update extra duty remaining payments.
Mass update extra duty remaining payments
Use the Mass Update utility to update employee data in preparation for the new school year. This utility allows you to quickly and easily mass change data resulting in minimal manual changes to individual employee records with less possibility of manual entry errors.
Mass update the remaining payments on all extra duties for applicable employees.
It is recommended to update the number of remaining payments for extra duties to ensure they are fully budgeted for.
CAUTION: To avoid entering data in an incorrect pay frequency, be mindful of the pay frequency to which you are logged on as you may be changing back and forth between the current year and next year's pay frequencies for several months.
This utility is used to update extra duty assignments for a number of employees at a single time. Extra duty data may be updated by a variety of criteria including pay type, pay grade, primary campus, and pay frequency. The Extra Duty tab allows users to add, change, and delete extra duty codes as well as alter the existing dollar amounts associated with the extra duty assignments. Once extra duty assignments are changed or deleted using this page, modifications are reflected in the individual extra duty records.
❏ Under Parameters, select the employees and records to be copied to the current year.
TIP: Prior to processing a mass update, capture a screenshot of the parameters used for future reference.❏ Under Method, select the extra duty changes to be implemented.
❏ Complete the Remain Pymts field under Change Existing Extra Duty Code Information.
❏ Click Populate Extra Duty Code Description to update the Amount field when a different extra duty code is selected.
❏ Click Execute. A preview report is displayed. Review the report.
❏ Click Process to accept the changes and continue. Or, click Cancel to return to the Mass Update page.
- Generate the Mass Account Code Comparison Report.
Generate the Account Code Comparison Report
Generate the following report before calculating salaries.
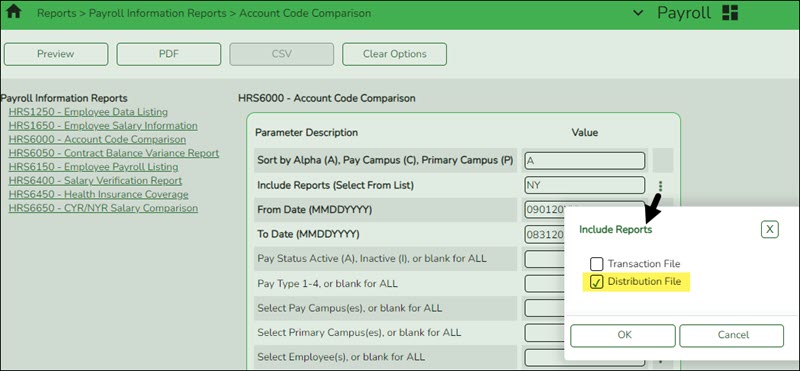
Payroll > Reports > Payroll Information Reports > HRS6000 - Account Code Comparison - This report is used to verify the distribution codes from the master distribution page against the account codes in Budget.
- Mass update salary calculations.
Mass update salary calculations
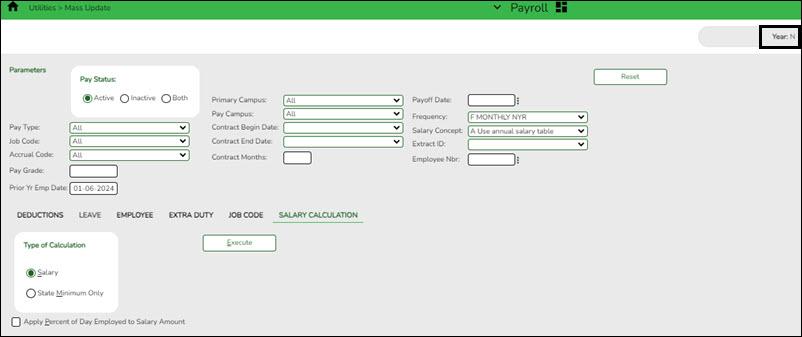
Payroll > Utilities > Mass Update > Salary Calculation
Perform salary calculations if you are using salary tables. This tab is used to automatically calculate salaries for active employees (pay status 1) that are linked to the salary tables. You can quickly calculate salaries and automatically update important fields in the employee record.
TIP: Salary calculations should not be done multiple times for an employee using the midpoint table.
A report provides a listing of errors prior to completing the process. Clear all errors and perform the calculations as often as necessary. All errors should be cleared before continuing. If employee errors are encountered, the listed employees are not updated. If the employee has multiple jobs and one of those jobs does not have all or part of the salary table information selected on the Job Info tab, errors are displayed and updates are not processed. When calculations are performed on one concept and the employee has multiple concepts, errors are displayed if any of the other concepts are incomplete and updates are not processed.
The system automatically uses the new contract amount and distributes it among the employees' master distribution records based on the existing percentage. The new amount displays regardless of the option selected in the Distributions Built by Amt % field on the Payroll or Personnel > Tables > District HR Options. Manual modifications may be necessary to employees' salary distribution codes, amounts, and/or percentages after performing salary calculations.
❏ The following fields must be completed on the Job Info tab for pay type 1, 2, and 3 employees:
- Pay Grade
- Step
- Max Days - If the Max Days field is not populated, salary calculations will only process if the field is not linked to the Annual Salary Concept. If the field is linked to the Annual Salary Concept, this field must be populated to run salary calculations.
- Begin Date
- End Date
- The OVTM Rate field and the # of Days Employed field are calculated when the OVTM flag and Calendar Code fields are populated on the Job Info tab.
- If the State Step field is populated on the Job Info tab, the amount from the state minimum salary table is entered in the State Min Salary field.
CAUTION: The State Min Salary field is calculated by multiplying either the State Min Days or the # of Days Employed by the appropriate daily rate from the state minimum salary table for all pay types that have state min. The % Assigned field in the State Info section on the Job Info tab is also considered in this calculation. The State Min Salary field should be checked closely and manually updated, if necessary, after performing salary calculations.
- If an employee has an extra duty account type G on the Pay Info tab, it is added to the Total field for the contract on the primary job.
- If an employee has a business allowance account type T or B amount with remaining payments and/or an extra duty account type S amount with remaining payments and distribution codes totaling 100% exists in the master distribution record for the account type, the appropriate distribution records are updated.
- If the # of Annual Payments and Contract Total fields are greater than zero, the Pay Rate field is calculated by dividing the Contract Total by the # of Annual Payments. If the # of Annual Payments and/or Contract Total are not populated, the Pay Rate is not calculated.
- If the # of Days Empld and Contract Total fields are greater than zero, the Daily Rate of Pay field is calculated by dividing the Contract Total by the # of Days Employed. If the # of Days Employed and/or Contract Total are not populated, the Daily Rate of Pay is not calculated.
- Other fields that are updated on the Job Info tab are:
- Accrual Rate - If the accrual code exists and the # of Days Empld and Contract Total fields are greater than zero, the Accrual Rate field is calculated by dividing the Contract Total by the # of Days Employed. The amount is rounded to three decimal places.
- Contract Total and Balance
- Pay type 3 employee salaries are calculated based on the hourly/daily or midpoint salary table information. If the local annual table is used, errors are displayed when performing mass salary calculations.
- When using the hourly/daily salary schedule, calculations are based on the Hrs Per Day field x the Amount field from the salary table x the # of Days Employed field from the Job Info tab. The resulting amount populates the Contract Total and Balance fields on the Job Info tab.
- When using the midpoint salary schedule, calculations are based on the Midpoint field x the Amount field from the salary table x the # of Days Employed field from the Job Info tab. The resulting amount populates the Contract Total and Balance fields on the Job Info tab.
- If the # of Days Employed field is not populated, the Contract Total and Balance fields are not calculated.
- If not performing mass salary calculations for hourly employees, manually update the Contract Total on the Job Info tab and distribution information. This salary information is extracted to Budget and used for PEIMS reporting.
- On the Job Info tab, there is a Calculate button, salary calculations can be done for an individual rather than doing salary calculations in Mass Update for groups of employees. The Calculate button on the Job Info tab will render the same results as doing the Mass Update salary calculations.
- The Automatically Compute fields on the District HR Options page assist in manually updating employees. By using this feature, the pay rate, daily rate, dock rate, accrual rate, and overtime rate can all be automatically calculated when the annual contract and days employed are entered on the Job Info tab.
- Manually add or update salary information.
Manually add or update salary information
Manually add or update salary information for those employees not tied to salary tables. For example, most often, administrators such as the Superintendent or Principal.
• Manually enter an estimated annual salary amount for pay type 3 (Hourly) employees in order to budget for these employees. • Add new employees as information becomes available.
Payroll
- Pay Info - This tab is not shared between the current year and next year records.
❏ Make the necessary changes to the extra duty supplements and verify the changes using the Payroll > Reports > Payroll Information Reports > HRS6400 - Salary Verification Report.
❏ Updates to the extra duty table do not automatically update the extra duty data on the Pay Info tab.
• Click Yes to update both the current year and next year records.
• Click No to update only the next year records.
This also occurs when changes are made in the current year records and next year records exist.
- Job Info - This tab is not shared between the current year and next year records.
❏ For new employees, a generic job is displayed on the Job Info tab and this job can be modified as needed. The following fields must be completed prior to saving:- Primary Campus
- % Assigned
- # of Days Empld
- TRS Member Position
- Begin Date
- End Date
Notes:
- The following data should be entered before performing automatic salary calculations:
- Pay Grade
- Step
- Sched (if applicable)
- Max Days
- State Step
- State Min Days
- TRS Year - This field should be selected if the employee has a nonstandard contract.
- Accrual Codes
- W/C Code
- State Minimum Salary % Assigned - Verify this field for employees whose # of Days Employed field does not match the State Min Days field on the Job Info tab for the primary job and adjust accordingly.
- Distribution information
- Distributions - This tab is not shared between the current year and next year records.
❏ If a contract amount is not entered on the Job Info tab, no amount or percentage is required before saving the record. If the account code does not exist in Budget, it cannot be selected from the account code drop-down list.
❏ A distribution code must exist for each job to be updated with salary calculations. When calculations are performed, amounts are updated based on the existing distribution percentages.
❏ Verify Expense 373 designations for applicable employees who are subject to Stat Min calculations.
- Deductions - This tab is not shared between the current year and next year records.
Exception: When changes to an existing employee's deduction information is saved, a message is displayed asking if the current year records should be updated.
If the Remain Pymts field is set to 99, it will not decrement each time a payroll is processed.
Be sure to add an Emplr Contrib (Employer Contribution) amount for vacancies/new employees to avoid an understated budget.
Update the garnishment amounts as there may be changes to the salary amounts for the upcoming year and the garnishment amounts are based on salary percentages.
• Click Yes to update both the current year and next year records.
• Click No to update only the next year records.
This also occurs when changes are made in the current year records and next year records exist.
• Click Yes to update both the current year and next year records.
• Click No to update only the current year records.
- Verify TRS fields.
Verify TRS fields
Payroll > Reports > User Created Reports > HR Report
Generate a user-created report to verify that the following TRS fields are accurate for all employees. You can use the sort/filter options to assist in the verification process. If corrections are needed, use the corresponding pages to make changes.
TRS Reporting Requirements
- ALL employees are reported.
- Retired employees are only reported on the ER record.
- A contract Begin and End Date is required for ALL employees.
Required Information ASCENDER Business Page The FTE Hours (full-time equivalent) is required for the ED record if 30 hours or more. Personnel > Tables > Job/Contract > Job Codes The Days Worked or scheduled is required for the RP record. This data is retrieved from either the school calendar or TR calendar. Personnel > Tables > Workday Calendars The Employment Type is required for the ED record. Personnel > Maintenance > Employment Info The TRS Status (TRS membership eligibility flag) is required for the ED record. Payroll > Maintenance > Staff Job/Pay Data > Pay Info A TRS Member Pos (position) Code is required for all employees (including substitutes).
The Wkly Hrs. Sched (hours scheduled) is required for the RP record.Payroll > Maintenance > Staff Job/Pay Data > Job Info The Retiree Employment Type is required for the ER record. Personnel > Maintenance > Employment Info - Verify salary calculations.
Verify salary calculations
Select and run the applicable reports to verify the salary calculations:
- Personnel > Reports > Personnel Reports > HRS1000 - Roster of Personnel - This report provides a list of employees by pay campus. This is a good report to give to principals and directors to verify employees assigned to their campus or department without sharing pay information.
- Payroll or Personnel > Reports > HR Reports > Personnel Reports > HRS1250 - Employee Data Listing - This report provides detailed information about demographics, salary, TRS/Calendar/School YTD, leave, deductions, and account distribution codes.
- Payroll > Reports > Payroll Information Reports > HRS6050 - Contract Balance Variance Report - This report will print exceptions for contracted (pay type 1) and non-contract (pay type 2) employees when the contract balance does not equal the Pay Rate times the # of Remaining Payments.
- Payroll > Reports > Payroll Information Reports > HRS6150 - Employee Payroll Listing - This report provides detailed information about pay status, campus code, pay type, marital status, number exemptions, months/days in contract, annual contract amount, monthly/daily rate of pay, and the first distribution line from the master distribution record.
- Payroll > Reports > Payroll Information Reports > HRS6400 - Salary Verification Report - This report can be used to verify that next year salary calculations have been correctly run before copying next year to current year.
- Payroll > Reports > Payroll Information Reports > HRS6000 - Account Code Comparison - The report is an error listing. For current year, the report identifies account codes in the payroll process and verifies that these account codes exist in Finance. If a code entered in the payroll process is not located in the chart of accounts, the account number, social security number, and name of the employee are printed on the report. For next year, the report identifies account codes on the Budget Data page of the Budget application.
- Personnel > Reports > Payroll Information Reports > HRS6550 - Employee Extra Duty Report - The report lists all employees with extra duty codes on the Pay Info tab. Users can sort the listing by name, campus, or extra duty code. The Include Distribution Account Codes parameter allows the user to include S-type distributions for those employees selected.
- Payroll or Personnel > Reports > Payroll Information Reports > HRS6650 - CYR/NRY Salary Comparison - This report provides a salary comparison for employees with pay type 1 and pay type 2 jobs. The report indicates employee information and job information for both the current year and next year to allow an easy comparison of salaries between the data.
- Payroll or Personnel > Reports > User Created Reports > HR Report - Run user created reports as defined by the user.
- Use Addendum sheets to verify data.
Use Addendum sheets to verify data
Payroll > Utilities > Payroll Simulation > Addendum
Use the Addendum created when using the Payroll Simulation utility to verify data as it lists all jobs separately, as well as business allowances, extra duty, etc.
Only active employees (pay status 1) are considered in this process. The Addendum sheets can be used to explain pay to employees and as a contract support document for applicable employees to sign & date.Personnel > Reports > Payroll Information Reports > Employee Salary Information
- If this report is generated from next year payroll files, leave information is excluded.
- If this report is generated from current year payroll files, leave information is included.
- Perform a "test payroll".
Perform "test payroll"
Payroll > Utilities > Pre-Edit Payroll Data
Run this utility to perform what could be called a “test payroll” for employees that meet the selected parameters.
It is a partial run of calculations and it does not use transmittals or leave files. This utility can be run in either the current year or next year.
An unprocessed pay date is required to be entered. If there are no unprocessed pay dates in the Pay Dates table, enter a pay date for the next month. For example, August payroll has been processed and pay dates for the new school year have not been entered yet.
Note: This utility should be run prior to creating your budget extract or before copying the next year to the current year. This utility creates a report that displays errors on each employee. The report is sorted by employee number order and provides error messages that are easy to understand so that corrections can be made prior to extracting for budget. Remember, if changes are made to the employee records, calculations need to be run again.
- Perform staff benefits update.
Perform staff benefits update
Payroll > Utilities > Employee Benefits Interface > Import Annual File
Perform the employee benefits update and import process.
❏ Under Year Selection, select one of the following:
- Current Year
- Next Year
Active Employees Only Select to base the selected pay frequency for the records on the highest pay frequency in which the employee is active. Deduction Import Path Click Browse, and then select the folder to which a copy of the deductions is to be imported. Click OK to select the folder or Cancel to close the dialog box without processing. ❏ Click Execute to start the import process.
- In the application dialog box, verify the path of the import, and click Yes to continue the import or No to return to the import dialog box.
- In the archive password dialog box, type a password for this imported file. Click OK.
- The files are imported, and a message is displayed indicating the import process completed successfully. Click OK.
If any errors are encountered during the import process, an error report is displayed. If there are no errors, the error report is not displayed.If no errors are encountered during the import process, or you clicked Continue from the error report, the import report is displayed.
❏ Click Continue to proceed.
❏ If you click Process, a message is displayed indicating that the data was imported. Click OK.
- Extract payroll account codes.
Extract payroll account codes
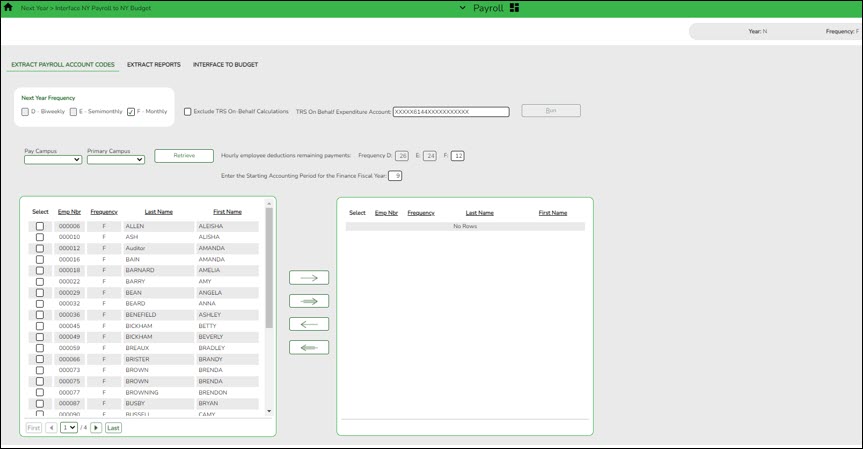
Payroll > Next Year > Interface NY Payroll to NY Budget > Extract Payroll Account Codes
Before interfacing the payroll to the budget, verify the following:
- Are all new employees in the system?
- Are all employees active that are to be extracted to budget?
- Are all Staff/Job Pay data tabs updated and complete for new and existing employees?
- Does the next fiscal year in distributions match the budget fiscal year?
- Are all deductions updated?
- Are all extra duty stipends updated?
- Since the next year payroll budget calculations use the s-type extra duty remaining amounts, verify that these amounts have been updated.
Run this utility to extract payroll account codes for specific active (pay status 1) employees who are in the next year payroll. The resulting extract is used to transfer this information to the budget. This process can be repeated as often as necessary.
❏ If applicable, select Exclude TRS On-Behalf Calculations.
❏ If you interface the on-behalf expenditures (6144) into Budget, manually input the revenue for the on-behalf account codes (5831).
- Verify Extract Reports tab.
Verify Extract Reports tab
Payroll > Next Year > Interface NY Payroll to NY Budget > Extract Reports
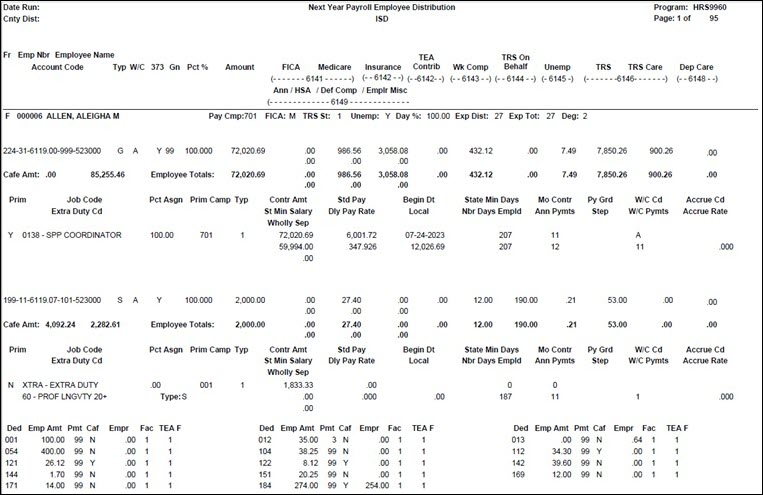
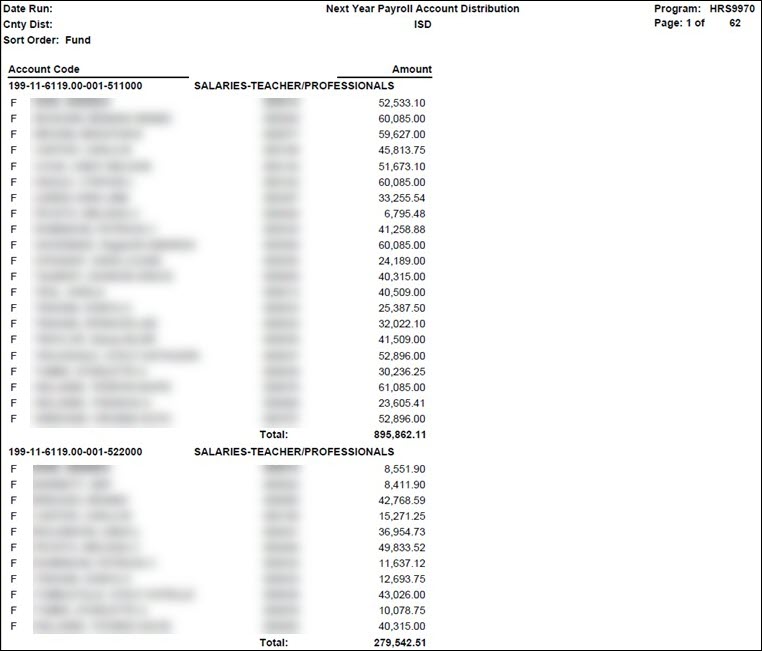
Use the reports to verify the accuracy and validity of the employees, accounts, and amounts.
Pay special attention to the employee count to verify that the correct number of employees are extracted and match the count on the Next Year Payroll Employee Distribution Report.
- (If necessary) Perform another extract and interface to Budget.
(If necessary) Perform another extract and interface to Budget
If changes are made to employee salary information, employees are added, employees are inactivated, or termination dates are entered, perform another extract and interface those new changes to Budget.
Note: Updates to the budget will replace the existing amounts for those account distribution codes that match the accounts in Budget. If an account distribution code no longer exists in payroll when interfaced to Budget (after previous interfaces), the account code is not changed or removed in Budget. You must manually modify the budget for those account codes. This also applies to those amounts in the budget that have been manually modified after the initial interface from payroll. If the budget account is not locked and the change needs to be retained for budget purposes, all manual modifications need to be made again.
- Interface to Budget.
Interface to Budget
Payroll > Next Year > Interface NY Payroll to NY Budget > Interface to Budget
If all of the information is correct:
❏ Under Next Year Payroll, select one of the following columns to be updated in Budget:
- Next Yr Recommend
- Next Yr Approved
❏ Click Interface. This process can be repeated as often as necessary until the Board approves the budget. For each run, the Next Year Budget amount is replaced. If the budget lock flag is set on an account, the budget amount is not replaced.If distributions or employees are changed after the first calculations are interfaced, you may be required to log back on to the current pay frequency and use the Payroll > Next Year > Copy CYR Tables to NYR > Clear Next Year Tables tab with the Clear NY Payroll Budget Only option selected to recalculate and interface the new changes back to the next year frequency.
Contact your regional ESC consultant if you need additional assistance.
Americans with Disabilities Act (ADA) and Web Accessibility
The Texas Computer Cooperative (TCC) is committed to making its websites accessible to all users. It is TCC policy to ensure that new and updated content complies with Web Content Accessibility Guidelines (WCAG) 2.0 Level AA. We welcome comments and suggestions to improve the accessibility of our websites. If the format of any material on our website interferes with your ability to access the information, use this form to leave a comment about the accessibility of our website.


