User Tools
Sidebar
Add this page to your book
Remove this page from your book
Activate Students
Registration > Utilities > Activate Students
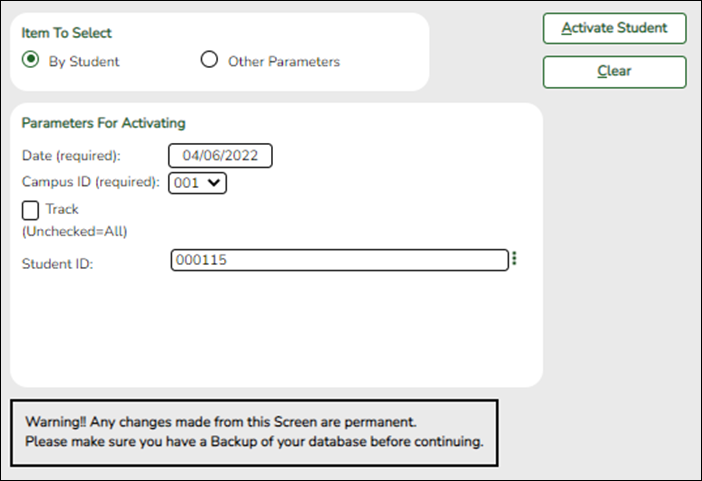
This utility allows campus staff to activate individual or groups of students who could not be activated from TeacherPortal, such as a student who shows up on the first day of school but was not on any attendance rosters.
Users can activate a group of students in a particular grade level or course; or they can activate an individual student if needed.
Update data:
❏ Under Item To Select:
| By Student |
Select if you are activating one student. |
|---|---|
| Other Parameters |
Select if you are activating multiple students by course or grade level. You can activate specific students who are in a particular grade level or course. |
❏ Under Parameters for Activating:
| Date |
(Required) Type the date on which students are activated. This is the date the student was first present for the ADA period within the activation window.
NOTE: Once the activation window has ended and the Create No Show Records utility has been run, you will go back to normal attendance taking. |
|---|---|
| Campus ID |
(Required) Select the campus at which you are activating students. |
| Track |
Select to activate students from one track, or leave blank to activate students from all tracks. |
The following fields are displayed according to the selected item.
| Grade Level (Unchecked=All) |
This field is only displayed if you selected Other Parameters. |
|---|---|
| Course Nbr (Unchecked=All) |
This field is only displayed if you selected Other Parameters. |
| Student ID |
This field is only displayed if you selected By Student. |
❏ Click Activate Student.
The Activate Students By Student pop-up window opens.
| Students That Meet Criteria (left grid) |
Students who meet the specified criteria are listed. |
|---|
❏ Click –» to move all students from the left grid to the right grid (whether selected or not). The selected students are displayed on the right side of the page under Students To Be Activated.
❏ Click → to move only the selected students from the left grid to the right grid.
| Students To Be Activated (right grid) |
The selected students are listed. |
|---|
❏ Click «– to move all students from the right grid to the left grid (whether selected or not). All students return to the left grid.
❏ Click ← to remove any selected students from the list to be activated. They will be listed in the left grid again.
❏ Click Save to activate the selected students.
- You are prompted to print the report.
Click Yes to print the report.
- Review, save, and/or print the report.
Review the report using the following buttons:
Click to go to the first page of the report.
Click to go back one page.
Click to go forward one page.
Click to go to the last page of the report.
The report can be viewed and saved in various file formats.
Click to save and print the report in PDF format.
Click to save and print the report in CSV format. (This option is not available for all reports.) When a report is exported to the CSV format, the report headers may not be included.
Click to close the report window. Some reports may have a Close Report, Exit, or Cancel button instead.
❏ Click Close to close the window and return to the Activate Students page.
Other functions and features:
| Clear | Clear your selections on the page. |
|---|
Americans with Disabilities Act (ADA) and Web Accessibility
The Texas Computer Cooperative (TCC) is committed to making its websites accessible to all users. It is TCC policy to ensure that new and updated content complies with Web Content Accessibility Guidelines (WCAG) 2.0 Level AA. We welcome comments and suggestions to improve the accessibility of our websites. If the format of any material on our website interferes with your ability to access the information, use this form to leave a comment about the accessibility of our website.


