User Tools
Sidebar
Add this page to your book
Remove this page from your book
ASCENDER - Position Management: Update NYR Positions and Move Employees to CYR Payroll
The purpose of this document is to guide you through the necessary steps to update next year positions and move 12-, 11-, and 10-month employees to the current year payroll.
This document assumes you are familiar with the basic features of the ASCENDER Business system and have reviewed the ASCENDER Business Overview guide.
Some of the images and/or examples provided in this document are for informational purposes only and may not completely represent your LEA’s process.
12-month Employees
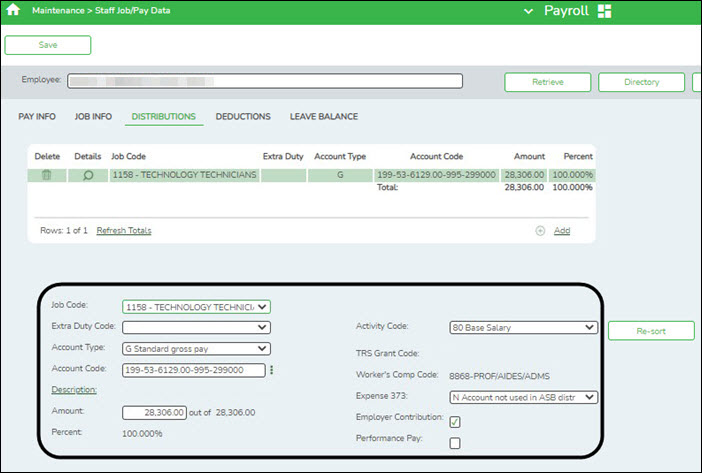
This process moves employees who receive their first paycheck in July from next year Position Management to current year Position Management. It also updates some of the fields on the following Maintenance tabs in the current year (see step 7 for detailed information):
- Employment Info
- Pay Info
- Job Info
- Distributions
A separate simulation needs to be set up for employees who receive their first paycheck in July. This is necessary because the position in the next year Position Management reflects the current year’s salary information. The simulation updates the fields in the next year positions for the new school year and clears the Accept Changes field. The new salary information from the next year position is updated in the current year, updating both the current year Position Management and the Staff Job/Pay Data fields for those employees. As 12-month employees do not accrue, it is not necessary to move them to the next year payroll. Contact your regional ESC consultant to discuss moving 12-month employees to the next year payroll.
Note: Depending on the LEA, it may not be necessary to set up separate simulations. If the LEA has determined next year salaries and completed all interfacing to Budget for the year, one simulation can be used when moving employees. Contact your regional ESC consultant to discuss this option.
It is important to consider how this process affects the budget. If you update 12-month positions with the new salary amount for the next school year in the next year Position Management, running the simulation a second time at a later date for all employees gives the 12-month employees an additional increase. If you were unable to update the budget with accurate salaries for all employees prior to rolling 12-month employees, it is necessary to update Budget with multiple simulations. Reference the Interface to Budget Checklist.
The following checklist assumes the LEA has interfaced the payroll salaries to Budget using the Salary Simulation process in Position Management.
TIP: Be sure to complete service records and extract June TRS before continuing this process. This process updates the begin and end contract dates for 12-month employees in the current year payroll. Service records must reflect the begin and end dates from the current school year, and these dates are used to calculate the days and hours worked for TRS purposes. This process will overwrite the employee’s calendar with the calendar for the new year. If June TRS has not been extracted, the system is unable to calculate this information for June.
- Verify account code fiscal years.
Position Management > Utilities > Update Fiscal Year by FundVerify that the account code fiscal years are accurate. This tab provides a list of the fund/fiscal years that are set up in the positions. This process increments the position distribution fiscal year by 1.
Note: Since the account codes are validated against the budget, there should not be any fiscal years less than the next year. If there are, generate a user-created report to identify the positions and manually update the information.
- Generate a user-created report.
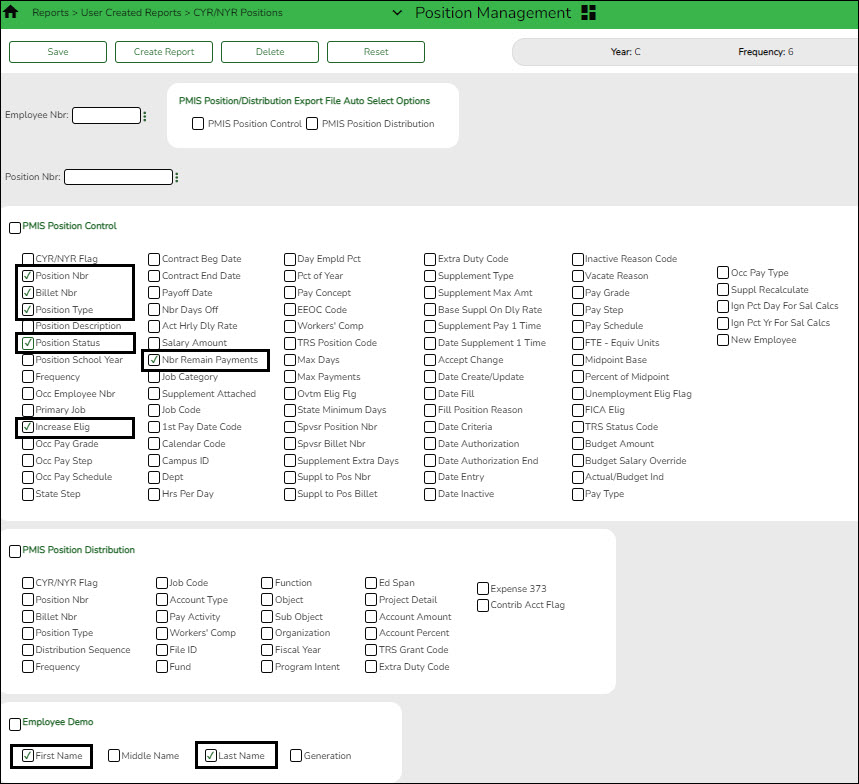
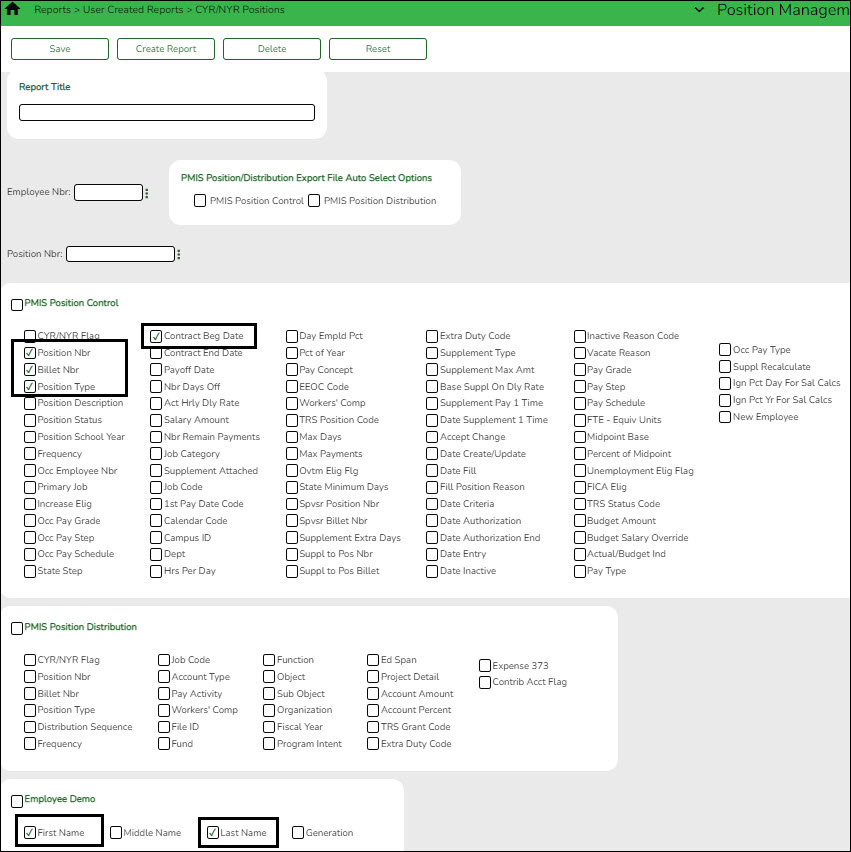
Position Management > Reports > User Created Reports > CYR/NYR PositionsGenerate a PMIS user-created report to verify that the Increase Eligible field is selected for applicable positions. It is possible that the field is not selected for new LEA employees from last year.
❏ It is recommended to verify the Nbr Remain Payments field prior to calculating salaries.
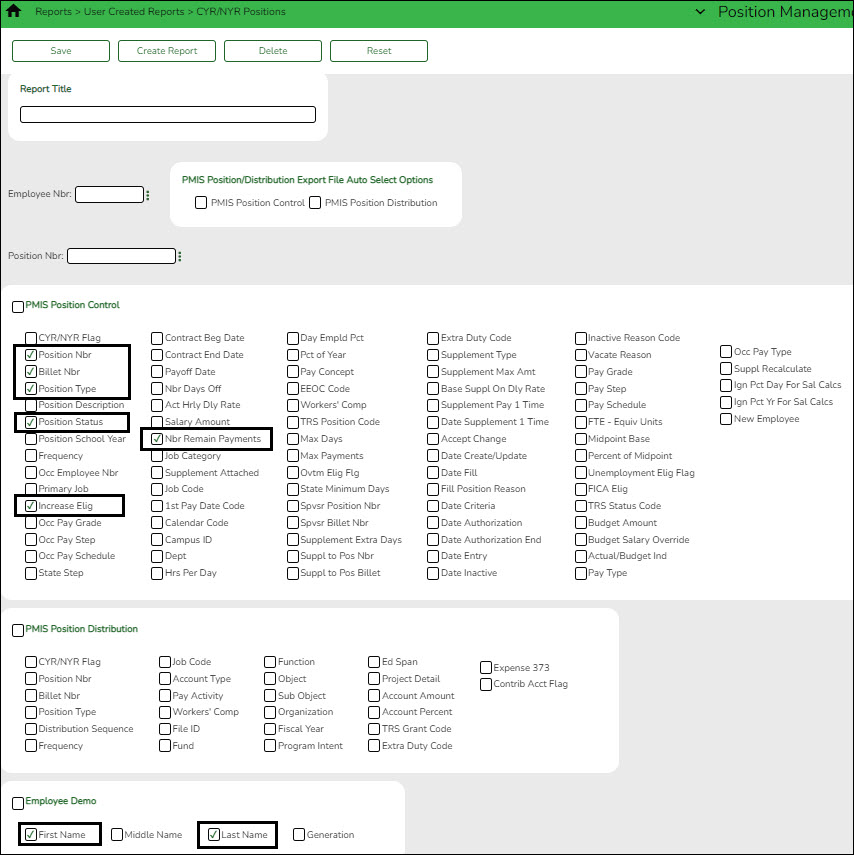
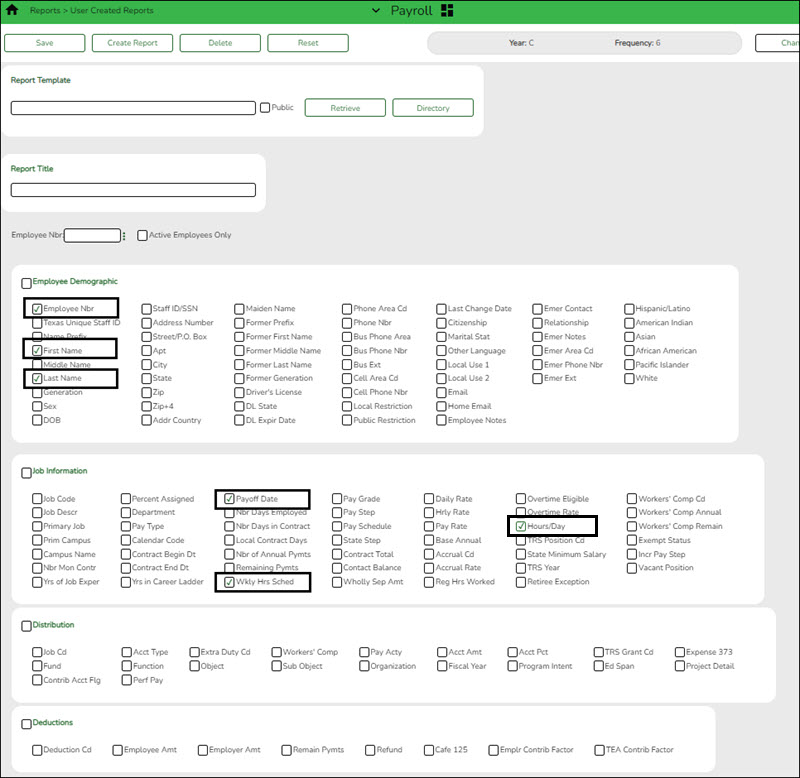
❏ Select the following fields on the user-created report:
❏ Click Create Report. The report is displayed. Use the sort/filter functionality to group the applicable data.
Note: The number of remaining payments reflected on the report is displayed on the Job Info tab as the number of annual payments and the number of remaining payments for the employee for any P position type. If the LEA uses S acct types or business allowances for extra duties, S position types on this report should reflect the correct number of remaining payments. Prior to continuing, make the necessary position corrections.
- Verify retiree information.
Position Management > Maintenance > PMIS Position Modify > BudgetVerify that the TRS Status field is set to 5 - Retired for retirees. If the TRS status is incorrect, there is a possibility that the status will be incorrect (TRS-eligible) when the employee is moved to the current year payroll.
- Identify employees to be moved to current year payroll.
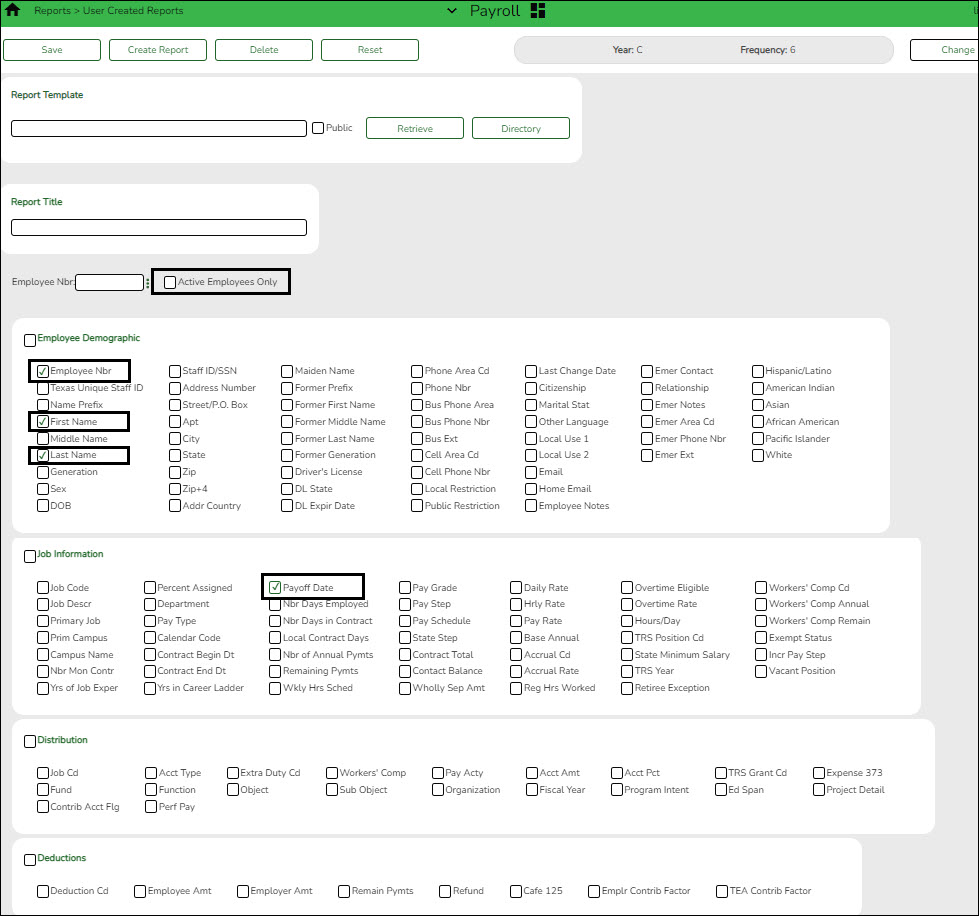
Log on to the current year.Payroll > Reports > User Created Reports
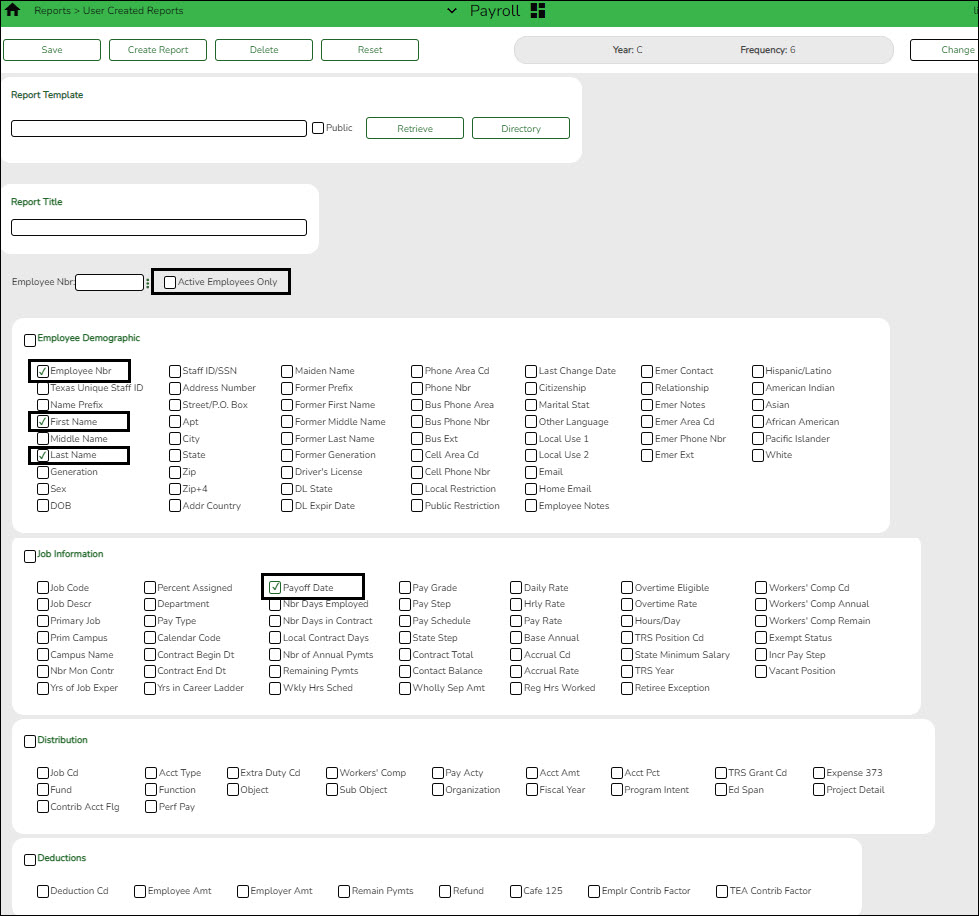
Generate a user-created report to identify the employees who begin their new contract in July. It is possible that the employees are inactive in the current year, be sure that the Active Employees Only field is not selected.
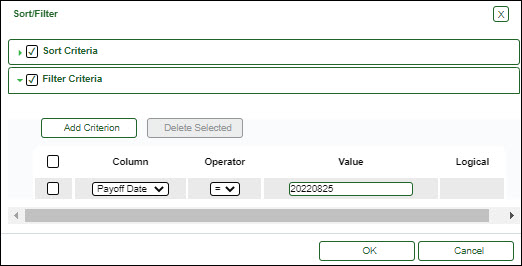
❏ Prepare a list of new hires as a supplement to this list. Sort by the Payoff Date to verify that all employees who have a June payoff date have the same date. For example, it is possible that an employee has a payoff date that is a day before or after the actual June payoff date.
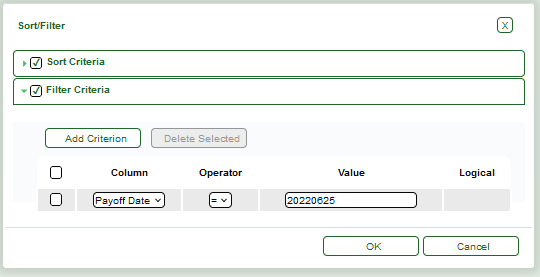
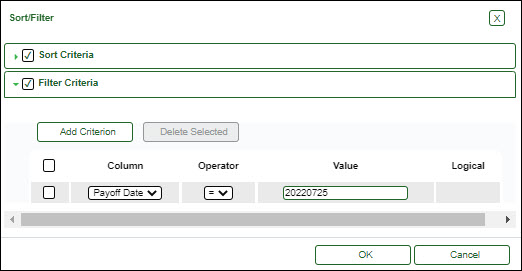
❏ Generate a user-created report again to verify that all of the data is accurate. Filter the report using your LEA's June payoff date (YYYYMMDD).
Print or save the report.
- Create a salary simulation.
Log on to the next year.Prior to setting up and performing salary simulations, review the Position Management: Salary Simulations Overview guide for a description of the Salary Simulation pages and samples of the available simulation reports.
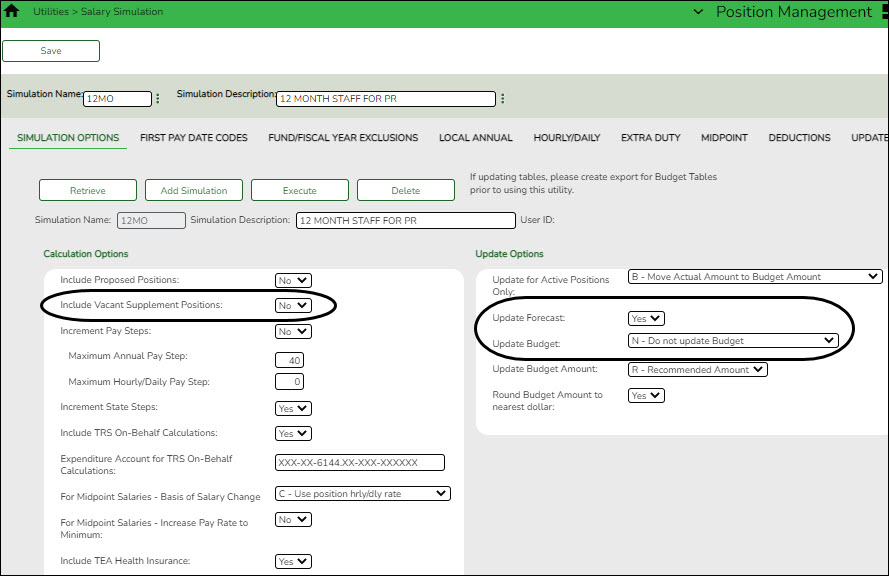
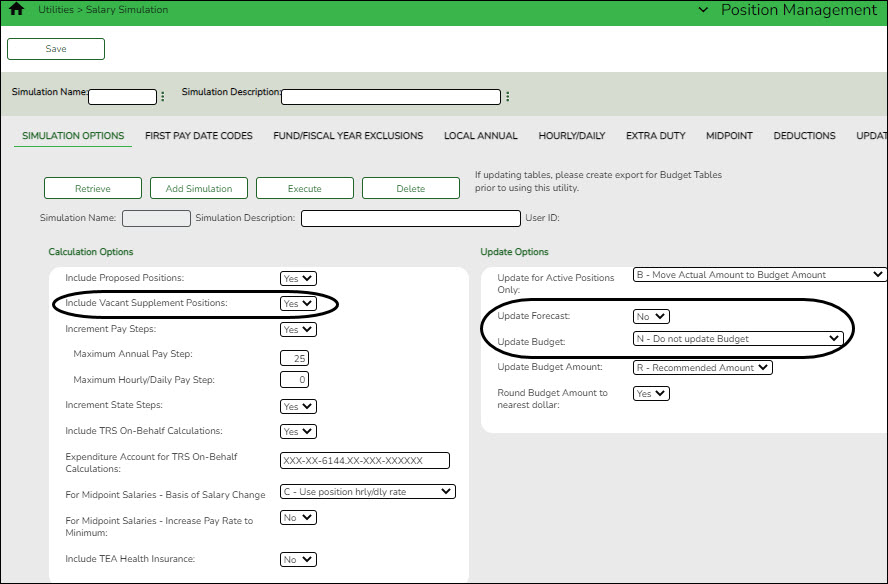
Position Management > Utilities > Salary Simulation > Simulation Options
❏ Complete the following:
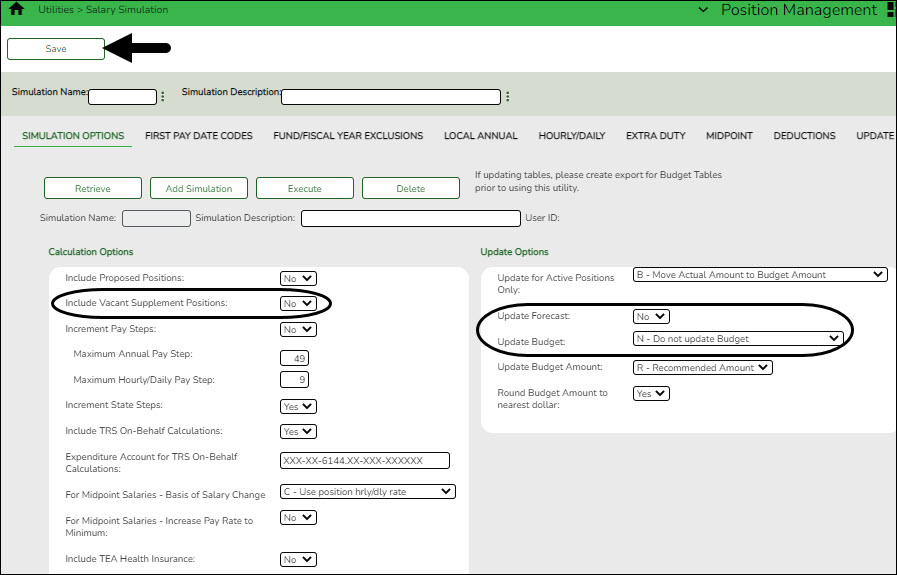
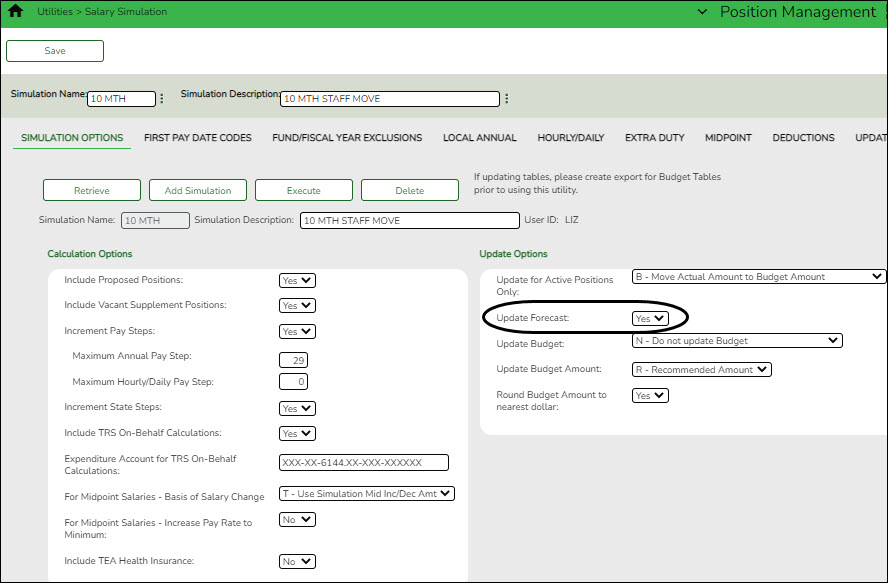
- (Recommended) In the Include Vacant Supplement Positions field, select No.
- In the Update Forecast field, select No.
- In the Update Budget field, select N - Do Not Update Budget.
- Include all first pay date codes for 12-month employees who receive their first paycheck in July. Include all local/annual, hourly/daily, midpoint (if applicable), and extra duty tables.
- If increases are not provided to 12-month employees in July, do not include an increase in the salary tables. If increases are provided to 12-month employees in July, update the salary tables with the increase data.
- If the LEA decides to interface the simulation to Budget, add the deductions with the annual amount for the Employer Contribution.
❏ Click Save.❏ Click Execute. Review the Simulation Process Error Listing and correct any errors prior to continuing the process.
- Generate the simulation reports and review all salaries.
- Review the user-created report to confirm that all 12-month employees or positions are included in the simulation. The reflected salaries are the amounts that are used to pay employees in the current year payroll.
If necessary, continue making corrections and running the simulation until all of the salary amounts are correct.
❏ Run the final simulation. This process updates the included state step, pay step, and salary amount in the next year PMIS for all 12-month positions and clears the Accept Changes field.
- In the Update Forecast field, select Yes.
- Click Save.
- Generate and save the reports.
- Click Process to process the simulation. Create a backup.
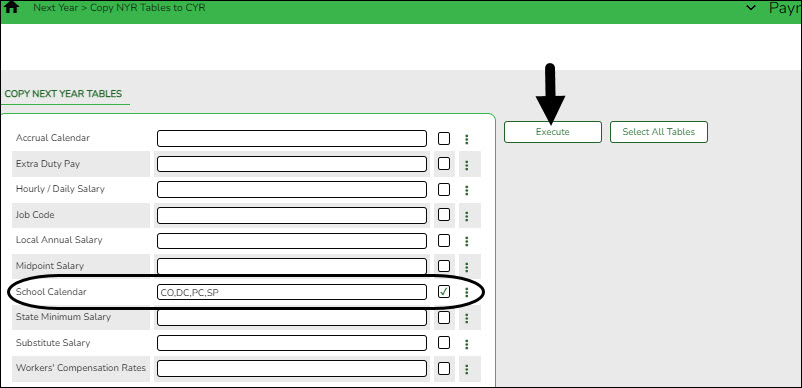
- Copy school calendars from next year to current year payroll.
Log on to the next year.Payroll > Next Year > Copy Next Year Tables
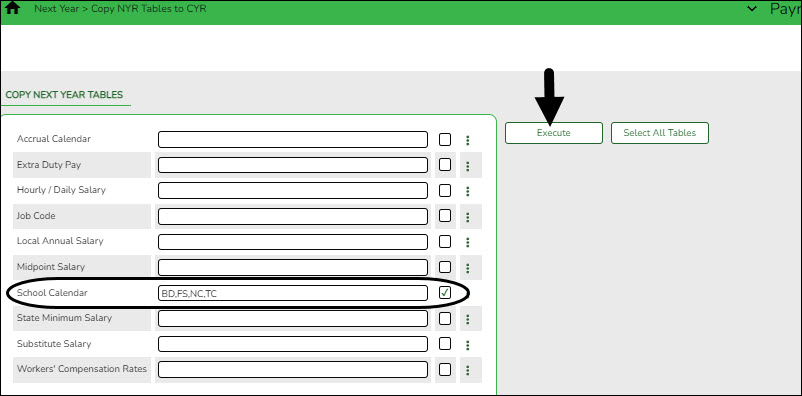
❏ In the School Calendar field, select only the 12-month employee calendars.
TIP: The calendar code is displayed in the first pay date code on the simulation (e.g., J40 includes calendar code 40).
❏ Click Execute.
Note: If changes were made to the next year payroll tables (extra duty pay, hourly/daily salary, job code, local annual salary, etc.), copy the tables from the next year payroll to the current year payroll.
- Generate a user-created report.
Log on to the current year.Payroll > Reports > User Created Reports
Generate a user-created report with the Hrs Per Day field selected. This field is overwritten when positions are moved from the next year to the current year.
- Move forecast to current year position and payroll
Log on to the next year.Position Management > Utilities > Move Forecast to CYR Position and Payroll
This process is used to move payroll and position forecast records to the current year PMIS with the same information that is set up in the next year PMIS records.
It also updates fields on the following Maintenance tabs: Employment Info, Pay Info, Job Info, Distribution
The Accept Changes field must be cleared when moving position records from forecast to current; otherwise, position records cannot be moved. The Accept Changes field is cleared after running a simulation with the Update Forecast field set to Yes. Similarly, you cannot run a simulation for positions without the Accept Changes field selected.
❏ Click Execute to execute the process. The following reports are available:
- Move Forecast Process Error Listing Important errors
Error Message Description Warning: The employee has Contract Balance amounts not equal to zero for current jobs. The employee has not been paid off by payroll. Failure: Position Accept Changes Flag set to Y The position will not be moved to the current/payroll. Failure: Emp Nbr must have one position declared as primary. The error does not necessarily reference the Primary Job field on the position. If an employee has a regular position and a supplement position, but there is an error that causes the primary position to fail, this message often indicates that there is only a supplement position to be moved. It is recommended to review and correct any errors that begin below this message about primary positions. After making those corrections, run the process again. This may resolve the primary job errors.
This error also occurs when calendars have not been copied to the current year.Warning: Emp Nbr has multiple supplement positions for the same job; however, one or more of the following do not match: Campus ID, Dept, TRS Status Code, FTE Units, Incr Elig, Max Paymts, FICA Elig, Unemp Elig, EEOC, Workers Comp, Supplement Extra Days or Category Cd. The values from lowest Supplement Position Number/Billet may be used if new rows are inserted for the Pay Info and Job Info tabs. This error indicates that the fields on the Payroll > Tables > Salaries > Extra Duty tab do not match those selected on a supplemental position.
Use the Position Management > Inquiry > PMIS Staff Inquiry to determine the Position Number and Billet for any supplemental positions for the employee. Then, use the Position Management > Maintenance > PMIS Supplement Modify page to retrieve the position and billet and compare the fields on the position to the Payroll > Tables > Salary > Extra Duty tab for the extra duty number on the supplement. For example, in some cases the W/C code on the position may not match the W/C code on the table. Or, the Exp 373 field on the position may be selected, but the Exp 373 on the table for that extra duty code may not be selected. Either the table or the position needs to be updated so that they both match. If changes are made to the Extra Duty table, it is necessary to move the table to the current year payroll before proceeding.
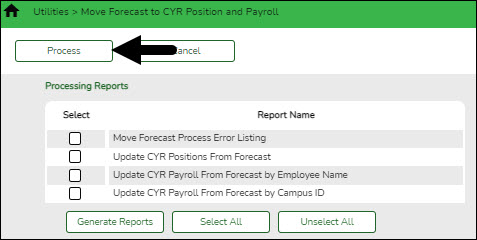
- Update CYR Positions From Forecast - The error report lists any funds that need to be set up in the Finance tables.
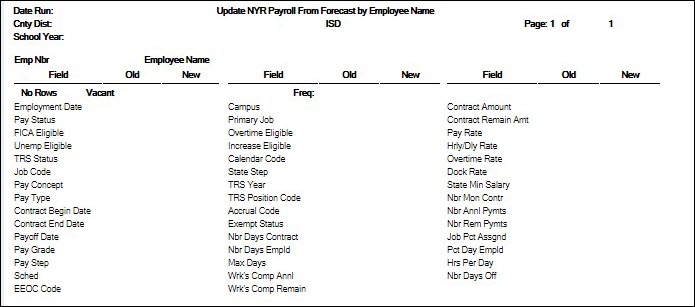
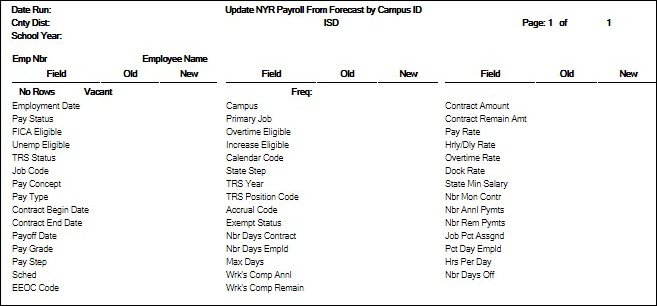
- Update CYR Payroll From Forecast by Employee Name
- Update CYR Payroll From Forecast by Campus ID
❏ Click Generate Reports. The selected reports are displayed. Review the report.
❏ Click Continue to view the next report. Or, click Return to return to the report selection page.
❏ After reviewing all of the reports and correcting all errors, return to the report selection page and click Process to move the forecast records to the current year. You are prompted to create a backup.
After the process is completed, the actual update is performed. If the update is successful, a message is displayed indicating that the move forecast updates were processed successfully.
Reminder: If fund/fiscal year(s) were added to Finance based on the error report listing, they should be deleted at this point.
❏ Click Cancel to return to the Move Forecast to CYR Position and Payroll page without moving the forecast records to the current year.If corrections are processed, repeat this step.
Generate and save each report. Compare the Update CYR Positions From Forecast report to the user-created report that was previously generated to confirm that all 12-month employees are included. The last two reports contain the same information; one is sorted by employee name and the other by campus ID. These reports reflect the existing salary in the current year payroll and the new salary, which overwrites the current year payroll amounts. Review the reports for accuracy.
Confirm that CYR salaries are accurate.
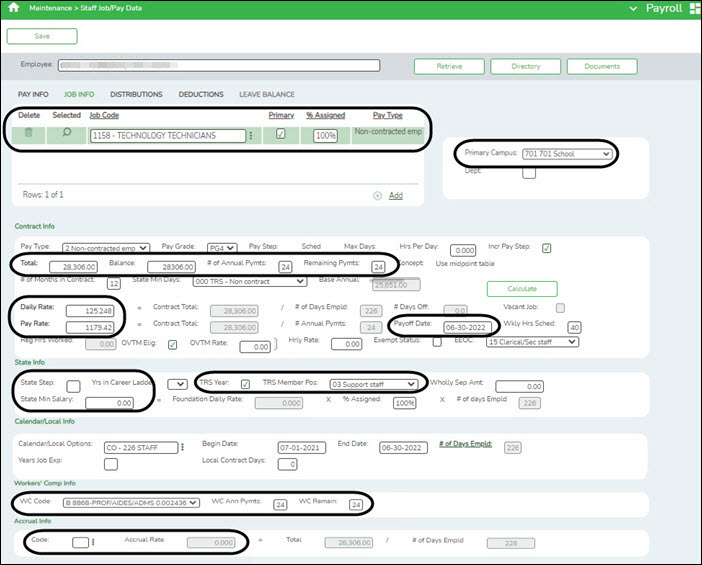
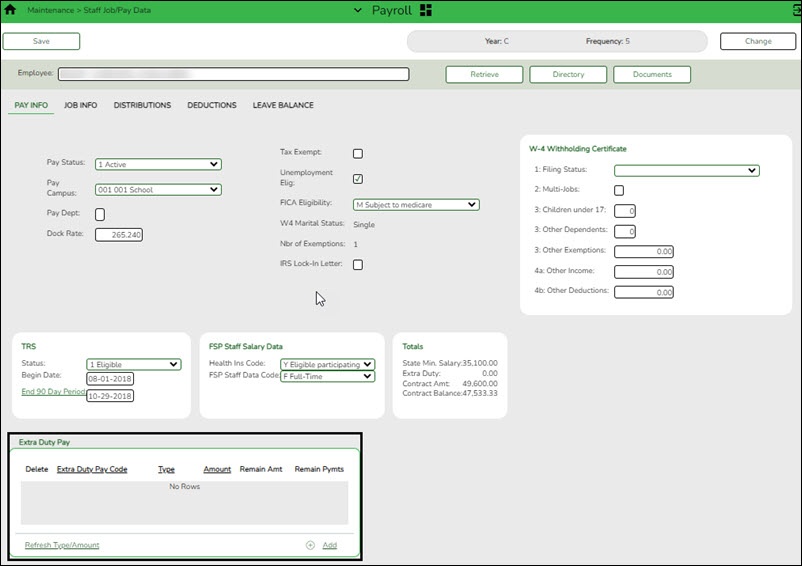
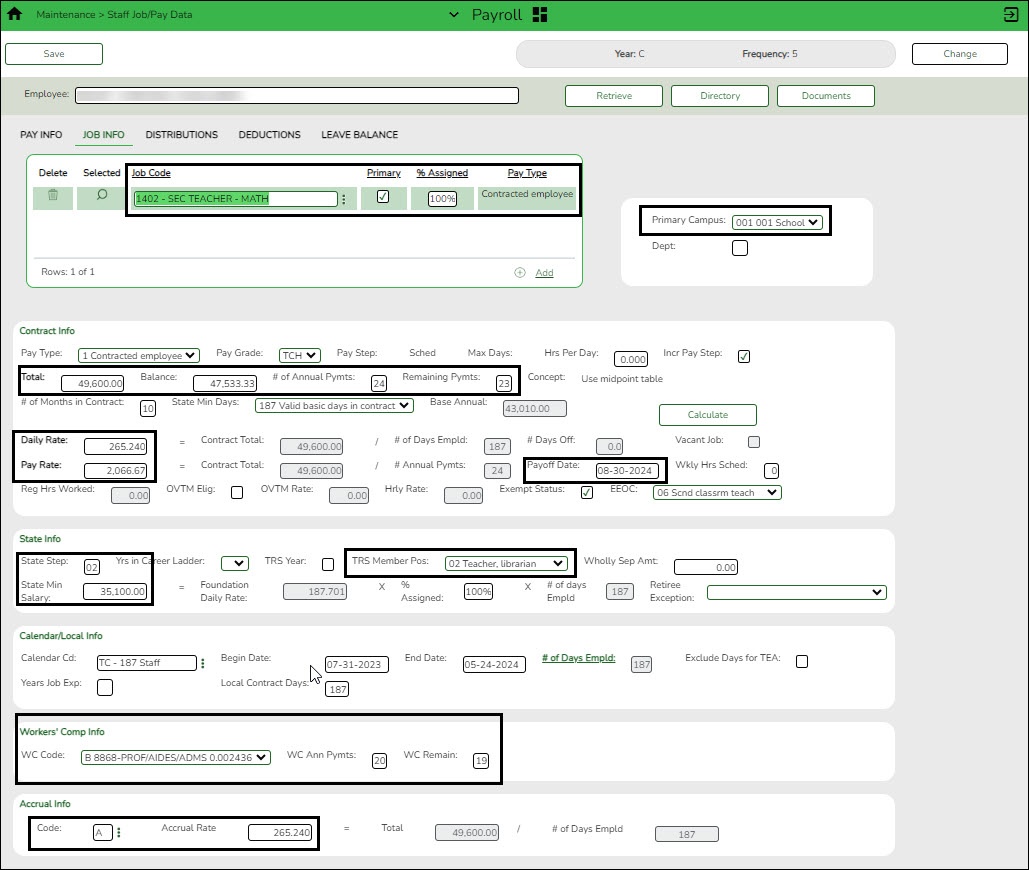
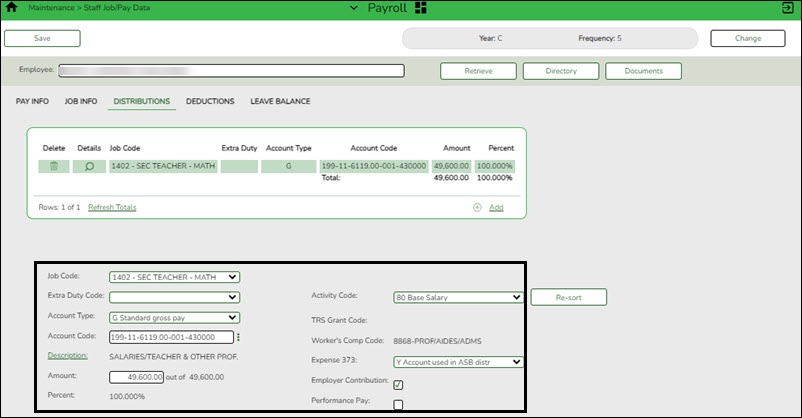
Log on to the current year.Verify the current year data to confirm that the salaries are correct. The following fields are updated:
Mass update fiscal year.
Log on to the current year.Payroll > Utilities > Mass Update > Employee
Skip this step if your LEA has a 7/1 fiscal year.
Mass update the fiscal year to the current school year for all employees.
Select Fiscal Year and type the current year fiscal year. Before processing, stop to consider if the LEA uses other fiscal years in the account codes for employees. If the entered year is not the only used fiscal year, additional parameters may need to be selected.
Contact your regional ESC consultant if you need assistance.
Identify those employees with a June payoff date and mass update the Hrs Per Day field.
- For LEAs that use the hours per day functionality in the current year payroll, select the Hrs Per Day field and type the number of hours per day for the majority of employees.
- Use the parameters to select specific groups of employees for the update.
11-month Employees
This process moves employees who receive their first paycheck in August from next year Position Management to current year Position Management. It also updates some of the fields on the following Payroll >Maintenance > Staff Job/Pay Data and Personnel > Maintenance > Employment Info tabs in the current year payroll (see step 16 for detailed information):
- Employment Info
- Pay Info
- Job Info
- Distributions
A separate simulation will be set up for 10-month employees at a later date. This is necessary because the position in the next year PMIS reflects the current year salary information. The simulation updates the fields in the next year positions for the new school year and clears the Accept Changes field. The new salary information from the next year position is updated in the current year, updating both the current year PMIS and the Staff Job/Pay Data fields for the employees. If 11-month employees accrue, it is important to move them to the next year payroll in order to perform the accrual process.
Note: Depending on the LEA, it may not be necessary to set up separate simulations. If the LEA has determined next year salaries and completed all interfacing to Budget for the year, one simulation can be used when moving employees. Contact your regional ESC consultant to discuss this option.
It is important to consider how this process affects the budget. If you update 11-month positions with the new salary amount for the next school year in the next year PMIS, running the simulation a second time at a later date for all employees gives the 11-month employees an additional increase. If you were unable to update Budget with accurate salaries for all employees prior to moving the 12-month employees, it is necessary to update Budget with multiple simulations. Reference the Interface to Budget Checklist located at the end of this document.
The following checklist assumes that the LEA has interfaced the payroll salaries to Budget using the PMIS Salary Simulation process.
- Verify account code fiscal years.
Position Management > Utilities > Update Fiscal Year by FundVerify that the account code fiscal years are accurate. This tab provides a list of the fund/fiscal years that are set up in the positions. This process increments the position distribution fiscal year by 1.
Note: Since the account codes are validated against the budget, there should not be any fiscal years less than the next year. If there are, generate a user-created report to identify the positions and manually update the information.
- Generate a user-created report.
Position Management > Reports > User Created Reports > CYR/NYR PositionsGenerate a PMIS User Created Report to verify that the Increase Eligible field is selected for applicable positions. It is possible that the field is not selected for new LEA employees from last year.
TIP: For 10- and 11-month employees, it is recommended to verify the Nbr Remain Payments field prior to calculating salaries.
❏ Select the following fields on the user-created report:
- First Name
- Last Name
- Position Nbr
- Billet Nbr
- Position Type
- Increase Elig
- Nbr Remain Payments
❏ Click Create Report. The requested report is displayed. Use the sort/filter functionality to group the applicable data.
Note: Only positions with the Increase Elig field set to Y will receive a salary increase. The number of remaining payments reflected on this report is the number of annual payments and the number of remaining payments for the employee on the Payroll > Maintenance > Staff Job/Pay Data > Job Info tab. Perform any position corrections prior to continuing the process.
- Identify the employees to be moved to the current year payroll.
Log on to the current year.Payroll > Reports > User Created Reports
Generate a user-created report to identify the employees who begin their new contract in August. It is possible that the employees are inactive in the current year, be sure that the Active Employees Only field is not selected.
❏ Prepare a list of new hires as a supplement to this list. Sort by the Payoff Date to verify that all employees with a July payoff date have the same date. For example, it is possible that an employee has a payoff date that is a day before or after the actual July payoff date.
❏ Use the current year payroll Payroll > Maintenance > Staff Job/Pay Data > Job Info tab to make corrections as needed.
❏ Generate a user-created report again to verify that all of the data is accurate. Filter the report using the LEA's July payoff date (YYYYMMDD).
Print or save the report for verification purposes.
- Create a salary simulation.
Log on to the next year.Prior to setting up and performing salary simulations, review the Position Management: Salary Simulations Overview document for a description of the Salary Simulation pages and samples of the available simulation reports.
Position Management > Utilities > Salary Simulation > Simulation Options
❏ Complete the following:
- (Recommended) In the Include Vacant Supplement Positions field, select No.
- In the Update Forecast field, select No.
- In the Update Budget field, select N - Do Not Update Budget.
- Include all first pay date codes for 11-month employees who receive their first paycheck in August. Include all local/annual, hourly/daily, midpoint (if applicable), and extra duty tables.
- If increases are not provided to 11-month employees in August, do not include an increase in the salary tables. If increases are provided 11-month employees in August, update the salary tables with the increase data.
- If the LEA wants to interface the simulation to Budget, add the deductions with the annual amount for the Employer Contribution.
❏ Click Save.❏ Click Execute. Review the Simulation Process Error Listing and correct any errors prior to continuing the process.
- Generate the simulation reports and review all salaries.
- Review the user-created report to confirm that all 11-month employees or positions are included in the simulation. The reflected salaries are the amounts that are used to pay employees in the current year payroll.
If necessary, continue making corrections and running the simulation until all of the salary amounts are correct.
❏ Run the final simulation. This process updates the state step, pay step, and salary amount in the next year PMIS for all 11-month positions and clears the Accept Changes field.
- In the Update Forecast field, select Yes.
- Click Save.
- Generate and save the reports.
- Click Process to process the simulation. Create a backup.
- (If applicable) Move employees to next year payroll.
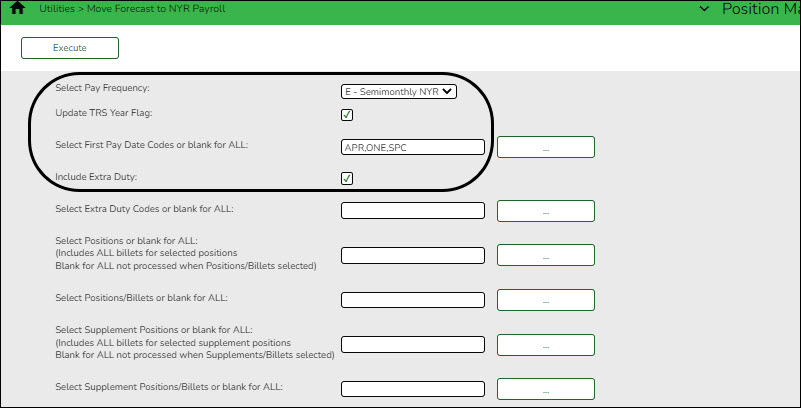
Log on to the next year.Position Management > Utilities > Move Forecast to NY Payroll
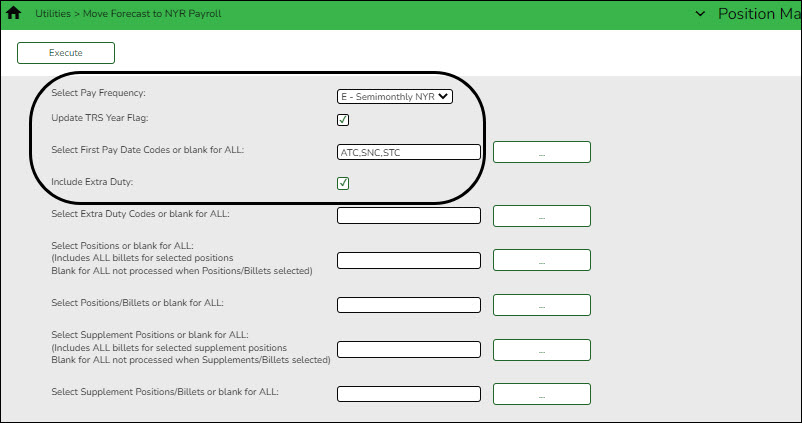
If your LEA uses ASCENDER Grade Reporting and/or accrues, 11-month employees may need to be moved to next year payroll.
❏ Complete the following:
- In the Select Pay Frequency field, select the frequency that represents the LEA's next year payroll.
- Select Update TRS Year Flag.
- In the Select First Pay Date Codes or blank for ALL, select the first pay date codes that represent the 11-month employees.
- Select Include Extra Duty pay.
The additional fields can be used to move select employees and positions. V CV Click Execute. Generate the Move Forecast Process Error Listing and correct any errors prior to continuing the process.❏ Click Process to process the final simulation.
Contact your regional ESC consultant if you need assistance.
- Copy school calendars from next year to current year payroll.
Log on to the next year.Payroll > Next Year > Copy NYR Tables to CYR > Copy Next Year Tables
❏ In the School Calendar field, select only the 11-month employee calendars.
TIP: The calendar code is displayed in the first pay date code on the simulation (e.g., J40 includes calendar code 40
❏ Click Execute.
Note: If changes were made to any of the next year payroll tables (extra duty pay, hourly/daily salary, job code, local annual salary, etc.), copy the tables from the next year payroll to the current year payroll.
- Generate a user-created report.
Log on to the current year.Payroll > Reports > User Created Reports
Generate a user-created report with the Hrs Per Day field selected. This field is overwritten when positions are moved from the next year to the current year.
- Move forecast to current year position and payroll.
Log on to the next year.Position Management > Utilities > Move Forecast to CYR Position and Payroll
This process is used to move payroll and position forecast records to the current year PMIS with the same information that is set up in the next year PMIS records.
It also updates fields on the following Maintenance tabs: Employment Info, Pay Info, Job Info, Distribution
The Accept Changes field must be cleared when moving position records from forecast to current; otherwise, position records cannot be moved. The Accept Changes field is cleared after running a simulation with the Update Forecast field set to Yes. Similarly, you cannot run a simulation for positions without the Accept Changes field selected.
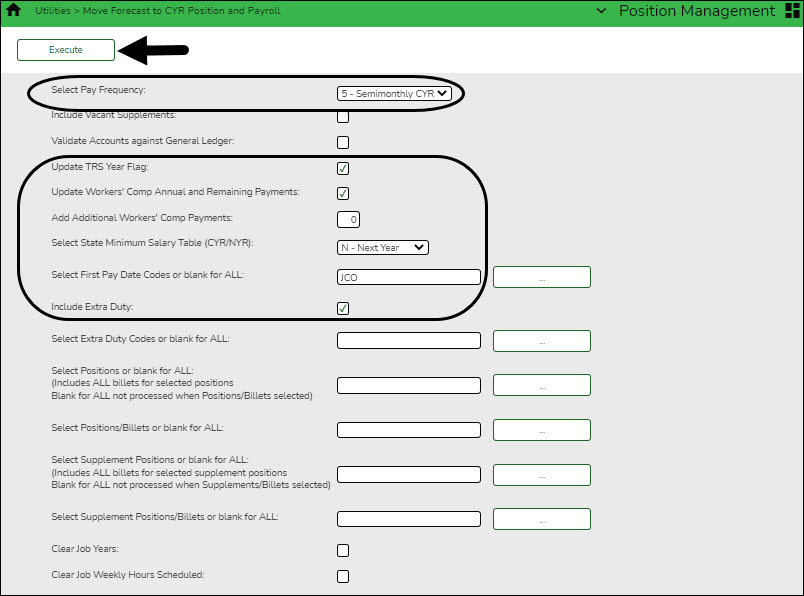
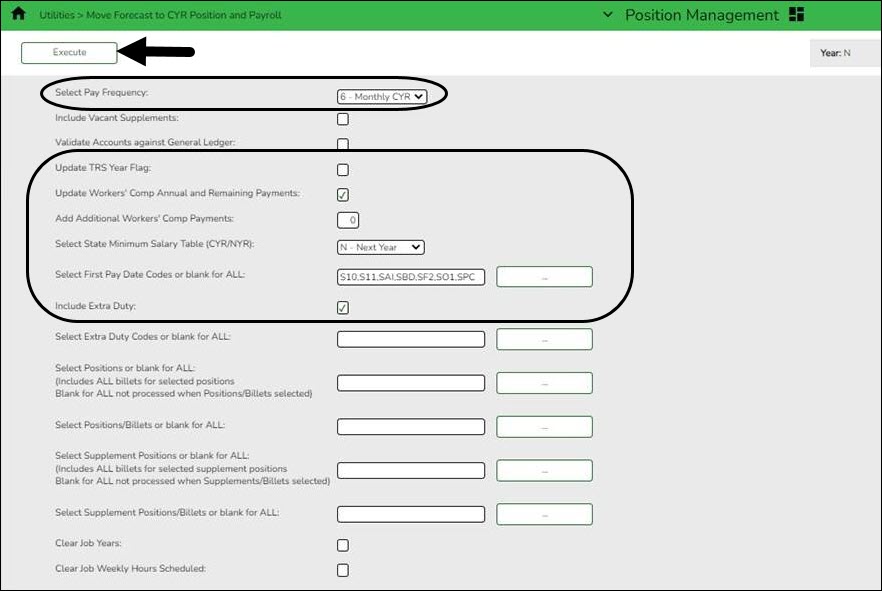
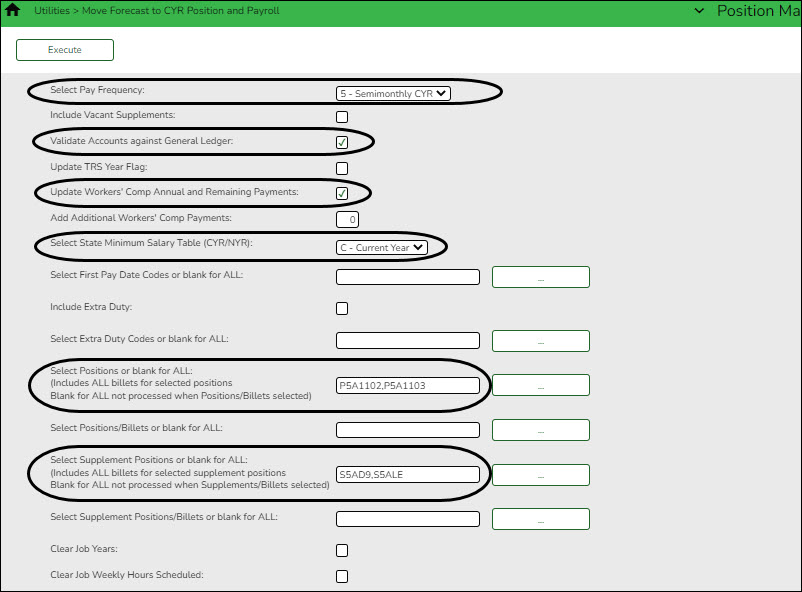
- In the Select Pay Frequency field, select the payroll frequency to be updated. LEAs with multiple frequencies must individually process each frequency.
- Do not select Include Vacant Supplements.
- Do not select Validate Accounts against General Ledger at this time. Distribution accounts in next year PMIS reflect the fiscal year for the upcoming school year. Finance still reflects the current year for the fiscal year in the general ledger. When running this process, the error report reflects funds for employees who are included in the process. It is necessary to create the funds with the new fiscal year on the Finance > Tables > Account Codes > Fund tab. It is NOT necessary to set up codes in the Chart of Accounts.
- Select Update TRS Year. If an employee has this field selected but they are now a 10-month employee, the TRS Year field is cleared when the 10-month move is processed.
- Select Update Workers’ Comp Annual and Remaining Payments if the LEA expenses worker's compensation in ASCENDER. The system references the # of months in Contract and makes the WC Ann Pymts and WC Remaining Pymts match this field.
- Leave the Additional Workers’ Comp Payments field blank. It is not necessary to populate this field even if the LEA expenses workers' compensation in ASCENDER.
- In the Select a Stat Minimum Salary Table (CYR/NYR) field, select the year (current or next ) that contains the tables with the updated amounts. If it is a legislative year and the state minimum amounts are updated.
- In the First Pay Date Codes or blank for ALL field, select only the first pay date codes for employees who receive their first paycheck in July.
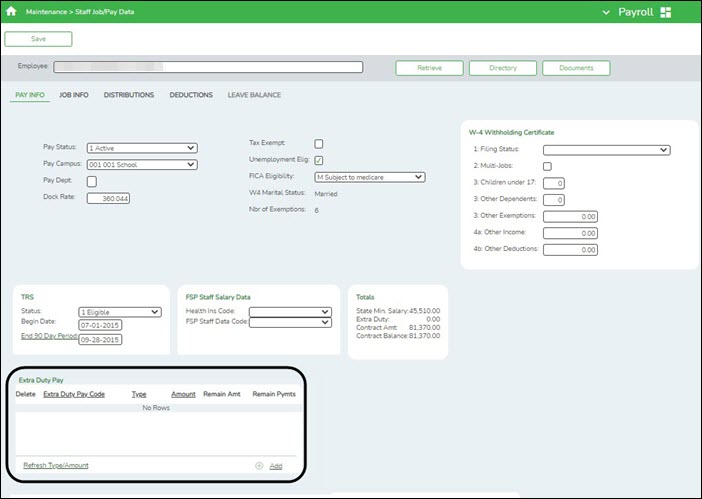
- Select Include Extra Duty to include the supplement pay with the regular pay.
❏ Click Execute to execute the process. The following reports are available:
- Move Forecast Process Error Listing Important errors
Error Message Description Warning: The employee has Contract Balance amounts not equal to zero for current jobs. The employee has not been paid off by payroll. Failure: Position Accept Changes Flag set to Y The position will not be moved to the current/payroll. Failure: Emp Nbr must have one position declared as primary. The error does not necessarily reference the Primary Job field on the position. If an employee has a regular position and a supplement position, but there is an error that causes the primary position to fail, this message often indicates that there is only a supplement position to be moved. It is recommended to review and correct any errors that begin below this message about primary positions. After making those corrections, run the process again. This may resolve the primary job errors.
This error also occurs when calendars have not been copied to the current year.Warning: Emp Nbr has multiple supplement positions for the same job; however, one or more of the following do not match: Campus ID, Dept, TRS Status Code, FTE Units, Incr Elig, Max Paymts, FICA Elig, Unemp Elig, EEOC, Workers Comp, Supplement Extra Days or Category Cd. The values from lowest Supplement Position Number/Billet may be used if new rows are inserted for the Pay Info and Job Info tabs. This error indicates that the fields on the Payroll > Tables > Salaries > Extra Duty tab do not match those selected on a supplemental position.
Use the Position Management > Inquiry > PMIS Staff Inquiry to determine the Position Number and Billet for any supplemental positions for the employee. Then, use the Position Management > Maintenance > PMIS Supplement Modify page to retrieve the position and billet and compare the fields on the position to the Payroll > Tables > Salary > Extra Duty tab for the extra duty number on the supplement. For example, in some cases the W/C code on the position may not match the W/C code on the table. Or, the Exp 373 field on the position may be selected, but the Exp 373 on the table for that extra duty code may not be selected. Either the table or the position needs to be updated so that they both match. If changes are made to the Extra Duty table, it is necessary to move the table to the current year payroll before proceeding.
- Update CYR Positions From Forecast - The error report lists any funds that need to be set up in the Finance tables.
- Update CYR Payroll From Forecast by Employee Name
- Update CYR Payroll From Forecast by Campus ID
❏ Click Generate Reports. The selected reports are displayed. Review the report.
❏ Click Continue to view the next report. Or, click Return to return to the report selection page.
❏ After reviewing all of the reports and correcting all errors, return to the report selection page and click Process to move the forecast records to the current year. You are prompted to create a backup.
After the process is completed, the actual update is performed. If the update is successful, a message is displayed indicating that the move forecast updates were successfully processed.
❏ Click Cancel to return to the Move Forecast to CYR Position and Payroll page without moving the forecast records to the current year.If corrections are processed, repeat this step.
Generate and save each report. Compare the Update CYR Positions From Forecast report to the user-created report that was previously generated to confirm that all 12-month employees are included. The last two reports contain the same information; one is sorted by employee name and the other by campus ID. These reports reflect the existing salary in the current year payroll and the new salary, which overwrites the current year payroll amounts. Review the reports for accuracy.
Confirm that the CYR salaries are accurate.
Log on to the current year.Verify the current year data to confirm that the salaries are correct. The highlighted fields are updated:
Mass update fiscal year.
Log on to the current year.Payroll > Utilities > Mass Update > Employee
Skip this step if your LEA has a 7/1 fiscal year.
Mass update the fiscal year to the next school year for all employees.
Select Fiscal Year and type the next year fiscal year. Before processing, stop to consider if the LEA uses other fiscal years in the account codes for employees. If the entered year is not the only used fiscal year, additional parameters may need to be selected.
Contact your regional ESC consultant if you need assistance.
Mass update the current year Wkly Hrs Sched and Hrs Per Day fields.
- Select Wkly Hrs Sched and type the number of hours displayed for the majority of employees. Any exceptions can be manually updated in the current year payroll. Reference the previously generated user-created report.
- For LEAs that use the hours per day functionality in the current year payroll, select the Hrs Per Day field and type the number of hours per day for the majority of employees.
- Use the parameters to select specific groups of employees for the update.
Generate the HRS6000 Account Code Comparison Report.
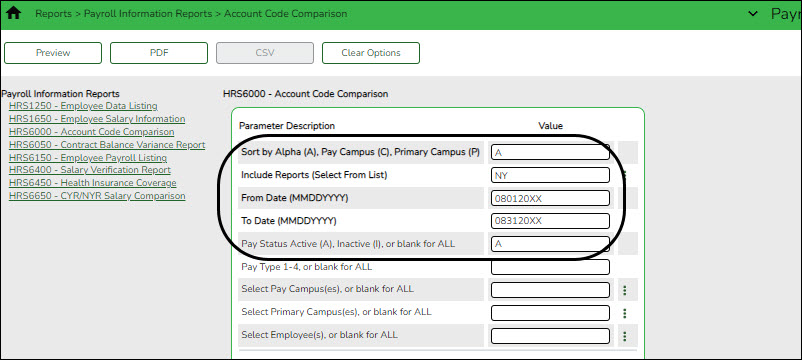
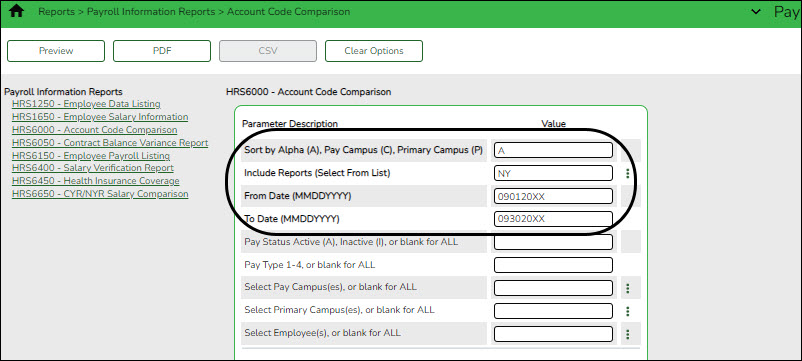
Payroll > Reports > Payroll Information Reports > HRS6000 - Account Code ComparisonThis report compares the account code on the employee’s master distribution record and compares it to the Chart of Accounts in Finance file ID C.
❏ Complete the following parameters:
If the LEA has multiple pay frequencies, generate the report for each frequency. The generated report should be blank. If any account codes are listed, determine if the account codes need to be added to the Chart of Accounts in Finance or if the employee distribution record needs to be modified.
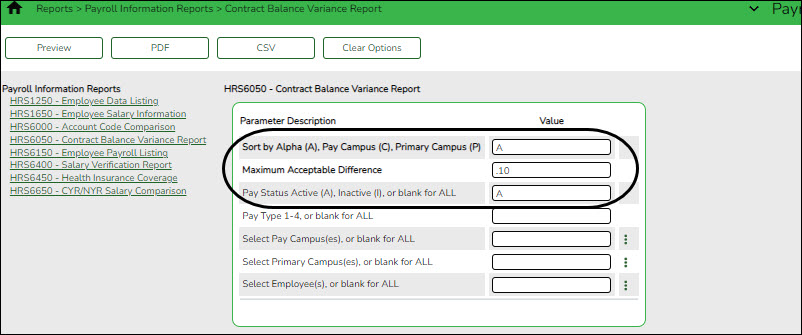
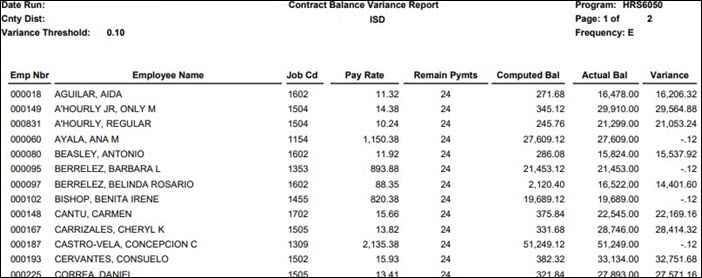
Generate the HRS6050 Contract Balance Variance Report.
Payroll > Reports > Payroll Information Reports > HRS6050 - Contract Balance Variance ReportThis report looks at the pay rate for each employee and multiplies it by the number of remaining payments, and compares that amount to the Contract Balance on the Job Info tab. If there is a variance of more than a few pennies, perform manual calculations to determine if any corrections are needed.
Generate the report for pay type 1 and again for pay type 2.
❏ Complete the following parameters:
Enter new hire data.
Log on to the current year.Use the Staff Job/Pay Data pages to enter new hire data. The HRS1550 - New Hire Report is helpful to identify these employees.
When new hires are entered in the next year Position Management and moved to the current year payroll, only the fields related to the position are populated.
Manually update the following:
Personnel > Maintenance > Employment Info
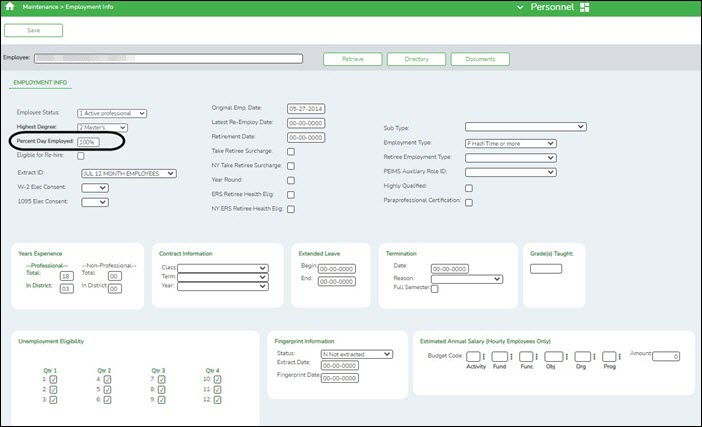
- Employee Status
- Highest Degree
- Percent Day Employed
- Original Employment Date or Latest Re-Employment Date
- Retirement Date (if applicable)
- Years of Experience
- Employment Type
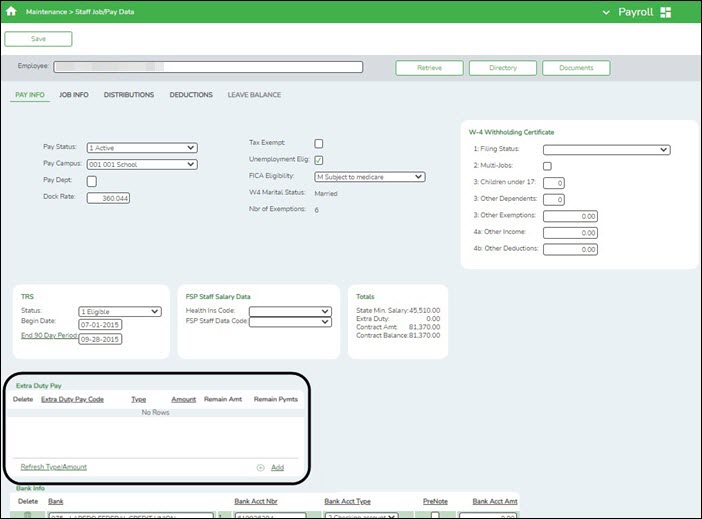
Payroll > Maintenance > Staff Job/Pay Data > Pay Info- Pay Campus
- FICA Eligibility
- W-4 Marital Status
- Nbr of Exemptions
- Bank Information
Complete the Payroll > Maintenance > Staff Job/Pay Data > Deductions tab.Payroll > Maintenance > Staff Job/Pay Data > Leave Balance - This tab can be updated in September using the First Pay Date of the School Year instructions.
Run payroll calculations.
Log on to the current year.Payroll > Payroll Processing > Run Payroll
Run payroll calculations to verify any errors.
10-month Employees
This process moves employees who receive their first paycheck in September from next year Position Management to current year Position Management. It also updates some of the fields on the following Maintenance > Staff Job/Pay Data tabs in the current year payroll:
- Employment Info
- Pay Info
- Job Info
- Distributions
Set up a separate simulation for employees who receive their first paycheck in September. If all of the employees receive their first check in September, you can use the simulation that was used for budgeting purposes. The simulation updates the fields in the next year positions for the new school year and clears the Accept Changes field. The new salary information from the next year position is updated in the current year, updating both the current year PMIS and the Staff Job/Pay Data fields for those employees.
- Verify account code fiscal years.
Position Management > Utilities > Update Fiscal Year by FundVerify that the account code fiscal years are accurate. This tab provides a list of the fund/fiscal years that are set up in the positions. This process increments the position distribution fiscal year by 1.
Note: Since the account codes are validated against the budget, there should not be any fiscal years less than the next year. If there are, generate a user-created report to identify the positions and manually update the information.
- Generate a user-created report.
Position Management > Reports > User Created Reports > CYR/NYR PositionsGenerate a PMIS user-created report to verify that the Increase Eligible field is selected for applicable positions. It is possible that the field is not selected for new LEA employees from last year.
❏ It is recommended to verify the Nbr Remain Payments field prior to calculating salaries.
❏ Select the following fields on the user-created report:
❏ Click Create Report. The report is displayed. Use the sort/filter functionality to group the applicable data.
Note: The number of remaining payments reflected on the report is displayed on the Job Info tab as the number of annual payments and the number of remaining payments for the employee for any P position type. If the LEA uses S acct types or business allowances for extra duties, S position types on this report should reflect the correct number of remaining payments. Prior to continuing, make the necessary position corrections.
- Verify retiree information.
Position Management > Maintenance > PMIS Position Modify > BudgetVerify that the TRS Status field is set to 5 - Retired for retirees. If the TRS status is incorrect, there is a possibility that the status will be incorrect (TRS-eligible) when the employee is moved to the current year payroll.
- Identify employees to move to the current year payroll.
Log on to the current year.Payroll > Reports > User Created Reports
Generate a user-created report to identify the employees who begin their new contract in August. It is possible that the employees are inactive in the current year, be sure that the Active Employees Only field is not selected.
❏ Prepare a list of new hires as a supplement to this list. Sort by the Payoff Date to verify that all employees with a July payoff date have the same date. For example, it is possible that an employee has a payoff date that is a day before or after the actual July payoff date.
❏ Use the current year payroll Payroll > Maintenance > Staff Job/Pay Data > Job Info tab to make corrections as needed.
❏ Generate a user-created report again to verify that all of the data is accurate. Filter the report using the LEA's July payoff date (YYYYMMDD).
Print or save the report for verification purposes.
- Create a salary simulation.
Log on to the next year.Prior to setting up and performing salary simulations, review the Position Management: Salary Simulations Overview document for a description of the Salary Simulation pages and samples of the available simulation reports.
Position Management > Utilities > Salary Simulation > Simulation Options
❏ Complete the following:
- (Recommended) In the Include Vacant Supplement Positions field, select Yes to budget for vacant supplement positions.
- In the Update Forecast field, select No.
- In the Update Budget field, select N - Do Not Update Budget.
- Include all first pay date codes for 10-month employees who receive their first paycheck in August. Include all local/annual, hourly/daily, midpoint (if applicable), and extra duty tables.
❏ Click Save.❏ Click Execute. Review the Simulation Process Error Listing and correct any errors prior to continuing the process.
- Generate the simulation reports and review all salaries.
- Review the user-created report to confirm that all 10-month employees or positions are included in the simulation. The reflected salaries are the amounts that are used to pay employees in the current year payroll.
If necessary, continue making corrections and running the simulation until all of the salary amounts are correct.
❏ Run the final simulation. This process updates the state step, pay step, and salary amount in the next year PMIS for all 10-month positions and clears the Accept Changes field.
- In the Update Forecast field, select Yes.
- Click Save.
- Generate and save the reports.
- Click Process to process the simulation. Create a backup.
- (If applicable) Move employees to next year payroll.
Log on to the next year.Position Management > Utilities > Move Forecast to NY Payroll
If your LEA uses ASCENDER Grade Reporting and/or accrues, 10-month employees may need to be moved to next year payroll.
❏ Complete the following:
- In the Select Pay Frequency field, select the frequency that represents the LEA's next year payroll.
- Select Update TRS Year Flag.
- In the Select First Pay Date Codes or blank for ALL, select the first pay date codes that represent the 10-month employees.
- Select Include Extra Duty pay.
The additional fields can be used to move select employees and positions.❏ Click Execute. Generate the Move Forecast Process Error Listing and correct any errors prior to continuing the process.
❏ Click Process to process the final simulation.
Contact your regional ESC consultant if you need assistance.
- Complete these steps before proceeding.
- Ensure that the August payroll is processed.
- Run the Regular Payroll (RP) extract with the Child Nutrition values (if applicable) and interface to Finance in order to run the TRS On-Behalf process and continue the end-of-year process in Finance.
- Create a folder (e.g., Preliminary Aug TRS Reports) and save all extracts for verification purposes.
- Do not report or submit any records to TRS at this time.
- (If applicable) Perform the August accrual process.
Skip this step if your LEA does not accrue in ASCENDER.After completing the August Accruals process and interfacing to Finance, ensure that there are no changes to the employee’s distribution accounts until the August accruals are posted to the payroll history as part of the end-of-year process (First Payroll of the School Year Checklist).
- Identify September start date employees.
Log on to the next year.Position Management > Reports > User Created Reports > CYR/NYR Positions
Generate a user-created report to identify employees who have a 9/1 or later start date.
Position Management > Maintenance > PMIS Position Modify > Position Record
Retrieve each employee.
For TRS purposes, select the Accept Changes field to avoid moving the employees to the current year payroll.
- Copy school calendars from next year to current year payroll.
Log on to the next year.Payroll > Next Year > Copy NYR Tables to CYR > Copy Next Year Tables
❏ In the School Calendar field, select only the 10-month employee calendars.
TIP: The calendar code is displayed in the first pay date code on the simulation (e.g., J40 includes calendar code 40
❏ Click Execute.
Note: If changes were made to any of the next year payroll tables (extra duty pay, hourly/daily salary, job code, local annual salary, etc.), copy the tables from the next year payroll to the current year payroll.
- Generate a user-created report.
Log on to the current year.Payroll > Reports > User Created Reports
❏ Generate a user-created report with the Hrs Per Day, Wkly Hrs Sched, and Payoff Date fields selected. These fields are overwritten when positions are moved from the next year to the current year.
❏ Identify the employees who have an August payoff date, and then use the Mass Update utility to update the fields after all positions are moved from the next year to the current year.
- Move forecast to current year position and payroll.
Log on to the next year.Position Management > Utilities > Move Forecast to CYR Position and Payroll
This process is used to move payroll and position forecast records to the current year PMIS with the same information that is set up in the next year PMIS records.
It also updates fields on the following Maintenance tabs: Employment Info, Pay Info, Job Info, Distribution
The Accept Changes field must be cleared when moving position records from forecast to current; otherwise, position records cannot be moved. The Accept Changes field is cleared after running a simulation with the Update Forecast field set to Yes. Similarly, you cannot run a simulation for positions without the Accept Changes field selected.
- In the Select Pay Frequency field, select the payroll frequency to be updated. LEAs with multiple frequencies must individually process each frequency.
- Do not select Include Vacant Supplements.
- Do not select Validate Accounts against General Ledger at this time. Distribution accounts in next year PMIS reflect the fiscal year for the upcoming school year. Finance still reflects the current year for the fiscal year in the general ledger. When running this process, the error report reflects funds for employees who are included in the process. It is necessary to create the funds with the new fiscal year on the Finance > Tables > Account Codes > Fund tab. It is NOT necessary to set up codes in the Chart of Accounts.
- Do not select Update TRS Year. If an employee has this field selected but they are now a 10-month employee, the TRS Year field is cleared when the 10-month move is processed.
- Select Update Workers’ Comp Annual and Remaining Payments if the LEA expenses worker's compensation in ASCENDER. The system references the # of months in Contract and makes the WC Ann Pymts and WC Remaining Pymts match this field.
- Leave the Additional Workers’ Comp Payments field blank. It is not necessary to populate this field even if the LEA expenses workers' compensation in ASCENDER.
- In the Select a Stat Minimum Salary Table (CYR/NYR) field, select the year (current or next ) that contains the tables with the updated amounts. If it is a legislative year and the state minimum amounts are updated.
- In the First Pay Date Codes or blank for ALL field, select only the first pay date codes for employees who receive their first paycheck in July.
- Select Include Extra Duty to include the supplement pay with the regular pay.
❏ Click Execute to execute the process. The following reports are available:
- Move Forecast Process Error Listing Important errors
Error Message Description Warning: The employee has Contract Balance amounts not equal to zero for current jobs. The employee has not been paid off by payroll. Failure: Position Accept Changes Flag set to Y The position will not be moved to the current/payroll. Failure: Emp Nbr must have one position declared as primary. The error does not necessarily reference the Primary Job field on the position. If an employee has a regular position and a supplement position, but there is an error that causes the primary position to fail, this message often indicates that there is only a supplement position to be moved. It is recommended to review and correct any errors that begin below this message about primary positions. After making those corrections, run the process again. This may resolve the primary job errors.
This error also occurs when calendars have not been copied to the current year.Warning: Emp Nbr has multiple supplement positions for the same job; however, one or more of the following do not match: Campus ID, Dept, TRS Status Code, FTE Units, Incr Elig, Max Paymts, FICA Elig, Unemp Elig, EEOC, Workers Comp, Supplement Extra Days or Category Cd. The values from lowest Supplement Position Number/Billet may be used if new rows are inserted for the Pay Info and Job Info tabs. This error indicates that the fields on the Payroll > Tables > Salaries > Extra Duty tab do not match those selected on a supplemental position.
Use the Position Management > Inquiry > PMIS Staff Inquiry to determine the Position Number and Billet for any supplemental positions for the employee. Then, use the Position Management > Maintenance > PMIS Supplement Modify page to retrieve the position and billet and compare the fields on the position to the Payroll > Tables > Salary > Extra Duty tab for the extra duty number on the supplement. For example, in some cases the W/C code on the position may not match the W/C code on the table. Or, the Exp 373 field on the position may be selected, but the Exp 373 on the table for that extra duty code may not be selected. Either the table or the position needs to be updated so that they both match. If changes are made to the Extra Duty table, it is necessary to move the table to the current year payroll before proceeding.
- Update CYR Positions From Forecast - The error report lists any funds that need to be set up in the Finance tables.
- Update CYR Payroll From Forecast by Employee Name
- Update CYR Payroll From Forecast by Campus ID
❏ Click Generate Reports. The selected reports are displayed. Review the report.
❏ Click Continue to view the next report. Or, click Return to return to the report selection page.
❏ After reviewing all of the reports and correcting all errors, return to the report selection page and click Process to move the forecast records to the current year. You are prompted to create a backup.
After the process is completed, the actual update is performed. If the update is successful, a message is displayed indicating that the move forecast updates were successfully processed.
❏ Click Cancel to return to the Move Forecast to CYR Position and Payroll page without moving the forecast records to the current year.If corrections are processed, repeat this step.
Generate and save each report. Compare the Update CYR Positions From Forecast report to the user-created report that was previously generated to confirm that all 10-month employees are included. The last two reports contain the same information; one is sorted by employee name and the other by campus ID. These reports reflect the existing salary in the current year payroll and the new salary, which overwrites the current year payroll amounts. Review the reports for accuracy.
Confirm that CYR salaries are accurate.
Log on to the current year.Verify the current year data to confirm that the salaries are correct. The highlighted fields are updated:
Mass update the fiscal year.
Log on to the current year.Payroll > Utilities > Mass Update > Employee
Skip this step if your LEA has a 7/1 fiscal year.
Mass update the fiscal year to the next school year for all employees.
Select Fiscal Year and type the next year fiscal year. Before processing, stop to consider if the LEA uses other fiscal years in the account codes for employees. If the entered year is not the only used fiscal year, additional parameters may need to be selected.
Contact your regional ESC consultant if you need assistance.
Mass update the current year Wkly Hrs Sched and Hrs Per Day fields.
- Select Wkly Hrs Sched and type the number of hours displayed for the majority of employees. Any exceptions can be manually updated in the current year payroll. Reference the previously generated user-created report.
- For LEAs that use the hours per day functionality in the current year payroll, select the Hrs Per Day field and type the number of hours per day for the majority of employees.
- Use the parameters to select specific groups of employees for the update.
Generate the HRS6000 Account Code Comparison Report.
Payroll > Reports > Payroll Information Reports > HRS6000 - Account Code ComparisonThis report compares the account code on the employee’s master distribution record and compares it to the Chart of Accounts in Finance file ID C.
Complete the following parameters.
If your LEA has multiple pay frequencies, generate the report for each frequency. The generated report should be blank. If any account codes are listed, determine if the account codes need to be added to the Chart of Accounts in Finance or if the employee distribution record needs to be modified.
Generate the HRS6050 Contract Balance Variance Report.
Payroll > Reports > Payroll Information Reports > HRS6050 - Contract Balance Variance ReportThis report looks at the pay rate for each employee and multiplies it by the number of remaining payments, and compares that amount to the Contract Balance on the Job Info tab. If there is a variance of more than a few pennies, perform manual calculations to determine if any corrections are needed.
Generate the report for pay type 1 and again for pay type 2.
❏ Complete the following parameters:
Enter new hire data.
Log on to the current year.Use the Staff Job/Pay Data pages to enter new hire data. The HRS1550 - New Hire Report is helpful to identify these employees.
When new hires are entered in the next year Position Management and moved to the current year payroll, only the fields related to the position are populated.
Manually update the following:
Personnel > Maintenance > Employment Info
- Employee Status
- Highest Degree
- Percent Day Employed
- Original Employment Date or Latest Re-Employment Date
- Retirement Date (if applicable)
- Years of Experience
- Employment Type
Payroll > Maintenance > Staff Job/Pay Data > Pay Info- Pay Campus
- FICA Eligibility
- W-4 Marital Status
- Nbr of Exemptions
- Bank Information
Complete the Payroll > Maintenance > Staff Job/Pay Data > Deductions tab.Payroll > Maintenance > Staff Job/Pay Data > Leave Balance - This tab can be updated in September using the First Pay Date of the School Year instructions.
Process TRS extracts and submit records/files.
Payroll > Payroll Processing > TRS Processing > ExtractProcess and submit all of the TRS extracts. Do not interface when processing the Regular Payroll (RP) extract.
Clear the Accept Changes field.
Position Management > Maintenance > PMIS Position Modify > Position RecordAfter all of the August TRS reports are in a completed status, clear the Accept Changes field in the next year PMIS for employees with a September start date.
Move calendars.
Move the TRS calendar and any calendars that pertain to employees with a 9/1 or later start date.Move employees with a September 1 or later start date to CYR.
Log on to the next year.Position Management > Utilities > Move Forecast to CYR Position and Payroll
Move employees with a 9/1 start date or later to the current year payroll. You can individually select employees. It is important to select ALL Position/Billets and Supplement Positions/Billets for the employee.
Run payroll calculations.
Log on to the current year.Payroll > Payroll Processing > Run Payroll
Run payroll calculations to verify any errors.
End-of-Year for PMIS LEAs
If you rolled employees from next year PMIS to current year PMIS, update the following information in District Administration to begin utilizing your CIP processes. Verify these fields are updated after rolling your employees to current year Payroll and current year Position Management.
District Administration > Options > Position Management
| Current Year | Type the four-digit fiscal year for the current school year in the YYYY format. When the position school year matches this year, the position is validated using the current year Human Resources tables. |
|---|---|
| Next Year | Type the four-digit fiscal year for the next school year in the YYYY format. This data is used for calculating next year historical data. When the position school year matches this year, the position is validated using the next year Human Resources tables. |
| Minimum Foundation Year | Type the four-digit current or next school year in the YYYY format to allow the system to select the corresponding tables to calculate the minimum foundation salary amount. If this year matches the current year value, the current Human Resources state minimum table is used. If this year matches the next year value, the next year Human Resources state minimum table is used. |
In the following example for the 2024-2025 school year, Current Year = 2025, Next Year = 2026, and Minimum Foundation Year = 2025.
District Administration > Tables > PMIS > First Pay Date
Update the first pay dates to reflect your LEA's July, August, and September current year pay dates.
Americans with Disabilities Act (ADA) and Web Accessibility
The Texas Computer Cooperative (TCC) is committed to making its websites accessible to all users. It is TCC policy to ensure that new and updated content complies with Web Content Accessibility Guidelines (WCAG) 2.0 Level AA. We welcome comments and suggestions to improve the accessibility of our websites. If the format of any material on our website interferes with your ability to access the information, use this form to leave a comment about the accessibility of our website.


