User Tools
Sidebar
Add this page to your book
Remove this page from your book
Teacher Guide to ASCENDER TeacherPortal
Daily Tasks
Attendance tasks:
Attendance > Post/View Attendance
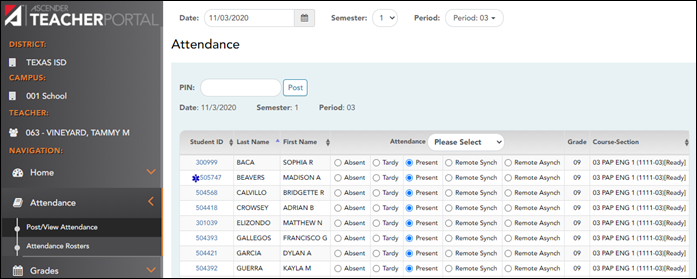
This page allows you to record and post attendance for each period. You can also view attendance data that has already been posted.
NOTE: You can post the data only once for each period-course. If you discover an error after you have posted, you must contact the attendance clerk to correct the record.
Flexible attendance cannot be posted from TeacherPortal.
❏ Retrieve the students.
| Date |
The current date is displayed by default. Type another date in the MMDDYYYY format, or click
NOTE: Some campuses may not allow you to post attendance for a prior date. In this case, the Post button is not displayed for prior dates. NOTE: You will get an error message, Attendance posting more than XX days prior not allowed., if the posting date is greater than the number of days entered in the Days field on Grade Reporting > Maintenance > TeacherPortal Options > Campus and the Allow Prior Days Posting field is checked. |
|---|---|
| Semester | The semester of the selected date is displayed by default. |
| Period |
Select the period-course for which to view or record attendance. By default, the first period for which you have not posted attendance is selected. |
The list of active students for the selected date and period-course is displayed.
The columns can be sorted according to your preferences.
If you sort by the last name column, the table sorts by last name, then first name. If you sort by the first name column, the table sorts by first name, then last name.
NOTE: Sorting the columns overrides the custom sort order established on the Arrange Student Order page. However, if you leave this page and return, the students are displayed in your custom sort order. (This does not apply on the Post/View Attendance page.)
- If attendance is already posted for the selected date-period-course, the attendance data is view only.
- If a student withdrew from the course since attendance was posted for the date, his attendance record is displayed.
- If a student's enrollment date is after the selected attendance date, his attendance record is not displayed.
- If you teach multiple courses for the selected period, by default, all students in all courses are listed. This setting can be changed using the Combine Courses in Attendance field on Settings > Update Profile.
- Attendance-only courses are included in the class list.
- Students whose attendance is excluded from reporting are listed, but you cannot record attendance. (This is a rare circumstance.)
- Students who withdrew from the course are no longer listed.
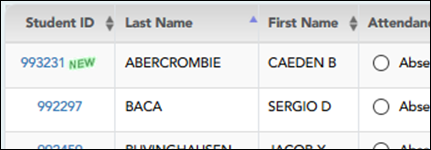
| Student ID | The student's ID is displayed. Click the student ID to view the student's profile. |
|---|---|
 | The Star of Life icon is displayed for any student who has medical circumstances you should be aware of. To view details, click the student ID to view the student's profile (Medical Alerts section). |
| Last Name First Name | The first and last names of the students in the selected course-period are listed. |
❏ Under Attendance:
By default, all students are set to Present. You will see these options if your campus chooses to use Remote Asynch attendance, Remote Sync attendance, or Both.
Present - physically present in the classroom
Remote Synch - online at the time of class
Remote Asynch - will complete the assignment at a later time
As you mark students Absent or Tardy, the rows change color.

• Tardy students are shaded yellow.
• Absent students are shaded red.
If a student's absence is pre-posted (e.g., a scheduled band trip or a student who called in sick), the student is shaded gray, and the Attendance field displays the reason for the absence. Pre-posted absences are handled by the attendance clerk, so you are not able to mark attendance for the student.
• The Absent and Tardy fields are disabled during the ADA period, on the first day of school, and on the first day of enrollment.
• The Absent and Tardy fields are enabled during the ADA period if the student has a withdrawal reason due to a status change.
The Tardy field may not be displayed depending on campus attendance settings.
If the district allows tardies during the ADA period, the tardies may only be valid during a set number of minutes for the period. After this number of minutes has passed, the student should no longer be marked as Tardy and should be marked as Absent, although the program does not prevent you from marking a student as Tardy (except on the first day of semester 1). The number of minutes is determined by the district. If applicable, a message is displayed above the table indicating when tardies are valid.

Students who are on a track that does not meet on the selected date are listed; however, the Absent, Tardy, and Present fields are replaced by a message indicating that the date is not a membership day for the student.
Students whose first day (or re-entry day) is not the official first day of school cannot be marked absent during the ADA period on their first day. The Absent option is disabled.
| Grade | The student's grade level is displayed. |
|---|---|
| Course Section | The course-section is displayed. |
| # Students | The total number of students enrolled in this period is displayed at the bottom of the Student ID column. |
| Click to print the attendance roster for one period or all periods. The Attendance Roster Report Selection page opens allowing you to make selections for printing the Attendance Roster report. |
Post attendance:
❏ After you have recorded attendance for the course, review your input carefully.
Be sure to follow procedures established by the district for recording attendance.
When you are satisfied with your attendance input, you must post the data.
| PIN | Type your four-digit personal identification number (PIN).
For your convenience, the PIN box and Post button are displayed at the top and bottom of the attendance list. You can use either box to post attendance. |
|---|
❏ Click Post.
If you indicated that all students are present (and no absences were previously entered by the attendance clerk), you are prompted you to confirm that all students are marked present.

❏ Click Confirm to confirm.
Attendance is posted.
Generate attendance verification report.
Reports > Attendance Verification
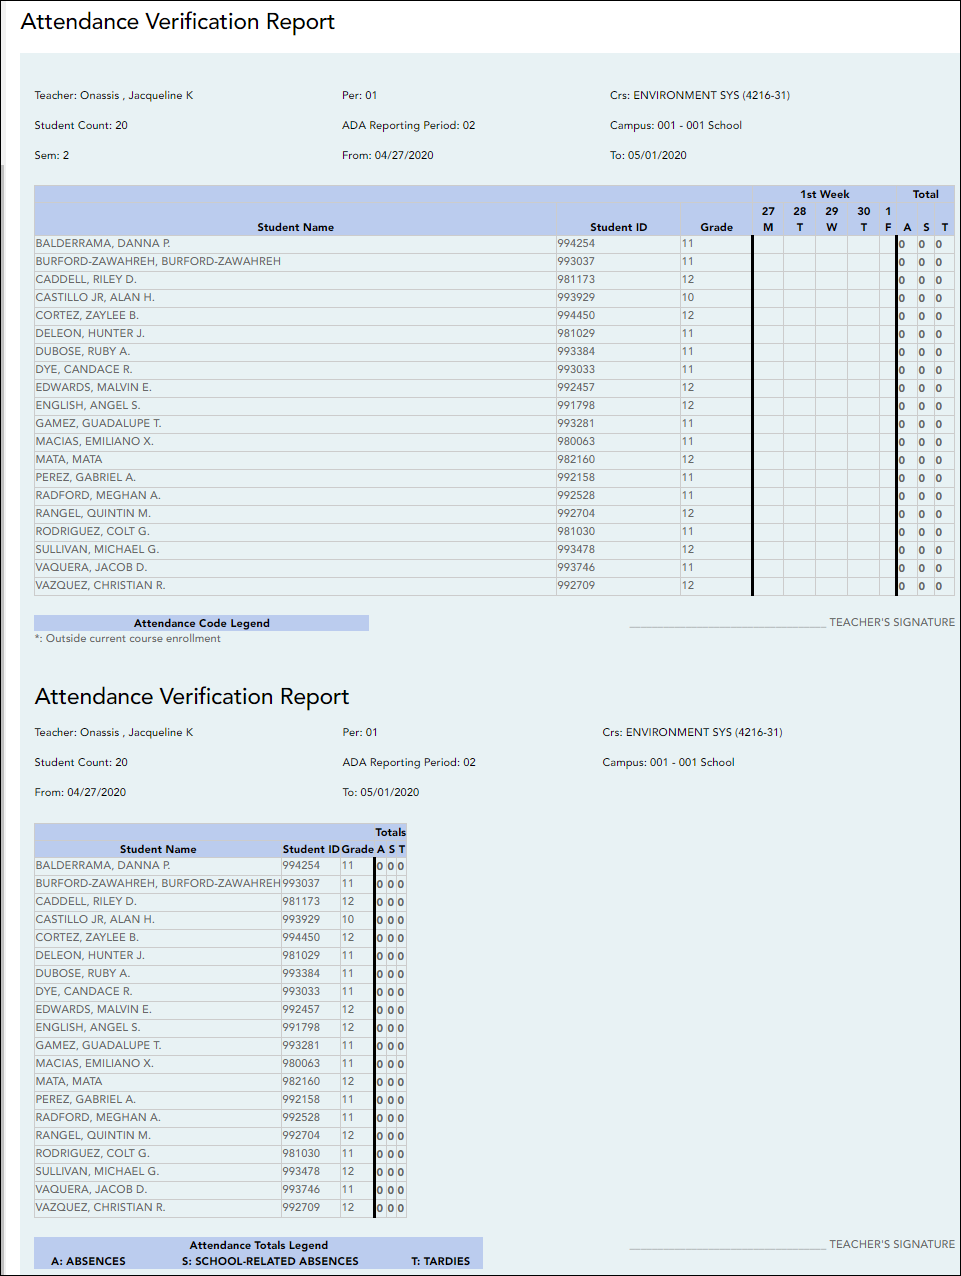
This report displays attendance for all of your students for a selected course-section and date range. You can view data for up to one semester. You can also generate a summary report that displays only totals for the selected date range.
The following codes are used:
- A - Excused absence
- S - School-related absences
- T - Tardy
- X - Truant
An asterisk next to the attendance code indicates that the absence or tardy occurred in a course other than the course the student is currently enrolled in (e.g., if he transferred from one course to another during the school year).
NOTES:
- Inservice work days are indicated with an I in the column heading.
- Saturday may be a valid attendance date, even if the course does not meet on Saturday. This may be used for bad weather makeup days.
- If you are printing the report for more than three weeks, you should set the printer orientation setting to landscape or the Page Scaling field to Shrink to Printable Area. If the Shrink to Printable Area setting is not enabled, the landscape orientation will accommodate up to six weeks plus the Total column per page. Additional weeks (up to one semester) can be generated by entering the appropriate dates in the From Date and To Date fields; however, the report will print on multiple sheets of paper with a Total column on each page.
❏ Specify report options:
| Semester | The current semester is displayed. You can select a different semester. |
|---|---|
| Course-Section | Select the course-section and period for which to print the report. |
| From Date To Date | Enter the beginning and ending dates. Both dates must fall within the selected semester. |
|---|---|
| Include Withdrawn Students | Withdrawn students are not automatically included. Select the field to include withdrawn students in the report. |
| Summary Only | Select to display only totals for the selected date range. If not selected, the report lists all absences for the selected date range. |
❏ Click Generate.
- The report opens in a new window, and you can print the report from that window.
- The report selection page remains open on your desktop.
Attendance > Attendance Rosters
This page allows you to print attendance rosters for one course or all of your courses at one time. A signature line is provided at the bottom of each period-course.
| Date | Type a date in the MMDDYYYY format, or click |
|---|---|
| Semester | The current semester is displayed by default. You can select another semester. |
| Period | Select the period-course for which you want to print the roster. Or, select ALL CLASSES to print rosters for all periods. |
| Sorting Options | Indicate if you want to sort the rosters by student ID, last name, first name, or course-section. |
❏ Click Generate.
- The report opens in a new window, and you can print the report from that window.
- The report selection page remains open on your desktop.
Generate seating chart report.
This report prints a teacher's seating charts for all periods or one period. For each period, the seating chart is displayed followed by a list of students who are not assigned to seats. The seating chart lists the student name, gender, and ID.
If printed for all periods, each period prints on a separate page.
NOTE: If that field has been changed, and the seating charts have not been re-saved on Settings > Manage Charts since the setting was changed, a warning message is displayed when the report is generated indicating that the reports will not be accurate until the Manage Seating Charts page has been re-saved. You must review the seating chart for each period on the Manage Seating Charts page, make any necessary changes, and then re-save each chart.
❏ Specify report options:
| Semester | The current semester is displayed. You can select a different semester. | ||||
|---|---|---|---|---|---|
| Period | Select the period-course(s) to print the seating chart for, or select ALL CLASSES to print seating charts for all periods. If Combine Courses in Attendance is selected on your Settings > Update Profile page, the courses are combined by period. |
||||
| width | Select the width setting for the report.
For either width setting, you can adjust the orientation when you print. Select Landscape to increase the number of students that fit on the page. |
||||
| Show Pictures | Select to display student photos in the seating chart. Photos are only available if they have been added by the district. |
❏ Click Generate.
- The report opens in a new window, and you can print the report from that window.
- The report selection page remains open on your desktop.
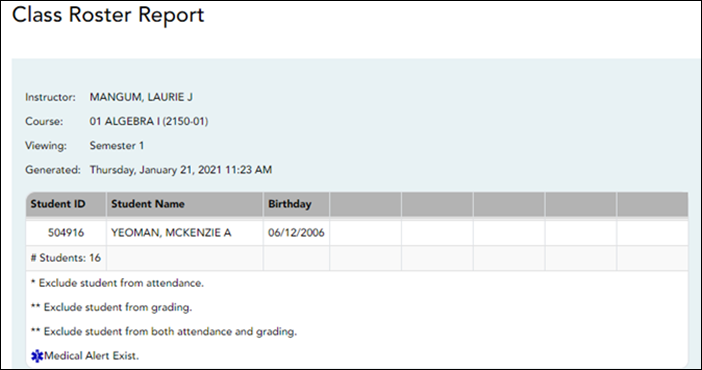
This report provides a blank class roster by semester and course, including a list of students enrolled in the course and up to 50 blank columns. You can choose the sort order and whether to include the student’s birth date and contact information. The report can be exported in CSV format.
If you print the report for a course group, the Course Section column is included allowing you to identify the course-section in which the student is enrolled.
❏ Specify report options:
| Semester | The current semester is displayed. You can select a different semester. | ||||||||
|---|---|---|---|---|---|---|---|---|---|
| Course-Section | Select the course-section and period for which to print the report. The drop down lists the two-digit period and course name. The course number and section number are in parentheses. If course groups have been created on the Course Grouping page, the groups are listed as well as the individual courses. |
||||||||
| Columns | Type the number of blank columns to display on the report, up to 50. | ||||||||
| Display Options |
|
||||||||
| Sorting Options | Indicate the order in which to sort the report data. You can sort by student name (last name), Student ID, course-section (for course groups), birth date (if included), or custom student order. Custom student order is the order specified for the course-section on Settings > Arrange Student Order. |
❏ Click Generate.
- The report opens in a new window, and you can print the report from that window.
- The report selection page remains open on your desktop.
Grading tasks:
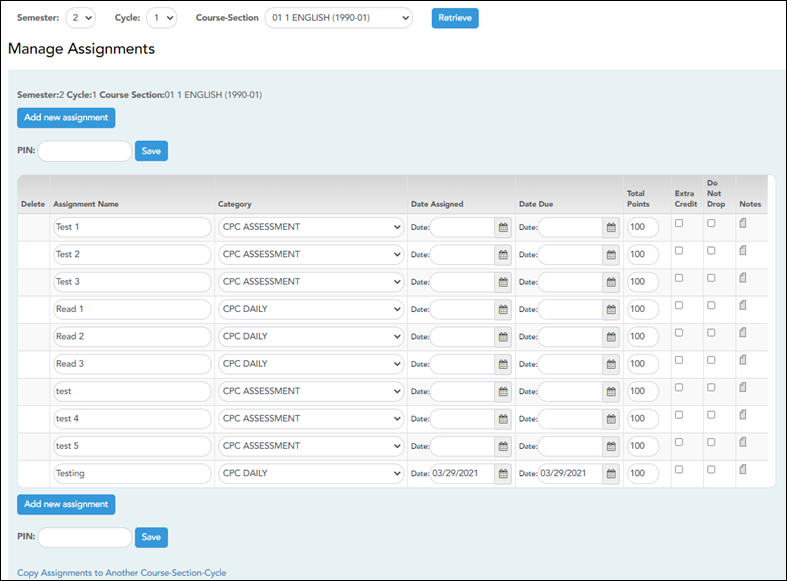
This page allows you to add assignments for your active courses, including extra credit assignments. You can also copy the assignments to other courses.
Categories must be established for the course on Settings > Manage Categories before you can add assignments.
Different fields are displayed according to the type of course selected (category-based (i.e., regular) courses and standards-based courses).
You cannot make changes to assignments once the cycle is closed.
❏ Specify the course-section:
| Semester | The current semester is displayed by default. You can select another semester. |
|---|---|
| Cycle | The current cycle is displayed by default. You can select another cycle. |
| Course-Section |
Select the course-section you want to add assignments for. The drop down lists the two-digit period and course name. The course number and section number are in parentheses.
NOTE: For courses that are part of a course group, any changes to an assignment will apply to all courses in the group. An assignment can only be modified or deleted if no grades exist for the assignment for any course in the group. |
❏ Click Retrieve.
Assignments that have previously been entered for the semester-cycle-course-section are listed. Otherwise, the message “No Assignment Exists” is displayed.
❏ Click Add new assignment to add a new assignment.
A blank row is added to the grid.
| Assignment Name |
Type a name for the assignment (e.g., Pop Quiz 1), up to 50 characters, that is unique no matter what the category is per semester/cycle. Assignment names can be changed at any time, as needed.
TIP: It is helpful to keep the assignment name as brief as possible; however, the name should be descriptive enough to distinguish it from other assignments. Longer assignment names require more space on the Assignment Grades page, which may result in a more cumbersome page.
|
||||||
|---|---|---|---|---|---|---|---|
| Category |
Select a category for the assignment. These categories are established on Settings > Manage Categories. |
||||||
| Edit Standards/Skills |
For standards-based courses, the number of standards currently associated for the assignment is displayed.
|
||||||
| Date Assigned |
Type the assignment date in the MMDDYYYY format, or click NOTE: This field is critical for running the Graded Assignment Count admin report. If this field is blank for an assignment, and a date range is selected when running the report, the assignment is not included in the report. |
||||||
| Date Due |
Type the assignment date in the MMDDYYYY format, or click NOTE: You can also set a default value for this field using the in the Default Assignment Due Date field on Settings > Update Profile. Valid options are no default date, the current date, or up to five days in the future. You can override the default date as needed. |
||||||
| Total Points |
Type the total number of possible points for the assignment. Do not type zero unless it is an extra credit assignment. The field is set to 100 by default. NOTE: If you have assigned a rubric chart to this assignment, this field displays the total possible points for the rubric chart and cannot be updated.
If you are using percentage-based weighting, and if the field is not set to 100, the warning icon WARNING: If all assignments in a category do not have the same total points value, then the calculations for dropping a specified number of assignments for the category (as indicated in the # Drop field on Settings > Manage Categories) may result in an average that is different than expected. If the total points value varies, the grade with the lowest number of points may not necessarily be the lowest grade. |
||||||
| Extra Credit | Select if the assignment is for extra credit. NOTE: If the assignment is for extra credit, the Total Points is set to zero and cannot be changed.
|
||||||
| Do Not Drop |
Select if you do not want to drop that particular assignment. This field relates to the # Drop field on Settings > Manage Categories. |
||||||
| Rubric |
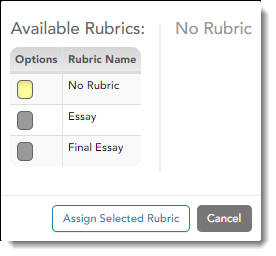
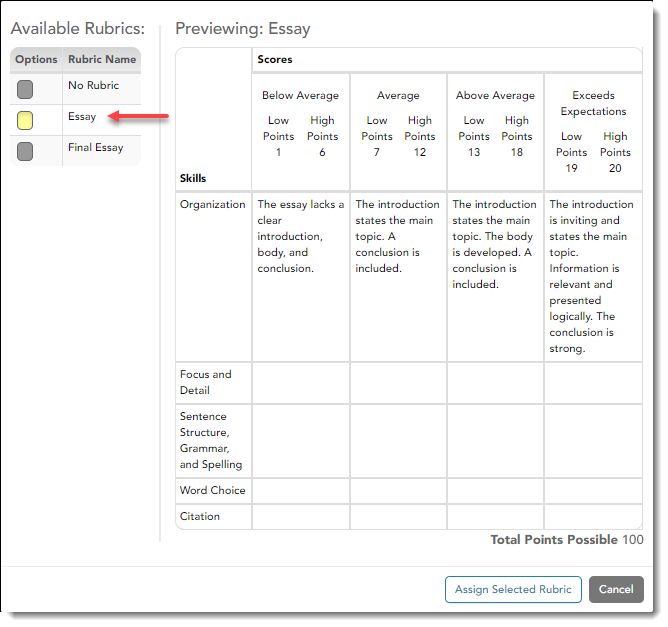
You can assign an existing rubric chart to the assignment, which allows you to grade the assignment using a rubric chart. The rubric charts are created on Settings > Rubric Setup.
• If a rubric chart is not currently associated with the assignment, the
The rubric chart window opens.
The window closes.
IMPORTANT: The Total Points field for the assignment changes to display the maximum possible points for the rubric chart (maximum possible points x skill count) and is read-only. |
||||||
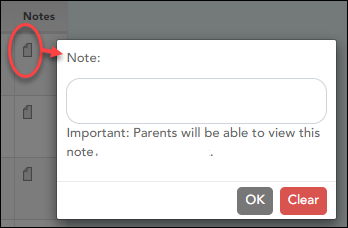
| Notes |
❏ Click
|
||||||
 |
Click to delete an assignment.
NOTE: You cannot delete an assignment if grades have been posted for the assignment. |
Save assignments:
| PIN | Type your four-digit personal identification number (PIN). |
|---|
❏ Click Save.
Copy assignments to another course-section:
Once you have saved assignments for a course, you can copy the assignments to another course-section.
❏ Use the Semester, Cycle, and Course-Section fields to select the course-section from which to copy assignments.
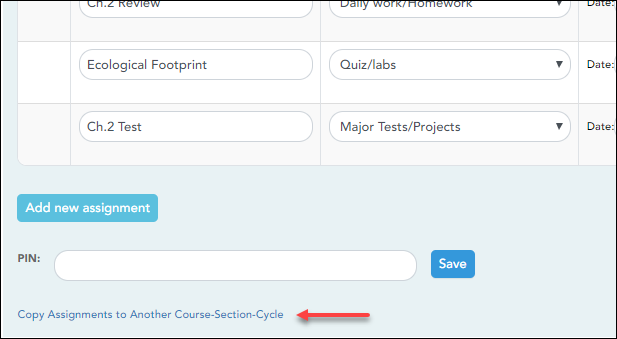
❏ Click Copy Assignments to Another Course-Section-Cycle.
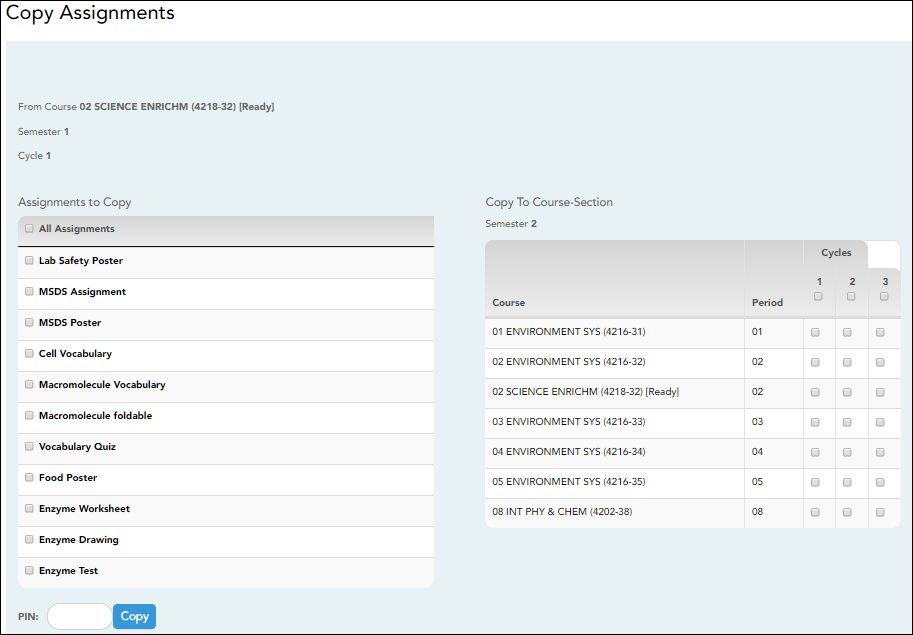
The Copy Assignments page opens.
Once you establish the assignments for a course on Settings > Manage Assignments, you can copy the assignments to other course-sections.
- If you are copying assignments for the current semester-cycle, the entire assignment record is copied, including the assignment date and due date.
- If you are copying assignments to a future semester-cycle, the assignment record is copied without the assignment date and due date.
This page is only accessible from the Manage Assignments page.
| From Course | The course-section, semester, and cycle selected on previous page are displayed. This is the course-section you are copying categories from. |
|---|---|
| Assignments to Copy | All assignments for the selected course-section are listed. Select specific assignments, or select All Assignments to select all. |
| Copy To Course-Section | All course-sections for all cycles are listed. Closed cycles are disabled. Select specific course-sections to copy assignments to, or select the cycle check box to select all course-sections for the cycle. |
| PIN | Type your four-digit personal identification number (PIN). |
|---|
❏ Click Copy.
The list of assignments and the courses to which the assignments were copied is displayed.
❏ Click Return to Assignments to return to the Manage Assignments page.
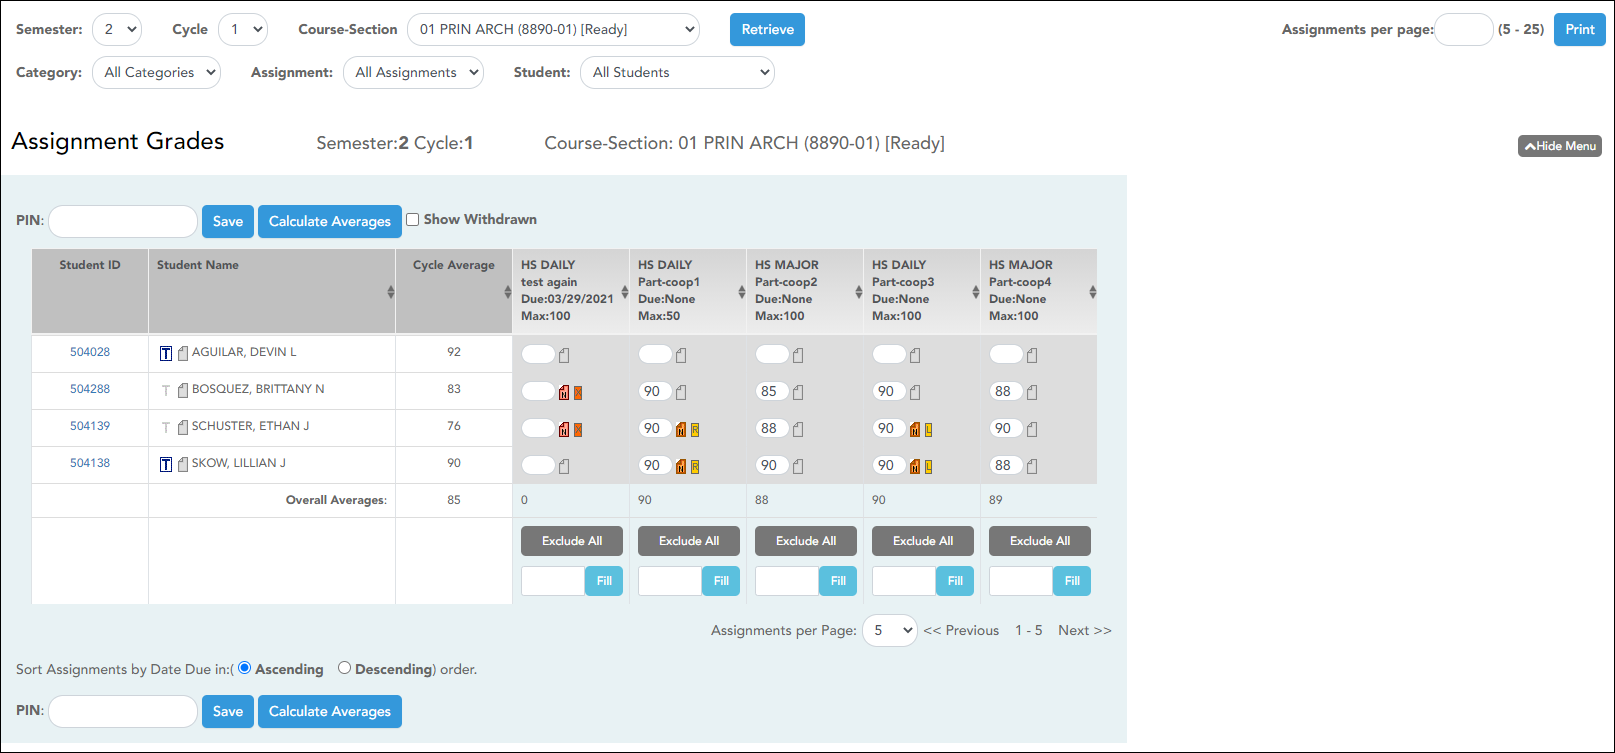
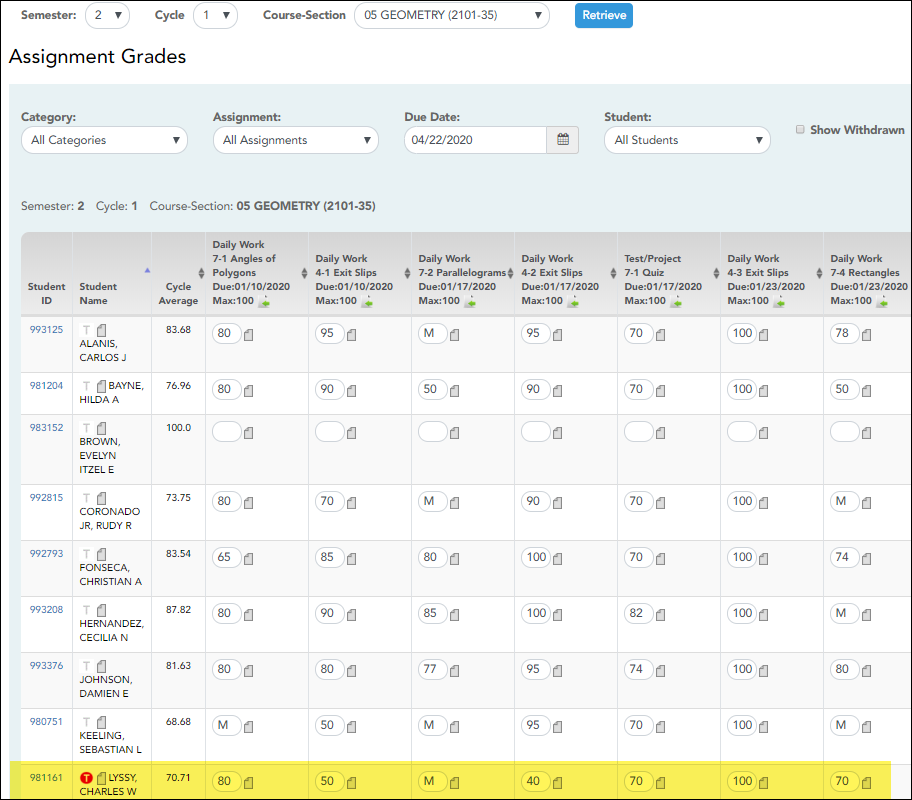
This page allows you to view and enter assignment grades for students by semester, cycle, and course-section. You can enter comments and indicators for each assignment grade (e.g., excluded, late, or re-do), and you can print grades by assignment. You can also accept transfer students into a course and enter a walk-in average for those students.
NOTE: Students are not listed on this page prior to the first day of school.
❏ Select the course-section you want to enter assignment grades for:
| Semester | The current semester is displayed by default. You can select another semester. |
|---|---|
| Cycle | The current cycle is displayed by default. You can select another cycle. |
| Course-Section |
Select the course-section you want to enter assignment grades for. The drop down lists the two-digit period and course name. The course number and section number are in parentheses.
NOTES: |
❏ Click Retrieve.
The students and assignments are displayed according to your selections in the previous steps. Students are sorted by last name, unless you have specified a custom sort order on Settings > Arrange Student Order.
❏ You can further filter the students and assignments displayed:
| Category |
Select the category to enter assignment grades for, or select All Categories. These categories are set up on Settings > Manage Categories. |
|---|---|
| Assignment | Select the assignment you want to enter grades for, or select All Assignments. |
| Student | Select the student you want to filter by, or select All Students. |
The grid lists all students currently enrolled in the course-section and the assignments according to your selections.
The columns can be sorted according to your preferences.
If you sort by the last name column, the table sorts by last name, then first name. If you sort by the first name column, the table sorts by first name, then last name.
NOTE: Sorting the columns overrides the custom sort order established on the Arrange Student Order page. However, if you leave this page and return, the students are displayed in your custom sort order. (This does not apply on the Post/View Attendance page.)
Student ID: The student's ID is displayed. Click the student ID to view the student's profile.
❏ Student Name:
 (Star of Life):
The Star of Life icon is displayed for any student who has medical circumstances you should be aware of. To view details, click the student ID to view the student's profile (Medical Alerts section).
Next to the student's name, click the icon to view or add a course note about the student. The note icon is yellow  if a course note already exists for the student.
The Student Course Note pop-up window opens allowing you to enter or update comments.
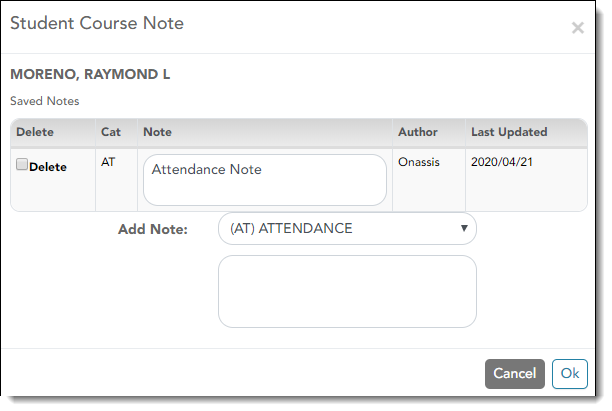
NOTE: These notes are not displayed to parents/guardians.
The student's name is displayed. Verify that you are adding/updating the note for the correct student.
❏ Under Saved Notes:
Any existing notes for the student are listed. You can view all notes for courses to which you have access.
Cat: Note category codes:
• AT - Attendance
• DS - Discipline
• GN - General
• HL - Health
• SP - Supplies
Note: If you created the note, you can update it, up to 3269 characters.
Author: The last name of the person who entered the note is displayed based on the user login.
Last Updated: The date on which the note was last updated is displayed.
Delete: Select to delete an existing note. You can only delete a note if you created it, or if you are the Teacher of Record for the course. For example, the Teacher of Record can delete a note entered by an Assistant Teacher for the course.
❏ Under Add Note:
To add a new note, select the category code indicating what the new note is related to, such as AT for attendance.
In the text box, type the new note, up to 3269 characters per note.
❏ Click Save.
NOTE: The Student Notes report provides a report of these course notes.
Beside each student's name is the transfer icon  (i.e., a gray T) indicating that he is not a transfer student. If a student transfers into the class, the red transfer icon
  is displayed next to his name.
NOTE: The student will only have a red T  if he is transferring from one section to another section within the same course. Otherwise the T will remain gray.
If a student transfers into the course, you must accept the student into the course and enter his walk-in transfer average and weight. The campus, student ID, semester, and cycle must all be the same for the average to transfer.
❏ To accept the transfer student into the course-section, click  .
.
The Transfer Walk-In Average window opens.
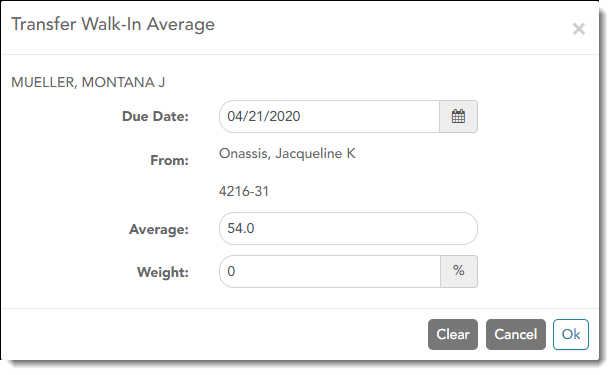
Date: The student's transfer date is displayed by default. You can type over the date in the MMDDYYYY format. Or, click ![]() to select a date from the calendar.
to select a date from the calendar.
From: The teacher name, course number, and section are displayed for the course from which the student transferred. This data is only displayed if the student transferred from a different section of the same course and has a transfer average.
Average: The student's transfer average is displayed if available. Otherwise, you can type the student's walk-in average.
This is the student's average in the class from which he transferred. You can enter a numeric grade or an alphabetical (ABCD or ESNU) grade.
NOTE: If a student transferred from a course that posts letter grades to a course that posts numeric grades, and a letter grade is entered for his transfer average, the student's working cycle average is
displayed as a numeric grade.
See the Calculate Averages guide for an explanation of calculating averages for each weighting type for an explanation of calculating averages for transfer students.
Weight: The field displays 0 for a transfer student who has not yet been accepted into the class.
To accept the student into your class, type the weight you want to apply to the student's transfer average. For example, if a student transferred three weeks into a six-week cycle, you may want to enter
a weight of 50%. The maximum weight you can enter is 100.
The student's transfer icon remains red until a weight is entered and saved.
Once you enter and save a weight, the student's transfer icon turns blue  . The blue icon remains until the end of the semester.
❏ Click Ok.
If you entered and saved the transfer average data for the student, his walk-in average is calculated in his working cycle average.
NOTE: The changes are not actually saved until you type your PIN and click Save Grades.
Clear: Clear all data previously entered for the transfer student.
NOTE: Any course assignments that were due prior to the student's transfer date are excluded for the student, and the Exclude indicator  is displayed for the assignments. You can override the exclusion if you want the transfer student to complete an assignment that was due prior to his transfer date.
To override the exclusion, click  , clear the Exclude field. Click OK and save.
NOTE: For standards-base courses, accepting a transfer student is a manual process. The transfer icon is not displayed.
Calculating the average for a transfer student:
If a student transfers into the course during a cycle, the following calculations are used to determine his working cycle average:
Formula for transfer student:
| 1. |
For the transfer grade, multiply the Transfer Average by the Transfer Weight: |
| 2. |
Calculate the average of the student's assignment grades (for the remainder of the cycle) using the steps described above under Percent-based, Point-based, or Multiplier-based. |
| 3. |
Calculate the weight for the Working Cycle Average: |
| 4. |
Calculate the Working Cycle Average Value. |
| 5. |
Take the sum of the Transfer Value and the Working Cycle Average Value. |
If a student transferred from a course that posts letter grades to a course that posts numeric grades and a letter grade is entered for his transfer average, the grade conversion table is used to determine the numeric value.
❏ Cycle Average:
The student's working cycle average is displayed. The average is updated every time you access the page, click Calculate Averages, or save grades. If the student does not yet have a working cycle average, the field is blank.
• The working cycle average is calculated according to the weighting selected on Settings > Manage Categories, as well as calculations described in the the Calculate Averages guide.
• The working cycle average is rounded to a whole number. If the decimal value is .5 or greater, the grade is rounded up.
• If you use percentage-based categories, and you have a category that does not yet have grades (e.g., if it is early in the cycle and you have not administered any tests), the student's working cycle average is calculated based on the percentages for the categories that have grades. For more information on calculations, view the Help for Weighting Type on Settings > Manage Categories.
❏ Show Averages as Alpha:
If the course is set up to post alphabetical grades, the field is displayed.
• Select the field to display averages as alphabetical grades.
• Clear the field to display the averages as numbers.
NOTE: For courses that use alphabetical grades, a cookie is set to remember the setting, and the page will always display averages according to the setting by default. Averages are also displayed on the Cycle Grades page according to the setting. Courses that use numeric grades will always display grades numerically.
❏ Sort Assignments by Date Due in:
Assignments are listed left to right in ascending order by the due date. (If there is no due date, they are displayed by the date assigned. Otherwise, the date entered is used.)
To change the assignment display order to descending, change this setting to Descending.
❏ Category:
The category for the assignment is displayed first in the column heading row, above the assignment name.
The assignments are color-coded according to the category. If a color is assigned to the category on Settings > Administer Categories, the column displays the selected color.
❏ Assignment Name:
The assignment name is displayed in the column heading below the category name.
❏ Due:
The assignment due date is displayed if entered on Settings > Manage Assignments.
❏ Max:
The total points possible for the assignment is displayed if entered in the Total Points field on Settings > Manage Assignments.
For campuses that use curriculum and test taking systems (e.g., eInstruction and Eduphoria), click the icon to import a data file that only includes the student's ID, assignment grade, first name, and last name.
NOTE: The import function is not available on mobile devices.
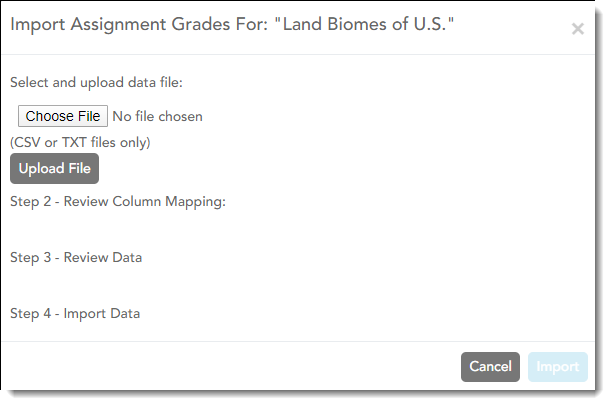
• Only .csv and .txt files can be imported. The text file must be comma-separated data with one student per row.
• Attempting to import for students not in the course will create exceptions errors that cause the import to fail. Deleting these rows should allow the import to be successful.
• You can only import assignment grades for existing students.
• You can only import grades where students has blank grades for the particular assignment. If the student already has grades, the data is displayed in red and crossed out.
Steps for importing the data file:
❏ Click  to import grades for the assignment.
The Import Assignment Grades window opens allowing you to upload the data file, review the data, and import the file.
❏ Under Step 1, click Browse to select the data file. Locate and open the file.
The file name is displayed.
❏ Click Upload File.
When the upload is complete, the “Success” message is displayed indicating the name of the uploaded file.
❏ Under Step 2, review the default file format and adjust the columns of your data if necessary:
❏ Under To Column, the default file format is listed. The format is determined according to the type of data found in the uploaded file. For example, a six-digit string of numbers is assumed to be the student ID, and a string of up to three characters is assumed to be an assignment grade. There are four columns:
• Student ID
• Assign Grade
• First Name
• Last Name
NOTE: For the six-digit student ID, include all leading zeros.
❏ Under From Column, make adjustments as needed.
For example, if the default file format has the first name before the last name, and you want the last name before the first name, you can change the columns under From Column accordingly (i.e., change column 3 to 4, and change column 4 to 3). NOTE: The order of the first and last names is not important when uploading this file.
❏ If you assign the same column number to more than one column, the message “duplicate” is displayed by the duplicated column. You must correct this before proceeding.
❏ As you make any changes under Step 2, the data displayed under Step 3 changes accordingly. Review the data under Step 3 before importing the file.
❏ When the data under Step 3 is being refreshed, the message “validating” is displayed. Wait until the message goes away.
• If errors are encountered, the records with errors are displayed in red with a strikethrough. The number of errors found is listed below the grid. Errors may include mismatched or invalid data.
• Currently, the only acceptable error is an error due to the student already having a grade for the assignment. Exception errors due to invaid records will cause the import to fail.
❏ When you are satisfied with the data under Step 3, click Import Now under Step 4. The data is imported, and the assignment grade fields on the Assignment Grades page are populated with data from the import file.
The Import Now button is disabled if there are no valid records to import.
NOTE: If the course has any withdrawn students, the import file has a record for the withdrawn students. Therefore, you must select Show withdrawn students on the Assignment Grades page to import the grade for the withdrawn students. If you do not select Show withdrawn students, the import file will generate errors for the withdrawn students.
❏ Assignments per Page
By default, the page displays only the first five assignments. You can change the number of assignments displayed.
To print all assignments, select All from the drop-down menu or select the number of specific assignments to be printed.

❏ Previous/Next:
If there are more assignments, use the buttons to view the other assignments.
❏ Enter the grades in the grid.
NOTES:
- Only whole numbers can be entered for numeric grades.
- To add extra credit points, you can add points to the assignment grade.
- When you enter or change a grade, the table cell turns gray to indicate that the grade was changed but not yet saved. Once you save the assignment grades, the cell is no longer gray.
- If you type an invalid grade, such as a letter grade that does not have a conversion value, the cell is shaded red. You must correct the entry before you can save the grades.
- Dropped grades are italicized.
- If the course is set up for alphabetical or ESNU grade posting, you can type letter grades or numeric grades. If you type a letter grade, it is automatically converted to a numeric grade for calculating the working cycle average, according to the conversion values set by the campus.
- Other codes can be typed in place of a grade:
- M - Missing
- I - Incomplete (If you type I for any grade, the student's working cycle average will be I until a grade is entered.)
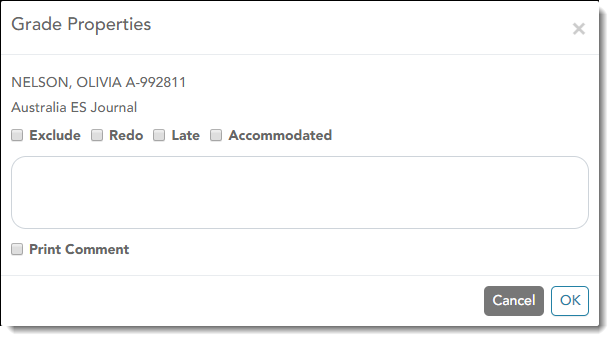
- X - Excluded (The X functions the same way as clicking the note icon and selecting Exclude from the Grade Properties window.)
- Only one shortcut code can be entered per assignment grade.
- If the campus has disabled posting of grades for prior cycles, you cannot make changes to assignment grades for previous semesters-cycles. The Save Grades button is disabled.
- Grades can be entered in the shaded fields for the selected skills on the Assignment Grades page. The field will change from gray to white and the grades will print on the report card. However, grades should not be entered in the shaded fields for the selected skills for the Semester and Cycle that appear gray on the Assignment Grades page.
- You can navigate through the grade fields using the keyboard
Press ENTER after you type each grade to move down the list to the next student. You can press SHIFT+ENTER to move up the list. You can also press the up and down arrow keys to move up and down the list.
Press TAB to move across the list to the next assignment. You can press SHIFT+TAB to move back to the left.
.
 |
Next the grade field, click
WARNING: Your comments and/or selections are not actually saved until you type your PIN and click Save to save all data on the Assignment Grades page.
NOTE: If an assignment is excluded for a student, and you have entered a number in the # Drop field on Settings > Manage Categories (indicating that you want to drop a specified number of assignments for a category), the assignment grade does not count toward the number that will be dropped. Only non-excluded grades are dropped. |
||
|---|---|---|---|
 |
If a rubric chart has been associated with the assignment, the
NOTE: When entering a score for a skill, you are not limited to the range specified in the rubric chart. For example, if the score range is 0-5, you are not prevented from typing 0 or 6. |
||
| Exclude All |
Click to mass exclude grades for an assignment for all students. |
||
| Fill |
Use the button and adjacent field to mass enter an assignment grade for all students. |
||
| Overall Averages | The overall averages (i.e., class averages) for the working cycle average and each assignment are displayed in the bottom row of the table. The overall averages are updated every time you click Calculate Averages and every time you save grades. |
Use this option instead of the browser's print option. This printout contains formatting to handle the features on the Assignment Grades page.
To choose the number of assignments that will print per page, use the up/down arrow. Assignments can also be printed using the Assignment Grades Report. |
Save Data:
Any data that has changed since the last time you saved your grades is indicated by gray shading in the table cell.
NOTE: Be aware that you may have changed data that is not currently displayed on the page. All changes are saved, including those that are not visible on the page. For example, if you are currently viewing assignment grades for one student, but you previously entered grades for other students, the grades for all students are saved, regardless of what is displayed on the page at the time you save the data.
| PIN | Type your four-digit personal identification number (PIN). |
|---|
❏ Click Save.
Generate assignment grades report.
This report lists assignment grades for all students in a course according to options entered on this page. The overall assignment average and class average are also displayed.
- Excluded grades are indicated by Ex in place of the grade.
- Dropped grades are indicated by D next to the grade.
NOTE: The Category Legend as it appears on the report matches the Cat ID (category ID) column (in the Assignment Legend) to the corresponding category name and category weight. The Assignment Legend matches the assignment ID heading to the corresponding assignment name, total points, and Cat ID.
❏ Specify report options:
| Semester | The current semester is displayed. You can select a different semester. |
|---|---|
| Cycle | The current cycle is displayed. You can select a different cycle. |
| Course-Section | Select the course-section for which to print the report. Or, select All to produce the report for all of your course-sections. The drop down lists the two-digit period and course name. The course number and section number are in parentheses. |
| Viewing Options |
|
||||
|---|---|---|---|---|---|
| Sorting Options | Indicate the field to sort the report by.
|
❏ Click Generate.
- The report opens in a new window, and you can print the report from that window.
- The report selection page remains open on your desktop.
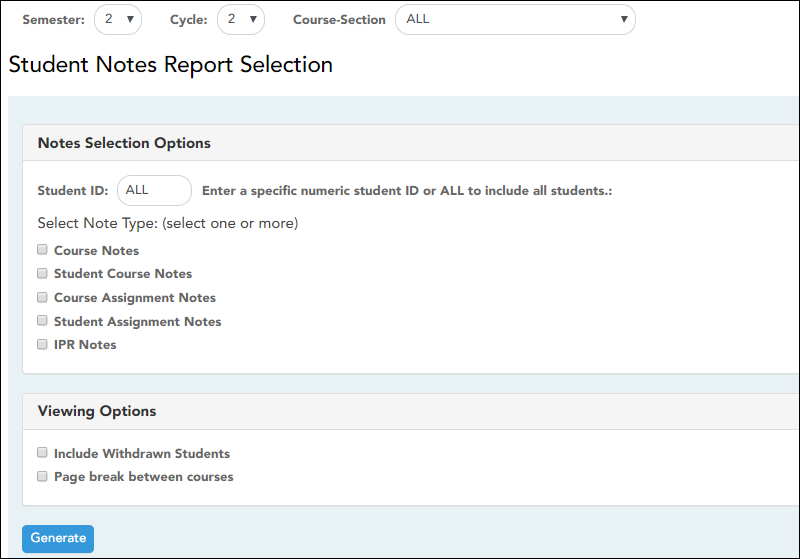
Review student notes (report).
This report displays any of the following notes for one or all courses, and for one or all students.
- Course Notes: Notes entered in the Course Notes field on Settings > Manage Courses. These are comments and notes entered by teachers about their courses, such as reminders, announcements, and other course-specific information. These notes are displayed to parents in ParentPortal.
- Student Course Notes: Notes entered by clicking the note icon next to the student's name on Grades > Assignment Grades. These are course-specific notes entered by teachers about the student, and the notes are associated with specific categories. These notes are note displayed to parents in ParentPortal.
- Course Assignment Notes: Notes entered in the Notes field on Settings > Manage Assignments. These are notes entered by teachers about their assignments. The notes are displayed to parents in ParentPortal.
- Student Assignment Notes: Notes entered by clicking the note icon next to the student's assignment grade on Grades > Assignment Grades. These are assignment-specific notes entered by teachers about the student. The teacher has the option to display the note to parents in ParentPortal.
- IPR Notes: Notes entered in the Note field on Grades > IPR Comments. These are student-specific notes entered by the teacher about the student relative to the IPR. These notes are printed on the IPR that is distributed to parents.
❏ Specify report options:
| Semester | The current semester is displayed. You can select a different semester. The selected semester affects the courses listed in the Course-Section drop-down list, but it does not affect the notes displayed; the notes are not semester-specific. For example, for a two-semester course, the notes are displayed for the entire year. |
|---|---|
| Cycle | The current cycle is displayed. You can select a different cycle. |
| Course-Section | Select the course-section for which to print the report. Or, select ALL to produce the report for all of your course-sections. The drop down lists the two-digit period and course name. The course number and section number are in parentheses. |
❏ Under Notes Selection Options:
| Student ID | Begin typing the student's ID. As you begin typing the ID, a drop-down list displays students whose student ID matches the numbers you have typed. From the drop-down list, select a student. | ||||||
|---|---|---|---|---|---|---|---|
| Select Note Type |
Select one or more note types to be printed. The descriptions for each note type are listed above.
|
❏ Under Viewing Options:
| Include withdrawn students | Withdrawn students are not automatically included. Select the field to include withdrawn students in the report. |
|---|---|
| Page break between courses | Select to print one course per page. Otherwise, the data will print continuously. |
❏ Click Generate.
- The report opens in a new window, and you can print the report from that window.
- The report selection page remains open on your desktop.
There are several ways to award extra credit:
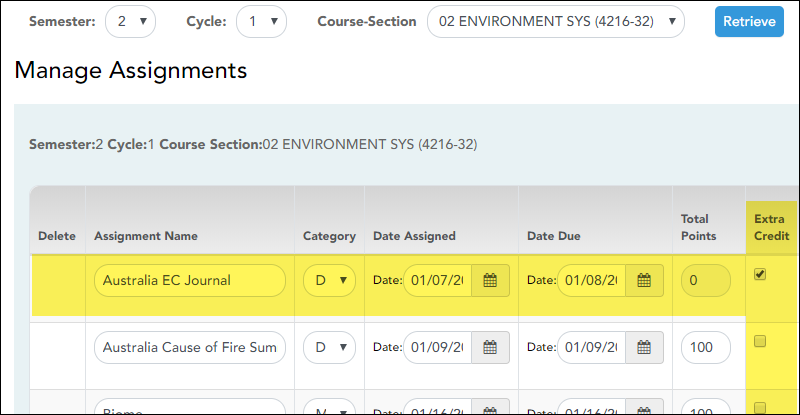
• Create an extra credit assignment on Settings > Manage Assignments
• Add extra points to an assignment grade on Grades > Assignment Grades
• Add extra points to the cycle average on Grades > Cycle & Semester Grades
Create extra credit assignment:
| Extra Credit | Select if the assignment is for extra credit. NOTE: If the assignment is for extra credit, the Total Points is set to zero and cannot be changed.
|
|---|
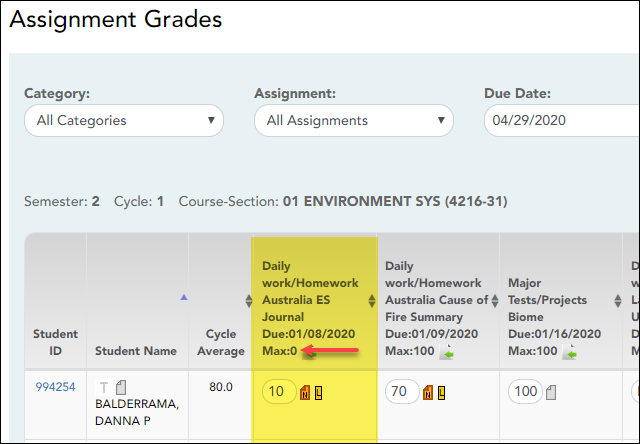
For extra credit assignments, the Max on Grades > Assignment Grades is 0.
Calculations for extra credit assignment:
IMPORTANT: See Calculate Averages for additional information.
Percent-based weighting:
If the student has extra credit points, include the extra credit (EC) points in the Total Points Earned.
(Points Earned 1 + Points Earned 2 + Points Earned 3 + EC) = Total Points Earned
For example:
The Homework category has three assignments. The student earned a 70/100, 80/100, and 90/95 for those assignments. He also has 10 points for the extra credit assignment.
(70 + 80 + 90 + 10) = 250
In this case, the Total Possible Points for the Homework category is 295.
250 / 295 = .847
The student's average for the Homework Category is 85.
Points-based weighting:
If the student has an extra credit assignment, add the points for the extra credit (EC) assignment to the Category Points:
Category Points + EC = new Category Points
For example:
The Homework category has three assignments, each worth 50 points. The student earned a 40, 45, and 50 for those assignments.
40 + 45 + 50 = 135
The student’s Homework Category Points is 135. The student was awarded 5 points for a homework extra credit assignment.
135 + 5 = 140
In this case, the Total Possible Points for the Homework category is 150.
140 / 150 = .933
The student's average for the Homework Category is 93.
Multiplier-based weighting:
If the student has an extra credit assignment, add the points for the extra credit (EC) assignment to the Actual Category Points:
Actual Category Points + EC = new Actual Category Points
For example:
The student’s Homework Actual Category Points is 240. The student was awarded 5 points for a homework extra credit assignment.
240 + 5 = 245
In this case, the multiplier for the Homework category is 2.
245 x 2 = 490
The Homework category has three assignments, each worth 100 points.
100 + 100 + 100 = 300
300 x 2 = 600
490 / 600 = .816
The student's average for the Homework category is 82.
ANOTHER OPTION: If you want to give an extra credit assignment that will be included in the cycle average for the students who do the assignment (but not for those who do not do it), create a regular assignment (not extra credit), and then exclude the grade for all students who do not complete the assignment.
Add extra points to an assignment:
Grades > Assignment Grades
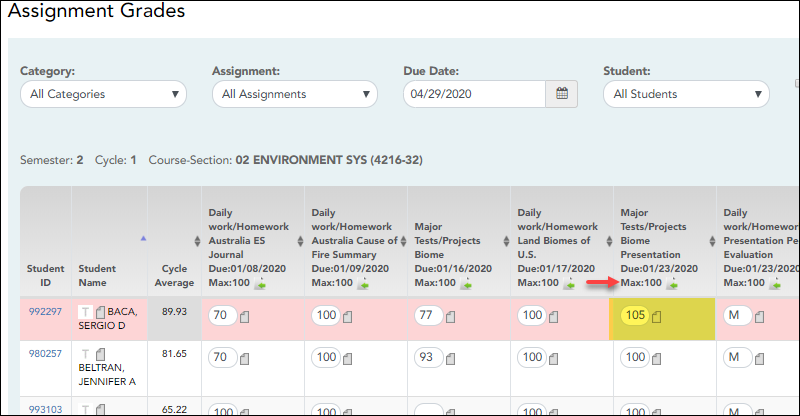
If you enter an assignment with the Total Points field set to 100, you can enter a grade that is greater than 100. In this case, it is not necessary to enter an extra credit assignment.
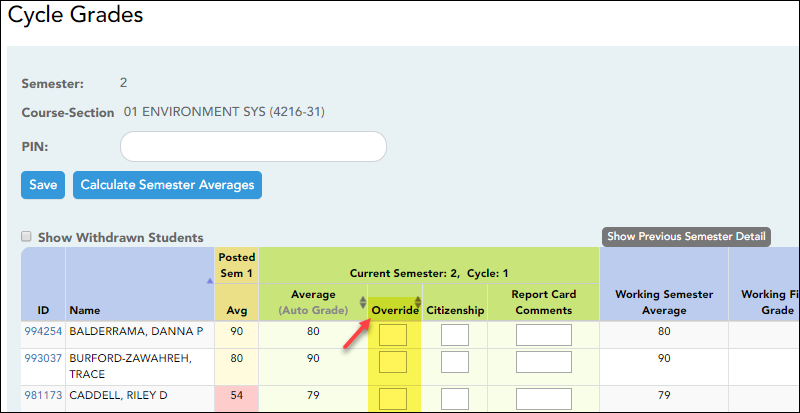
Add extra points to cycle average:
| Override |
This field allows you to override a student's working semester average with a different grade (e.g., if the student's working cycle average is 69, you may give the student a cycle grade of 70, depending on district policy). |
|---|
Generate seating chart report.
This report prints a teacher's seating charts for all periods or one period. For each period, the seating chart is displayed followed by a list of students who are not assigned to seats. The seating chart lists the student name, gender, and ID.
If printed for all periods, each period prints on a separate page.
NOTE: If that field has been changed, and the seating charts have not been re-saved on Settings > Manage Charts since the setting was changed, a warning message is displayed when the report is generated indicating that the reports will not be accurate until the Manage Seating Charts page has been re-saved. You must review the seating chart for each period on the Manage Seating Charts page, make any necessary changes, and then re-save each chart.
❏ Specify report options:
| Semester | The current semester is displayed. You can select a different semester. | ||||
|---|---|---|---|---|---|
| Period | Select the period-course(s) to print the seating chart for, or select ALL CLASSES to print seating charts for all periods. If Combine Courses in Attendance is selected on your Settings > Update Profile page, the courses are combined by period. |
||||
| width | Select the width setting for the report.
For either width setting, you can adjust the orientation when you print. Select Landscape to increase the number of students that fit on the page. |
||||
| Show Pictures | Select to display student photos in the seating chart. Photos are only available if they have been added by the district. |
❏ Click Generate.
- The report opens in a new window, and you can print the report from that window.
- The report selection page remains open on your desktop.
Generate rubric report (if enabled for campus).
There are two ways to access the rubric printing options:
- From the Manage Rubric Charts page, click Print.
- From the Reports menu, select Rubrics.
Print the rubric chart:
❏ Click Print to print a report of the displayed rubric chart.

The Rubric Report Selection page opens allowing you to make selections for printing the report.
This report prints a rubric chart which has been set up on Settings > Manage Rubric Charts. You can print only the rubric chart (i.e., blank), or you can print the rubric chart with student grades for a particular assignment.
❏ Specify report options:
| Rubric Name | Select the rubric chart you want to print. Only rubric charts that have skills and scores already set up are listed. | ||||||
|---|---|---|---|---|---|---|---|
| Title | (Optional) Type a title for the report, up to 50 characters. If blank, the rubric chart name is used as the title. | ||||||
| Print with grades |
Select to print the report with student grades. This field is only displayed if the selected rubric chart has already been used to grade an assignment.
|
❏ Click Generate.
- The report opens in a new window, and you can print the report from that window.
- The report selection page remains open on your desktop.
This report provides a blank class roster by semester and course, including a list of students enrolled in the course and up to 50 blank columns. You can choose the sort order and whether to include the student’s birth date and contact information. The report can be exported in CSV format.
If you print the report for a course group, the Course Section column is included allowing you to identify the course-section in which the student is enrolled.
❏ Specify report options:
| Semester | The current semester is displayed. You can select a different semester. | ||||||||
|---|---|---|---|---|---|---|---|---|---|
| Course-Section | Select the course-section and period for which to print the report. The drop down lists the two-digit period and course name. The course number and section number are in parentheses. If course groups have been created on the Course Grouping page, the groups are listed as well as the individual courses. |
||||||||
| Columns | Type the number of blank columns to display on the report, up to 50. | ||||||||
| Display Options |
|
||||||||
| Sorting Options | Indicate the order in which to sort the report data. You can sort by student name (last name), Student ID, course-section (for course groups), birth date (if included), or custom student order. Custom student order is the order specified for the course-section on Settings > Arrange Student Order. |
❏ Click Generate.
- The report opens in a new window, and you can print the report from that window.
- The report selection page remains open on your desktop.
Generate blank/missing grades report.
Reports > Blank/Missing Grades
This report lists blank, missing, and incomplete assignment grades according to options entered on this page.
❏ Specify report options:
| Semester | The current semester is displayed. You can select a different semester. |
|---|---|
| Cycle | The current cycle is displayed. You can select a different cycle. |
| Course-Section | Select the course-section for which to print the report. The drop down lists the two-digit period and course name. The course number and section number are in parentheses. |
| Grade Selection Options | Select the items you want to include in the report. For example, to include all student assignment grades for which no grade has been entered, select Show Blank Grades. To include all items, select Select All. | ||||||||||||
|---|---|---|---|---|---|---|---|---|---|---|---|---|---|
| Viewing Options |
|
❏ Click Generate.
- The report opens in a new window, and you can print the report from that window.
- The report selection page remains open on your desktop.
Other tasks:
Beside each student's name is the transfer icon  (i.e., a gray T) indicating that he is not a transfer student. If a student transfers into the class, the red transfer icon
  is displayed next to his name.
NOTE: The student will only have a red T  if he is transferring from one section to another section within the same course. Otherwise the T will remain gray.
If a student transfers into the course, you must accept the student into the course and enter his walk-in transfer average and weight. The campus, student ID, semester, and cycle must all be the same for the average to transfer.
❏ To accept the transfer student into the course-section, click  .
.
The Transfer Walk-In Average window opens.

Date: The student's transfer date is displayed by default. You can type over the date in the MMDDYYYY format. Or, click ![]() to select a date from the calendar.
to select a date from the calendar.
From: The teacher name, course number, and section are displayed for the course from which the student transferred. This data is only displayed if the student transferred from a different section of the same course and has a transfer average.
Average: The student's transfer average is displayed if available. Otherwise, you can type the student's walk-in average.
This is the student's average in the class from which he transferred. You can enter a numeric grade or an alphabetical (ABCD or ESNU) grade.
NOTE: If a student transferred from a course that posts letter grades to a course that posts numeric grades, and a letter grade is entered for his transfer average, the student's working cycle average is
displayed as a numeric grade.
See the Calculate Averages guide for an explanation of calculating averages for each weighting type for an explanation of calculating averages for transfer students.
Weight: The field displays 0 for a transfer student who has not yet been accepted into the class.
To accept the student into your class, type the weight you want to apply to the student's transfer average. For example, if a student transferred three weeks into a six-week cycle, you may want to enter
a weight of 50%. The maximum weight you can enter is 100.
The student's transfer icon remains red until a weight is entered and saved.
Once you enter and save a weight, the student's transfer icon turns blue  . The blue icon remains until the end of the semester.
❏ Click Ok.
If you entered and saved the transfer average data for the student, his walk-in average is calculated in his working cycle average.
NOTE: The changes are not actually saved until you type your PIN and click Save Grades.
Clear: Clear all data previously entered for the transfer student.
NOTE: Any course assignments that were due prior to the student's transfer date are excluded for the student, and the Exclude indicator  is displayed for the assignments. You can override the exclusion if you want the transfer student to complete an assignment that was due prior to his transfer date.
To override the exclusion, click  , clear the Exclude field. Click OK and save.
NOTE: For standards-base courses, accepting a transfer student is a manual process. The transfer icon is not displayed.
Calculating the average for a transfer student:
If a student transfers into the course during a cycle, the following calculations are used to determine his working cycle average:
Formula for transfer student:
| 1. |
For the transfer grade, multiply the Transfer Average by the Transfer Weight: |
| 2. |
Calculate the average of the student's assignment grades (for the remainder of the cycle) using the steps described above under Percent-based, Point-based, or Multiplier-based. |
| 3. |
Calculate the weight for the Working Cycle Average: |
| 4. |
Calculate the Working Cycle Average Value. |
| 5. |
Take the sum of the Transfer Value and the Working Cycle Average Value. |
If a student transferred from a course that posts letter grades to a course that posts numeric grades and a letter grade is entered for his transfer average, the grade conversion table is used to determine the numeric value.
Discipline > Discipline Referrals
This page allows you to view and enter discipline referrals. The referrals are submitted to an administrator for review and further action. The page is only available if the campus allows teachers to enter referrals in TeacherPortal; otherwise, the Discipline menu is not displayed.
NOTE:
You can only view your own referrals. If you are logged on to TeacherPortal as an administrator, you cannot see a teacher’s entered referrals on this page; however, you can view your own referrals.
Inquiry-only users cannot submit referrals.
Your existing referrals for the school year are listed, as well as the following statistical data:
| Draft | The number of referrals you have created but not submitted is displayed. |
|---|---|
| Pending | The number of referrals you have submitted that are awaiting review and further action from an administrator is displayed. |
| Reviewed | The number of submitted referrals that have been reviewed by an administrator, for which the administrator is taking no further action, is displayed. |
| Completed | The number of submitted referrals that have been reviewed by an administrator, and for which further action was taken, is displayed. |
Up to five referrals are displayed at a time. If more referrals exist, you can page through the list to see the others.
❏ To retrieve a referral for a specific student and/or a specific status, do one or more of the following, or leave all fields blank to retrieve all referrals sorted by status:
| Student ID | Begin typing the student's ID. As you begin typing the ID, a drop-down list displays students whose student ID matches the numbers you have typed. From the drop-down list, select a student. |
|---|---|
| Student Name |
Begin typing the student's name in one of the following formats: |
| Status | Select a status to view only referrals for the selected student with that status. Or, select ALL to see all referrals for the selected student. |
❏ Click Search.
The referrals grid is redisplayed according to the criteria specified.
Only Draft and Pending referrals can be updated or deleted. The Reviewed and Completed referrals can only be viewed and printed.
Enter or update a referral:
❏ Click Add Referral.
❏ Or, click  to edit an existing referral.
The Record Details section is displayed.
❏ Under Record Details, retrieve the student(s) involved in the incident:
| Student ID | Begin typing the student's ID. As you begin typing the ID, a drop-down list displays students whose student ID matches the numbers you have typed. From the drop-down list, select a student. |
|---|---|
| Student Name |
Begin typing the student's name in one of the following formats: |
| Add Another Student | If more than one student was involved, click Add Another Student to retrieve the next student. A blank row is displayed allowing you to retrieve the student. |
|---|
❏ To remove a student from the list, click  .
.
❏ To see a student's schedule, click Schedule next to the student's name.
The Schedule window opens and displays the student's schedule, including the course-section, period, course title, teacher name, withdrawn indicator, room number, and days the class meets.
| Severity | Indicate the severity of the offense. For example, select High if the nature of the offense is very severe. |
|---|---|
| Offense Description |
(Required) Select the offense code describing the offense.
NOTE: Only offense codes allowed by the district are listed. |
| Referrer Comments |
Type comments related to the offense, up to 2000 characters including spaces. A character counter below the text box allows you to see the number of remaining characters available. |
| Incident Date |
The current date is displayed by default. Type another date in the MMDDYYYY format, or click |
| Incident Time | The current (i.e., system) time is displayed by default. You can type another time in the HH:MM:SSA format, where HH is the hour, MM is the minutes, SS is the seconds, and A is a.m. or p.m. |
| Sent to Office | Select if the student(s) were sent to the office because of the incident. |
| Teacher's Course Section | Select a course-section if the incident occurred during class. |
| Incident Location | (Required) Select the location in which the incident occurred. |
Save data:
| PIN | Type your four-digit personal identification number (PIN). |
|---|
❏ Click Save Draft to save a draft of the referral, which allows you to finish and submit the referral at a later time.
❏ Or, click Submit Referral if the referral is complete, and you are ready to submit the referral to an administrator for further action.
The referral will appear in the administrator's discipline referral list with a status of Pending.
Other Reports:
Generate special programs report.
This report is only available to users who log on to TeacherPortal with a district- or campus-level security administrator user ID, or to teachers who have access to run the special programs report.
This report lists of the special programs for each student in the class.
Only the special programs selected by the campus are included. If enabled, the Generic column appears in the report and displays program information.
❏ Specify report options:
| Semester | The current semester is displayed. You can select a different semester. | ||||||||||||||||||||||||||||||||||||||||||||
|---|---|---|---|---|---|---|---|---|---|---|---|---|---|---|---|---|---|---|---|---|---|---|---|---|---|---|---|---|---|---|---|---|---|---|---|---|---|---|---|---|---|---|---|---|---|
| Course-Section | Select the course-section for which to print the report. The drop down lists the two-digit period and course name. The course number and section number are in parentheses. | ||||||||||||||||||||||||||||||||||||||||||||
| As Of Date | Type a date in the MMDDYYYY format. Or, or click |
||||||||||||||||||||||||||||||||||||||||||||
| Viewing Options |
These options are disabled if you are logged on as an administrative user and select Across Campus under Admin Options. |
||||||||||||||||||||||||||||||||||||||||||||
| Admin Options | These fields are only displayed if you are logged on as an administrative user:
|
❏ Click Generate.
- The report opens in a new window, and you can print the report from that window.
- The report selection page remains open on your desktop.
Generate student group reports.
Settings > Manage Student Groups
| Group Manager (left grid) | Your existing groups are listed. Otherwise, the message “No Student Groups were found” is displayed. |
|---|---|
| Group Reports (right grid) | The available student group reports are listed; they are linked to the reports in the Reports > Student Group Reports submenu. Some of the group reports mirror other reports available in the Reports menu. If no groups exist, the message “No Student Groups Exist” is displayed in place of any reports. |
| Group Reports (left grid) |
Click a report title to run the report for a student group:
• The group Admin Student Grades page allows you to run the Admin Student Grades report for a student group. |
Americans with Disabilities Act (ADA) and Web Accessibility
The Texas Computer Cooperative (TCC) is committed to making its websites accessible to all users. It is TCC policy to ensure that new and updated content complies with Web Content Accessibility Guidelines (WCAG) 2.0 Level AA. We welcome comments and suggestions to improve the accessibility of our websites. If the format of any material on our website interferes with your ability to access the information, use this form to leave a comment about the accessibility of our website.













The icon is displayed next to the attendance, if the attendance clerk entered comments associated with a student's attendance for the date and period displayed.
Click the icon to view the comments. The Comments window opens, and the comments are displayed. The date-time and user ID of the person who entered the comments are also displayed.
Click Close to close the Comments window.