User Tools
Sidebar
Add this page to your book
Remove this page from your book
Process Payroll
This guide provides an overview of how to run payroll in ASCENDER.
This guide assumes you are familiar with the basic features of the ASCENDER Business system and have reviewed the ASCENDER Business Overview guide.
Before You Begin
Review the following information:
- Payroll & General Business Terms
Term Description Accrual Calendar Accrual calendars are established for LEAs that will be accruing salaries in the payroll process. The number of days to be used in accruing salaries for each pay period in the year is entered in the calendar. Each employee with a salary that is being accrued is assigned a one-character accrual code (e.g., A-Z). For each accrual code, enter the number of days worked for each pay date used by your LEA. You must update the Accrual Calendar tab before running the first payroll of the year. During the payroll process, it is recommended that you verify data in your accrual calendar to ensure that the pay date you are using on the Run Payroll page corresponds with a pay date listed in the accrual calendar that is used. If you select a pay date where the accrual code pay date is different, errors will occur during the payroll process. Automated Clearing House (ACH) An electronic funds transfer system that facilitates payments. CYTD Calendar Year-To-Date Electronic Fund Transfer (EFT) An electronic funds transfer of money from one bank account to another, either within a single bank or across multiple banks. Employer Identification Number (EIN) A unique nine-digit number assigned by the Internal Revenue Service (IRS) to business entities operating in the United States for the purpose of identification. EOY End-of-Year Export An exported file of data as it stands at the time it is exported from the system. Export or backup files can later be used to restore data to its original state at the time of extraction. Reminder: Do not change the export file name as it may cause issues during the import process. Federal Insurance Contributions Act (FICA) The United States federal payroll contribution directed towards both employees and employers to fund Social Security and Medicare—federal programs that provide benefits for retirees, people with disabilities, and children of deceased workers. FICA refers to the combined taxes withheld for Social Security and Medicare. Social Security taxes are referred to as OASDI, for Old Age Survivor and Disability Insurance and Medicare taxes go to pay for the Medicare Hospital Insurance for seniors. There is a limit on the income subject to Social Security taxes, there is no limit on the income subject to Medicare taxes. There is an additional Medicare tax for high earners which is the responsibility of the employee. It is not split between the employer and the employee. In Texas, if an employee qualifies for TRS eligibility, the employee typically contributes to only Medicare and not Social Security. Financial Accountability System Resource Guide (FASRG or FAR Guide) The TEA guide that describes the rules of financial accounting for school districts, charter schools, and Education Service Centers (ESCs). A highly referenced module is Module 1 - Financial Accounting and Reporting (FAR) and FAR Appendices. General Journal A journal in ASCENDER that contains account code entries resulting from a payroll process, which when interfaced, updates the Finance general ledger with the transactions. Import The process of importing an exported file to restore data to the state at the time it was exported from the system. The Payroll > Utilities > Import HR Tables From Database Tables page is used to import Human Resources tables that were previously exported to database tables during payroll processing. When importing Human Resources tables, ensure the payroll frequency of the archived file is the same as that of the logged-on payroll frequency. To import pay tables for another payroll frequency (e.g., E - Semimonthly NYR), you must change to that payroll frequency using the Change Payroll Frequency dialog box. Job Code Tab This tab contains an LEA-defined table used to identify each of the jobs at an LEA. Every LEA employee must have a job code including substitute employees. The data is maintained on the Job Code tab and the field is accessed on the Maintenance > Staff/Job Pay Data > Job Info and Distributions tabs to identify the specific job or jobs assigned to a particular employee. Each job selected from this tab on the Job Info page must have separate contract and distribution information completed. You can also use this tab to set up extra-duty jobs such as a librarian stipend, counselor stipend, and others where you want to maintain a separate contract amount and enable the employee to be paid whenever a payroll is processed without having to create an extra duty transmittal. Local Educational Agency (LEA) Refers to the educational entity (e.g., charter, district, etc.). Office of Attorney General (OAG) This is the office to which employers are required to report all new employees and terminated employees. Positive Pay Positive Pay is an automated tool offered by most banks to detect forged, altered, and/or counterfeit checks. Positive Pay requires the company/organization (e.g., LEA) to transmit a file for each day checks are issued. The check issue file that is sent to the bank contains the check, number, account number, issue date, dollar amount, and sometimes the payee name. When the issued checks are presented for payment to the bank, they are electronically verified to the list of transmitted checks. All of the check components must match exactly or the bank will not clear the check and the check becomes an “exception item”. The bank will notify the LEA through an exception report (fax or electronic image) and withhold payment until a confirmation is received from the LEA indicating whether to accept or reject the check.
Payroll Liabilities Payroll liabilities include payroll-related payments that a business owes to a supplier/vendor but has yet to pay. For example, TRS, voluntary deductions, and taxes withheld from employees are liabilities that accompany each payroll. Salary Accruals Accrue means to accumulate. Relative to payroll, it means to accumulate expenses that were actually incurred and owed, but not paid.
Accrual background
Why do we accrue?TEA Finance Accountability System Resource Guide:
❏ Monthly Accruals: “Expenditures should be recorded and reported in the period in which they are incurred. Therefore, unpaid salaries and related benefits that have been earned, but not yet paid should be recorded as accrued expenditures.”
❏ EOY Accruals: “Effective August 31, 1994, school districts were no longer allowed to defer the recognition of those expenditures incurred during one fiscal year that relates primarily to the next fiscal year.”
• The process of accruing salaries enables an LEA to accurately reflect expenses after each payday.
• This process enables LEAs to maintain earned but unpaid salary amounts for each employee in School YTD.Non Standard Employee Accruals
If the TRS Year field is selected for an employee on the Payroll > Maintenance > Staff Job/Pay Data > Job Info tab (non-standard employee) and the employee is accrued, a school YTD record is created for the new school year when payroll is calculated for July and August. The program determines whether a new school YTD record should be created if the TRS Year is selected and the contract begin date year is equal to the pay date year.
Salary Concept Salary tables are hourly, daily or mid-point and used when setting up the system for salary calculations SYTD School Year-To-Date. State Minimum Salary Schedule A schedule of the required minimum salary for classroom teachers, full-time librarians, full-time certified counselors, and full-time registered nurses. In no instance may a public school LEA pay less than the state base salary listed for that individual’s years of experience as determined by the Texas Administrative Code, Commissioner’s Rules on Creditable Years of Service. Workday Calendar A calendar created on the Personnel > Tables > Workday Calendars > School Calendar tab that is used to automatically calculate the number of days employees will work based on the entered contract begin and end dates. The calendar displays the employee workdays, school start date, in-service sessions, and holidays for the entire school year. These calendars are also used to determine the number of workdays each month for TRS reporting. - Payroll Reminders
- Verify that the prior month Payroll General Journal was interfaced to Finance, the TRS interface was completed, and that all necessary wire transfers and fund transfers were completed.
- Verify that TexNet is posted in ASCENDER.
- Report new hires to the Office of the Attorney General.
- Verify new hires against the Registry of Persons Ineligible for Employment
- If processing monthly, verify that the prior month on-behalf payment was interfaced to Finance.
- Forward any employee deduction changes to third-party administrators (e.g., FBS, NBS, FFGA).
- Create payroll folders to save all reports, exports, and files related to the current pay date.
- (If applicable) Verify that the appropriate check signatures are uploaded. Check signatures are maintained in District Administration.
- Submit the TRS Active Care bill through TexNet by the 10th of the month.
- Reference section 1.4.2.1 Account Code Structure Minimum Requirements in the Financial Accountability System Resource Guide for more information about the account code structure.
Helpful Templates & Worksheets
- Booking TEXNET and IRS Worksheet - This worksheet may be helpful if posting payments using a PA.
Process Payroll
- Verify payroll frequency
Verify payroll frequency
The Payroll application allows the use of multiple payroll frequencies in both the current year and next year payroll. This feature allows you to use a different authorized payroll frequency for salaried staff than hourly staff or substitutes, if necessary.
CYR Payroll Frequency Frequency Description NYR Payroll Frequency 4 Biweekly Payroll D 5 Semimonthly payroll E 6 Monthly payroll F The Year field displays the year to which you are logged on (i.e., C - current year or N - next year).
The Frequency field displays the pay frequency based on the Year field.
❏ Click Change to select another year and frequency.
❏ Click Apply to apply the changes.
- Verify pay dates
Verify pay dates
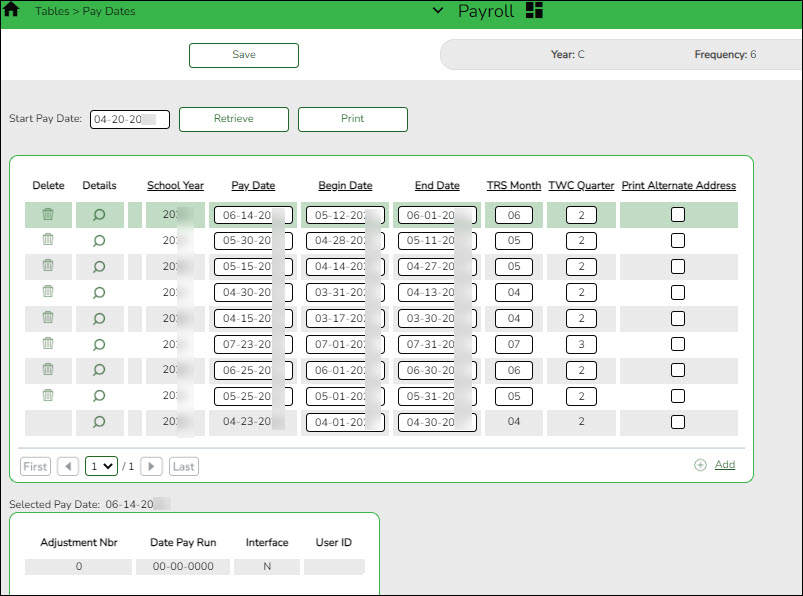
Verify that the pay dates exist for each payroll frequency.
❏ Enter the Pay Date, Begin Date, End Date, TRS Month, TWC Quarter, and click Save.
Recommended: In September, enter all pay dates for the year, September through August. As supplemental payrolls arise, you may need to add additional pay dates.
- Add or update employee information
Add or update employee information
Verify the employee's TRS status (new members, retiree surcharges) and confirm their Social Security Number (SSN) on the SSA website. Use the following pages to add or update existing employee records for the current payroll (e.g., deduction change, address change, etc.).
Personnel:
Payroll: - (If applicable) Create and send prenote file
(If applicable) Create and send prenote file
A prenote file is a test authorization EFT that is sent to the bank to verify that the EFT account numbers are correct. The prenote file includes the employee name, account number, and bank routing number. It does not include any currency amounts.
If you have employees who are receiving an electronic funds transfer (EFT) or direct deposit for the first time or who have had a change in their bank account number, complete the Bank Information section and select PreNote on the Payroll > Maintenance > Staff Job/Pay Data > Pay Info tab.
❏ Use the Payroll > Payroll Processing > EFT Processing > Create EFT File page to create the prenote EFT file.
❏ Send the prenote file to the bank and ask them to run it through ACH to verify that the routing and account numbers are correct. The prenote file should be sent at least 10-14 days prior to processing payroll.
- Report new hires to Office of the Attorney General of Texas
Report new hires to the Office of the Attorney General of Texas
Use the Personnel > Reports > Personnel Reports > HRS1550 - New Hire Report to generate a report or create a file containing a list of new hires to send to the Office of the Attorney General of Texas.
Refer to the Office of the Attorney General of Texas website at https://www.texasattorneygeneral.gov/child-support/employers/new-hire-reporting to review employer responsibilities, reporting deadlines, and reporting methods.
- Import or manually enter employee and substitute leave
Import or manually enter employee and substitute leave
Use one of the following options to enter employee and substitute leave:
❏ (If applicable) Import leave data from a timekeeping/leave software:
- Payroll > Utilities > Import Online Leave Requests - Import employee leave entries from EmployeePortal.
- Payroll > Utilities > Merge Payroll Transaction Files - Import and merge payroll transactions.
❏ Manually enter employee leave and employee substitute transmittals using the following tabs:- Payroll > Maintenance > Leave Account Transaction > Staff Leave Maintenance - Enter employee leave without a substitute.
- Payroll > Maintenance > Leave Account Transaction > Employee Substitute - Enter employee leave transmittals and substitute pay (extra duty) transmittals. You can enter employee leave transmittals without a substitute and substitutes transmittal without an employee leave.
❏ Verify transmittals on the Payroll > Hours/Pay Transmittals > Extra Duties, Inquiry, or Total tabs, or generate one of the following reports:
After reviewing the transmittals, make corrections as needed and reprint the reports to verify that all data is accurate. - Import or manually enter hours/pay transmittals
Import or manually enter hours/pay transmittals
Create the necessary hours and pay transmittals for applicable employees. The Print button on each tab allows you to balance the report with transactions then balance all reports with the Totals.
Note: Transmittal records cannot be changed after payroll is processed.
Review the Help for each individual tab for more information.
- Payroll > Maintenance > Hours/Pay Transmittals > Create Hours - This tab is used to create records for multiple hourly employees at one time.
- Payroll > Maintenance > Hours/Pay Transmittals > Reg Hours - This tab is used to pay hourly employees (pay type 3) based on their hourly rate.
- Payroll > Maintenance > Hours/Pay Transmittals > Abs Ded - This tab is used to dock an employee’s pay.
- Payroll > Maintenance > Hours/Pay Transmittals > Ovtm Hours - This tab is used to pay overtime at the employee’s overtime rate.
- Payroll > Maintenance > Hours/Pay Transmittals > Cd Abs Ded - This tab is used to dock an employee’s pay from a specific account code.
- Payroll > Maintenance > Hours/Pay Transmittals > Extra Duties - This tab is used to pay extra duty and/or substitutes.
- Payroll > Maintenance > Hours/Pay Transmittals > Non TRS - This tab is used to pay employees amounts that are not subject to TRS (reimbursements).
- Payroll > Maintenance > Hours/Pay Transmittals > Addl Ded - This tab is used to take additional one time deductions.
- Payroll > Maintenance > Hours/Pay Transmittals > Ded Refund - This tab is used to refund a deduction to an employee.
- Payroll > Maintenance > Hours/Pay Transmittals > System Adjust - This tab is used to correct system calculated amounts such as TRS, Medicare, etc.
- Verify all transactions
Verify all transactions
Use one of the following to verify the accuracy of all transactions.
❏ Payroll > Maintenance > Hours/Pay Transmittals > Total
❏ Payroll > Reports > Payroll Reports > HRS2050 - Proof List of Payroll Transactions
❏ Payroll > Reports > Leave Information Reports > HRS2600 - Employee Substitute Report
- Verify retiree surcharges (only pay during months retiree physically works)
Verify retiree surcharges (only pay during months retiree physically works)
Payroll > Reports > User Created Reports
Run a user-created report with Take Retiree Surcharge selected to verify that retiree surcharges are deducted as needed. Retiree surcharges are payable only during the months that the retired employee is working unless the retiree is exempt from the surcharges. A retiree is exempt if one of the following criteria is met:
- The retiree is reported only as a substitute.
- The retiree's retirement date is prior to September 1, 2005.
- The retiree works less than half‐time.
- Run Contract Variance report.
Run the Contract Variance Report
Payroll > Reports > Payroll Information Reports > HRS6050 - Contract Balance Variance Report
❏ Run the report with the Maximum Acceptable Difference parameter set to:
- .11 (eleven cents) for monthly payroll (12 pay periods)
- .23 (twenty-three cents) for semi-monthly payroll (24 pay periods)
- .25 (twenty-five cents) for bi-weekly payroll (26 pay periods)
❏ If variances greater than these amounts exist, make the necessary changes on the Payroll > Maintenance > Staff Job/Pay Data > Job Info tab.This process is intended for annualized employees such as pay types 1 and 2. It does not work for pay types 3 and 4 employees.
- If your LEA accrues, run Payroll Accrual Variance report
If your LEA accrues, run the Payroll Accrual Variance report
Payroll > Utilities > Payroll Accrual Variance Extract > Extract
Run the report and review possible accrual discrepancies. If discrepancies exist, make the necessary adjustments on the Payroll > Maintenance > Staff Job/Pay Data > Pay Info tab.
- Run preliminary payroll calculations to verify data
Run preliminary payroll calculations to verify data
Payroll > Payroll Processing > Run Payroll
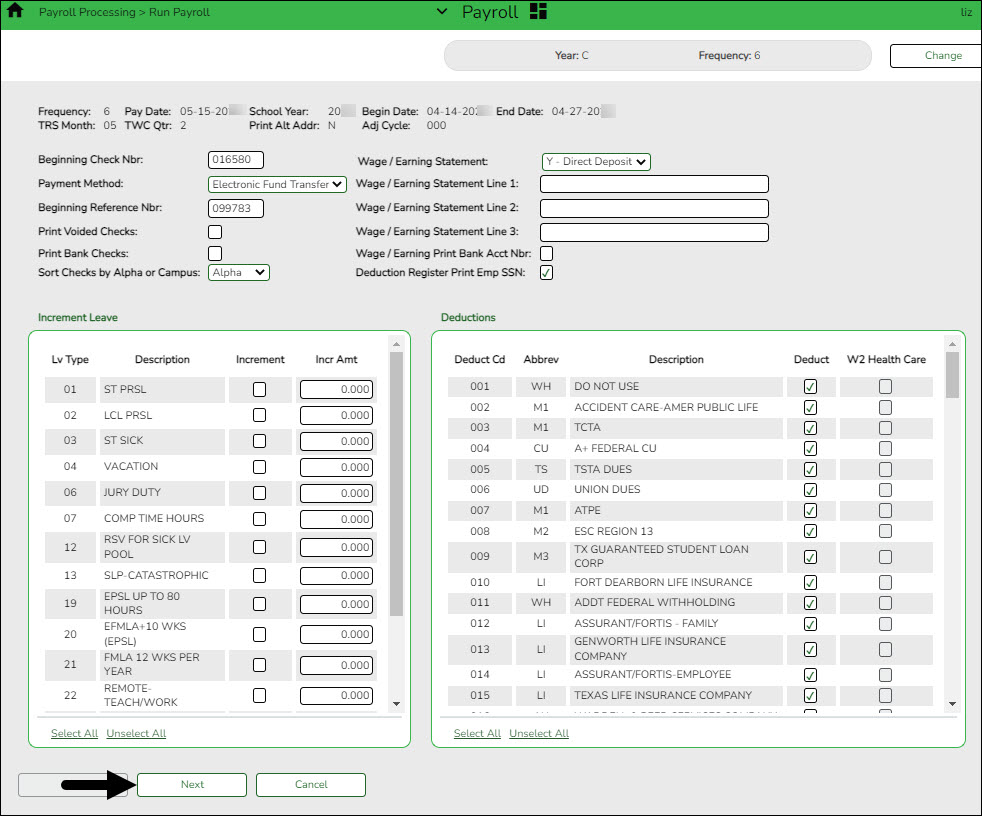
Run the preliminary calculations for the selected payroll. Only pay dates that have not been processed and posted can be run from this page.
The payroll information is populated.
❏ Complete the following fields:
❏ Under Increment Leave, a list of all available leave types for the pay period is displayed.
Note: Inactive leave types are excluded from the Increment Leave section. Payroll calculations are processed and leave transmittals are posted even if a leave type or absence reason is inactive.
Increment Select to increment a leave type. If not selected, the leave is not incremented.
Click Select All to increment all of the leave types.Incr Amt Type the amount to increment for each leave type. ❏ Under Deductions:
- Select the deductions to include in the payroll process by selecting the Deduct field for the corresponding deduction code.
- Click Select All to include all of the deductions in the payroll process.
Notes:
- If a new deduction code is added to the deduction code table, Deduct is selected automatically. If you do not want the new deduction included in the payroll process, you must manually clear the Deduct field for the new deduction code.
- If Deduct is not selected and deduction transmittals exist on the Payroll > Maintenance > Hours/Pay Transmittals page, then deductions are not processed.
❏ Click Next to continue to the Staff Selection page. Otherwise, click Cancel to exit the run payroll process.❏ Under Sort by, select one of the following:
- Select the Employee Number field to sort by employee number.
- Select the Last Name field to sort by the last name. The system default is to sort by the last name.
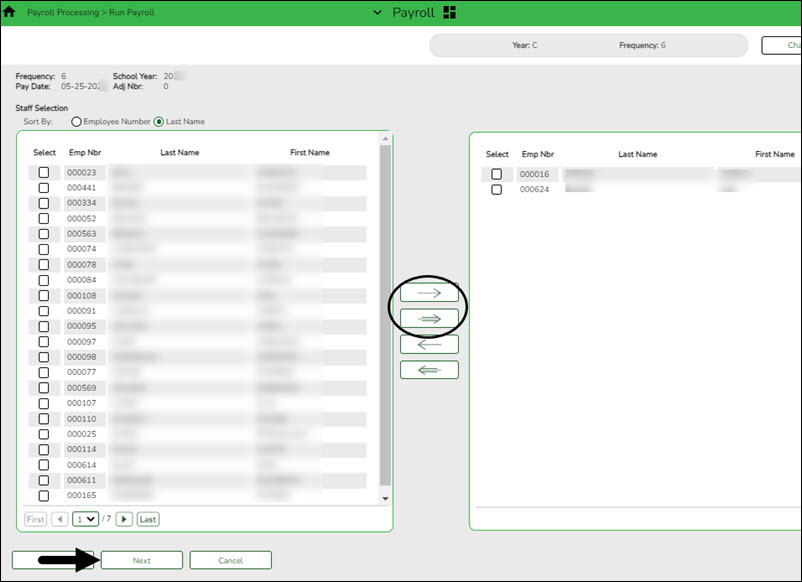
All employees are displayed on the left side of the page.
❏ Select the employees to include in the payroll.
- Select an individual employee number to select only one employee.
- To select multiple rows when the employee numbers are consecutive (e.g., 000001-000025), select an employee number to start at and then press and hold SHIFT while selecting an employee number to end the selection process. All employee numbers (between the first and last items) in the sequence are now selected.
- To select multiple rows when the employee numbers are not consecutive (e.g., 000025, 000185, 000221), select an employee number, and then select other individual employee numbers from different parts of the listing.
- The system displays all available employees to include in payroll on the left side of the page. Use the following buttons to select which employees to move to the right side of the page:
 - Click to move selected entries from the left side to the right side of the page.
 - Click to move all entries from the left side to the right side of the page.
 - Click to move selected entries from the right side to the left side of the page.
 - Click to move all entries from the right side to the left side of the page.
❏ Click Next to continue the Calculations page. The calculation process computes net pay amounts for all employees using salaries, taxes, deductions, supplemental pay, and transmittals. Otherwise, click Back to go back to the previous page or click Cancel to exit the run payroll process.
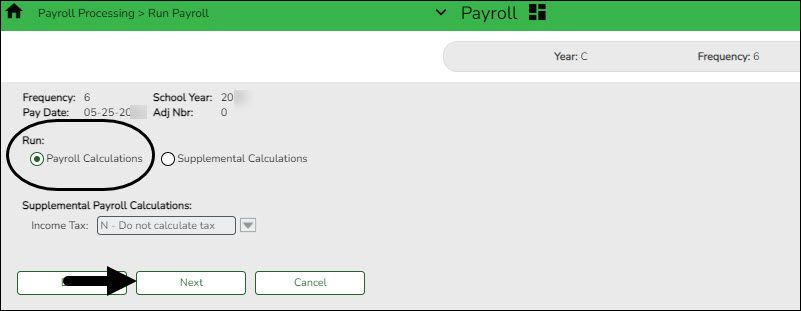
❏ Under Run, select one of the following:
- Select Payroll Calculations to run the payroll calculation for this payroll.
- Select Supplemental Calculations to calculate only the supplemental transmittals that have been created on the Extra Duty, Deduction Refunds, and Non-TRS tabs in Hours/Pay Transmittals under the Maintenance menu. Only transmittals that exist in the Extra Duty, Deduction Refunds, and Non-TRS tabs are processed with this selection.
When Supplemental Calculations is selected, the fields under Supplemental Payroll Calculations are enabled allowing you to select the supplemental payroll parameters to include in the payroll.
❏ Click Next to continue to the Payroll Processing page. Otherwise, click Back to go back to the previous page or click Cancel to exit the run payroll process.
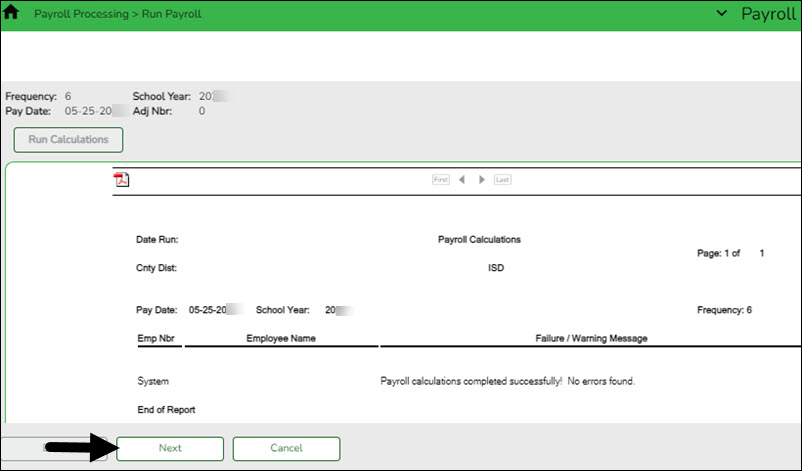
❏ Click Run Calculations. A message is displayed asking you to confirm that you want to continue and payroll details are provided.
- Click Yes to continue. The temporary tables will be cleared of the previous records for the pay date, and the payroll will be calculated based on the current user's selections. Otherwise, click No to cancel the process. No temporary tables will be deleted, and the current user can cancel out of the payroll calculations process. An error message will display on the Payroll Calculations Error report.
Notes:
- Failure and warning messages are displayed by employee number.
- If a failure message is received, the employee does not have a paycheck calculated.
- If a warning message is received, the amount calculated for the employee may or may not be correct based on the type of warning received.
❏ Be sure to print the failure and warning messages before clicking Next as these messages are no longer available after you click Next. If there are no errors that affect payroll processing, click Next. Otherwise, click Back to go back to the previous page, or in the event of a substantial error, click Cancel to exit the run payroll process and correct the problem.
The Payroll Calculations report is displayed. Review the report.
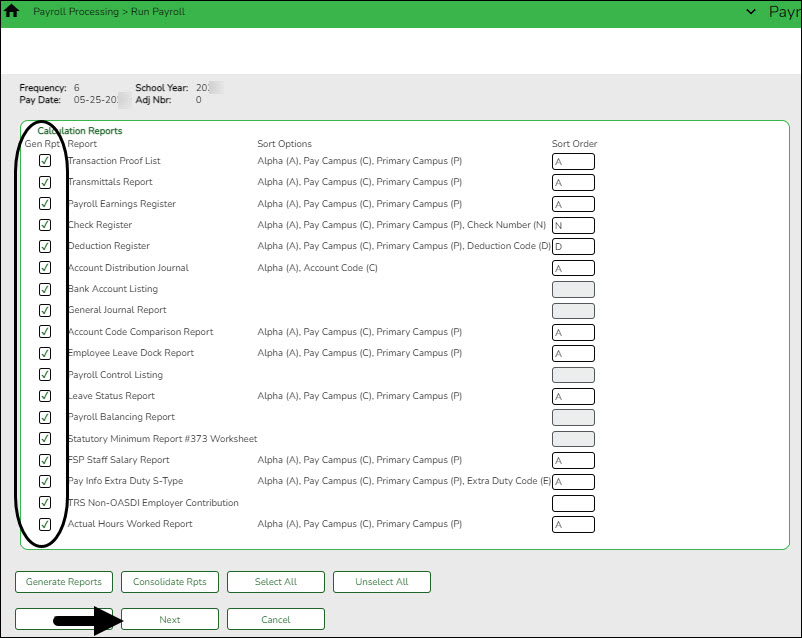
After running the payroll calculations, verify the results on the Calculation Reports page before continuing with the payroll process. Errors must be corrected before continuing. Once corrections are made, run payroll calculations again to ensure that corrections were completed. If errors are found and corrections made, click Cancel to exit the run payroll process and start the run payroll process again.
❏ Under Calculation Reports:
- Select and generate all pre-post reports and review as needed.
- Compare current payroll data to prior month's payroll data to identify discrepancies. Reference the Helpful Templates & Worksheets section of the Process Payroll guide for additional resources.
❏ Select the Gen Rpt checkbox next to each report you want to generate or click Select ALL to select all reports. Review and print the reports as needed.
❏ For each report, under Sort Order, type the one-character letter that represents the sort option to be applied. Available sort options are listed under Sort Options. If the field is blank, no sort options are available.
❏ Click Generate Reports. The system displays the first report selected. Click Cancel to display the next selected report. Verify the totals of each report. When you are done viewing all of the selected reports, you are returned to the Calculation Reports page.
❏ Click Consolidate Rpts to generate all selected reports as one PDF file.
- Reconcile all deductions to bills and add/modify deductions as needed
Reconcile all deductions to bills and add/modify deductions as needed
Compare the Deduction Register generated in step 12 to your billing statements to reconcile all deductions.
- Run final payroll calculations
Run final payroll calculations
Payroll > Payroll Processing > Run Payroll
Run the final calculations for the selected payroll. Only pay dates that have not been processed and posted can be run from this page.
Perform all steps listed in step 12 and verify that the final payroll calculations are accurate. Continue with the below steps to complete the run payroll process.
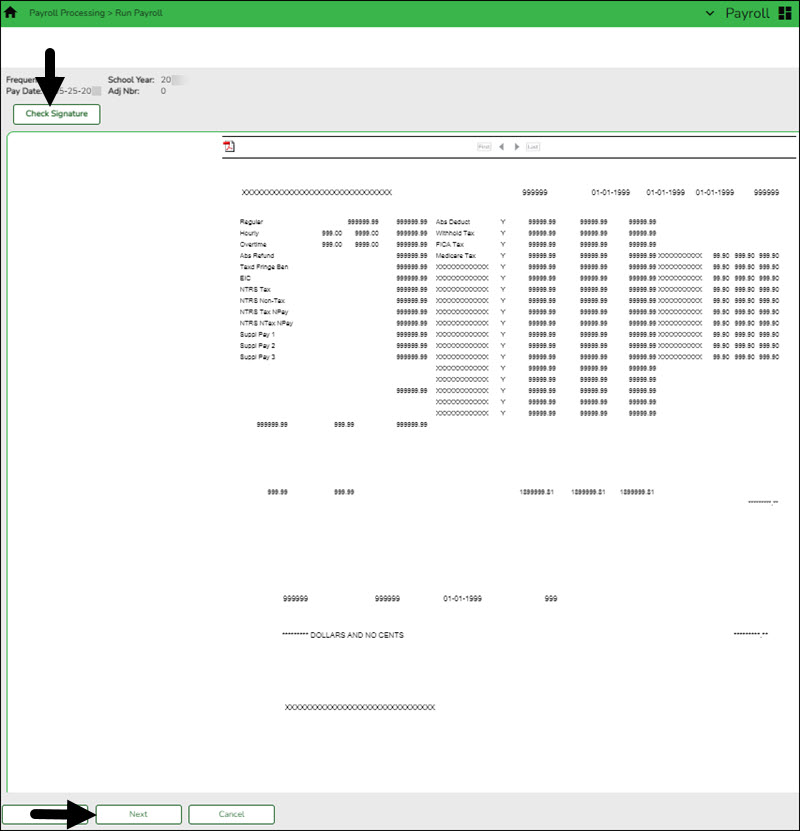
❏ Click Next to continue to the Payroll Check Test Pattern page. Otherwise, click Back to go back to the previous page or click Cancel to exit the run payroll process.
The Payroll Check Test Pattern page is used to preview and print the payroll checks. Use the scroll bars to view and verify the alignment of the check. If the local education agency (LEA) is using electronic signatures for checks, click Check Signatures.
❏ Click Next to continue. Otherwise, click Back to go back to the previous page or click Cancel to exit the run payroll process. If you click Next, the actual payroll checks are displayed. Only one check is displayed at a time.
Note: Be sure to verify printer settings.
❏ Choose from the following options:
- Click Previous Check to view the last check again.
- Click Next Check to view the next payroll check.
- Click Print. The Printer Selection pop-up window opens.
- Under Page Range, select All or Pages. If Pages is selected, type the page range (e.g., 1-12) to print.
- Click Print. The pop-up window closes.
- Click Check Signature to open Check Signature pop-up window and to customize these options for individual checks.
❏ Click Next to continue. Otherwise, click Back to go back to the previous page or click Cancel to exit the run payroll process.
You printed checks 000100 -000120, and check numbers 000115 and 000117 did not print correctly. You cannot reprint only check numbers 000115 and 000117. Therefore, check numbers 000115-000120 must be reprinted. To assign new check numbers for checks 000115-000120, do the following:
- Select No in the Did the checks print correctly? field.
- Type 000115 in the Reprint checks starting from check number field, which indicates on which check the first printing error occurred.
- The Starting New Check Nbr field defaults to 000121, which is the next available check number.
- Click Next. The Print Checks pages opens for the user to view and reprint the original check numbers 000115-000120 as new checks 000121-000126.
❏ Click Next to continue. Otherwise, click Back to go back to the previous page or click Cancel to exit the run payroll process. If you click Next, the create backup and post page is displayed.
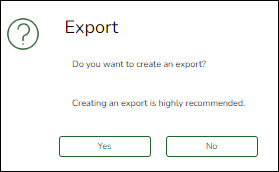
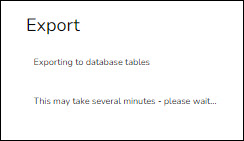
IMPORTANT: Do not skip this step. Click Create Backup. The export pay tables pop-up window opens allowing you to export the payroll tables.
- If you create an export when processing Regular or Supplemental payroll calculations, the data is exported to database tables, and the external .rsf file is no longer generated. As a result, the table names are no longer displayed during the export. Database tables can be imported using the Import HR Tables From Database Tables utility.
- If an export is run, it will overwrite the previous export database tables created for the pay frequency as only one set of payroll export database tables can exist per pay frequency.
- If you process payroll calculations for a check issue (adjustment cycle greater than zero), the external .rsf file is generated and the table names are displayed during the export.
- Click Yes to create the export. A progress message is displayed.
- Click No to create the export.
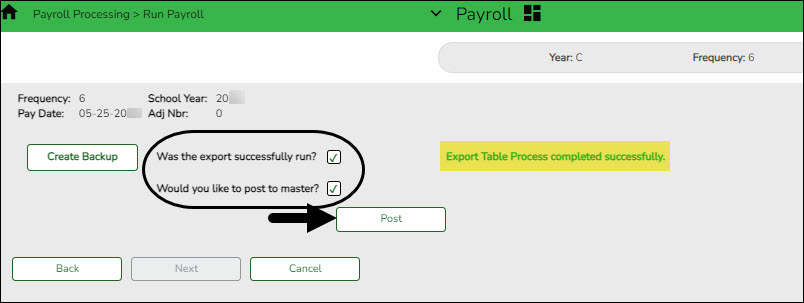
A message is displayed if the export was successful.
Was the export successfully run? Select if the export was successful. Would you like to post to master? This field is enabled. Select to post to the master. The Post button is enabled. ❏ Click Post! A message is displayed indicating that the posting was completed successfully. Click OK. The Post button is disabled and the Next button is enabled.
❏ Click Next to continue. If you click Next after running the payroll check process, print the Payroll Reports.
Under Payroll Reports:
❏ Select the Gen Rpt checkbox next to each report you want to generate or click Select ALL to select all reports. Review and print the reports as needed.
❏ On each report, under Sort Order, type the one-character letter that represents the sort option to be applied. Available sort options are listed under Sort Options. If the field is blank, no sort options are available.
❏ Click Generate Reports. The system displays the first report selected. Verify the report data is correct.
❏ Click Consolidate Rpts to combine the selected reports into one continuous report. This allows one PDF report to be created (instead of a PDF for each report).
❏ When all totals are verified, click Finish to close the Run Payroll page.
- Create and submit EFT file.
Create and submit EFT file
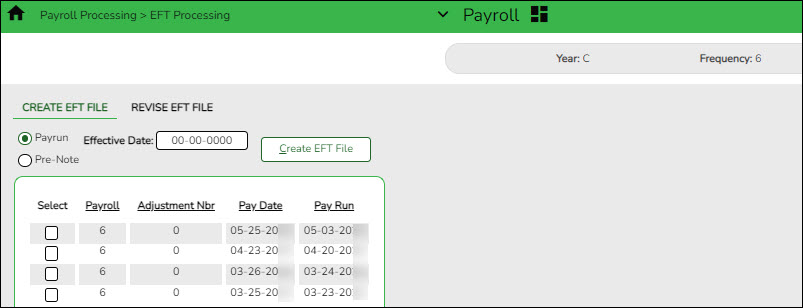
Payroll > Payroll Processing > EFT Processing > Create EFT File
❏ Create an EFT file to process employee direct deposits.
❏ Submit the EFT file to the bank.
Notes:
- All fields on the Payroll > Tables > Bank Codes > EFT tab must be populated. Otherwise, the create EFT file process cannot be performed.
- The employee number or social security number will be included in the EFT file based on the option selected in the Use Emp Nbr or SSN in EFT File field on the Payroll > Tables > District HR Options page.
- Distribute printed payroll checks/send Wage & Earnings Statements
Distribute printed payroll checks/send Wage & Earnings Statements
❏ If issuing employee pay via printed checks, distribute the checks/Wage & Earnings Statements in a timely manner.
❏ If issuing employee pay via an EFT, verify that the employee has a valid Work E-mail on the Personnel > Maintenance > Staff Demo > Demographic Information tab.
❏ If your LEA uses EmployeePortal, the employee can access their Wage & Earnings Statements in EmployeePortal as needed.
- (If applicable) Create positive pay file.
(If applicable) Create positive pay file
Payroll > Utilties > Positive Pay
Create a Positive Pay file (positive_MMDDYYY.txt).
Positive Pay is an automated tool offered by most banks to detect forged, altered, and/or counterfeit checks. Positive Pay requires the company/organization (e.g., LEA) to transmit a file for each day checks are issued. The check issue file that is sent to the bank contains the check, number, account number, issue date, dollar amount, and sometimes the payee name. When the issued checks are presented for payment to the bank, they are electronically verified to the list of transmitted checks. All of the check components must match exactly or the bank will not clear the check and the check becomes an “exception item”. The bank will notify the LEA through an exception report (fax or electronic image) and withhold payment until a confirmation is received from the LEA indicating whether to accept or reject the check.
Field Description Frequency The logged-on pay frequency is selected. From Date Type the beginning date of the range of dates for which you want to retrieve check numbers, or select a date from the calendar. Use the MMDDYYYY format. To Date Type the ending date of the range of dates for which you want to retrieve check numbers, or select a date from the calendar. Use the MMDDYYYY format. Include Payee Name in File Select to include the payee name in the export file, or leave blank to exclude the payee name from the export file. ❏ Click Retrieve. A list of all check numbers for the selected date range is displayed.
❏ Click Create File to export the list of check numbers. A message is displayed indicating that the export was successful. Save the file in the appropriate folder. Otherwise, click Cancel to return to the Positive Pay Export tab.
- Create general journal
Create general journal
Payroll > Payroll Processing > Interface Processing > Create General Journal
You must create the general journal before the payroll information can be posted to Finance. The general journal consists of all of the transactions that are posted to Finance.
The Create General Journal tab is a display-only grid of previous pay runs that have not been saved as pending or interfaced to Finance.
❏ Select the row(s) to create a general journal for the pay run.
❏ Click Create Gen Journal.
- A message may be displayed if all account amounts net to zero for the selected payroll and there are no accounts to process. You are prompted to set the interface flag.
- Click Yes. The interface flag is set to Y (meaning the payroll has been interfaced to Finance).
- Click No. The interface flag is not reset, and the entry will remain on this page.
- If any errors exist that are forcing entries to object code 3600 - undesignated fund balance, a message is displayed indicating that a report is being printed and that transactions with object code 3600 have been created. The report is sent directly to the printer and indicates the employees that could be causing the out of balance. Click OK to view the general journal report.
- If there are no errors, the General Journal, Funds Transfer Summary, and Auto JV Transaction Summary preview reports are displayed. Review the report.
- Click Save Pending. A message is displayed indicating that the general journal transactions were successfully saved as pending.
- Click Cancel to not save the transactions and return to the Create General Journal tab. The pay run that was being processed is shown in the grid.
- Click X to close the window.
If after restoring HR tables through the import process, payrolls that had been previously posted to Finance reappear on this page, click Reset Interface Flags. A message box is displayed with the message, “When the interface posting flags are reset, the payroll transactions cannot be interfaced to Finance,” and asks whether to reset the Interface Posting Flags.
- Click Yes. The interface flag is set to Y (meaning the payroll will no longer display on the page).
- Click No. The interface flag is not reset, nothing is changed, and the payroll will continue to display on the page.
- Interface general journal to Finance
Interface general journal to Finance
Payroll > Payroll Processing > Interface Processing > Interface to Finance
The general journal must be created prior to interfacing to Finance. You must save the transactions as pending in order to interface the pay run transactions to the Finance files. This process is the actual interface between payroll processing and Finance.
The tab consists of a display-only grid of all the transactions that are in pending status.
❏ Select the pay run(s) that you want to interface to the Finance.
Field Description Post to Current Acct Period If selected and you click Interface, the following may occur:
If Finance end-of-month processing is being performed against any file ID, you may not post to either accounting period.
If the current and next accounting periods are the same, and the current accounting period is closed, a message is displayed indicating that the current accounting period XX is closed and that the next accounting period is set to XX. You are not allowed to post at this time. Click OK to return to the Interface to Finance tab.
If the current accounting period is closed, a message is displayed indicating that the current accounting period XX is closed. You are not allowed to post at this time. Click OK to return to the Interface to Finance tab. You can select the next accounting period for posting.
If the current accounting period is locked, a message is displayed indicating that the current accounting period XX is locked. You are not allowed to post at this time. Click OK to return to the Interface to Finance tab. You can select the next accounting period for posting.Post to Next Acct Period If selected and you click Interface, the following may occur:
If the current and next accounting periods are the same, a message is displayed indicating that the current accounting period XX is closed and that the next accounting period is also set to XX. You are not allowed to post at this time. Click OK to return to the Interface to Finance tab.❏ Click Preview. The General Journal, Funds Transfer Summary, and Auto JV Transaction Summary reports that were created on the Create General Journal tab are displayed. Review the report.
❏ Click Interface. A message is displayed indicating that the general journal transactions were successfully interfaced into Finance. Click OK.
Notes:
- You can verify that the interface to Finance was successful by running a general journal from Finance to compare to the general journal produced from Payroll.
- Verify that the interface flag is set to Y on the Pay Dates table. This indicates that the payroll has been run and interfaced to Finance.
- (If applicable) Transfer funds to payroll clearing bank account
(If applicable) Transfer funds to the payroll clearing bank account
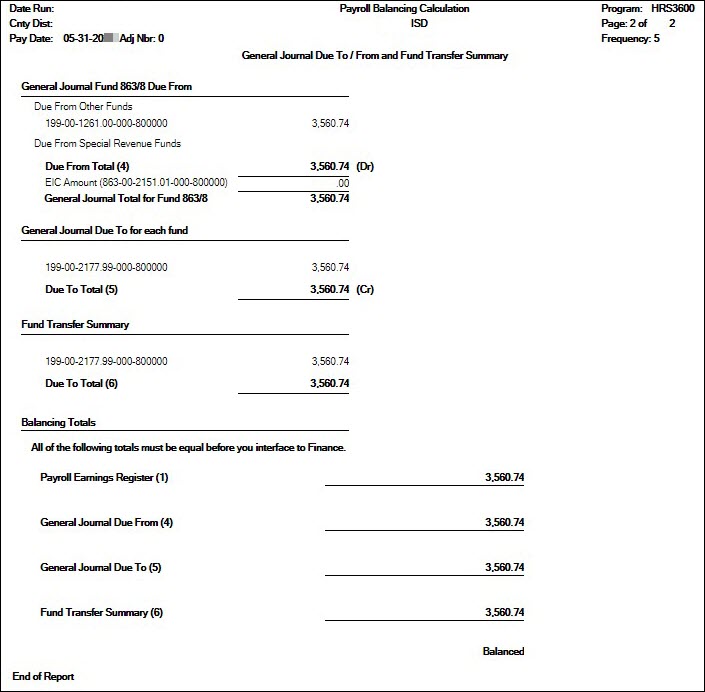
Transfer money to the payroll clearing bank account at the bank using the Fund Transfer Summary. The transfer can be completed by submitting a Bank Transfer form, calling the bank to request a transfer(s), or via an electronic funds transfer.
❏ If you already transferred TRS Active Care funds, be sure to subtract that amount.
❏ If you already interfaced to Finance, use the Payroll Balancing Calculation Report as it may be difficult to regenerate the Fund Transfer Summary report.
- Process deduction checks
Process deduction checks
Use the following tabs to process deduction checks:
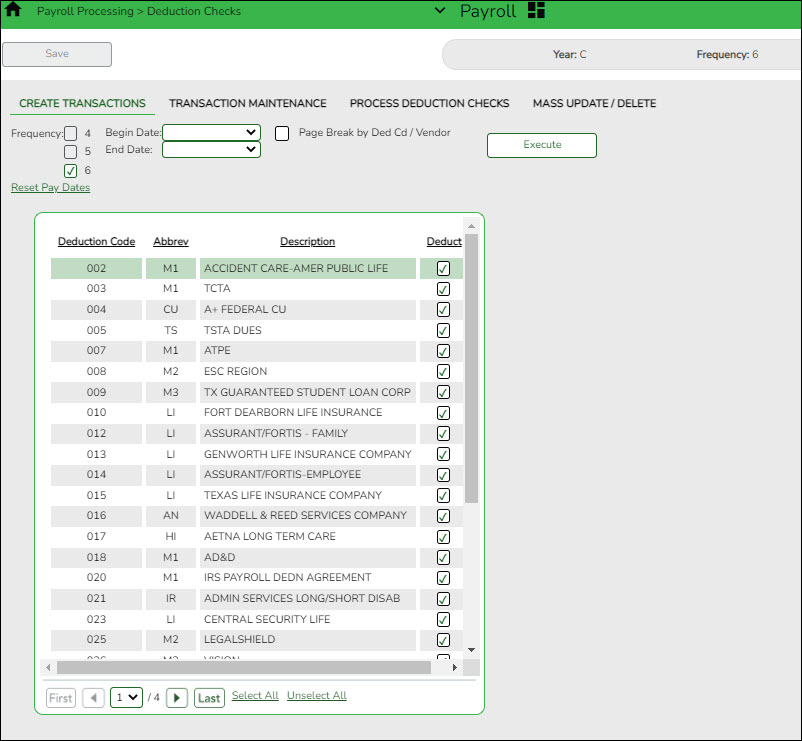
❏ Payroll > Payroll Processing > Deduction Checks > Create Transactions - This tab allows you to create the required deduction transactions. Before printing the deduction checks, use the Transaction Maintenance reports to verify that the amounts are correct.
❏ Payroll > Payroll Processing > Deduction Checks > Transaction Maintenance- This tab allows you to modify transactions before printing deduction checks and posting to the general ledger. Transactions grayed out on this tab have already had checks issued and cannot be modified.
❏ Payroll > Payroll Processing > Deduction Checks > Process Deduction Checks - This tab allows you to print the deduction checks and post the transactions to Finance.
- Perform wire transfers and post payments in ASCENDER
Perform wire transfers and post payments in ASCENDER
❏ Perform wire transfers to pay third parties (e.g., child support through Expert Pay).
❏ The payment can be posted via a transfer transaction, journal voucher (JV), or purchase authorization (PA). Use one of the following pages to post the payment in ASCENDER:
- Submit tax payments and post payments in ASCENDER
Submit tax payments and post payments in ASCENDER
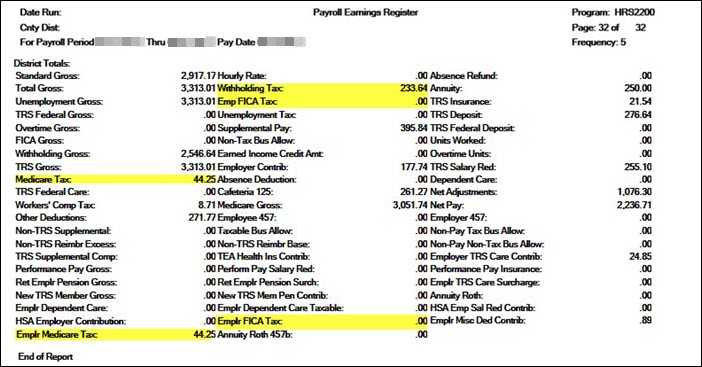
Payroll > Reports > Payroll Reports > HRS2200 - Payroll Earnings Register
❏ Refer to the payroll general journal fund (863/163) for tax amounts or print the Payroll Earnings Register to obtain the total amount of taxes for Withholding, Social Security (FICA), and Medicare. The total should match the total from the Payroll General Journal.
❏ Following your LEA's tax deposit rules, use the Electronic Federal Tax Payment (EFTPS) Online System to transfer Withholding, FICA, and Medicare taxes.
❏ The tax payment can be posted via a transfer transaction, journal voucher (JV), or purchase authorization (PA). Use one of the following pages to post the payment in ASCENDER:
- (If applicable) Upload third-party administrator files
Upload third-party administrator files
If you have deduction changes that need to be reported to third-party administrators, make those changes in accordance with your LEA's guidelines.
Post-payroll Tasks
- (If applicable) Process supplemental payroll.
Process supplemental payroll
Reference the Supplemental Payroll Checklist to complete this process.
- (If applicable) Process check voids and/or issues
Process check voids and/or issues
Use the Payroll > Payroll Processing > Payroll Adjustments > Check Void or Check Issue tabs to complete these processes.
Be sure to complete the entire check void/issue process in one instance. If you exit the process, you will have to start the process again from the beginning.
- Run quarterly reports
Run quarterly reports
- Run TWC Wage List
Payroll > Reports > Quarterly/Annual Reports > HRS5050 - TWC Wage ListThe report is also known as the TWC Quarterly Report. The report lists each employee’s salary for the selected quarter. The report must be printed after the last payroll, and all adjustments are run for March, June, September, and December. Print the report for all pay periods at once or print the pay periods individually.
❏ Create and save the file in the Payroll Folder > TWC folder.
❏ Depending on your LEA, submit the file to TASB at https://www.tasb.org/apps/ucw/ucw_districtinput.cfm or TWC at https://apps.twc.state.tx.us/UITAXSERV/security/logon.do .
If applicable, run this report on a quarterly basis.
Quarter Month Due First March April 25 Second June July 25 Third September October 25 Fourth December January 25 - Run the 941 Worksheet Report.
Payroll > Reports > Quarterly/Annual Reports > HRS5000 - 941 WorksheetThe report lists information on checks that each employee received during the date range entered. The information is listed by employee name and includes the check number, check date, taxable gross, federal income tax, FICA gross, FICA withheld, Medicare gross, Medicare tax withheld, and earned income credit. The report is primarily used as a worksheet for preparing the quarterly 941 report. It only works if the LEA is maintaining year-to-date files, and it includes the pay history records that were created from the Calendar YTD maintenance tab.
If the calendar year is greater than 2013, the non-TRS nontax business allowance and non-TRS nontax non pay business allowance amounts are not included in the taxable gross calculations.
Note: taxable gross = withholding gross + non-TRS - nontax business allowances
You should run this report on a quarterly basis.
Quarter Month Due First March April Second June July Third September October Fourth December January
- Reconcile payroll clearing liability funds
Reconcile payroll clearing liability funds
Finance > Inquiry > General Ledger Inquiry > General Ledger Account Summary
Reconcile the payroll clearing liability accounts (e.g., 863 and 163 accounts) and verify that all liability account balances are zero. If the account balances are not zero, be sure that you can account for the remaining balances or make the necessary changes to clear the accounts.
❏ Enter account mask X63-XX-2XXX-XXX-XXXXXX.
❏ Print the information to verify that all liability account balances are zero or are accountable.
- Process monthly TRS reports
Process monthly TRS reports
Reference the TRS Reporting Process document for guidance on TRS reporting.
Americans with Disabilities Act (ADA) and Web Accessibility
The Texas Computer Cooperative (TCC) is committed to making its websites accessible to all users. It is TCC policy to ensure that new and updated content complies with Web Content Accessibility Guidelines (WCAG) 2.0 Level AA. We welcome comments and suggestions to improve the accessibility of our websites. If the format of any material on our website interferes with your ability to access the information, use this form to leave a comment about the accessibility of our website.


