User Tools
Sidebar
Add this page to your book
Remove this page from your book
ASCENDER Grade Reporting - End-of-Semester and End-of-Year Processes
This guide covers the complete process for the end of a semester and end of the school year.
IMPORTANT: Each LEA will have unique situations. Some of the images and examples provided in this document are for informational purposes only and may not completely represent your LEA's process.
Prerequisites
- This guide assumes you are familiar with the basic features of the ASCENDER Student system and have reviewed the ASCENDER Student Overview guide.
NOTE: Your pages may look different depending on your grading cycle setup. Years shown may not represent current year and may be for example only.
I. Before you begin
IMPORTANT: For semester averages to calculate accurately, ALL previous/closed cycle grade fields must be reviewed for blank, incomplete, and N/G grades. Accurate working semester averages are essential for assuring a successful import of semester grades.
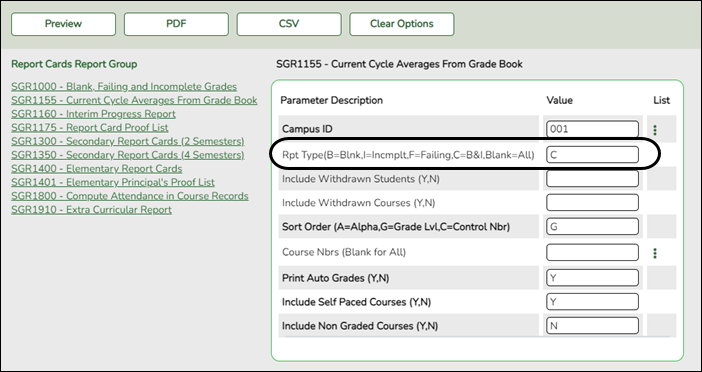
A. Run the SGR1000 - Blank, Failing and Incomplete Grades report.
A. Run the SGR1000 - Blank, Failing and Incomplete Grades report
This report provides a list of students with blank, failing, or incomplete grades, and No Grade. Self-paced courses can be included. The report should be run for each previous cycle to check student grade fields in ASCENDER Grade Reporting for blanks, incompletes (I), and No Grade (N/G). Posted blank or incomplete cycle grades MUST be updated prior to posting semester grades from the TeacherPortal in order to post accurate working semester averages.
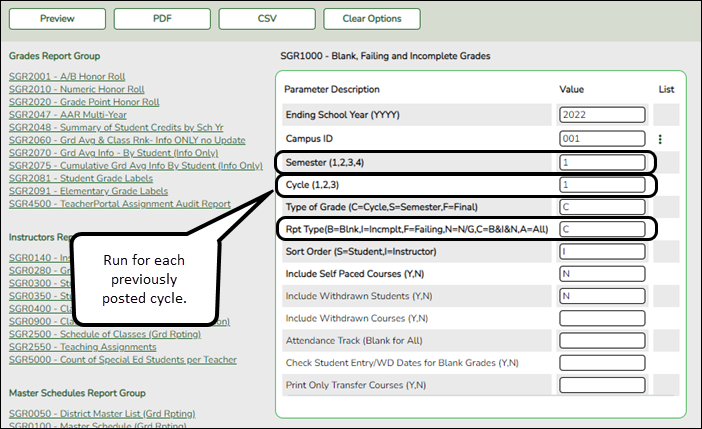
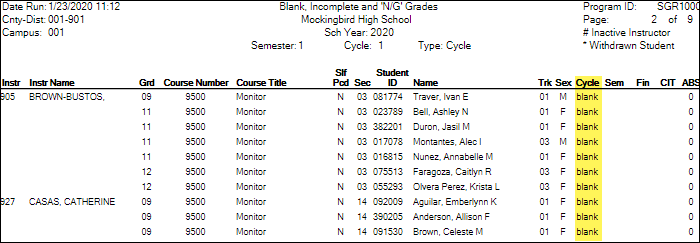
❏ Run this report for each posted cycle.
Set Rpt Typ to C to get only the blank, incomplete, and N/G grades.
❏ It is recommended that you distribute the report to the instructors for assistance in updating the incomplete, blanks, and No Grades, and set a deadline that allows time to enter the grade changes prior to posting grades for the final cycle-semester end date.
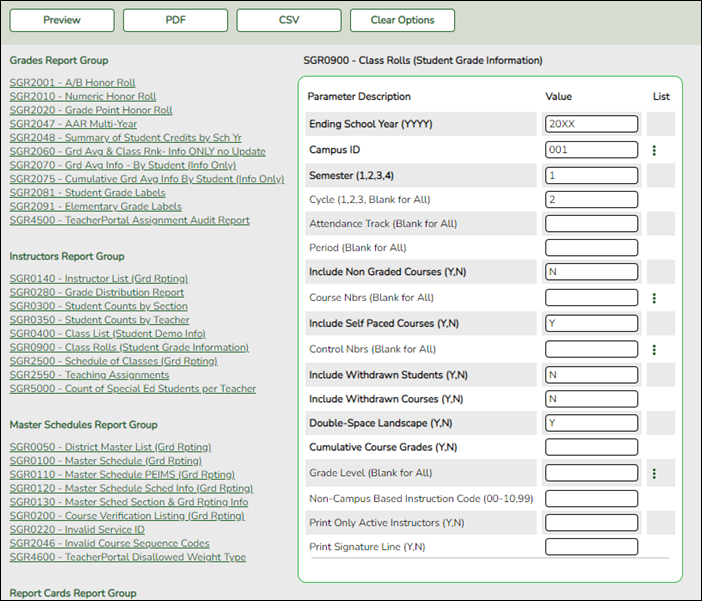
NOTE: You can also run SGR0900 - Class Rolls (Student Grade Information) for a prior cycle (by instructor or course) which will help identify students who have cycle grades that need to be calculated by the instructor in TeacherPortal. You can print and distribute this report as a verification sheet for instructors to update and sign.
Note that the report may also include students who are waiting on cycle grades from a previous district.
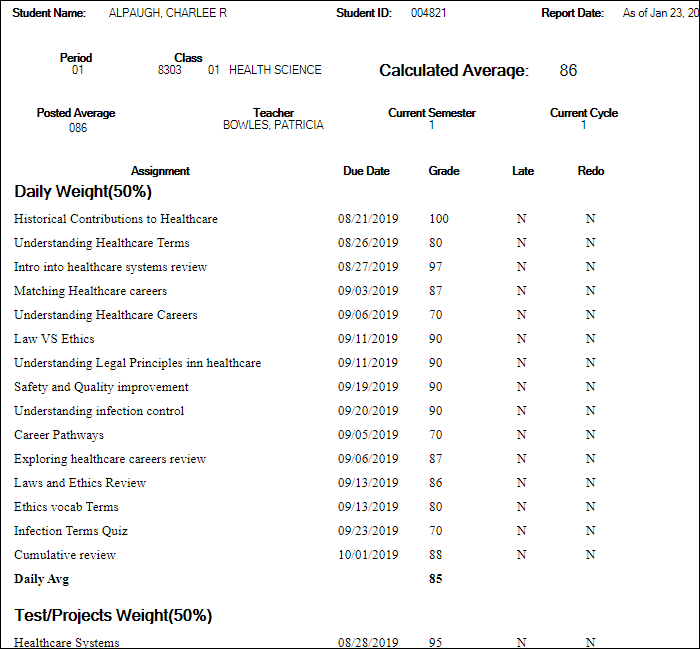
TIP: For an individual student report of current assignment grades that have been entered in TeacherPortal, use Grade Reporting > Maintenance > Student > Individual Maint > Assignments and click ![]() the to view a report for the course.
the to view a report for the course.
B. Update blank, incomplete, and N/G cycle grades for students.
B. Update blank, incomplete, and N/G cycle grades for students.
Grades can be updated for students individually or as a group (same instructor-course).
Individual Students:
Grade Reporting > Maintenance > Student > Individual Maint > Grd Update
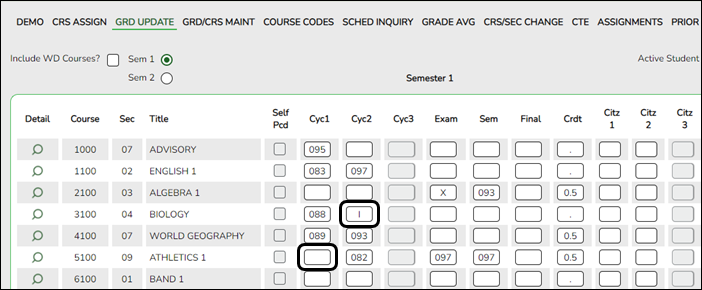
❏ Update blank, incomplete, and N/G grades with information provided by the instructor.
The updated cycle grade field will then be posted in TeacherPortal, which allows the system to calculate a current working semester average in TeacherPortal system prior to running the Grade Posting From ASCENDER TeacherPortal utility.
❏ Verify these updated fields are displayed and calculating correctly in TeacherPortal.
Group of Students:
Grade Reporting > Maintenance > Student > Group Maint > Post Grades
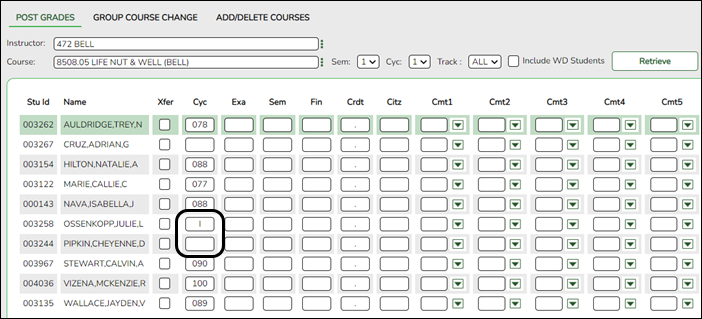
❏ Update blank, incomplete, and N/G grades with information provided by the instructor.
C. Run SGR1000 again.
Grade Reporting > Reports > Grade Reporting Reports > Report Cards > SGR1000 - Blank, Failing and Incomplete Grades
The report should have no data if all blanks, incompletes, and N/G grades have been corrected.
NOTE: There are some situations where you may not be able to correct all grades. For example, a student may be sick for an extended period at the end of a cycle. You will need to follow up for that student. It is recommended that you retain a list of any blank, incomplete, or N/G grades that could not be updated before posting end-of-semester grades.
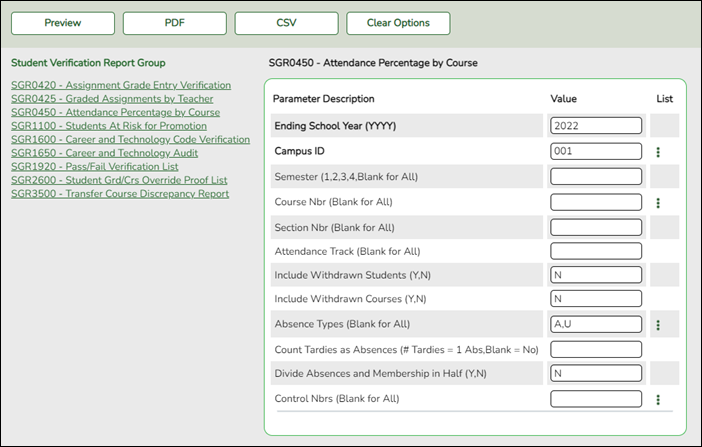
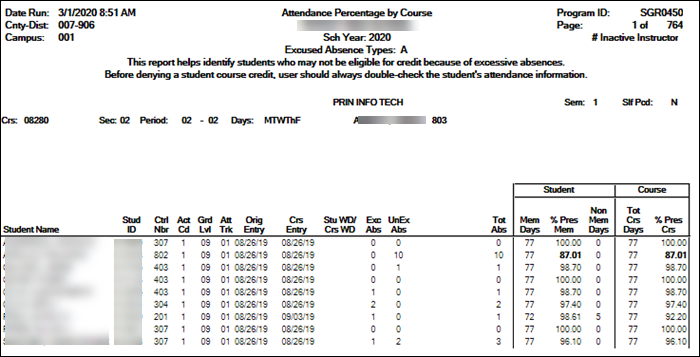
D. Run the SGR0450 - Attendance Percentage by Course report.
D. Run the SGR0450 - Attendance Percentage by Course report.
This report is used to determine if a student meets the 90% attendance rule for awarding or denying credit. For each period, the report displays course, instructor, and attendance information, including the course number and section, total absences, percentage the student was present for the course based on the course entry date, and percentage the student was present for the entire course based on days the course was taught.
The absences listed are for the days the class meets. If not correct, verify in the section record that the days of the week the class meets are accurate.
TIP: This report can be used by teachers who choose to exempt students from taking exams if they meet a certain attendance requirement.
Be sure to review district policy regarding Absence Types.
II. Review campus and district options
The following fields are likely already set correctly, but a quick check is recommended.
A. Review campus control option tables.
A. Review campus control option tables.
Grade Reporting > Maintenance > Tables > Campus Control Options > Ranges & Conversions

❏ Review Highest/Lowest grade allowed.
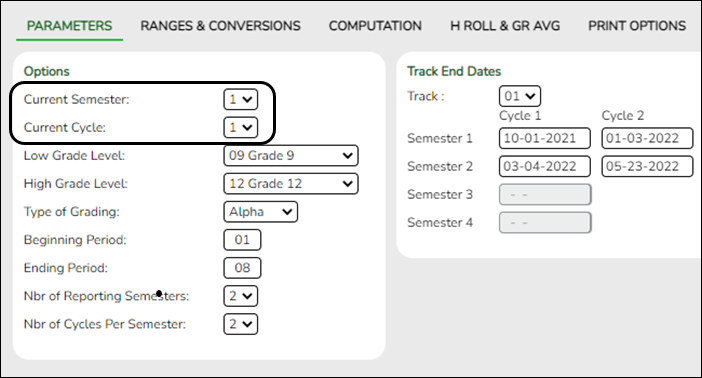
Grade Reporting > Maintenance > Tables > Campus Control Options > Parameters
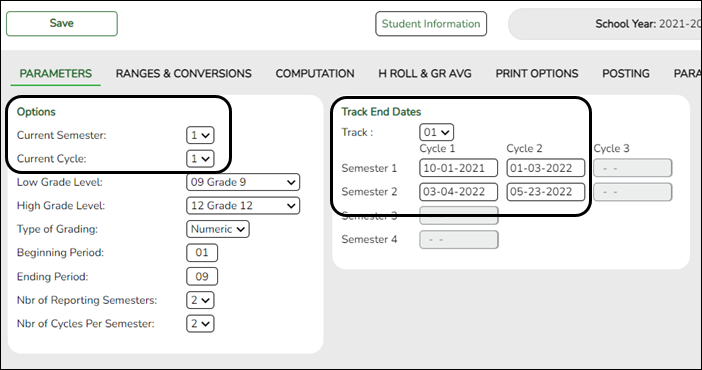
❏ Confirm that the Current Semester, Current Cycle, and Track End Dates fields are correct.
IMPORTANT:
Pay particular attention to Track End Dates if you have had any unplanned campus closure dates.
❏ Be sure to verify that track end dates are correct for each track.
Grade Reporting > Maintenance > Tables > Campus Control Options > Posting
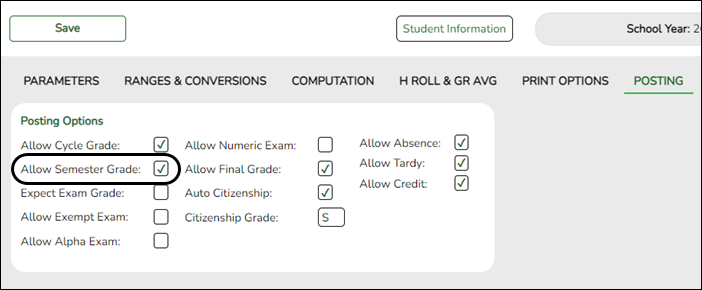
❏ Verify that all fields are set correctly. Pay particular attention to the following:
| Allow Semester Grade |
Select if semester grades can be posted from TeacherPortal or external grade book files. |
|---|
NOTE: The following are only necessary for campuses that do not use TeacherPortal:
| Allow Absence |
Select if absences can be posted from external grade book files. |
|---|---|
| Allow Tardy |
Select if tardies can be posted from external grade book files. |
| Allow Credit |
Select if credits can be posted from external grade book files. |
NOTE: The semester grade will come from TeacherPortal (as long as previous cycles are not blank) and semester exam grades will be calculated according to the settings in ASCENDER.
The final grade, if applicable, will be calculated when the Grade Computation and Credit Assignment or Grade Computation - Elementary utility is run.
B. Review tables for elementary campuses.
B. Review tables for elementary campuses.
Grade Reporting > Maintenance > Tables > Elementary > Elem Grade
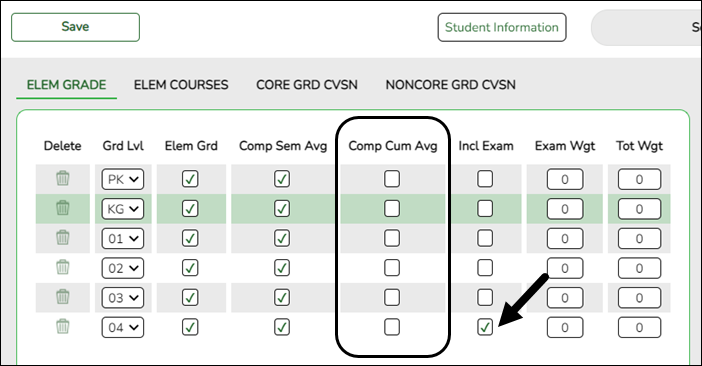
❏ Verify that all fields are set correctly. Pay particular attention to the following:
| Comp Cum Avg |
Select if the system computes the cumulative year-to-date (YTD) average for students. If selected, the YTD average is calculated with cycle grades until the end of the school year. At the end of the school year, the final grade can be calculated in one of two ways:
• If you are not computing the semester average, the following formula is used to calculate the final grade: (Cycle 1 + Cycle 2 + Cycle 3 + Cycle 4 + Cycle 5 + Cycle 6) / 6
• If you are computing the semester average, the following formula is used to calculate the final grade: (Semester 1 + Semester 2) / 2
• If there is only one cycle grade and the Grade Computation - Elementary utility is run, no calculations are performed. |
|---|
❏ If using exam grades for any grade level:
| Incl Exam |
Select if you want to include the exam grade in the semester average and display the Exam column in TeacherPortal. If selected, you must indicate the weight of the exam in the semester average in the Exam Wgt and Tot Wgt fields to calculate the weighing percentage. IMPORTANT: If selected, you must also select Include Exam in Semester Average on Maintenance > Tables > Campus Control Options > Computation. |
|---|---|
| Exam Wgt |
Type the two-digit number indicating the weight assigned to the exam grade when calculating the semester average for the grade level. |
| Tot Wgt |
Type the three-digit number indicating the total weight to use to calculate the semester average. |
C. Review report card comments.
D. Review TeacherPortal options.
C. Review TeacherPortal options.
Grade Reporting > Maintenance > TeacherPortal Options > Campus > Options
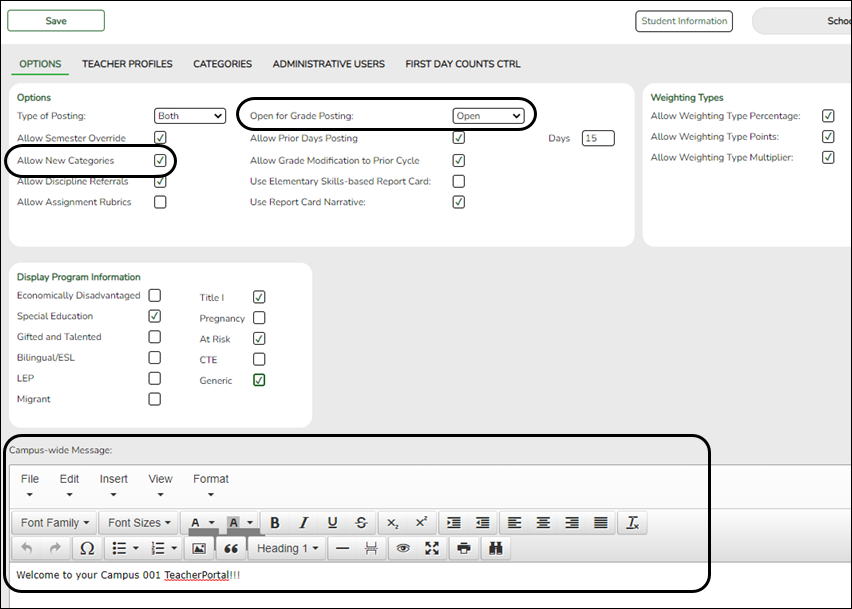
❏ Set Open for Grade Posting to Open so that instructors can post end-of-semester grades.
❏ Select Allow Semester Override if you wish to include the Semester Override field on the TeacherPortal Cycle Grades page allowing an instructor to override a working semester average.
For example, if a student's working semester average is 69, the instructor will be able to enter 70 in the Semester Override field. When the Grade Posting From ASCENDER TeacherPortal utility is run, the override grade from TeacherPortal will be posted as the student's semester grade in Grade Reporting (rather than calculated).
Clear the field if instructors are not allowed to override a semester grade.
Be sure to check district policy about semester override grades.
❏ Update the Campus-wide Message as needed.
Grade Reporting > Maintenance > TeacherPortal Options > District > Options
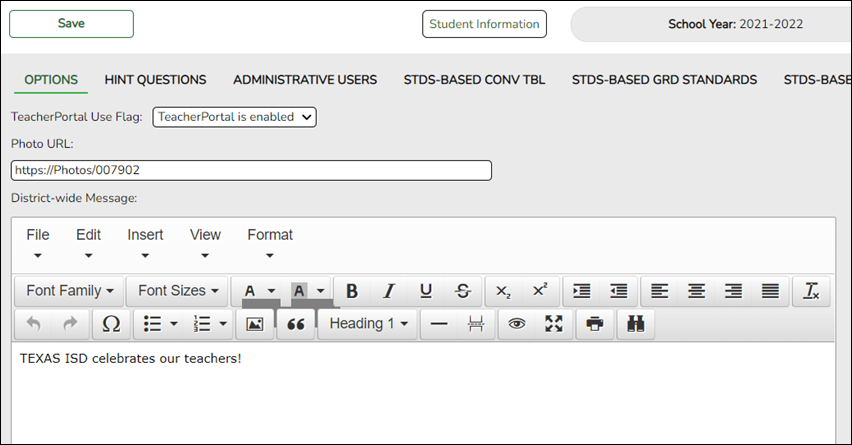
❏ Update the District-wide Message as needed.
III. Verify that teachers are ready to post
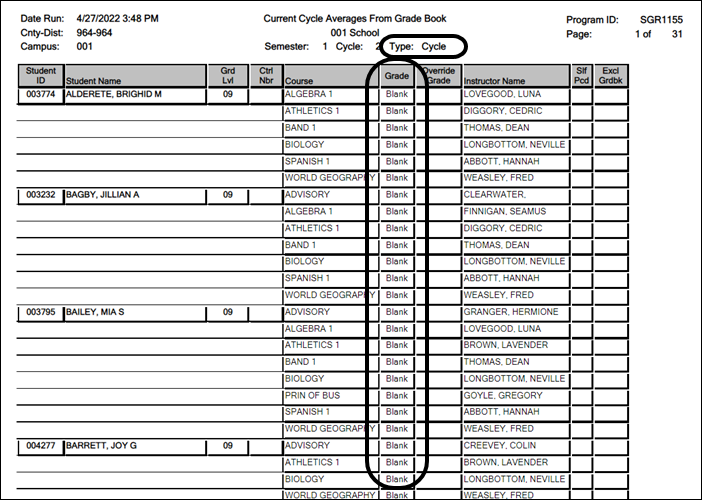
A. Check current cycle averages.
A. Check current cycle averages.
The report displays working cycle averages from TeacherPortal.
❏ Review the list to identify instructors who still have blank or incomplete working cycle averages.
NOTE: If an assignment grade is I, the working cycle average will calculate as I.
❏ As an alternative to running SGR1155, TeacherPortal administrators can run TeacherPortal > Admin Reports > Missing Averages, which lists instructors who have students with no working cycle average, and can be sorted by teacher and course-section.
B. Instruct teachers to check for missing exam grades and enter missing grades.
B. Instruct teachers to check for missing exam grades and enter missing grades.
If exam grades are calculated and imported, as specified on Grade Reporting > Maintenance > Tables > Campus Control Options > Computation and Posting tabs, the exam grades cannot be blank in TeacherPortal.
The following steps should be completed by teachers using TeacherPortal to ensure that there are no blank exam grades in TeacherPortal.
NOTE: This can be completed by a TeacherPortal administrator by selecting the Across Campus report option. The Run Group Report option must be selected for the user on Grade Reporting > Maintenance > TeacherPortal Options > Campus > Administrative Users (or on the District > Administrative Users tab).
TeacherPortal > Reports > Missing Exam Grades
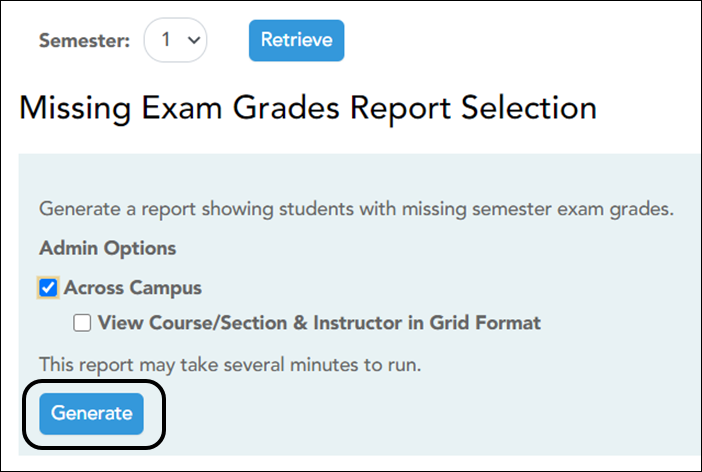
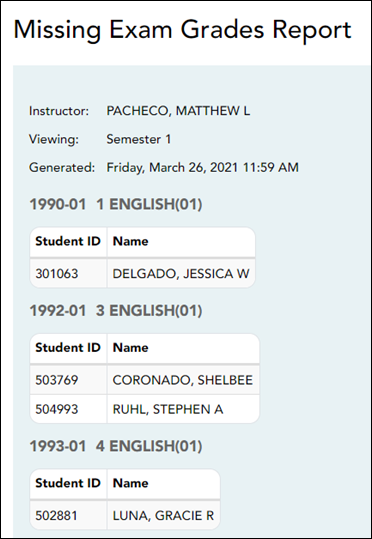
❏ Each teacher should run the TeacherPortal Missing Exam Grades Report and ensure that there are no missing exam grades. If any exam grades are missing, the grades should be updated as described next.
TeacherPortal > Grades > Cycle Grades
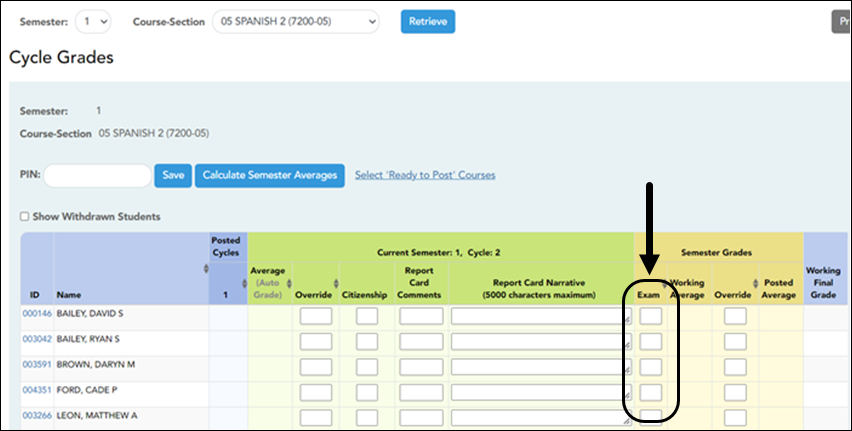
❏ Teachers must enter an exam grade for each student (or X for an exempt exam grade); otherwise, the semester average will not post from TeacherPortal.
C. Instruct teachers to post grades.
B. Instruct teachers to post grades.
TeacherPortal > Grades > Cycle Grades
Instructors should mark grades as ready to post.
In TeacherPortal on the Cycle Grades page, the Select courses to mark grades as Ready to Post link is displayed for current cycles that are open for posting, as determined by the campus.
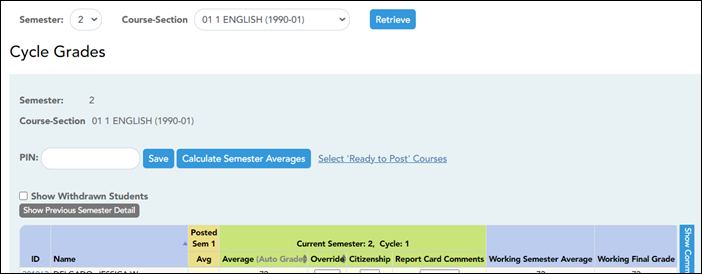
The instructor does the following:
❏ Enter all semester grades for the course, review the grades carefully, and save all changes.
❏ Click Select courses to mark grades as Ready to Post.
A pop-up window opens allowing the instructor to select the course-sections that are ready to post.
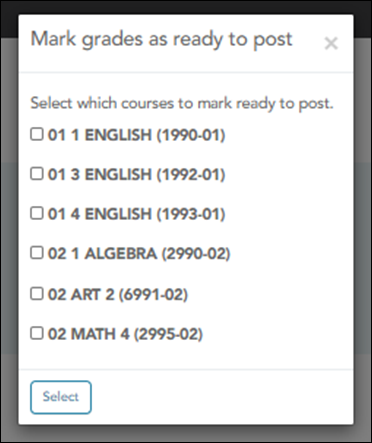
All eligible courses are listed. Select the course(s), and then click Select.
The window closes, and the selected course(s) are listed below the PIN field.
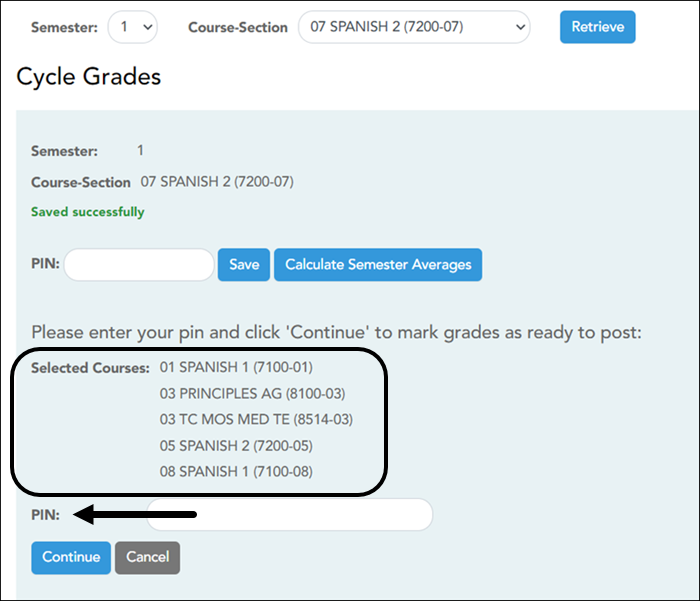
❏ Type the four-digit personal identification number (PIN) in the right-most PIN field and click Continue.
The page reloads, and a message is displayed indicating that the cycle grades were successfully sent to be posted. The message “[Ready]” is displayed in the Course Section drop-down list next to the course.
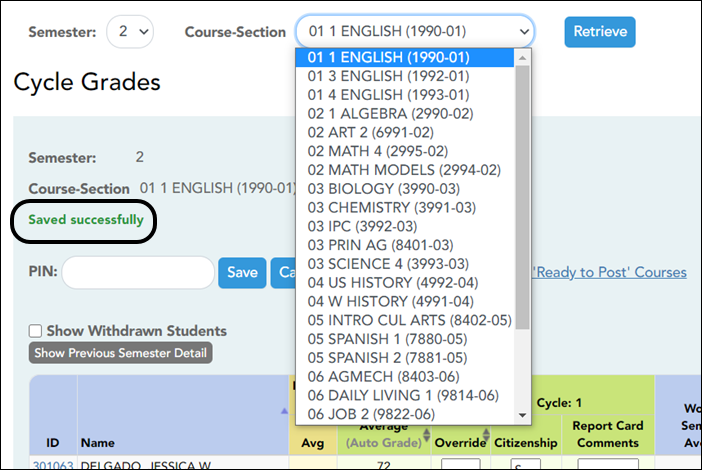
NOTE: Instructors can submit grades more than one time if they make a change shortly after marking the grades as ready to post; however, once the data is posted on Grade Reporting > Utilities > Grade Posting From ASCENDER TeacherPortal, the teacher can't change data and mark ready to post again.
D. Monitor teacher posting status.
C. Monitor teacher posting status.
This page produces a report of classes by cycle that indicates if the teacher's cycle grade posting status is Posted, Ready to Post, or Not Ready to Post.
❏ Run all three reports.
| Status |
Select the posting status for the report:
Not Ready to Post - View course-sections where the teacher has not indicated via TeacherPortal that the cycle grades, comments, or citizenship are 'Ready to Post.'
• If the teacher has entered comments and/or citizenship for at least one student in the course-section for the semester-cycle being run in TeacherPortal, the course-section is included.
Posted - View course-sections where cycle grades, comments, or citizenship have been posted (Grade Posting From ASCENDER TeacherPortal utility).
• If the teacher has entered comments and/or citizenship for at least one student in the course-section for the semester-cycle being run in TeacherPortal, and the course-section is marked Posted, the course-section is included.
Ready to Post - View course-sections where the instructor has indicated via TeacherPortal that the cycle grades, comments, or citizenship are marked as 'Ready to Post.' These grades will be post in Grade Reporting the next time the Grade Posting From ASCENDER TeacherPortal utility is run.
• Teachers on this list may still change grades, save the changes, and mark grades as 'Ready to Post' again.
NOTES: A teacher may be listed on more than one list. |
|---|
IV. Post grades, compute attendance, and assign credit
A. Post grades from TeacherPortal to ASCENDER Grade Reporting.
A. Post grades from TeacherPortal to ASCENDER Grade Reporting.
Grade Reporting > Utilities > Grade Posting From ASCENDER TeacherPortal
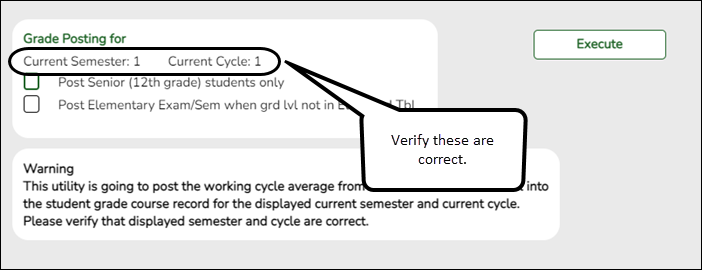
This utility posts the working cycle average, citizenship grade, and report card comments from TeacherPortal, as well as the exam and semester grades when applicable, to the student grade-course record in ASCENDER. Students who were not enrolled in the course or campus on the grade reporting cycle end date are excluded.
Processes performed by the utility
- Any numeric cycle and exam grades that are higher than the highest grade allowed are converted to the highest grade allowed.
- Any numeric cycle and exam grades that are lower than the lowest grade allowed are converted to the lowest grade allowed. Blank grades are bypassed (i.e., not converted nor posted).
NOTE: Numeric semester grades are not converted based on the highest or lowest grade allowed.
- If an exam grade is X, and the campus does not allow exempt exam grades, the exam grade and the semester average are not posted.
- If the campus allows exempt exams, and if an auto-graded course has a semester grade posted and a blank exam grade, an X (exempt) is posted for exam grades if an exam grade is required.
- Grades from TeacherPortal are converted according to the Rpt Card Grd Typ field in the campus master schedule.
- The exam, semester, and cycle grades are posted if the cycle selected is the highest cycle offered for the semester (e.g., cycle 2 for a two-semester nine-week campus), and the exam-semester pattern indicates an exam-semester grade is given this semester.
- If the cycle grade is blank, the utility only posts the exam grade (if applicable) and the semester grade if an override semester grade exists.
For secondary courses (i.e., credit level is not E):
- Grades are converted according to the campus options.
- The utility does not convert a P or F if posted for a course with a numeric report card grade type. A warning message is displayed on the error report.
- If the exam grade is blank from TeacherPortal, the exam grade and semester average are not posted if either Include Exam in Semester Average or Expect Exam Grade is selected on the Maintenance > Tables > Campus Control Options tabs.
- The semester average is posted if How will Avg be Computed is set to Computer on Maintenance > Tables > Campus Control Options> Computation.
- If Allow Semester Override is selected on Grade Reporting > Maintenance > TeacherPortal Options > Campus > Options, and the override semester grade is not blank, the override semester grade is used.
For elementary courses:
- Grades are converted according to the core course code and the elementary conversion tables.
- The exam grade and semester average are posted if Incl Exam and Comp Sem Avg are selected on Maintenance > Tables > Elementary > Elem Grade. If Incl Exam is not selected, an exam grade is not posted.
- If Comp Sem Avg is not selected, the semester average is not posted.
- The override semester grade is only posted if it has a value and if Allow Semester Override is selected on on Grade Reporting > Maintenance > TeacherPortal Options > Campus > Options.
- If the exam grade is blank for an auto-graded course that require an exam grade, the semester grade is posted.
- If a citizenship grade is blank for a course-cycle posted from TeacherPortal, and Auto Citizenship is selected on Maintenance > Tables > Campus Control Options > Posting, the citizenship grade is posted according to the campus options.
- If the cycle grade is blank for a course-cycle posted from TeacherPortal, the grade from the Auto Grd field in the district master schedule is posted.
NOTE:
- Semester grades are never posted with an auto grade.
- Even if all students will receive the auto grade, the course must still be marked as “Ready to Post” in TeacherPortal.
- If the working semester average or override semester average is an I (incomplete) and the campus expects an exam grade, the correct semester average is posted if the campus allows semester grades, even if the exam grade is blank.
- The citizenship from TeacherPortal is not posted if citizenship grade already exists in ASCENDER for the cycle being posted.
NOTE: This utility can be run more than once; however, only grades that have not already been posted to ASCENDER Grade Reporting, and are marked as 'Ready to Post' are posted.
| Campus | The campus to which you are logged on is displayed. | ||||||||
|---|---|---|---|---|---|---|---|---|---|
| Grade Posting for |
|
❏ Click Execute.
- A message is displayed indicating that the posting is successfully completed.
- Grades are posted to the student grade-course record.
- The Grade Ready column is reset from “Ready to Post” to “Posted.”
| View Error List | Click to view the error list if errors are encountered.
|
|---|---|
| View Fail List | Click to view the list of students with blank, failing, or incomplete grades, if applicable.
|
❏ Print both reports before exiting the page.
The Error Report will reflect only errors generated for a particular grade posting, as well as the details of any Override cycle grades entered by the instructor.
B. (If needed) Reset a teacher's posting status.
B. (If needed) Reset a teacher's posting status.
Grade Reporting > Utilities > Clear Grades, Comments, Credits, or Citizenship
This utility allows you to reset an instructor's course-section so that instructor can mark grades as 'Ready to Post' again, AFTER the course-section grades have been posted. Rarely will you reset the entire campus.
CAUTION: Use this utility carefully. If in doubt, contact your regional service center for assistance.

❏ Select to Clear by Course.
❏ Select to Clear Cycle Grades.
Remember to clear all fields that need to be re-posted from TeacherPortal. You can only clear one field at a time. For example, if you need to clear both cycle grades and comments, you must run the utility twice.
❏ Select Reset Teacher Gradebook 'Ready to Post' Flag.
❏ Specify the Course, Section, Sem, and Cyc.
❏ Click Execute.
C. Compute attendance.
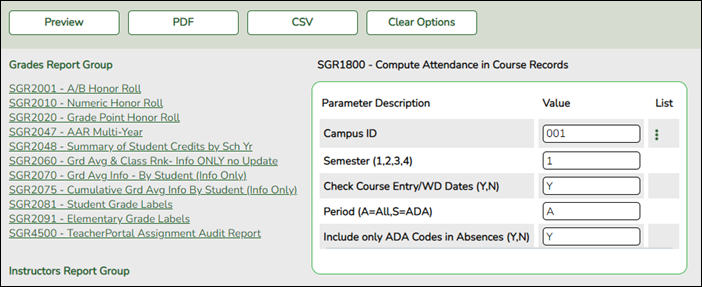
For attendance to print on teacher class rolls, report cards, and IPRs, you must run the SGR1800, which computes attendance from the attendance application for the student grade-course records. The report should be run before printing report cards, IPRs, and SGR1000 - Blank, Failing and Incomplete Grades.
The following absence types are posted to the absence categories on the Grade Reporting reports.
- Excused: S, R, M, A, D, C, V, G, L
- Unexcused: U
- School-related: F, E
- Tardies: T
D. Assign No Credit due to absences if needed.
D. Assign No Credit due to absences if needed.
Before running the Grade Computation and Credit Assignment utility which assigns credit to courses, you must update the credit field for any students who should not receive credit for a high school credit level course due to excessive absences.
When the Grade Computation and Credit Assignment utility is run, any student with Crdt/Credit set to NC will not receive credit for the course.
If the student makes up the absences at a later date, you can then remove the NC from the Crdt field and update that field with the credit earned.
There are two options for assigning NC (No Credit) to a course:
Option 1:
Grade Reporting > Maintenance > Student > Individual Maint > Grd Update
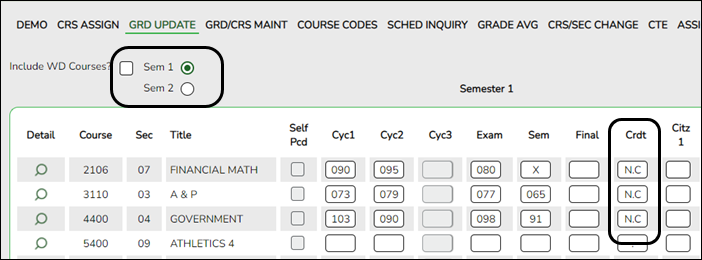
❏ Retrieve the student.
❏ Select Sem 1.
❏ In the Crdt (Credit) field for all applicable courses, type NC.
The period is automatically inserted between the two characters.
Option 2:
Grade Reporting > Maintenance > Student > Individual Maint > Grd/Crs Maint
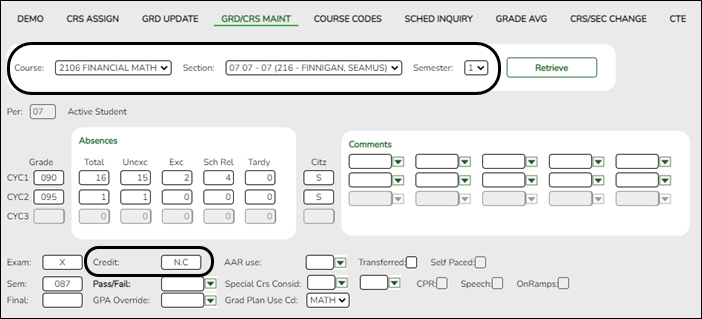
❏ Retrieve the student.
❏ Select the Course, Section, and Semester.
❏ In the Credit field type NC.
The period is automatically inserted between the two characters.
NOTE:
TREx uses the Pass/Fail indicator to show credit removal. If a student has been denied credit due to excessive absences, when that student's transcript is sent through TREx, it does not pick up the asterisk from the transcript which indicates that credit was denied due to excessive absences.
Any students who lose credit due to excessive absences should have their Pass/Fail indicator updated manually at the time NC is entered.
D. Assign auto grades.
Grade Reporting > Utilities > Auto Assign Grades and Citizenship
Only districts with courses that have an Auto Grd set in the district master schedule or Auto Citizenship grade set on the Posting tab should run this utility.
The utility assigns course or citizenship grades for all active students enrolled in courses with no withdrawal date. The same grade is assigned to every student taking the course.
NOTE: In TeacherPortal, auto grades are automatically displayed on the Grades > Cycle Grades page, even if the utility is not run. If the instructor marks grades as 'Ready to Post for a course-section, the auto grade will be imported when the Grade Posting from ASCENDER Gradebook utility is run. If these grades are not imported from the ASCENDER Gradebook utility because the instructor does not mark grades as 'Ready to Post', you must run the Auto Assign Grades and Citizenship utility to assign auto grades and/or auto citizenship for the course-section.
❏ Select to post Grades or Citizenship.
• If you select to post Grades, the Auto Grd field in the district master schedule is automatically used. The grade-course record for students enrolled in courses with an auto grade are updated, if the grade field is blank for the specified semester-cycle.
• If you select to post Citizenship, the Auto Citizenship and Citizenship Grade on Grade Reporting > Maintenance > Tables > Campus Control Options > Posting are used. If Auto Citizenship is selected and a valid Citizenship Grade exists, all blank citizenship grades for the selected semester-cycle are updated for all students.
❏ Select the Semester to be updated. The Cycle fields appear.
❏ Select the Cycle to be updated. The Execute button is enabled.
❏ Click Execute. The Print Report button is enabled once the utility is executed.
F. Compute grades and assign credit.
F. Compute grades and assign credit.
Different utilities are for secondary and elementary campuses.
• Secondary campuses: Grade Reporting > Utilities > Grade Computation and Credit Assignment
• Elementary campuses: Grade Reporting > Utilities > Grade Computation Elementary
Secondary campuses:
Grade Reporting > Utilities > Grade Computation and Credit Assignment
This utility calculates and assigns semester grades, final grades, and course credits for secondary grade levels.
- Numeric grades and pass/fail grades (i.e., report card grade type P) are calculated.
- Students in elementary grade levels are excluded.
- Semester Average and Final Grades for Self-paced courses are excluded.
❏ Under Options:
| Include Withdrawn Students |
Select to include withdrawn students in the process. The utility does not consider the withdrawal date, only if the student is withdrawn.
|
|---|---|
| Include Withdrawn Courses |
Select to include withdrawn courses in the process. |
❏ Select the process(es) to be performed:
| Compute Semester Average |
Select if you are not using TeacherPortal, or if you are calculating blank semester grades when Allow Recomputation is not selected on Maintenance > Tables > Campus Control Options > Computation. |
|---|---|
| Compute Final Grades |
Select to calculate final grades. If selected, the fields under Exclude Final Grade Computations are enabled. |
| Award Credits |
Select to award credits. |
| Award Credits Self Paced |
Select to award credits to self-paced courses. If selected, credits are assigned if the course has a semester grade. |
| Track |
(Required) Select a track number, or select A to calculate grades and assign credits for all tracks. |
| Reset Non-Graded Courses |
Select to clear any grades that have been entered or posted for a student in a non-graded course, or if a graded course is changed to a non-graded course and at least one grade exists for this course. If selected, and a course with grades assigned is changed to a non-graded course, the grades are deleted in ASCENDER only, not in TeacherPortal. |
| Semesters |
Select the semesters to be updated. You must select at least one semester. IMPORTANT! Select all semesters that should be updated; semesters are considered when awarding grades or credits. |
| Grade Levels |
Select one or more specific grade levels to be updated (e.g., 12th grade only). Or, click All Grade Levels to update all grade levels.
|
| Campus Control Information |
Settings from several Maintenance > Tables > Campus Control Options tabs are used when the utility is run. The settings are displayed for your reference. The Allow Partial Credit and Credit Sequence fields in the district master schedule are also considered in processing. |
|---|---|
| Exclude Final Grade Computations |
The section is enabled only if Compute Final Grades is selected. Select any options to be excluded from final grade computation. The options only apply to courses that were not taken for all semesters of the course. |
❏ Click Execute.
A progress bar displays the progress of the student IDs being processed.
If the following conditions exist, the process is stopped, and a message is displayed:
- Compute Semester Average is selected.
- Allow Recomputation is selected on Grade Reporting > Maintenance > Tables > Campus Control Options > Computation (recalculate all grades).
- The campus is using TeacherPortal.
You must clear either Compute Semester Average or Allow Recomputation.
If the following conditions exist, the process is interrupted, and a message is displayed:
- Compute Semester Average is selected.
- Allow Recomputation is selected on Grade Reporting > Maintenance > Tables > Campus Control Options > Computation (recalculate all grades).
- The campus is not using TeacherPortal.
You are prompted to continue the process. Click Yes to recalculate all grades, or click No to stop the process.
- If errors are encountered, an error report is generated at the bottom of the page.
Review, save, and/or print the report.
Review the report using the following buttons:
Click to go to the first page of the report.
Click to go back one page.
Click to go forward one page.
Click to go to the last page of the report.
The report can be viewed and saved in various file formats.
Click to save and print the report in PDF format.
Click to save and print the report in CSV format. (This option is not available for all reports.) When a report is exported to the CSV format, the report headers may not be included.
Click to close the report window. Some reports may have a Close Report, Exit, or Cancel button instead.
NOTE: Warnings may indicate that semester records were bypassed for students who retook failed courses.
| Print Excl List | If students and courses were excluded from final grade computation, click to print the Exclusion list.Review, save, and/or print the report.
|
|---|---|
| Print Partial | If any course was not taken for all semesters of the course, but was included in final grade computation, print a list of students who only took part of the course. Review, save, and/or print the report.
|
Elementary campuses:
Grade Reporting > Utilities > Grade Computation Elementary
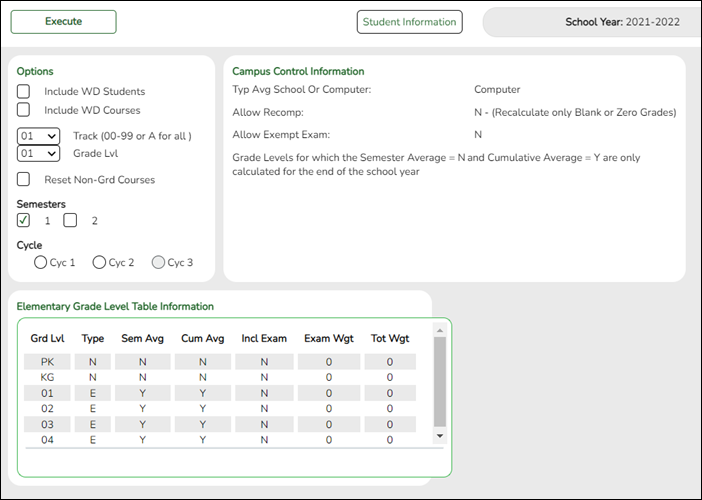
This utility calculates and assigns semester grades and final (year-to-date cumulative) grades for all elementary grade levels set up on the Grade Reporting > Maintenance > Tables > Elementary > Elem Grade. The process calculates alphabetic and numeric grades.
If there are blank semester grades or if a cumulative average must be calculated, run this utility.
| Campus Control Information |
Settings from the Maintenance > Tables > Campus Control Options tabs are used when the utilities (secondary and elementary) are run. The settings are displayed for your reference.
|
|---|---|
| Elementary Grade Level Table Information |
Settings from the Grade Reporting > Maintenance > Tables > Elementary > Elem Grade tab are used when the elementary utility is run. The settings are displayed for your reference. |
| Include WD Students |
Select to include withdrawn students in the process. |
|---|---|
| Include WD Courses |
Select to include withdrawn courses in the process. |
| Track |
(Required) Select a track number, or select A to calculate grades for all tracks. |
| Grade Lvl |
Select the grade level, or select AL to computer grades for all grade levels. |
| Reset Non-Grd Courses |
Select to clear any grades that have been entered or posted for a student in a non-graded course, or if a graded course is changed to a non-graded course and at least one grade exists for this course. |
| Semesters |
Select the semesters to be computed. If you select 2, both semesters 1 and 2 are computed. |
| Cycle |
Select the cycle to be updated.
• If a grade level is set to compute cumulative averages (i.e., Comp Cum Avg is selected for the grade level on Maintenance > Tables > Elementary > Elem Grade), the final grade is calculated as the average of the two semester grades.
If a grade level is set to compute both semester average and cumulative average the final grade is calculated as the average of the two semester grades. |
❏ Click Execute.
A progress bar displays the progress of the student IDs being processed.
If the following conditions exist, the process is stopped, and a message is displayed:
- Comp Sem Avg is selected on Grade Reporting > Maintenance > Tables > Elementary > Elem Grade.
- Allow Recomputation is selected on Grade Reporting > Maintenance > Tables > Campus Control Options > Computation (recalculate all grades).
- The campus is using TeacherPortal.
You must clear either Compute Sem Avg or Allow Recomputation.
If the following conditions exist, the process is interrupted, and a message is displayed:
- Comp Sem Avg is selected on Grade Reporting > Maintenance > Tables > Elementary > Elem Grade.
- Allow Recomputation is selected on Grade Reporting > Maintenance > Tables > Campus Control Options > Computation (recalculate all grades).
- The campus is not using TeacherPortal.
You are prompted to continue the process. Click Yes to recalculate all grades, or click No to stop the process.
| Preview Errors | Click to view the error list if errors are encountered.
|
|---|
V. Verify grades
A. Print class rolls and get signed by teachers.
A. Print class rolls and get signed by teachers.
It is recommended that you distribute the class rolls to instructors as proof sheets for grade verification. If an instructor makes any changes, the instructor should initial or sign next to the grade change. All instructors should sign and date these forms, and the forms can be filed as the official grade sheets for the reporting period.
REMINDER: If an instructor updates an incomplete grade or changes a cycle grade for a student, the instructor should also provide a semester average if possible; otherwise, semester/final averages will need to be computed again.
The following reports can be used as a check-off list for instructors:
- Grade Reporting > Reports > Grade Reporting Reports > Instructors > SGR0350 - Student Counts by Teacher
This report provides more details.
B. (If needed) Change verified grades.
B. (If needed) Change verified grades.
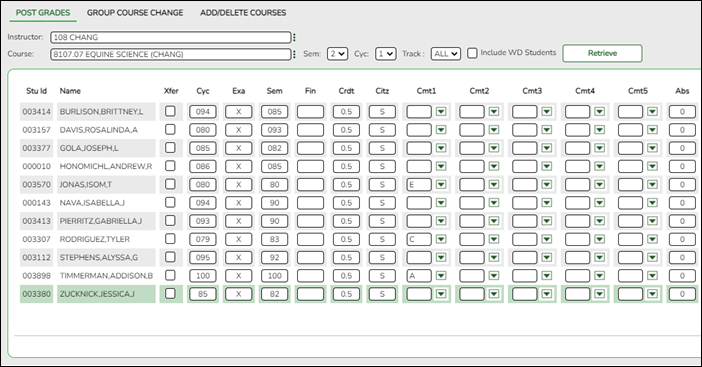
Grades can be updated for students individually or as a group (same instructor-course) using information from the instructor's class rolls.
NOTE: If any grades are changed, the Sem and/or Final and Credit field must also be updated; otherwise, you will need to re-run the grade computation utilities (secondary or elementary).
REMINDER: When you update grades in ASCENDER Grade Reporting, the corrected grades will appear in the instructor’s TeacherPortal as an Override grade for that cycle.
Individual Students:
You can make grade corrections for an individual student on either of the following tabs.
Grade Reporting > Maintenance > Student > Individual Maint > Grd Update

Grade Reporting > Maintenance > Student > Individual Maint > Grd/Crs Maint
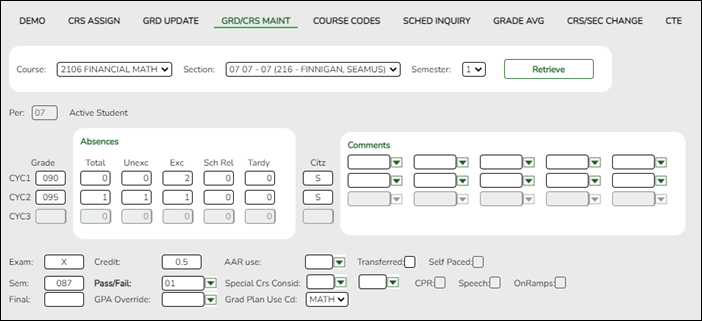
Group of Students:
Grade Reporting > Maintenance > Student > Group Maint > Post Grades
C. Print/save final verification for teacher to approve (if grades were changed).
C. Print/save final verification for teacher to approve (if grades were changed).
Grade Reporting > Reports > Grade Reporting Reports > Instructors > SGR0900 - Class Rolls (Student Grade Information)
❏ If any grades were changed, it is recommended that you print/save the final version. Some districts may choose to print the final version and have it signed by the instructor.
VI. Print report cards
A. Do a final review of grades before printing.
A. Do a final review of grades before printing
❏ Before printing report cards, re-run SGR1000 and check for blank, failing, and incomplete grades.
B. Update report card messages.
B. Update report card messages.
There are different tabs for secondary and elementary report card messages.
Secondary:
Grade Reporting > Maintenance > Tables > Grade Reporting Tables > Rpt Card Messages
This tab allows you to set up campus-level messages for secondary report cards (SGR1300 and SRG1350) and interim progress reports (SGR1160). The messages are printed at the bottom of the report card or IPR.
- For two-semester campuses, 20 message lines and 1 failing message line can be printed on the report card/IPR.
- For four-semester campuses, 18 message lines and 1 failing message line can be printed.
| Language |
Click |
|---|
If messages exist, they are displayed in the selected language.
❏ Click +Add to add a message.
A blank row is added to the grid.
| Code |
Select the code for the message. If the option to print failing message is selected, and a student has a 69 or lower in any of his grades in the cycle specified for the report card/IPR being printed, the failing message prints on the report card/IPR. The failing message only prints for students with a failing grade for the cycle being printed. |
|---|---|
| Message |
Type the message that corresponds to the code, up to 80 characters. |
❏ To edit a message, type over the existing data.
❏ Click Save.
 | Delete a row.
1. Click You can save edits and delete records in the same step (i.e., the changes are all committed when the record is saved).
|
|---|
Elementary:
Grade Reporting > Maintenance > Tables > Grade Reporting Tables > Rpt Card Msg Elementary
This tab allows you to set up campus-level messages that will print on the Elementary Report Cards (SGR1400) and Interim Progress Report From Grade Book (SGR1160).
- SGR1400 displays up to 17 message lines and 1 failing message line.
- SGR1160 displays up to 14 message lines. The messages are printed at the bottom of the report card or IPR.
| Language |
Click |
|---|
If messages exist, they are displayed in the selected language.
❏ Click +Add to add a message.
A blank row is added to the grid.
| Msg Nbr |
Select the number of the message. This is a sequence number that determines the order in which messages are printed
on the report cards/IPRs. If the option to print failing message is selected, and a student has a 69 or lower in any of his grades in the cycle specified for the report card/IPR being printed, the failing message prints on the report card/IPR. The failing message only prints for students with a failing grade for the cycle being printed. |
|---|---|
| Message Text |
Type the message that corresponds to the number, up to 80 characters. |
❏ To edit a message, type over the existing data.
❏ Click Save.
 | Delete a row.
1. Click You can save edits and delete records in the same step (i.e., the changes are all committed when the record is saved).
|
|---|
C. Verify campus printing options.
C. Verify campus printing options.
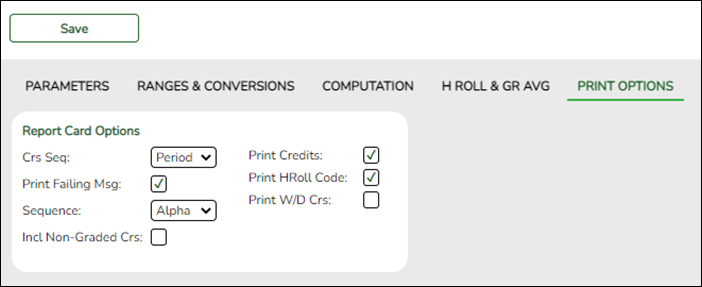
❏ Under Report Card Options:
| Crs Seq |
Select the sequence in which courses are printed on report cards - either by course number or by period. |
|---|---|
| Print Failing Msg |
Select if you want to print report card messages for students who are failing one or more courses.
This field works with the Code field on Grade Reporting > Maintenance > Tables > Grade Reporting Tables > Rpt Card Messages and the Msg Nbr field on Maintenance > Tables > Grade Reporting Tables > Rpt Card Msg Elementary. |
| Sequence |
Select the sequence in which report cards are printed. |
| Incl Non-Graded Crs |
Select to include non-graded courses on report cards. |
| Print Credits |
Select to print academic credits on report cards. |
| Print HRoll Code |
Select to print honor roll codes next to courses on report cards. |
| Print W/D Crs |
Select to print withdrawn courses on report cards or grading labels. |
❏ Click Save.
D. Assign control numbers (if printing report cards by control number).
D. Assign control numbers (if printing report cards by control number).
If printing report cards by control number (i.e., Sequence is Cntrl# on Grade Reporting > Maintenance > Tables > Campus Control Options > Print Options), you must add or update control numbers for students with blanks or course-section changes. Control numbers can be updated by grade level or period, or for individual students.
Grade Reporting > Utilities > Assign Control Numbers > Cntrl by Grd Lvl
This utility assigns control numbers by grade level.
Student control numbers are stored and can also be maintained on Registration > Maintenance > Student Enrollment > Demo1 in the Control Num field under Current/Next Year Information. When this utility is executed, the student’s control number is updated on that tab.
| Instr ID |
Select the instructor (i.e., control number) that will be assigned to the selected students. Only instructors who have a grade level selected in Elementary - Grade on Maintenance > Master Schedule > Campus Schedule > Instructor can be retrieved. |
|---|---|
| Grd Lvl |
The grade level associated with the selected instructor is displayed. |
A list of students in the grade level is displayed.
- The Cntrl # field displays the student's control number from the prior school year. Newly enrolled students will not have a control number.
- The list can be re-sorted.
You can re-sort the grid by clicking on an underlined column heading. It will sort in ascending order. Click it again to sort in descending order.
A triangle next to the column heading indicates the column by which the grid is currently sorted and whether it is sorted in ascending or descending
  order.
- If there are multiple pages, you can page through the list.
❏ Select the students whose control number you want to change:
| Update |
Select to select a student. TIP: If you need to select or unselect numerous students, you can press TAB to move down the list of check boxes, and use the spacebar to toggle the check box from selected to unselected. |
|---|
❏ Click Execute.
Only the selected students are listed (including students selected on subsequent pages), and the Cntrl # field for all selected students now displays the new control number.
| Cntrl # |
The new control number is displayed for the selected students. |
|---|
❏ Click Save.
| Reset |
Clear unsaved changes and start over. |
|---|
This utility assigns control numbers by period. For the retrieved students, the control number will be updated to the control number for the teacher of record for the course-section.
Student control numbers are stored and can also be maintained on Registration > Maintenance > Student Enrollment > Demo1 in the Control Num field under Current/Next Year Information. When this utility is executed, the student’s control number is updated on that tab.
| Sem | (Required)
Select the semester. |
|---|---|
| Grd Lvl |
Select the student's grade level, or select AL to retrieve students in all grade levels. If blank, students in all grade levels are retrieved. |
| Period | (Required)
Select the period in which the students meet. |
| Select only Students with Blank Cntrl #s |
Select to change only blank control numbers. |
❏ Click Retrieve.
A list of students who meet the specified criteria is displayed, including the course-section for each semester and period.
- The list can be re-sorted.
You can re-sort the grid by clicking on an underlined column heading. It will sort in ascending order. Click it again to sort in descending order.
A triangle next to the column heading indicates the column by which the grid is currently sorted and whether it is sorted in ascending or descending
  order.
- If there are multiple pages, page through the list.
❏ Click Execute.
The control number for all listed students is changed. The Ctrl # and Instr # fields are now the same.
❏ Click Save.
| Reset |
Clear unsaved changes and start over. |
|---|
E. Print secondary report cards.
E. Print secondary report cards.
There are two reports for printing secondary report cards:
•
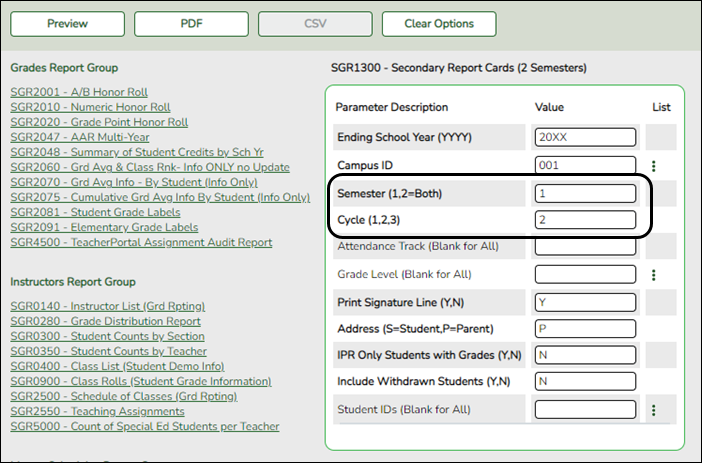
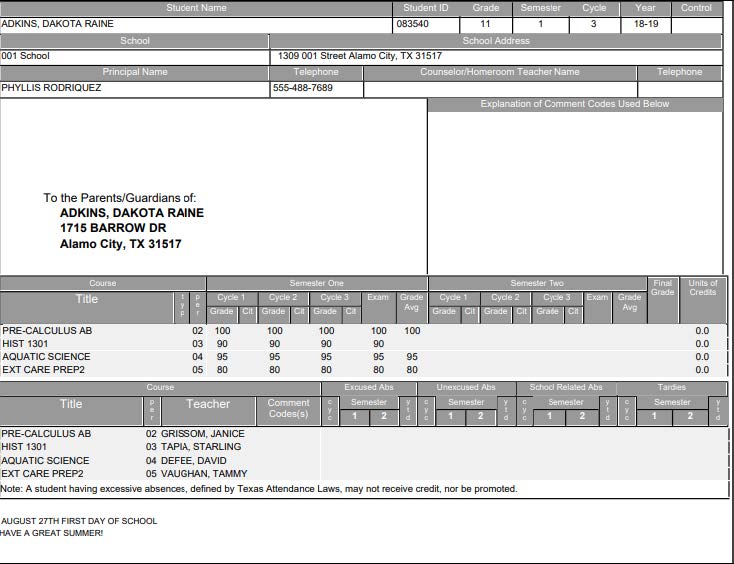
Secondary Two-semester Campuses: SGR1300 - Secondary (2 Semesters)
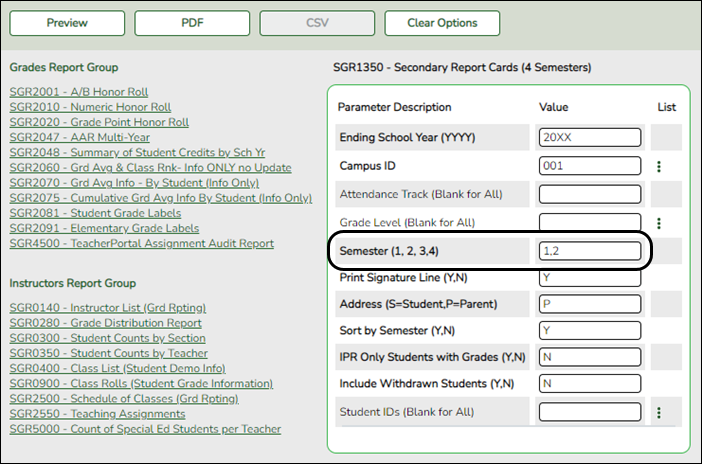
• Secondary Four-semester Campuses: SGR1350 - Secondary (4 Semesters)
Review all parameters carefully, especially Semester and Cycle.
Grade Reporting > Reports > Grade Reporting Reports > Report Cards > SGR1300 - Secondary Report Cards (2 Semesters)
Grade Reporting > Reports > Grade Reporting Reports > Report Cards > SGR1350 - Secondary Report Cards (4 Semesters)
F. Print elementary report cards.
F. Print elementary report cards.
❏ IMPORTANT: Before printing end-of-year report cards for elementary campuses, be sure each student's Promotion - Year End Status and Promotion - Retained Reason # fields are set correctly on Registration > Maintenance > Student Enrollment > Demo3.
Grade Reporting > Reports > Grade Reporting Reports > Report Cards > SGR1400 - Elementary Report Cards
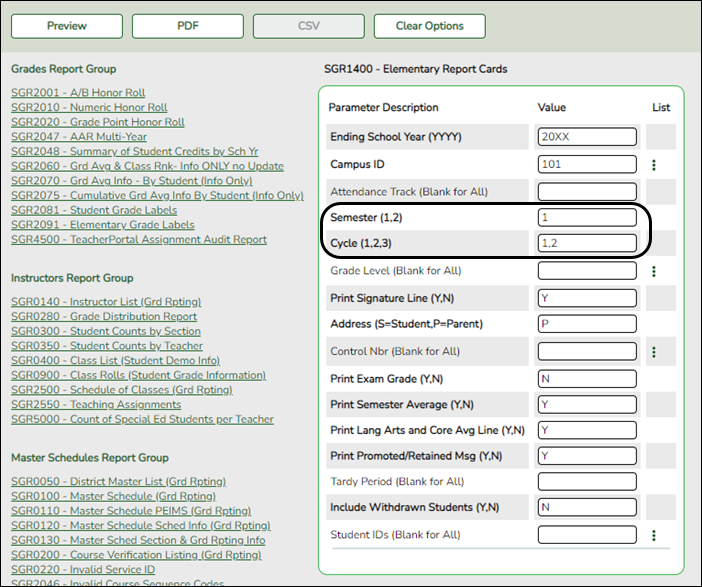
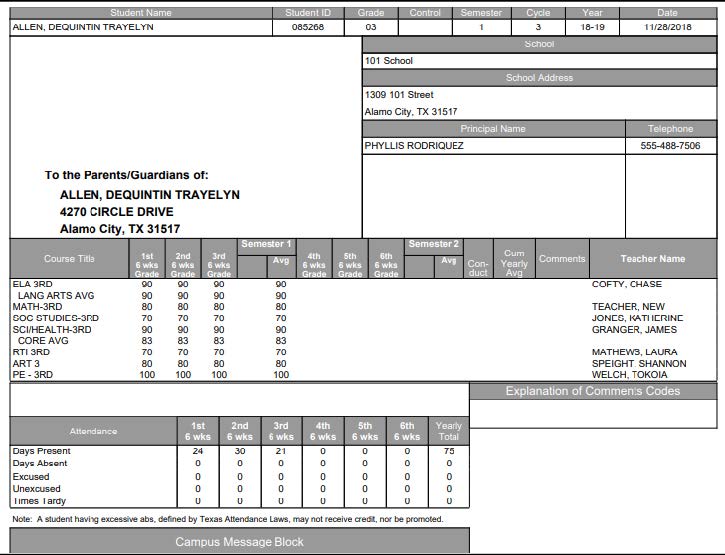
| Print Promoted/Retained Msg (Y, N) |
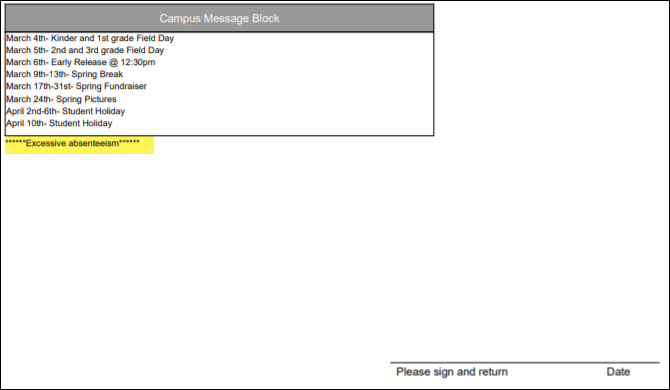
If Y, a message will print at the bottom of the report card according to the student’s setting in the first Promotion - Retained Reason # field on Registration > Maintenance > Student Enrollment > Demo3.
If this parameter is set to Y, the promoted/retained message will only print if the report card is run for the final grade reporting cycle and semester of the school year. |
|---|
VII. Complete final steps
A. Print recommended reports.
The following end-of-semester reports should be generated and saved.
NOTE: For audit purposes, all attendance reconciliation reports for the end of cycle and semester should be printed.
B. Reset semester and cycle.
Grade Reporting > Maintenance > Tables > Campus Control Options > Parameters
❏ Update Current Semester and Current Cycle with the upcoming semester-cycle numbers.
C. Additional follow-up items.
C. Additional follow-up items.
REMINDERS:
❏ It may be necessary to run the Assign Pass/Fail Indicator utility at the end of the first semester, due to TREx using the Pass/Fail indicator to identify credit removal due to excessive absences. This is only applicable if the student has withdrawn. If a student has been denied credit due to excessive absences, when that student's transcript is sent through TREx, it does not pick up the asterisk from the transcript which indicates that credit was denied due to excessive absences.
❏ Follow up on any students who still have blank, incomplete, or N/G grades after closing out the semester.
NOTE: If you change any grades for a student after publishing a report card, you must republish the report card to ParentPortal for the individual student.
❏ Follow up on any students who were denied credit due to excessive absences who may have regained credit.
❏ Semester 1 must be completely finished before final grades are assigned at the end of the final semester, and before assigning pass/fail indicators for PEIMS Submission 3.
❏ Run the SAT0670 or SAT0671 report for semester 1 and require instructors to sign and return the form. These must be reconciled and saved for audit purposes. This is required at the end of the first and fourth attendance cycle.
D. Complete grade averaging and class ranking and print transcripts.
D. Complete grade averaging and class ranking and print transcripts.
See ASCENDER Grade Reporting - Run Grade Averaging & Class Ranking and Print AARs. (opens and prints separately)
VIII. End-of-year steps and ASDR preparation
A. Verify or update graduation type code and graduation date.
A. Verify or update graduation type code and graduation date.
Registration > Maintenance > Student Enrollment > Demo3

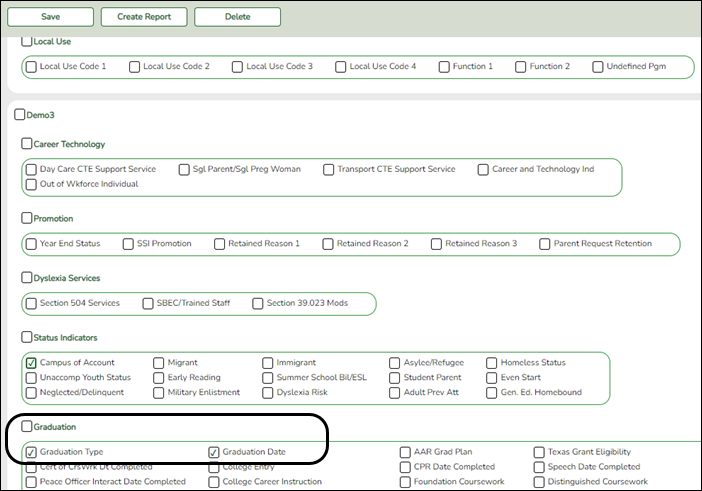
- Verify graduation type code and graduation date.
❏ Graduation Type and Graduation Date can be verified by running the following report.
- Assign graduation date.
Graduation Date can be assigned to a group of students or to an individual student.
Group:
Registration > Utilities > Reset Values
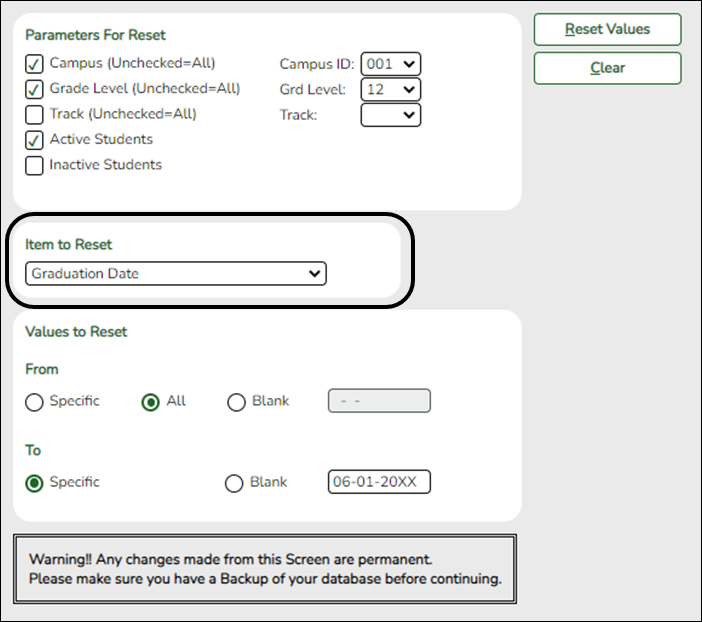
❏ You can update Graduation Date for a group of students.
Individual:
Registration > Maintenance > Student Enrollment > Demo3

❏ You can update a student's Graduation Date individually.
- Assign graduation type
Graduation Type can be assigned to a group of students or to an individual student.
NOTE: For students who have been assigned a graduation plan, Graduation Type should only be updated in the Graduation Plan application, not by using Reset Values in Registration > Utilities > Reset Values.
Group:
Registration > Utilities > Reset Values
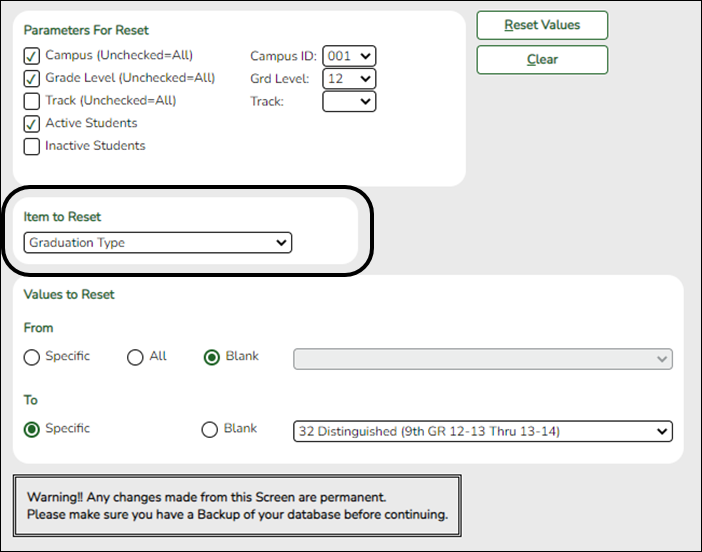
❏ You can update Graduation Type for a group of students.
Individual:
Registration > Maintenance > Student Enrollment > Demo3

❏ You can update a student's Graduation Type individually.
B. Set next year campus and transfer students to the next year campus.
B. Set next year campus and transfer students to the next year campus.
The sending campus assigns the next year campus and transfers the students.
IMPORTANT: All campuses must complete this step, including one-campus districts because this affects Graduation Plan and grade averaging and class ranking.
- Assign next year campus to students.
Registration > Utilities > Set NY Campus
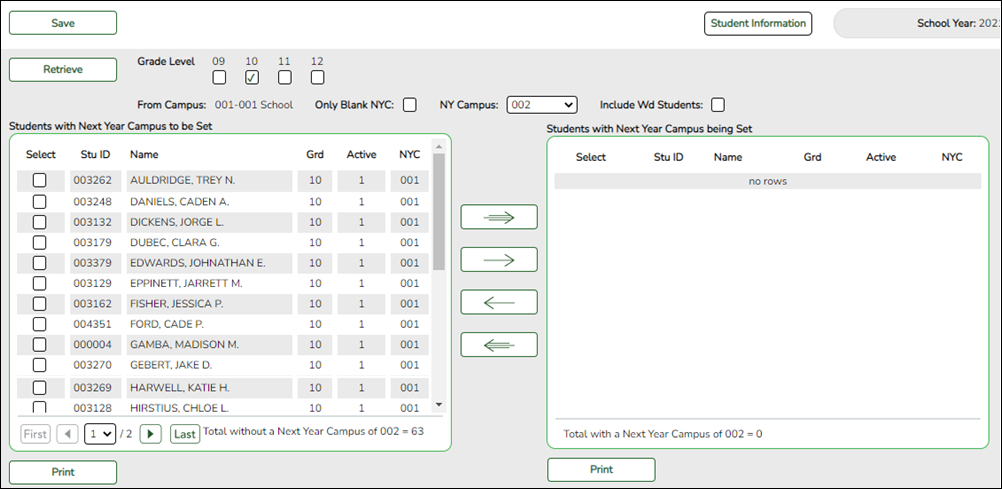
- Select the grade level to assign.
- Select the next year campus for these students.
- Make other selections as needed.
- Click Retrieve. The selected students are listed in the left grid.
- Select the students who will be assigned to the next year campus.
- Use the arrow buttons to move the students to the right grid.
- Click Save.
- If your campus feeds into multiple campuses, re-run the utility for each receiving campus.
NOTE: If new students enroll during the school year, run the utility again to include all new students with the Only Blank NYC field selected.
- Transfer the students.
Registration > Utilities > Transfer > Scheduling Transfer

- Select the campus where the students will be transferred (Receiving Campus).
- Select the grade level to be transferred.
- Select Match Next Year Campus if there are multiple next year campuses to which students are being transferred.
- Click Start.
- Repeat until all students have been transferred.
IMPORTANT:About pre-registering students:
If you need to set up a student who is not currently attending the campus/district but will attend next year, you must register the student in current year registration. The student should be pre-registered in the campus they will attend in the new school year.
Registration > Maintenance > Student Enrollment
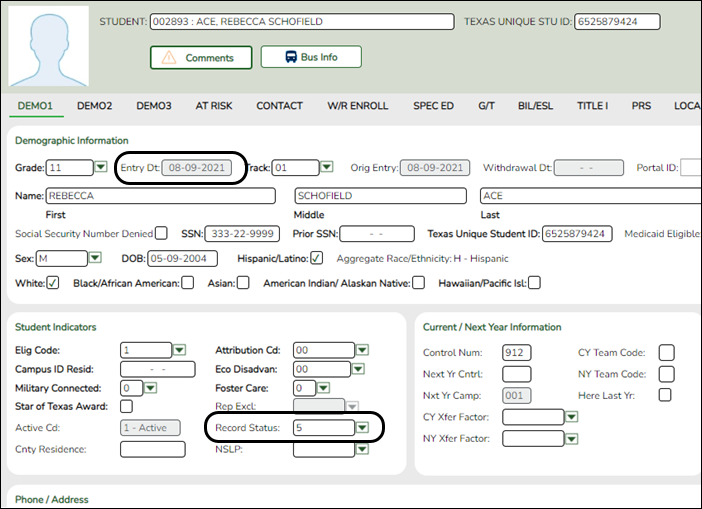
- Use the grade level the student will be in next year.
- Use the last day of the current year as the Date of Entry (WR Enroll tab).
- Use Record Status 5 (not enrolled this year but will attend next year).
WARNING: Do not use Record Status 4, or the program will not let you edit or delete the student until after Annual Student Data Rollover is done.
Returning current year student: If you have a current year student who has withdrawn, but intends to come back next year, do not use these steps to pre-register them or current year data will be skipped during PEIMS. This student will need to be registered after ASDR is done in the summer.
C. Update end-of-year status codes.
C. Update end-of-year status codes.
Skip this step if year-end-status codes have been assigned for the current year.
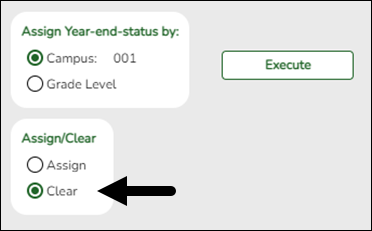
- Clear existing year-end-status codes.
Grade Reporting > Utilities > Assign or Clear Year-End-Status Code- Under Assign/Clear, select Clear.
- Click Execute.
- Assign year-end-status codes.
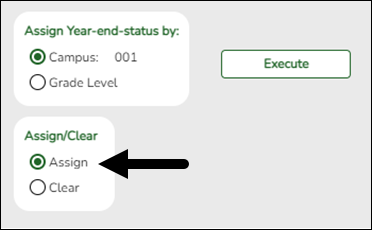
Grade Reporting > Utilities > Assign or Clear Year-End-Status Code- Under Assign/Clear, select Assign.
If selected, only blank year-end-status codes are updated, and retained reason codes are cleared.
Blank year-end-status codes are updated as follows:
• Grade levels KG and 1-8 are updated to code 01 (Promoted next grade).
• Grade levels 9-11 are updated to code 11 (Advanced next grade).
• Grade level 12 is updated to code 12 (Graduated). - Click Execute.
IMPORTANT: This step marks all students as promoted. You must individually change all students who were not promoted on Registration > Maintenance > Student Enrollment > Demo3.
- (Optional) Create a report to confirm that codes were updated.
Registration > Reports > Create Registration Report

- Select the Year End Status field and any other necessary demographic fields, including Active and Record Status.
- Click Create Report.
- Once the report is generated, filter the report by the Active and Record Status columns.
D. Update pass/fail indicators.
D. Update pass/fail indicators.
Follow these steps to properly assign pass/fail indicators for all students.
- Clear existing pass/fail indicators.
Grade Reporting > Utilities > Clear Pass/Fail Indicators

This utility clears the Pass/Fail field on Maintenance > Student > Individual Maint > Grd/Crs Maint.
Select the criteria and click Execute. - Assign pass/fail indicators to individuals.
Grade Reporting > Maintenance > Student > Individual Maint > Grd/Crs Maint
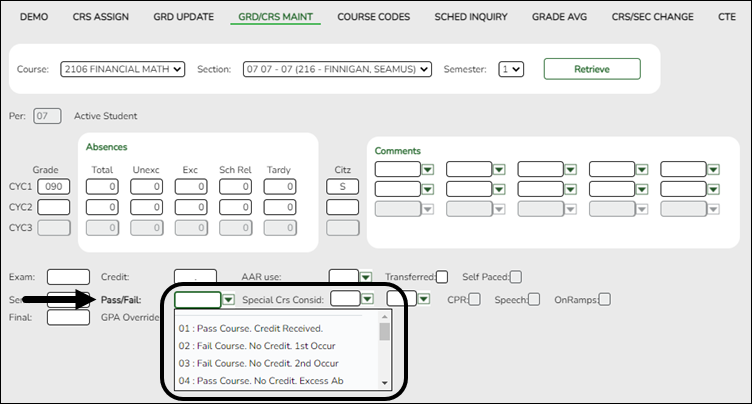
Pass/Fail Indicate the student’s academic outcome for the course.
TWEDS Data Elements:
CourseCompletionIndicator (E1068)
CourseAttemptResult (E0949) (Code table: C136)
Edits:
• Code 00 is only allowed if there is no semester average for any grade level or credit level.
• Codes 00, 13, and 14 are only allowed for grade levels 1-8, and only for courses that are not high school-level credit.
• Codes 00-12 are only allowed for high school-level credit courses. - Mass assign pass/fail indicators.
Grade Reporting > Utilities > Assign Pass Fail Indicators
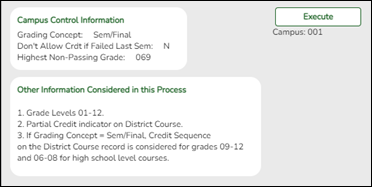
The utility populates the Pass/Fail field on Maintenance > Student > Individual Maint > Grd/Crs Maint.
If the course is Dual Credit, the utility will also populate the College Credit Hrs field.- Click Execute.
- If errors are encountered, review the error list and correct errors.
- Run the utility again until all students have a correct pass/fail indicator.
- Run a report to verify that pass/fail indicators are assigned correctly.
SGR1920 - Pass/Fail Verification List
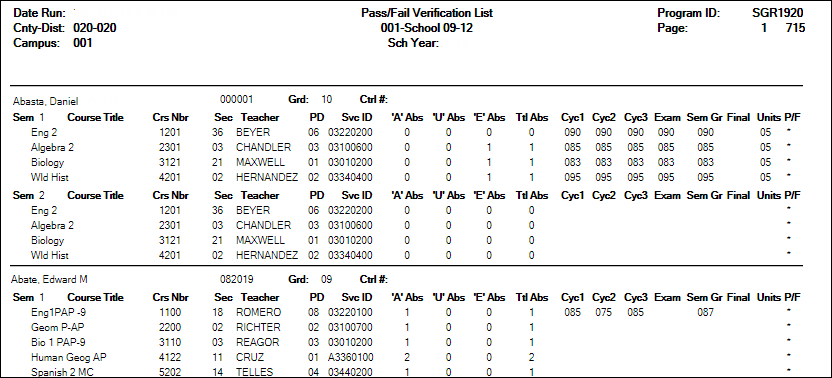
Print and review the report.
E. Run Set Student CTE Indicators Utility
E. Set Student CTE Indicators utility.
Registration > Utilities > Set Student CTE Indicators
This utility assigns CTE code 1 (i.e., enrolled) to all students in grade levels 6-12 who are taking at least one CTE course (i.e., the C022 service ID type is VOED). This utility should be run for Fall and Summer PEIMS.
NOTE: Students with CTE code 2 (i.e., participant in a coherent sequence of courses) are not reset to 1. This utility does not change codes for these students.
Users must run the Set Student CTE Indicators utility before generating the following reports, extracts or logic that rely on this utility to produce correct CTE Counts:
- SAT0900
- SAT0600
- SAT0900C
- SAT920
- SAT950
- SAT2100
- SGR2500
- PEIMS Attendance Extract
Update data:
| Campus |
Select the campus for which to set student CTE indicators. |
|---|
❏ Select one:
| Set CTE Indicators for Fall PEIMS |
Select to set CTE Indicators for fall PEIMS.
|
||
|---|---|---|---|
| Set CTE Indicators for Summer PEIMS |
Select to set CTE Indicators for summer PEIMS. |
❏ Click Execute.
| Preview Errors | Click to view the list of students with updated codes.
|
|---|
F. Print final Academic Achievement Record (AAR).
E. Print final Academic Achievement Record (AAR).
AARs can be printed for a group of students or for an individual student.
Group:
Grade Reporting > Reports > Grade Reporting Reports > Grades > SGR2047 - AAR Multi-Year
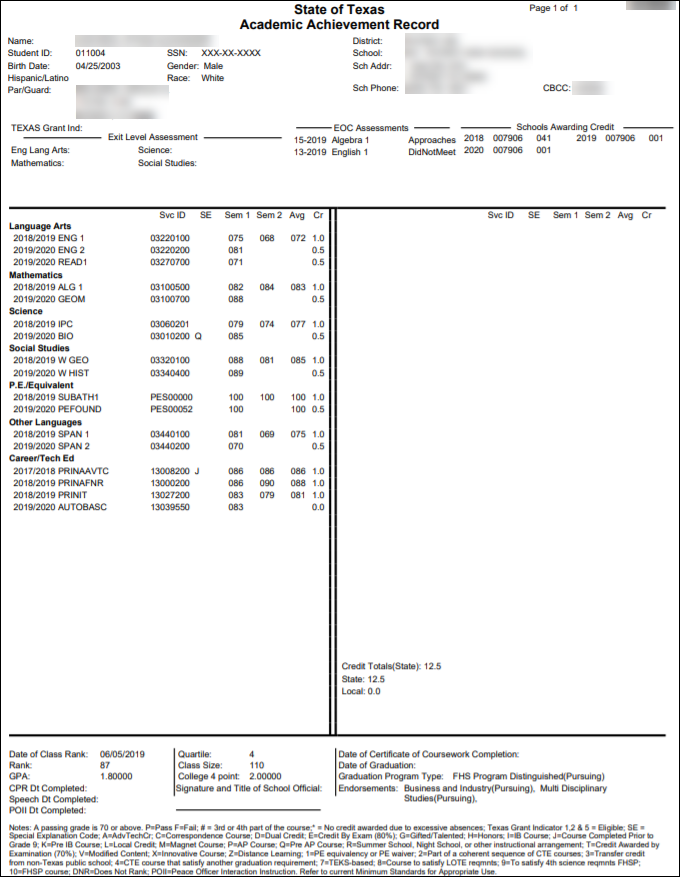
Individual:
Grade Reporting > Maintenance > Student > Individual Maint > Cumulative Courses (Click Print AAR)
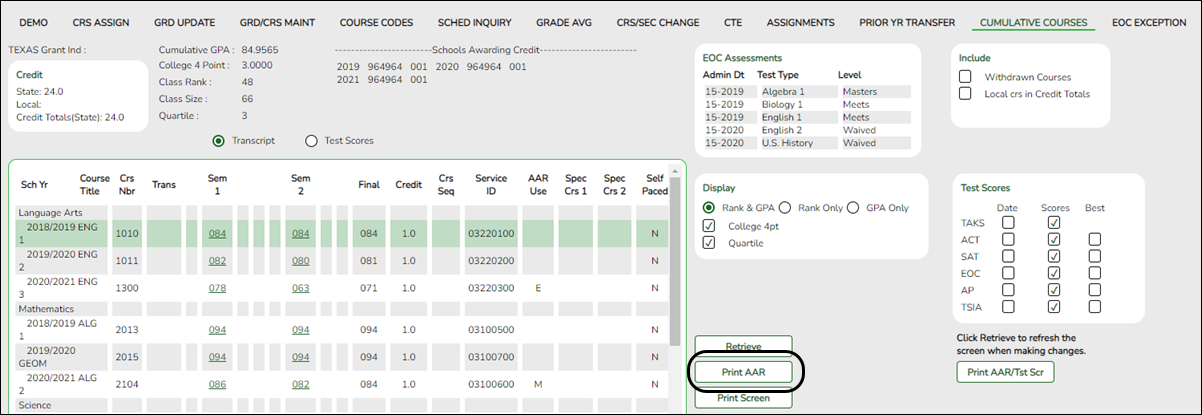
G. Print all attendance audit reports.
F. Print all attendance audit reports.
❏ Verify that all required attendance audit reports have been generated from ASCENDER and stored for your records, as well as other reports required for the district. Review the TEA Student Attendance Accounting Handbook (SAAH), Section 2.3 for specific rules.
IMPORTANT: The following attendance reports must be generated throughout the year and retained for auditing purposes. They can be saved as a PDF.
These reports are not available in Historical.
❏ Attendance Reports > Audit > SAT0600 - Student Detail Report
Verify that individual student membership information is correct, and that the totals on the summary page match the totals on the SAT0900 Principal/Superintendent semester report.
❏ Attendance Reports > Audit > SAT0900 - Campus/District Summary Report
Verify eligible attendance days present/absent and special programs contact hours, by campus and by district. Verify that the report is balanced against the SAT0600 - Student Detail Report report.
❏ Attendance Reports > Audit > SAT0900C - Campus/District Summary Report (COVID)
Verify eligible attendance days present/absent and special programs contact hours, by campus and by district. For the 2020-2021 school year, school districts should also run SAT900C if they participated in remote instruction.
❏ Attendance Reports > Audit > SAT0920 - Campus/District Multi-Track Summary Report
This report is the same as SAT0900, except it provides information for multiple tracks.
❏ Attendance Reports > Audit > SAT0670 - Teacher Membership Roster by Control Num
Verify that first and fourth six weeks campus membership is balanced against district enrollment totals on SAT1000.
❏ Attendance Reports > Students > SAT0400 - Daily Attendance Summary
Verify that daily attendance summaries have been balanced daily.
❏ Attendance > Reports > Attendance Reports > Rosters > SAT1370 - Class Attendance Verification
Print current year class attendance by instructor name or control number. Use for attendance verification for all attendance or grade reporting cycles.
Americans with Disabilities Act (ADA) and Web Accessibility
The Texas Computer Cooperative (TCC) is committed to making its websites accessible to all users. It is TCC policy to ensure that new and updated content complies with Web Content Accessibility Guidelines (WCAG) 2.0 Level AA. We welcome comments and suggestions to improve the accessibility of our websites. If the format of any material on our website interferes with your ability to access the information, use this form to leave a comment about the accessibility of our website.






B. Review report card comments.
Grade Reporting > Maintenance > Tables > Grade Reporting Tables > Rpt Card Comments
This tab allows you to set up instructor comments for student report cards and interim progress reports (IPRs). Instructors can select from these comment codes in TeacherPortal to assign codes to individual students. The comment descriptions are printed in the Explanation of Comment Codes Used Below section of the report card or IPR (or Explicación de Código de Comentario Utilizado Debajo if Spanish) when the corresponding code is selected for the report card/IPR.
Comments should be set up in both English and Spanish. If a comment code does not have a corresponding Spanish comment, the corresponding English comment will be printed on the Spanish language report.
It is recommended that these be set up at the beginning of the year and not changed during the year.
❏ Update the comments as needed.
NOTE: If a report card comment code does not have a corresponding Spanish comment, the corresponding English comment will be printed on the Spanish language report card.
Secondary report cards (SGR1300 and SGR1350) use only codes A-N.
Elementary report cards (SGR1400) use codes A-Z and 1-9.